manuals.online logo
Brands
  1. Home
  2. •
  3. Brands
  4. •
  5. Sunrise Medical
  6. •
  7. Controllers
  8. •
  9. Sunrise Medical Empulse R90 Use and care manual

Sunrise Medical Empulse R90 Use and care manual

Sunrise Medical 2842 N. Business Park Ave Fresno, CA 93727 USA
© 2022 Sunrise Medical (US) LLC
09/2022 255611 Rev. A Page 1of2
Customer Service: +1(800) 333-4000
or visit www.SunriseMedical.com
R90™ACTUATOR REPLACEMENT
™
Please read these instructions carefully before beginning the assembly. Failure to understand and
follow assembly instructions may result in injury to technician and/or end user and may void the
warranty. If you have any questions call Sunrise Medical Technical Support at +1(800) 333-4000.
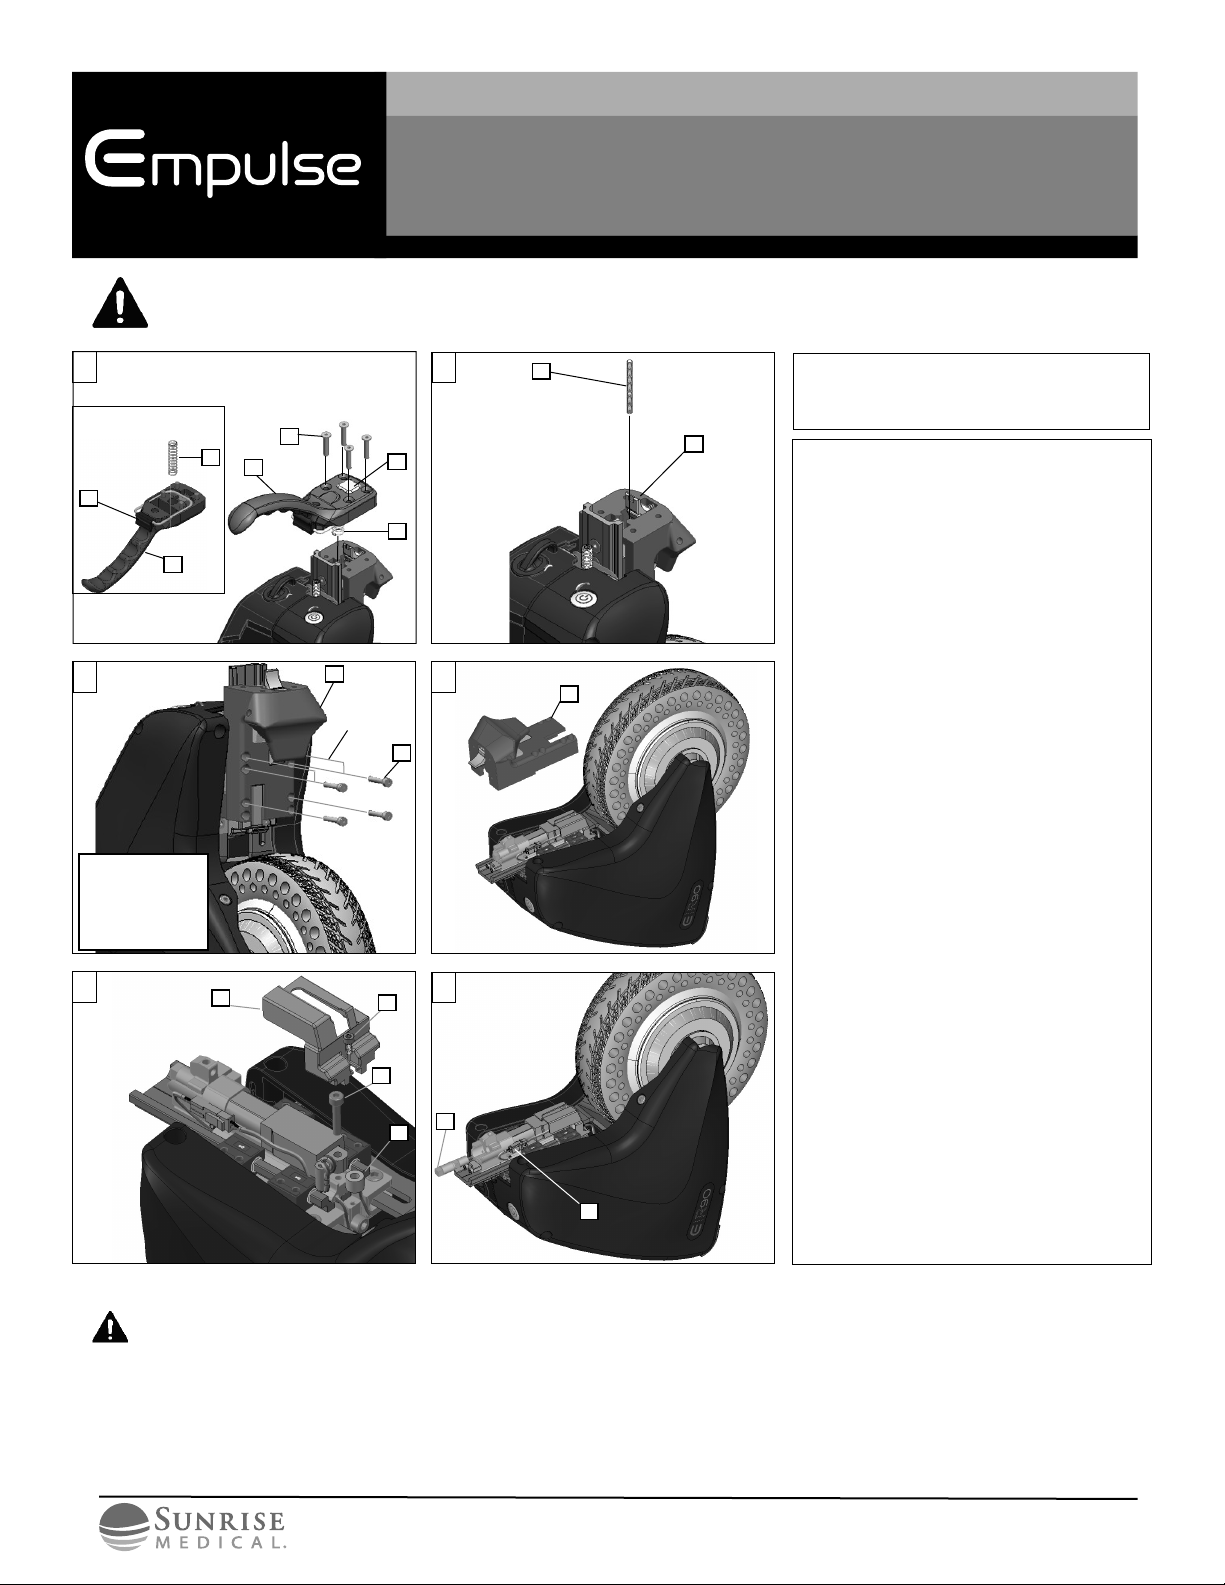
1. To remove handle: (Fig. 1)
a. Using a 3mm Allen wrench,
unscrew the four screws (A)
that hold the handle and the
latch wire holder (B).
b. Remove hardware (A), handle
(C), spring (D), and the latch
button (E).
2. Remove the M4 set screw (F) using
a 1.5mm Allen wrench. (Fig. 2)
Note: Hold latch (G) in order to get
access to (F).
3. Using a 3mm Allen wrench, remove
the front bolts (H) that mount the
latch block (I). Note the position of
the bolts for reassembly (Fig. 3)
To complete steps 4-11, set the device
in a horizontal position.
4. Remove the latch block (I). (Fig. 4)
Note: There is a spring in the latch
block. It must be positioned
correctly for reassembly.
5. Next, remove the actuator.
a. Remove the cover bolt (K)
and cover (J) using a 2.5mm
Allen wrench. (Fig. 5)
b. Remove the bottom actuator
bolt (L) using a 3mm Allen
wrench. Next, remove the
spacer underneath the
actuator (M). (Fig. 5)
c.
Back
off the actuator bolt (N)
by hand or with a plier. (Fig. 6)
d. Disconnect the connector (O)
of the actuator harness. Then,
remove the actuator. (Fig. 6)
Tools required
1. Allen wrench, sizes: 1.5mm,
2.5 mm, and 3mm
DEALER/TECHNICIAN WARNING
Attention dealers and qualified technicians, do not operate or service this device without first reading the owners manual.
If you do not understand the instructions and warnings in the owners manual please contact the Sunrise Medical Technical
Service Department before operating and/or servicing the Empulse device. Failure to do so may result in damage and/or
injury.
Find more information and important warnings in the device owner’s manual or at: www.SunriseMedical.com.
5J
L
M
K
4I
6
O
N
1
A
E
D
C
D
B
View of Bottom of Handle
C
3
H
I
Note: 24-in
configuration
shown, 25-in/26-in
configuration uses
top two holes
See Note
2F
G
Sunrise Medical 2842 N. Business Park Ave Fresno, CA 93727 USA
© 2022 Sunrise Medical (US) LLC
09/2022 255611 Rev. A Page 2of2
Customer Service: +1(800) 333-4000
or visit www.SunriseMedical.com
R90™ACTUATOR REPLACEMENT
™
6. To mount the new actuator,
follow step 5 in reverse order
.
7. Attach the actuator bolt and
cover:
a. First, ensure you insert the
spacer (P) back under the
actuator before inserting bolt
(Q).
Using a 3mm Allen
wrench
, fasten the M5
bolt (Q) and torque it to
2.2 Nm [1.7 ft-lbs]. Then,
insert the cover (R) and
torque M3 bolt (S) to 1.0
Nm [0.8 ft-lbs] using a 2.5mm
Allen wrench. Ensure the wire
(T) is not pinched. (Fig. 7)
b. Thread the actuator bolt
(U) into the actuator through
the insert (V) and tighten it
completely. (Fig. 8)
8. Add Latch Block:
a. Ensure the spring (W) is still
positioned in the pocket
in the latch block (X). (Fig. 9)
b. Align the slider blocks (Y)
with latch block (Z). (Fig. 10)
c. If the slider blocks are out
of place,
loosen the shroud a
little
.
d. Fasten the M5 hardware (AA)
using a 3mm Allen wrench
and torque to 2.2 Nm
[1.7 ft-lbs]. (Fig. 11)
Note: Refer to notes from
step 3 for correct mounting
position.
9. Insert M4 hardware (BB) in the
latch block. (Fig. 12)
Note: Hold latch (CC) in order to
get access to (BB).
10. Place the spring (DD) into the
actuator bolt. Then, hold the
latch block (EE) on the handle
(FF) and insert the handle into the
latch block, insert the latch cover
(GG), and torque the screws
(HH) to 7.8 Nm [5.8 ft-lbs].
(Fig. 12)
8
U
V
11 AA
13
FF
DD
HH
EE
GG
7T
Q
P
S
R
9
W
X
10
Y
Y
Z24-in configuration
mounting locations shown
25-in/26-in
configuration
mounting locations
12 BB
CC
0
15
15
30
30
45
TORQUE !
0
15
15
30
30
45
TORQUE !
0
15
15
30
30
45
TORQUE !
0
15
15
30
30
45
TORQUE !

Other Sunrise Medical Controllers manuals

Sunrise Medical SWITCH-IT VersaGuide User manual

Sunrise Medical

Sunrise Medical SWITCH-IT VersaGuide User manual

Sunrise Medical Switch-It CTRL+5 User manual

Sunrise Medical

Sunrise Medical Switch-It CTRL+5 User manual

Sunrise Medical Magic Mobility R-net OMNI2 User manual

Sunrise Medical

Sunrise Medical Magic Mobility R-net OMNI2 User manual

Sunrise Medical QUICKIE OMNI2 User manual

Sunrise Medical

Sunrise Medical QUICKIE OMNI2 User manual

Popular Controllers manuals by other brands

Intel 6 SERIES CHIPSET -  UPDATE 01-2011 datasheet

Intel

Intel 6 SERIES CHIPSET - UPDATE 01-2011 datasheet

CTR Electronics CANdle user guide

CTR Electronics

CTR Electronics CANdle user guide

TLV SC-F70 operating instructions

TLV

TLV SC-F70 operating instructions

WIKA CPC7000 operating instructions

WIKA

WIKA CPC7000 operating instructions

IDVT LED-Wiz Command reference

IDVT

IDVT LED-Wiz Command reference

Onlab ONDRIVE ED07 user manual

Onlab

Onlab ONDRIVE ED07 user manual

Vacon NX6 Design guide

Vacon

Vacon NX6 Design guide

Siemens SIMATIC S7-200 manual

Siemens

Siemens SIMATIC S7-200 manual

Amana PTAC PWHK01G70 installation instructions

Amana

Amana PTAC PWHK01G70 installation instructions

Intiel INT0140 user manual

Intiel

Intiel INT0140 user manual

EINBREW 3V2P User instructions

EINBREW

EINBREW 3V2P User instructions

Immergas System Manager Kit Instructions and warnings

Immergas

Immergas System Manager Kit Instructions and warnings

Toro EVOLUTION Series quick start guide

Toro

Toro EVOLUTION Series quick start guide

OJ Electronics ETO2 manual

OJ Electronics

OJ Electronics ETO2 manual

ready robotics Forge/OS 5 Startup guide

ready robotics

ready robotics Forge/OS 5 Startup guide

G4S M2150 installation instructions

G4S

G4S M2150 installation instructions

Worcester FW 100 User quick reference guide

Worcester

Worcester FW 100 User quick reference guide

Grin V4 user manual

Grin

Grin V4 user manual

manuals.online logo
manuals.online logoBrands
  • About & Mission
  • Contact us
  • Privacy Policy
  • Terms and Conditions

Copyright 2025 Manuals.Online. All Rights Reserved.