SUNTEC ST601 Pro User manual

\
Suntec Industries (H.K.) Ltd.
Te l : +852 8130 0676
Fax: +852 8130 0671
URL: www.suntecind.com
READ AND STUDY MANUAL BEFORE USE
LGR Mobile Dehumidifier
220~240V Model: ST601 Pro / ST1001 Pro
OPERATING MANUAL

We also provide other kinds of dehumidifiers:
l LGR Mobile Dehumidifiers with Timer Control
Models: SD600, SD800 & SD1000
l Swimming Dehumidifiers with Humidistat Control
Models: SP500C, SP1000C & SP1500C
Please find out more from our website, www.suntecind.com
Suntec ST Serials dehumidifiers are used for professionals drying out wet
materials such as carpets, carpet cushions, floors, walls, building contents and
more. They reduce the water in enclosed structural environments like building
or part of a building by removing water vapor from the air.
Safety Instructions
l Do not allow children to play with or around the operating unit.
l Keep wiring and motor dry. Never operate the unit in standing water, rain
and snow, as this may create a risk of injury from electric shock.
l Do not use the adaptor.
l Do not operate the unit with a damaged power cable.
l Always operate the unit with an earthed plug and with an earthed supply.
l Extension cables must be earthed and be able to deliver the appropriate
voltage to the unit.
l Do not drop or throw the unit.
l Always operate the unit on a stable, level surface.
l Do not clog or block air intakes.
l Always to keep the filter clean.
l Do not attempt to disassemble or repair the unit if you are not qualified to
do so.
How to Use Dehumidifiers
Setting Up a Drying Area
Create a closed drying chamber
The dehumidifier should be operated in an enclosed space, as this creates a
drying chamber. Close all doors, windows or areas that open to the outside to
maximize the unit’s water removal efficiency. Inside the drying chamber, air
should circulate freely. Open interior doors and turn on Air Movers to increase
the circulation.

Position the dehumidifier
Place the dehumidifiers in the center of a room and keep it away from anything
that could prevent airflow into and out of the unit.
Managing the rising temperature
The dehumidifier warms the air as it removes its moisture. Room temperatures
of about 20oC to 29oC are usually a good condition for drying.
CAUTION! Never operate the Suntec ST Series dehumidifier at temperature
above 38oC. It could damage the machine and building contents.
Operating Your Dehumidifier
Place the dehumidifiers in upright position
If the dehumidifier has been in a horizontal position for any time over a few
minutes, you must set it upright (vertical) for 30 minutes before starting.
Connect drainage system
You can find the hose wrapped around the back of the machine. Unwrap the
entire hose and run it into a sink, toilet, drain, or bucket.
Plug in the electrical cord
Locate the electrical cord and unwrap around the air outlet located on the back
of the unit. Plug it into a standard outlet with the correct voltage and amperage
for the unit. If the unit experiences a loss of power, which can results from a
power interruption and overheated.
Before Transporting Your Dehumidifier
Before moving the unit, make sure the pump is empty of water. To do t hi s, let
the unit stop dehumidification for 10mins. Push PURGE key to clear waters.
See “How to Use the Touch Pad Control Panel with Humidistat” for more details.
DECLARATION OF CONFORMITY
We, declare under sole responsibility that our models (ST601 Pro / ST1001
Pro) to which this declaration relates are in conformity with the following
standards:
EMC:
EN 55014 - 1:2006
,
EN 55014-2:1997+A1:2001
Electromagnetic Compatibility: emission requirement
EN 61000 - 3 - 2:2006
,
EN 61000-3-3:1995+A1:2001+A2:2005
Electromagnetic Compatibility: emission requirement.
LVD:
EN 60335 - 1: 2002+A1:2004+A11:2004+A12:2006+A2:2006
Safety of household and similar electrical appliance
- General requirements.
EN 60335 - 2 - 40: 2003+A11:2004+A12:2005+A1:2006
Particular requirements for electric heat pumps,
air conditioners and dehumidifiers.
Suntec Industries (H.K.) Ltd.
Design and Development

Specifications
Model
ST601 Pro
ST1001 Pro
Water Removal (32° C/90%RH)
138Pint / 65L per day
212Pint / 100L per day
Water Removal (27° C/60%RH)
83Pint / 39L per day
129Pint / 61L per day
Water Removal (10°C/70%RH)
32Pint / 15L per day
57Pint / 27L per day
Temp. Range
1° - 38° C
1° - 38° C
Refrigerant
410A
410A
Power Consumption
920 Watt
1650 Watt
Voltage / Cycle
220-240V/50Hz
220-240V/50Hz
Ampere
4.0 Amps
6.5 Amps
Rated Air Flow
600 m3/h
750 m3/h
Control Panel
Touch-pad
Touch-pad
Humidistat/Timer Control
Yes
Yes
Built in WiFi
Yes
Yes
Defrost Type
Hot-gas bypass
Hot-gas bypass
Air Filter
Pleated Filter
Pleated Filter
Water Pump
Centrifugal
Centrifugal
Housing
Roto Molded
Roto Molded
Large Wheels
Semi-pneumatic
Semi-pneumatic
Drain Hose Length
10m
10m
Cable Length
8m
8m
Height
840mm
840mm
Width
500mm
500mm
Depth
485mm
485mm
Use Weight
40kg
50kg
Specifications are subject to change without notice. Some values are approximate.
How to Use the Touch Pad Control Panel with Humidistat
Note: Find “Dry Connect” Mobile App Quick Start Manual for WiFi
connection.
l LCD Display X 1
l On/Off Indication Light (RED/GRN) X 1; WiFi Indication Light (RED/GRN) X 1
l Five keys (From left to right): ON/OFF Key X 1; MENU Key X 1;
ADJUSTMENT Key X 1; START/STOP Key X 1; PURGE Key X 1
LCD Display
:
DEHUMIDIFIER ON.
FAN ON.
PURGE ON. The pump is on and it is pumping water out of the
reservoir tank.
DEFROST ON. Frost forming on the coils, defrosting cycle start.
DELAY BAR
SERVICE.
RUN
RUN Mode. DEHUMIDIFICATION is ON.
SLEEP
SLEEP Mode. DEHUMIDIFICATION is OFF. It automatically
goes back to Running Mode again when the ambient humidity is
higher than the preset humidity.

LCD Display – Cont.
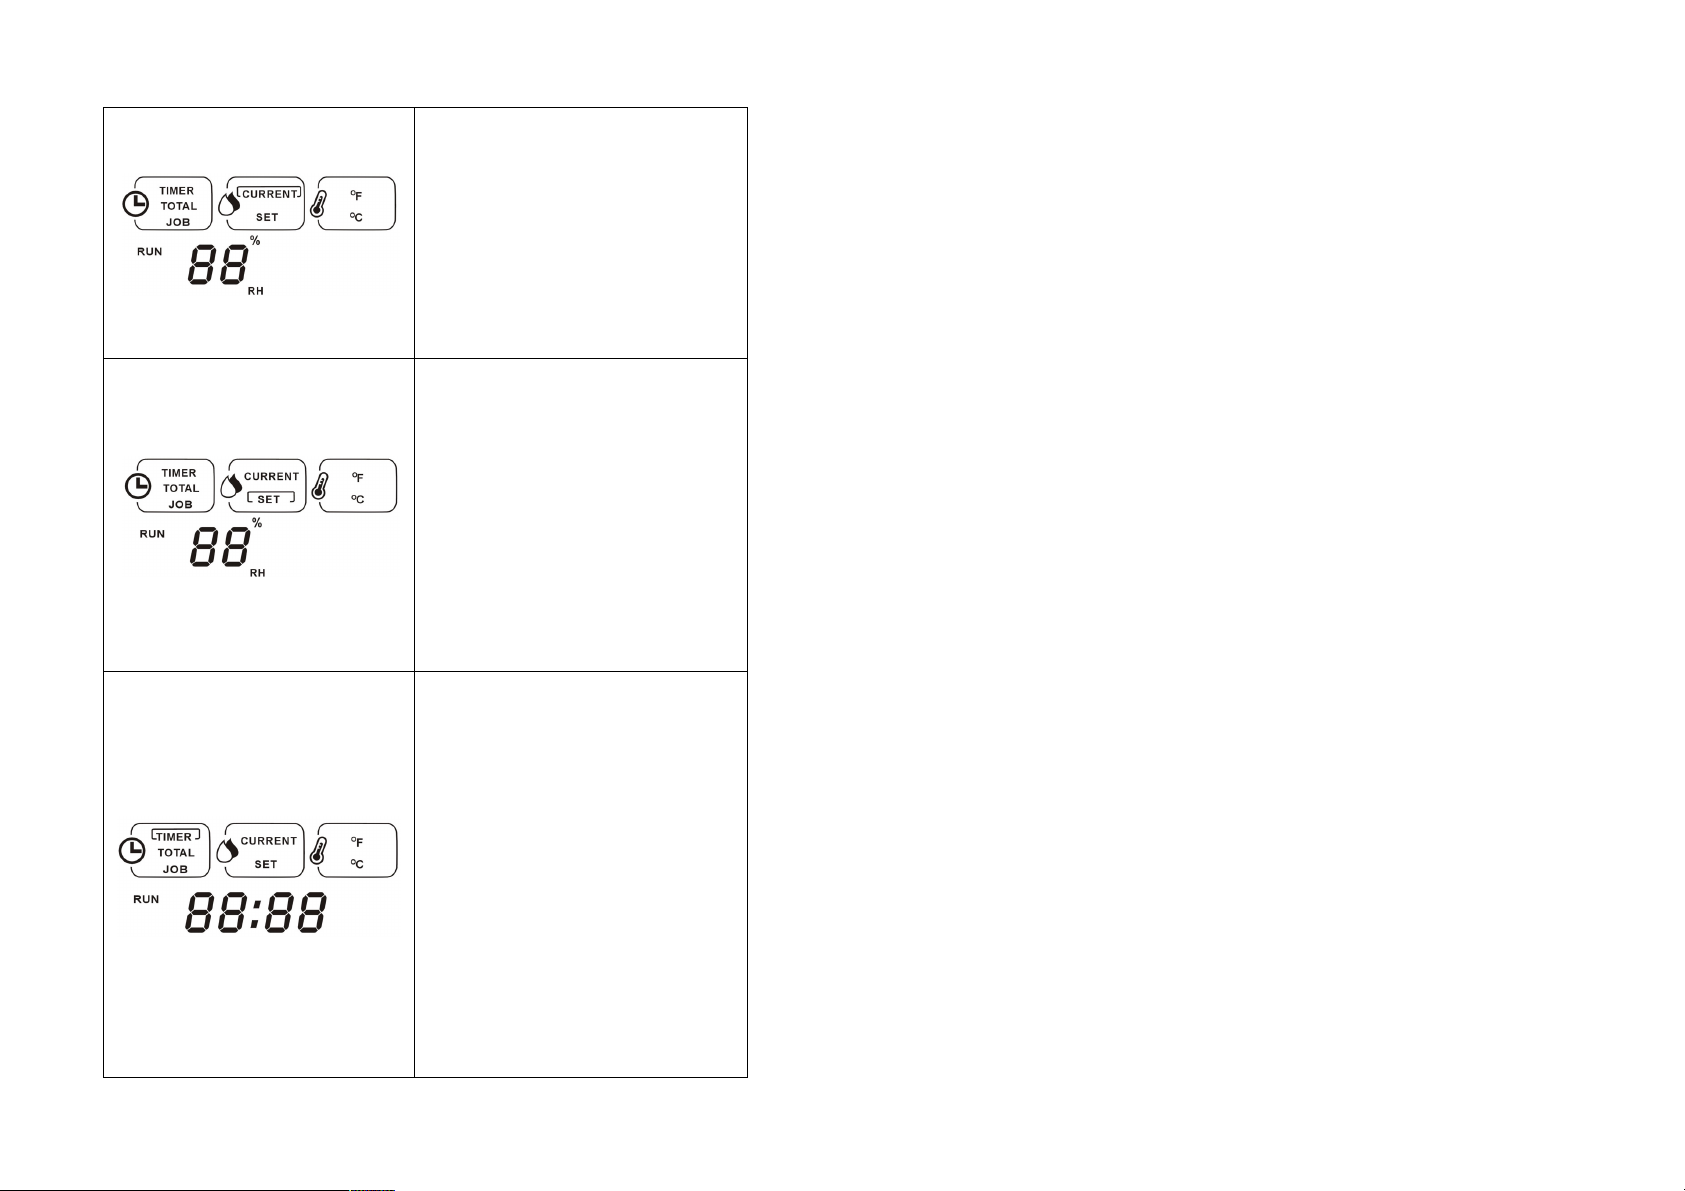
“CURRENT” HUMIDITY. When the
machine is turned on, the default display
function goes to “CURRENT” HUMIDITY.
“CURRENT” wording in the square box will
flash for 3 sec and 2 digits Relative Humidity
figures display the current ambient humidity.
“SET” HUMIDITY. While “SET”
HUMIDITY function is chosen, “SET”
wording in the square box will flash for 3 sec
and the bottom 2 digits Relative Humidity
figures also flash continuously until the user
set the desired humidity which is from 25%
to 80%. “- - %RH” is the value beyond this
range, which read as nonstop
dehumidification.
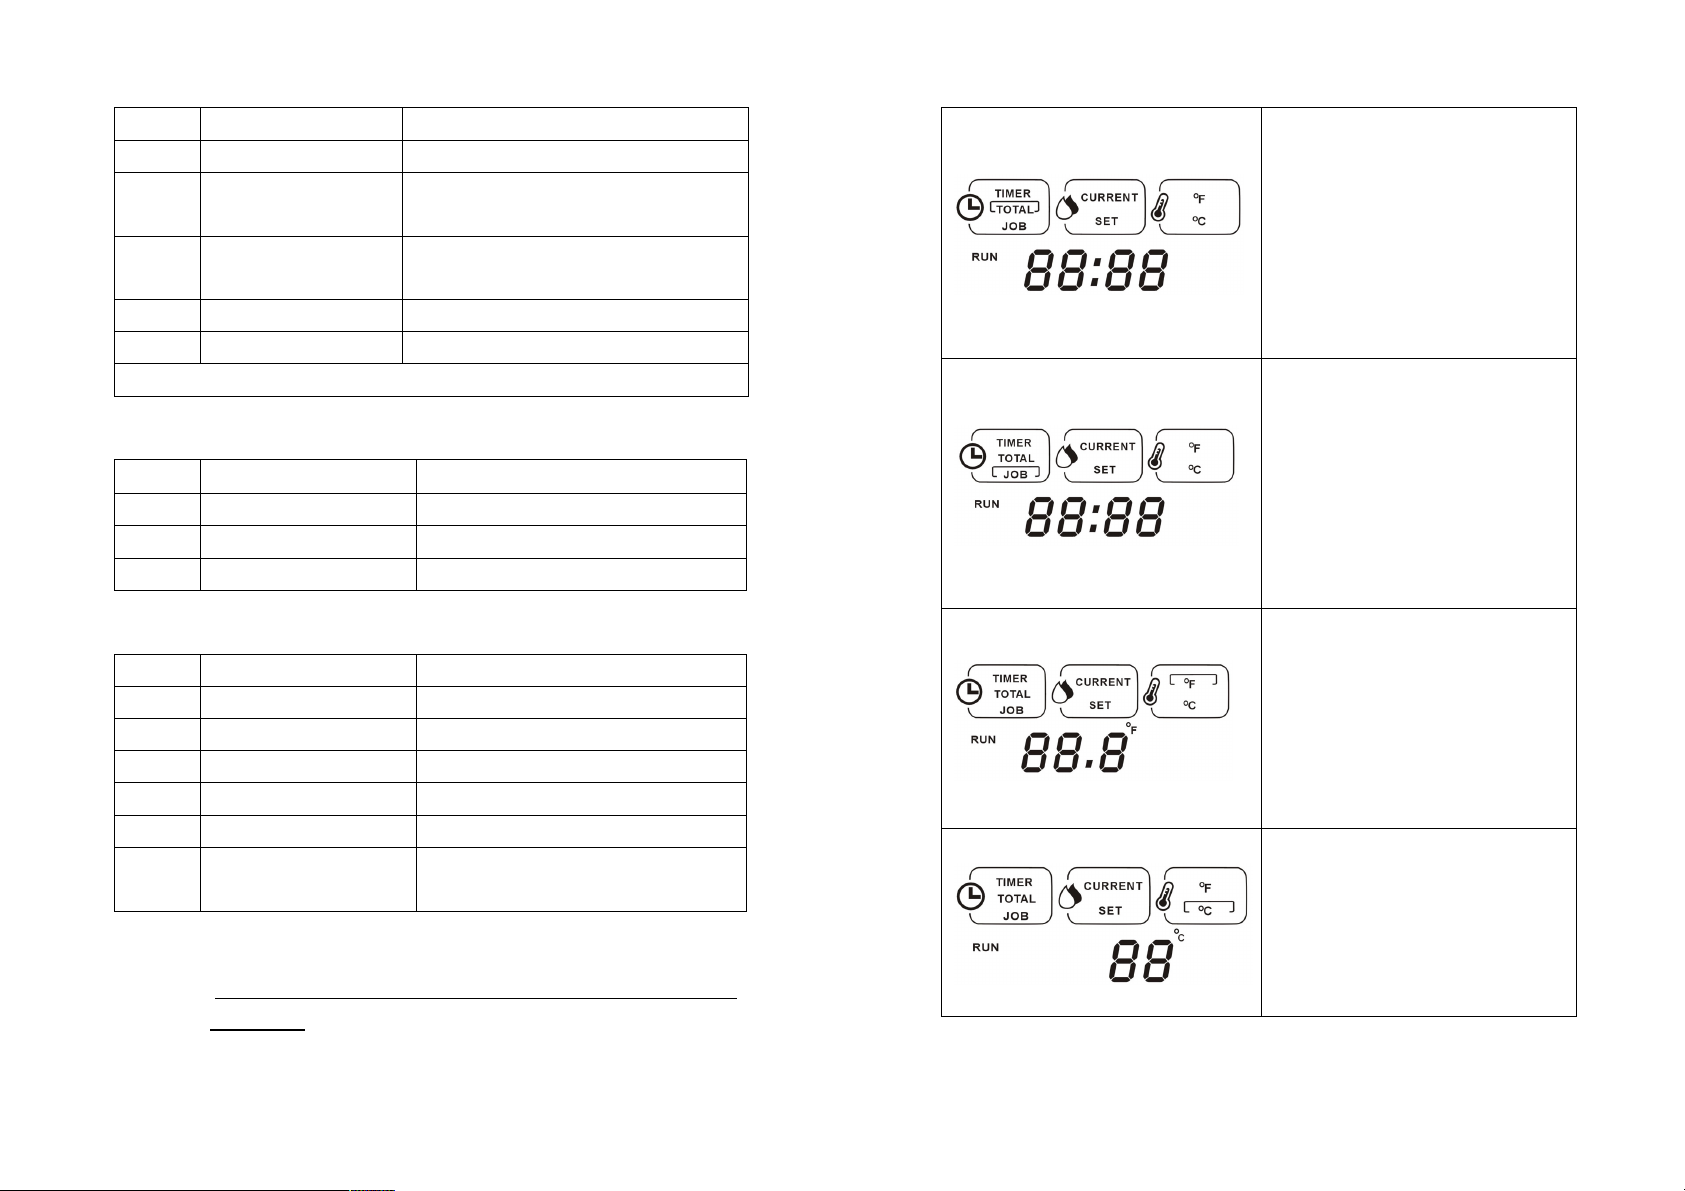
“TIMER” CLOCK. While “TIMER”
CLOCK time is chosen, “TIMER” wording in
the square box will flash for 3 sec. The
bottom four digits show how many HOURS
and MINUTES the “TIMER” is. In STANDBY
mode, the four digits (- - : - -) flash
continuously until user sets the TIMER from
00:10 to 23:50 hours. Once the “TIMER” is
set and machine starts running, the four
digits displays remain running time of the
current TIMER., “- - : - -” is the value beyond
this range, which read as nonstop
dehumidification.
l Inspect pump tube. Make sure the pump tube is completely unwrapped
and not kinked. Failure to do so can cause water to back up in the pump
and leak out. The control panel may signal this problem by displaying
“ER00”
l Inspect filter. Look for accumulated dust and dirt that would restrict airflow
through the filter into the unit. If any is visible, vacuum out the debris. Do
not wash the filter, as it will reduce the effectiveness of the electrostatic
material.
Important: Replace the filter whenever
l It has been vacuumed clean 3 times.
l It has been used on a mold remediation job.
Periodically Inspection (as needed)
Make sure the unit is unplugged. Remove housing, in order to locate the coil,
pump and drain hose.
l Check coil and clean visible dirty
n Vacuum both sides of the coils until clean.
l Check pump
n Inspect and clean the pump system regularly to maintain effective
operation. Remove one screw to open up the top cover, and then
open up the second cover. Clean the float shaft to make sure the
floating switch can operate smoothly.
l Check drain hose
n Look for obstructions. Disconnect and clear any debris present.
Warranty
SunTec warrants to the original purchaser that if, within a period of 12 months
from the date of purchase, this equipment is found to be defective either in
original materials or workmanship (excluding normal usage wear and/or
mishandling or abuse) the faulty part will be replaced free of charge upon
presentation of the appropriate evidence, provided the unit is returned to the
original supplier. Shipping expenses are not covered under the warranty.

Error Messages
Msg.
Icon
Description
Er00
“PUMP ON” flashing
Problem with pump or pump tube is kinked.
Er01
N/A
Check coil temperature sensor at the side of
coil and its sensor cable.
Er02
N/A
Check ambient temperature sensor in the front
of the coil and its senor cable.
Er03
N/A
Check humidistat sensor in the front of the coil.
Er04
N/A
Ambient temperature is too high.
Note: Contact your local distributor for service.
On/Off Indication Light:
Color
Status
Description
N/A
Off
Machine has been turned off.
Red
On
Machine has been turned on.
Green
On
Machine start dehumidification.
WiFi Indication Light:
Color
Status
Description
Red
Flash, 2 times per Sec.
EZ mode WiFi connection
Red
Flash, 1 time per Sec.
AP mode WiFi connection
Red
On
EZ/AP WiFi Connection Failure
Green
Flash, 1 time per Sec.
Connecting WiFi network.
Green
On
WiFi Connection successful.
Green
Flash, 2 times per Sec.
WiFi Connection Failure/ WiFi pcb is
disconnected.
Maintenance
WARNING! Always unplug any dehumidifier before performing maintenance
procedures.
Before Each Use
l Inspect the electrical cord for damage.
LCD Display – Cont.
“TOTAL” CLOCK. While “TOTAL”
CLOCK time is chosen, “TOTAL” wording
in the square box will flash for 3 sec. The
4 digits show how many DAYS the
machine has been used.
“JOB” CLOCK. While “JOB” CLOCK
time is chosen, “JOB” wording in the
square box will flash for 3 sec. The four
digits display how many HOURS and
MINUTES either the CURRENT JOB is
running or the LAST JOB has been run.
“oF” TEMPERTURE. While “oF”
TEMPERTURE function has been
chosen, “oF” wording in the square box
will flash for 3 sec and 3 digits figures
display the current ambient “oF”
temperature.
“oC” TEMPERTURE. While “oC”
TEMPERTURE function has been
chosen, “oC” wording in the square box
will flash for 3 sec and 2 digits figures
display the current ambient “oC”
temperature.

Touch Pad Keys:
ON/OFF. Press the ON/OFF key to turn the machine on or off.
l When turning the machine on, the machine is under STANDBY
MODE. The red indication light and LCD light up. LCD displays
CLOCK icon; “TIMER”, ”TOTAL” and ”JOB” wordings; HUMIDITY
icon, “CURRENT” and “SET” wordings; TEMPERTURE icon; “℉”
and “℃” wordings. The default function is “CURRENT” HUMIDITY.
“CURRENT” wording in the square box will flash for 3 sec. Press the
“START/STOP” KEY to start the nonstop dehumidification.
l Press the ON/OFF key again to turn the machine off. The red
indication light and LCD light off. Note: In STANDBY MODE, the
machine can also be automatically turned off if there are no other
keys pressed within 3 minutes.
MENU. Press the MENU key each time to choose the “CURRENT”
HUMIDITY, “SET” HUMIDITY; “TIMER” CLOCK, “TOTAL” CLOCK, “JOB”
CLOCK; “oF” TEMPERTURE, “oC” TEMPERTURE functions sequentially.
l In STANDBY MODE, the default function is “CURRENT” HUMIDITY,
l When error messages are on, “TIMER” CLOCK, “TOTAL” CLOCK,
“JOB” CLOCK; “SET” HUMIDITY; “CURRENT” HUMIDITY, “oF”
TEMPERTURE, “oC” TEMPERTURE icons & wordings are
disappear. Press MENU key again to get back those displays.
Adjustment. Press the “Adjustment” key, the timer time and preset
humidity figures can be adjusted as you desire.
l In “SET” HUMIDITY function, the preset humidity range is from 25%
to 80%. It increases by 5% for every press
l In “TIMER” CLOCK function, the “TIMER” time setting range is from
00:10 to 23:50. It increases by 10mins for every key press
Press this key without releasing; either the preset humidity or the timer can
be adjusted continually.
Touch Pad Keys – Cont.:
START/STOP. Press the START/STOP key to start or stop the
dehumidification.
l When dehumidification starts, the machine performs a compressor
delay. The delay is up to a maximum of 180 seconds. (30 seconds
delay for the first startup). The DELAY BAR flashes during this delay
period.
l While the dehumidification is on, the display reads “DEHUMIDIFIER
ON” & “FAN ON” icons.
l In “CURRENT” HUMIDITY, “TOTAL” CLOCK, “JOB” CLOCK, “o F”
TEMPERTURE, “o C” TEMPERTURE functions, it runs as nonstop
dehumidification. RUN Mode is on.
l In “SET” HUMIDITY function, when the ambient humidity is lower
than the preset humidity, the dehumidification stops and machine
goes into SLEEP Mode. When the ambient humidity is higher than
the preset humidity, the dehumidification goes back on again and
machine goes into RUN Mode. When preset humidity is set as “- - :
- -”, the machine runs as nonstop dehumidification.
l In “TIMER” CLOCK function, the dehumidification stops
automatically as the “TIMER” set. When the time is set as “- - : - -”,
the machine runs as nonstop dehumidification. RUN Mode is on.
Press the START/STOP key again to stop the dehumidification. The
“DEHUMIDIFIER ON” & “FAN ON” icons come off while the
dehumidification stops.
PURGE. Press the PURGE key to empty water from the pump reservoir.
During the normal operation, the pump purges automatically whenever the
reservoir is full. The display will read PURGE ON icon.
TO PURGE THE PUMP MANUALLY BEFORE TRANSPORTATION:
l Stop the dehumidification using the START/STOP key, and let the
unit sit for about 10mins. This allows water to drip from the coils.
l Press PURGE to remove residual water.
This manual suits for next models
1
Table of contents
Other SUNTEC Dehumidifier manuals