• Protecon against electric shock: Class II including AC/DC Adapter.
• Applied parts : No applied parts.
• Protecon against harmful ingress of water: ordinary IPXO.
Direct current Class II
equipment
CE mark Serial No.
Alternang
current
Aenon, consult
accompanying
documents
CLASSIFICATION
Storing the LED system in a safe place will prolong the life of the unit. The
following guidelines will help in sustaining the LED systems useful life:
• Keep the opcal face on the light unit from touching hard surfaces which may
cause scratches on the surface. Scratches on the surface will diminish the light
quality.
• When cuts or punctures are visible on the system’s light cord, the wireless LED
system is no longer safe to use; it should be taken out of service immediately.
MAINTENANCE
• Do not immerse in water or any liquid; wipe down with damp cloth. Do not use
HOT or COLD water; using “room-temperature” water is acceptable
• Avoid using running water and disinfectant sprays on or near open slots located
on light unit. Carefully wiping with damp cloth is ok.
• Do not use any disinfectants containing glutaraldehydes, iodophors, ammonia,
alcohol, or ethanol
• Do not autoclave
Disinfecon: Use of quaternary ammonium compounds is ok. Dry throughly. For a
full list of recommended disinfectants, visit www.surgitel.com/help
FACTORY REFURBISHMENT CLEANING: is available if you come across a dicult
cleaning situaon. Call customer support for details: 800-959-0153
*IMPORTANT*
CLEANING
OPERATION
Dove Tail
Adapter
Clip
Adapter
ATTACHING LIGHT ADAPTER TO LOUPE
w
• Aach the LED light to loupes or glasses using appropriate adapter
ADJUSTMENTS
Note about light-cured composites
• Although it is not recommended to use this LED Light while working with
light-cured composites, seng the light to a lower light intensity may allow
you to work briey with materials before hardening
• Using the appropriate COLOR FILTER (orange lter) is STRONGLY
RECOMMENDED when using light-cured materials with the LED Light
• Ambient temperature range 10 to 40oC
• Relave humidity range 30 to 75%
• Atmospheric pressure range 70 to 106 kPa
• Ambient temperature range -40 to 70oC
• Relave humidity range 10 to 100%
• Atmospheric pressure range 50 to 106 kPa
OPERATING CONDITION
TRANSPORT & STORAGE CONDITION
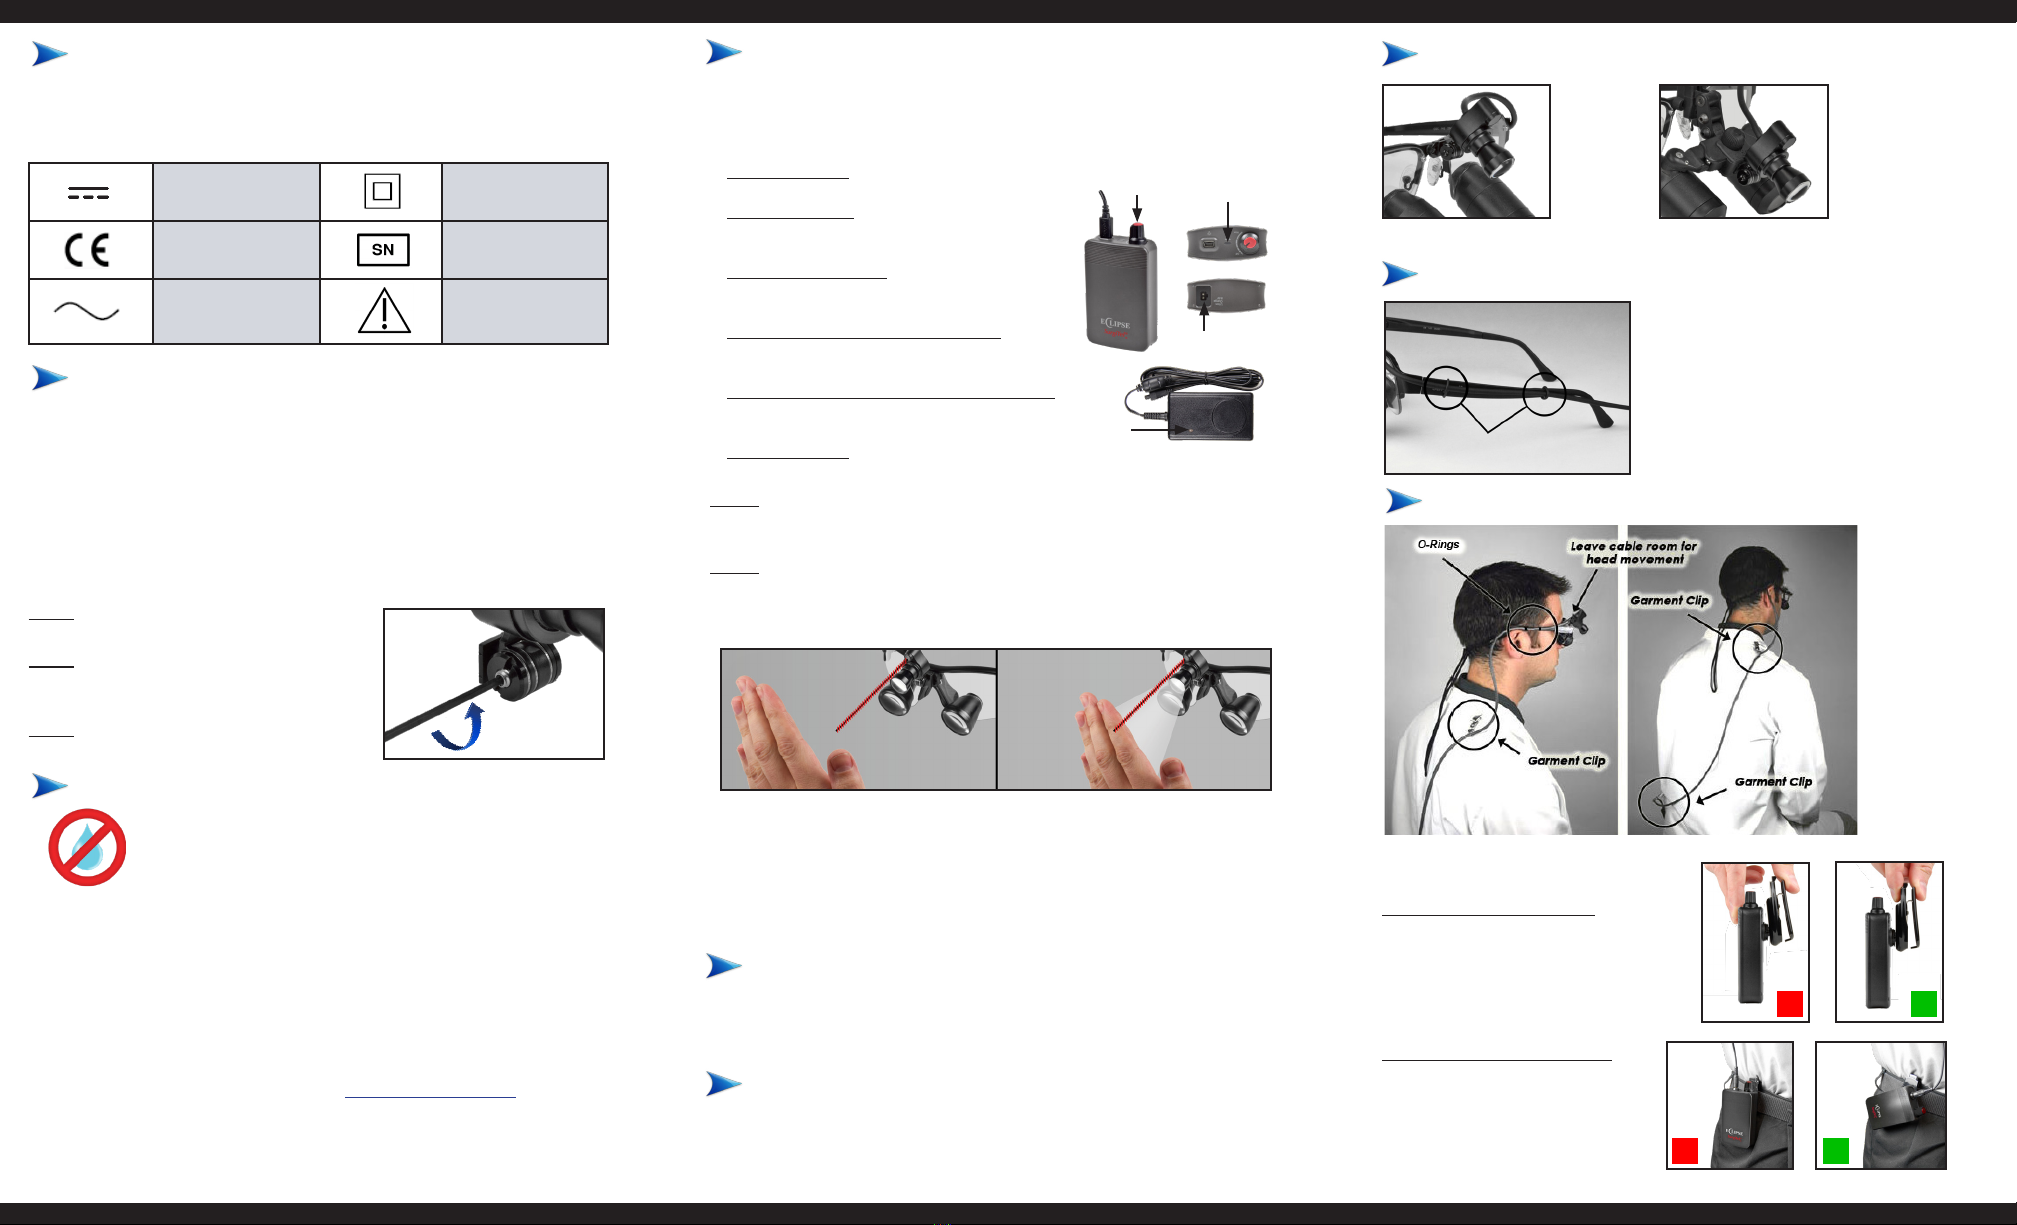
Fixing Hinge Tension (too loose or too tight):
Step 1: Use provided hex key to remove hinge
set screw (see photo to the right)
Step 2: Use two at-head screwdrivers (placed
on each side) to loosen/ghten special
screw and nut
Step 3: Once desired tension is met,
reassemble and ghten set screw
• Charge Time (Baery Pack) = approximately 2-3 hours
• Maximum connuous operaon at full load is approximately 7 hours
• Aach the LED light to loupes or glasses using an appropriate adapter
• Use the included garment clips to route the cable appropriately
Warning:
Baery Control Pack Belt Clip
• Improper use of the belt clip
can lead to product damage.
Refer to photos shown to the
right for correct use.
Baery Control Pack Placement
• Posioning the baery pack
incorrectly can lead to belt
clip damage. Refer to the photos
shown to the right for correct
placement.
• Aach light cord to frame by
sliding both o-rings onto
temple arm, as shown
Note: O-rings are aached to
LED cord
CABLE ROUTING
O-rings
55
• Power switch (1):
Rotate to turn light o/on
• Light intensity (1):
Adjust the posion of the knob to adjust the
light level
• Rechargeable inlet (2):
Recharges the baery with the aid of an AC
charger
• Baery charge level indicator light (3):
GREEN = fully charged, RED = charging,
FLASHING RED = error
• Baery pack baery power indicator light (4):
GREEN = 2-6 hours, RED = less than 2 hours,
FLASHING RED = less than 1 hour
2
4
1
• Power switch (5):
Note: Baery pack must be powered on for this funcon to work.
STEP 1 - Turning on LED light
Allow 60 seconds of uninterrupted use for the on/o moon sensor to warm up
and adjust to your room lighng condions.
STEP 2 - Operang on/o moon sensor
A. First, place your hand about 9 inches in front of the Eclipse LED sensor.
B. Next, slowly move your hand towards the moon sensor to turn on/o your
Eclipse LED.
3