SWDK FG2020 User manual

SWDK Cordless Floor Cleaner User Manual
Read all user manual before using your SWDK Cordless Vibration Mop and properly kept.


Content
Safety Instruction
Product Instruction 2
Trouble Shooting 10
Technical Parameters 11
Warrant Card 13
Hazardous Substances
12
11
Daily Maintenance & Installation
Assembly 3
Operation 4
6
1
Performance Fault Table


All technical and other data reflected in this product manual shall be obtained by our company or designated third party testing company, and the final interpretation right shall be owned by our company.
Do not use this machine to absorb any burning or smoking objects, such as unextinguished
heat source soot, burning cigarette ends or matches.
Please keep the air passage or moving part away from hair, loose clothing, fingers and other
parts of the body.Do not place tools in your eyes, ears, or mouth.
If the electric leakage or motor temperature is found to be too high and abnormal sound, such
as body heat, noise, odor, weak suction, etc., should immediately stop using.
Discontinue using if charger or plug is damaged.Please call our professional maintenance
personnel for replacement to avoid damage.
Please use our special charger for charging.Other types of chargers can cause extreme
thermal effects on the battery, resulting in personal injury and product damage.
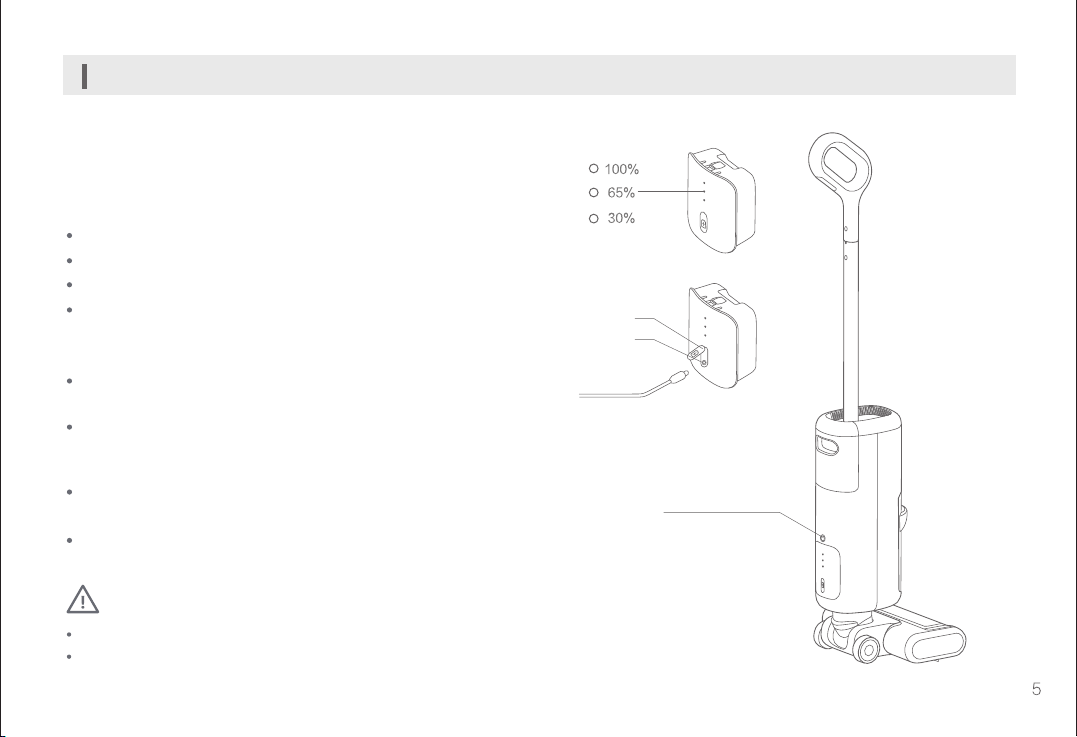
If you do not use this product for a long time, please turn off the power and unplug the charger.
After using the machine, please timely clean the recycling bucket, keep the ventilation path
clear, avoid blocking caused by suction drop side preservation, damp places will affect the
electrical insulation and service life.
The machine body and ground brush are electrified, and cannot be washed by soaking in water.
In case of machine failure, do not repair by yourself. Please call our after-sales department for
help.Do not disassemble and assemble the closed machine by yourself. There are no parts in
the machine that customers can repair by themselves. Do not try to change the performance
of the machine, otherwise it will lead to maintenance.
The use of voltage not corresponding to the product specifications will damage the motor, more
likely to cause harm to the user.The correct voltage rating is marked on the nameplate.
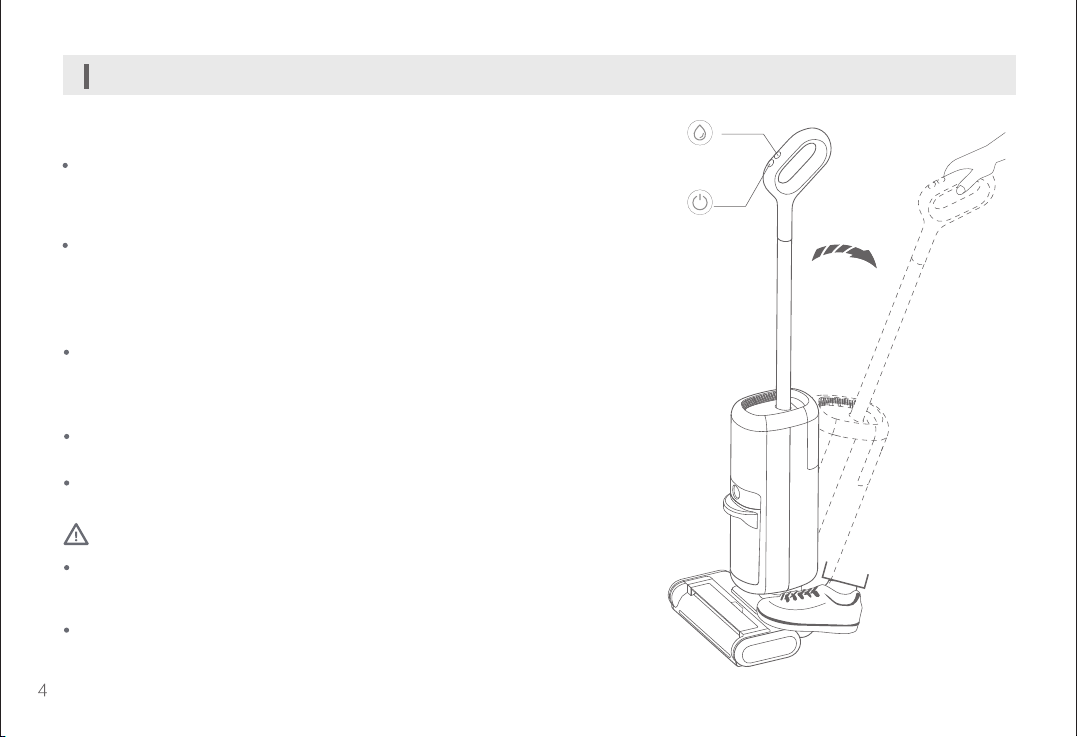
Care must be taken to prevent falling when sweeping stairs.
Do not shake the machine up and down or violent collision, prevent sewage into the motor.
When the motor is working, please do not lift or carry the appliance up and down, and do not tilt
the machine to one side or lay it flat to prevent sewage into the motor.
In order to prevent tripping, the machine should be placed against the wall after use.
Do not use this machine to absorb sharp objects, such as glass fragments, small toys, pins,
paper clips, stones, gypsum, large pieces of paper, etc. These objects may cause blockage
and damage the machine.
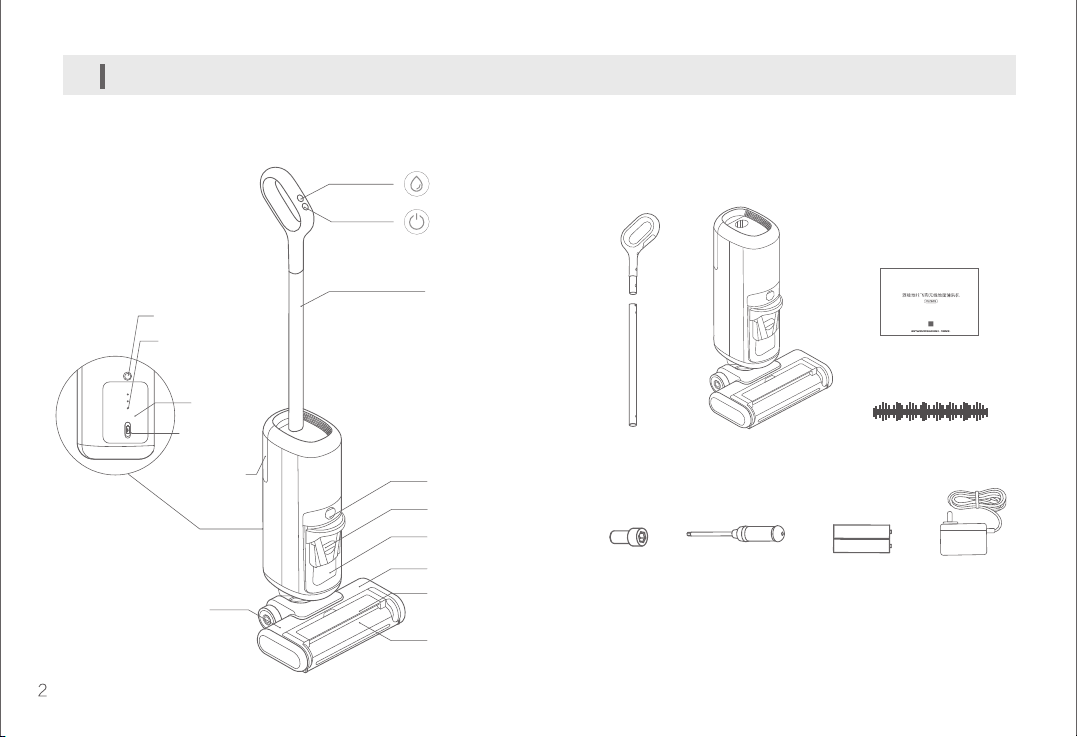
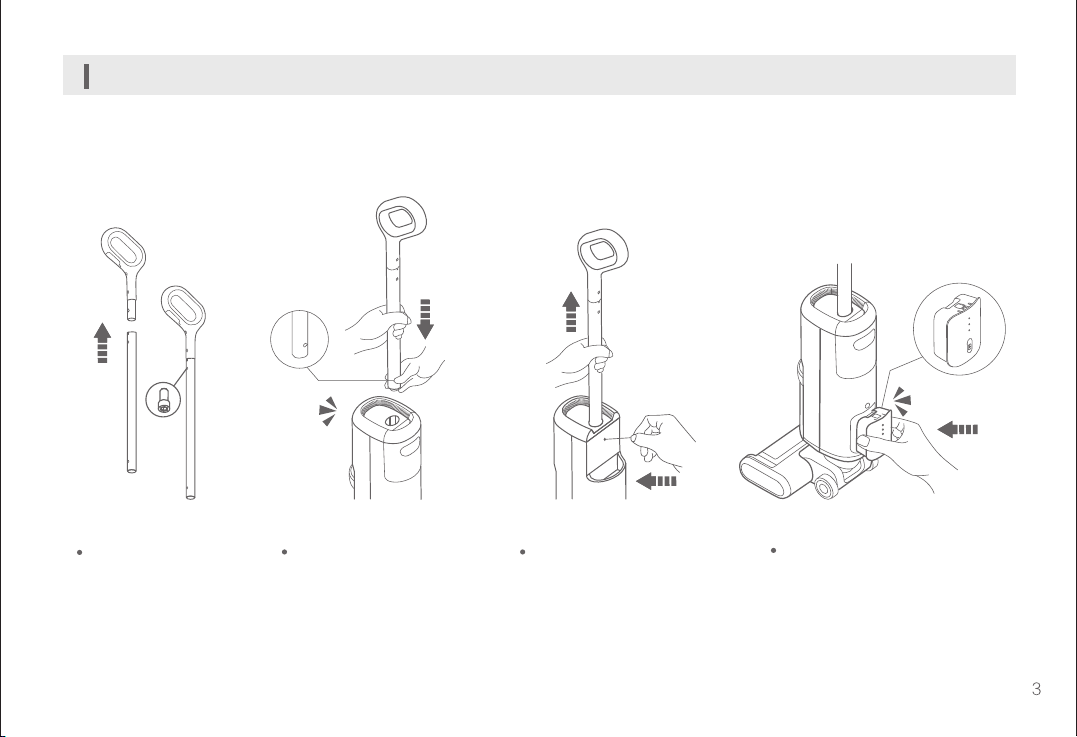
About this manual
Follow the instructions to install the machine and well keep the manual. If you transfer the
product to a third party for use, please attach this manual with the machine.Any operation
that is inconsistent with the instructions may result in product damage or serious personal
injury.
Our company will not bear the relevant legal responsibility for the loss caused by not operating
according to the instructions of the floor cleaner.
About cleaning liquid
If a large amount of cleaning fluid penetrates into the motor, it will cause danger.
It is recommended to use the detergent approved by our company, which shall not contain acid,
alkali solution or harmful substances to the environment.
Cleaners should be kept out of the reach of children. If the cleaning solution accidentally gets
into the eyes, rinse thoroughly with water. Follow local environmental regulations when handling
sewage and cleaning solutions.
Product safety instruction
This product is only suitable for use in the home environment, not suitable for industrial or outdoor
use.
This product is suitable for the hard ground in indoor environment, including rubber floor, marble
floor, granite floor, terrazzo floor, solid wood floor, compound floor, bamboo floor and all kinds of
mirror tiles, porcelain tiles and other flat surface.It may not achieve the best effect if it is used on
uneven surface.
This product is not suitable for people with physical, sensory or intellectual disabilities or lack of
experience and common sense (including children), unless supervised or directed to ensure safe
use.
Do not touch the plug or any live parts of the product with wet hands to avoid the risk of electric
shock.
Do not vacuum high temperature material (cigarette butts, matches or hot ash), superfine material
(such as lime, cement, wood, gypsum powder, ash, carbon powder, etc.), large sharp debris (such
as glass, nails, pins, etc.), dangerous goods (such as solvent, detergent, etc.), chemicals (such as
acid, strong alkali, etc.), flammable liquids (gasoline), alcohol products.
Do not use this product near working fireplace and heater to prevent deformation of machine shell.
Do not use this cleaning machine to absorb detergent, kerosene, gasoline, alcohol, paint, perfume,
etc. These liquids may lead to short circuit, fire or explosion.
Do not wet the machine or it may cause fire and electric shock due to short circuit.
Do not put any small objects in the air outlet, also do not plug the air outlet, take away all may
hinder the air flow smooth small objects, to prevent overheating machine.
Do not use the clean water tank and sewage tank if they are not properly installed.
Safety Instruction Read all user manual before using this product

Product Instruction
Part List
Clean Water Tank
Battery Pack
Battery Lock Button
Battery Indicator Light
Charging Port
Spray Indicator Light
Aluminium Tube
Dust Tank
Buoy
Dust Tank Release Button
Floor Brush
Roller Cover
Roller Brush
Spray Button
Power Button
Handle X 1 Main Machine Body X 1
User Manual X 1
Note: The product, accessories, and other illustrations in the manual are schematic
diagrams for your reference only. Due to the update and upgrade of the product,
there may be some differences between the actual product and the schematic diagram.
Please refer to the actual product
Carpet Roller Brush X 1
Screws X 2 Screwdriver X 1 Handle Batteries X 2
(AAA)
(User X1, Stand-dy X1)
Carton Contents
Charger X 1

Assembly
Assembly & Disassembly of Handle Assembly of Battery
Link the aluminum tube to the
handle and fix the screw with
the screwdriver.
Erect the body, insert the limit post
at the end of the handle into the
port of main machine body, and the
installation is successful after
hearing the sound of locking.
“KA”
If the handle needs to be removed,
lift the aluminum tube up with the
lifting pin against the limit post.
Load the battery pack into the battery
tank, and the installation is successful
after hearing the sound of locking.
“KA”

Operation
Preparation
Using
NOTES
Before use, please ensure that all parts of the machine have been
installed, and check whether the battery pack is sufficient. If lower
than 30%, please charge it before use (see page 5 for power
indicator).
Choose the use mode according to the actual use requirements.
If dry wipe mode, you can use it directly; if wet wipe mode, please
inject clean water or neutral detergent into the water tank before
use.
Step on the floor brush and pull the handle backward. After hearing
the release sound of the lock, the whole unit enters the standby
state.After use, push the handle forward to stand upright. When you
hear the locking sound, it will be turned off.
In standby mode, press the power button to start the cleaning
machine; press it again to stop working.
Press the spray button, the water spraying nozzle starts to spray
continuously; press it again to stop spraying.
In the process of using the machine, if there is any abnormality,
please shut down the machine in time and refer to the chapter of
TROUBLE SHOOTING.
If you do not use the machine for a long time, please remove the
battery pack and store it properly.
Spray Button
Power Button
Power Off Standby

Operations
Battery Indicator
Charging
NOTES:
The power indicators correspond to 100%, 65%, and 30% respectively.
When three lights are flashing at the same time, it means the battery is
about to run out. Please charge it in time.
Three lights on:65%<power<100%
Two lights on: 30%<power<65%
One light on:power<30%
Three lights flash:battery is running out
Battery Cover
Charging Port
Battery Lock Button
Charging: open the charging cover and connect one end of charger to the
charging port and the other end to the socket for charging.
Battery charging separately: press the battery lock, remove the battery,
open the charging cover and connect one end of charger to the charging
port and the other end to the socket for charging.
During the charging process, the quantity indicator is displayed as cyclic
flashing.
When full, the power indicator will be normally on. It is suggested to
remove charger plug and cover the charging port in time
Only charge it with our specific charger.
Do not start the machine during charging.

Assembly & Disassemly of Roller Cover
Daily Maintenance & Installation
To remove the roller cover, first place
your fingers to the position shown in
Picture and pull it upward to remove
the cover.
During installation, align the arc-shaped ends of the roller cover
with the corresponding ends of the base, and then press forward.
If hearing the locking sound and the installation is completed.
Cleaning
It is recommended to clean the roller
cover regularly after use to keep it
clean and tidy.
Remove the roller cover and clean with
water before putting it back in the base.
Spray Nozzle
Water Outlet
“KA”

Daily Maintenance & Installation
Assembly & Disassembly of Roller Brush
To remove the roller brush, as shown in Picture, lift the roller brush
handle by hand.
During installation, hold the roller brush handle and align the right
side to the right end, and then press the left handle into the left
slot to install successfully.
Cleaning
It is recommended to clean the roller brush regularly after use to
keep it clean and tidy.
The roller brush can be removed according to Picture, and the
hair or debris tangled on the brush head can be removed by
using the other cleaning tool. Clean the roller brush with clean
water.
After cleaning, install the roller brush back to the base.

Daily maintenance and Installation
Removal, Water Injection and Assembly of Clean Water Tank
Hold the fuselage steady, put your hand into the position shown and pull up,
then the clean water tank can be removed.
Open the water tank lid, add water (no more than 40 ° C temperature), tighten
the cap and ensure tight no leakage.
Assemble the clean water tank head downward toward the tank and back to the
body, the installation is successful after heard the lock sound.
“KA”
Suction Nozzle
Cleaning the Suction Nozzle
It’s recommended to clean the nozzle regularly after use to keep it clean and tidy
Refer to the roller brush cover section to remove
Put the cleaning brush into the suction nozzle and draw the dirt out by circling it
After cleaning, the roller brush and its cover can be installed back to the body.
Note: Do not add water whose temperature exceeds 40℃
Note: Optional cleaning brush

Daily maintenance and Installation
Removal and Assembly of Dust Tank
Press the dust tank button and pull outward to remove it.
During installation, put the bottom of dust tank into the fuselage and
push forwarder. After the whole tank is loaded into the fuselage, the
installation is successful when the lock sound is heard.
“KA”
Clean
It is recommended to clean the dust tank after each use to keep it clean and tidy.
Open the Lid Clean the Dust Tank Clean the Lid and Buoy Take Off the Filter Clean the Filter
NOTES: Filter can be used after completely dry.

Trouble Shooting
Comment Fault
Machine notwork
2. Dust cup has been reached the availavle capacity
3. The roller brush is entwined with objects such as hair
Lower suction
1. Rolling brush cover and sewage tank installation is not in place
2. The roller brush is entwined with objects such as hair
3. The suction nozzle is blocked
Abnormal noise of motor
Unable to charge
No water sprayed from the
fresh water tank
1. No water in the fresh water tank
The air vent cover is leaking
If you still cannot make the product work normally according to the above steps, please contact our after-sales department for help.
1. The product is out of power or lower
4. Excluding the above conditions, the situation remains the same
2. Excluding the above conditions, the situation remains the same
3. Excluding the above conditions, the situation remains the same
5. Low battery
6. Excluding the above conditions, the situation remains the same
1. The suction nozzle is blocked
2. The fresh water tank is not installed in place
1. No filter element is installed or the filter element is too wet
Please fully charge the product then to use it
Take out the dust tank and pour out the dust
Clean the roller brush
Please contact our after-sales service for
maintenance
Re-assembly
Clean the roller brush
Clean the barrier in the suction nozzle
Clean the filer to use
Please fully charge the product then use it
Please contact our after-sales service for
maintenance
Clean the barrier in the suction nozzle
Please contact our after-sales service for
maintenance
Please kindly check and connect them well
Please contact our after-sales service for
maintenance
Add the water
Install the fresh water tank in correct place
Please contact our after-sales service for
maintenance
Install the filter element or dry it before use
Please contact our after-sales service for
maintenance
Possible Reasons
Solution
4. The filter element on the cover of the tank is dirty
1. The charging port is not well connected to the charger

Technical Parameters Hazardous Substances
Fresh water tank 500ml
Dust tank 750ml
Battery Capacity 2500mAh
Rated Power 140W
N.W.
Size 308×250×1100mm
Work time 25±3min
Charge time 4.5-5h
5kg
Work Voltage 29.6V
Product Technical Parameters
* The company reserves the right to make any technical or design changes to
the products due to the continuous improvement of the products. The company
reserves the right of interpretation
Components
Hazarous Substances
Lead
(Pb)
Mercury
(Hg)
Cadmium
(Cd)
Chromium
(C r(V I))
Polybrominated
biphenyl
(PBB)
Polybrominated
diphenyl ethers
(PBDE)
PCB Board
Metal Element
Plastic
Adapter
Battery
This chart is based on the regulation of SJ/T11364
O:It indicates the content of the hazardous substance contained in the component is
within the limits set by GB/T26572.
X:It indicates the content of the hazardous substance contained in the component is
higher than the limits set by GB/T26572.
Note:This product uses the environmental protection design concept, and has carried
on the effective control to the hazardous substance. "X" indicates the hazardous
substance mainly because the technical development level limit, which cannot
realize replacement.
Environmental use restrictions:
Products supports the environmental protection use period of rechargeable batteries of
(five years), dry cell environmental protection use period (three years), hazardous
substances in electrical and electronic products under the condition of normal use will not
leak or mutation, use the electronic products will not cause serious pollution to the
environment or cause serious damage to the person or property.
Tips for recycle:
In order to better care and protect the earth, when users no longer need this product or
the product life is terminated, please comply with the relevant laws and regulations on
the recycling of waste electrical and electronic products, and give it to the local
manufacturer Dwith state-approved recycling resources for recycling.

Performance Fault Table
Main Machine
Functions listed on the user manual not work
Unable to start the machine
Spray pump is not working
Part Performance Fault
Unable to charge for the machineCharger
Table of contents