Swegon actionair DWFX-F User manual

INSTALLATION GUIDE
DWFX-F Installation Method
Health and safety
• This process must be undertaken by competent per-
sons. More than one person may be required to ensure
the safe handling of large dampers and other materi-
als. Use must be made of access equipment to ensure
unsafe practices are not used to approach walls or dif-
cult access areas.
• Standard site PPE should be used (minimum steel toe
cap boots, hard hat); together with any protective
eyewear, gloves and masks, when drilling or cutting is
being undertaken. The latter should also be used when
handing the wall construction materials, as dened by
the material suppliers. If loud equipment is being used,
hearing protection should be used.
• All waste materials should be collected and disposed of
as dened by the relevant supplier.
• Actuators: All wiring should be carried out in accor-
dance with the wiring details provided by the IEE and
BS regulations and by a competent person. Care must
be taken when installing and inspecting dampers, as
they are likely to close without warning due to loss of
electrical power or a temperature rise in the ductwork.
This is their prime function. Do not insert any items,
ngers or limbs between the blades. Larger dampers
must be handled in accordance with current regula-
tions and good practice due to weight.
Drawings
Please visit our website to download the installation dra-
wings, which are located on the relevant product down-
load section.
Applies to...
• Actionair SmokeShield PTC
• Actionair FireShield
Contents
CE Installation Method Overview ............... 2
Vertical Damper Installation in Plasterboard
Walls...................................................3
Vertical Damper Installation (Top Flange
removed) in a Plasterboard Wall under
Concrete Slab........................................4
Vertical Damper Installation in Masonry Walls
5
Vertical Damper in a Masonry Wall against
slab ....................................................6
Self Latching Removable Release Mechanism
Cassette .............................................. 7
Actuators.............................................8
Periodic maintenance..............................9
Control Mode Installation Procedure .............................. 9
Wiring Diagrams .......................................................... 10
DWFX-F Damper Dimensional Data............ 11
Actionair SmokeShield PTC ...........................................11
Actionair FireShield ...................................................... 13
Troubleshooting ....................................14
Inspection and handover check sheet.........15

Actionair DWFX-F Installation Guide
2Swegon reserves the right to alter specications. 20210408 - LNNN00354 (3.0)
Application
Installation Method
Actionair SmokeShield Actionair FireShield
Vertical DWFX-F In A Plasterboard
Wall
Page 3, [AA/F10704] Page 3, [AA/F10705]
Vertical DWFX-3F (Top Flange Remo-
ved) In A Plasterboard Wall Under
Concrete Slab
Page 5, [AA/F11945] Page 5, [AA/F11944]
Vertical DWFX-F In A Masonry Wall Page 6, [AA/F12493] Page 6, [AA/F10707]
Vertical DWFX-3F (Top Flange Remo-
ved) In A Masonry Wall Under Con-
crete Slab
Page 9, [AA/F12394] Page 9, [AA/F12827]
• The methods in this manual should be followed to
ensure a CE-marked installation. This CE installation
document covers single dampers only. If a multiple
damper assembly or, if a non-standard install is requi-
red, talk to us as early as possible in the project to get
important stakeholders engaged and ensure an instal-
lation solution can be found.
• The instructions are based on the tested method using
Actionair SmokeShield PTC and FireShield products.
• Our SmokeShield dampers are designed to be used
with re separating elements to maintain re compart-
ments. The SmokeShield is an actuated failsafe close
damper with low smoke leakage, often referred to in
the industry as a Fire/Smoke damper.
• Under the Fire Damper Product standard BS EN 15650
our Fire Damper products are tested to BS EN 1366-2
and classied under BS EN 13501-3.
• For smoke control, the product you use should be
tested to BS EN 12101-8 and drive open, drive closed
without failsafe position, see our website for informa-
tion on the Actionair SmokeCommand smoke con-
trol damper documentation and suitable installation
methods.
CE Installation Method Overview

3
20220503 - LNNN00354 (4.0) Swegon reserves the right to alter specications.
Actionair DWFX-F Installation Guide
Vertical Damper Installation in a
Plasterboard Wall
Actionair SmokeShield PTC - [AA/F10704]
Actionair FireShield - [AA/F10705]
Installation Method
1. Measure the overall Fire damper casing size w x h, but
for Smoke Shield include the PTC Shroud (28mm) in
the width but do not include any of the peripheral
ange.
2. Calculate the hole size using hole sizer program
available on www.swegon.com/uk
3. For Fire Shield calculate the nished hole size by adding
10-40mm to the case width and height.
4. For Smoke Shield calculate the nished hole size adding
10-52mm to the width and 10-40mm to the height.
5. Calculate the hole to cut size by adding two board
thicknesses to the nished hole width and height.
6. Mark out the hole on the partition and cut it out, cut-
ting the top and bottom edges rst to maintain stabi-
lity.
7. Frame out the hole with stud and track and cover this
with board. Finish edges with joint ller.
8. Drill clearance holes in the damper ange at 150mm
centres and such that they will allow screws to pull into
the stud and track around the hole.
9. Install the damper and fasten.
10. Back ll and complete penetration seal as per the
Comments:
Rev:
Drawn By:
J.Mount
Approved By:
1 of 2
Reference No:
Date:
Date:
By: Date:
27/04/2022
Date:
G
Checked By:
Sheet Rev
AAF10704
Description:
If your proposed installation details differ from
that shown here, please discuss this with the
authority having jurisdiction, referencing this
documentation.
Deviation from this drawing requires approval
of the relevant authority.
Connecting ductwork omitted for clarity.
Ductwork must be independently supported.
There must be an appropriate break-away
joint between the damper and the connecting
ductwork on both sides of the installation.
A minimum of 200mm between fire dampers
installed in separate ducts and 75mm between
fire damper and construction elements/edges
needs to be observed unless otherwise
specified in the drawing.
Installation Detail
³
at least 40mm thick
³
(optional*)
EXPLANATION:
2 Hour fire, smoke rating, & 2 hour fire integrity.
The damper must be installed in accordance with the manufacturer's
recommendations and HEVAC/HVCA publication HVC6/5/83 rev 1
APRIL 2002.
This solution has been assessed by BRE to BS476 PT 20 for 2 hours
and tested by BRE to BS-EN1366-2.
Acceptance of this solution must be sought by the system designer
(In writing) from the appropriate LA prior to installation.
Requirements for access openings for inspection and cleaning
purposes are provided in HVCA DW/144 specification for sheet metal
ductwork.
Access provision must be allowed to permit jointing of ducts to fire
damper. It may be necessary to install access doors on both sides of
the partition so that the ducts can be fitted from inside the damper.
VERTICAL BLADES;
Damper can be installed with the blades
in the vertical orientation with the actuator
mounted at either the top or bottom. F
DEC1770 MJB 20-02-18
Damper Size Range (mm)
VERTICAL APPLICATION
SMOKE SHIELD DWFX-F IN
PLASTERBOARD WALL
200 x 200 to 1000 x 1000
EEC1830 RTC 20/03/18
©Swegon Air Management Limited
South Street, Whitstable, Kent CT5 3DU
Tel: +44 (0)1227 276100
Email: actionair@swegon.com
www.swegon.com/uk
FECN5134 MJB 05-02-21
G ECN2227 JPM 13/04/22
Please refer to the DoP
for latest classifications
for CE/UKCA
compliance and the
Installation, Operation
and Maintenance Guide
SCAN ME
installation drawing
11. Connecting ductwork omitted for clarity. Ductwork
must be independently supported. There must be an
appropriate break-away joint between the damper and
connecting ductwork on both sides of assembly. Alu-
minium rivets or plastic cleats, clips, clamps and bolts
etc. should be used for this, unless re resisting duct-
work is being used where re resisting xings should
be used. A minimum of 200 mm between re dam-
pers installed in separate ducts and 75 mm between
re damper and a construction element (wall/oor).

Actionair DWFX-F Installation Guide
4Swegon reserves the right to alter specications. 20210408 - LNNN00354 (3.0)
Vertical Damper Installation (Top
Flange removed) in a Plasterboard
Wall under Concrete Slab
Actionair SmokeShield PTC - [AA/F11945]
Actionair FireShield - [AA/F 11944]
Installation Method
1. Measure the overall Fire damper casing size w x h, but
for Smoke Shield include the PTC Shroud (28mm) in
the width but do not include any of the peripheral
ange.
2. Calculate the hole size using hole sizer program availa-
ble on www.swegon.com/uk
3. For Fire Shield calculate the nished hole size by adding
10-60mm to the case width and 5-30mm for the
height as the head of the damper will be against the
slab.
4. For Smoke Shield calculate the nished hole size adding
10-57mm to the width and 10-30mm to the height as
the head of the damper will be against the slab.
5. Calculate the hole to cut size by adding two board
thicknesses to the nished hole width and only one for
the height.
6. Mark out the hole on the partition and cut it out.
7. Frame out the hole sides and bottom with stud and
track and cover this with board. Finish edges with joint
ller.
8. Drill clearance holes in the three damper ange sides at
150mm centres and such that they will allow screws to
pull into the stud and track around the hole.
9. Apply a bead of low pressure intumescent mastic
along top edge of damper as a gap ller and Install the
damper and fasten.
10. Back ll with mineral/stone wool and pattress over
this down to the spigot. Fasten with drywall screws
at 300mm centres on the sides and bottom such that
they will allow screws to pull into the stud and track
around the hole. Fix the top pattress into the track at
the sides.
11. Connecting ductwork omitted for clarity. Ductwork
must be independently supported. There must be an
appropriate break-away joint between the damper and
connecting ductwork on both sides of assembly. Alu-
minium rivets or plastic cleats, clips, clamps and bolts
etc. should be used for this, unless re resisting duct-
work is being used where re resisting xings should
be used. A minimum separation of 200 mm between
re dampers installed in separate ducts and 75mm bet-
ween re damper and a construction element (ie wall/
oor) unless otherwise tested.
Comments:
Rev:
Drawn By:
S.Wehrle
Approved By:
Kimberley.M
1 of 2
Reference No:
Gore.S
Date:
Date:
By: Date:
13/04/2022
07/11/2016
13/04/2022
Date:
H
Checked By:
Sheet Rev
AAF11945
Description:
If your proposed installation details differ from
that shown here, please discuss this with the
authority having jurisdiction, referencing this
documentation.
Deviation from this drawing requires approval
of the relevant authority.
Connecting ductwork omitted for clarity.
Ductwork must be independently supported.
There must be an appropriate break-away
joint between the damper and the connecting
ductwork on both sides of the installation.
A minimum of 200mm between fire dampers
installed in separate ducts and 75mm between
fire damper and construction elements/edges
needs to be observed unless otherwise
specified in the drawing.
Installation Detail
³
AECN1770 MJB 20-02-18
Damper Size Range (mm)
VERTICAL APPLICATION
SMOKE SHIELD DWFX-F IN
PLASTERBOARD WALL AGAINST
SUPPORTING CONSTRUCTION
200 x 200 to 1000 x 1000
VERTICAL BLADES
Damper can be installed with the
blades in the vertical orientation
with the actuator mounted at the
bottom. For cleat locations of
motors mounted on the bottom
refer to drawing
³
BECN1820 MJB 06-03-18
C ECN1821 N.H 08/03/18
D ECN1922 MJB 12-04-19
E ECN1928 MJB 14-05-19
F ECN1936 MJB 01-07-19
©Swegon Air Management Limited
South Street, Whitstable, Kent CT5 3DU
Tel: +44 (0)1227 276100
Email: actionair@swegon.com
www.swegon.com/uk
G ECN5134 MJB 05-02-21
Please refer to the DoP
for latest classifications
for CE/UKCA
compliance and the
Installation, Operation
and Maintenance Guide
SCAN ME
HECN2227 JPM 13/04/22
³

5
20220503 - LNNN00354 (4.0) Swegon reserves the right to alter specications.
Actionair DWFX-F Installation Guide
Vertical Damper Installation in
a Masonry Wall
Actionair SmokeShield PTC - [AA/F12493]
Actionair FireShield - [AA/F10707]
Installation Method
1. Drill clearance holes in the damper ange at 150mm
centres.
2. Install the damper and x through ange using re
rated fasteners, min ø4mm.
3. Back ll and complete penetration seal as per the
installation drawing
4. Connecting ductwork omitted for clarity. Ductwork
must be independently supported. There must be an
appropriate break-away joint between the damper and
connecting ductwork on both sides of assembly. Alu-
minium rivets or plastic cleats, clips, clamps and bolts
etc. should be used for this, unless re resisting duct-
work is being used where re resisting xings should
be used. A minimum of 200 mm between re dam-
pers installed in separate ducts and 75 mm between
re damper and a construction element (wall/oor).
Comments:
Rev:
Drawn By:
M. Bushell
Approved By:
Kimberley.M
1 of 2
Reference No:
Gore.S
Date:
Date:
By: Date:
13/04/2022
21/08/2018
13/04/2022
Date:
B
Checked By:
Sheet Rev
AAF12493
Description:
If your proposed installation details differ from
that shown here, please discuss this with the
authority having jurisdiction, referencing this
documentation.
Deviation from this drawing requires approval
of the relevant authority.
Connecting ductwork omitted for clarity.
Ductwork must be independently supported.
There must be an appropriate break-away
joint between the damper and the connecting
ductwork on both sides of the installation.
A minimum of 200mm between fire dampers
installed in separate ducts and 75mm between
fire damper and construction elements/edges
needs to be observed unless otherwise
specified in the drawing.
Installation Detail
³
.EC1879 MJB 23-08-18
Damper Size Range (mm)
VERTICAL APPLICATION
SMOKE SHIELD + DWFX-F WITH
PATTRESS IN MASONRY WALL
200 X 200 to 1000 x 1000
VERTICAL BLADES;
Damper can be installed with the blades in the
vertical orientation with the actuator mounted at
either the top or bottom. For cleat
©Swegon Air Management Limited
South Street, Whitstable, Kent CT5 3DU
Tel: +44 (0)1227 276100
Email: actionair@swegon.com
www.swegon.com/uk
AECN5134 MJB 05-02-21
Please refer to the DoP
for latest classifications
for CE/UKCA
compliance and the
Installation, Operation
and Maintenance Guide
SCAN ME
BECN2227 JPM 13/04/22

Actionair DWFX-F Installation Guide
6Swegon reserves the right to alter specications. 20210408 - LNNN00354 (3.0)
Vertical Damper Installation (Top
Flange Removed) In A Masonry Wall
Under Concrete Slab
Actionair SmokeShield - [AA/F12493]
Actionair FireShield - [AA/F12827]
Installation Method
1. Measure the overall Fire damper casing size width x
height, but for Smoke Shield include the PTC Shroud
(28mm) in the width but do not include any of the
peripheral ange.
2. Calculate hole size...
3. For Fire Shield calculate the nished hole size by adding
10-80mm to the case width and 5-40mm for the
height as the head of the damper will be against the
slab.
4. For Smoke Shield calculate the nished hole size adding
10-57mm to the width and 5-30mm to the height as
the head of the damper will be against the slab.
5. Drill clearance holes in the three damper ange's side
and bottom at 150mm centres.
6. Apply a bead of low pressure intumescent mastic
along top edge of damper as a gap ller and install
the damper and fasten through ange using re rated
fasteners, min ø4mm.
7. Dampers are supplied with cleats and only need to be
used to help/assist with the installation before faste-
ning the ange to the wall.
8. Back ll with mineral/stone wool and to retain this use
Section A-A
Section B-B
- DRIVE SIDE DETAIL
Section C-C
Section D-D
A
A
BB
C C
D
D
1
1
2
2
3
3
4
4
5
5
6
6
A A
B B
C C
D D
Comments:
Rev:
Drawn By:
M. Bushell
Approved By:
Kimberley.M
1 of 2
Reference No:
Gore.S
Date:
Date:
By: Date:
13/04/2022
01/05/2018
13/04/2022
Date:
D
Checked By:
Sheet Rev
AAF12394
Description:
If your proposed installation details differ from
that shown here, please discuss this with the
authority having jurisdiction, referencing this
documentation.
Deviation from this drawing requires approval
of the relevant authority.
Connecting ductwork omitted for clarity.
Ductwork must be independently supported.
There must be an appropriate break-away
joint between the damper and the connecting
ductwork on both sides of the installation.
A minimum of 200mm between fire dampers
installed in separate ducts and 75mm between
fire damper and construction elements/edges
needs to be observed unless otherwise
specified in the drawing.
Installation Detail
A
A
B
B
C
C
D
D
VERTICAL BLADES;
The damper can be installed with the
blades in the vertical orientation with the
actuator mounted at the bottom. For
cleat locations of motors mounted on the
bottom refer to drawing AA-SS-2011.
Supporting
Construction
Actuator
Interface
Interface
shroud
Damper
Dampers supplied with cleats
welded to side flanges to assist
with installation only
Min. 30kg/m³stone mineral wool
insulation filing gaps on three sides.
5-30mm.infillon
nondriveside
andbottom.
Block/masonry wall
Damper Size Range (mm)
VERTICAL APPLICATION
SMOKE SHIELD DWFX-F, IN
MASONRY WALL AGAINST
SUPPORTING CONSTRUCTION
200 x 200 to 1000 x 1000
EC1843 MJB 08-05-18
12.5mm. thick 150mm. gypsum fire
boards type F (EN520) on sides and
bottom, fixed with suitable fire resisting
steel fixing (min Ø4 x 40mm) to suit
supporting construction.
Up to 55mm.
infil on actuator
side only.
AECN1922 MJB 12-04-19
DWFX-F angle flange (welded to damper
casing) on sides and bottom fixed with
suitable fire resisting steel fixing min
dia. 4mm at least 40mm long to suit
supporting construction (@150mm. ctrs).
Cleat
BECN1940 MJB 01-07-19
©Swegon Air Management Limited
South Street, Whitstable, Kent CT5 3DU
Tel: +44 (0)1227 276100
Email: actionair@swegon.com
www.swegon.com/uk
C ECN5134 MJB 05-02-21
Min 100mm thick
Please refer to the DoP
for latest classifications
for CE/UKCA
compliance and the
Installation, Operation
and Maintenance Guide
SCAN ME
D ECN2227 JPM 13/04/22
a 150mm pattress down to the damper spigot/duct
line. Fasten with re rated fasteners, min ø4mm at
300mm centres on the sides and bottom. Measure the
gap for the top pattress and x this pattress to the wall
either side of the damper, (do not x at 300ctr to the
damper case).
9. Connecting ductwork omitted for clarity. Ductwork
must be independently supported. There must be an
appropriate break-away joint between the damper and
connecting ductwork on both sides of assembly. Alu-
minium rivets or plastic cleats, clips, clamps and bolts
etc. should be used for this, unless re resisting duct-
work is being used where re resisting xings should
be used. A minimum of 200 mm between re dampers
installed in separate ducts and 75 mm between re
damper and a construction element (wall/oor).

7
20220503 - LNNN00354 (4.0) Swegon reserves the right to alter specications.
Actionair DWFX-F Installation Guide
The cassette mechanism is
completely removable from
the FireShield
Damper by manually
releasing the retaining clip.
This allows replacement of the cassette
without the use of tools
Simple hand operation enables the
damper curtain to be reset and latched
in the fully Open Position.
This increases the ease and speed with
which the FireShield Damper can be
reset following periodic functional
testing in accordance with British
Standard BS9999:2008 Code of
Practice for re safety.
The thermal actuator in the form of
a helical memory metal compression
spring is produced from a special
Cu-Zn-AI brass alloy.
On temperature rise this expands and
at 72 °C, causes the FireShield damper
blades to release.
On cooling, the spring reverts to
the close-coiled state offering the
signicant advantage of repeated
operation, unless it has reached
temperatures in excess of 170 °C,
where it will remain extended,
preventing reset.
Cassettes are only available for 72
°C. For Dampers where alternative
thermal link temperatures are required
a chain-link can be offered in place
of a cassette. Electrical release is only
available with a cassette i.e. 72 °C.
Please refer to Actionair Sales Ofce.
Please note: For dampers with
dimensions of 150mm and below
ensure that there is adequate access to
enable re-setting.
Self Latching Removable Release Mechanism
Cassette
Manual Operation
Manual Operation for periodic fun-
ctional testing in accordance with
BS9999:2008 Code of Practice for
Ventilation and Air Conditioning
Ductwork.
Thermal Actuator
Operation
Memory metal coil springs, specially
designed to fully expand at 72 °C and
actuate damper closure.
Remote Release Operation
Remote release operation to close the
FireShield Damper is by Bowden cable
with Manual action or Electrical 230V
AC or 24V AC and DC Electro Magnet
fail-safe action and independent of
the thermal actuator. Bowden outer
sleeve can be tted from either side of
cassette.
Reset Operation
Single hand operation.
Each blade pushes the
latch back under spring
tension. On full blade
reset the latch springs out
to secure.
Release Mechanism
Support Bracket Latch
Retaining clip
Cassette
Set Position
Non Access
Access

Actionair DWFX-F Installation Guide
8Swegon reserves the right to alter specications. 20210408 - LNNN00354 (3.0)
Actuators
Control Mode Installation Procedure
1. Remove transit plate and recycle.
2. Slide the interface and mode assembly into the shroud.
Ensure the slots in the interface casing and the drive
coupling located on the rear of the interface are in line.
3. Push the assembly fully home until the interface sprung
retaining pin engages through the locating hole in the
damper shroud (snaplock™).
4. The control mode can be tted in any of three orienta-
tions i.e. vertically down, horizontally and vertically up
(For height restrictions). This can easily be carried out
by the following:
5. Remove and retain screw (8mm A/F) and washer,
through the position indicator on the control mode.
6. Remove the control mode and interface adapter plate.
7. Taking care not to disturb the drive hexagon. Replace
the interface adapter plate and control mode in the
new orientation.
8. Replace the washer and screw tight (Max 5Nm) Select
a suitable position for the Electrical Thermal Release
(ETR) to be mounted through the ductwork.
9. Ideally this should be in the top half of the duct and/ or
above the level of the interface.
10. Apply the self-adhesive template (located on the rear
of the ETR) and drill the necessary holes (Ø3mm &
Ø9.5 & Ø11mm). Push the ETR through the duct and
ensure both screws are used to hold it in position.
Both screws should be tightened fully to ensure that
both sections of the ETR are closed together. It is a
safety feature, if both sections are not closed the unit
will not operate. For ductless installations the ETR
should be tted onto the damper spigot (not casing)
above the damper interface shroud and in accordance
with the tting instructions. If the ETR is not tted in
the exact manner described above, the unit will not
operate.
11. The damper should be manually reset and released
using the winder provided to ensure that correct
mechanical operation is achievable. It is possible to
mechanically lock open the SmokeShield PTC damper
to allow air to pass through it using the winder pro-
vided, this may be necessary if electrical power isn’t
available yet. The ETR is not operable in this instance,
the damper will not release automatically if the tempe-
rature rises or a re occurs.
12. The unit must be wired as detailed. When power is
available, the unit must be checked for correct electri-
cal operation. Power on to reset, power off to release.
13. The unit must also be checked by pushing and holding
the test switch on the ETR to conrm that the damper
releases. When pressure is removed from the switch
the damper resets. This may also be done after the
initial installation test, to provide periodic operation of
the damper to simulate actual fail-safe release under
smoke/re conditions.
14. The ETR cable must not cut to shorten or lengthen,
and care must be taken not to damage it. Either will
render the unit inoperable and void any warranties.
This is due to a built in safety feature.

9
20220503 - LNNN00354 (4.0) Swegon reserves the right to alter specications.
Actionair DWFX-F Installation Guide
Periodic Maintenance
Manufacturer Recommended Service Inter-
vals
• After commissioning and handover (see DW145 check
sheet), in order to remain compliant with 15650:2010,
we recommend that you follow a regular service and
inspection programme to ensure correct operation
of dampers in the event the damper is required to
actuate.
• In addition to regular physical inspections (in accor-
dance with 15650:2010) we recommend using a
dedicated damper control panel with a digital reporting
mechanism (such as an Actionpac LNS system) to fre-
quently monitor and report on regular remote damper
testing.
• Ensure maintenance is performed in line with the latest
best practice and relevant local or specialist guidance.
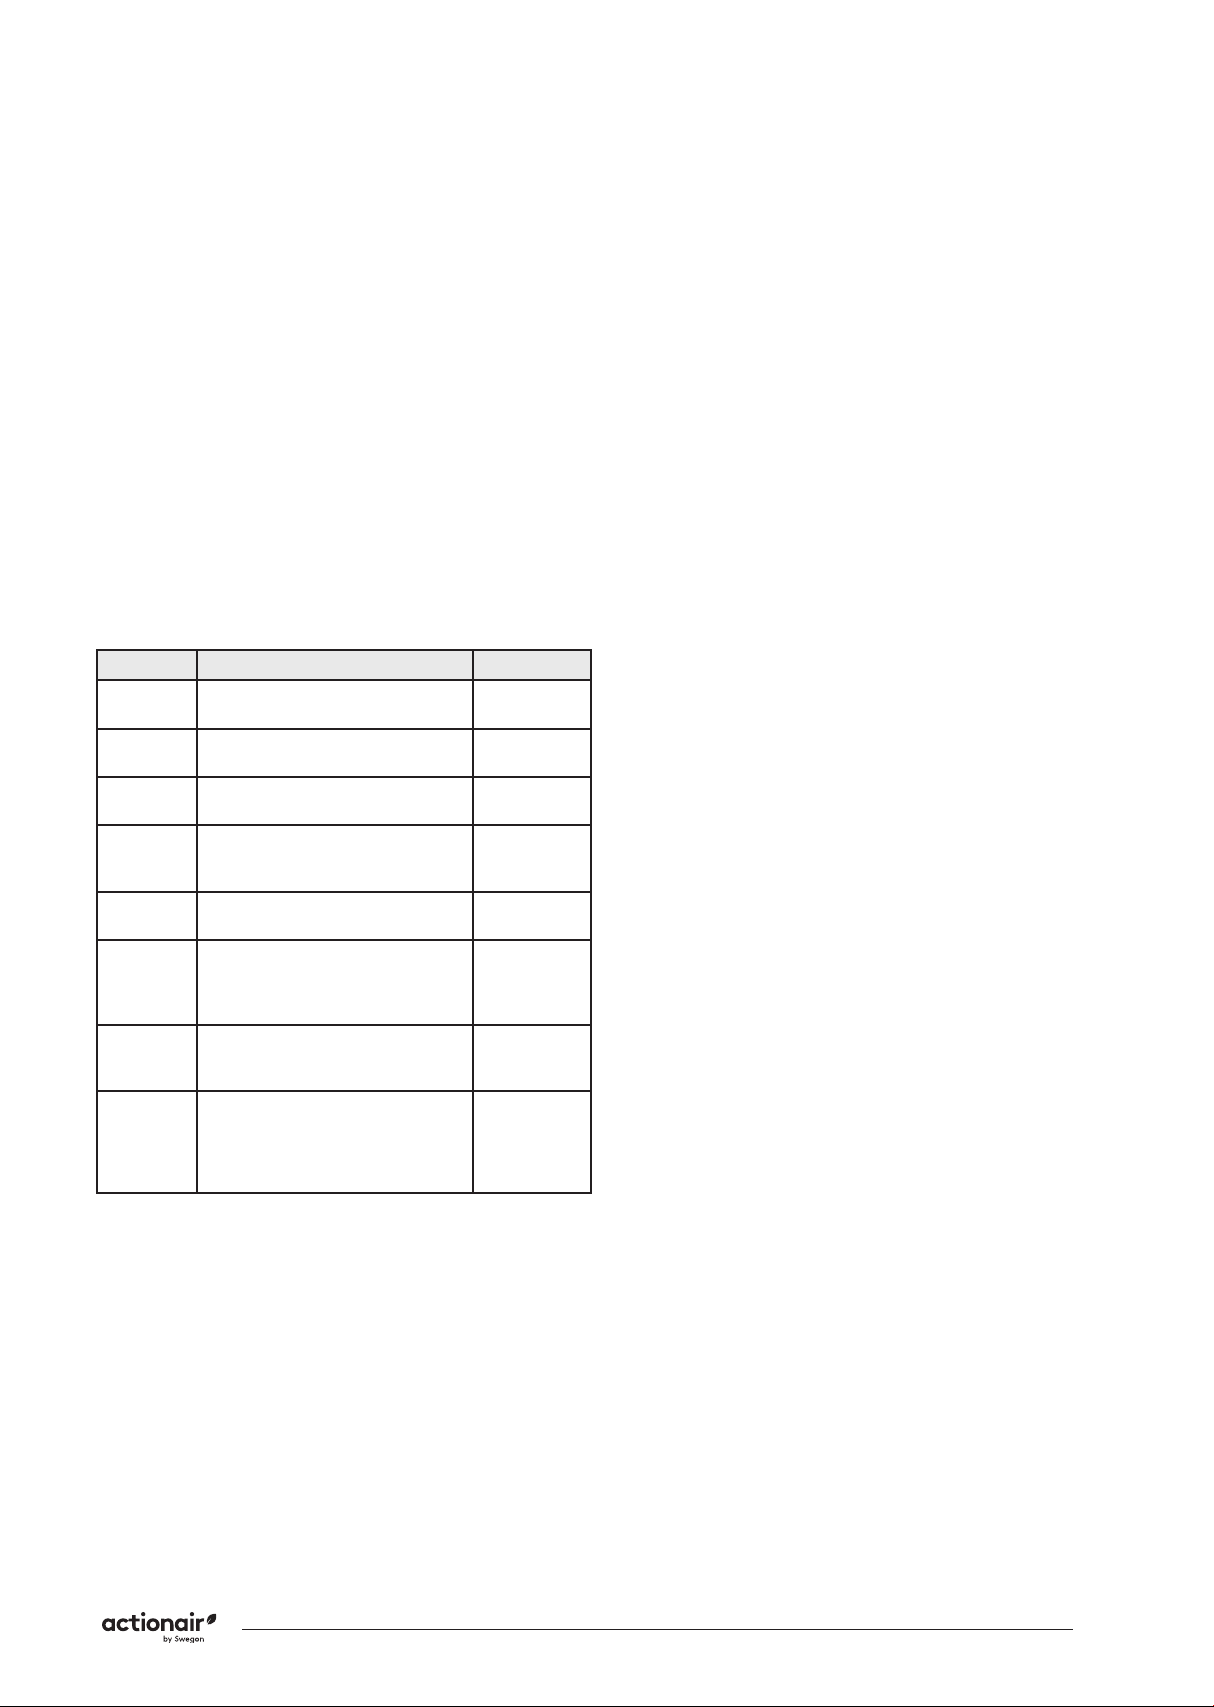
• Our recommended service intervals for life safety pro-
ducts are as follows:
Interval Action Competence
6 Months Check Actuator Wiring (if appli-
cable) for Damage
Specialist
Persons
6 Months Check Limit Switch Wiring (if
applicable) for Damage
Specialist
Persons
6 Months Check Damper Cleanliness, Clean
and Lubricate if necessary.
Specialist
Persons
6 Months Check Condition of Blades and
Seals, report and rectify if neces-
sary.
Specialist
Persons
6 Months Check for blade obstructions Specialist
Persons
6 Months Check Damper Release Me-
chanism (through activation or
release of the ETR or Thermal
Fuse Device)
Specialist
Persons
6 Months Check damper is left in normal
operational position after inspec-
tion.
Specialist
Persons
Monthly Complete actuation of damper
from control panel (if installed)
and check all faults. Consult spe-
cialist persons to investigate any
reported faults.
Facility Ma-
nager
• *Specialist Persons: A recognised and experienced
person with prior experience in the inspection and
assessment of the functional safety of smoke and re
damper products. If in doubt, please consult with our
technical support team for advice. To talk about our
OEM maintenance inspections, contact our nationwide
service team.
BS EN 15650:2010 - Ventilation for Buildings
- Fire Dampers
• Section 8.3 states regular testing/ inspection should
be undertaken to meet regulatory requirements, or at
intervals not exceeding six months.
• A comprehensive example of the maintenance pro-
cedure is given in Annex D of the standard. Some
automatic systems may allow more frequent testing
(48hr or less) and this may be required by a national
standard.
Approved Document B, Volume 2
• Clause 10.12 states adequate means of access must be
provided to allow inspection, testing and maintenance
of both re damper and its actuating mechanism.
BS 9999:2017 - Code of Practice for the Fire
Safety in the Design, Management and Use
of Buildings - Annex I
Smoke Control Systems
• For means of escape states actuation of the system
should be simulated once a week. It should be ensured
that any fans and powered exhaust ventilators ope-
rate correctly, smoke dampers close (or open in some
systems), natural exhaust ventilators open, automatic
smoke curtains move into position, etc.
Three Monthly
• In addition to the checks recommended in V.2, V.3 and
V.4, the actuation of all smoke control systems should
be simulated once every three months. All zones should
be separately tested and it should be ensured that any
fans and powered exhaust ventilators operate correctly,
smoke dampers close (or open in some systems) etc.
Yearly
• In addition to the following checks should be made for
annual inspections and tests of the following to be car-
ried out by competent persons, for any defects to be
logged and the necessary action taken, and for certi-
cates of testing to be obtained.
– Fire detection and re alarm systems;
– Self-contained luminaires with sealed batteries, if more
than 3 years old;
– Sprinkler, drencher and watermist systems;
– Smoke ventilators and smoke control systems;
– Fire dampers
BS 9999:2017 - Code of Practice for the Fire
Safety in the Design, Management and Use
of Buildings - Annex W
Maintenance of air conditioning and ventilation
equipment including air lters, motors, re dampers
and their controls, smoke detectors and alarms is
of paramount importance both in preventing re
and in ensuring that measures taken to mitigate its
consequences are effective when needed. Arrangements
should be made for all re dampers to be tested by a
competent person on completion of the installation
and at least annually, and to be prepaired or replaced
immediately if found to be faulty. Spring-operated re
dampers should be tested annually and re dampers
situated in dust-laden and similar atmospheres should
be tested much more frequently, at periods suited to the
degree of pollution.

Actionair DWFX-F Installation Guide
10 Swegon reserves the right to alter specications. 20210408 - LNNN00354 (3.0)
DWFX-F Wiring Diagrams
Close Time ≈ 22 secs.
Open Time ≈ 60 secs.
(Connect 24V via a safety isolating
transformer.)
IP54 Rated.
Supply On – Damper motors open.
Electrical Thermal Release.
External mechanical position indicator
with pointer.
WHITE (2)
BLACK (1)
1
2
3
4
5
6
_
+
COMMON
SUPPLY 24V AC or DC
TYPICALLY 10W (MOTORING
2W (RESET)
CONTINUITY WITH 'COMMON'
WHEN DAMPER CLOSED
COMMON
VOLT FREE CONTACT
MADE BETWEEN 1 & 2
WHEN DAMPER
FULLY CLOSED
M
AC/DC 24V
50 / 60 Hz
12.5 VA
VOLT FREE CONTACT
MADE BETWEEN 4 & 6
WHEN DAMPER
FULLY OPEN
10 / 2 W
Imax
8.3A @ 5ms
-30°C...+50°C
CONTINUOUS TF 72°C
AC
250V
6(3)
A
ELECTRICAL THERMAL RELEASE (ETR)
(MUST BE FITTED TO DUCTING FOR
DAMPER OPERATION).
(SPRING BIASED TEST SWITCH)
CONTINUITY WITH 'COMMON'
WHEN DAMPER OPEN
CONTINUITY WITH 'COMMON'
WHEN DAMPER CLOSED
CONTINUITY WITH 'COMMON'
WHEN DAMPER OPEN
Supply O – Damper spring closes.
Mode 6 PTC 230V
Supply On – Damper motors open.
Electrical Thermal Release.
External mechanical position indicator
with pointer.
Close Time ≈ 22 secs.
Open Time ≈ 60 secs.
(To isolate from main power supply, the
system must incorporate a device which
disconnects the phase conductors, with at
least 3mm contact gap.)
Note: 120V A.C. version also available.
IP54 Rated.
BLUE
BROWN
1
2
3
4
5
6
L1
COMMON
COMMON
SUPPLY 230V AC 50/60Hz
TYPICALLY 12W (MOTORING
4W (RESET)
VOLT FREE CONTACT
MADE BETWEEN 1 & 2
WHEN DAMPER
FULLY CLOSED
VOLT FREE CONTACT
WHEN DAMPER
MADE BETWEEN 4 & 6
M
FULLY OPEN
AC/DC 230V
50 / 60 Hz
14 VA
12 / 4 W
-30°C...+50°C
CONTINUOUS TF 72°C
AC
250V
6(3)A
N
CONTINUITY WITH 'COMMON'
ELECTRICAL THERMAL RELEASE (ETR)
(MUST BE FITTED TO DUCTING FOR
DAMPER OPERATION).
(SPRING BIASED TEST SWITCH)
WHEN DAMPER CLOSED
CONTINUITY WITH 'COMMON'
WHEN DAMPER OPEN
CONTINUITY WITH 'COMMON'
WHEN DAMPER CLOSED
CONTINUITY WITH 'COMMON'
WHEN DAMPER OPEN
Supply O - Damper spring closes.
Mode 5-3P
Supply On – Damper motors open.
Spring close time ≈ 18 seconds
Motor open time ≈ 120 seconds
(Connect 24V via a safety isolating transformer.)
IP54 Rated.
The M5-3P is controlled by standard 0...10V
control signal. The actuator motors to the position
activated, power supply lost or removed the device
springs the damper to the fail-safe position.
Electrical thermal release (ETR)
_
+
~
T
1
2
3
4
5
6
COMMON
COMMON
VOLT FREE CONTACT
WHEN DAMPER
MADE BETWEEN 1 & 2
FULLY RELEASED
VOLT FREE CONTACT
MADE BETWEEN 4 & 6
WHEN DAMPER
FULLY RESET
TF 72°C
AC
250V
6(3)A
CONTINUITY WITH 'COMMON'
ELECTRICAL THERMAL RELEASE (ETR)
(MUST BE FITTED TO DUCTING FOR
DAMPER OPERATION).
(SPRING BIASED TEST SWITCH)
WHEN DAMPER CLOSED
CONTINUITY WITH 'COMMON'
WHEN DAMPER OPEN
CONTINUITY WITH 'COMMON'
WHEN DAMPER CLOSED
CONTINUITY WITH 'COMMON'
WHEN DAMPER OPEN
WHITE (5)
WHITE (3) Y DC 0...10V
U DC 2...10V
AC/DC 24V
50 / 60 Hz
9.5 VA
7 / 2.5 W
Imax
8.3A @ 5ms
M
-30°C...+50°C
CONTINUOUS
RED (2)
BLACK (1) SUPPLY 24V A.C. or D.C.
TYPICALLY 6W (MOTORIN G
2W (HOLDING)
DIAGRAMS SHOWS ACTUATOR IN FULLY CLOSED STATE
NOTE THAT THE FOR INTERMEDIATE
POSITIONS, NEITHER OF THE
CONDITIONS BELOW WILL BE TRUE.
Supply O - Damper spring closes.
specied by the control signal. If the ETR is
(Must be tted to ducting for damper operation).
Mode 5 PTC 24V

11
20220503 - LNNN00354 (4.0) Swegon reserves the right to alter specications.
Actionair DWFX-F Installation Guide
DWFX-F Damper Dimensional Data
O 398mmVERALL FLANGE WIDTH =
OVERALL FLANGE HEIGHT = 395mm
OVERALL FLANGE WIDTH = 448mm
OVERALL FLANGE HEIGHT = 445mm
OVERALL FLANGE WIDTH = DUCT DIA + 248mm
G
W
OVERALL FLANGE HEIGHT = DUCT DIA + 245mm
FOR DUCT DIAMETERS BET EEN 970mm - 1000mm
OVERALL WIDTH OF FLAN E WIDTH IS 1198mm
OVERALL HEIGHT OF INSTALLATION FRAME IS 1195mm
OVERALL FLANGE WIDTH = DUCT DIA + 248mm
OVERALL FLANGE HEIGHT = DUCT DIA + 245mm
FOR DUCT WIDTHS BETWEEN 970mm - 1000mm
OVERALL WIDTH OF INSTALLATION FRAME IS 1198mm
Flat Oval Dampers Series 701
C
Circular Dampers Series 601 FOR DAMPERS 100-150MM
2
FOR IRCULAR DAMPERS SERIES 601, DIAMETERS 151-199MM
FOR CIRCULAR DAMPERS SERIES 601, DIAMETERS 00-1000MM
Actionair SmokeShield PTC

Actionair DWFX-F Installation Guide
12 Swegon reserves the right to alter specications. 20210408 - LNNN00354 (3.0)
Rectangular Dampers Series 501
For Rectangular Dampers spigots are 5mm under duct size.
Widths and heights available in 1mm increments.
OVERALL FLANGE WIDTH DUCT WIDTH + 198mm
OVERALL FLANGE HEIGHT DUCT HEIGHT + 195mm
For Ducts with widths and heights of 200 - 1000mm
FOR DUCT WIDTHS 200MM - 1000MM WITH HEIGHTS OF 100-199MM
OVERALL FLANGE WIDTH IS 398mm
UCT WIDTHS A
OVERALL FLANGE HEIGHT IS 395mm
FOR D ND HEIGHTS OF 100-150MM
FOR DUCT WIDTHS AND HEIGHTS OF 151-199MM
OVERALL FLANGE WIDTH IS 448mm
OVERALL FLANGE HEIGHT IS 445mm
FOR OVERALL HEIGHTS SEE 100 - 150mm
OR 151 - 199mm AS ABOVE

13
20220503 - LNNN00354 (4.0) Swegon reserves the right to alter specications.
Actionair DWFX-F Installation Guide
Actionair FireShield
Base Dampers Dampers with DWFX-F
Series 101
FireShield Dampers with blades partly in airstream (Damper spigots
-
stream
Series 201
spigots 5mm under duct size) 100 – 249 high, use Series 101 Damper as
Series 301
spigots 3mm under duct size)
Series 401
spigots 3mm under duct size)

Actionair DWFX-F Installation Guide
14 Swegon reserves the right to alter specications. 20210408 - LNNN00354 (3.0)
Fault Possible problem Recommended action
Interface Mode
Assembly does not t
into the shroud on the
damper.
Damper drive shaft
not in line with
shroud
Gentle adjustment made by manually
setting blades to fully closed
Mode not in released
position
Release clutch on motor using manual
key. Check the slot on rear of interface
Slots on the non-
access side of the
shroud may be
blocked (due to
removal of transit
plate prior to
backlling)
Ensure adequate clearance
Control mode does
not operate electrically
The ETR is not
correctly tted to duct
Screw x to duct ensuring both parts
of the ETR are fully together. Do not
over tighten
The mode is
incorrectly wired
Check wiring in accordance with
procedures
The ETR cables have
been damaged or
tampered with
Replace with new mode
Control Mode
operates, but limited,
or no movement of
damper blades is
observed
The mode is not
correctly synchronised
with the interface
Remove motor from interface. Check
motor in fully released state. Set
position of interface, and ret motor
with label upmost, include motor
location pointer and washer
The damper is
damaged or poorly
installed
New damper or re-install
Interface not tted
correctly to damper
Fit interface correctly, ensure retaining
pin protrudes through location hole in
the shroud
Foreign matter is
impeding blade
movement
Check and remove
Motor location
pointer omitted
Fit new pointer
Mode not screwed
down correctly
Check and tighten
Troubleshooting
Product Commissioning & Maintenance Available
Below is a quick guide to problems that may be encountered.
Please note modications made to units will invalidate warranties etc

15
20220503 - LNNN00354 (4.0) Swegon reserves the right to alter specications.
Actionair DWFX-F Installation Guide
Inspection and handover check sheet
This certicate applies only to Swegon Fire Dampers. The installer must complete this installation certicate when instal-
ling re and smoke dampers. A separate certicate must be completed for each individual re and smoke damper.
Damper Unique System I.D: ...............................................................................................................................................................................
Name of installation location:.............................................................................................................................................................................
Address:....................................................................................................................................................................................................................
Installation location identication section/oor/room: ..............................................................................................................................
Damper product type: .........................................................................................................................................................................................
Release fuse temperature: ..................................................................................................................................................................................
Notes/Considerations: ...........................................................................................................................................................................................
Installed by: .............................................................................................................................................................................................................
Company Name: ....................................................................................................................................................................................................
Address: ....................................................................................................................................................................................................................
Company Telephone No: .....................................................................................................................................................................................
Installers Name: ......................................................................................................................................................................................................
Installers Telephone No: .......................................................................................................................................................................................
Date of installation: ...............................................................................................................................................................................................
It is hereby veried that the damper detailed above has been installed and tested according to the manufactures recom-
mendations:
Installers signature: ................................................................................................ Date: ................................................
Question Action
1 Are the dampers the correct type? Conrm damper is correct type for the application
2 Are the dampers located correctly? The damper location is to be checked against the installation
drawings/details
3Are the dampers correctly identied? Unique system ID to be clearly indicated on the damper or
other agreed location.
4 Have supports for both the damper and the adjacent
ductwork been installed in accordance with the appro-
ved manner?
5Are the dampers tted in the correct orientation? Conrm the damper is installed with any actuators (if applica-
ble) on the left or right hand side. Not on the top or the bot-
tom (i.e. blade pivot running vertically) unless permitted under
the respective DoP.
6 Is access through the ductwork, to the damper unob-
structed?
Unobstructed space should be provided for safe access to the
damper. This must include access through ceiling voids and ad-
jacent services. Damper installer to advise the system designer
if problems are foreseen.
7 Has the space around the damper and within the
opening been left clear and not been used for other
services?
Other services within the installation opening will invalidate
the installation method. Damper installer to advise the lead
contractor if problems are foreseen.
8 Using the access opening provided, check that blades
open and close.
Check position of damper blades.
9 Has the damper been checked for internal cleanliness,
free from damage and that vertical casings in particular
are free from debris?
With the damper in the closed position, inspect for damage.
10 Has the damper been released to simulate operation of
the thermal release? (Damper drop test)
Ensure damper operation is free from interference.
11 Have the damper blades been re-set following drop
test and the access panel replaced?
After re-setting the damper, check the position shown on the
blade position indicator is correct.
12 At the time of damper handover, is the re barrier and
penetration seal complete?
Damper installer to record on the handover register if
any following trades are still to complete their activities.
13 Is the damper installation complete and available for
handover prior to system commissioning?
Obtain the relevant acceptance of the damper installation from
the CDM coordinator.
14 Is the completed handover register cross-referenced
back to the identication codes listed in the system
designers damper schedule?
This manual suits for next models
1
Table of contents
Other Swegon Fire And Smoke Damper manuals

Swegon
Swegon SAFEGARDSYSTEMS FD 25 User manual

Swegon
Swegon Actionair SmokeShield PTC User manual

Swegon
Swegon Actionair ThermShield MF User manual

Swegon
Swegon BLBd Guide

Swegon
Swegon SIRI a Guide

Swegon
Swegon Actionair A60 User manual

Swegon
Swegon Actionair ThermShield FD User manual

Swegon
Swegon actionair FireShield User manual

Swegon
Swegon actionair DWFX-C User manual

Swegon
Swegon Actionair CSS Series User manual