manuals.online logo
Brands
  1. Home
  2. •
  3. Brands
  4. •
  5. Swegon
  6. •
  7. Heater
  8. •
  9. Swegon CASA SDHE250-3T User manual

Swegon CASA SDHE250-3T User manual

SDHE_f_EN–m
Swegon CASA®
Electric duct mounted air heaters
Important information
Only qualified personnel
Only qualified personnel should carry out installation,
configuration and commissioning.
Observe the following during installation
The air heater is installed in the outdoor or supply air
duct. If the heater is installed in the outdoor air duct
before the ventilation unit, the heater and the duct
must be insulated with nonflamable insulation and a
duct mounted filter must be used for the air heater.
The air heater must be accessible without obstruction. The
air heater must not be installed in the immediate vicinity
of the ventilation unit or duct bends, as this will prevent an
even air flow across the heater resulting in impaired output.
Commissioning
The duct connection spigots of the air heater must be
capped during transport, storage and installation.
Make sure that the air heater and the ducts are clean
and that there are no loose objects in them before
you commission the ventilation system.
Do not commission the air heater until all work that
produces large quantities of sanding dust or other
impurities has been completed.
Electrical safety
The air heater must be installed according to the local
electrical safety provisions.
Electrical connection
The electric air heater requires a separate supply.
!
Products
For 125 mm ducts; SDHE125-1T (LVI nro. 7906723)
• Duct heater, 1,2 kW: 300H125-12-1
For 160 mm ducts; SDHE160-1T (LVI nro. 7906724)
• Duct heater, 1,2 kW: 300H160-12-1
For 200 mm ducts; SDHE200-1T (LVI nro. 7906725)
• Duct heater, 1,2 kW: 300H200-12-1
For 250 mm ducts; SDHE250-1T
• Duct heater, 1,2 kW: 300H250-12-1
For 250 mm ducts; SDHE250-2T
• Duct heater, 2,0 kW: 300H250-20-1
For 250 mm ducts; SDHE250-3T (LVI nro. 7907398)
• Duct heater, 3,0 kW: 300H250-30-1
For 315 mm ducts; SDHE315-1T
• Duct heater, 1,2 kW: 300H315-12-1
For 315 mm ducts; SDHE315-2T
• Duct heater, 2,0 kW: 300H315-20-1
For 315 mm ducts; SDHE315-3T (LVI nro. 7907396)
• Duct heater, 3,0 kW: 300H315-30-1
For 315 mm ducts; SDHE315-5T (LVI nro. 7907397)
• Duct heater, 4,5 kW: 300H315-35-3
The delivery also includes
• SET connection unit
• Temperature sensor, cable length 3 m
• Rubber grommet for temperature sensor
NOTE! The manual’s original language is English.
General Description
Duct mounted electric air heater for pre- or post heating
the air.
As pre heater
Guarantees continuous ventilation under very cold
conditions and to permit balancing functions (fireplace
function/cooker hood function) in ventilation units that
are not equipped with an internal air heater.
As post heater
Helps to achieve the desired supply air temperature
under very cold conditions whereby the heat exchanger
may not be capable to heat air sufficiently.
Planning
Take the pressure loss caused by the air heater into
consideration when sizing the airflows and selection of
the ventilation unit.
The airflow through the heater must be greater than 1.5 m/s.
Make sure there is free access to the air heater for service.
The air heater must not be installed with the service hatch
cover directed downwards.
2
SDHE.300823
Swegon reserves the right to make changes.www.swegon.com
1. Installation
The air heater must be installed in the outdoor air duct.
Make sure that the flow direction is correct (marked
with an arrow on the air heater). The air heater must
not be installed with the service hatch cover directed
downwards, all other positions are acceptable.
NOTE! The air heater and outdoor air duct must be
insulated up to the ventilation unit. Insulation must
be designed according to national regulations, with
nonflamable insulation for example mineral wool. The
insulation may not cover the lid as the specification plate
and warning sign must be visible and the lid must be
accessible for opening.
NOTE! A duct mounted filter must be installed on the
air flow before the heater when the heater is used as
pre heater. Swegon recommends the duct filter that is
available as an accessory. (See chapter Dimensions and
technical data.)
Installation in the outdoor air duct (pre heater)
• Connect SET connection module (4) to the venti-
lation unit (1) by connecting the RJ45 cable to the
SET2 conncetors.
• Install a 0...10V control cable* (A) to the heater (2)
and connect it to the AO3 connector in SET module
(4).
• Connect the power cord via fuse protection and a
service switch* (3) to the air heater. The system is
a fixed installation, which means that an electrical
inspection of the connection must be made.
• Install any actuators for duct dampers according to the
manufacturer’s instructions and connect the control
cables to the SET connection module’s relay outputs.
*) Not included.
NOTE! If the SET module is used for 230 VAC control,
the module must be installed, according to the electri-
cal safety directives, in a separate enclosure.
NOTE!Make sure that the strain relief is arranged for the
connections according to the electrical safety directives.
2. Electric and control cables
3. Commissioning
The commissioning of the air heater is performed with
a Smart control panel. Main menu/Settings/(1234)/
Heating / cooling.
External electric pre heater
Put the air heater for preheating into service from the
menu option Ext. electric preheater.
Relay control functions
If you wish to use relay control functions, e.g. for a duct
damper, the SET unit’s relays can be programmed for
the required function from the Sensors / controls menu.
4. Use
Once the air heater has been commissioned it works auto-
matically and maintains optimal ventilation unit efficiency.
The ventilation unit’s automatic control system controls
and monitors the function of the air heater. If a fault
occur on the heater, this is indicated by the alarm Elect.
preheater fail.
The heater is equipped with over temperature protecti-
on, which is located inside the air heater. If an overhea-
ting protection with manual reset trips, it can be reset
by pressing a button on the air heater.
NOTE! Check why the overheating protection tripped
before resetting the fault.
5. Service
NOTE! Disconnect the power to air heater and ventilati-
on unit before servicing.
Service should always be carried out on the air heater and
the filter when servicing the ventilation unit. Check that
dirt has not collected in the air heater, clean if necessary.
Clean the duct filter by vacuum cleaning or if necessary
replace with new G3/G4-filter material.
Replacement filters can be found in the online store, casas-
tore.fi / casabutiken.se.
Smart Extension Temperature module
Sensor
T6 T7
T8 T9
Smart unit
SET2 SET1
DI
max 50 VDC
NC NC NC
1 2 3 4 5 6 7 8 9 10 11 12
max 250 V/ 6 A
Relay 1
4 3 2 1
max 250 V/ 6 A
Relay 2
NC
4 3 2 1
AO3AO2AO1
NC
NC NC
SET
1
0
Power
input
2
1
3
4
5 78 9 10 1
AO3AO2O1
A
SDHE.300823
Swegon reserves the right to make changes. 3www.swegon.com
Installation in the supply air duct (post heater)
1. Installation
The air heater must be installed in the supply air duct.
Make sure that the flow direction is correct (marked
with an arrow on the air heater). The air heater must
not be installed with the service hatch cover directed
downwards, all other positions are acceptable.
The supply air temperature sensor must be installed in
the air flow after the heater. (min. distance from the
heater is 5 x duct diameter)
NOTE! The air heater and supply air duct must be
insulated if they are conducted through cold space.
Insulation must be designed according to national re-
gulations, with nonflammamble insulation for example
mineral wool. The insulation may not cover the lid as the
specification plate and warning sign must be visible and
the lid must be accessible for opening.
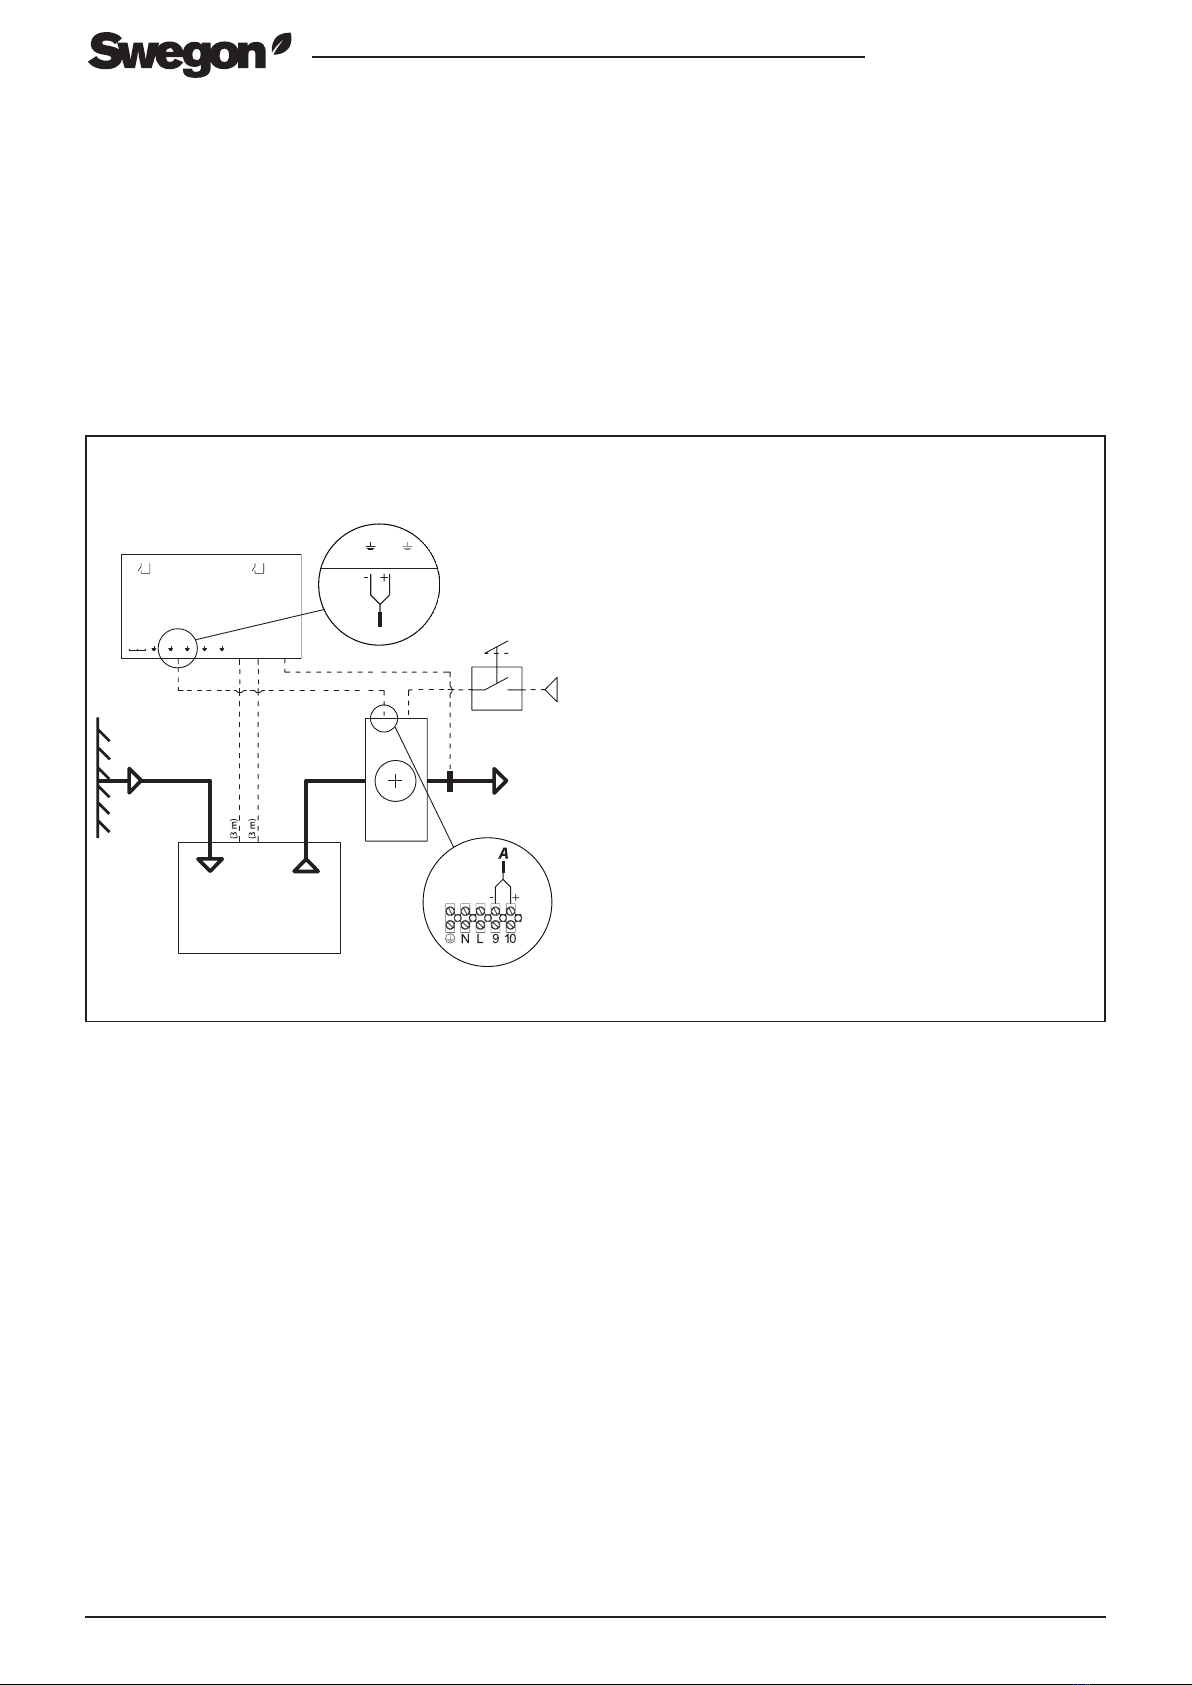
• Connect SET connection module (4) to the ventila-
tion unit (1) by connecting the RJ45 cables to the
SET1 and SET2 connectors.
• Install a 0...10V control cable* (A) to the heater (2) and
connect it to the AO2 connector in SET module (4).
• Install temperature sensor (5) to the supply air duct
(min. distance from the heater is 5 x duct diameter).
Connect sensor to the T6, T7, T8 or T9 connector in
SET module (4).
• Connect the power cord via fuse protection and a
service switch* (3) to the air heater. The system is
a fixed installation, which means that an electrical
inspection of the connection must be made.
• Install any actuators for duct dampers according to the
manufacturer’s instructions and connect the control
cables to the SET connection module’s relay outputs.
*) Not included.
NOTE! If the SET module is used for 230 VAC control,
the module must be installed, according to the electri-
cal safety directives, in a separate enclosure.
NOTE!Make sure that the strain relief is arranged for the
connections according to the electrical safety directives.
2. Electric and control cables
3. Commissioning
The commissioning of the air heater is performed with
a Smart control panel. Main menu/Settings/(1234)/
Heating / cooling.
External electric post heater
Put the air heater for post heating into service from the
menu option Ext. electric postheater.
Supply air temperature sensor
Select SET T6, T7, T8 or T9 to be used as supply air
temperature sensor, depending on which connector the
sensor is connected. The choice is made from Sensors /
controls menu.
Relay control functions
If you wish to use relay control functions, e.g. for a duct
damper, the SET unit’s relays can be programmed for
the required function from the Sensors / controls menu.
4. Use
Once the air heater has been commissioned it works auto-
matically and maintains optimal ventilation unit efficiency.
The ventilation unit’s automatic control system controls
and monitors the function of the air heater. If a fault
occur on the heater, this is indicated by the alarm Elect.
postheater fail.
The heater is equipped with over temperature protecti-
on, which is located inside the air heater. If an overhea-
ting protection with manual reset trips, it can be reset
by pressing a button on the air heater.
NOTE! Check why the overheating protection tripped
before resetting the fault.
5. Service
NOTE! Disconnect the power to air heater and ventilati-
on unit before servicing.
Service should always be carried out on the air heater and
the filter when servicing the ventilation unit. Check that
dirt has not collected in the air heater, clean if necessary.
Smart Extension Temperature module
Sensor
T6 T7
T8 T9
Smart unit
SET2 SET1
DI
max 50 VDC
NC NC NC
1 2 3 4 5 6 7 8 9 10 11 12
max 250 V/ 6 A
Relay 1
4 3 2 1
max 250 V/ 6 A
Relay 2
NC
4 3 2 1
AO3AO2AO1
NC
NC NC
SET
1
1
0
2
3
4
5 56 7 812
AO2AO1O1
A
5
Power
input
4
SDHE.300823
Swegon reserves the right to make changes.www.swegon.com
Air flow
Pressure differential, Pa
FLK12 FLK16 FLK20 FLK25 FLK31
H205 mm 235 mm 275 mm 325 mm 390 mm
B215 mm 265 mm 315 mm 365 mm 425 mm
D125 mm 160 mm 200 mm 250 mm 315 mm
K140 mm 155 mm 180 mm 230 mm 320 mm
L252 mm 267 mm 302 mm 352 mm 452 mm
Direction of airow
B
HD
K
L
Dimensions for FLK duct filter
Pressure loss in FLK duct filter with G4-filter
12 16 20
150
100
50
0
050 100 150 200 250 300 350 400 450 500 550 l/s
600
25 31
Dimensions and technical data
270
370
Technical data
Model
mm
Capacity
kW
Minimum airflow
l/s m3/h
SDHE125-1T
125
1,2 19 70
SDHE160-1T
160 1,2 31 110
SDHE200-1T
200
1,2
47 170
SDHE250-1T
250
1,2 74
265
SDHE250-2T
250
2,0 74
265
SDHE250-3T
250
3,0 74
265
SDHE315-1T
315
1,2 118
425
SDHE315-2T
315
2,0 118
425
SDHE315-3T
315
3,0 118
425
SDHE315-5T
315
4,5 118
425
Dimensions for duct heater

This manual suits for next models

9

Other Swegon Heater manuals

Swegon CASA Installation and operating instructions

Swegon

Swegon CASA Installation and operating instructions

Swegon CASA CWW 125 Manual

Swegon

Swegon CASA CWW 125 Manual

Swegon CASA Installation and operating instructions

Swegon

Swegon CASA Installation and operating instructions

Swegon Gold TBLE Series Instruction and safety manual

Swegon

Swegon Gold TBLE Series Instruction and safety manual

Swegon CASA SDHW250F User manual

Swegon

Swegon CASA SDHW250F User manual

Swegon TBLA User manual

Swegon

Swegon TBLA User manual

Swegon TCLF User manual

Swegon

Swegon TCLF User manual

Swegon CASA SDHE125-1T Manual

Swegon

Swegon CASA SDHE125-1T Manual

Swegon TBLE Series User manual

Swegon

Swegon TBLE Series User manual

Swegon PARASOLc-X User manual

Swegon

Swegon PARASOLc-X User manual

Swegon TBLA User manual

Swegon

Swegon TBLA User manual

Swegon CASA R3 Smart User manual

Swegon

Swegon CASA R3 Smart User manual

Popular Heater manuals by other brands

Pelonis NY1506-18SRA user manual

Pelonis

Pelonis NY1506-18SRA user manual

Etherma EIH-3000 operating instructions

Etherma

Etherma EIH-3000 operating instructions

Omega SEPDH Series Guide

Omega

Omega SEPDH Series Guide

Marta MT-FH2525A user manual

Marta

Marta MT-FH2525A user manual

Lasko CC24920 instruction manual

Lasko

Lasko CC24920 instruction manual

Haverland RC WAVE quick start guide

Haverland

Haverland RC WAVE quick start guide

tomado THC2003W instruction manual

tomado

tomado THC2003W instruction manual

Muller Intuitiv CAMPA CVVU10 Instructions for installation and use

Muller Intuitiv

Muller Intuitiv CAMPA CVVU10 Instructions for installation and use

Master B 5 EPA R owner's manual

Master

Master B 5 EPA R owner's manual

Ridea ROUND-AL BATH INSTALLATION AND INSTRUCTION

Ridea

Ridea ROUND-AL BATH INSTALLATION AND INSTRUCTION

Gabarron IC-1200 Installation and operating instructions

Gabarron

Gabarron IC-1200 Installation and operating instructions

KING CB SERIES installation guide

KING

KING CB SERIES installation guide

Heinner VITG010 manual

Heinner

Heinner VITG010 manual

DeLonghi TRRS0715ECA Instructions for use

DeLonghi

DeLonghi TRRS0715ECA Instructions for use

Uberhaus Pro HFK48 Important instructions

Uberhaus

Uberhaus Pro HFK48 Important instructions

Aspira TEPORSPLIT User instructions

Aspira

Aspira TEPORSPLIT User instructions

Johnson VELA Instructions for use

Johnson

Johnson VELA Instructions for use

Blyss NE10FB manual

Blyss

Blyss NE10FB manual

manuals.online logo
manuals.online logoBrands
  • About & Mission
  • Contact us
  • Privacy Policy
  • Terms and Conditions

Copyright 2025 Manuals.Online. All Rights Reserved.