manuals.online logo
Brands
  1. Home
  2. •
  3. Brands
  4. •
  5. SWELLPRO
  6. •
  7. Drone
  8. •
  9. SWELLPRO SPLASH DRONE User manual

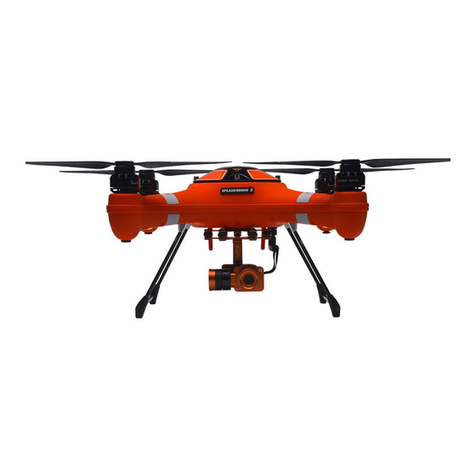
SWELLPRO SPLASH DRONE User manual

V5.6
01
01
02
03
05
04
06
07
08
09
10
11
12
13
14
15
17
18
20 21
25
26
19
16
22 24
27
28
02
03
04
05
06
07
08
09
10
11
12
SWB1 SWB2
23
01 02 03 04
Splash Drone Remote Controller Safety Guide
1. Please obey the relevant regulations of the International Civil Aviation
Organization and local laws regarding the control of airspace & UAV
management regulations. Please do not fly in any no-fly zones.
2. When flying the Splash Drone, always fly in an open area, away from buildings,
trees and obstacles.
3. Keep a minimum distance of 3-5 meters between you and others. Do not
operate the drone close to crowds.
4. Before flight, you need to calibrate the aircraft according to procedures in the
manual.
5. If any abnormal operation is detected while using the Splash Drone, please
land immediately and stop operating the drone.
6. Before flying, ensure the propellers are installed in the correct direction and
tightened securely to each of the motors.
7. Do not attempt to touch the motors, until the motors have stopped rotating .
8. When using the WiFi Sport camera with the Splash Drone, please disable the
WiFi function before flying. Wifi should not be used in the area where you are
flying.
9. If the aircraft battery is low, land immediately to avoid damage.
10. Wait for 6-10 seconds after powering on aircraft before taking off or moving
the Splash Drone, the system is in self-checking and satellite collecting.
11. If a loss of radio signal occurs, the aircraft will enter into Auto Return Home
mode automatically. If radio contact is re-established, please flip SWC once and
then switch to GPS mode to take control of the aircraft.
Forbidden ight conditions:
a. Never fly nearby strong radio interference activity areas.
b. Never fly nearby any crowds.
c. Never fly around strong magnetic fields.
d. Never fly when you are tired or affected by alcohol.
e. Never fly when the remote controller can not control aircraft due to any other
reasons.
Splash Drone Quick Guide
Splash Drone Splash Drone Splash Drone Splash Drone
Quick Guide
Quick Guide
Quick Guide
Quick Guide
SWC1 SWC2 SWC3
Right StickLeft Stick
U
p
T
u
r
n
R
i
g
h
t
D
o
w
n
T
u
r
n
L
e
f
t
F
o
r
w
a
r
d
R
i
g
h
t
B
a
c
k
w
a
r
d
L
e
f
t
U
p
T
u
r
n
R
i
g
h
t
D
o
w
n
T
u
r
n
L
e
f
t
F
o
r
w
a
r
d
R
i
g
h
t
B
a
c
k
w
a
r
d
L
e
f
t
www.swellpro.com
SWELLPRO TECHNOLOGY Co., LTD
Nose Direction
3.1.2. Compass Calibration
Return-Home Switch
1. Radio
3. Flight
3.1. Calibration
Open the battery compartment cover, insert the battery JST cable into power
socket of the Radio controller. Please observe the correct polarity. (The Radio
controller won’t burn out even when connected with a reverse polarity. If the
battery is incorrectly connected, the controller will not power up.)
SWB1
SWB2
Flight Mode switch ( SWC1, SWC2, SWC3)
SWC1 GPS Mode
SWC2 Circle Flight
SWC3 ATTI Mode
Attention: When returning and descending, the drone nose & aileron
joystick are controllable, to allow for a better landing location.
Note: Throttle is not controllable whilst the drone is in Auto Return-Home
mode.
Calibration is necessary in below cases:
a. Use the drone for the first time.
b. After following excessive flight in ATTI Mode.
c. When pushing up the THROTTLE joystick without moving the right AILERON
joystick, the drone drifts with certain angle under ATTI Mode.
d. If the drone incurred or was subjected to a heavy shaking during
transportation.
e. After a completed compass calibration as well as the motors successfully
unlock, but the red LED stays solid red when trying to start up the motors.
Please Note: It is recommended to calibrate the compass in the proposed flying
area before flying. Flying anywhere close to any magnetic interference is HIGHLY
DISCOURAGED. (Please make sure to keep far away from the following:
High-Voltage transmission power lines, Emitting base stations, metal objects,
etc.)
a. Left Joystick is for Throttle and Nose direction
b. Right Joystick is for aileron control, pitch to forward/backward,
roll to left/right.
1.2.2 Flight Operation Guide
2. Self-tightening Propeller
2.2.1. Installation
2.2.2. Uninstall Propeller
Assembly
Location
NEVER try to un-fasten the propellers until the motors have stopped
spinning and are locked.
Return-Home
Normal
1.2 Flight Mode
1.2.1 Flight Mode Introduction
1.1. Using the Radio controller
Attention: All calibrations MUST be done with the motors LOCKED
and WITHOUT propellers.
Calibration Steps:
Remarks: Items 18,19,20,21,25 and 26 are spare buttons for extra usage if
required. The default throttle control configuration is set to American Mode on
the left joystick. However, the Japanese Mode (right joystick ) is also available
basing on requirement.
Propeller Propellor with silver cap Propellor with black cap
Graphic
Installation
Graphic
a. Before flying drone for the first time.
b. If 100KM or more away from the last compass calibration location.
c. The drone has been crashed/dropped by accident.
d. The drone keeps swaying / drifting during flight.
e. If the drone incurred or was subjected to a heavy shaking during
transportation.
f . If the RED Light stays on, and the motors can’t be unlocked.
Calibration is necessary in below cases:
2. Pull the left joystick to right-lowest at a 45° angle, push the right joystick to
right-upper at a 45° angle as shown in the picture below:
3. Maintain the above gesture for 2s until the light changes to flashing RED,
the drone then enters into its calibration process. Wait till the light stops
flashing, and goes to a slower RED blink, then release the joysticks. The
accelerometer calibration is now completed.
1. Turn on the Radio controller, then power on the drone, wait until the
self-checking sequence is completed, then flip SWB to SWB2 (Return-Home)
position.
Accelerometer Calibration
3.1.1 Accelerometer Calibration
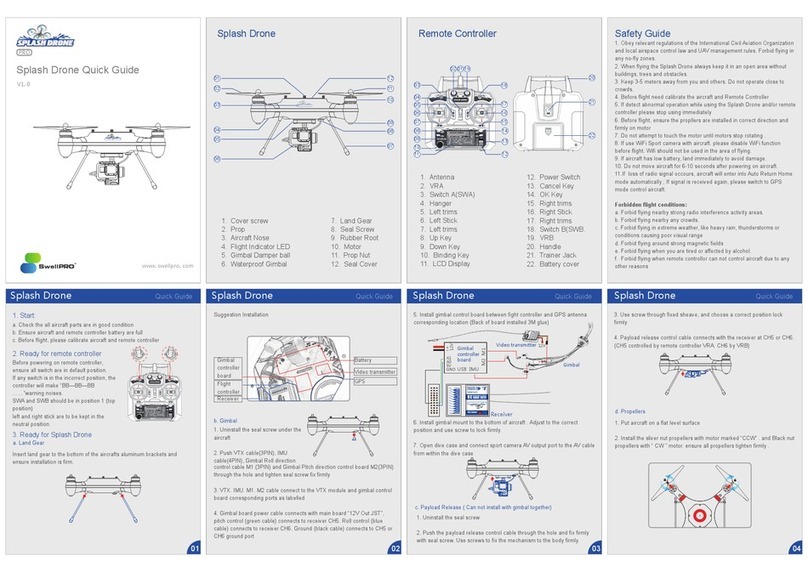
1. Hatch Screws
3. Drone Nose
5. Anti-vibration damper ball
7. Landing Gear
9. Rubber cushion foot
11. Propeller securing nut
2. Propeller
4. Navigation Lights
6. 2-Axis Waterproof Gimbal
8. Watertight sealing connector
10. Watertight Motor
12. NANO Vent cover
1. Antenna
2. SWB-Normal/ Return Home
3. SWA-Airdrop
4. Power switch
5. Left Joystick
6. Throttle Sub-trim button
7. Yaw Sub-trim button
8. Mode/Menu button
9. End/Back button
10. Display
11. Enter button
12. Scrolling wheel
13. Left/Right Sub-trim button
14. Front/Rear Sub-trim button
15. Right Joystick
16. SWD-Camera Control
17. SWC-Flight Mode
18. SWG (NO Function)
19. VRB (NO Function)
20. VRA (NO Function)
21. SWH (NO Function)
22. VRD-Gimbal Pitch control
23. Handle Shaft
24. VRC-Gimbal Roll control
25. SWF (NO Function)
26. SWE (NO Function)
27. Trainer Socket
28. Battery cover
Motor with silkprinting ‘CCW’ Motor with silkprinting ‘CW’
Caution: Please make sure the GPS arrow on the removable vent cover
is pointing towards the nose direction.
Front view Back view
1
3 4 5 6
2
05 06 07 08
09 10 11 12
Splash Drone Splash Drone Splash Drone Splash Drone
Quick Guide
Quick Guide
Quick Guide
Quick Guide
Splash Drone Splash Drone Splash Drone Splash Drone
Quick Guide
Quick Guide
Quick Guide
Quick Guide
4. The upper-right WIFI icon will change to GREEN when successfully connected.
The flight data will be visible on the screen.
5. At this point, firstly unlocking the drone by the radio controller, hereafter, use
the App to control the drone for take-off, landing, ascending/descending,
hovering, return-home, as well as mission planning and for the follow me
function etc.
6.2 Mission Planning
Follow-me
Click "A Mode" to select " Follow Me ", the drone will then automatically follow
the people that have the receiver terminal and smart phone.
Note: Please do not y anywhere near areas with strong magnetic
interference, it will signicantly aect the follow me experience.
3. Execution: Click button " A Mode " to choose " WPLaunch ", then drone starts
the mission planned flight.
6.3 Follow Me Mode
Tap " A Mode " and select " Guide
", then click the designated
location, the drone will
automatically fly to the specified
location and keep hovering on
arrival.
6.4 Guide Mode
4. Take-o
Calibration Steps
5. Landing
6. Using the Smart Ground Station
6.1 Downloading and installing the Swellpro APP
1. Turn on the radio controller, then power on the drone. Wait until the
self-checking sequence is completed, then flip SWB to Return-Home position.
2. Pull the Left joystick to left-lowest at a 45° angle, push the Right Joystick to
left-upper 45°angle as the picture below shows:
3. Wait 2s until the RED light is ON SOLID, the drone is now ready for compass
calibration.
4. Pick up drone HORIZONTALLY, to commence full COUNTER CLOCKWISE
rotation in 6 respective cubic planes, 1 complete circle is sufficient in each
plane, make sure that all of the rotations are basing on the same vertical axis.
For details, please refer to the images below. After completing above process,
put the drone onto a flat surface, keep the drone still, and wait for 2 minutes to
allow for the compass data to be collected and stored. When the solid red
indicator changes to blinking slowly, the compass calibration is completed.
(Note: 1. Try to unlock the motors, if they start up, it means the calibration is
successful.
2. If the motors do not unlock, it indicates the calibration procedure was not
successful, and needs to be re-done.)
1. Please always fly the drone in open air spaces, and ALWAYS keep the drone at
least 3M away from the pilot & the crowds.
2. Ensure all switches are in their default position before turning on the radio
controller. (SWC stays at GPS position, SWB at Normal position)
3. Please make sure that all parts are in good condition before powering on
drone.
4. Power on the drone, it will enter into self-checking sequence, don't disturb
the drone when it is in self-checking sequence, when the self-checking is
finished, you will hear a "DI" sound.
5. When in ATTI mode, it is possible unlock and fly without waiting for the
required GPS signal. In GPS mode, you need to wait until a minimum of 9
satellites are shown.
Pull the 2 joysticks to their lowest location in opposite direction as showed in
right pictures.
1. Slowly pull down the throttle joystick to reduce height, when the drone is
close to the ground, put the throttle stick to its lowest position, until the drone is
landed and the motors have stopped rotating. (Note: the drone will
automatically lock the motors after 5seconds, or they can be manually locked.)
2. First, power off the drone, then power off the radio controller.
1. Download the Android APP at www.swellpro.com, or download IOS (Splash
drone) APP in APPLE store for your iPhone. (Below illustrations are basing on
Android smart phone )
2. Run the " Swellpro " APP, click " GPS coordinate " to find the current location
and to select a suitable flying area.
Important Notes:
1. Good wireless communication is of great importance when using
autopilot functions.
2. If the drone fails to execute orders from the App, it is probably inuenced
by unexpected interference, please try to re-send the orders.
3. If the drone doesn't execute any orders from the App, please take over the
ight using the radio controller. (Method: Quickly ip SWC from GPS to ATTI
once, then return at GPS position.
4. During the App control, the receiver and transmitter terminal of the
Bluetooth Data Link will pair to each other automatically. When it is paired, it
won't jump or pair to another device. Make sure you link to the right drone
when there are more than one drone ying at the same location.
Flight Status
Flight Status
Connection
Mission Planning GPS Coordinate
GPS Specic
Coordinate
Return-To-Home
Taking-o
Landing
Ascending
Hovering
More
Splash Drone &
Nose Direction
Battery
Voltage
Latitude &
Longitude
Operation diagram
Operation diagram
Operation diagram
unlock motors lock motors
Please Note: In GPS mode, a Good GPS signal is required to unlock motors with a
minimum of 9 satellites.
Note: If the chosen ying area doesn't have internet access, you might need to
download the google map data of the ying area on your smartphone rst.
Note: The Bluetooth signal name always starts with ‘ UAV....’, see pictures below.
3. After completing the steps above, turn on mobile's GPS & Bluetooth, power on
the receiver terminal, click the WIFI icon in the right-upper corner, it will pop up
" Connection Type " window. Choose " BLUETOOTH " and press " Connect " to
scan the available devices.
1. Setup: Way-points can easily be set by clicking " Waypoint " button to select
locations on the map, it’s also possible to do a customized setup for every
way-point, such as height, hovering time, circling, etc.. (see pictures below)
2. After completing the waypoints setting, tap " Send " button to save and
submit the flight command. Then, the system will return to default interface
automatically.
Other manuals for SPLASH DRONE

6

Other SWELLPRO Drone manuals

SWELLPRO Splash Drone 3 User manual

SWELLPRO

SWELLPRO Splash Drone 3 User manual

SWELLPRO SPLASH DROME 3 User manual

SWELLPRO

SWELLPRO SPLASH DROME 3 User manual

SWELLPRO JCMatthew FD1 User manual

SWELLPRO

SWELLPRO JCMatthew FD1 User manual

SWELLPRO FPV Goggle User manual

SWELLPRO

SWELLPRO FPV Goggle User manual

SWELLPRO Fisherman User manual

SWELLPRO

SWELLPRO Fisherman User manual

SWELLPRO Splash Drone Pro User manual

SWELLPRO

SWELLPRO Splash Drone Pro User manual

SWELLPRO Splash Drone 3 Instruction Manual

SWELLPRO

SWELLPRO Splash Drone 3 Instruction Manual

SWELLPRO Splash Drone Pro User manual

SWELLPRO

SWELLPRO Splash Drone Pro User manual

SWELLPRO SPLASH DRONE User manual

SWELLPRO

SWELLPRO SPLASH DRONE User manual

SWELLPRO SPLASH DRONE User manual

SWELLPRO

SWELLPRO SPLASH DRONE User manual

SWELLPRO spry User manual

SWELLPRO

SWELLPRO spry User manual

SWELLPRO Splash Drone Auto User manual

SWELLPRO

SWELLPRO Splash Drone Auto User manual

SWELLPRO spry Use and care manual

SWELLPRO

SWELLPRO spry Use and care manual

SWELLPRO GC3-T User manual

SWELLPRO

SWELLPRO GC3-T User manual

SWELLPRO SPLASH DRONE User manual

SWELLPRO

SWELLPRO SPLASH DRONE User manual

SWELLPRO GC2-S User manual

SWELLPRO

SWELLPRO GC2-S User manual

SWELLPRO SPLASH DRONE User manual

SWELLPRO

SWELLPRO SPLASH DRONE User manual

SWELLPRO SPLASH DRONE User manual

SWELLPRO

SWELLPRO SPLASH DRONE User manual

SWELLPRO Fisherman FD3 User manual

SWELLPRO

SWELLPRO Fisherman FD3 User manual

SWELLPRO Splash Drone 4 User manual

SWELLPRO

SWELLPRO Splash Drone 4 User manual

SWELLPRO spry User manual

SWELLPRO

SWELLPRO spry User manual

SWELLPRO SplashDrone 4 User manual

SWELLPRO

SWELLPRO SplashDrone 4 User manual

SWELLPRO SPLASHDRONE 3 Operating instructions

SWELLPRO

SWELLPRO SPLASHDRONE 3 Operating instructions

SWELLPRO Splash Drone 3 User manual

SWELLPRO

SWELLPRO Splash Drone 3 User manual

Popular Drone manuals by other brands

UDI R/C VOYAGER U845Wifi user manual

UDI R/C

UDI R/C VOYAGER U845Wifi user manual

Skydio 2 Operator's manual

Skydio

Skydio 2 Operator's manual

Eachine Wizard X220HV Quick start guides

Eachine

Eachine Wizard X220HV Quick start guides

Skydio X2D QGC Operator's manual

Skydio

Skydio X2D QGC Operator's manual

MS CX-40 Flight manual

MS

MS CX-40 Flight manual

Propel RC sky master+fpv Instruction booklet

Propel RC

Propel RC sky master+fpv Instruction booklet

Juguetronica NANODRONE EVOLUTION Manual of Instruction

Juguetronica

Juguetronica NANODRONE EVOLUTION Manual of Instruction

Origaudio FLYINGTON user manual

Origaudio

Origaudio FLYINGTON user manual

Overmax x-bee drone 3.1 plus user manual

Overmax

Overmax x-bee drone 3.1 plus user manual

MALA GeoDrone 80 quick guide

MALA

MALA GeoDrone 80 quick guide

dji crystalsky CS785 user guide

dji

dji crystalsky CS785 user guide

Flight Lab Toys HoverCross instruction manual

Flight Lab Toys

Flight Lab Toys HoverCross instruction manual

Brookstone Flight Force 324185 instruction manual

Brookstone

Brookstone Flight Force 324185 instruction manual

Autel Robotics EVO Lite Series user manual

Autel Robotics

Autel Robotics EVO Lite Series user manual

Lynx PIKA 65 FPV RACER user manual

Lynx

Lynx PIKA 65 FPV RACER user manual

SYMA X2 Gyro instruction manual

SYMA

SYMA X2 Gyro instruction manual

Blade CHROMA BLH8660 reference guide

Blade

Blade CHROMA BLH8660 reference guide

Teal Sport user guide

Teal

Teal Sport user guide

manuals.online logo
manuals.online logoBrands
  • About & Mission
  • Contact us
  • Privacy Policy
  • Terms and Conditions

Copyright 2025 Manuals.Online. All Rights Reserved.