SWI-TEC Anchor Buoy Setup guide

SPECIAL WATER INNOVATION
SWI-TEC
www.swi-tec.com
Repair Instructions
Anchor Buoy

SPECIAL WATER INNOVATION
Anchor Buoy – Repair Instructions
1a: Insert end of belt (the end without the loop)
through the exit guide.
1b: Secure the belt to the drum with a self-tapping
screw.
1c: Wind belt clockwise onto drum.
Note: keep the belt tensioned by occasionally
pulling it tight onto the drum.
2a: Install the machine screw (M6 x 60) through the
exit guide assembly with the counter-sunk head
on the belt side.
2b: Mount the plastic shim and the spring coil bea
ring onto the machine screw installed on the exit
guide assembly.
3a: Support the spring coil
on a suitable platform so
that the spring coil and the
slot in the center hub are
at the same height.
3b: Make sure that the spring
coil orientation is exactly
as shown in the picture.

SPECIAL WATER INNOVATION
Anchor Buoy – Repair Instructions
4a: Push the end of the spring coil into the slot
of the hub.
4b: Secure the end of the spring coil with the
M4 set-screw with a 2mm Allen wrench.
5: Hold the spring coil tight against the hub
leading the spring in a clockwise direction
away from the slot in the hub.
6: Use a hammer to bend the spring coil so that
the end exits the slot in the hub and is in
close and even contact with the hub.
7: Hold the spring coil tightly and wind it
2 to 3 times around the hub.
Note: observe the number of windings:
2 to 3 – no more and no less).

SPECIAL WATER INNOVATION
90 mm
Anchor Buoy – Repair Instructions
8a: Use the palm of your hand to secure the spring
coil in place on the hub.
8b: Carefully mount the spring coil onto the spring
coil bearing previously installed on the exit
guide assembly with the machine screw.
Note: ensure that the plastic shim is still in place.
9: At this point you no longer need to secure the
coil spring with the palm of your hand. Do not
move the assembly until the next step is com
pleted to prevent the spring coil from becoming
dislodged.
10: Mount the L-shaped guide arm onto the ma
chine screw, install a flat washer and the M6
self-locking nut; do not tighten at this time.
11: At this point the spring coil is secured and the
assembly can now be moved as necessary
to accomplish the next steps in the
assembly procedure.
12a: Grasp the assembly with your left
hand as shown in the picture holding the
guide arm and the spring coil at the same
time.
12b: Insert the axle from the right hand side
as shown in the picture.

SPECIAL WATER INNOVATION
Anchor Buoy – Repair Instructions
13: Push the axle through hub and guide arm until
the retaining collar is seated against the end
plate of the belt reel.
Note: you should be able to rotate the axle
freely in the hub. If excessive friction is obser
ved use sand paper to open up the bore in the
hub as necessary.
14a: Turn the assembly over and hold between
your knees as shown in the picture.
14b: Tighten the M6 self-locking nut previously
installed in step 10.
Note: do not over tighten the nut. Check that
the spring coil is free to rotate, otherwise loosen
the nut as necessary.
15: Use a feeler gauge to set the retaining collar to
provide a clearance of 1mm (3/64 in).
Note: make sure that the belt reel and spring coil
assembly are able to rotate freely. Increase
the clearance if necessary.
16: Use WD40 or similar spray lubricant to lubrica
te the spring coil.
Note: this will improve the service life and per-
formance of the spring coil.

SPECIAL WATER INNOVATION
Anchor Buoy – Repair Instructions
17: Pull out a length of the belt and
slowly release it while checking
that the belt retracts smoothly and
rolls up onto the belt reel.
18: Insert the assembly into the lower
housing.
Caution: the exit slot is offset! The assem
bly must be inserted so that the exit
guide is in line with the exit slot at the
bottom of the lower housing and the
belt runs straight off the reel through
the slot. The axle will rest evenly in
the saddles at the upper end of the lo
wer housing.
19a: Verify proper alignment of the exit
guide with the exit slot in the bottom
of the lower housing and that the axel
is fully seated in the saddles at the
upper end of the lower housing.
19b: Apply the ribbon sealer (Art. 1023)
evenly around the lip of the upper end
of the lower housing.
Note: make sure that the ends of the
ribbon sealer are fully connected. If
the mating surfaces of the upper and
lower housing do not form an air-tight
seal then the Anchor Buoy will not
float!

SPECIAL WATER INNOVATION
Anchor Buoy – Repair Instructions
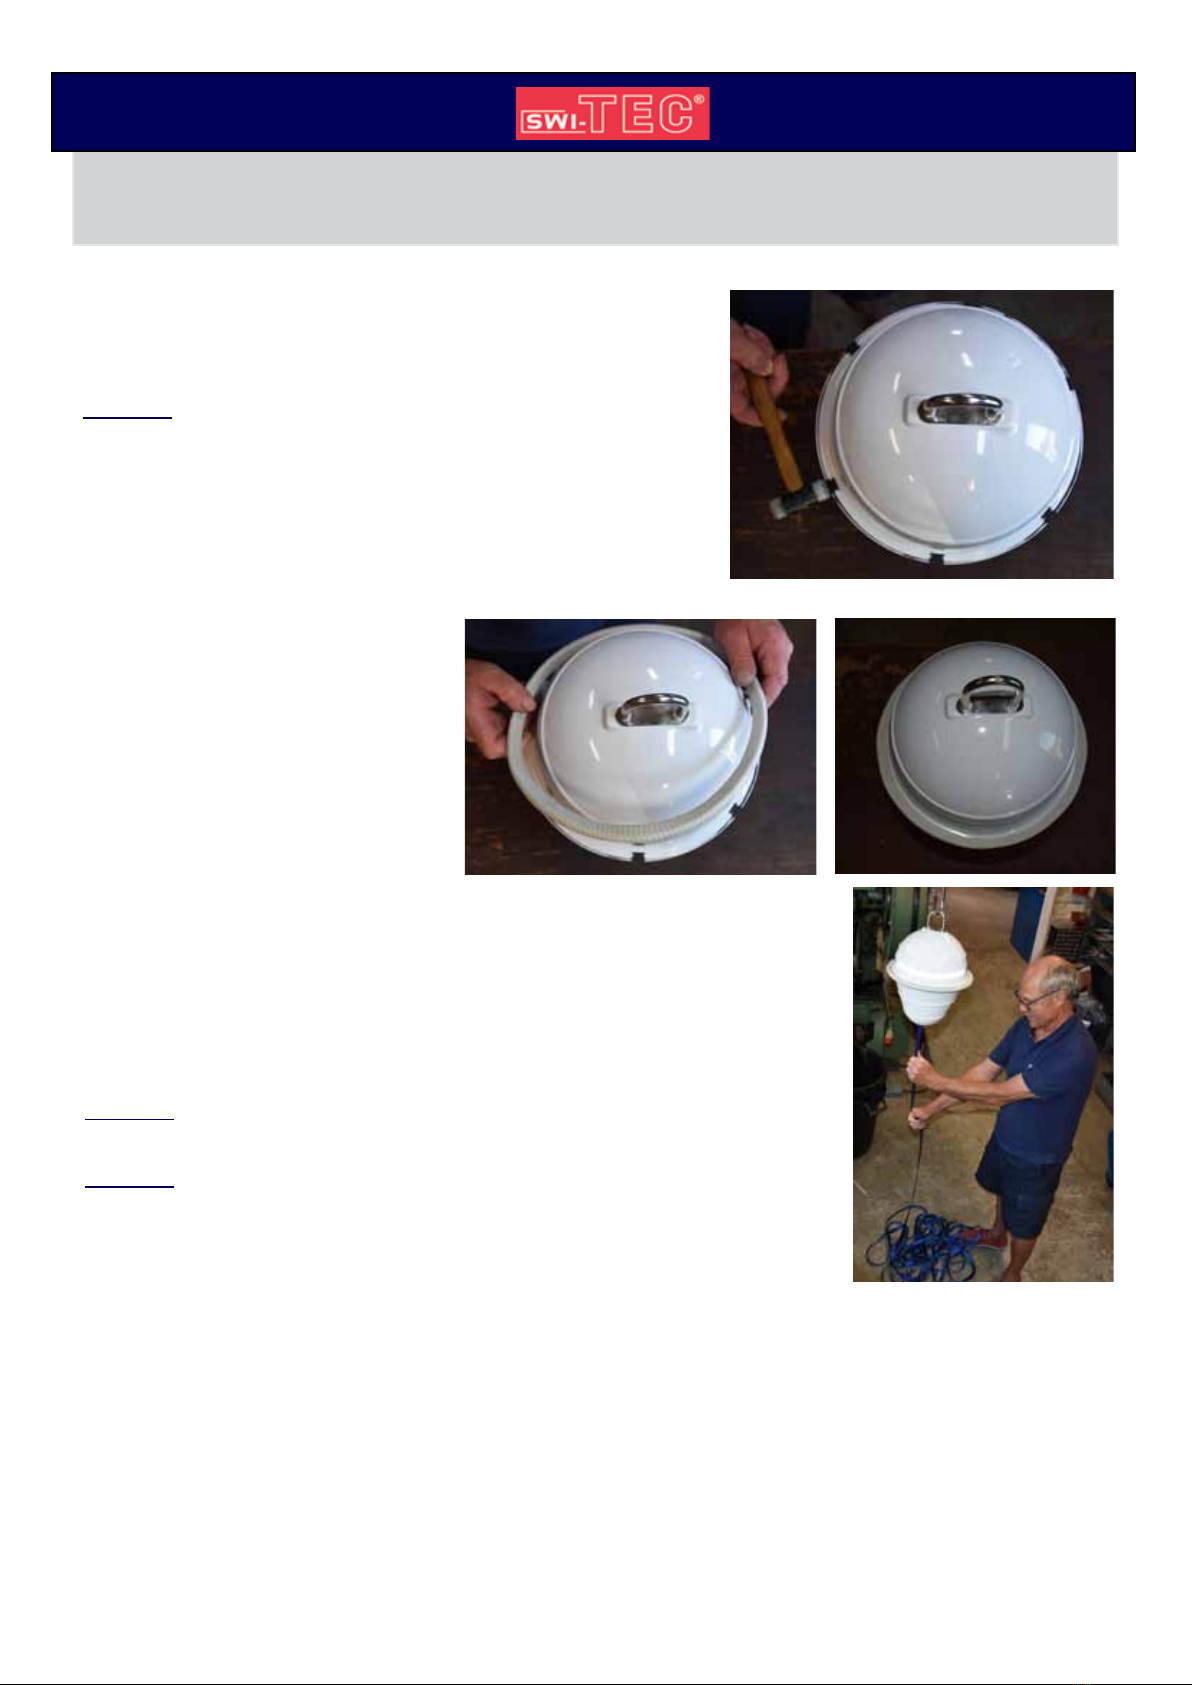
20: Carefully place the upper housing onto the lower
housing.
Caution: make sure that the D-ring bolts line up
properly with the holes in the top of the guide arm.
21a: Push the upper housing firmly down onto the
lower housing.
21b: Use a mallet to install a crimp clip (Art. 1024) to
secure the upper and lower
housing together. Install the
next crimp clip diagonally
across from the previous
location.
Note: upper housing will seat
inside the lip of the lower
housing.
22: Use a mallet to install the remaining crimp clips as in step 23b
evenly spaced 60o apart from each other.
Note: the even spacing provides proper seating of the two housings
and ensures an air-tight seal.
23a: Suspend the Anchor Buoy and pull out the entire length of
the belt. Slowly allow the spring coil to wind up the belt.
Caution: do not pull with excessive force once you reach the end
of the belt.
Caution: Keep some tension on the belt to prevent the belt from
jumping off the reel.
24: Place the U-channel edge protection over the joint of the two
housings.
25: Test the fully assembled Anchor Buoy by pushing it completely under water for sever
al minutes. There should not be any air bubbles escaping from the joint between the
upper and lower housing or from the D-ring at the top. If air bubbles are observed then
the Anchor Buoy must be disassembled and the affected area must be resealed.
Your SWI-TEC Anchor Buoy is once again ready to serve you well on your future
cruising adventures.
Please do not hesitate to contact your SWI-TEC representative if you have any questi-
ons or comments.
www.swi-tec.com

SPECIAL WATER INNOVATION
Anchor Buoy – Repair Instructions
Table of contents
Other SWI-TEC Boating Equipment manuals