Wichard NEXE 4.0V12 User manual

MANUEL DE MONTAGE
INSTALLATION MANUAL
NEXe
Emmagasineurs motorisés
Motorized ying sail furlers
Pour Gennakers
For code 0, gennakers
NEXE 4.0V12
NEXE 4.0V24
NEXE 8.0V12
NEXE 8.0V24
Pour spis asymétriques
For asymetrical
spinnakers
SPINEXE 4.0V12
SPINEXE 4.0V24
SPINEXE 8.0V12
SPINEXE 8.0V24
www.profurl.com Ref : 55079
Indice B / 2022
®

2
TABLE DES MATIERES / CONTENTS
Note aux installateurs: Ce manuel devra être remis à l’utilisateur qui en prendra connaissance avant l’utilisation du
matériel. Il devra être conservé à bord.
Note to riggers: This installation manual should be given to the boat owner, who should read it before using the system. It
must be kept on board for future reference.
Réception du matériel: Le matériel voyage toujours aux risques et périls du destinataire. Il y a donc lieu d’eectuer une
vérication dès réception et émettre toutes réserves ou exercer tous recours à l’encontre du transporteur dans les délais
réglementaires.
Receipt of goods: All goods must be checked on delivery and the purchaser should claim from the carrier within seven
days in the event of loss or damage.
COMPOSITION DU SYSTÈME ET OPTIONS 3SYSTEM COMPONENTS AND OPTIONS
INSTALLATION 4INSTALLATION
Etape 1: réglage du mousqueton 5 Step 1: trigger snap shackle installation
Etape 2: installation en cas de pont > 5 mm 5 Step 2 : deck plate installation for deck > 5 mm
Etape 3: Installation en cas de pont < 5 mm 4 Step 3: Installation for deck < 5 mm
MONTAGE DE LA PARTIE ÉLECTRIQUE 6-8 WIRING OF ELECTRIC SYSTEM
CABLAGE DU MOTOREDUCTEUR 8GEAR MOTOR WIRING
BOITIER DE CONTROLE 9REMOTE CONTROL
PREPARATION AUX MANOEUVRES 9PREPARING OPERATIONS
OPERATIONS ENROULEMENT / DEROULEMENT 10 UNFURLING / FURLING OPERATIONS
CONSEILS 10 ADVICES
CONDITIONS DE GARANTIE 11 LIMITED WARRANTY
NOUS CONTACTER 12 CONTACT US

3
COMPOSITION DU SYSTEME /
SYSTEM COMPONENTS
Mécanisme d’émerillon
Halyard swivel mechanism
Boitier relais
Contactor unit
Disjoncteur / Circuit breaker
12V: 40A - 24V: 30A
Motoréducteur NEXe + câble d’alimentation (1.5m)
NEXe gear motor + 1.5m power cable
+
Mécanisme
d’émerillon
Halyard swivel
mechanism
+ +
Point d’amure libre
Swivel tack point
NEXe5.0 Réf / Part #: P585100
NEXe8.0 Réf / Part #: P588100
Pour gennakers
For gennakers
NEXe=
Pour spis asymétriques
For asymetrical
spinnakers
SPINEXe=
Composition standard / Standard components
Options / Options
2 prises
2 plugs
Boitier électrique 12V / 12V Contactor unit: réf / Part #: P274038
Boitier électrique 24V / 24V Contactor unit: réf / Part #: P274039
Radio commande
(emetteur + récepteur)
Radio remote
controller
Réf / Part #: 53310
Télécommande laire
Wired remote
controller
Réf / Part #: 53320
Platine de pont
Deck plate
Réf / Part #: 54959
+Cable de prise
de pont (2m)
Power cable (2m)
Réf / Part #: 54936
Cable de prise
de pont (6 m)
Power cable (6 m)
Réf / Part #: 54950
Cable de prise
de pont (10 m)
Power cable (10 m)
Réf / Part #: 54951
Motoréducteur NEXe +
câble d’alimentation (1.5m)
NEXe gear motor +
1.5m power cable
Platine de pont
Deck plate
Réf / Part #: 54959
Cable de prise
de pont (2m)
Power cable (2m)
Réf / Part #: 54936
+

4
INSTALLATION / INSTALLATION
Etape 1: Réglage du mousqueton sur le point d’ancrage (0 à 90°)
Step 1: Trigger snap shackle adjustment on the fastening point (0 to 90°)
Dévisser les 4 vis comme indiqué.
Remove the 4 screws as shown.
Tourner l’ensemble en inox pour le
xer sur le point de xation.
Turn the stainless steel part to attach it
to the fastening point.
Appliquer la colle bleu et revisser les
4 vis.
Apply the blue glue and t the 4 screws.

5
Etape 2 / Step 2: Installation de la platine de pont - Deck plate tting for deck
L’installation de la platine de pont est recommandée pour toutes les épaisseurs de pont.
The deck plate installation is recommended for any deck thicknesses
Platine de pont / Deck plate
Réf / Part #: 54959
Positionner la platine pour percer les
trous des 4 vis
Place the deck plate to drill the 4 screw
holes
Utiliser la platine pour réperer le
centre de celle-ci et percer à 40 mm
Use the deck plate to identify its centre
and drill at 40 mm (1 37/64’’)
Monter la platine et les 4 vis et utiliser
un produit d’étancheité adéquate
Fit the deck plate and the 4 screws and
use a sealant

6
MONTAGE DE LA PARTIE ELECTRIQUE
WIRING OF ELECTRIC SYSTEMS
Ci-contre, le coret à réception: L’ouvrir en dévissant les 4 vis nylon
Contactor unit delivered. Unscrew the screws to open it.
Sortir et ouvrir les sacs contenus dans le coret et refermer celui-ci. NE RIEN
CONNECTER A L’INTERIEUR DU COFFRET;
Take out and open the bags stored into the contactor unit. DO NOT WIRE ANY-
CABLE INSIDE THE CONTACTOR UNIT.
Sertir les 5 contacts de la prise de commande.
Swage the 5 pins of the remote plug.
IMPORTANT: pour le cablage voir en page 6
WARNING: for wiring instructions: see page 6
1 prise et 2 bornes pour les câbles 16mm² du moteur
1 plug and 2 pins for the 16mm² wires of the motor
1 prise et 2 x 2bornes pour les câbles 25mm² ou 35 mm² de la batterie au
disjoncteur.
1 plug and 2 x 2 pins for 25 mm² or 35 mm² wires for battery wiring

7
MONTAGE DE LA PARTIE ELECTRIQUE
WIRING OF ELECTRIC SYSTEMS
Cablage / Wiring
IMPORTANT: relier les bornes 5 et 2 en 12V et 5 et 3 en 24V
IMPORTANT : Connect pins No 5 and 2 if 12V / No 5 and 3 if
24V to the 2 wires (thermal switch)
12V 24V Cablage de la
commande
Remote
controller
wiring
Power in
Power out

8
MONTAGE DE LA PARTIE ELECTRIQUE
WIRING OF ELECTRIC SYSTEMS
Wiring the system:
The main switch must be easily accessible in case of emergency.
It is recommended that the electrical installation must be installed by a professional and skilled person (electrician).
ATTENTION:
Le moto-réducteur a été scellé en usine, et son étanchéité vériée. Toute tentative d’ouverture du capot du moto-réducteur peut, en
l’absence d’outillage spécique et du suivi rigoureux de la procédure de démontage et de remontage, conduire à l’impossibilité d’obtenir
ultérieurement l’étanchéité du boîtier.
Tout moto-réducteur ouvert sans l’accord préalable de Profurl donne lieu à l’annulation immédiate de la garantie
CAUTION:
The gear motor has been watertight tested in factory. Without the special tools and knowledge procedure to open the gear motor,
the unit may be permanently damaged.
Any attempt to open the gear motor without prior written consent of Profurl will avoid the warranty
Veillez à dégager du trajet de la chaîne d’ancre ou de toute manoeuvre les câbles électriques apparents au dessus du pont.
Please make sure the anchor chain or any other line will not chafe on the electrical wires above deck.
Le circuit électrique devra être impérativement protégé par le disjoncteur thermique parfaitement calibré, fourni par Profurl.
Ce disjoncteur est de type monopolaire. Pour les bateaux à coque métallique ou dans certains cas d’utilisation (Bateaux en
NUC), un disjoncteur supplémentaire identique à celui fourni par Profurl (à commander en option) doit être installé.
The electrical circuit has to be protected with the thermal circuit breaker supplied with the system, tted as shown on the
drawing. In case the boat has a metal hull or is being used for commercial sailing in some countries, the circuit breaker
should be specied as bi-polar, and ordered as an option at Profurl.
Branchement de l’enrouleur:
Le coupe-circuit doit être facilement accessible en cas d’urgence.
Il est recommandé que l’installation électrique soit réalisée par une personne compétente dans ce domaine (electricien).
BRANCHEMENT DU MOTORÉDUCTEUR /
GEAR MOTOR INSTALLATION

9
PREPARATION AUX MANOEUVRES /
PREPARING OPERATIONS
BOITIER DE COMMANDE / REMOTE CONTROL
Le boîtier de commande (non fourni) pourra avoir diérentes formes : manette, interrupteur, bouton.
Dans tous les cas, le boîtier de commande choisi ne doit pas permettre d’engager simultanément l’enroulement et le
déroulement de la voile. Les manœuvres doivent s’eectuer en exerçant une pression constante sur la manette ou
sur l’interrupteur. Dans le cas d’un interrupteur dans le cockpit, il est recommandé de choisir une position qui évite un
déclenchement accidentel de la manœuvre. La commande doit etre positionnée de façon a toujours avoir une bonne
visibilité lors des manoeuvres d’enroulement et déroulement.
The remote control (not supplied) might be a joystick or a switch. In any case, the remote control should make impos-
sible to select both directions (furl/unfurl) at the same time. The operations must be operated by pressing continuously
the button of the remote control.
When using a switch in the cockpit, it is recommended to choose an appropriate position to avoid the system to be
activated accidentally.
Attacher le point d’amure de la voile sur la chape
du motoréducteur
Attach the sail tack point to the fork of the gear
motor
Attacher le point de drisse à l’émerillon
Attach the halyard point to the swivel
Dans le cas d’un spi asymétrique, installer le point
d’amure libre sur la chape du motoréducteur.
In case of asymetric spinnaker, install the swivel tack
point onto the gear motor.
Fixer le motoréducteur sur le point d’ancrage
prévu.
Install the gear motor on the fastening point
Préparer le bateau pour l’envoi de voile (abattre etc...) et hisser la voile
Position the boat downwind and host the sail

10
OPERATIONS DE DEROULEMENT - ENROULEMENT /
UNFURLING - FURLING OPERATIONS
POUR DEROULER LA VOILE:
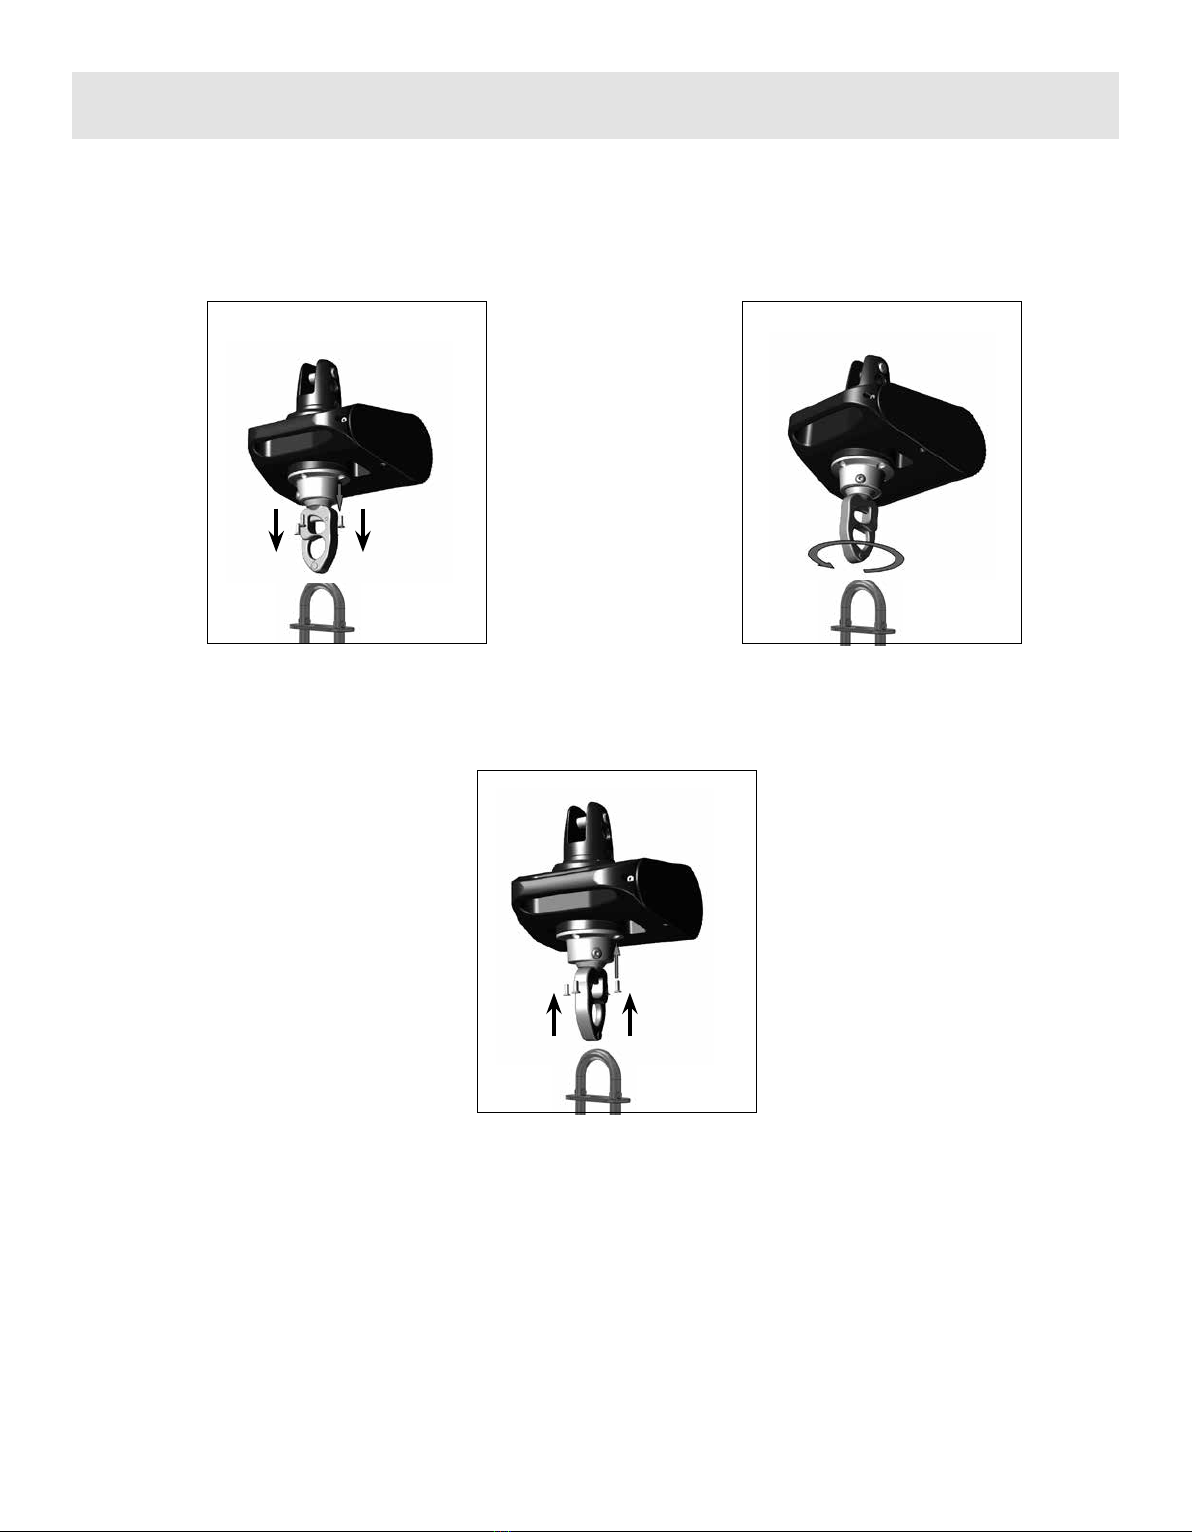
• Vérier le bon branchement de l’emmagasineur
• Veiller à abattre
• Dérouler avec la télécommande - border l’écoute simul-
tanément
POUR UN BON ENROULEMENT DE LA VOILE
• Positionner le bateau à la bonne allure (abattu > 120°)
• Vérier que les écoutes de la voile soient claires
• Choquer progressivement la voile et enrouler la voile
avec la télécommande
• Faire 2/3 tours d’écoute au tour de la voile
• Aaler la voile
IMPORTANT:
• Ne pas naviguer avec la voile partiellement enroulée
• Une fois la voile enroulée, aaler la voile, ne pas navi-
guer avec la voile à poste
UNFURLING THE SAIL
• Check rst if the gear motor is properly plugged
• Bear away
• Unfurl the sail with the remote control and take in the
sheet simultaneously
FURLING EFFICIENTLY THE SAIL
• Position the boat in the appropriate wind direction (bear
away > 120°)
• Check the sail sheets can be released
• Release the sheet smoothly and furl the sail with the
remote control
• Make 2 or 3 turns with the sheet around the sail once
furled
• Drop the sail
WARNING:
• Never sail with the sail partially furled
• Once the sail is fully furled, drop it and do not sail with
the sail furled.
CONSEILS / ADVICES
AVANT TOUTE UTILISATION
• Vérier le bon fonctionnement de l’installation électrique
• Vérier que les batteries sont bien chargées
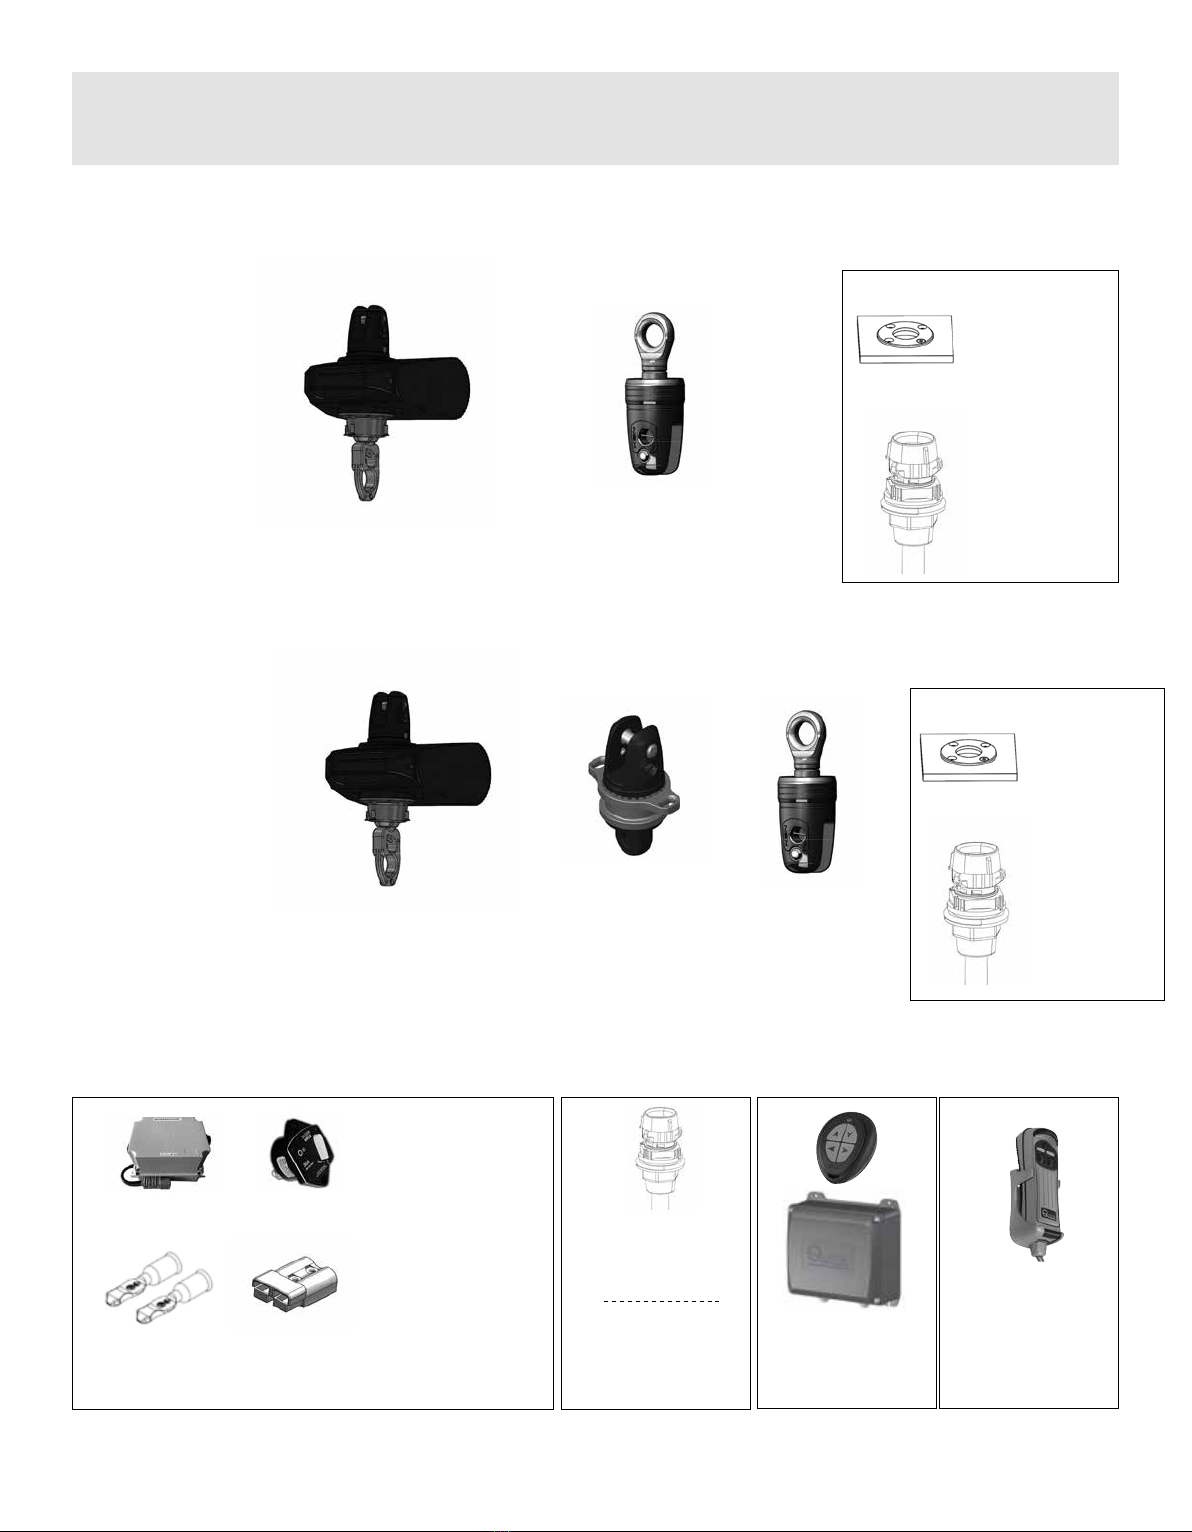
• Installer toujours le produit sur un ancrage métallique
adapté (ex: cadènes Wichard)
PENDANT L’UTILISATION
• Anticiper toujours vos maneuvres
• Laisser toujours une distance susante entre le bateau
et les obstacles potentiels: cote, entrée de port, navires...)
ENTRETIEN ET STOCKAGE
• Rincer à l’eau claire, aucun entretien spécique,pas de
graissage type WD40
• Une fois utilisé, stocker l’emmagasineur dans un endroit
sec
BEFORE ANY USE
• Check the correct operation of the electric installation
• Check that the batteries are fully charged
• Always install the product on an appropiate fastening like
Wichard pad eyes
WHEN USING THE PRODUCT
• Plan and prepare your operations
• Always leave sucient distance between the boat and
potential obstacles (shore, harbour, other boats / vessels)
MAINTENANCE AND STORAGE
• Rinse with clear water, no maintenance required, never
use WD40 (or similar product)
• Always store the product inside the boat

11
CONDITIONS DE GARANTIE
Sans préjudice de la garantie légale, votre enrouleur PROFURL est garanti 3 (trois) ans et 1 (un) an pour le moteur électrique à partir de la date de sa mise
en service, la facture d’achat au revendeur ou au constructeur faisant foi.
La garantie se limite au remplacement ou à la réparation en nos ateliers des pièces reconnues défectueuses.
La garantie disparaît immédiatement et complètement si le client modie ou fait réparer sans l’accord de Wichard le matériel fourni. La réparation, la
modication ou le remplacement des pièces pendant la période de garantie ne peuvent avoir pour eet de prolonger le délai de garantie du matériel.
La garantie ne couvre pas les dommages consécutifs à un mauvais montage, à une utilisation inappropriée ou abusive, à un accident ou à toute fortune
de mer.
VERIFICATIONS IMPERATIVES
Il appartient à l’utilisateur de vérier ou de faire vérier par une personne compétente que :
- la longueur du guindant de la voile est correcte, ni trop longue ni trop courte
- les xations de l’enrouleur à la base de l’étai sont correctement réalisées
- les diérentes vis sont correctement serrées
- la drisse, une fois la voile hissée, est correctement tendue
- le Multitop est correctement installé et serré
- le diamètre de l’axe de xation fourni avec l’enrouleur correspond bien à celui de l’axe d’origine
- Le voltage adequat au système ou la pression d’alimentation adéquate
Les ennuis consécutifs à ces défauts de montage ou d’utilisation, souvent constatés, ne sont pas couverts par la garantie.
PROCEDURE A SUIVRE EN CAS D’APPEL EN GARANTIE
En cas d’impossibilité de faire constater par une personne compétente la nature des dommages, le client prendra contact directement avec WICHARD
S.A. - France.
La ou les pièce(s) défectueuse(s) devra (devront) impérativement être retournée(s) pour inspection à WICHARD S.A.S (France), à WICHARD, Inc aux USA
ou à WICHARD PACIFIC Pty Ltd, port aux frais du client, dans les 14 (quatorze) jours suivant le constat de l’avarie.
En cas de réexpédition du matériel depuis un pays tiers, les frais de dédouanement éventuels correspondant à l’entrée en France ou aux USA restent à
la charge du client.
Au cas où le client exige une réexpédition des pièces avant réception des pièces défectueuses par WICHARD S.A.S (France), WICHARD Inc (USA) ou
WICHARD PACIFIC Pty, celles-ci seront facturées et payables avant l’expédition, règlement par carte bancaire, transfert bancaire ou tout autre moyen. Si
la responsabilité de WICHARD est reconnue, WICHARD remboursera le client dans les meilleurs délais.
LIMITED WARRANTY
Your PROFURL reeng-furling system is warranted for a period of 3 (three) year and 1 (one) for the electric motor from the date of purchase against parts and
materials.
This warranty is limited to the repair and replacement of defective parts by an authorized PROFURL dealer and only after the written consent of WICHARD
S.A.S (France), WICHARD Inc, or WICHARD PACIFIC (addresses below).
The warranty is void if the system is modied or repaired prior written consent of WICHARD S.A.S (France), WICHARD Inc or WICHARD PACIFIC.
This warranty covers only the WICHARD parts and materials. Any accidental damage or expenses are not covered by the warranty.
This warranty does not cover damages caused by a system which was installed or used improperly, damaged by collision, or any act of God.
In the event of a warranty claim, WICHARD’s liability is limited to the value of the system at the date of purchase. Packaging costs, shipment or custom charges
are at customer’s expense.
OWNER SHOULD CHECK OR HAVE CHECKED BY A SKILLED PERSON THE FOLLOWING
After installation of the system the customer must check the following:
- the sail lu is cut at the correct length
- the locking devices attaching the drum mechanism are properly secured
- all screws are tightened
- the halyard is tight when the sail is hoisted
- the Wrapstop is properly installed as shown in this manual
- the diameter of the clevis pin supplied with the WICHARD’s system is correct with the forestay terminal
- the appropriate power of the system or the operation pressure
WHICH PROCEDURE SHOULD YOU FOLLOW IN CASE OF WARRANTY CLAIM?
• In case it is impossible for the owner to have the damage checked by a skilled person, the owner will contact WICHARD S.A.S (France), WICHARD, Inc
(USA) or WICHARD PACIFIC Pty Ltd. Please see address below.
• The defective part should be returned at owner’s expenses to WICHARD S.A.S (France), WICHARD Inc or WICHARD PACIFIC Pty Ltd within 14 (fourteen)
days after the damage occured to the system.
• In case the parts are shipped from a country outside France, USA or Australia, custom duties for return to WICHARD should be prepaid by the owner.
• In case the owner will demand urgent replacement of part before the defective part is received by WICHARD, the replacement part will be charged to the
owner, and paid before shipping (credit cards accepted). In case WICHARD’s responsibility is nally acknowledged, WICHARD will refund the owner.
• No replacement part purchased from a PROFURL dealer will be refunded to the owner.
• In the normal warranty procedure, the parts will be returned to the owner, shipping and customs at owner’s expenses.

12
WICHARD France Hotline / Support technique / SAV
ZA Pornichet Atlantique 16 rue du Gulf Stream 44380 Pornichet - France
www.profurl.com
®
This manual suits for next models
7
Table of contents
Other Wichard Boating Equipment manuals
Popular Boating Equipment manuals by other brands

Fluid Concepts
Fluid Concepts Rear Bimini instruction manual

Humphree
Humphree HCS-5 Setup manual

bamar
bamar RLG EVO 08 instruction manual

Floe
Floe 510-27100-00 Assembly instructions and owner's manual

TIDELAND
TIDELAND SeaBeacon 2 installation manual

monster tower
monster tower MT7 Tower installation manual

Classic Accessories
Classic Accessories Stellex T-Top Instructions & Care

SUSPENZ
SUSPENZ SUP Stow & Go System Mounting instructions

JOBE
JOBE ADDICT 1.6 installation guide

Livorsi
Livorsi TTK1150EL Installation

Roswell
Roswell Bennington C924-016650 Care, Maintenance, Operations

RS SAILING
RS SAILING VENTURE CONNECT SCS Installation