swissflex uni 20 85RF User manual

0408129348
0408129352
Bedienungsanleitung
Mode d’emploi
Operating instructions
Gebruiksaanwijzing
Modo de empleo
Istruzioni d’uso
uni 20_85RF/uni 22_85RF bridge®
uni 21_25
uni 21_45
uni 21_05
uni 21_35
uni 21_75K
uni 21_95RF
uni 21_85RF
uni 21_95RS
uni 21_15
A575R
A
5
7
5
R
uni 21_75S
uni 21_85S
uni 21_75RF

Wir gratulieren zum Kauf Ihrer Swissflex-Unterfederung. Sie haben sich für ein ausgezeichnetes Pro-
dukt entschieden, das Qualitätsdenken und Know-how konsequent verbindet. Wir danken für Ihr Ver-
trauen und wünschen Ihnen einen erholsamen Schlaf!
Nous vous félicitons pour l’achat de votre literie Swissflex. Vous avez fait le choix d’un produit ex-
ceptionnel, qui associe qualité et savoir-faire. Nous vous remercions de la confiance que vous nous
accordez et nous vous souhaitons un sommeil réparateur !
We congratulate you on the purchase of your new Swissflex slat base. You have chosen an outstanding
product, which incorporates the perfect combination of quality and know-how. We would like to thank
you for your confidence and trust you will have a restful night’s sleep!
Van harte gefeliciteerd met de aanschaf van uw Swissflex-lattenbodem. Daarmee hebt u gekozen voor
een uitstekend product, waarin kwaliteitsbesef en knowhow onlos-makelijk met elkaar verbonden
zijn. Wij danken u voor uw vertrouwen en wensen u veel verkwikkend slaapgenot toe!
Le felicitamos por la compra de su sistema de descanso. Usted ha elegido un producto excepcional,
que asocia calidad y saber-hacer. Le agradecemos la confianza depositada en nosotros y le deseamos
un sueño reparador.
Congratulazioni per l’acquisto della vostra rete Swissflex. Avete optato per un prodotto eccezionale
che concilia perfettamente alta qualitá e know-how. Vi ringraziamo per la fiducia e vi auguriamo un
sonno riposante e rigenerante.
NL Van harte gefeliciteerd!
ES ¡Felicidades!
IT Congratulazioni!
FR Félicitations !
DE Herzlichen Glückwunsch!
GB Congratulations!

04 | Bedienungsanleitung DE
08 | Mode d’emploi FR
12 | Operating instructions GB
16 | Gebruiksaanwijzing NL
20 | Modo de empleo ES
24 | Istruzioni d’uso IT
uni 20_85RF/uni 22_85RF bridge®
uni 21_25
uni 21_45
uni 21_05
uni 21_35
uni 21_75K
uni 21_95RF
uni 21_85RF
uni 21_95RS
uni 21_15
A575R
A
5
7
5
R
uni 21_75S
uni 21_85S
uni 21_75RF

4Bedienungsanleitung DE
Funk-Fernbedienung
1 Memoryposition 1
2 Memoryposition 2
3 Memoryposition 3
4 Memoryposition 4
5 Taschenlampe
6 Alle Motoren «auf»
7 Alle Motoren «ab»
8 Unterflurbeleuchung
9 Antrieb Kopfbereich «auf»
10 Antrieb Kopfbereich «ab»
11 Antrieb Rückenbereich «auf»
12 Antrieb Rückenbereich «ab»
13 Antrieb Oberschenkelbereich «auf»
14 Antrieb Oberschenkelbereich «ab»
15 Synchronfunktion aktivieren / deaktivieren
16 Memoryspeichertaste
17 Freisteckdose ein / aus
18 Tastenblockierung (Kindersicherung)
19 Batteriefach
(Rückseite Funk-Fernbedienung)
Im Batteriefach: Rote Teach-In-Taste
20 3x AAA-Batterie (im Lieferumfang)
Motorensteuerung
21 Synchronanschluss / Bluetooth Adapter
(Anschluss)
22 Unterflurbeleuchtung (intern)
23 Netzteilanschluss / Anschluss externe
Unterflurbeleuchtung
24 Anschluss für Zusatzmotoren
25 Teach-In-Taste / Taste „Notabsenkung“
(Rückseite des Motors)
26 Batteriefach für Notabsenkung (2x 9 V)
(nur angeschlossen wenn benötigt)
27 Schaltnetzteil
28 Bluetooth-Adapter (Optional)
(Anschluss am Motor)
29 Freisteckdose (Optional)
23
1
5, 6
9
11
13
15
17
19
4
7, 8
10
12
14
16
18
26
25
21
24
22
23 (2 Kabel)
28 29
27
19
20
uni 20_85RF/uni 22_85RF bridge®

5
DE Bedienungsanleitung
Komfort und Gesundheit
Willkommen in der Welt von Swissflex!
Ihr Swissflex uni 20_/22_85RF bridge® ist ein Schwei-
zer Qualitätsprodukt. Wenn Sie die wenigen Bedie-
nungs- und Sicherheitshinweise beachten, wird es
über Jahre hinweg zu Ihrer Zufriedenheit funktionie-
ren. Neben vielen anderen Vorteilen bietet Ihnen Ihr
uni 20_/22_85RF bridge® ein ungestörtes Schlafum-
feld. Alle elektrischen Leitungen die vom Netzstecker
zum Bett führen befinden sich dank EcoTec in einem
fast stromlosen Zustand (unter 0.5 Watt).
Sicherheitshinweise
ACHTUNG! Setzen Sie den uni 20_/22_85RF bridge®
und das Zubehör weder Regen, noch sonstiger
Feuchtigkeit aus, um Feuergefahr und die Gefahr
eines elektrischen Schlages zu vermeiden. Sollte
Flüssigkeit in das Zubehör gelangen, trennen Sie das
Netzkabel von der Steckdose und lassen Sie es von
Ihrem Swissflex Fachhändler überprüfen.
Achten Sie beim Einbau der Unterfederung darauf,
dass alle Bewegungen von Kopf-, Rücken- und Fuss-
teil nicht durch Möbelteile behindert werden.
Trennen Sie unbedingt bei allen Demontage- und
Montagearbeiten an der Unterfederung oder am
Bettgestell den Netzstecker vom Netz.
Schliessen Sie an die Freisteckdose (29) keine Gerä-
te an, die beim Einschalten über die Fernbedienung
Personen oder Sachgut gefährden könnten, insbe-
sondere keine motorbetriebenen Werkzeuge wie
z.B. Sägen, Bohrmaschinen und dergleichen (Verlet-
zungsgefahr), oder keine ortsveränderlichen Wärme-
geräte (Brandgefahr).
Verlegen Sie das Netzkabel von der Freisteckdose
(29) zum Bett nie so, dass ev. vorhandene scharfe
Kanten oder enge Knickstellen die Leitungsisolation
beschädigen. Auf keinen Fall darf die Anschlusslei-
tung durch den Verstellmechanismus geführt werden.
Falls die Kabel, das Gehäuse des Schaltnetzteils oder
die Freisteckdose (29) beschädigt sind, darf das Sitz-
bett nicht mehr in Betrieb genommen werden. Ent-
fernen Sie den Netzstecker aus der Steckdose und
informieren Sie Ihren Fachhändler.
Öffnen Sie niemals das Gehäuse der Freisteckdose
(29), an der die Kabel herausgeführt werden. Durch
Eingriffe am stromführenden Teil der Freisteckdose
(29) entfallen jegliche Gewährleistungsansprüche.
Gehen Sie vorsichtig mit dem uni 20_/22_85RF
bridge® und dem Zubehör um, zerlegen und modi-
fizieren Sie es nicht und lassen Sie die Kinder nicht
damit spielen und verhindern Sie, dass gebrechliche
Personen ohne Aufsicht das Produkt verwenden.
Das Produkt darf nicht mit einem Medizinprodukt
verwendet oder in ein Medizinprodukt eingebaut wer-
den.
Das Produkt darf nicht in einer Umgebung verwendet
werden, in der mit dem Auftreten von entzündlichen
oder explosiven Gasen oder Dämpfen (z.B. Anästheti-
ka) zu rechnen ist.
Das Produkt darf nicht zum Heben und Senken von
Lasten verwendet werden.
Verwenden Sie nur Ersatzteile, die von Swissflex her-
gestellt oder freigegeben wurden. Nur diese gewähr-
leisten eine ausreichende Sicherheit.
Inbetriebnahme
Legen Sie die Batterien in die Funk-Fern be dienung ein
Entfernen Sie auf der Rückseite die Abdeckung vom
Batteriefach (19) der Funk-Fern bedienung. Legen Sie
drei AAA-Batterien (20) ein, achten Sie dabei auf die
+/- Markierung. Schieben Sie die Abdeckung wieder
zu. Die Reichweite der Funk-Fernbedienung ist max.
15 m.
Handsender einlernen (Teach-In) (werkseitig
bereits eingelernt)
1. Batterieabdeckung auf der Rückseite des
Handsenders entfernen.
2. Batterien einlegen / überprüfen (3x AAA).
3. Die Teach-In-Taste (25) am Motor aktivieren
(2x Drücken). Sie leuchtet nach erfolgreicher
Aktivierung auf.
4. Im Batteriefach des Handsenders ist oberhalb der
Batterien eine kleine rote Taste.
5. Taste drücken, eine blaue LED beginnt zu blinken.
Die Taste solange gedrückt halten, bis die blaue
LED dauerhaft leuchtet, dann ist das Pairen
abgeschlossen.
Bluetooth®
1. Laden Sie die Standard „Swissflex“ App von der
entsprechenden Plattform für Android (Google
play) oder Apple iOs (App Store).
2. Installieren Sie die Standard „Swissflex“ App auf
Ihrem Smartphone / Tablet-PC.
3. Überprüfen Sie, dass der Motor mit Strom
versorgt ist und der Bluetooth®-Adapter am Motor
angeschlossen ist (21).
4. Die Bluetooth® Connection LED blinkt für ca. 2 min.
5. Verbinden Sie Ihr Smartphone / Tablet-PC via
Bluetooth® mit dem Steuerungssystem, siehe
auch in der Anleitung vom Smartphone / Tablet-PC.
6. Sofern erforderlich geben Sie den PIN (siehe
Typenschild) bei der Abfrage ein, ansonsten
verbindet sich das Smartphone / der Tablet-PC
automatisch.

6Bedienungsanleitung DE
Zurücksetzen der werkseitig programmierten Me-
morypositionen
Drücken Sie 3 Sekunden lang die Memoryspeicher-
taste (16) - die Hintergrundbeleuchtung blinkt darauf
ein Mal, dann muss innerhalb einer Sekunde die Tas-
te Unterflurbeleuchtung (8) gedrückt werden. Als Be-
stätigung, dass die Zurücksetzung auf die Werksein-
stellungen funktioniert hat, blinkt die komplette
Beleuchtung des RF-Touch zwei Mal.
Speichern einer Sitz- oder Liegeposition auf eine
Memorytaste
1. 3x Drücken der Memoryspeichertaste (16)
innerhalb von 2 Sekunden.
2. Aufleuchten der Memorytasten (blau) (1–4).
3. 1x Drücken der gewünschten Speichertaste
Memoryposition 1–4 (1–4) innerhalb von drei
Sekunden.
4. Bei Programmierung einer neuen Position wird
die alte automatisch überschrieben. Erfolgreiches
Abspeichern wird durch umschalten der LED
Farbe (weiss) der ausgewählten Speichertaste
visualisiert. Zwei Sekunden nach Loslassen der
Memotaste wechseln alle Memotasten die Farbe
auf weiss.
So rufen Sie eine gespeicherte Position ab
Drücken Sie die gewünschte Speichertaste Memo-
ryposition 1–4 (1–4), bis alle Liegeflächenteile die
programmierte Position erreicht haben. Während der
Verfahrzeit leuchtet die aktivierte Memorypositions-
taste (blau).
Rückstellung in die Horizontalposition
Mit der «Alle Motoren ab» Taste (7) fahren Sie alle
Liegeflächenteile gleichzeitig in die Horizontalposi-
tion.
Pflege und Wartung
Bei Ihrem uni 20_/22_85RF bridge® handelt es sich
um ein hochwertiges Produkt, dass für zuverlässigen
Betrieb über Jahre hinaus entwickelt wurde. Zur ge-
legentlichen Reinigung von Staub empfehlen wir ein
trockenes Tuch.
So wechseln Sie die Batterien in der Funk-Fernbe-
dienung
Entfernen Sie die Abdeckung vom Batteriefach (19)
auf der Rückseite der Funk-Fernbedienung. Legen
Sie drei AAA-Batterien ein, achten Sie dabei auf die
+/- Markierung. Schieben Sie die Abdeckung wieder zu.
So wechseln Sie die Batterien (20) am Motor am uni
22_85RF (Batterien für Notabsenkung)
Trennen Sie die Batterien vorsichtig von den Batte-
rieclips. Legen Sie 2 x 9-Volt-Block-Batterien ein,
7. Testen Sie die Bluetooth®-Verbindung und
Bedienung mit dem Smartphone / Tablet-PC.
8. Die Bluetooth®-Connection-LED leuchtet blau,
sobald sich das Smartphone / der Tablet-PC mit
der Steuerung verbunden hat (Bluetooth® ist
eingeschaltet).
Synchronfunktion (mit Synchronkabel)
Werden zwei uni 20_/22_85RF bridge® mit einem
Synchronkabel miteinander verbunden (Anschluss
Buchse 19), wird die Synchronfunktion (15) benötigt.
Durch Drücken und Halten der Taste (15), wird die
Synchronfunktion aktiviert/deaktiviert. Beim Betä-
tigen der Verfahrtasten (6-7) synchronisieren sich
die Antriebe und fahren anschliessend in die betä-
tigte Verfahrrichtung. Nach erfolgreicher Aktivierung
leuchtet die Taste dauerhaft blau. Nach erfolgrei-
chem Deaktivieren leuchtet die Taste weiss.
Unterflurbeleuchtung
Durch Drücken der Taste „Unterflurbeleuchtung“
(8) wird die Unterflurbeleuchtung aktiviert. Nach 30
Minuten schaltet sich diese automatisch aus, oder
durch wiederholte Betätigung der Taste. Während
des Betätigens der Taste leuchtet diese Taste (blau).
Taschenlampe
Durch Gedrückthalten der Taste „Taschenlampe“ (5)
leuchtet die Taschenlampe. Beim Loslassen der Tas-
te erlischt das Licht. Während des Benutzens der Ta-
schenlampe leuchtet diese Taste (blau).
Tastenblockierung
Um die Tasten zu blockieren, drücken Sie die Taste
„Tastenblockierung“ (18) für fünf Sekunden. Nach
erfolgreichem Aktivieren der Tastenblockierung
blinken (blau) alle Tasten (ausser Steckdose (17),
Taschenlampe (5), Unterflurbeleuchtung (8) und Tas-
tenblockierung (18)) zwei Mal.
Bei Betätigen einer deaktivierten Taste blinken alle
Tasten zwei Mal (weiss). Durch das Betätigen der Tas-
te „Tastenblockierung“ (18) für fünf Sekunden wird
die Blockierung deaktiviert. War dies erfolgreich,
blinken alle Tasten zwei Mal (blau).
Verstellmöglichkeiten
Ab Werk sind die Schlaf- und Sitzpositionen in der
Steuerung vorprogrammiert.
M1 Ermüdungsfreie Position für Lesen und Fern-
sehen
M2 Erleichternde Position bei Erkältung,
Atemwegs- oder Herz-Kreislauf-Beschwerden
M3 Ergonomische Position bei Rückenschmerzen
und Bandscheibenbeschwerden
M4 Ausstiegs- und Einstiegshilfe
Die Positionen können individuell überschrieben werden.

7
DE Bedienungsanleitung
achten Sie dabei auf die +/- Markierung. Die Batte-
rien am Motor dienen zur Spannungsversorgung bei
einem Stromausfall.
Verhalten bei Störungen
Wenn an Ihrem uni 20_/22_85RF bridge® Störungen
auf treten, versuchen Sie bitte, diese anhand der fol-
genden Anweisungen zu beheben. Wenn sich das
Problem nicht beheben lässt, trennen Sie den uni
20_/22_85RF bridge® von der Steckdose und wenden
Sie sich an Ihren Swissflex Fach händler.
Stromausfall in Sitzposition
Am Motor befindet sich ein nicht angeschlossenes
Batteriepack, um Ihr Bett bei Stromausfall in die fla-
che Schlafposition zurück zu stellen. Sie können Ihr
Bett bei Stromausfall flach stellen, indem Sie diese
Batterien anschliessen und die Taste
«Notabsen-
kung» (25) solange gedrückt halten bis alle Liege-
flächenteile in der Horizontalposition sind.
Der uni 20_/22_85RF bridge® funktioniert nicht,
obwohl er eingeschaltet ist und alle Komponenten
richtig angeschlossen sind
Trennen Sie das Netzkabel von der Steckdose. Warten
Sie eine Minute und stellen Sie die Stromversorgung
wieder her. Überprüfen Sie gegebenenfalls mit einer
Nachttischlampe, ob die Netzspannung (240 V) ge-
währleistet ist. Ist kein Strom vorhanden, überprüfen
Sie die Sicherung vom Netz. Drücken Sie die «Alle
Motoren ab» Taste (7), um alle Einstellungen zu-
rückzusetzen. Da die Steuerung des uni 20_/22_85RF
bridge® Microprozessoren enthält, kann es durch
Netzschwankungen zu Störungen kommen.
Problem Mögliche Ursache Lösung
Handschalter oder
Antriebssystem
ohne Funktion.
Keine Netzspannung. Netzverbindung herstellen.
Handschalter oder Anstriebssystem defekt. Wenden Sie sich an Ihren Lieferanten / Händler.
Schaltkondensator oder Netzfreischaltung leer. Drücken Sie die Taste am Netzstecker der Netzfreischaltung.
Antriebe lassen
sich plötzlich nicht
mehr verfahren /
bewegen.
Thermoschalter am Transformator hat mögli-
cherweise ausgelöst oder defekt.
Das Antriebssystem ca. 20-30 Minuten in Ruhestellung belassen.
Temperatursicherung im Transformator hat
möglicherweise ausgelöst oder defekt.
Wenden Sie sich an Ihren Lieferanten / Händler.
Gerätesicherung hat möglicherweise ausge-
löst oder defekt.
Wenden Sie sich an Ihren Lieferanten / Händler.
Keine Netzspannung. Netzverbindung herstellen.
Zuleitung (Netz und / oder Handschalter /
Zusatzantriebe) unterbrochen.
Zuleitung überprüfen und ggf. Kontakt wiederherstellen.
Die netzunabhängige
elektrische Rückstell-
funktion lässt sich
nicht betätigen.
Blockbatterie / Blockbatterien leer.
Blockbatterie / Blockbatterien überprüfen / gegebenenfalls erneuern.
Blockbatterie(n) nicht angeschlossen. Blockbatterie / Blockbatterien anschliessen.
Die Funk-Fernbedienung funktioniert nicht (Die
Hintergrundbeleuchtung funktioniert nicht)
Legen Sie neue Batterien ein. Entfernen Sie gegebe-
nenfalls Hindernisse zwischen der Funk-Fernbedie-
nung und der Motorensteuerung.
Nach einem Stromausfall
Drücken Sie vor erneuter Inbetriebnahme des uni
20_/22_85RF bridge® solange die «Alle Motoren
ab»-Taste (7), bis alle Liegeflächenbereiche die Aus-
gangsposition (Horizontalposition) erreicht haben
und keine Motoren mehr zu hören sind.
Die Notabsenkung
Mit der Notabsenkungsfunktion lässt sich die Liege-
fläche des Bettes im Falle eines Ausfalles der Netz-
versorgung, in die Schlafposition verstellen.
1. Schliessen Sie die Batterien für Notabsenkung
(26) an.
2. Halten Sie den Knopf für die Notabsenkung (25)
solange gedrückt bis alle Liegeflächen in der
Horizontalposition sind.
Nach mehrfacher Not absen kung werden die Batteri-
en stark ent laden und müssen ausgetauscht werden.
Technische Daten
Versorgungsspannung: 110–240 Volt
Versorgung Funk-Fernbedienung: 3 x AAA Batterie
Schaltleistung Motoren: Aussetzbetrieb AB 2 min /18 min
Schaltleistung Freisteckdose: 850 W
Sicherung Freisteckdose: 5 x 20 mm T 4A
Schubkraft Motoren: 4 x 3000 N
Versorgung Notabsenkung: 2 x 9 Volt-Blockbatterie

8Mode d’emploi FR
Télécommande à radiofréquence
1 Position Memory 1
2 Position Memory 2
3 Position Memory 3
4 Position Memory 4
5 Lampe de poche
6 Tous les moteurs «haut»
7 Tous les moteurs «bas»
8 Eclairage du sol
9 Moteur partie tête «haut»
10 Moteur partie tête «bas»
11 Moteur partie dos «haut»
12 Moteur partie dos «bas»
13 Moteur partie cuisses «haut»
14 Moteur partie cuisses «bas»
15 Activer / désactiver fonction synchro
16 Touche d‘enregistrement mémoire
17 Marche / arrêt prise libre
18 Blocage des touches (sécurité enfant)
1 9 C o m p a r t i m e n t à p i l e s ( a u d o s d e l a
télécommande à radiofréquence)
Dans le logement des piles :
touche rouge teach-in
20 3 x piles AAA
(dans le contenu de la livraison)
Commande moteurs
21 Raccordement câble de synchronisation /
Adaptateur Bluetooth (raccordement)
22 Eclairage du sol (interne)
23 Raccordement adaptateur /
Raccordement
de l‘éclairage du sol externe
24 Raccordement pour moteurs
supplémentaires
25 Touche teach-in / touche «descente
d‘urgence» (arrière moteur)
26 Compartiment à piles descente
d‘urgence (2 x 9 V)
(raccorder uniquement si nécessaire)
27 Bloc à découpage
28 Adaptateur Bluetooth (en option)
(Raccordement au moteur)
29 Prise libre (en option)
22 (2 câbles)
23
1
5, 6
9
11
13
15
17
19
4
7, 8
10
12
14
16
18
26
25
21
24
22
23 (2 câbles)
28 29
27
19
20
uni 20_85RF/uni 22_85RF bridge®

9
FR Mode d’emploi
Confort et santé
Bienvenue dans le monde de Swissflex !
Votre Swissflex uni 20_85RF/uni 22_85RF bridge®
est un produit suisse de qualité. Si vous observez les
quelques consignes de manipulation et de sécurité,
il vous donnera entière satisfaction pendant des an-
nées. Outre de nombreux autres avantages, votre uni
20_85RF/uni 22_85RF bridge® vous offre un environ-
nement de sommeil exempt de perturbations. Grâce
à la technologie EcoTec, tous les fils électriques si-
tués entre la prise secteur et le lit sont quasiment
dépourvus de courant (inférieur à 0,5 W).
Pour votre sécurité
ATTENTION ! N‘exposez pas l‘uni 20_85RF/uni
22_85RF bridge® et ses accessoires à la pluie ni à
toute autre source d‘humidité, afin d‘éviter le risque
de feu et de choc électrique. Si un liquide venait à
s‘infiltrer dans les accessoires, déconnectez le cor-
don secteur de la prise et faites-le vérifier par votre
revendeur spécialisé Swissflex.
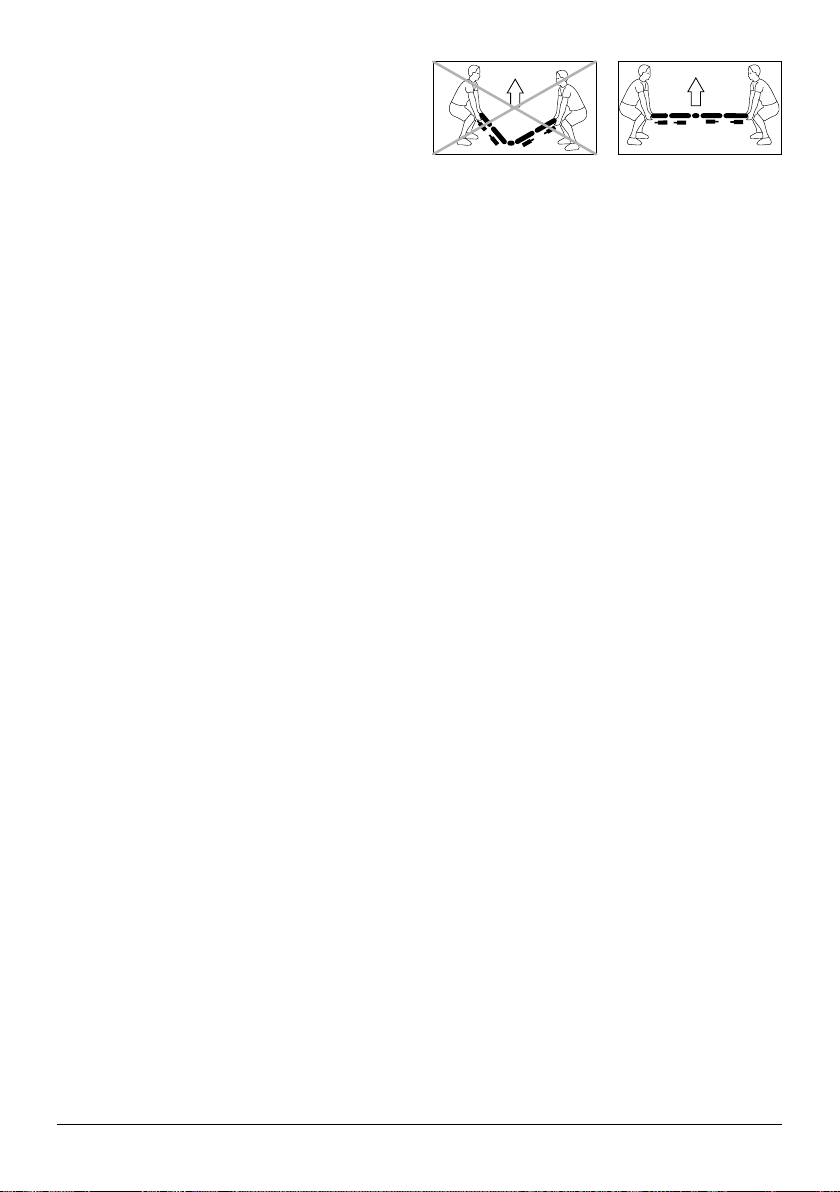
Lors du montage du sommier, veillez à ce que tous
les mouvements des parties tête, dos et pieds ne soi-
ent pas entravés par des parties de meubles.
Débranchez toujours les prises de courant des fiches
secteurs lors des opérations de montage et de dé-
montage du sommier ou du bois de lit. Ne branchez
aucun appareil à la prise libre (29) qui pourrait mettre
en danger des personnes ou des objets, en particulier
aucun outillage électrique tel que scies, perceuses et
autres (risque de blessures) ou chauffage électrique
mobile (risques d‘incendie). Lors du placement du
câble secteur de la prise libre (29), veillez à ce que
des côtés coupants ou d’éventuels noeuds n’abîment
les isolations des câblages. Le câble ne doit en aucun
cas traverser le mécanisme de réglage du sommier.
Dans le cas de dommage des câbles, du boîtier de
l‘alimentation à découpage ou de la prise libre (29),
le lit-siège ne doit plus être activé. Retirez la fiche
de la prise de courant et contactez votre revendeur
spécialisé. N‘ouvrez jamais le boîtier de la prise libre
(29) d‘où partent les câbles. En cas d‘intervention sur
les éléments conducteurs de courant de la prise libre
(29), tout recours à la garantie est exclu.
Soyez prudent dans la manipulation de votre uni
20_85RF/uni 22_85RF bridge® et de ses accessoires,
ne le démontez pas, ne procédez à aucune modi-
fication. Ne laissez pas les enfants jouer avec et
empêchez les personnes impotentes de les utiliser
sans surveillance. Le produit ne doit pas être utilisé
avec du matériel médical ni être inséré dans une ins-
tallation médicale. Le produit ne doit pas être utilisé
dans un environnement susceptible de contenir des
vapeurs ou des gaz inflammables ou explosifs (p.ex.
anesthésiants). Le produit ne doit pas être utilisé pour
soulever ou abaisser des charges.
Utilisez uniquement des pièces détachées fabriquées
ou autorisées par Swissflex. Elles seules garantis-
sent une sécurité suffisante.
Mise en service
Placez les piles dans la télécommande à radio-fré-
quence
Au dos de la télécommande, retirez le couvercle du
compartiment (19). Mettez trois piles AAA (20) en
place en tenant compte des pôles +/-. Faites glisser
le couvercle pour refermer le compartiment. La por-
tée de la télécommande à radiofréquence est de 15
m. max.
Calibrage de la commande (teach-in) (déjà calibrée
au sortir de l‘usine)
1. Enlever le couvercle du logement des piles sur
l‘arrière de la commande.
2. Insérer / vérifier les piles (3 x AAA).
3. Activer la touche teach-in (25) sur le moteur
(ap-
puyer 2x).
Une fois activée, elle s‘allume.
4. Dans le logement piles de la commande se trouve
une petite touche rouge, au-dessus des piles.
5. Appuyer sur cette touche : une LED bleue com-
mence à clignoter.
6. Maintenir la touche enfoncée jusqu‘à ce que la LED
bleue s‘allume en continu - la synchronisation est
alors effectuée.
Bluetooth®
1. Téléchargez l‘application standard «Swissflex»
depuis la plateforme appropriée pour Android
(Google Play) ou Apple iOs (App Store).
2. Installez l‘application standard «Swissflex» sur
votre smartphone / votre tablette.
3. Vérifiez que le moteur soit alimenté en courant et
que l‘adaptateur Bluetooth® soit raccordé au mo-
teur (21).
4. La LED Bluetooth® Connection clignote pendant 2
min. environ.
5. Reliez votre smartphone / votre tablette via Blu-
etooth® au système de commande - voir aussi le
manuel du smartphone / de la tablette.
6. Si cela est nécessaire, entrez le code PIN demandé
(voir plaque type) - sinon, le smartphone / la tab-
lette se connecte automatiquement.
7. Testez la connexion et la commande Bluetooth®
avec le smartphone / la tablette.
8. La LED Bluetooth® Connection s‘allume en bleu
dès que le smartphone / la tablette est relié/e avec
la commande (Bluetooth® est activé).

10 Mode d’emploi FR
Fonction synchronisation (avec câble de synchroni-
sation)
Lorsque deux uni 20_85RF/uni 22_85RF bridge® sont
reliés par un câble de synchronisation (branchement
sur prise 19), il faut utiliser la fonction de synchroni-
sation (15). Appuyez sur la touche (15) et maintenez-
la enfoncée pour activer et désactiver la fonction de
synchronisation. Appuyez sur les touches de procédu-
re (6-7) pour synchroniser les moteurs et les amener
ensuite à la position demandée. Lorsque l‘activation
est réussie, la touche reste allumée en bleu. Lorsque
la désactivation est réussie, la touche s‘allume en
blanc.
Éclairage du sol
Pour activer l‘éclairage du sol, appuyer une fois sur
la touche «éclairage du sol» (8). Il s‘éteint automati-
quement au bout de 30 minutes ou bien en appuyant
une nouvelle fois sur la touche. La touche s‘allume en
bleu lorsqu‘on appuie dessus.
Lampe torche
Pour allumer la lampe torche, maintenir enfon-
cée la touche «lampe torche» (5). La lampe s‘éteint
lorsqu‘on relâche la touche. La touche s‘allume en
bleu lorsqu‘on utilise la lampe torche.
Verrouillage du clavier
Pour verrouiller le clavier, appuyer sur la touche
«verrouillage du clavier» (18) pendant cinq secondes.
Une fois que le verrouillage du clavier a été activé cor-
rectement, toutes les touches clignotent en bleu deux
fois (sauf la prise secteur (17), la lampe torche (5),
l‘éclairage du sol (8) et le verrouillage clavier (18)).
Si on appuie sur une touche verrouillée, toutes les
touches clignotent deux fois en blanc. Pour déver-
rouiller le clavier, appuyer sur la touche « verrouilla-
ge du clavier » (18) pendant cinq secondes. Une fois
que le verrouillage du clavier a été désactivé, toutes
les touches clignotent deux fois en bleu.
Possibilités de réglage
À la sortie de l‘usine, les positions assises et allon-
gées suivantes sont pré-programmées dans la com-
mande.
M1 Position pour lire et regarder la télévision
aisément
M2 Position de confort en cas de rhume ou de
troubles respiratoires ou cardio-vasculaires
M3 Position ergonomique en cas de douleurs du
dos ou des disques intervertébraux
M4 Aide pour sortir du lit ou y monter
Ces positions peuvent être effacées et remplacées
une par une.
Retour sur les positions mémoire programmées au
sortir de l‘usine
Appuyez 3 secondes sur la touche d‘enregistrement
mémoire (16) - le rétroéclairage clignote alors une
fois, puis il faut presser dans la seconde qui suit la
touche éclairage du sol (8). En confirmation que
l‘annulation des positions programmées a bien été
effectuée, toute la commande RF s‘allume deux fois.
Pour enregistrer une position assise ou allongée sur
une touche mémoire
1. Appuyer 3 fois sur la touche d‘enregistrement mé-
moire (16) dans les 2 secondes.
2. Les touches mémoires (1-4) s‘allument en bleu.
3. Appuyer une fois sur la touche mémoire souhaitée
(1-4) dans les 3 secondes.
4. Lorsqu‘on programme une nouvelle position,
l‘ancienne est automatiquement effacée. Une fois
que l‘enregistrement a été correctement effec-
tué, la touche concernée s‘allume en blanc. Deux
secondes après avoir relâché la touche mémoire,
toutes les touches mémoires passent à un éclai-
rage blanc.
Voici comment placer le sommier dans une position
enregistrée
Maintenez appuyée la touché mémoire souhaitée (1-
4) jusqu‘à ce que toutes les parties du sommier aient
atteint la position programmée. Pendant ce temps, la
touche mémoire activée s‘allume en bleu.
Remise à plat
Grâce à la touche «Tous les moteurs bas» (7), vous
pouvez mettre à plat toutes les parties du sommier
en même temps.
Soin et entretien
Votre uni 20_85RF/uni 22_85RF bridge® est un produit
de haute qualité qui a été développé pour garantir un
fonctionnement pendant des années. Nous vous con-
seillons d’utiliser un chiffon sec pour épousseter.
Pour remplacer les piles dans la télécommande à
radio-fréquence
Retirez le couvercle du compartiment (19) au dos de
la télécommande à radiofréquence. Placez trois pi-
les AAA en tenant compte des pôles +/-. Refermez
le couvercle.
Pour remplacer les piles (20) dans le moteur de vot-
re uni 20_85RF/uni 22_85RF bridge® (piles pour
abaissement d‘urgence)
Retirez avec précaution les piles des clips. Placez
deux piles de 9 volts en tenant compte des pôles +/-.
Les piles du moteur servent d’alimentation en cas de
coupure de courant.

11
FR Mode d’emploi
En cas de dérangement
En cas de problème avec votre uni 20_85RF/uni
22_85RF bridge®, vous pouvez essayer de le soluti-
onner à l’aide des recommandations ci-après. Si vous
ne pouvez résoudre le problème, débranchez votre
uni 20_85RF/uni 22_85RF bridge® et adressez-vous à
votre revendeur Swissflex.
Panne de courant en position assise
Dans le moteur se trouve un pack de piles non rac-
cordé qui vous permet de ramener le sommier en
position horizontale en cas de coupure de courant.
Pour cela, vous devrez raccorder le pack de piles et
maintenir enfoncée la touche
«abaissement d‘urgence»
(25) jusqu‘à ce que toutes les parties du lit soient en
position horizontale.
Votre uni 20_85RF/uni 22_85RF bridge® ne fonction-
ne pas, bien qu’il soit connecté à la prise et que tous
les branchements aient été correctement effectués
Débranchez le sommier. Attendez une minute et re-
branchez-le. Vérifiez à l’aide d’une lampe de chevet si
la tension d’alimentation (240V) est assurée. S’il n’y a
pas de courant, vérifiez le fusible.
Appuyez sur la touche «Tous les moteurs bas» (7)
pour refaire les programmations. En cas de variati-
on d‘intensité du courant dans le réseau, des déran-
gements peuvent survenir car la commande du uni
20_85RF/uni 22_85RF bridge® contient des micropro-
cesseurs.
La télécommande à radiofréquence ne fonctionne
pas (l‘éclairage de fond ne fonctionne pas)
Placer de nouvelles batteries. Eventuellement éloig-
ner les obstacles entre la télécommande à radiofré-
quence et la commande moteurs.
Après une coupure de courant
Pour redémarrer votre uni 22_85RF, appuyez sur la
touche «Tous les moteurs bas» (7) jusqu’à ce que
toutes les parties du sommier se remettent en positi-
on de démarrage (horizontale) et que les moteurs ne
fassent plus de bruit.
L‘abaissement d‘urgence
La fonction d‘abaissement d‘urgence permet de ra-
mener la surface de couchage à la position horizon-
tale en cas de coupure de l‘alimentation électrique.
1. Raccordez les piles pour l‘abaissement d‘urgence
(26).
2.
Maintenir enfoncée la touche
«abaissement
d‘urgence» (25) jusqu‘à ce que toutes les parties
du lit soient en position horizontale.
Après plusieurs abaissements d‘urgence, les piles
seront fortement déchargées et devront être chan-
gées.
Problème Cause possible Solution
Commande ou
système moteur ne
fonctionnent pas.
Pas de tension secteur. Raccorder le secteur.
Commande ou système moteur défectueux. Adressez-vous à votre revendeur / fournisseur.
Condensateur commuté ou coupe-courant
déchargé.
Appuyez sur la touche située sur le bloc secteur du coupe-courant.
Les moteurs
s'arrêtent brusque-
ment de fonctionner.
Le commutateur thermique du transfor-
mateur s'est peut-être déclenché ou est
défecteux.
Laisser le système moteur reposer pendant 20-30 minutes.
Le fusible de température dans le trans-
formateur s'est peut-être déclenché ou est
défectueux.
Adressez-vous à votre revendeur / fournisseur.
Le fusible appareil s'est peut-être déclenché
ou est défectueux.
Adressez-vous à votre revendeur / fournisseur.
Pas de tension secteur. Raccorder le secteur.
Alimentation (secteur et/ou commande et/ou
moteurs supplémentaires) interrompue.
Vérifier l'alimentation et rétablir le contact le cas échéant.
Impossible d'activer la
fonction électrique de
retour à l'horizontale
(indépendante du
secteur).
Pile/s déchargée/s.
Vérifier ou changer la/les pile/s.
Pile/s non raccordées. Raccorder la/les piles.
Données techniques
Tension d’alimentation : 110–240 volts
Alimentation télécommande à radiofréquence : 3x piles AAA
Puissance de commutation moteurs :
service discontinu cycles 2 min / 18 min
Puissance de commutation prise libre : 850 W
Fusible prise de courant libre : 5x 20 mm T 4A
Poussée moteurs : 4x 3000 N
Tension remise à plat des moteurs :
2x piles monobloc 9 volts

12 Operating instructions GB
Radio remote control
1 Memory position 1
2 Memory position 2
3 Memory position 3
4 Memory position 4
5 Pocket lamp
6 All motors «up»
7 All motors «down»
8 Floor lighting
9 Control system head section «up»
10 Control system head section «down»
11 Control system back section «up»
12 Control system back section «down»
13 Control system thigh section «up»
14 Control system thigh section «down»
15 Activating / disabling the sync function
16 Memory button
17 User socket on / off
18 Key blocking (child safety device)
19 Battery compartment
(on the back of the radio remote control)
In the battery compartment:
red teach-in button
20 3x AAA-Battery (included in the delivery)
Motor control
21 Sync cable connection /
Bluetooth Adapter (connection)
22 Under-floor lighting (internal)
23 Connection for mains supply unit /
Connection for external under-floor
lighting
24 Connection for auxiliary motors
25 Teach-in button / emergency lowering
button (back of the motor)
26 Battery compartment for emergency
lowering (2x 9V)
(only connect if required)
27 Switching power supply
28 Bluetooth adapter (optional)
(motor connection)
29 User socket (optionally)
23
1
5, 6
9
11
13
15
17
19
4
7, 8
10
12
14
16
18
26
25
21
24
22
23 (2 cables)
28 29
27
19
20
uni 20_85RF/uni 22_85RF bridge®

13
GB Operating instructions
Health and comfort
Welcome to the world of Swissflex!
Your Swissflex uni 20_85RF/uni 22_85RF bridge® is a
Swiss quality product. If you follow the simple opera-
ting and safety instructions, it will function to your
complete satisfaction for many years. In addition
to its many other advantages, your uni 20_85RF/uni
22_85RF bridge® offers an undisturbed sleep envi-
ronment. All electrical connections between the
mains plug and the bed are virtually free of mains
voltage (below 0.5 watts) thanks to EcoTec.
Safety instructions
CAUTION! The uni 20_85RF/uni 22_85RF bridge® and
accessories must be protected from rain and other
moisture to prevent causing a fire hazard or the risk
of electric shock. In case of spillages on an accessory,
the mains cable must be disconnected from the power
outlet and checked by your Swissflex stockist.
When installing the slat base, ensure that the head,
back and foot sections are not obstructed by furniture.
Ensure that the mains supply is disconnected before
any assembly or disassembly work is carried out on
the slat base or the bed frame.
Do not connect any devices to the user socket (29)
that could endanger persons or damage objects when
the socket is turned on by remote control, in parti-
cular electrical tools such as saws, drills and similar
(risk of injury) or portable heating devices (risk of fire).
Never place the mains cable between the user socket
(29) and the bed in such a way that the cable insulati-
on could be damaged by sharp edges or twists. Never
feed the cable through the adjustment mechanism.
In the case of damage to cables to the control housing
or to the user socket (29), do not adjust the bed to
a seated position. Remove the mains plug from the
socket and inform your stockist.
Never open the user socket housing (29) to which the
cables are connected. If you interfere with any electri-
cal part of the user socket (29), the guarantee entitle-
ments will no longer apply.
Handle the uni 20_85RF/uni 22_85RF bridge® and
accessories with care; do not disassemble or modify
them, do not allow children to play with them and pre-
vent frail individuals from using the product without
supervision.
The product may not be used with a medical device or
be installed in a medical device.
The product may not be used in an environment in
which flammable or explosive gases or vapours (e.g.
anaesthetics) are likely to occur.
The product may not be used to raise and lower loads.
Only use spare parts that have been produced or ap-
proved by Swissflex. Only these parts guarantee ade-
quate safety.
Initial setup
Place the batteries into the radio remote control
Remove the cover from the battery compartment (19)
on the back of the radio remote control. Place 3 AAA-
batteries (20) into the compartment, paying attention
to the +/- markings. Close the compartment cover
again. The maximum range of the radio remote con-
trol is 15 metres.
Teaching-in the remote control (already taught-in in
the factory)
1. Remove the remote control‘s battery cover on the
back of the device.
2. Insert / check the batteries (3x AAA).
3. Activate the teach-in button (25) on the motor
(press 2x). It flashes after successful activation.
4. A small red button is located above the batteries in
the battery compartment of the device.
5. Press the button; a blue LED will start flashing.
6. Hold the button down until the blue LED is per-
manently illuminated; this means that pairing has
been completed.
Bluetooth®
1. Download the standard „Swissflex“ app from the
relevant platform for Android (Google play) or
Apple iOs (App Store).
2. Install the standard „Swissflex“ app onto your
Smartphone / Tablet PC.
3. Check that the motor has a power supply and that
the Bluetooth® adapter is connected to the motor
(21).
4. The Bluetooth® connection LED flashes for about
2 min.
5. Connect your Smartphone / Tablet PC via Blu-
etooth® using the control system, also see the
Smartphone / Tablet PC instruction manual.
6. Enter the PIN (see type plate) if requested,
otherwise the Smartphone / Tablet PC connects
automatically.
7. Test the Bluetooth® connection and operation
with the Smartphone / Tablet PC.
8. The Bluetooth® connection LED turns blue as
soon as the Smartphone / Tablet PC is connected
to the control system (Bluetooth® is activated).

14 Operating instructions GB
Synchro function (with sync cable)
When two uni 20_85RF/uni 22_85RF bridge® are
linked together with a sync cable (connection jack 19),
the synchro function (15) is required. By pressing and
holding down the button (15), the synchro function is
activated/deactivated. When pressing the travel but-
ton (6-7), the control systems synchronise and then
move in the confirmed direction of travel. After suc-
cessful activation, the button glows blue continuous-
ly. After successful deactivation, the button appears
white.
Under-floor lighting
Activate the under-floor lighting by pushing the „Un-
der-floor lighting“ button (8). This switches off auto-
matically after 30 minutes, or if the button is pushed
once again. This button is illuminated (blue) when it
is pushed.
Pocket lamp
The pocket lamp is illuminated when the „Pocket
lamp“ button (5) is held down. The light turns off
when the button is released. This button is illumina-
ted (blue) while the pocket lamp is in use.
Lock buttons
To lock the buttons, hold down the „Lock buttons“
button (18) for five seconds. Once the button lock has
been activated, all buttons (except for the mains out-
let (17), the pocket lamp (5), the under-floor lighting
(8) and the button lock (18)) flash (blue) twice.
All buttons flash twice (white) when a disabled button
is pushed. The lock is disabled by holding down the
„Lock buttons“ button (18) for five seconds. All but-
tons flash twice (blue) if this was successful.
Adjustment options
The sleep and sit positions have been pre-program-
med in the factory.
M1 Read and watch TV without getting tired
M2 Relieving position for colds, respiratory
disorders or cardiovascular complaints
M3 Ergonomic position for backaches and
invertebral disk complaints
M4 Aids for getting into and out of the bed
The positions can be overwritten individually.
Resetting the factory-programmed memory posi-
tions
Hold down the memory button (16) for 3 seconds –
the background lighting then flashes once, the under-
floor lighting button (8) must then be pressed within
a second. The entire RF-Touch lighting flashes twice
to confirm that the factory settings have been reset.
Saving the sitting and lying position to a memory
button
1. Press the memory button (16) 3x within 2 seconds.
2. The memory button is illuminated (blue) (1–4).
3. Press the desired memory button for memory
position 1–4 (1–4) 1x within three seconds.
4. The programming of a new position automatically
overwrites an old position. A successful save is
visualised by a change in colour of the selected
memory button LED (white). All memory buttons
turn white two seconds after the memory button is
released.
To call up a position stored in memory
Press the desired memory button for memory po-
sition 1–4 (1–4), until all the comfort sections have
reached the programmed position. The activated
memory button is illuminated (blue) during the travel
time.
To reset to the horizontal position
Press the “all motors down” button (7) to simultane-
ously move all sections to the horizontal position.
Care and Maintenance
Your uni 20_85RF/uni 22_85RF bridge® is a high-quali-
ty product that has been designed to serve you relia-
bly for many years to come. For occasional cleaning
and the removal of dust, we recommend the use of
a dry cloth.
Changing the batteries in the radio remote control
Remove the cover from the battery compartment (19)
on the back of the radio remote control. Place three
AAA batteries into the compartment, paying attention
to the +/- markings. Close the compartment cover
again.
Changing the batteries (20) in the uni 20_85RF/uni
22_85RF bridge® motor (batteries for emergency
lowering)
Carefully remove the batteries from the battery
clips. Place two 9V block batteries in the compart-
ment, paying attention to the +/- markings. The bat-
teries in the motor provide power in the case of a
power failure.
Troubleshooting
In case of malfunctions with your uni 20_85RF/uni
22_85RF bridge®, consult the following troubleshoo-
ting tips. If the problem cannot be resolved, discon-
nect the uni 20_85RF/uni 22_85RF bridge® from the
mains outlet and contact your Swissflex stockist.

15
GB Operating instructions
Loss of power in the sitting position
In case of a power failure, a battery pack (2 x 9V) that
has not been connected is located in the motor which
allows you to move the bed to the flat sleeping positi-
on. Connect this battery pack and hold the emergency
lowering button (25) down until all sleeping surfaces
are horizontal to move the bed to the horizontal posi-
tion when there is no mains power.
The uni 20_85RF/uni 22_85RF bridge® does not
work despite being switched on and all components
being connected properly
Disconnect the mains supply unit from the mains out-
let. Wait a minute and then reconnect it. If necessary,
connect a bedside lamp to check that mains voltage
(240V) is present. If there is no current, check the fuse.
Press the “all motors down” button (7) to reset all
adjustments. The control of the uni 20_85RF/uni
22_85RF bridge® contains microprocessors, so irre-
gular power supply can lead to malfunctions.
The radio remote control does not work (The back-
ground light does not work)
Insert new batteries. Where applicable, remove any
obstacles between the radio remote control and the
motor control.
After a power failure
Before resuming use of the uni 20_85RF/uni 22_85RF
bridge®, press and hold the “All motors down” button
(7), until all comfort areas have reached the horizon-
tal position and the motors have stopped moving.
Emergency lowering
The emergency lowering function allows the bed‘s
sleeping surface to be moved to the sleeping position
in case of a power failure.
1. Connect the batteries for emergency lowering (26).
2. Hold the emergency lowering button (25) down un-
til all sleeping surfaces are horizontal.
Repeated use of the emergency lowering function
puts a lot of strain on the batteries, in which case
they must be replaced.
Problem Possible cause Solution
Remote control or
control system not
working.
No mains supply. Restore mains connection.
Manual switch or control system defective. Contact your supplier / stockist.
Switched capacitor or mains isolation blank. Press the button on the mains isolation plug.
Control systems
suddenly no longer
travel / move.
Thermoswitch on the transformer may have
been triggered or may be defective.
Leave the control system in the rest position for 20-30 minutes.
Thermal cut-out in the transformer may have
been triggered or may be defective.
Contact your supplier / stockist.
Internal fuse may have been triggered or may
be defective.
Contact your supplier / stockist.
No mains supply. Restore mains connection.
Supply line (mains and / or manual switch /
auxiliary control system) interrupted.
Check the supply line and restore contact if applicable.
The battery-operated
electric reset function
cannot be activated.
Block battery / block batteries flat.
Check and replace the block battery / block batteries if necessary.
Block battery/batteries not connected. Connect the block battery / block batteries.
Technical data
Supply voltage: 110-240V
Remote control power supply: 3x AAA Batteries
Power rating motors:
Intermittent operation FROM 2 min / 18 min
Power rating user socket : 850 W
User socket fuse: 5x 20 mm T 4A
Thrust motors: 4x 3000 N
Power supply for emergency lowering: 2x 9V block battery

16 Gebruiksaanwijzing NL
Draadloze afstandsbediening
1 Geheugenpositie 1
2 Geheugenpositie 2
3 Geheugenpositie 3
4 Geheugenpositie 4
5 Zaklamp
6 Alle zones «omhoog»
7 Alle zones «omlaag»
8 Vloerverlichting
9 Aandrijving hoofdzone «omhoog»
10 Aandrijving hoofdzone «omlaag»
11 Aandrijving rugzone «omhoog»
12 Aandrijving rugzone «omlaag»
13 Aandrijving bovenbeenzone «omhoog»
14 Aandrijving bovenbeenzone «omlaag»
15 Synchroonfunctie inschakelen/uitschakelen
16 Geheugentoets
17 Stopcontactenlat aan / uit
18 Toetsblokkering (kinderbeveiliging)
19 Batterijvak
(achterkant draadloze afstandsbediening)
In het batterijvak: Rode Teach-In-toets
20 3x AAA-batterij
(bij de levering inbegrepen)
Motorbedieningsapparaat
21 Aansluiting synchroonkabel /
Bluetooth-adapter (aansluiting)
22 Vloerverlichting (intern)
23 Adapteraansluiting / Aansluiting externe
vloerverlichting
24 Aansluiting voor extra motoren
25 Teach-In-toets / „nood-uitknop“-toets
(achterkant van de motor)
26 Batterijvak voor nood-uitknop (2x 9 V)
(alleen aansluiten wanneer nodig)
27 Schakeladapter
28 Bluetooth-adapter (optioneel)
(aansluiting op motor)
29 Stopcontactenlat (optioneel)
23
1
5, 6
9
11
13
15
17
19
4
7, 8
10
12
14
16
18
26
25
21
24
22
23 (2 kabels)
28 29
27
19
20
uni 20_85RF/uni 22_85RF bridge®

17
NL Gebruiksaanwijzing
Comfort en gezondheid
Welkom in de wereld van Swissflex!
Uw Swissflex uni 20_85RF/uni 22_85RF bridge® is een
Zwitsers kwaliteitsproduct waarvan u nog jarenlang
plezier kunt hebben, als u een aantal elementaire be-
dienings- en veiligheidsaanwijzingen opvolgt. Naast
tal van andere voordelen biedt uw uni 20_85RF/uni
22_85RF bridge® u vooral een ongestoorde slaapom-
geving. Alle snoeren van het stopcontact naar het bed
zijn dankzij EcoTec bijna vrij van netspanning (onder
0,5 watt).
Veiligheidsaanwijzingen
LET OP! Schakel de uni 20_85RF/uni 22_85RF bridge®
en onderdelen bij regen of andere vochtigheid uit om
brandgevaar en het gevaar op een elektrische schok
te voorkomen. Mocht er vloeistof op de onderdelen
terechtkomen, trek dan de stekker uit het stopcontact
en laat deze door uw Swissflex-speciaalzaak contro-
leren.
Let er tijdens het inbouwen van de lattenbodem op dat
de bewegingen van het hoofd-, rug- en voetgedeelte
niet door meubelonderdelen worden gehinderd.
Bij alle demontage- en montagewerkzaamheden aan
de lattenbodem of de beddenbak moet de netstekker
altijd uit het stopcontact worden getrokken.
Sluit geen apparaten op de stopcontactenlat (29)
aan, die bij het aanzetten via de afstandsbediening
gevaarlijk kunnen zijn voor personen of zaken, met
name geen motoraangedreven gereedschap zoals
bv. zagen, boormachines en dergelijke (kans op ver-
wondingen), of verplaatsbare verwarmingstoestellen
(brandgevaar).
Leg de stekker van de stopcontactenlat (29) naar het
bed zodanig, dat de leiding niet geknikt wordt of even-
tuele scherpe kanten de leidingisolatie beschadigen.
De aansluitleiding mag in geen geval door het ver-
stelmechanisme gevoerd worden.
Als het snoer, de behuizing van de schakeladapter of
de stopcontactenlat (29) beschadigd zijn, mag het zit-
bed niet meer worden gebruikt. Trek de stekker uit
het stopcontact en neem contact op met uw Swissflex-
speciaalzaak.
Open nooit de behuizing van de stopcontactenlat (29)
waar de kabels uitkomen. De garantie vervalt bij in-
grepen aan het stroomvoerende deel van de stopcon-
tactenlat (29).
Ga voorzichtig met de uni 20_85RF/uni 22_85RF
bridge® en de onderdelen om, demonteer en wijzig
niets, laat kinderen er niet mee spelen en laat perso-
nen met een beperking het product niet zonder toe-
zicht gebruiken.
Het product mag niet met een medisch product ge-
bruikt of in een medisch product ingebouwd worden.
Het product mag niet worden gebruikt in een omge-
ving waar brandbare of explosieve gassen of dampen
(bijv. anesthetica) aanwezig kunnen zijn.
Het product mag niet worden gebruikt voor het heffen
en laten zakken van lasten.
Gebruik uitsluitend door Swissflex gefabriceerde of
goedgekeurde vervangingsonderdelen. Alleen deze
onderdelen garanderen een voldoende veiligheids-
niveau.
Ingebruikneming
Plaats de batterijen in de draadloze afstandsbedie-
ning
Verwijder aan de achterkant het klepje van het bat-
terijvak (19) van de draadloze afstandsbediening.
Plaats drie AAA-batterijen (20), let daarbij op de +/-
markering. Schuif het klepje weer dicht. Het bereik
van de draadloze afstandsbediening is maximaal 15
meter.
Voer de Teach-In-procedure voor de afstandsbedie-
ning uit (in fabriek al uitgevoerd)
1. Verwijder het klepje van het batterijvak aan de ach-
terkant van de afstandsbediening.
2. Plaats en controleer de batterijen (3 x AAA).
3. Schakel de Teach-In-toets (25) op de motor in (2x
drukken). Als deze is ingeschakeld licht de toets een-
maal op.
4. In het batterijvak van de afstandsbediening bevindt zich
boven de batterijen een kleine rode toets.
5. Druk de toets in, een blauw lampje begint te knipperen.
6. Houd de toets ingedrukt tot het blauwe lampje brandt
zonder te knipperen, dan is het pairen afgerond.
Bluetooth®
1. Download de standaard “Swissflex”-app van de
website voor Android (Google Play) of Apple iOs
(App Store).
2. Installeer de standaard “Swissflex”-app op uw
smartphone of tablet.
3. Controleer of de motor op de stroom is aangeslo-
ten en of de Bluetooth®-adapter op de motor is
aangesloten (21).
4. Het Bluetooth® Connection-lampje knippert ca. 2
min.
5. Verbind uw smartphone of tablet via Bluetooth®
met het bedieningssysteem, zie hiervoor ook de
handleiding van de smartphone of tablet.
6. Voer indien nodig de pincode in (zie typeaandu-
iding) in, anders maakt de smartphone of tablet
automatisch verbinding.
7. Test de Bluetooth®-verbinding en de bediening via
de smartphone of tablet.

18 Gebruiksaanwijzing NL
8. Het Bluetooth® Connection-lampje licht blauw op
zodra de smartphone of tablet verbinding heeft ge-
maakt met het bedieningssysteem (Bluetooth® is
ingeschakeld).
Synchroonfunctie (met synchroonkabel)
Indien twee uni 20_85RF/uni 22_85RF bridge® door
middel van een synchroonkabel met elkaar worden
verbonden (aansluiting connector 19), is de syn-
chroonfunctie (15) nodig. Door de knop (15) ingedrukt
te houden, wordt de synchroonfunctie geactiveerd/
gedeactiveerd. Door op de verstelknoppen (6-7) te
drukken, worden de aandrijvingen gesynchroniseerd,
waarna ze zich in de gewenste richting bewegen. Na
succesvolle activering licht de knop blauw op en blijft
branden. Na succesvolle deactivering licht de knop
wit op.
Vloerverlichting
Druk op de toets “Vloerverlichting” (8) om de vloer-
verlichting aan te zetten. Deze wordt na 30 minuten
automatisch uitgeschakeld of door nogmaals op de
toets te drukken. Als u de toets indrukt, licht deze
blauw op.
Zaklamp
Houd de toets “Zaklamp” (5) ingedrukt om de za-
klamp te laten schijnen. Als u de toets loslaat, dooft
het licht. Als de zaklamp is ingeschakeld, licht deze
toets blauw op.
Toetsblokkering
Houd de toets “Toetsblokkering” (18) vijf seconden
ingedrukt om de toetsen te blokkeren. Als de toet-
sen geblokkeerd zijn knipperen alle toetsen (behalve
Stopcontact (17), Zaklamp (5), Vloerverlichting (8) en
Toetsenblokkering (18)) twee keer (blauw). Als u op
een geblokkeerde toets drukt, knipperen alle toetsen
twee keer (wit). Houd de toets “Toetsblokkering” (18)
nogmaals vijf seconden ingedrukt om de toetsen weer
te deblokkeren. Als de toetsen weer zijn gedeblok-
keerd knipperen alle toetsen twee keer (blauw).
Verstelmogelijkheden
De slaap- en zitstanden zijn bij aflevering voorge-
programmeerd.
M1 Ontspannen positie voor lezen en tv-kijken
M2 Verlichtende positie bij verkoudheid of
klachten met betrekking tot de luchtwegen en
het hartvaatstelsel
M3 Ergonomische positie bij rugpijn en tussen-
wervelschijfklachten
M4 Uitstap- en instaphulp
U kunt de standen ook naar uw individuele voorkeur
instellen.
Terugzetten van de in de fabriek geprogrammeerde
geheugenposities
Houd de geheugentoets (16) drie seconden lang in-
gedrukt. De achtergrondverlichting knippert dan één
keer, waarna u binnen één seconde op de toets voor
vloerverlichting (8) moet drukken. Als bevestiging dat
het terugzetten van de fabrieksinstellingen is gelukt,
knippert de verlichting van de RF-Touch twee keer.
U slaat een zit- of ligstand als volgt op onder een
geheugentoets
1. Druk binnen twee seconden drie keer op de geheu-
gentoets (16).
2. De geheugentoetsen lichten blauw op (1-4).
3. Druk binnen drie seconden één keer op de gewens-
te geheugentoets (1-4) (1-4).
4. Als u een nieuwe stand programmeert, wordt de
oude stand automatisch overschreven. Als de
stand is geprogrammeerd, ziet u dat aan de geko-
zen geheugentoets die wit oplicht. Twee seconden
nadat u de geheugentoets loslaat, lichten alle ge-
heugentoetsen wit op.
U kunt de opgeslagen stand als volgt weer oproepen
Druk net zolang op de toets voor de gewenste geheugen-
positie (1-4) (1-4), totdat alle ligzones hun geprogram-
meerde eindstand bereikt hebben. Tot de zones hun
eindstand hebben bereikt, licht de geheugentoets blauw
op.
Terug naar de horizontale stand
Met de «alle zones omlaag» toets (7) kunt u alle ligzo-
nes tegelijk in de horizontale stand laten zakken.
Onderhoud
Uw uni 20_85RF/uni 22_85RF bridge® is een hoog-
waardig product dat ontwikkeld is om u jarenlang op
betrouwbare wijze van dienst te zijn. Wij adviseren u
het bed met een droge doek af te stoffen.
U vervangt de batterijen van uw draadloze afstands-
bediening als volgt
Verwijder het klepje van het batterijvak (19) aan de
achterkant van de draadloze afstandsbediening.
Plaats drie AAA-batterijen, let daarbij op de +/- mar-
kering. Schuif het klepje weer dicht.
U vervangt de batterijen (20) van de motor van uw
uni 20_85RF/uni 22_85RF bridge® als volgt (batteri-
jen voor nood-uitknop)
Haal de batterijen voorzichtig uit de batterijclips. Let
bij het plaatsen van de twee 9 volt-blokbatterijen op
de +/- markering. De batterijen in de motor zorgen
voor stroom bij een stroomuitval.

19
NL Gebruiksaanwijzing
Wat te doen bij storingen
Wanneer er iets mis is met uw uni 20_85RF/uni
22_85RF bridge®, probeer dan aan de hand van de
volgende instructies de storing op te lossen. Als het
probleem niet is op te lossen, trek dan de stekker uit
het stopcontact en neem contact op met uw Swiss-
flex-speciaalzaak.
Stroomuitval in zitstand
In de motor bevindt zich een niet aangesloten batte-
rijpak om uw bed bij stroomuitval in de vlakke slaap-
stand (horizontale stand) te brengen. U kunt uw bed
bij stroomuitval in de vlakke stand brengen door dit
batterijpak aan te sluiten en op de nood-uitknop (25)
net zolang ingedrukt totdat alle ligzones de hori-
zontale stand hebben bereikt te houden.
De uni 20_85RF/uni 22_85RF bridge® werkt niet,
terwijl hij aan staat en alle onderdelen goed zijn
aangesloten
Trek de stekker uit het stopcontact. Wacht een paar
minuten en doe daarna de stekker weer in het stop-
contact.
Controleer eventueel met een nachtlampje de net-
spanning (240V). Als er geen stroom is, moet u de
zekering controleren.
Druk op de «alle zones omlaag» toets (7) om alle
instellingen terug te zetten. Aangezien de bediening
van de uni 20_85RF/uni 22_85RF bridge® micropro-
cessoren bevat, kunnen netschommelingen storin-
gen veroorzaken.
De draadloze afstandsbediening werkt niet (de
achtergrondverlichting werkt niet)
Vervang de batterijen. Verwijder eventuele obstakels
Probleem Mogelijke oorzaken Oplossing
Afstandsbediening
of aandrijfmecha-
nisme werkt niet.
Geen netspanning. Netspanning herstellen.
Afstandsbediening of aandrijfmechanisme
defect.
Neem contact op met uw leverancier/distributeur.
Schakelcondensator of netvrijschakelaar leeg. Druk op de toets op de stekker van de netvrijschakelaar.
Aandrijfmechanis-
me loopt plotseling
vast.
Thermoschakelaar op de transformator is
mogelijk uitgeschakeld of defect.
Laat het aandrijfmechanisme ca. 20-30 minuten in de ruststand
staan.
De temperatuurbeveiliging in de transforma-
tor is mogelijk uitgeschakeld of defect.
Neem contact op met uw leverancier/distributeur.
Apparaatbeveiliging is mogelijk uitgeschakeld
of defect.
Neem contact op met uw leverancier/distributeur.
Geen netspanning. Netspanning herstellen.
Stroomtoevoer (net en/of afstandsbediening/
aandrijfmechanisme) onderbroken.
Toevoer controleren en indien nodig verbinding herstellen.
De niet van netspan-
ning afhankelijke
elektrische terugstel-
functie werkt niet.
Blokbatterij(en) leeg.
Blokbatterij(en) controleren en indien nodig vervangen.
Blokbatterij(en) niet aangesloten. Blokbatterij(en) aansluiten.
tussen de afstandsbediening en het motorbedie-
ningsapparaat.
Na een stroomuitval
Druk voor het opnieuw in gebruik nemen van de uni
20_85RF/uni 22_85RF bridge® net zolang op de «alle
zones omlaag» toets (7), totdat alle ligzones de begin-
stand (horizontale stand) hebben bereikt en er geen
motors meer te horen zijn.
De nood-uitknop
Met de nood-uitknop kunt u als de stroom uitvalt de
ligzones van het bed in de vlakke slaapstand zetten.
1. Sluit de batterijen voor de nood-uitknop (26) aan.
2. Houd de nood-uitknop (25) net zolang ingedrukt
totdat alle ligzones de horizontale stand hebben
bereikt.
Omdat veelvuldig gebruik van de nood-uitknop erg
veel batterijvermogen vraagt, moeten ze na enkele
malen vervangen worden.
Technische gegevens
Voedingsspanning: 110–240 volt
Voeding draadloze afstandsbediening: 3x AAA-batterij
Schakelvermogen motoren: Onderbrekende werking
afstandsbediening 2 min / 18 min
Schakelvermogen stopcontactenlat: 850 W
Zekering stopcontactenlat: 5x 20 mm T 4A
Schuifkracht motoren: 4x 3000 N
Voeding nood-uitknop: 2x 9 volt-blokbatterij

20 Modo de empleo ES
Mando a distancia por radio
1 Posición de memoria 1
2 Posición de memoria 2
3 Posición de memoria 3
4 Posición de memoria 4
5 Linterna
6 Todos los motores «arriba»
7 Todos los motores «abajo»
8 Illuminación en el suelo
9 Accionamiento de la zona cabeza «arriba»
10 Accionamiento de la zona cabeza «abajo»
11 Accionamiento de la zona espalda «arriba»
12 Accionamiento de la zona espalda «abajo»
13 Accionamiento de la zona muslo «arriba»
14 Accionamiento de la zona muslo «abajo»
15 Activar / desactivar función de sincronización
16 Tecla de grabación de memoria
17 Enchufe libre ON / OFF
18 Bloqueo de teclas (seguridad niños)
19 Compartimento de batería (en la parte
trasera del mando a distancia por radio)
En el compartimento de las pilas:
Tecla roja Teach-In
20 3x baterías AAA (en el suministro)
Control de los motores
21 Conexión del cable de sincronización /
Adaptador de Bluetooth (conexión)
22 Illuminación del suelo (interna)
23 Conexión de fuente de alimentación /
Conexión de la illuminación del suelo
externa
24 Conexión de los motores adicionales
25 Tecla Teach-In / Tecla de bajada de
emergencia (parte trasera del motor)
26 Compartimento de batería para descen-
so de emergencia (2x 9 V)
(conéctese solo cuando sea necesario)
27 Fuente conmutada
28 Adaptador Bluetooth (opcional)
(conexión del motor)
29 Enchufe libre (opción)
23
1
5, 6
9
11
13
15
17
19
4
7, 8
10
12
14
16
18
26
25
21
24
22
23 (2 cables)
28 29
27
19
20
uni 20_85RF/uni 22_85RF bridge®
This manual suits for next models
1
Table of contents
Languages:
Other swissflex Personal Care Product manuals