swissflex uni 11_95RF User manual

0408123215
Bedienungsanleitung
Mode d’emploi
Operating instructions
Gebruiksaanwijzing
Modo de empleo
Istruzioni d’uso
uni 21_25
uni 21_45
uni 21_05
uni 21_35
uni 21_75K
uni 21_95RF
uni 21_85RF
uni 21_95RS
uni 21_15
A575R
A
5
7
5
R
uni 21_75S
uni 21_85S
uni 21_75RF
uni 11_95RF | ambiente 11_95RF

Wir gratulieren zum Kauf Ihrer Swissflex-Unterfederung. Sie haben sich für ein ausgezeichnetes Produkt
entschieden, das Qualitätsdenken und Know-how konsequent verbindet. Wir danken für Ihr Vertrauen
und wünschen Ihnen einen erholsamen Schlaf!
Nous vous félicitons pour l’achat de votre literie Swissflex. Vous avez fait le choix d’un produit exceptionnel,
qui associe qualité et savoir-faire. Nous vous remercions de la confiance que vous nous accordez et nous
vous souhaitons un sommeil réparateur!
We congratulate you on the purchase of your new Swissflex slat base. You have chosen an outstanding
product, which incorporates the perfect combination of quality and know-how. We would like to thank you
for your confidence and trust you will have a restful night’s sleep!
Van harte gefeliciteerd met de aanschaf van uw Swissflex-lattenbodem. Daarmee hebt u gekozen voor een uitste-
kend product, waarin kwaliteitsbesef en knowhow onlos-makelijk met elkaar verbonden zijn.
Wij danken u voor uw vertrouwen en wensen u veel verkwikkend slaapgenot toe!
Le felicitamos por la compra de su sistema de descanso. Ud. ha elegido un producto excepcional, que asocia
calidad y saber-hacer. Le agrade-cemos la confianza depositada en nosotros y le deseamos un sueño reparador.
Congratulazioni per l’acquisto della vostra rete Swissflex. Avete optato per un prodotto eccezionale che
concilia perfettamente alta qualitá e know-how. Vi ringraziamo per la fiducia e vi auguriamo un sonno
riposante e rigenerante.
F
Van harte gefeliciteerd!
Felicidades !
Congratulazioni!
Félicitations !
D Herzlichen Glückwunsch!
G B
N L
E
I
Congratulations!

04 | Bedienungsanleitung D
08 |Mode d’emploi F
12 | Operating instructions GB
16 | Gebruiksaanwijzing NL
20 | Modo de empleo E
24 | Istruzioni d’uso I
uni 21_25
uni 21_45
uni 21_05
uni 21_35
uni 21_75K
uni 21_95RF
uni 21_85RF
uni 21_95RS
uni 21_15
A575R
A
5
7
5
R
uni 21_75S
uni 21_85S
uni 21_75RF
uni 11_95RF | ambiente 11_95RF

4 Bedienungsanleitung D
uni 11_95RF interaktiv | ambiente 11_95RF interaktiv
11
15
1
3
5
7
9
18
21
22
23
24 27
12
13
17
2
4
6
8
10
19
20
Funk-Fernbedienung
1 Alle Motoren kombiniert Taste «auf» /
Teach-In
2 Alle Motoren kombiniert Taste «ab» /
Teach-In
3 Kopfbereich «auf»
4 Kopfbereich «ab»
5 Rückenbereich «auf»
6 Rückenbereich «ab»
7 Oberschenkelbereich «auf»
8 Oberschenkelbereich «ab»
9 Unterschenkelbereich «auf»
10 Unterschenkelbereich «ab»
11 Memoryposition 1
12 Memoryposition 2
13 Memoryposition 3
14 Set-Memory / Tastenblockierung / Teach-In
15 Fernbedienbare Freisteckdose ein / aus
16 Taschenlampe
17 Nachtlicht (LED-Lichtleiste)
18 Synchrofunktion ein
19 Synchrofunktion aus
20 Batteriefach
(Rückseite Funk-Fernbedienung)
21 3x AAA-Batterie
22 2x Blockbatterie 9-Volt
Motorensteuerung
23 Taste für Notabsenkung / Teach-in
24 Batteriefach für Notabsenkung (2x 9 V)
25 Synchronanschluss
26 Unterflurbeleuchtung (Nachtlicht)
27 Netzteilanschluss
28 Anschluss für Megamat Motoren 1 – 4
29 Netzteil
30 Netzkabel mit integrierter
Netzfreischaltung
31 Freisteckdose (Option)
28
16
14
26
25
29
30
31

Bedienungsanleitung 5
D
isolation beschädigen. Auf keinen Fall darf die An-
schlussleitung durch den Verstellmechanismus geführt
werden.
gFalls die Kabel, das Gehäuse der Steuerung oder die
Freisteckdose (31) beschädigt sind, darf das Sitzbett
nicht mehr in Betrieb genommen werden. Entfernen Sie
den Netzstecker aus der Steckdose und informieren Sie
Ihren Swissflex Fachhändler.
gGehen Sie vorsichtig mit dem uni 11_95RF interaktiv |
ambiente 11_95RF interaktiv und dem Zubehör um, zer-
legen und modifizieren Sie es nicht. Lösen Sie niemals
die Schrauben an der Seite der Freisteckdose (31), an
der die Kabel herausgeführt werden. Durch Eingriffe
am stromführenden Teil der Freisteckdose (31) entfal-
len jegliche Gewährleistungsansprüche.
gLassen Sie nicht Kinder unbeaufsichtigt mit den Sitz-
betten spielen. Sie könnten sich dabei ver letzen.
gWechseln Sie aus Sicherheitsgründen die Batterien in
der Steuerung nach 3 Jahren und diejenige der Funk-
Fernbedienung nach 6 bis 12 Monaten aus, andernfalls
können die Batterien auslaufen. Swissflex empfiehlt
auslaufsichere 9-Volt-Block batterien (Motorensteue-
rung), AAA-Batterien (Funk-Fernbedieung). Sollte die
Batterieflüssigkeit ausgelaufen sein, waschen Sie diese
bei Haut- und Augenkontakt mit viel Wasser aus und
gehen Sie zu einem Arzt. Entsorgen Sie die Batterien
nur über den Fach handel.
Inbetriebnahme
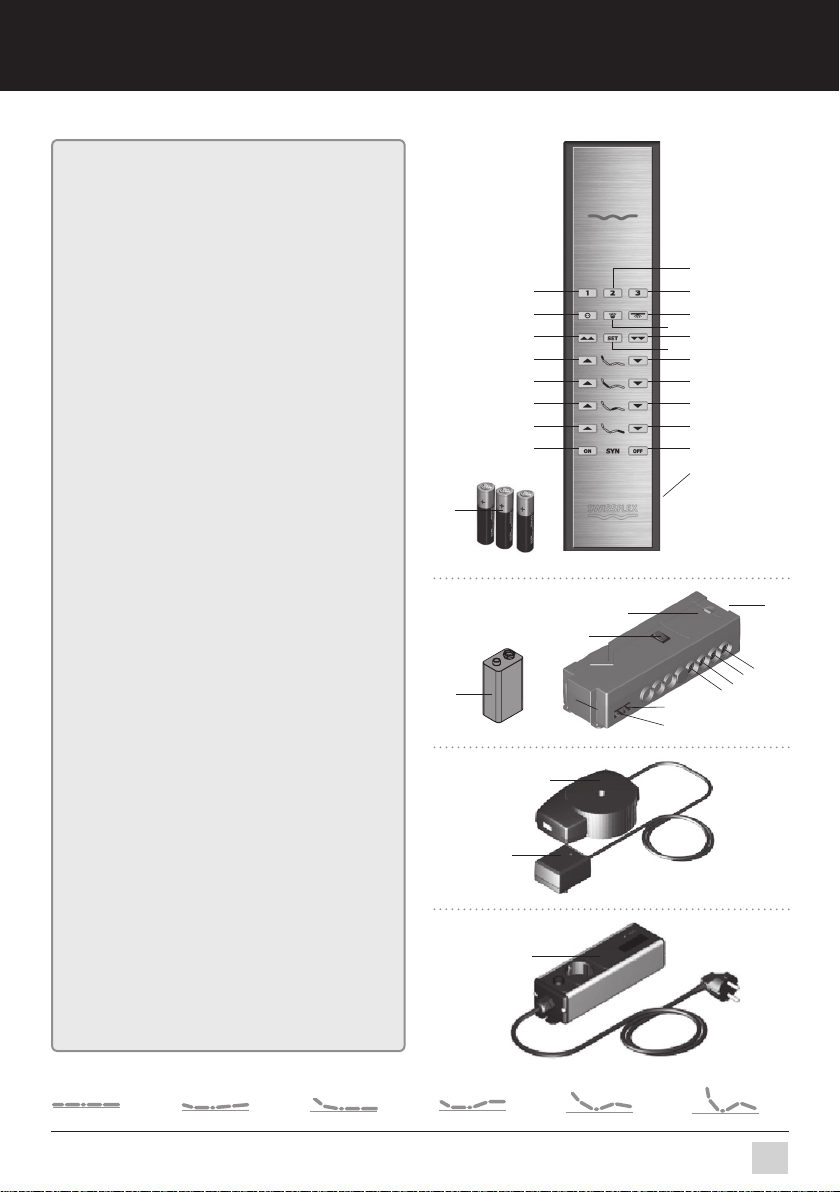
Legen Sie die Batterien in die Funk-Fern be dienung ein
gEntfernen Sie auf der Rückseite die Abdeckung vom
Batteriefach (20) der Funk-Fern bedienung. Legen Sie
drei AAA-Batterien (21) ein, achten Sie dabei auf die
+/- Markierung. Schieben Sie die Abdeckung wieder zu.
Die Reichweite der Funk-Fernbedienung ist max. 15 m.
Swissflex ist nicht bekannt, dass die Funk-Wellen für die
Gesundheit schädlich sind.
gSchliessen Sie das LED-Bodenlicht in den Anschluss
für LED-Bodenlicht (26) an der Steuerug an.
Ringkern mit Netzfreischaltung
gSchliessen Sie das Netzteil über das Verbindungs-
kabel in den Netzteilanschluss (27) an der Steuerung
an. Schliessen Sie dann das Netzteil (29) über das Netz-
kabel (30) an eine Steckdose an. Durch die neue Technik
vom Ringkerntransformator wird eine separate Netz-
freischaltung nicht mehr benötigt. Beim Betätigen des
uni 11_95RF interaktiv | ambiente 11_95RF interaktiv
minimiert der ab geschirmte Ringkerntransformator
des Net z teils die elektromag ne ti schen Felder auf ein
absolutes Minimum.
Hinweise zum Funkbetrieb
gBeachten Sie bitte, daß die Reichweite der Funk-
Fernbedieung von den jeweiligen örtlichen Bedin-
Komfort und Gesundheit
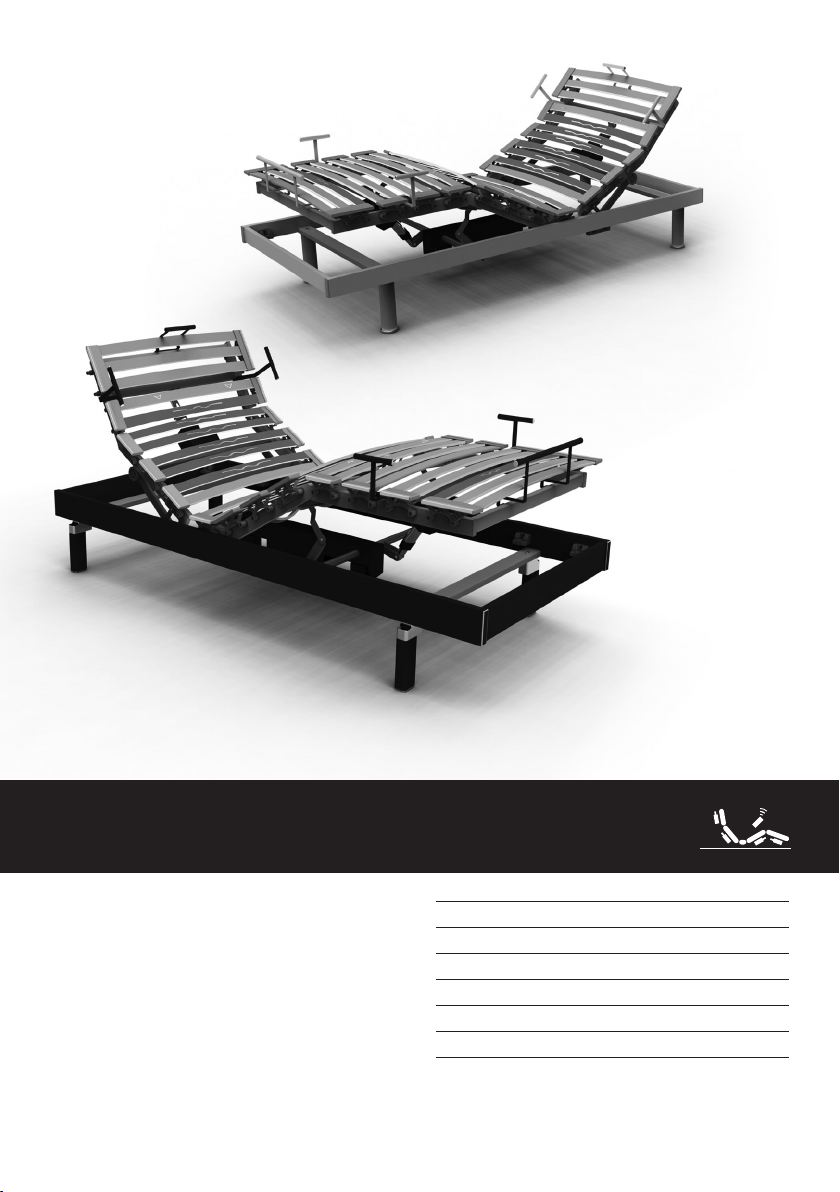
Willkommen in der Welt von Swissflex!
Ihr Swissflex uni 11_95RF interaktiv | ambiente 11_95RF
interaktiv ist ein Schweizer Qualitätsprodukt. Wenn
Sie die wenigen Bedienungs- und Sicherheitshinweise
beachten, wird es über Jahre hinweg zu Ihrer Zufrie-
denheit funktionieren. Neben vielen anderen Vortei-
len bietet Ihnen Ihr uni 11_95RF interaktiv | ambiente
11_95RF interaktiv ein ungestörtes Schlafumfeld. Alle
elektrischen Leitungen, die vom Netzstecker zum Bett
führen, sind dank Netzfreischaltung im Ruhezustand
frei von Netzspannung. Wenn Sie die Freisteckdose (31)
etwa 1 m vom Bett entfernt platzieren, wird das direkte
Umfeld während des Schlafes frei von elektrischen und
elektromagnetischen Feldern gehalten.
Sicherheitshinweise
ACHTUNG! Setzen Sie den uni 11_95RF interaktiv | ambi-
ente 11_95RF interaktiv und das Zubehör weder Regen,
noch sonstiger Feuchtigkeit aus, um Feuergefahr und
die Gefahr eines elektrischen Schlages zu vermeiden.
Sollte Flüssigkeit in das Zubehör gelangen, trennen Sie
das Netzkabel (30) von der Steckdose und lassen Sie es
von Ihrem Swissflex Fachhändler überprüfen.
gLagern und verwenden Sie den uni 11_95RF interak-
tiv | ambiente 11_95RF interaktiv und das Zubehör nicht
an Orten mit extremen Temperaturen (von über 60 °C),
andernfalls kann es zu Fehlfunktionen kommen oder
Teile können sich verformen. Der uni 11_95RF interak-
tiv | ambiente 11_95RF interaktiv ist für eine Temperatur
von +5 °C bis 40 °C aus gelegt.
gAchten Sie beim Einbau der Unterfederung darauf,
dass alle Bewegungen von Kopf-, Rücken- und Fussteil
nicht durch Möbelteile behindert werden.
gTrennen Sie unbedingt bei allen Demontage- und Mon-
tagearbeiten an der Unterfederung oder am Bettgestell
den Netzstecker vom Netz.
gSchliessen Sie an die Freisteckdose (31) keine Geräte
an, die beim Einschalten über die Fernbedienung Per-
sonen oder Sachgut gefährden könnten, insbesondere
keine motorbetriebenen Werkzeuge wie z.B. Sägen,
Bohrmaschinen und dergleichen (Verletzungsgefahr),
oder keine ortsveränderlichen Wärmegeräte (Brand-
gefahr).
gFühren Sie keine Kabel durch den Verstellmechanis-
mus um Schäden an der Elektronik oder Verletzungen
zu vermeiden. Achten Sie darauf, dass die einzelnen
Liegeflächen bereiche der Unterfederung nicht blockiert
sind, eine Blockierung kann zur Erhitzung und Beschä-
digung der Motoren führen.
gStellen Sie keine schweren Gegenstände auf die
Kabel, da sie sonst beschädigt werden können.
gVerlegen Sie die Verbindungsleitung von der Frei-
steckdose (31) zum Bett nie so, dass ev. vorhandene
scharfe Kanten oder enge Knickstellen die Leitungs-

6 Bedienungsanleitung D
gungen beeinflusst wird. Andere mit Funk betriebene
Geräte können den Betrieb der Funk-Fernbedienung
beeinträchtigen. Hierzu gehören beispielsweise Mo-
bilfunk-Sendemasten, Mobilfunk-Telefone und Funk-
Bestell- systeme in Restaurants. Um einen guten
Empfang zu gewährleisten, platzieren Sie die Steuerung
mit dem Funk-Empfänger nicht direkt auf eine Metall-
platte! Halten Sie zu metallischen Gegenständeneinen
Mindestabstand von ca. 5 Zentimetern ein. Funk-Sender
und Empfänger dürfen nur innerhalb der Europäischen
Union bzw. innerhalb des Geltungs-bereiches der EN
300220 (Funk SRD 868MHz) verwendet werden!
Tastenblockierung
Um den unsachgemässen Gebrauch der Motorrahmen
zu vermeiden, können Sie die Tasten der Fernbedienung
blockieren. Ausgenommen sind die Tasten für die Frei-
steckdose (15), die Taschenlampe (16) und das Nachtlicht
(17), die jederzeit zu betätigen bleiben. Um die Tasten zu
blockieren, drücken Sie die Set-Memory-Taste (14) ca. 8 –
10 Sek. lang. Es ertönt ein Piepston aus der Motorensteue-
rung. Die Tastenblockierung ist dann aktiv. Werden jetzt
andere Tasten gedrückt, ertönen nur drei Piepstöne aus
der Motorensteuerung (Zeichen, dass die Fernbedienung
blockiert ist), aber die Unterfederung bewegt sich nicht.
Aufheben der Tastenblockierung.
Drücken Sie die Set-Memory-Taste (14) ca. 8 – 10 Sek.
lang. Nach Ertönen eines Piepstons aus der Motoren-
steuerung, sind die Tasten wieder aktiviert.
Einlernvorgang ohne Synchronfunktion (Teach-In):
1.Die Tasten (1) und (14) (SET und “Alles hoch”) gleichzei-
tig betätigen. Dann Einlerntaste (23) an der Steuerung
betätigen. Die Steuerung bestätigt einen erfolgreichen
Einlernvorgang mit einem Signalton und am Sender
blinkt die Hintergrundbeleuchtung für kurze Zeit.
2. 1s nach dem Einlernvorgang ist Gerät betriebsbereit
Einlernvorgang mit Synchronfunktion (Teach-In):
Die Steuerung, die ein Sender bei ausgeschaltetem („SYN
OFF“) Synchronbetrieb bedienen soll, muss diesem Sen-
der als „Master“ zugeordnet werden. Die jeweils andere
Steuerung als Slave. Folgende Vorgehensweise empfiehlt
sich: 1.Zunächst den Master einlernen. Dazu die Tasten
(1) und (14) gleichzeitig gedrückt halten und die Einlern-
taste (23) an der Steuerung betätigen. Der erfolgreiche
Einlernvorgang wird durch einen Signalton an der Steue-
rung und kurzes blinken der Hintergrundbeleuchtung des
Senders bestätigt. 2.Nach etwa 1s Pause den Slave ein-
lernen. Dazu die Tasten (14) und (2) gleichzeitig gedrückt
halten und die Einlerntaste (23) an der Slave Steuerung
betätigen. Der erfolgreiche Einlernvorgang wird durch
einen Signalton an der Steuerung und kurzes blinken der
Hintergrundbeleuchtung des Senders bestätigt.
Nachtlicht (LED-Lichtleiste)
Sie können durch einmalige Betätigung der Taste (17), das
Nachtlicht (Accessoire Unterflurbeleuchtung) anschal-
ten.Nach 30 Minuten schaltet es sich automatisch wieder
aus, oder durch wiederholte Betätigung der Taste (17).
Verstellmöglichkeiten
gDie einzelnen Liegeflächenzonen können Sie über
Einzelfunktionstasten (3 – 10) am der Funk-Fernbedie-
nung verstellen. Ab Werk sind die Schlaf- und Sitzposi-
tionen (Position 11 – 13) vorprogrammiert. Sie können
die Positionen jedoch individuell anpassen und neu de-
finieren.
So programmieren Sie Ihre Wunschposition
gIndividuelles Einstellen der Position über Einzelfunk-
tionstasten (3 – 10)
g3 x Drücken der Memory-Taste (14).
g1 x Drücken der vorgesehenen Speichertaste
Memory- position 1 – 3.
Wird die neu eingespeicherte Position von der Elektro-
nik erkannt, ertönt als Bestätigung eine Tonfolge. Bei
der Programmierung einer neuen Po si tion wir die alte
automatisch gelöscht. Wird eine Position unverändert
auf der selben Speichertaste programmiert, ertönt ein
Brummton.
So rufen Sie eine gespeicherte Position ab
gDrücken Sie so lange auf die gewünschte Speicherta-
ste Memoryposition 1 – 3, bis alle Liegeflächenteile die
programmierte Endposition erreicht haben.
So rufen Sie die standardmässig program mierten
Positionen ab
gDrücken Sie so lange die Speichertaste Memory-
position 1, 2 oder 3 an der Funk-Fernbedienung, bis die
Liegeflächenbereiche die programmierte End position
erreicht haben. Eine Endposition ist erreicht, wenn
keine Motoren mehr zu hören sind. Die standardmässig
programmierten Positionen, können Sie verändern und
individuell neu anpassen, siehe «So programmieren Sie
Ihre Wunschposition».
So stellen Sie alle Einstellungen zurück (Horizontal
Position)
gDrücken Sie so lange «Alle Motoren kombiniert»
Taste «ab» (2), bis alle Liegeflächenbereiche die Hori-
zontalposition erreicht haben und keine Motoren mehr
zu hören sind. Bei einem Strom ausfall können Sie die
Ausgangsposition nur erreichen, indem Sie eine Notab-
senkung vor nehmen.
Zusatzfunktionen
So schliessen Sie eine zweite Unterfederung an
gSchliessen Sie die zweite Steuerung über das
Synchrokabel mit der Ersten an. Das Synchrokabel zum

Bedienungsanleitung 7
D
Technische Daten
Versorgungsspannung: 230 Volt / 50-60 Hz
Schubkraft Motoren: 4 x 3000 N
Schaltleistung Motoren: 4 x 96 W
Versorgung Funk-Fernbedienung: 3 x AAA Batterien
Reichweite Funk-Signal unter Normalbedingungen: 15 m
Versorgung Notabsenkung: 2 x 9 Volt-Blockbatterie
Gesamter Anschlusswert: 484 W / 6A
Temperaturbereich: + 5 °C bis + 40 °C
Gesamter Anschlusswert: 1440 W / 6 A
EG-Konfirmität: siehe letzte Seite
Anschluss an eine zweite Steuerung ist optional bei
Ihrem Swissfex-Fachhändler erhältlich.
Optionale Freisteckdose
gEine optionale Freisteckdose können Sie bei Ihrem
Swissflex Fachhändler als Accessoire kaufen. An der
optionalen Freisteckdose können Sie ein elektrisches
Gerät (Radio, Lampe) anschliessen und über die Funk-
Fernbedienung ein oder ausschalten.
Pflege und Wartung
Bei Ihrem uni 11_95RF interaktiv | ambiente 11_95RF in-
teraktiv handelt es sich um ein hochwertiges Produkt,
dass für zuverlässigen Betrieb über Jahre hinaus ent-
wickelt wurde. Zur gelegentlichen Reinigung von Staub
empfehlen wir ein trockenes Tuch.
So wechseln Sie die Batterien in der Funk-Fern-be-
dienung
g Entfernen Sie die Abdeckung vom Batteriefach (20)
auf der Rückseite der Funk-Fernbedienung. Legen Sie
drei A AA-Batterien ein, achten Sie dabei auf die +/- Mar-
kierung. Schieben Sie die Abdeckung wieder zu.
So wechseln Sie die Batterien an der Motorensteuerun
am uni 11_95RF interaktiv | ambiente 11_95RF interaktiv
gZiehen Sie das Netzkabel (30) vor dem Batteriewech-
sel aus der Steckdose. Entfernen Sie die Abdeckung vom
Batteriefach (24) auf der Rückseite vom Motorgehäuse.
Trennen Sie die Batterien vorsichtig von den Batterien-
clips. Legen Sie zwei 9-Volt-Blockbatterien ein, achten Sie
dabei auf die +/- Markierung. Schieben Sie die Abdeckung
wieder zu. Die Batterien in der Motorensteuerung dienen
zur Spannungsversorgung bei einem Strom ausfall.
Verhalten bei Störungen
Wenn an Ihrem uni 11_95RF interaktiv | ambiente
11_95RF interaktiv Störungen auf treten, versuchen
Sie bitte, diese anhand der folgenden Anweisungen zu
beheben. Wenn sich das Problem nicht beheben lässt,
trennen Sie den uni 11_95RF interaktiv | ambiente
11_95RF interaktiv von der Steckdose und wenden Sie
sich an Ihren Swissflex Fach händler.
Stromausfall in Sitzposition
gIn der Motorensteuerung befindet sich ein Batterie-
pack (2 x 9 Volt), um Ihr Bett bei Stromausfall in die
flache Schlafposition (Horizontal-Position) zurück zu
stellen. Sie können Ihr Bett bei Stromausfall flach stel-
len, indem Sie die Notabsenkungstaste (23) drücken.
Nach einem Stromausfall
gDrücken Sie vor erneuter Inbetriebnahme des uni
11_95RF interaktiv | ambiente 11_95RF interaktiv solange
die «Alle Motoren kombiniert» Taste «ab» (2), bis alle Lie-
geflächenbereiche die Ausgangsposition (Horizontalposi-
tion) erreicht haben und keine Motoren mehr zu hören sind.
So nehmen Sie eine Notabsenkung vor
gDrücken Sie die Notabsenkungstaste (23) an der Moto-
rensteuerung um die Horizontalposition (Ausgangsposition)
zu erreichen. Nach mehrfacher Not absen kung werden die
Batterien stark ent laden und müssen ausgetauscht werden.
Der uni 11_95RF interaktiv | ambiente 11_95RF inter-
aktiv funktioniert nicht, obwohl er eingeschaltet ist
und alle Komponenten richtig angeschlossen sind
g
Trennen Sie das Netzkabel (30) von der Steckdose. Warten
Sie eine Minute und stellen Sie die Stromversorgung wieder
her. Überprüfen Sie gegebenenfalls mit einer Nachttisch-
lampe, ob die Netzspannung (230V) gewährleistet ist. Ist kein
Strom vorhanden, überprüfen Sie die Sicherung vom Netz.
gDrücken Sie die «Alle Motoren kombiniert» Taste
«ab» (2), um alle Einstellungen zurückzusetzen. Da
die Steuerung des uni 11_95RF interaktiv | ambiente
11_95RF interaktiv Microprozessoren enthält, kann es
durch Netzschwankungen zu Störungen kommen.
Die Funk-Fernbedienung funktioniert nicht (Die Hin-
tergrundbeleuchtung funktioniert nicht)
gLegen Sie (neue) Batterien ein. Entfernen Sie gege-
benenfalls Hindernisse zwischen der Funk-Fernbedie-
nung und der Motorensteuerung.
Neuprogrammierung der Positionen funktioniert nicht
gWiederholen Sie den Programmiervorgang neu.
Abruf der gespeicherten Positionen funktioniert nicht
gÜberprüfen Sie durch das Verstellen von einzelnen
Motoren, ob auf zwei Speicherorten die identische Po-
sition abgespeichert wurde und wiederholen Sie den
Programmiervorgang neu.
Einzelne Motoren funktionieren nicht
gSchl ie ssen Sie die einzelnen Motoren-Kabel an der
Steuerung richtig an.

8 Mode d’emploi F
uni 11_95RF interactif | ambiente 11_95RF interactif
11
15
1
3
5
7
9
18
21
22
23
24 27
12
13
17
2
4
6
8
10
19
20
Télécommande à radiofréquence
1 Touche tous les moteurs combinés « haut » /
Teach-In
2 Touche tous les moteurs combinés « bas » /
Teach-In
3 Partie tête « haut »
4 Partie tête « bas »
5 Partie dos « haut »
6 Partie dos « bas »
7 Parties cuisses « haut »
8 Parties cuisses « bas »
9 Parties jambes « haut »
10 Parties jambes « bas »
11 Position Memory 1
12 Position Memory 2
13 Position Memory 3
14 Set Memory / Blocage de clé / Teach-In
15 Marche/arrêt de la prise libre
télécommandée
16 Lampe de poche
17 Veilleuse (lumière LED)
18 Fonction synchro enclenchée
19 Fonction synchro arrêtée
20 Compartiment à piles (au dos de la
télécommande à radiofréquence)
21 3x pile AAA
22 2x pile monobloc 9 V
Commande moteurs
23 Touche de descente d‘urgence / Teach-in
24 Compartiment à piles descente d’urgence
(2x 9 V)
25 Branchement synchro
26 Eclairage du sol (veilleuse)
27 Raccordement adaptateur
28 Raccordement moteurs Megamat 1 – 4
29 Adaptateur
30 Câble secteur avec mise hors tension
intégrée
31 Prise libre (optionnellement)
28
16
14
26
25
29
30
31

Mode d’emploi 9
F
Confort et santé
Bienvenue dans le monde de Swissflex !
Votre Swissflex uni 11_95RF interactif | ambiente
11_95RF interactif est un produit suisse de qualité. Si
vous observez les quelques consignes de manipulation
et de sécurité, il vous donnera entière satisfaction pen-
dant des années. Outre de nombreux autres avantages,
votre uni 11_95RF interactif | ambiente 11_95RF interac-
tif vous offre un environnement de sommeil exempt de
perturbations. Tous les câbles électriques partant de la
prise et allant jusqu’au lit sont exempts de tension élec-
trique à l’état de repos. Placez la prise libre (31) à en-
viron 1 m du lit afin d’éviter une exposition aux champs
électriques et électromagnétiques durant le sommeil.
Pour votre sécurité
ATTENTION ! Placez votre uni 11_95RF interactif | ambi-
ente 11_95RF interactif et les éléments de raccordement
à l’abri de la pluie et de toute source d’humidité, de ris-
que d’incendie ou de court-circuit électrique. En cas de
projection de liquide sur les éléments de raccordement,
retirez la prise de courant (30) du secteur et faites contrô-
ler l’ensemble par votre revendeur Swissflex.
gNe placez pas et n’utilisez pas votre uni 11_95RF interac-
tif | ambiente 11_95RF interactif avec les éléments de rac-
cordement dans des endroits aux températures extrêmes
(à plus de 60 °C), il en résulterait des dysfonctionnements
ou des déformations. uni 11_95RF interactif | ambiente
11_95RF interactif est conçu pour une température de +5
°C à 40 °C.
gLors du montage du sommier, veillez à ce que les mou-
vements des parties tête, dos et pieds ne soient pas ent-
ravés par des meubles.
gDébranchez toujours les prises de courant des fiches
secteurs lors des opérations de montage et démontage
du sommier ou du bois de lit.
gNe branchez aucun appareil à prise libre (31) qui pour-
rait mettre en danger des personnes ou des objets, en par-
ticulier aucun outillage électrique tel que scies, perceuses
et autres (risque de blessures) ou chauffage électrique
mobile (risques d‘incendie).
gAucun câble ne doit traverser le mécanisme de réglage,
afin d’éviter des dégâts sur l’électronique ou des dom-
mages. Vérifier que chaque partie du sommier n’est pas
bloquée, car un blocage pourrait conduire à la surchauffe
ou à la détérioration des moteurs.
gAucun élément lourd ne doit être posé sur les câbles qui
pourrait les endommager.
gLors du placement du câble de la prise libre (31) veil-
lez à ce que des côtés coupants ou d’éventuels noeuds
n’abîment les isolations des câblages. Le câble ne doit en
aucun cas traverser le mécanisme de réglage du sommier.
gDans le cas de dommage des câbles ou de la prise libre
(31) le lit-siège ne doit plus être activé. Retirez la fiche de
la prise de courant et contactez votre revendeur spécialisé.
gUtilisez votre uni 11_95RF interactif | ambiente
11_95RF interactif et les éléments électroniques avec
précaution, ne les démontez pas et ne les modifiez pas.
Ne desserrez jamais les vis du côté de la prise libre
(31) où sortent les câbles. En cas d‘intervention sur
les éléments conducteurs de courant de la prise libre,
tout recours à la garantie est exclu.
gNe laissez pas les enfants jouer avec les lits-sièges sans
surveillance. Ils pourraient se blesser.
gPour des raisons de sécurité, remplacez les piles de la
commande moteurs tous les 3 ans, celles de la télécom-
mande tous les 6 à 12 mois, car elles peuvent se vider.
Swissflex recommande l’utilisation de batteries alcalines
monobloc de 9 volts (commande moteurs) et piles AAA
(télécommande à radiofréquence). En cas d’écoulement
du liquide de la batterie et de contact avec la peau et
les yeux, laver abondamment avec de l’eau et consulter
un médecin. Recycler les batteries par l’intermédiaire de
votre revendeur.
Mise en service
Placez les piles dans la télécommande à radiofréquence
gAu dos de la télécommande, retirez le couvercle du
compartiment à piles (20). Mettez trois piles AAA (21)
en place, en tenant compte des pôles +/-. Faites glisser
le couvercle pour refermer le compartiment. La portée
de la télécommande à radiofréquence est de 15 m max.
Swissflex n’a pas connaissance d’une éventuelle nocivité
des ondes pour la santé.
gRaccordez l’éclairage au sol LED dans la prise (26) sur
le boîtier.
Adaptateur
gRaccordez l‘adaptateur au boîtier (29) par
l’intermédiaire du câble de connexion dans le raccorde-
ment (27). Branchez le câble secteur (30) à la prise de
courant. Grâce à la nouvelle technique de l’adaptateur
annulaire, la prise libre séparée n’est pas nécessaire.
Lors de l’utilisation de votre uni 11_95RF interactif | ambi-
ente 11_95RF interactif, l’adaptateur annulaire réduit les
champs électromagnétiques à un minimum.
Recommandations sur la fonction radiofréquence
gSachez que la portée de la télécommande à ra-
diofréquence est influencée, selon la situation, par
les conditions locales. D’autres appareils équipés de
systèmes à radiofréquence peuvent altérer le fonc-
tionnement de la télécommande. Les relais, télépho-
nes portables ou systèmes de commandes par radio
dans les restaurants font partie des ces systèmes.
Afin d’obtenir une bonne réception, ne placez pas
le boîtier avec récepteur radio directement sur une
plaque de métal. Eloignez tous les objets métalli-
ques d’environ 5 centimètres. Les télécommandes et

10 Mode d’emploi F
récepteurs à radiofréquence ne peuvent être utilisés
qu’au sein de la Communauté européenne et dans le
domaine d’application de la norme EN 300220 (radio
SRD 868MHz).
Blocage des touches
Afin d’empêcher l’utilisation inappropriée du sommier, il
est possible de bloquer les touches de la télécommande.
Sont exclues les touches de la prise libre (15), de la lampe
de poche (16) et de la veilleuse (17), qui restent toujours
en fonction. Afin de bloquer les touches, appuyez sur la
touche memory (14) environ 8 à 10 secondes. Un signal
sonore est émis par le boîtier. Le blocage des touches est
alors activé. A présent, lorsque d’autres touches sont ac-
tivées, le boîtier récepteur émet 3 signaux sonores (signe
du blocage de la télécommande), mais le sommier ne se
déplace pas.
Annulation du blocage des touches
Appuyez sur la touche memory (14) environ 8 à 10 secon-
des. Le signal sonore émis par le boîtier indique que les
touches sont de nouveau activées.
Procédure Teach-in sans fonction synchro :
1. Appuyer en même temps sur les touches (1) et (14)
(SET Memory et ‚‘tous les moteurs combinés haut‘‘).
Puis appuyer sur la touche Teach-in (23) de la com-
mande moteur. La commande moteur confirme par un
signal sonore que la procédure s‘est faite et le rétro-
éclairage de la télécommande clignote un instant. 2.
Une seconde après la procédure Teach-in, l‘appareil
est prêt à être utilisé.
Procédure Teach-in avec fonction synchro :
La commande moteur qui doit être actionnée par une
télé-commande lorsque la fonction synchro est désac-
tivée (‚‘SYN ON/OFF‘‘) doit être associée à cette com-
mande moteur comme ‚‘master‘‘. L‘autre commande
moteur sera alors ‚‘slave‘‘. Il est conseillé de procéder
de la manière suivante : 1. Programmer d‘abord le ‚‘ma-
ster‘‘. Pour cela, maintenir appuyées les deux touches
(1) et (14) et appuyer sur la touche de Teach-in (23) sur
la commande moteur du lit n°1. La commande moteur
confirme par un signal sonore que la procédure s‘est
faite et le rétro-éclairage de la télécommande clignote
un instant. 2. Après une pause d‘une seconde environ,
programmer le slave. Pour cela, maintenir appuyées les
touches (2) et (14) et appuyer sur la touche Teach-in (23)
de la commande moteur du lit n°2 slave. La commande
moteur confirme par un signal sonore que la procédure
s‘est faite et le rétro-éclairage de la télécommande clig-
note un instant. 3. Répéter l’opération avec la deuxième
télécommande, mais changer les numéros de lit. (Assi-
gner le master au lit 2 et le slave au lit 1). 4. Après une
pause d‘une seconde environ, vérifier que la procédure a
bien été effectuée avec les deux télécommandes. Tester
aussi la fonction synchro.
Veilleuse (lumière LED)
La veilleuse (accessoire éclairage du sol) peut être
activée en appuyant une seule fois sur la touche (17).
Au bout de 30 minutes celle-ci s’éteint automatique-
ment, ou en appuyant de nouveau sur la touche (17).
Possibilités de réglage
Vous pouvez régler les zones de couchage individu-
elles avec les touches de fonctions individuelles (3 –10).
Les positions assise et couchée (positions 11 – 13) sont
préprogrammées à l’usine. Vous pouvez cependant mo-
difier ces positions selon vos désirs personnels.
Pour programmer vos positions idéales
gRégler les différentes positions à l’aide des touches
individuelles (3 – 10).
gPresser trois fois la touche Memory (14).
gPressez une fois la touche de mémorisation prévue
Position Memory 1 – 3.
Si la position programmée est reconnue par
l’électronique, un bip sonore retentit. Lors de la pro-
grammation d’une nouvelle position, l’ancienne sera
automatiquement effacée. Si une position est program-
mée de manière identique sur la même touche de pro-
grammation, un bourdonnement se produit.
Pour sélectionner une position programmée
gPresser la touche programmable désirée Position Me-
mory 1 – 3 jusqu’à ce que les différentes parties du som-
mier aient atteint leur position finale mémorisée.
Pour sélectionner les positions standard préprogrammées
g
Appuyer sur la touche de mémorisation 1, 2 ou 3 de la
télécommande, jusqu’à ce que les parties du sommier att-
eignent la position finale programmée. La position finale est
atteinte lorsque les moteurs ne font plus de bruit. Les positi-
ons standard préprogrammées peuvent être modifiées selon
vos désirs, voir « Pour programmer vos positions idéales ».
Remise à plat
gAppuyer sur la touche tous les moteurs combinés «
bas » (2) jusqu’à ce que toutes les parties du sommier
soient en position horizontale et que les moteurs ne
fassent plus de bruit. En cas de coupure de courant,
vous devez activer la descente d’urgence pour retrou-
ver les positions initiales.
Fonctions complémentaires
Pour raccorder un deuxième sommier
gRaccordez le second boîtier de commande au pre-
mier à l‘aide du câble synchro. Celui-ci est disponible
en option auprès de votre revendeur Swissflex.

Mode d’emploi 11
F
Données techniques
Tension d’alimentation : 230 volts/50-60 Hz
Poussée moteurs : 4 x 3000 N
Puissance de commutation moteurs : 4 x 96 W
Alimentation télécommande à radiofréquence :
3 x pile AAA
Portée des signaux à radiofréquence dans
des conditions normales : 15 m
Tension remise à plat moteurs :
2 x pile monobloc 9 volts
Valeur totale de raccordement : 484 W / 6 A
Température : de + 5 °C à + 40 °C
Conformité CE : voir dernière page
Prise libre en option
gVous pouvez obtenir une prise libre en option auprès
de votre revendeur Swissflex. Vous pouvez brancher
un appareil électrique (radio, lampe) à la prise libre
et l’allumer ou l’éteindre grâce à la télécommande à
radio-fréquence.
Soin et entretien
Votre uni 11_95RF interactif | ambiente 11_95RF inter-
actif est un produit de haute qualité qui a été développé
pour garantir un fonctionnement pendant des années.
Nous vous conseillons d’utiliser un chiffon sec pour
épousseter.
Pour remplacer les piles dans la télécommande à
radiofréquence
gRetirez le couvercle du compartiment (20) au dos
de la télécommande à radiofréquence. Placez 3 piles
AAA en tenant compte des pôles +/-. Refermez le cou-
vercle.
Pour remplacer les piles dans le boîtier moteurs de votre
uni 11_95RF interactif | ambiente 11_95RF interactif
gAvant le remplacement, débranchez le câble de sec-
teur (30). Retirez le couvercle du compartiment (24)
au dos du boîter moteurs Retirez avec précaution les
piles des clips. Placez deux piles de 9 volts en tenant
compte des pôles +/-. Les piles du boîtier moteur ser-
vent d’alimentation en cas de coupure de courant.
En cas de dérangement
En cas de problème avec votre uni 11_95RF interactif |
ambiente 11_95RF interactif, vous pouvez essayer de
le solutionner à l’aide des recommandations ci-après. Si
vous ne pouvez résoudre le problème, débranchez votre
uni 11_95RF interactif | ambiente 11_95RF interactif et
adressez-vous à votre revendeur Swissflex.
Panne de courant en position assise
gDes piles monobloc se trouvent dans le boîtier de
commande moteurs afin de remettre votre lit en po-
sition horizontale en cas de panne de courant. Vous
pouvez remettre votre lit à plat en pressant la touche
de descente d’urgence (23).
Après une coupure de courant
gPour redémarrer votre uni 11_95RF interactif | ambiente
11_95RF interactif, appuyez sur la touche Tous les mo-
teurs combinés « bas » (2) jusqu’à ce que toutes les
parties du sommier se remettent en position de dé-
marrage (horizontale) et que les moteurs ne fassent
plus de bruit.
Pour remettre à plat
gAppuyez sur la touche de descente d’urgence (23)
qui se situe sur le boîtier de commande moteurs afin
de remettre le sommier en position horizontale (posi-
tion de démarrage). Après plusieurs remises à plat, les
piles se déchargent fortement et doivent être rempla-
cées.
Votre uni 11_95RF interactif | ambiente 11_95RF in-
teractif ne fonctionne pas, bien qu’il soit connecté à
la prise et que tous les branchements aient été cor-
rectement effectués
gDébranchez le sommier (30). Attendez une minute et
rebranchez-le. Vérifiez à l’aide d’une lampe de chevet
si la tension d’alimentation (230 V) est assurée. S’il n’y
a pas de courant, vérifiez le fusible.
gAppuyez sur la touche tous les moteurs combinés
« bas » (2) pour refaire les programmations. En cas
de variation d‘intensité du courant dans le réseau, des
dérangements peuvent survenir car la commande de
votre uni 11_95RF interactif | ambiente 11_95RF inter-
actif contient des microprocesseurs.
La télécommande à radiofréquence ne fonctionne pas
(l‘éclairage de fond ne fonctionne pas)
gPlacez des (nouvelles) piles. Eloignez éventuellement les
obstacles entre la télécommande à radiofréquence et le
boîtier de commande moteurs.
La nouvelle programmation des positions ne fonctionne
pas
gRecommencez le processus de programmation.
La sélection des positions programmées ne fonctionne pas
gVérifiez sur chaque moteur que deux positions identi-
ques ne sont pas programmées sur deux touches de mé-
morisation, et recommencez la programmation.
Un moteur individuel ne fonctionne pas
gVérifiez que chaque borne du moteur est correctement
raccordée au boîtier.

12
uni 20 / uni 21_95RF
GB
Operating instructions
uni 11_95RF interactive | ambiente 11_95RF interactive
11
15
1
3
5
7
9
18
21
22
23
24 27
12
13
17
2
4
6
8
10
19
20
Radio remote control
1 “All motors combined” button “up” /
Teach-In
2 “All motors combined” button “down” /
Teach-In
3 Head section “up”
4 Head section “down”
5 Back section “up”
6 Back section “down”
7 Thigh section “up”
8 Thigh section “down”
9 Calf section “up”
10 Calf section “down”
11 Memory position 1
12 Memory position 2
13 Memory position 3
14 Set Memory / Key blocking / Teach-In
15 On/off for the remote controlled
user socket
16 Pocket lamp
17 Night light (LED light)
18 Synchronisation function on
19 Synchronisation function off
20 Battery compartment
(on back of the radio remote control)
21 3x AAA Battery
22 2x 9V block battery
Motor control
23 Emergency lowering button / Teach-in
24 Battery compartment for emergency
lowering (2 x 9 V)
25 Synchronisation connection
26 Floor lighting (night light)
27 Connection for mains supply unit
28 Connection for Megamat motors 1 – 4
29 Mains supply unit
30 Mains cable with integrated
mains isolation
31 User socket (optionally)
28
16
14
26
25
29
30
31

Operating instructions 13
GB
Health and comfort
Welcome to the world of Swissflex!
Your Swissflex uni 11_95RF interactive | ambiente 11_95RF
interactive is a Swiss quality product. If you follow the
simple operating and safety instructions, it will function to
your complete satisfaction for many years. In addition to
its many other advantages, your uni 11_95RF interactive |
ambiente 11_95RF interactive offers an undisturbed sleep
environment. All electrical connections between the mains
plug and the bed are free of mains voltage in standby mode.
Place the user socket (31) about 1 metre (40”) from the bed
to ensure that the area directly surrounding the bed is free
from electrical and electromagnetic fields while you sleep.
Safety instructions
CAUTION! The uni 11_95RF interactive | ambiente 11_95RF
interactive and accessories must be protected from rain
and other moisture to prevent causing a fire hazard or
the risk of electric shock. In case of spillages on an acces-
sory, the mains cable (30) must be disconnected from the
power outlet and checked by your Swissflex stockist.
gDo not store or use the uni 11_95RF interactive | ambiente
11_95RF interactive or accessories in extreme temperatures
(above 60 °C), as this can lead to malfunctions and defor-
mation of parts. The uni 11_95RF interactive | ambiente
11_95RF interactive was designed for use in temperatures
between +5 °C and 40 °C.
gWhen installing the slat base, ensure that the head, back
and foot sections are not obstructed by furniture.
gEnsure that the mains supply is disconnected before any
assembly or disassembly work is carried out on the slat
base or the bed frame.
gDo not connect any devices to the user socket (31) that
could endanger persons or damage objects when the sok-
ket is turned on by remote control, in particular electrical
tools such as saws, drills and similar (risk of injury) or por-
table heating devices (risk of fire).
gTo avoid damaging electronic parts or causing injury,
do not feed cables through the adjustment mechanism.
Ensure that the different comfort sections of the slat base
are not obstructed, as this can cause overheating and da-
mage to the motors.
gTo avoid damaging the cable, do not place heavy ob-
jects on the cable.
gNever place the connection cable between the user sok-
ket (31) and the bed in such a way that the cable insulation
could be damaged by sharp edges or twists. Never feed the
cable through the adjustment mechanism.
gIn the case of damage to cables to the control housing or
to the user socket (31), do not adjust the bed to a seated
position. Remove the mains plug from the socket and in-
form your Swissflex stockist.
gHandle the uni 11_95RF interactive | ambiente 11_95RF
interactive and accessories with care; do not disas-
semble or modify them.
gNever loosen the screws on the side of the user socket
(31) to which the cable is connected. If you interfere with
any electrical part of the user socket (31), the guarantee
entitlements will no longer apply. Never allow children
to „play“ on the sit-up bed without supervision because
of the risk of injury.
g
For safety reasons, change the batteries in the
motor control every 3 years and the ones in the
radio remote control every 6 to 12 months to pre-
vent leakages. Swissflex recommends the use of
leak-proof 9V block batteries (motor control) and
AAA batteries (radio remote control). In the case
of skin or eye contact with battery fluid, wash the
affected area with plenty of water and seek medical
assistance. Batteries must be disposed of through
your stockist.
Initial setup
Place the batteries into the radio remote control
gRemove the cover of the battery compartment (20) on
the back of the radio remote control. Place 3 AAA-batte-
ries (21) into the compartment, paying attention to the
+/- markings. Close the compartment cover again. The
maximum range of the radio remote control is 15 metres.
Swissflex is not aware of any adverse effects on health of
radio waves.
gConnect the LED floor light to the relevant connector
(26) on the remote control.
Toroidal core with mains isolation
gConnect the mains supply unit to the connection for the
mains supply unit (27) using the connection cable. Use
the mains cable (29) to connect the mains supply unit (30)
to a socket. Thanks to the toroidal core transformer tech-
nology, separate mains isolation is no longer necessary.
When the uni 11_95RF interactive | ambiente 11_95RF in-
teractive is in use, the isolated toroidal core transformer
in the mains supply unit reduces electromagnetic fields to
an absolute minimum.
Recommendations for use of radio control
gPlease be aware that the range of the radio remote
control may be affected by the conditions in the sur-
rounding area. Other radio-controlled devices may
deteriorate the function of the radio remote control.
Examples of such devices include radio transmitter
masts, mobile phones and radio order systems in re-
staurants. In order to ensure good reception, do not
place the control with the radio receiver directly on
a metal sheet. Keep metal objects at a distance of at
least 5 centimetres. The radio transmitter and recei-
ver may only be used within the European Community
and within the area of validity of INTO 300220 (radio
SRD 868MHz).

14 Operating instructions GB
Key lock
To avoid improper use of the motor frame, you can lock
the buttons on the remote control. With the exception of
the buttons of the user socket (15), the floor lighting (16)
and the night light (17), which are accessible at all times.
In order to lock the keys, you hold down the memory but-
ton (14) for about 8 to 10 seconds.
A beep will be heard from the receiver. The key lock is
then activated. From now, if other buttons are pressed,
the receiver will emit 3 beeps (indicating that the remote
control is locked), but the slat-base will not move.
Deactivating the key lock
Hold down the memory button (14) for about 8 to 10 se-
conds. The beep emitted by the receiver indicates that the
buttons are reactivated.
Teach-in procedure without the simultaneous function:
1. Press both buttons (1) and (14), (SET Memory and
“all motors combined up”) simultaneously and hold
it down. Then press the teach-in button (23) on the
motor control. The motor control confirms the suc-
cessfully teach-in procedure with a sound and the
background lighting on the sender blinks for a short
while. 2. The device is functional 1 sec. after the teach-
in procedure.
Teach-in procedure with the simultaneous function:
The motor control which is to operate a radio remote
control on which the (“SYN ON/OFF“) simultaneous
function has not been taught needs to be assigned as
“Master”. The other motor control need to be assigned
as “Slave”. The next steps are to be as follow: 1. First
teach-in the master. Press both buttons (1) and (14) si-
multaneously and hold it down. Then press the teach-in
button (23) on the motor control of bed 1. The motor con-
trol confirms the successfully teach-in procedure with a
sound and the background lighting on the sender blinks
for a short while. 2. After a pause of about 1 sec., teach-
in the slave. Hold both buttons (14) and (2) pressed and
press the teach-in button
(23)
on the slave motor con-
trol of bed 2. The motor control confirms the successfully
teach-in procedure with a sound and the background
lighting on the sender blinks for a short while. 3. Repeat
the process with the second radio remote control, but
ex-changing the bed number. (Assign the master to bed
2 and the slave to bed 1). 4. After a short pause (about 1
sec.) check the teach-in procedure with both radio re-
mote control. Also check the simultaneous function.
Night light (LED light)
The night light (accessory floor lighting) can be activated
by pressing one time the button (17).
After 30 minutes it will be automatically switched off,
or by pressing again on the button (17).
Adjustment options
gThe various sections can be adjusted using the
function buttons (3 – 10) on the radio remote control.
The sleep and sit positions (position 11 – 13) have
been pre-programmed in the factory. However, you
can adjust and redefine each of these positions.
To programme your preferred positions
gIndividually adjust the position with the function but-
tons (3 – 10)
gPress the memory button (14) 3 times
gPress the memory button you want to use once:
Memory position 1 – 3.
Once the electronics have recognised the newly saved
position, a sequence of sounds will confirm your choice.
The programming of a new position automatically
overwrites an old position. If an unchanged position is
programmed under the same memory button, a low
humming tone will sound.
To call up a position stored in memory
gPress the relevant memory button Memory position
1 – 3 until all sections have reached the required final
position.
Selecting the standard pre-programmed positions
gPress the memory button 1, 2 or 3 on the radio
remote control until the sleep surface reaches the
programmed end position. The final position has been
reached when the motors can no longer be heard. The
standard pre-programmed positions can be changed
and individually adjusted (see “Programming your pre-
ferred position“).
Resetting all adjustments (horizontal position)
gPress “all motors combined” button “down” (2) until all
comfort areas have reached the horizontal position and
the motors have stopped. In the case of a power failure,
the basic position can only be reached by using the emer-
gency lowering function.
Additional functions
Connecting a second slat base
gUse the synchronisation cable to connect the second
remote control to the first one. The synchronisation cable
for the additional remote control is available from your
Swissflex stockist.
Optional user socket
gThe optional user socket is available as an acces-
sory from your Swissflex stockist. The optional user
socket can be used to connect an electronic device
(radio, lamp) that can be switched on and off using the
radio remote control.

Operating instructions 15
GB
Technical data
Supply voltage: 230V / 50-60 Hz
Thrust motors: 4x 3000 N
Power rating motors: 4x 96 W
Remote control power supply: 3x AAA batteries
Radio signal range under normal conditions: 15 m
Power supply for emergency lowering:
2x 9 V block battery
Total connected load: 484 W / 6 A
Temperature range: + 5 °C to + 40 °C
Total connected load: 1440 W / 6 A
EG conformity: see last page
Care and Maintenance
Your uni 11_95RF interactive | ambiente 11_95RF in-
teractive is a high-quality product that has been de-
signed to serve you reliably for many years to come.
For occasional cleaning and the removal of dust, we
recommend the use of a dry cloth.
Changing the batteries in the radio remote control
gRemove the cover from the battery compartment
(20) on the back of the radio remote control. Place
three AAA batteries into the compartment, paying at-
tention to the +/- markings. Close the compartment
cover again.
Changing the batteries in the uni 11_95RF interactive |
ambiente 11_95RF interactive motor control
gDisconnect the mains cable (30) from the mains
outlet before changing the batteries. Remove the cover
of the battery compartment (24) on the back of the
motor housing. Carefully remove the batteries from
the battery clips. Place two 9V block batteries into the
compartment, paying attention to the +/- markings.
Close the compartment cover again. The batteries in
the motor housing provide power in the case of a power
failure.
Troubleshooting
In case of malfunctions with your uni 11_95RF inter-
active | ambiente 11_95RF interactive, consult the
following troubleshooting tips. If the problem cannot
be resolved, disconnect the uni 11_95RF interactive |
ambiente 11_95RF interactive, from the mains outlet
and contact your Swissflex stockist.
Loss of power in the sitting position
gIn the case of a power failure, the battery pack (2x 9V) in
the motor control allows you to move the bed to a slee-
ping position (horizontal position). Use the emergency lo-
wering key (23) to move the bed to the horizontal position
when there is no mains power.
After a power failure
gBefore resuming use of the uni 11_95RF interactive |
ambiente 11_95RF interactive, press and hold the “All mo-
tors combined” “down” button (2), until all comfort areas
have reached the horizontal position and the motors have
stopped moving.
Activating the emergency lowering
gPress the emergency lowering button (23) on the
motor control to reach the horizontal (basic) position.
Repeated use of the emergency lowering function puts
a lot of strain on the batteries, in which case they must
be replaced.
The uni 11_95RF interactive | ambiente 11_95RF in-
teractive does not work despite being switched on
and all components being connected properly
gDisconnect the mains supply unit (30) from the
mains outlet. Wait a minute and then reconnect to the
mains. If necessary, connect a bedside lamp to check
that mains voltage (230V) is present. If there is no cur-
rent, check the fuse.
gPress the “all motors combined” button “down” (2) to
reset all adjustments. The control of the uni 11_95RF |
ambiente 11_95RF contains microprocessors, so irregu-
lar power supply can lead to malfunctions.
The radio remote control does not work (The back-
ground light does not work)
gInsert (new) batteries. Where applicable, remove
any obstacles between the radio remote control and
the motor control.
Cannot programme new positions
gRepeat the programming procedure.
Programmed positions do not work
gCheck whether the same position has been stored
in two different memory locations by moving the in-
dividual motors and re-programme the positions and
repeat the programming procedure.
Individual motors do not work
gEnsure the proper connection of the motor cables
to the control.

16 Gebruiksaanwijzing NL
uni 11_95RF interactief | ambiente 11_95RF interactief
11
15
1
3
5
7
9
18
21
22
23
24 27
12
13
17
2
4
6
8
10
19
20
Draadloze afstandsbediening
1 „Alle zones samen“ toets „omhoog“ /
Teach-In
2 „Alle zones samen“ toets „omlaag“ /
Teach-In
3 Hoofdzone „omhoog“
4 Hoofdzone „omlaag“
5 Rugzone „omhoog“
6 Rugzone „omlaag“
7 Bovenbeenzone „omhoog“
8 Bovenbeenzone „omlaag“
9 Onderbeenzone „omhoog“
10 Onderbeenzone „omlaag“
11 Geheugenpositie 1
12 Geheugenpositie 2
13 Geheugenpositie 3
14 Geheugen instellen / Toetsblokkering /
Teach-In
15 Op afstand bedienbare stopcontactenlat
aan / uit
16 Zaklamp
17 Nachtlamp (ledlichtlijst)
18 Synchroonfunctie aan
19 Synchroonfunctie uit
20 Batterijvak
(achterkant draadloze afstandsbediening)
21 3x AAA-batterij
22 2x 9 volt-blokbatterij
Motorbedieningsapparaat
23 Toets voor nood-uitknop / Teach-in
24 Batterijvak voor nood-uitknop (2x 9 V)
25 Synchroonaansluiting
26 Vloerverlichting (nachtlamp)
27 Adapteraansluiting
28 Aansluiting voor Megamat-motoren 1 – 4
29 Adapter
30 Stekker met geïntegreerde
netvrijschakelaar
31 Stopcontactenlat (optioneel)
28
16
14
26
25
29
30
31

Gebruiksaanwijzing 17
NL
Comfort en gezondheid
Welkom in de wereld van Swissflex!
Uw Swissflex uni 11_95RF interactief | ambiente 11_95RF
interactief is een Zwitsers kwaliteitsproduct waarvan u
nog jarenlang plezier kunt hebben, als u een aantal ele-
mentaire bedienings- en veiligheidsaanwijzingen opvolgt.
Naast tal van andere voordelen biedt uw uni 11_95RF in-
teractief | ambiente 11_95RF interactief u vooral een on-
gestoorde slaapomgeving. Alle snoeren van stopcontact
naar bed zijn in rusttoestand vrij van netspanning dankzij
de netvrijschakelaar. Als u de stopcontactenlat (31) op
circa 1 m afstand van het bed plaatst, zijn er tijdens het
slapen geen elektrische en elektromagnetische velden in
de directe omgeving van het bed.
Veiligheidsaanwijzingen
LET OP! Schakel de uni 11_95RF interactief | ambiente
11_95RF interactief en toebehoren bij regen of andere
vochtigheid uit om brandgevaar en het gevaar op een
elektrische schok te voorkomen. Mocht er vloeistof op
de onderdelen terechtkomen, trek dan de stekker (30)
uit het stopcontact en laat deze door uw Swissflex-spe-
ciaalzaak controleren.
g
Gebruik en bewaar de uni 11_95RF interactief | ambiente
11_95RF interactief en toebehoren niet op plekken met
extreme temperaturen (warmer dan 60 °C), anders kun-
nen er storingen optreden of delen vervormen. De uni
11_95RF interactief | ambiente 11_95RF interactief is
ontworpen voor gebruik bij een omgevingstemperatuur
van +5 °C tot +40 °C.
gLet er tijdens het inbouwen van de lattenbodem op dat
de bewegingen van het hoofd-, rug- en voetgedeelte niet
door meubelonderdelen worden gehinderd.
gBij alle demontage- en montagewerkzaamheden aan
de lattenbodem of de beddenbak moet de netstekker
altijd uit het stopcontact worden getrokken.
gSluit geen apparaten op de stopcontactenlat (31) aan,
die bij het aanzetten via de afstandsbediening gevaarlijk
kunnen zijn voor personen of zaken, met name geen mo-
toraangedreven gereedschap zoals bv. zagen, boormachi-
nes en dergelijke (kans op verwondingen), of verplaatsbare
verwarmingstoestellen (brandgevaar).
gSnoeren niet tussen het verstelmechanisme aanbren-
gen om schade aan de elektronica of verwondingen te
voorkomen. Let erop dat de afzonderlijke ligzones van de
lattenbodem niet geblokkeerd worden, een blokkering kan
tot oververhitting en beschadiging van de motoren leiden.
gLeg geen zware voorwerpen op de snoeren, die kunnen
daardoor beschadigen.
gLeg de aansluitleiding van de stopcontactenlat (31)
naar het bed zodanig, dat de leiding niet geknikt wordt
of eventuele scherpe kanten de leidingisolatie be-
schadigen. De aansluitleiding mag in geen geval door
het verstelmechanisme gevoerd worden.
gAls het snoer, de behuizing van de bediening of de
stopcontactenlat (31) beschadigd zijn, mag het zitbed niet
meer worden gebruikt. Trek de stekker uit het stopcon-
tact en neem contact op met uw Swissflex- speciaalzaak.
gGa voorzichtig met de uni 11_95RF interactief | ambi-
ente 11_95RF interactief en toebehoren om, demonteer
en wijzig niets. Draai de schroeven aan de zijkant van de
stopcontactenlat (31), waar de kabels uitkomen, nooit
los. De garantie vervalt bij ingrepen aan het stroom-
voerende deel van de stopcontactenlat (31).
gLaat nooit kinderen zonder toezicht op het zitbed spe-
len. Ze zouden zich kunnen bezeren.
gVervang na drie jaar uit veiligheidsoverwegingen de
batterijen van de bediening en na zes tot twaalf maanden
de batterij van de draadloze afstandsbediening, anders
kunnen de batterijen opraken. Swissflex raadt u aan lek-
bestendige blokbatterijen van 9 volt (motorbedieningsap-
paraat) en AAA-batterijen (draadloze afstandsbediening)
te gebruiken. Indien vloeistof is gelekt en in contact is ge-
komen met uw huid en ogen, moet u deze met veel water
spoelen en contact opnemen met een arts. Lever lege bat-
terijen uitsluitend in bij uw speciaalzaak.
Ingebruikneming
Plaats de batterijen in de draadloze afstandsbediening
gVerwijder aan de achterkant het klepje van het batteri-
jvak (20) van de draadloze afstandsbediening.
Plaats drie AAA-batterijen (21), let daarbij op de +/-
markering. Schuif het klepje weer dicht. Het bereik
van de draadloze afstandsbediening is maximaal 15
meter. Eventuele schadelijke gevolgen van de infra-
roodgolven zijn bij Swissflex niet bekend.
gSluit het ledvloerlicht via de ledvloerlichtaansluiting
(26) op de bediening aan.
Ringkerntransformator met netvrijschakelaar
gSteek de adapter via het verbindingssnoer in de ad-
apteraansluiting (27) op de bediening. Steek vervolgens
de stekker (30) van de adapter (29) in een stopcontact.
Dankzij de nieuwe techniek van de ringkerntransfor-
mator is een aparte stroomschakelaar niet meer nodig.
Een speciaal afgeschermde ringkerntransformator in
de adapter reduceert de magnetische velden tijdens
het bedienen van de uni 11_95RF interactief | ambiente
11_95RF interactief tot het absolute minimum.
Opmerkingen bij draadloze bediening
gHoud er rekening mee dat het bereik van de
draadloze afstandbediening door de desbetreffende
plaatselijke omstandigheden wordt beïnvloed. An-
dere draad- loze apparaten kunnen de werking van
de draadloze afstandbediening nadelig beïnvloeden.
Voorbeelden hiervan zijn zendmasten voor mobiele
telefonie, mobiele telefoons en draadloze bestelsy-
stemen in restaurants. Om een goede ontvangst te
waarborgen, mag de bediening met de draadloze ont-

18 Gebruiksaanwijzing NL
vanger niet op een metalen plaat worden geplaatst!
Zorg ervoor dat de afstand tot metalen voorwerpen ten
minste 5 cm bedraagt. Draadloze zender en ontvanger
mogen uitsluitend in de EU respectievelijk in het gel-
digheidsgebied van EN 300220 (draadloze kortbereik-
apparatuur 868 MHz) worden gebruikt.
Toetsblokkering
Om verkeerd gebruik van het gemotoriseerde frame te
voorkomen, is het verstandig de toetsen van de afstands-
bediening te blokkeren.
Dit geldt niet voor de toetsen voor de stopcontactenlat (15),
de zaklamp (16) en de nachtlamp (17). Deze dienen te allen
tijde beschikbaar te blijven.
Houd gedurende 8-10 seconden de toets Geheugen instel-
len (14) ingedrukt om de toetsen te blokkeren.
Het motorbedieningsapparaat piept. Dit betekent dat de
toetsblokkering actief is. Als nu andere toetsen worden in-
gedrukt, piept het motorbedieningsapparaat slechts drie
keer (wat erop duidt dat de afstandsbediening geblokkeerd
is). De lattenbodem beweegt echter niet.
De toetsblokkering opheffen
Houd gedurende 8-10 seconden de toets Geheugen instellen
(14) ingedrukt. De toetsen zijn opnieuw geactiveerd nadat
het motorbedieningsapparaat een pieptoon laat horen.
Teach-in procedure zonder synchroonfunctie:
1. De beide toetsen (1) en (14) (SET en “alle zones
samen omhoog”) tegelijkertijd indrukken. Vervolgens
Teach-in-toets (23) op de motorbediening indrukken.
U hoort een pieptoon wanneer de Teach-in procedure
succesvol is afgerond en op de afstandsbediening knip-
pert de achtergrondverlichting kort. 2. Het apparaat is
1 sec. na de Teach-in-procedure klaar voor gebruik.
Teach-in procedure synchroonfunctie:
De motorbediening waarmee de afstandsbedien-
ing wordt bestuurd waarop de synchroonfunctie uit-
geschakelde is (“SYN ON/OFF“) moet als “Master”
worden aangeduid. De andere motorbediening moet
als “Slave“ worden aangeduid. Wij raden aan de vol-
gende procedure te volgen: 1. Daartoe de toetsen (1)
en (14) tegelijkertijd ingedrukt houden en de Teach-in
toets (23) op de motorbediening van bed 1 indrukken.
U hoort een pieptoon wanneer de Teach-in procedure
succesvol is afgerond en op de afstandsbediening
knippert de achtergrond-verlichting kort. 2. Na ca. 1
sec. de Teach-in procedure voor de Slave uitvoeren.
Daartoe de toetsen (2) en (14) tegelijkertijd inge-
drukt houden en de Teach-in toets (23) op de Slave-
motorbediening van bed 2 indrukken. U hoort een
pieptoon wanneer de Teach-in procedure succesvol
is afgerond en op de afstandsbediening knippert de
achtergrondverlichting kort. 3. Herhaal de procedure
met de tweede afstandsbediening, maar het bed num-
mer te veranderen. (Master op bed 2 en Slave op bed 1
toewijzen). 4. Na ca. 1 sec. de correcte Teach-in proce-
dure met beide afstandsbediening controleren. Hierbij
ook de synchroonfunctie testen.
Nachtlamp (ledlichtlijst)
Druk één keer op de toets (17) om de nachtlamp (ac-
cessoire vloerverlichting) aan te doen.
De lamp wordt na 30 minuten automatisch uitgescha-
keld of door nogmaals op de toets (17) te drukken.
Verstelmogelijkheden
gU kunt de afzonderlijke ligzones via de desbetref-
fende insteltoetsen (3 – 10) op de draadloze afstands-
bediening verstellen. De slaap- en zitstanden (stand
11 - 13) zijn bij aflevering voorgeprogrammeerd. U
kunt deze standen echter afzonderlijk aanpassen en
naar voorkeur opnieuw instellen.
U kunt de gewenste stand als volgt instellen
gAfzonderlijk instellen van de stand via de desbetref-
fende insteltoetsen (3 – 10).
g3 x op de geheugentoets (14) drukken.
g1 x op de toets voor de desbetreffende geheugenpo-
sitie drukken Geheugenpositie 1 – 3.
Als de bediening de nieuwe stand geaccepteerd heeft,
dan hoort u een toonreeks ter bevestiging. Als u een
nieuwe stand programmeert, wordt de oude stand au-
tomatisch gewist. Als een bestaande stand onveran-
derd op dezelfde geheugenpositie geprogrammeerd
wordt, dan klinkt er een bromtoon.
U kunt de opgeslagen stand als volgt weer oproepen
gDruk net zolang op de toets voor de gewenste geheu-
genpositie 1 – 3, totdat alle ligzones hun geprogram-
meerde eindstand bereikt hebben.
U kunt de standaard ingestelde standen als volgt
gOproepen Druk net zolang op de toets voor de gewen-
ste geheugenpositie 1, 2, 3 op de afstandsbediening,
totdat alle ligzones hun geprogrammeerde eindstand
bereikt hebben. Een eindstand is bereikt wanneer er geen
motors meer te horen zijn. U kunt de standaard ingestelde
standen veranderen en naar eigen voorkeur opnieuw
programmeren, zie «U kunt de gewenste stand als volgt
instellen».
U kunt alle instellingen als volgt terugzetten (horizontale
stand)
gDruk net zolang op de «alle zones samen» toets
«omlaag» (2) totdat alle ligzones de horizontale stand
hebben bereikt en er geen motors meer te horen zijn.
Als de stroom uitvalt kunt u de beginstand alleen her-
stellen door de nood-uitknop te gebruiken.

Gebruiksaanwijzing 19
NL
Technische gegevens
Voedingsspanning: 230 volt / 50-60 Hz
Schuifkracht motoren: 4x 3000 N
Schakelvermogen motoren: 4x 96 W
Voeding draadloze afstandsbediening:
3x AAA-batterij
Bereik IR-signaal onder normale
omstandigheden: 15 m
Voeding nood-uitknop: 2x 9 volt-blokbatterij
Totale aansluitwaarde: 484 W / 6A
Omgevingstemperatuur: + 5 °C tot +40 °C
Totale aansluitwaarde: 1440 W / 6 A
Voldoet aan EG-normen: zie laatste pagina
Extra functies
U sluit een tweede lattenbodem als volgt aan
gGebruik de synchrokabel om de tweede bediening
met de eerste te verbinden. De synchrokabel voor
aansluiting op een tweede bediening is apart bij uw
Swissflex-speciaalzaak verkrijgbaar.
Optionele stopcontactenlat
gU kunt een optionele stopcontactenlat als accessoire
bij uw Swissflex-speciaalzaak kopen. U kunt hierop een
elektrisch apparaat (radio, lamp) aansluiten en deze met
de draadloze afstandsbediening in- of uitschakelen.
Onderhoud
Uw uni 11_95RF interactief | ambiente 11_95RF inter-
actief is een hoogwaardig product dat ontwikkeld is om
u jarenlang op betrouwbare wijze van dienst te zijn. Wij
adviseren u het bed met een droge doek af te stoffen.
U vervangt de batterijen van uw draadloze afstands-
bediening als volgt
gVerwijder het klepje van het batterijvak (20) aan de
achterkant van de draadloze afstandsbediening. Plaats
drie AAA-batterijen, let daarbij op de +/- markering.
Schuif het klepje weer dicht.
U vervangt de batterijen van het motorbedienings-
apparaat van uw uni 11_95RF interactief | ambiente
11_95RF interactief als volgt
g
Trek voordat u de batterijen vervangt de stekker (30) uit
het stopcontact. Verwijder het klepje van het batterijvak (24)
aan de achterkant van de motorbehuizing. Haal de batteri-
jen voorzichtig uit de batterijclips. Let bij het plaatsen van de
twee 9 volt-blokbatterijen op de +/- markering. Schuif het
klepje weer dicht. De batterijen in het motorbedieningsap-
paraat zorgen voor stroom bij een stroomstoring.
Wat te doen bij storingen
Wanneer er iets mis is met uw uni 11_95RF | ambiente
11_95RF, probeer dan aan de hand van de volgende in-
structies de storing op te lossen. Als het probleem niet is
op te lossen, trek dan de stekker uit het stopcontact en
neem contact op met uw Swissflex-speciaalzaak.
Stroomuitval in zitstand
gIn het motorbedieningsapparaat bevindt zich een
batterijpak (2 x 9 volt) om uw bed bij stroomuitval in
de vlakke slaapstand (horizontale stand) te brengen. U
kunt uw bed bij stroomuitval in de vlakke stand bren-
gen door op de nood-uitknop (23) te drukken.
Na een stroomuitval
gDruk voor het opnieuw in gebruik nemen van de uni
11_95RF | ambiente 11_95RF net zolang op de «alle
zones samen» toets «omlaag» (2), totdat alle ligzones
de beginstand (horizontale stand) hebben bereikt en er
geen motors meer te horen zijn.
U gebruikt de nood-uitknop als volgt
gDruk de nood-uitknop (23) op het motorbedienings-
apparaat in om de horizontale stand (beginstand) te
bereiken. Omdat veelvuldig gebruik van de nood-uit-
knop erg veel batterijvermogen vraagt, moeten ze na
enkele malen vervangen worden.
De uni 11_95RF interactief | ambiente 11_95RF inter-
actief werkt niet, terwijl hij aan staat en alle onderde-
len goed zijn aangesloten
gTrek de stekker (30) uit het stopcontact. Wacht een
paar minuten en doe daarna de stekker weer in het
stopcontact. Controleer eventueel met een nacht-
lampje de netspanning (230V). Als er geen stroom is,
moet u de zekering controleren.
gDruk op de «alle zones samen» toets «omlaag»
(2) om alle instellingen terug te zetten. Aangezien de
bediening van de uni 11_95RF interactief | ambiente
11_95RF interactief microprocessoren bevat, kunnen
netschommelingen storingen veroorzaken.
De draadloze afstandsbediening werkt niet (de acht-
ergrondverlichting werkt niet)
g
Vervang de batterijen. Verwijder eventuele obstakels tus-
sen de afstandsbediening en het motorbedieningsapparaat.
De nieuw ingestelde standen werken niet
gHerhaal het instellen van de standen.
Het oproepen van geprogrammeerde standen werken niet
gControleer of door het veranderen van afzonderlijke
motors op twee geheugenposities dezelfde stand opges-
lagen wordt en herhaal het instellen.
Afzonderlijke motors werken niet
gSluit het snoer voor de motors correct op de bediening aan.

20 Modo de empleo E
11
15
1
3
5
7
9
18
21
22
23
24 27
12
13
17
2
4
6
8
10
19
20
Mando a distancia por radio
1 Tecla “Todos los motores combinados” “arriba” /
Teach-In
2 Tecla “Todos los motores combinados” “abajo” /
Teach-In
3 Zona cabeza “arriba”
4 Zona cabeza “abajo”
5 Zona espalda “arriba”
6 Zona espalda “abajo”
7 Zona muslo “arriba”
8 Zona muslo “abajo”
9 Zona pantorrilla “arriba”
10 Zona pantorrilla “abajo”
11 Posición de memoria 1
12 Posición de memoria 2
13 Posición de memoria 3
14 Ajuste de memoria / Bloqueo de teclas /
Teach-In
15 Toma de corriente libre controlable
a distancia ON / OFF
16 Linterna
17 Luz nocturna (regleta de luces LED)
18 Función sincrónica ON
19 Función sincrónica OFF
20 Compartimento de batería
(en la parte trasera del mando a distancia
por radio)
21 3x baterías AAA
22 2x pilas de 9 voltios
Control de los motores
23 Tecla de descenso de emergencia / Teach-in
24 Compartimento de batería para descenso
de emergencia (2x 9V)
25 Conexión sincrónica
26 Iluminación en el suelo (luz nocturna)
27 Conexión de fuente de alimentación
28 Conexión para motores Megamat 1 – 4
29 Alimentación
30 Cable de alimentación con conexión
eléctrica integrada
31 Enchufe libre (Opción)
28
16
14
26
25
29
30
31
uni 11_95RF interactivo | ambiente 11_95RF interactivo
This manual suits for next models
1
Table of contents
Languages:
Other swissflex Personal Care Product manuals
Popular Personal Care Product manuals by other brands

Croydex
Croydex Halington MM720500E instructions

BaByliss
BaByliss Twist Secret TS1100E manual

Sundo Homecare
Sundo Homecare 46 500 user manual

VANITY PLANET
VANITY PLANET Forever Young user guide

GO LITE
GO LITE RE BOOTS operating instructions

Streifeneder
Streifeneder ManuMax 96B1 Series Instructions for use