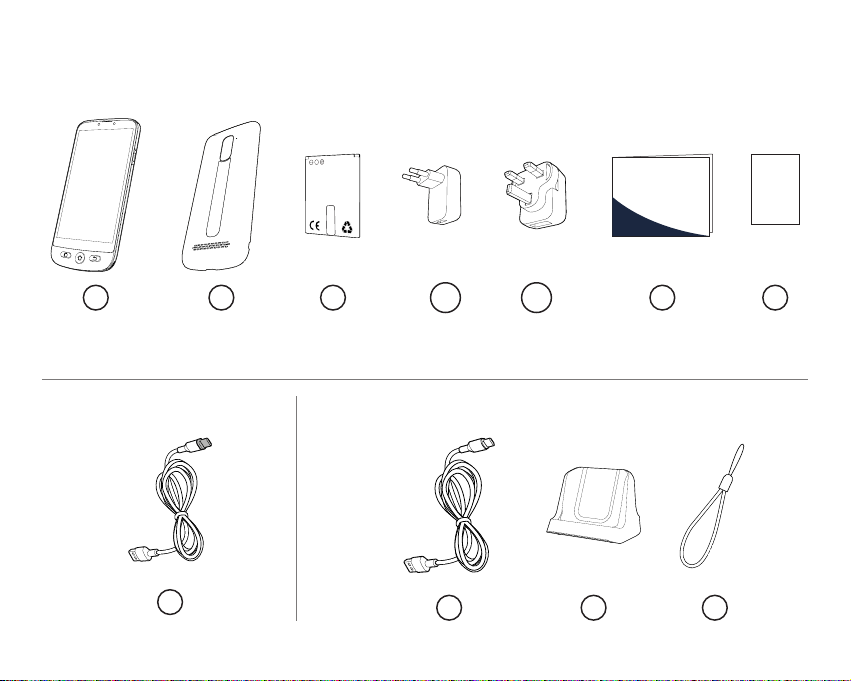
Swissvoice S 510 User manual

1
SMARTPHONE
S/M 510
User manual

2
1
3
5
6
2
4
9
8
7
Smartphone overview
5
6
7
8
9
10
11
12
13
14
10
15
17
11
15
16
12
13
14

3
A B C F G
HI J L
D2D1
What’s in the box?
S/M 510-M S/M 510-C
User Manual
SMARTPHONE
S/M 510

4
Smartphone overview
1
2
3
4
5
7
6
8
9
10
Front camera
ON/OFF button
• Press to turn on/off the screen.
• Press and hold to switch on/off your
device.
Touch screen with built-in protective film
Torch switch
• Slide up/down to switch on/off the
torch.
Hearing volume key (Up and Down)
Home key
• Press to go to the main screen
Return key
• Returns to previous menu/screen.
Microphone
USB Type-C port for charging battery
Recent task key in Android mode
11
13
15
12
14
16
17
Camera flash
Loudspeaker
Headset jack
Notch to remove the battery cover
Main camera
SOS button
• Press and hold to dial out assistance
numbers.
Torch

What’s in the box?
A
B
C
D1
D2
F
G
H
I
J
L
Smartphone
Battery cover
Battery
Power adaptor: UE
USB Type-C cable with
detachable magnetic tip
(S/M 510-M)
Power adaptor: UK
USB Type-C cable
(S/M 510-C)
User manual
Charging base
(S/M 510-C)
Technical sheet
Lanyard
(S/M 510-C)
or

4
| Getting started
What’s in the box?
Smartphone elements (All models)
Accessories (model-dependent)
Smartphone overview
First installation 6
Install the SIM card (provided by your
mobile operator) 6
Install the battery 6
Tie the lanyard (only available for
S/M 510-C) 6
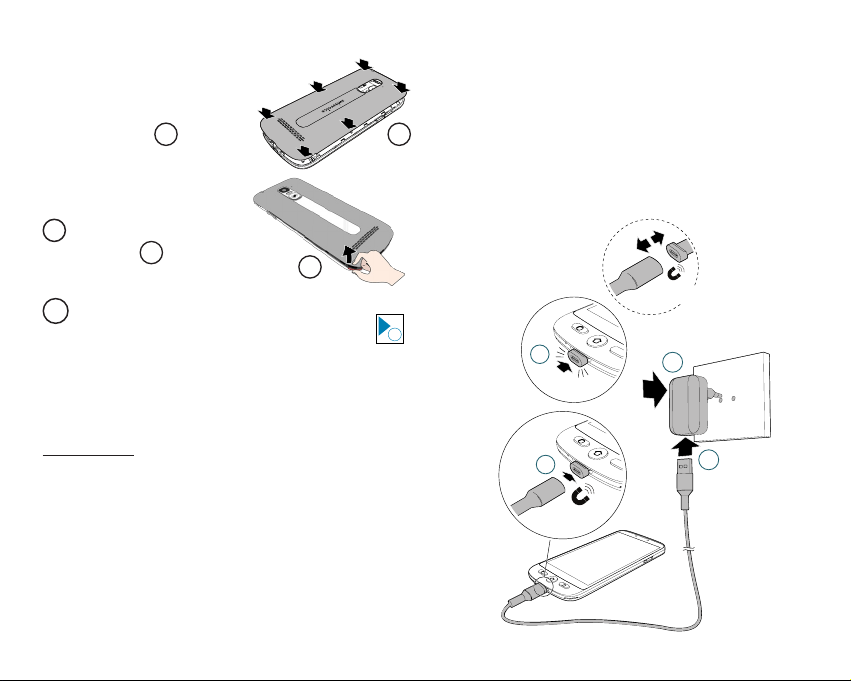
Replacing the battery cover 7
Charge your phone 7
Turn Smartphone ON 10
To turn ON 10
To turn OFF 10
Initial setup 10
Setup Wizard 15
| Smartphone Use 19
Smartphone menu/ interface Overview 19
Home screen overview 19
Call 20
Make a call 20
Answer a call/ Reject a call 20
Call a number in the phonebook 20
Calling on of the 3 speed dial icons 20
Calling from the call log 20
Adjust hearing volume/ Audio boost/
Handsfree 20
Ringer mode 21
Messages 21
Write a new message 21
WhatsApp (simplified access) 22
Write a WhatsApp message 22
Send a picture with WhatsApp 22
Place a Call with WhatsApp (Voice or Video call) 22
Receive a WhatsApp call (or video call) 22
Send a voice message through WhatsApp22
Use regular WhatsApp interface 23
Pictures 23
Take a picture 23
View and share pictures 23
Phone Book 23
Add a contact 23
Assign the 3 speed dial numbers 24
Edit contact 24
Add a photo 24

5
Fun 24
Weather 24
Games 24
Internet Radio 25
Apps 25
Add new applications 25
SOS Assistance button 25
Set SOS Assistance number 26
Call SOS Assistance number 26
Advanced Settings 26
Talking Digits 27
Rearrange applications in Apps menu 27
Rearrange the menu buttons 27
Manage messages filter 27
Android settings 27
| Learn more & Supports 28
FAQ’s 28
Troubleshooting 30
| Conformity 33
Declaration of Conformity 33

6
|Getting started
First installation Install the battery
Tie the lanyard (only available for
S/M 510-C)
a
b
Do not remove the transparent tape as it will
help you to remove later the battery if needed.
!
Install the SIM card (provided by your
mobile operator)
• Insert the micro-SIM card as depicted.
Contact your operator to get a micro-
SIM card adaptor if necessary.
SD card
(Not provided
and not essential)
Micro
Sim Card
• Risk of swallowing small objects! The
micro-SIM card and memory card
can be removed. Small children can
swallow them.
• Do not bend or scratch the micro-SIM
card. Prevent any contact with water,
dirt, or electrical charges.
Getting started

7
Getting started |
Replacing the battery cover
Charge your phone
Before first use, the smartphone has to be
charged at least at 80%.
S/M 510-M
For effortless charging, the USB cable
supplied with your smartphone is fitted
with a detachable magnetic tip.
To install:
1. Detach the small magnetic tip from the
supplied cable.
2. Insert the tip in the smartphone USB-C
port until a click is emitted.
3. Bring the USB cable magnetic end close
to the magnetic tip until it adheres to it.
4. Connect the other end of the USB cable
to the USB outlet of the power adaptor.
5. Plug the power adaptor to the power
outlet and charging starts.
a
4
5
3
2
Gently peel off the thin plastic film on the
smartphone screen, by pulling the label
!
2
In case you need
to remove it: (see
17 “Smartphone
overview”) B
A
B
Press well on each
side of the cover
(see arrows). A

8
|Getting started
a
b
c
d
S/M 510-C model: 2 way for charging
A Using charging dock
1. Insert the USB cable into dock’s
connector.Connect as shown.
2. Insert the other end of the USB cable
into the adaptor.
3. Connect the power adaptor to the
power outlet.
4. Place your smartphone on the
charging dock to charge.

9
Getting started |
B Using USB Type-C cable
1. Insert the USB cable directly into the
phone’s USB connector.
2. Connect the other end of the USB cable
to the power adaptor.
a
b
c
• To avoid injury or damage to your
device, only use battery, charger and
accessories that have been approved
for use with this model. Connecting
other accessories may be dangerous
and invalidate the warranty.
3. Plug the adaptor to the power outlet.
• While charging, the device and the
charger may become hot. This usually
does not affect the device’s lifespan
or performance, and is in the device’s
normal range of operation.

10
|Getting started
Turn Smartphone ON Initial setup
To turn ON
To turn OFF
Press and hold the ON/OFF key (see 2
in smartphone overview) a few seconds
to turn on the smartphone, the screen
lights up.
Press and hold
the ON/OFF key a
few seconds, and
the display shows
Power off. Tap on
it to Turn off.
The display lights up when the smartphone
is on. You can now setup the smartphone.
• If your SIM card has
a PIN code, enter it.
• Tap to confirm.
• Important: If the screen displays
System update, select Update >
Download > Click to update.
• The phone will reboot automatically
and install the update.
• The process can last a few minutes.

11
Getting started |
1. To change the language, point and tap
ENGLISH (UNITED KINGDOM).
2. Scroll to the desired language, and tap
it to select.
• If you have a WiFi router at home,
connect your smartphone to it to save
mobile data consumption.
3. Select your WiFi
access point,
and enter its
password.
• If there is no
WiFi access point
available, tap
Continue, and
you can select
Setup Offline.
You can change
this setting later.
Atlinks Guest
4. If you have a
Google account:
Enter your
credentials > Tap
Next > Enter your
password > Next.

12
|Getting started
5. If you don’t have yet a “Google account”
on page 22
• To create one: Tap
Create account >
Follow the on-screen
instructions to fill in
your information >
Tap Next.
• Choose a password
(with 8 characters
minimum).
• Enter your telephone
number. You will
receive a verification
code on your
smartphone and your
Google account is
created.
• Tap I agree after going through Google
agreement details.
6. Swipe up and choose
the Google services
you want to enable
It is recommended to have one as it is required
to download new applications from Google Play
store, receive apps and software updates or send
and receive emails through Gmail.

13
Getting started |
or disable, and tap Accept.
7. Select your preferred search engine for
searches over the internet (For example
Chrome, Yahoo,..) and tap Next.
8. You will be asked to set a screen lock
code.
!Tap Skip to move to next step.

14
|Getting started
• Select simple smartphone to
access the simplified menu
which we recommend for
beginners.
• The following instructions refer
only to this easy-to-use menu
(Simple Smartphone).
• Select Android mode if you
want to use this smartphone as
a regular one (not detailed in
this user guide).
Tap Skip anyway (highly
recommended).
9. Tap on Select Home
icon . You will
get the following
options:
10. Tap on SIMPLE Smartphone and press
OK. The phone will restart.
Note: At any time once you have
selected Simple Smartphone mode, a
notication may invite you to install
a new version. If so, tap Install. The
phone may restart. Enter the SIM card
PIN code if asked.
11. To experiment the
default long press
on menu keys, Tap
on Press here

15
Getting started |
Setup Wizard
This menu will help you to program quickly
main features.
Follow each Wizard menu option one
by one. (Minimum recommended steps:
1. Permissions through 5. WhatsApp)
1. Permissions - Tap Next > Permission
• Accessibility and Installation have to
be in green .
• If one of them is in orange ,
tap on that function to activate and
authorize it. It will turn into green.
Tap Return to Wizard.
2. Keyboard - Tap Keyboard > Next

16
|Getting started
Click Duration
• To set up your prefered click choice for
both menu and keyboard
• Tap Click Duration (menu) > Change Click
Duration > Select one of the durations
(according to user dexterity) > OK.
• Tap Click Duration (keyboard) > Change
keyboard click duration > Long-press time >
Select one of the durations (according to user
dexterity) Tap 3 times to return to wizard.
x3

17
Getting started |
3. WiFi (if available) - for WiFi setup
(if it has not been done previously and
if available)
4. Google Account - If it has not been
done previously, see page 12
If you did not set it up during Initial Setup steps,
you can do it through the Wizard now.
5. WhatsApp
This menu offers a simplified
interface for most used functions in
WhatsApp.
• Tap Setup and follow the
instructions. Once Setup done,
icon turns green .
• Tap Permissions and follow
instructions
• Then, you need to allow
Camera / Microphone / Phone
/ Contacts / Files & media in
WhatsApp application: App
info > Tap Permissions >
and for each item, tap and
authorize
• Press Return to Wizard
Once you are inside Whatsapp application, short
tap may apply.

18
|Getting started
6. Copy Contacts from your SIM
7. New Contact, see page 23
8. SOS and Support to set your SOS and
assistance numbers, see page 25
9. Speed Dial to set the Home page speed
dials, see page 24
10. Favorite Contacts to select which
contacts are displayed at the top of the
list.
11. ZoomLy - to get ready to participate in
Zoom group calls easily.
12. Advanced Settings
13. Exit Setup
To reach Setup Wizard later from Home
screen.
1. Tap until Settings displays.
2. Tap Settings > Setup Wizard.
To exit from Setup Wizard menu at any
step, Tap twice and select Exit Setup.
Main Simple menu will appear.
x2
!
This manual suits for next models
5
Table of contents
Other Swissvoice Cell Phone manuals

Swissvoice
Swissvoice SV29 User manual

Swissvoice
Swissvoice S28 Instruction manual

Swissvoice
Swissvoice MP03 User manual

Swissvoice
Swissvoice D38 Instruction manual

Swissvoice
Swissvoice B24 Instruction manual

Swissvoice
Swissvoice MP03 User manual

Swissvoice
Swissvoice C50s User manual

Swissvoice
Swissvoice S24 Instruction manual

Swissvoice
Swissvoice G50 User manual