Sygonix 2464453 User manual

5.4 Betrieb
Wenden Sie sich an eine Fachkraft, wenn Sie Zweifel über die Arbeitsweise, die Sicherheit
oder den Anschluss des Gerätes haben.
Sollte kein sicherer Betrieb mehr möglich sein, nehmen Sie das Produkt außer Betrieb und
schützen Sie es vor unbeabsichtigter Verwendung. Sehen Sie UNBEDINGT davon ab,
das Produkt selbst zu reparieren. Der sichere Betrieb ist nicht mehr gewährleistet, wenn
das Produkt:
– sichtbare Schäden aufweist,
– nicht mehr ordnungsgemäß funktioniert,
– über einen längeren Zeitraum unter ungünstigen Umgebungsbedingungen gelagert
wurde oder
– erheblichen Transportbelastungen ausgesetzt wurde.
5.5 Netzspannung
Nehmen Sie keinerlei Änderungen an den elektrischen Komponenten des Pro-
dukts vor. Es besteht die Gefahr eines lebensgefährlichen elektrischen Schlags!
Vergewissern Sie sich, dass der Netzstecker des Geräts ordnungsgemäß
angeschlossen ist.
Sollte eine der elektrischen Komponenten beschädigt sein, sehen Sie von der
weiteren Verwendung des Geräts unbedingt ab.
Nehmen Sie keine Änderungen an den elektrischen Komponenten vor.
Als Spannungsquelle für das Produkt darf nur eine haushaltsübliche Steckdose verwendet
werden, die an das öffentliche Versorgungsnetz angeschlossen ist. Überprüfen Sie vor
dem Anschluss, ob die Spannungsangaben auf dem Produkt mit der Spannung in Ihrem
Haushalt übereinstimmen.
Schließen Sie das Produkt an einer Steckdose an, die jederzeit leicht zugänglich ist.
Das Produkt darf nicht mit nassen Händen angeschlossen oder getrennt werden.
Sollte das Produkt Beschädigungen aufweisen, so fassen Sie es nicht an, da dies zu einem
tödlichen Stromschlag führen kann! Gehen Sie wie folgt vor:
– Schalten Sie zuerst die Netzspannung zur Steckdose ab, an der das Produkt ange-
schlossen ist (zugehörigen Leitungsschutzschalter abschalten bzw. Sicherung heraus-
drehen, anschließend FI-Schutzschalter abschalten, sodass die Netzsteckdose allpolig
von der Netzspannung getrennt ist).
– Ziehen Sie das Produkt aus der Steckdose.
Ein beschädigtes Produkt darf nur vom Hersteller, einer vom Hersteller beauftragten Werk-
statt oder einer ähnlich qualizierten Person repariert werden, um jegliche Gefährdungen
zu vermeiden.
Trennen Sie das Produkt aus Sicherheitsgründen während eines Gewitters stets von der
Spannungsversorgung.
Ziehen Sie bei längerer Nichtbenutzung das Produkt aus der Netzsteckdose.
6 Inbetriebnahme/Bedienung
6.1 Inbetriebnahme
Beachten Sie die Sicherheitshinweise und alle anderen Informationen in dieser
Bedienungsanleitung!
Beachten Sie die Bedienungsanleitung der von Ihnen angeschlossenen Leuchte,
ob diese dimmbar ist. Beachten Sie die jeweilige Mindest- und Maximallast im
Kapitel „Technische Daten“.
Der WLAN-Dimmer ist nicht für Energiesparlampen oder Leuchtstofampen ge-
eignet.
Stecken Sie den WLAN-Dimmer in eine ordnungsgemäße Schutzkontakt-Netzsteckdose
(Wandsteckdose) ein.
Schließen Sie an der Frontsteckdose des WLAN-Dimmers eine geeignete dimmbare LED-
Lampe oder Leuchte an.
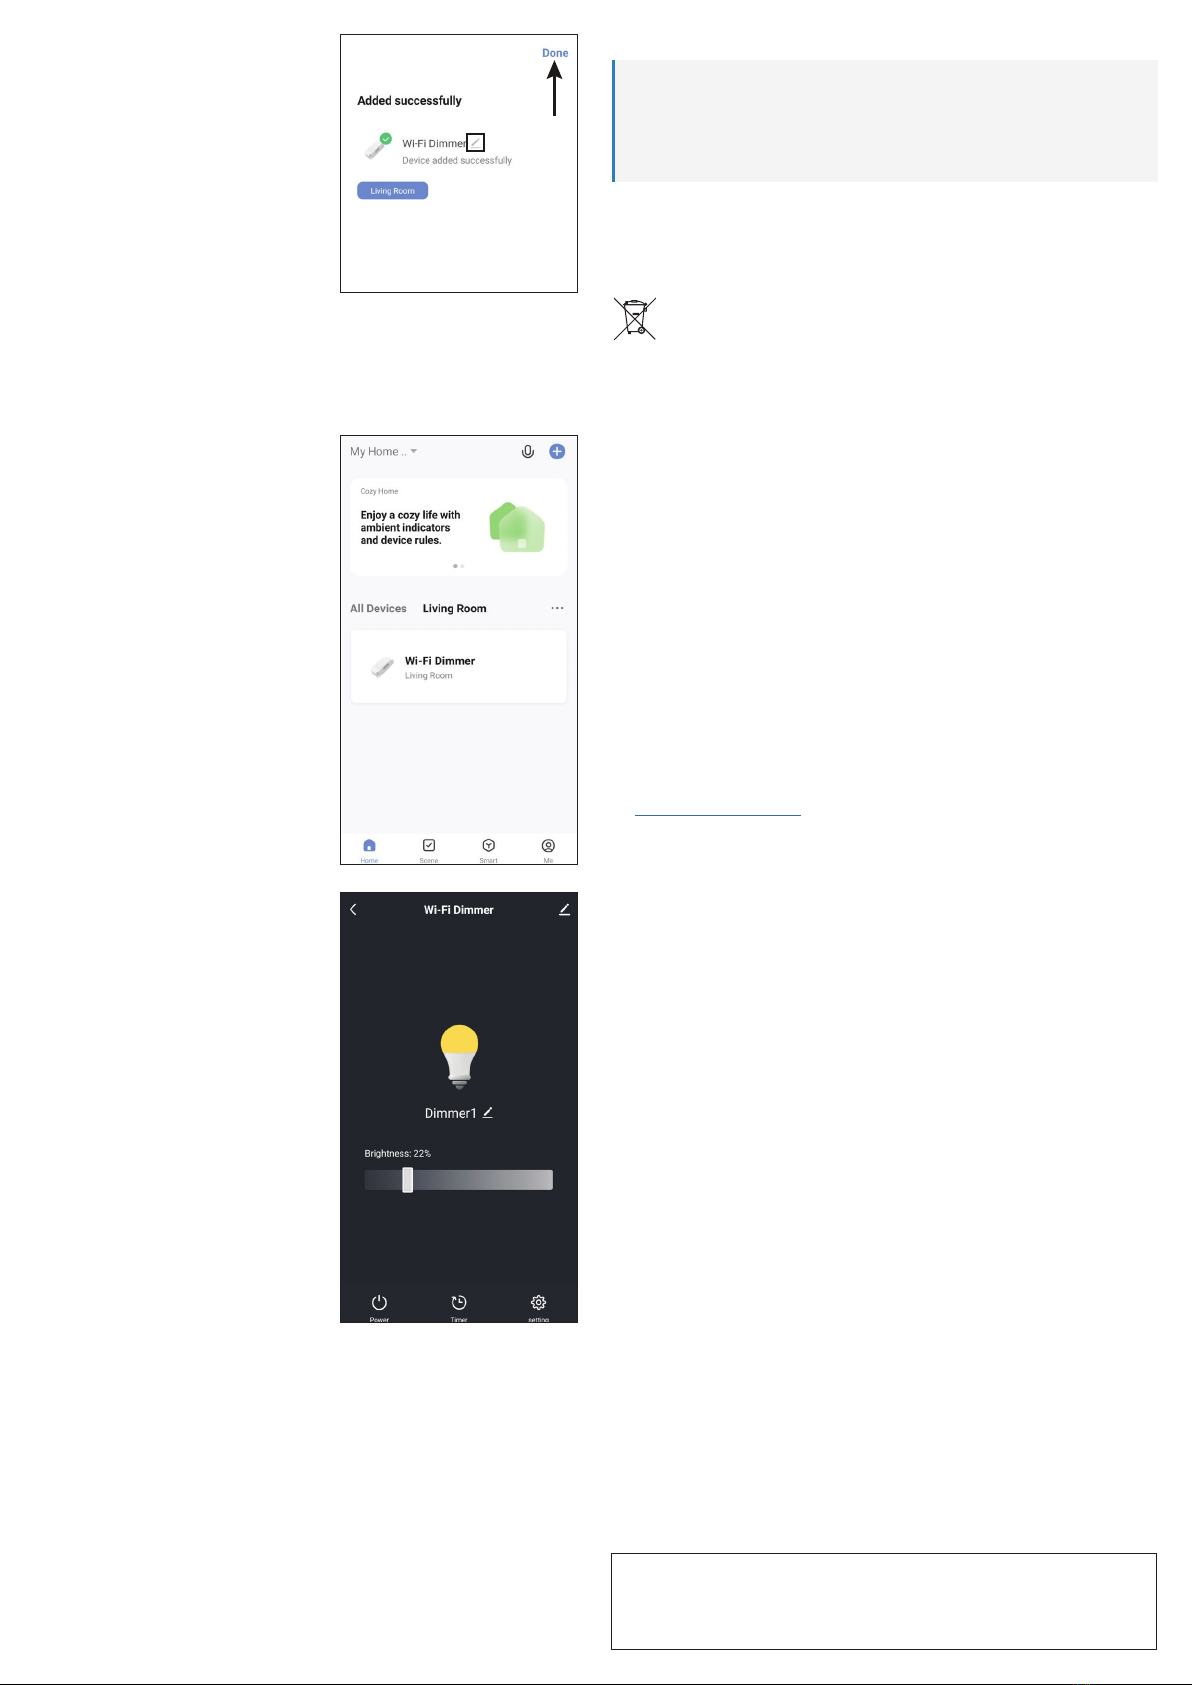
6.2 Bedienung
Um die angeschlossene LED/Leuchte ein- bzw. auszuschalten, drücken Sie kurz auf den
Taster (Drehknopf). Der WLAN-Dimmer merkt sich dabei die eingestellte Helligkeit.
Um die Helligkeit der angeschlossene LED/Leuchte anzupassen, drehen Sie am Knopf.
Drehen Sie den Knopf nach rechts im Uhrzeigersinn, wird die Helligkeit erhöht. Wenn Sie
den Knopf nach links drehen, wird die Helligkeit verringert.
Wenn Sie den Taster vom Drehknopf gedrückt halten, wird beim ersten Druck auf die maxi-
male Helligkeit und beim erneuten Drücken und Halten auf die Mindesthelligkeit gedimmt.
Auch wenn die von Ihnen am WLAN-Dimmer angeschlossene Leuchte vom Hersteller als
„dimmbar“ gekennzeichnet ist, kann es vorkommen, dass die Leuchte sich nicht korrekt
dimmen lässt.
Es kann z.B. vorkommen, dass die Leuchte bei niedriger Helligkeit ackert oder dass
dieses Flackern nur bei einer bestimmten Dimmer-Stellung auftritt.
Manche LED-Leuchten können (obwohl als „dimmbar“ gekennzeichnet) nicht unter ei-
ner bestimmten Mindesthelligkeit gedimmt werden (z.B. Dimmen nur zwischen 60% und
100% möglich, jedoch nicht unter 60%).
Dies ist kein Fehler des WLAN-Dimmers, sondern technisch bedingt durch die Elektronik
in der Leuchte. Aufgrund der Vielzahl an unterschiedlichen Produkten kann leider nicht
garantiert werden, dass der WLAN-Dimmer eine angeschlossene Leuchte korrekt dim-
men kann.
Bedienungsanleitung
WLAN-Dimmer 5 - 100 W
Best.-Nr. 2464453
1 Bestimmungsgemäße Verwendung
Das Produkt verfügt über eine Steckdose, an der eine geeignete dimmbare LED bzw. Leuchte
angeschlossen werden kann. Die Helligkeit der LED/Leuchte lässt sich über den Drehknopf
stufenlos einstellen, die LED/Leuchte kann hierüber auch ausgeschaltet werden.
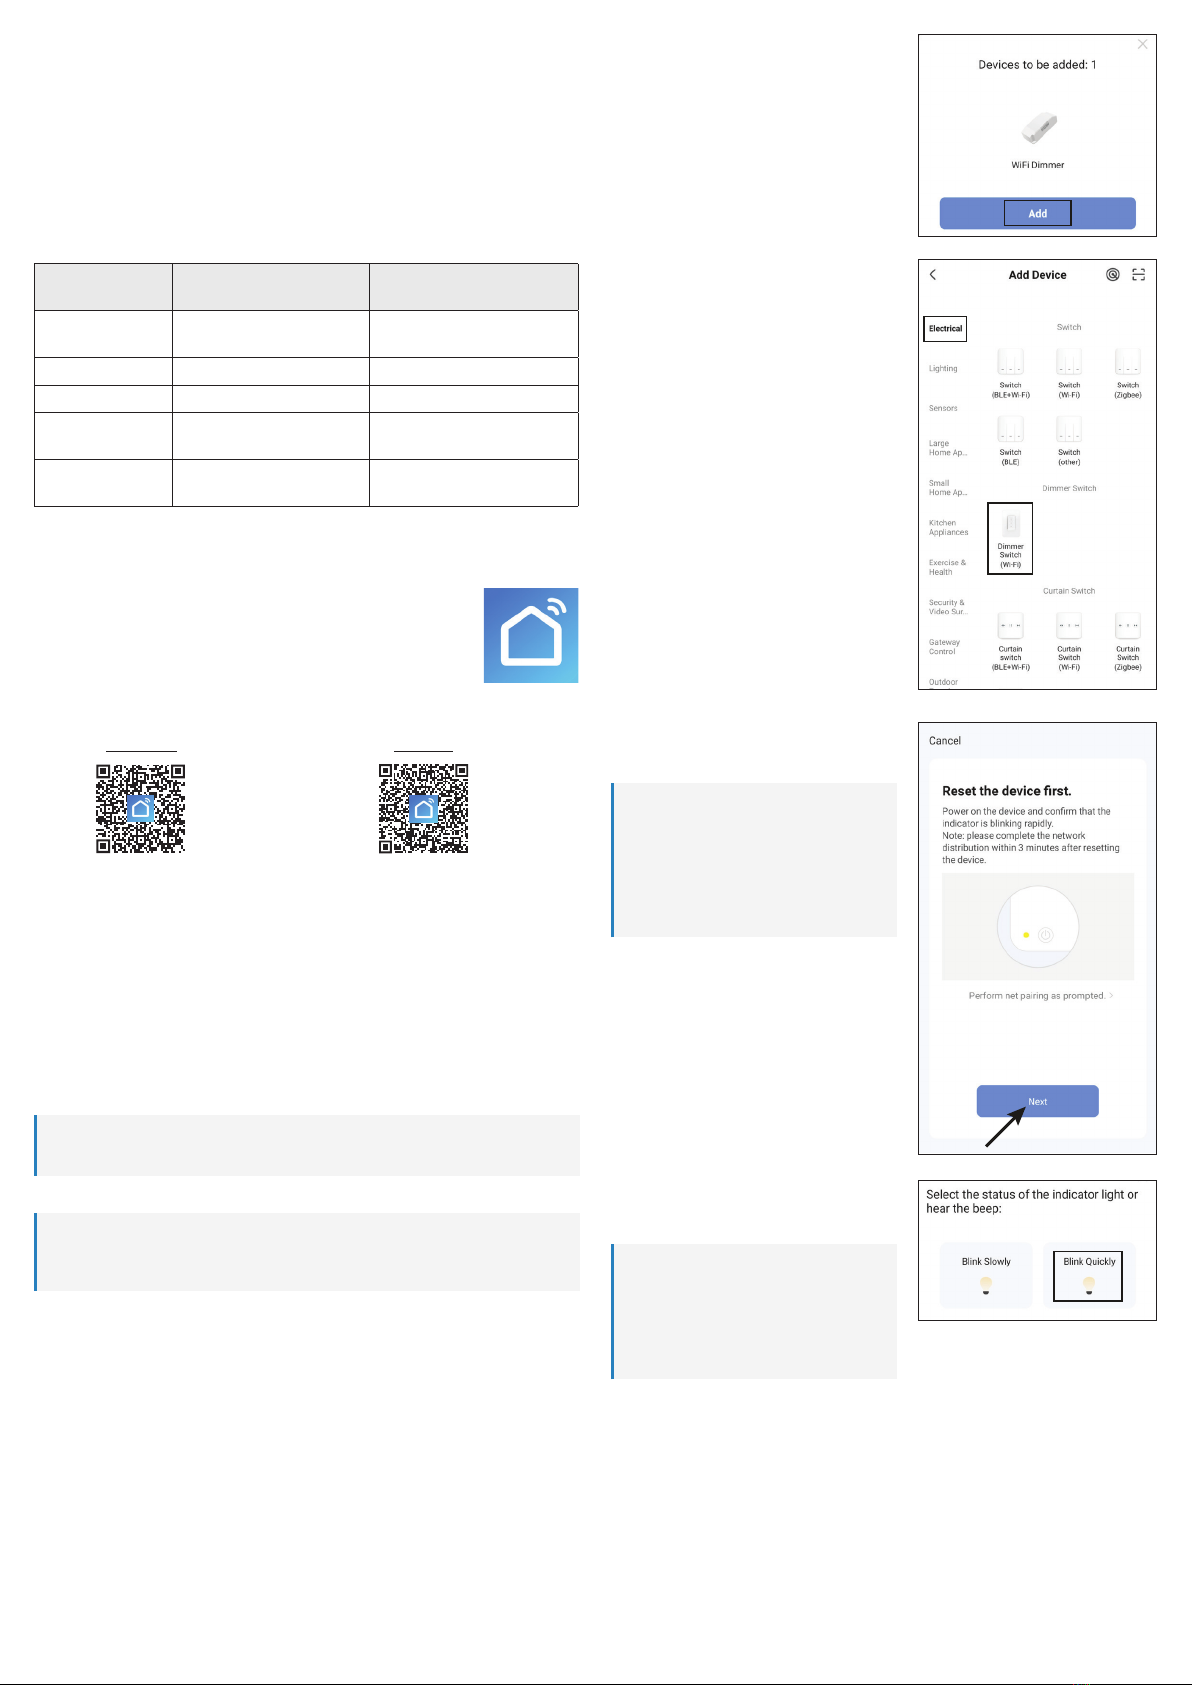
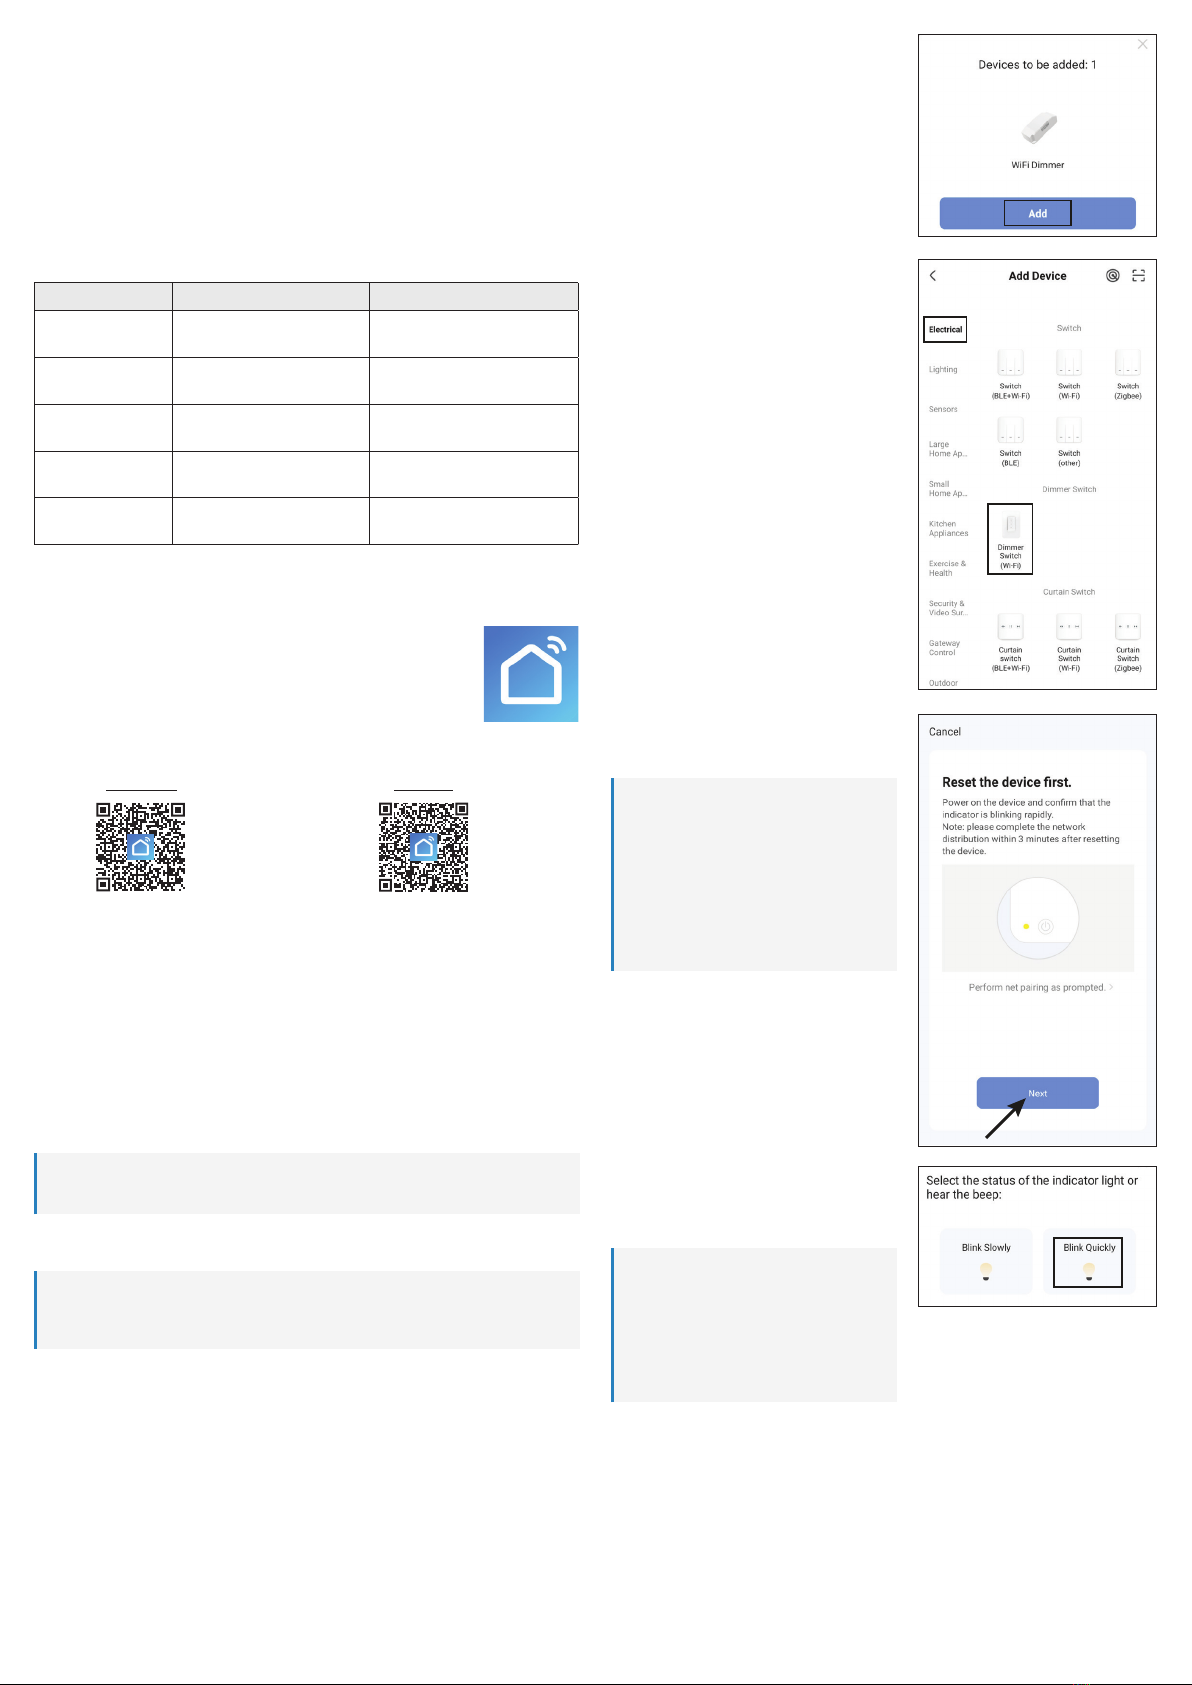
Zusätzlich kann das Produkt bzw. die daran angeschlossene LED/Leuchte, über die App
„Smart Life - Smart Living“ bedient bzw. programmiert werden. Für die Benutzung ist ein
kostenloser Account nötig. Dieser muss bei der Ersteinrichtung der App angelegt werden.
Über die App kann das Produkt auch mit anderen Geräten, die ebenfalls mit Ihrer App verbun-
den sind, vernetzt werden. Eine Sprachsteuerung wird auch über die App unterstützt.
Die Spannungsversorgung erfolgt über die Netzsteckdose, in der das Produkt eingesteckt ist.
Das Produkt ist ausschließlich für den Innengebrauch bestimmt. Verwenden Sie es also nicht
im Freien. Der Kontakt mit Feuchtigkeit ist in jedem Fall zu vermeiden.
Falls Sie das Produkt für andere als die zuvor genannten Zwecke verwenden, könnte das Pro-
dukt beschädigt werden. Unsachgemäßer Gebrauch kann zu Kurzschluss, Feuer, Stromschlag
oder anderen Gefährdungen führen.
Dieses Produkt entspricht den gesetzlichen, nationalen und europäischen Anforderungen. Aus
Sicherheits- und Zulassungsgründen dürfen Sie dieses Produkt nicht umbauen und/oder ver-
ändern.
Lesen Sie sich die Bedienungsanleitung sorgfältig durch und bewahren Sie sie sicher auf.
Geben Sie das Produkt nur zusammen mit der Bedienungsanleitung an Dritte weiter.
Alle enthaltenen Firmennamen und Produktbezeichnungen sind Warenzeichen der jeweiligen
Inhaber. Alle Rechte vorbehalten.
AndroidTM ist eine eingetragene Marke der Google LLC.
2 Lieferumfang
WLAN-Dimmer Bedienungsanleitung
3 Neueste Informationen zum Produkt
Laden Sie die neuesten Produktinformationen unter www.conrad.com/downloads herunter
oder scannen Sie den abgebildeten QR-Code. Folgen Sie den Anweisungen auf der Website.
4 Symbole in diesem Dokument
Das Symbol warnt vor Gefahren, die zu Personenschäden führen können. Lesen
Sie die Informationen sorgfältig.
Das Symbol warnt vor gefährlicher Spannung, die zu Verletzungen durch Strom-
schlag führen kann. Lesen Sie die Informationen sorgfältig.
5 Sicherheitshinweise
Lesen Sie sich die Bedienungsanleitung sorgfältig durch und beachten Sie
insbesondere die Sicherheitshinweise. Sollten Sie die in dieser Bedienungs-
anleitung enthaltenen Sicherheitshinweise und Informationen für einen ord-
nungsgemäßen Gebrauch nicht beachten, übernehmen wir keine Haftung
für daraus resultierende Verletzungen oder Sachschäden. Darüber hinaus
erlischt in solchen Fällen die Gewährleistung/Garantie.
5.1 Allgemein
Das Produkt ist kein Spielzeug. Halten Sie es von Kindern und Haustieren fern.
Lassen Sie Verpackungsmaterial nicht achtlos herumliegen. Dieses könnte für Kinder zu
einem gefährlichen Spielzeug werden.
Beachten Sie auch die Sicherheitshinweise aller Geräte, die an das Produkt angeschlos-
sen werden.
Falls Sie Fragen haben, die mit diesem Dokument nicht beantwortet werden können, wen-
den Sie sich an unseren technischen Kundendienst oder an einen anderen Fachmann.
5.2 Handhabung
Gehen Sie stets vorsichtig mit dem Produkt um. Stöße, Schläge oder das Herunterfallen
aus geringer Höhe können das Produkt beschädigen.
5.3 Betriebsumgebung
Setzen Sie das Produkt keiner mechanischen Beanspruchung aus.
Schützen Sie das Produkt vor extremen Temperaturen, starken Stößen, brennbaren Ga-
sen, Dämpfen und Lösungsmitteln.
Schützen Sie das Produkt vor hoher Feuchtigkeit und Nässe.
Schützen Sie das Produkt vor direkter Sonneneinstrahlung.
Vermeiden Sie den Betrieb in unmittelbarer Nähe von starken magnetischen oder elektro-
magnetischen Feldern bzw. Sendeantennen oder HF-Generatoren. Andernfalls besteht die
Möglichkeit, dass das Produkt nicht ordnungsgemäß funktioniert.

Wenn sich der WLAN-Dimmer bereits im Ver-
bindungsmodus bendet (LED „Indicator“
blinkt 8x innerhalb von 5 Sekunden) und die
App aktiv ist, kann es sein, dass die App das
Gerät automatisch ndet und die Einrichtung
anbietet. Tippen Sie dann auf den Button, um
das Gerät hinzuzufügen und folgen Sie an-
schließend den Anweisungen in der App, bis
zu dem Punkt, wo Sie das neue Gerät umbe-
nennen können.
Um ein neues Gerät manuell hinzuzufügen,
tippen Sie auf der Hauptseite der App oben
rechts auf das „+“ und anschließend auf die
Auswahl, um ein neues Gerät hinzuzufügen.
Alternativ können Sie auch direkt unten in der
Mitte auf den blauen Button tippen.
Um den WLAN-Dimmer in der App hinzuzu-
fügen, wählen Sie in der linken Spalte den
obersten Punkt für elektrische Schalter aus
(siehe linkes schwarzes Viereck im Bild).
Anschließend wählen Sie in der vierten Ru-
brik den „Dimmschalter (Wi-Fi)“ aus (siehe
rechtes schwarzes Viereck im Bild).
Sobald Sie darauf tippen, werden Sie zur
nächsten Kongurationsseite weitergeleitet.
Falls hier Ihr WLAN-Netzwerk nicht automa-
tisch übernommen wird, wählen Sie dieses
zuerst aus (rechts daneben auf den Dop-
pelpfeil tippen) und geben anschließend das
WLAN-Kennwort ein.
Tippen Sie auf den blauen Button, um die
Auswahl zu speichern und fortzufahren.
Wenn die LED „Indicator“ immer noch 8x in-
nerhalb von 5 Sekunden blinkt, tippen Sie in
der App auf den unteren blauen Button.
Wichtig:
Die Zeit ab dem Punkt, wo Sie das Gerät
in den Verbindungsmodus versetzt haben
und dem Beginn der Suche nach dem Gerät
durch das Setup (nach der Bestätigung im
nächsten Bild), sollte nicht zu lang sein. An-
sonsten kann es passieren, dass die Suche
nicht erfolgreich beendet werden kann, da
sich das Gerät nicht mehr im Verbindungs-
modus bendet.
Wenn die LED „Indicator“ immer noch 8x in-
nerhalb von 5 Sekunden blinkt, tippen Sie auf
den rechten Button, um zu bestätigen, dass
die LED schnell blinkt.
Wichtig:
Sollte es zu Problemen kommen, können
Sie hier auf den linken Button klicken, dann
wird ein manueller Modus gestartet, bei dem
Sie Ihr Smartphone zuerst mit dem WLAN-
Hotspot des WLAN-Dimmers verbinden
müssen. Folgen Sie in diesem Fall den wei-
teren Anweisungen der App.
Das neue Gerät wird gesucht und eingerichtet. Dies kann einige Minuten dauern.
6.3 Anpassen der Mindesthelligkeit
Um die Mindesthelligkeit anzupassen, ziehen Sie zuerst den Drehknopf vom WLAN-Dim-
mer ab.
Falls die LED/Leuchte, für die Sie die Mindesthelligkeit einstellen wollen, noch nicht am
WLAN-Dimmer angeschlossen ist, schließen Sie diese jetzt an.
Schalten Sie die LED/Leuchte ein (1x auf den Drehknopf-Taster drücken) und regeln Sie
die Helligkeit so weit herunter wie es geht, bzw. bis die LED/Leuchte nicht mehr leuchtet.
Nehmen Sie einen kleinen Schlitzschraubendreher zur Hand und drehen Sie den kleinen
Regler unter dem Drehknopf langsam nach rechts, bis die gewünschte Mindesthelligkeit
erreicht ist.
Stecken Sie den Drehknopf wieder auf die Achse des Dimmers. Damit ist die Einstellung
abgeschlossen.
6.4 Funktionen des Tasters/Drehkopfs/Status-LED
Taster/Dreh-
knopf/LED
Aktion Funktion
Taster (Drehknopf) 1x kurz Schaltet die angeschlossene LED/
Leuchte ein bzw. aus.
Drehknopf Drehen nach rechts
(Uhrzeigersinn)
Erhöht die Helligkeit
Drehknopf Drehen nach links
(gegen den Uhrzeigersinn)
Verringert die Helligkeit
Reset-Taster
(unter Drehknopf)
ca. 5 Sek. gedrückt halten Versetzt das Produkt in den Ver-
bindungsmodus für die App
Status-LED
(unter Drehknopf)
wenn sich der WLAN-Dimmer
im Verbindungsmodus bendet
blinkt ca. 8x innerhalb von
5 Sekunden
7 Konguration und Bedienung des WLAN-Dimmers in der App
7.1 Installation der App
Öffnen Sie auf Ihrem Smartphone den jeweiligen App-Store. Bei And-
roidTM öffnen Sie „Google Play“. Falls Sie ein Gerät von Apple verwen-
den, öffnen Sie den „App Store“ von Apple.
Suchen Sie nach der App „Smart Life - Smart Living“ (blauer Hinter-
grund mit Haus-Symbol) und installieren Sie diese.
Alternativ können Sie auch ganz einfach unten den entsprechenden QR-Code scannen,
oder auf den Namen darüber tippen. Sie werden dann auf die entsprechende Store Seite
weitergeleitet.
Google Play Apple iOS
7.2 Erster Start der App
Öffnen Sie die zuvor installierte App „Smart Life - Smart Living“.
Wenn Sie noch kein kostenloses Konto erstellt haben, registrieren Sie sich und folgen Sie
dabei allen Anweisungen.
Melden Sie sich jetzt mit Ihrem Konto in der App an.
Falls Sie mehrere Geräte verwenden, legen Sie am besten zuerst ein Prol für Ihr Zuhause
an. Hier können Sie dann auch z.B. mehrere Räume anlegen, usw. Die entsprechende
Einstellungsseite erreichen Sie in der App mit dem Button ganz unten rechts.
7.3 Anlernen des WLAN-Dimmers
Ihr Smartphone sollte für die Konguration mit dem WLAN verbunden sein, welches Sie
auch für das WLAN-Thermo-/Hygrometer verwenden wollen.
Wichtig:
Bitte beachten Sie, dass nur WLAN-Netzwerke mit 2,4 GHz unterstützt werden.
Damit der WLAN-Dimmer mit der App verbunden werden kann, muss sich dieser im Ver-
bindungsmodus benden.
Wichtig:
Ohne Verbraucher funktioniert der Verbindungsmodus nicht! Falls noch nicht geschehen,
schließen Sie jetzt zuerst eine Leuchte an.
Ziehen Sie den Drehknopf vom Dimmer ab und halten Sie anschließend den Taster „Reset“
für ca. 5 Sekunden gedrückt.
Die LED „Indicator“ blinkt zuerst schnell und anschließend 8x innerhalb von 5 Sekunden.
Lassen Sie den Taster dann wieder los.

Wenn alles funktioniert hat, sollte die Anzei-
ge so aussehen, wie im Bild rechts. Sollte
irgendetwas nicht funktioniert haben, wieder-
holen Sie den Vorgang.
Wenn Sie auf den Stift tippen, können Sie
dem neuen Gerät einen individuellen Namen
zuordnen.
Falls Sie zuvor ein Prol mit Räumen ange-
legt haben, können Sie das Gerät auch noch
einem Raum zuordnen. Tippen Sie unter dem
Namen des Geräts auf den gewünschten
Raum, so dass dieser dunkel hinterlegt ist.
Zum Schluss tippen Sie oben auf den blauen
Schriftzug, um die Einrichtung fertigzustellen.
Auf der Hauptseite sehen Sie jetzt das neu hinzugefügte Gerät (siehe erstes Bild im nächs-
ten Kapitel).
Wenn Sie das Gerät einen Raum zugeordnet haben, ist dieses natürlich auch unter dem
jeweiligen Raum zu sehen.
Wenn Sie durch Tippen auf einen Raum wechseln, sehen Sie nur die Geräte, die mit dem
jeweiligen Raum verknüpft sind.
8 Bedienung in der App
Auf der Hauptseite der App können Sie durch
Tippen auf das Gerät die Seite mit den erwei-
terten Bedienfunktionen und Einstellungen
öffnen.
Um den WLAN-Dimmer wieder aus der App
zu entfernen, tippen Sie auf der Hauptseite
so lange auf das Gerät, bis unten ein Button
zum Entfernen des Geräts erscheint. Tippen
Sie anschließend auf den Button und bestä-
tigen Sie dies.
Auf der Seite des WLAN-Dimmers wird im-
mer der aktuelle Status angezeigt. Egal ob
Sie die WLAN-Dimmer über die App oder ma-
nuell bedienen. Ist die Anzeige wie im Bild, ist
der WLAN-Dimmer eingeschaltet. Ansonsten
ist die Leuchte in der Mitte grau hinterlegt.
Um die am WLAN-Dimmer angeschlossene
Leuchte ein- bzw. auszuschalten tippen sie
unten links auf den Button mit dem Ein-/Aus-
Symbol.
Um die Dimm-Funktion zu nutzen, muss der
WLAN-Dimmer eingeschaltet sein. Dann
können Sie mit dem Schieber die Helligkeit
einstellen.
Wenn Sie ganz unten auf den mittleren But-
ten tippen, können Sie einen Timer aktivie-
ren. Stellen Sie einfach die gewünschte Zeit
ein und bestätigen Sie diese. Der Timer kann
sowohl den Dimmer ein- als auch ausschal-
ten. Je nachdem ob dieser bei Aktivierung
aus- oder eingeschaltet ist.
Im Menü ganz unten rechts (Zahnrad) kön-
nen Sie den Dimm-Bereich einstellen.
Wenn Sie ganz oben rechts auf den Stift tippen, öffnen sich die Einstellungen des aktuellen
Geräts.
Hier können Sie z.B. die Firmware aktualisieren oder das Gerät mit Alexa oder Google
Assistent verbinden.
9 Reinigung und Plege
Wichtig:
– Verwenden Sie auf keinen Fall aggressive Reinigungsmittel, Reinigungsalkohol oder
andere chemische Lösungen, da dadurch das Gehäuse angegriffen oder gar die Funk-
tion beeinträchtigt werden kann.
– Tauchen Sie das Produkt nicht in Wasser ein.
Verwenden Sie ein trockenes, faserfreies Tuch zur Reinigung des Produkts.
10 Entsorgung
10.1 Produkt
Alle Elektro- und Elektronikgeräte, die auf den europäischen Markt gebracht wer-
den, müssen mit diesem Symbol gekennzeichnet werden. Dieses Symbol weist da-
rauf hin, dass dieses Gerät am Ende seiner Lebensdauer getrennt von unsortiertem
Siedlungsabfall zu entsorgen ist.
Jeder Besitzer von Altgeräten ist verpichtet, Altgeräte einer vom unsortierten
Siedlungsabfall getrennten Erfassung zuzuführen. Die Endnutzer sind verpichtet,
Altbatterien und Altakkumulatoren, die nicht vom Altgerät umschlossen sind, sowie
Lampen, die zerstörungsfrei aus dem Altgerät entnommen werden können, vor der
Abgabe an einer Erfassungsstelle vom Altgerät zerstörungsfrei zu trennen.
Vertreiber von Elektro- und Elektronikgeräten sind gesetzlich zur unentgeltlichen Rücknahme
von Altgeräten verpichtet. Conrad stellt Ihnen folgende kostenlose Rückgabemöglichkeiten
zur Verfügung (weitere Informationen auf unserer Internet-Seite):
in unseren Conrad-Filialen
in den von Conrad geschaffenen Sammelstellen
in den Sammelstellen der öffentlich-rechtlichen Entsorgungsträger oder bei den von Her-
stellern und Vertreibern im Sinne des ElektroG eingerichteten Rücknahmesystemen
Für das Löschen von personenbezogenen Daten auf dem zu entsorgenden Altgerät ist der
Endnutzer verantwortlich.
Beachten Sie, dass in Ländern außerhalb Deutschlands evtl. andere Pichten für die Altgeräte-
Rückgabe und das Altgeräte-Recycling gelten.
11 Konformitätserklärung (DOC)
Hiermit erklärt Conrad Electronic SE, Klaus-Conrad-Straße 1, D-92240 Hirschau, dass dieses
Produkt der Richtlinie 2014/53/EU entspricht.
Der vollständige Text der EU-Konformitätserklärung ist unter der folgenden Internetadresse
verfügbar: www.conrad.com/downloads
Geben Sie die Bestellnummer des Produkts in das Suchfeld ein; anschließend können Sie die
EU-Konformitätserklärung in den verfügbaren Sprachen herunterladen.
12 Technische Daten
12.1 Spannungsversorgung
Eingangsspannung....................... 220 - 240 V/AC, 50 Hz
12.2 Dimmer
Dimm-Modus ................................ Phasenabschnitt
Regelungsart................................ Einwegsteuerung
12.3 Anschlussleistung
LED-Lampen ................................ 5 - 100 W
Glühlampen .................................. 10 - 100 W
NV-Halogenlampen ...................... 10 - 100 W (mit elektronischen Transformatoren)
12.4 Funkmodul
WLAN ........................................... IEEE802.11b/g/n, 2,4 GHz
Frequenz ...................................... 2,412 - 2,472 GHz
Sendeleistung............................... < 16 dBm
Reichweite WLAN......................... max. 40 m (im Freifeld)
12.5 Andere
Unterstützte Betriebssysteme....... AndroidTM 6.0 oder höher; Apple iOS 10.0 oder höher
Abmessungen (B x H x T) ............ ca. 55 x 115 x 87 mm
Gewicht......................................... ca. 111 g
12.6 Umgebungsbedingungen
Betriebsbedingungen.................... -10 bis +45 °C, 10 bis 90% rF (nicht kondensierend)
Lagerbedingungen........................ -20 bis +60 °C, 10 bis 95% rF (nicht kondensierend)
Dies ist eine Publikation der Conrad Electronic SE, Klaus-Conrad-Str. 1, D-92240 Hirschau (www.conrad.com).
Alle Rechte einschließlich Übersetzung vorbehalten. Reproduktionen jeder Art, z. B. Fotokopie, Mikroverlmung, oder
die Erfassung in elektronischen Datenverarbeitungsanlagen, bedürfen der schriftlichen Genehmigung des Herausgebers.
Nachdruck, auch auszugsweise, verboten. Die Publikation entspricht dem technischen Stand bei Drucklegung.
Copyright 2022 by Conrad Electronic SE. *2464453_V1_0122_02_m_RR_VTP_DE

5.4 Operation
Consult an expert when in doubt about the operation, safety or connection of the device.
If it is no longer possible to operate the product safely, stop using it and prevent unautho-
rised use. DO NOT attempt to repair the product yourself. Safe operation can no longer be
guaranteed if the product:
– is visibly damaged,
– is no longer working properly,
– has been stored for extended periods in poor ambient conditions or
– has been subjected to any serious transport-related stress.
5.5 Mains voltage
Never attempt to modify the electrical components of the product. Risk of death
by electric shock!
Always ensure proper connection of the device to the mains supply.
Discontinue use of the device if any electrical components are damaged.
Do not modify the electrical components.
Only connect the product to a normal mains socket connected to the public supply network.
Before plugging in the product, check whether the voltage stated on the product complies
with the voltage of your electricity supplier.
Connect the product to a wall socket that can be accessed easily.
Never connect or disconnect the product if your hands are wet.
Do not touch the product if there are any signs of damage, as this may cause a fatal electric
shock! Proceed as follows:
– First, cut off the power supply to the mains socket to which the product is connected
(switch off the corresponding circuit breaker or remove the safety fuse, and then switch
off the FI safety switch so that all poles of the mains socket are disconnected).
– Then unplug the product from the mains socket.
To prevent risks, a damaged product may only be repaired by the manufacturer, a specialist
workshop authorised by the manufacturer, or a qualied person.
For safety reasons, always disconnect the product from the mains socket during lightning
storms.
Unplug the product from the mains socket if it won‘t be used for a long time.
6 Getting started/operation
6.1 Getting started
Follow the safety instructions and other information in this manual.
Check the operating instructions for the lamp connected whether it can be dim-
med. Observe the information on the minimum and maximum loads under “Spe-
cications”.
The Wi-Fi dimmer is not suitable for energy-saving or uorescent lamps.
Plug the Wi-Fi dimmer into a standard earthed mains socket (wall socket).
Connect a suitable LED lamp that can be dimmed to the front outlet of the Wi-Fi dimmer.
6.2 Operation
Briey pressing the button (control knob) turns the connected LED/lamp on or off. The Wi-Fi
dimmer remembers the brightness setting.
Turn the knob to adjust the brightness of the connected LED/lamp. Turning the knob to
the right (clockwise) increases the brightness. Turning the knob to the left decreases the
brightness.
When pressing and holding the button of the control knob, the rst press sets the brightness
to the maximum and the next press and hold reduces the brightness to the minimum.
There may be situations in which the lamp connected to the Wi-Fi dimmer and specied
by the manufacturer as “dimmable” cannot be dimmed correctly.
For example, the lamp may icker at low brightness or ickering may occur only at a
certain dimmer setting.
Some LED lamps (though specied as “dimmable”) can only be dimmed down to a certain
minimum brightness (e.g. between 60% and 100%, but not below 60%).
This is not a fault of the Wi-Fi dimmer, but a technical limitation of the lamp electronics.
Given a wide variety of products, it cannot be guaranteed that any lamp connected to the
Wi-Fi dimmer will be dimmed correctly.
Operating instructions
Wi-Fi dimmer 5 - 100 W
Item no. 2464453
1 Intended use
The product features an electrical outlet to connect a suitable LED or lamp which can be dim-
med. The brightness of the LED/lamp can be innitely adjusted with a large control knob, which
also serves to turn the light on and off.
Moreover, the “Smart Life - Smart Living” app enables to use and congure the product and
the LED/lamp connected to it. A free account is required to use the app. It must be created
during the initial app setup.
Moreover, the app provides networking of your product with other devices that are also connec-
ted to your app. The app also supports voice control.
A plug connects the product to the mains electricity supply.
The product is intended for indoor use only. Do not use it outdoors. Contact with moisture must
be avoided under all circumstances.
Using the product for purposes other than those described above may damage the product.
Improper product use can cause a short circuit, re, electric shock, other hazards.
This product complies with statutory, national and European regulations. For safety and appro-
val purposes, you must not rebuild and/or modify the product.
Read the instructions carefully and store them in a safe place. Always provide these operating
instructions when giving the product to a third party.
All company and product names contained herein are trademarks of their respective owners.
All rights reserved.
AndroidTM is a registered trademark of Google LLC.
2 Delivery content
Wi-Fi dimmer Operating instructions
3 Latest product information
Download the latest product information at www.conrad.com/downloads or scan the QR code
shown. Follow the instructions on the website.
4 Symbols in this document
This symbol warns of hazards that can lead to personal injury. Read the information
carefully.
This symbol warns of a dangerous voltage that can lead to injuries due to electric
shock. Read the information carefully.
5 Safety information
Read the operating instructions carefully and especially observe the safety
information. If you do not follow the safety instructions and information on
proper handling, we assume no liability for any resulting personal injury or
damage to property. Such cases will invalidate the warranty/guarantee.
5.1 General information
This product is not a toy. Keep it out of the reach of children and pets.
Do not leave packaging material lying around carelessly. It may become a dangerous
plaything for children.
Always observe the safety instructions for all devices connected to the product.
Should you have any questions or concerns after reading these operating instructions,
please contact our technical support or a professional technician.
5.2 Handling
Please handle the product carefully. Impact, shocks or a fall even from a low height can
damage the product.
5.3 Operating conditions
Do not subject the product to any mechanical stress.
Protect the product from extreme temperatures, strong jolts, ammable gases, vapours,
and solvents.
The product must be protected from high humidity and dampness.
The product must not be exposed to direct sunlight.
Avoid operation near strong magnetic or electromagnetic elds, transmitter aerials or HF
generators. Otherwise, the product may not function properly.

When the connection mode is enabled (“Indi-
cator” LED ashes 8 times within 5 seconds)
and the app is active, it can be that the app is
trying to nd the Wi-Fi dimmer automatically
and needs setup. In this case, tap the button
to add the device and follow the instructions
in the app up to the point in which you can
rename the new device.
You can add a new device manually by tap-
ping “+” on the top right of the app‘s main
page and selecting the device you want to
add. Otherwise, tap the blue button below in
the middle.
You can add the Wi-Fi dimmer to the app by
selecting the uppermost item for electrical
switches in the left column (see left black rec-
tangle in the screenshot).
Then select the “Dimmer Switch (Wi-Fi)”
item in the fourth segment (see right black
rectangle in the screenshot).
Tapping this rectangle takes you to the next
conguration page.
If your Wi-Fi network has not been applied
automatically, rst select it (tap the double
arrow on the right) and then enter the Wi-Fi
password.
Tap the blue button to save your selection
and continue.
If the “Indicator” LED continues to ash 8
times within 5 seconds, tap the blue button
below in the app.
Important:
The search for the device via setup (after
conrmation in the next screenshot) should
begin shortly after the device has been
put into connection mode. Otherwise, the
search may not be successful because the
device has exited the connection mode.
If the “Indicator” LED continues to ash 8
times within 5 seconds, tap the right button to
conrm the LED is ashing rapidly.
Important:
If this raises concern, tap the left button
to activate the manual mode in which you
should rst connect your smartphone to the
Wi-Fi hotspot of the Wi-Fi dimmer. Then ob-
serve further instructions in the app.
The app will search for the new device and complete the setup. This can take several
minutes.
6.3 Adjusting the minimum brightness
First, pull the control knob out of the Wi-Fi dimmer to adjust the minimum brightness.
Before setting the minimum brightness, make sure the LED/lamp is properly connected to
the Wi-Fi dimmer.
Turn on the LED/lamp by pressing the control knob button once and adjust the brightness
to the lowest possible level or until the light goes off.
Using a small at-tip screwdriver, slowly turn the small adjuster under the control knob to
the right until the required minimum brightness is reached.
Push the control knob back in the dimmer. By doing this, the setting is completed.
6.4 Functions of the button/control knob/status LED
Button/control
knob/LED
Action Function
Button (control knob) Press once briey Turns the connected LED/lamp
on or off.
Control knob Turn right (clockwise) Increases the brightness
Control knob Turn left (counter-clockwise) Decreases the brightness
Reset button (under
the control knob)
Keep pressed for approx. 5
seconds
Activates the app connection
mode
Status LED (under
the control knob)
When the Wi-Fi dimmer is in
connection mode
Flashes approx. 8 times within
5 seconds
7 Conguring and operating the Wi-Fi dimmer in the app
7.1 Installing the app
Open the respective app store on your smartphone. If you are using
AndroidTM, open “Google Play”. If you are using an Apple device, open
“App Store” from Apple.
Search for the “Smart Life - Smart Living” app (house icon with blue
background) and install it.
Otherwise, just scan the respective QR code below or tap on the name above. You will be
directed to the page of the appropriate store.
Google Play Apple iOS
7.2 Launching the app for the rst time
Open the previously installed “Smart Life - Smart Living” app.
If you have not created a free account yet, please sign up and follow the instructions.
Log in to the app using your account.
If you are using several devices, we recommended that you create a prole for your home
rst. You can then create several proles (e.g. for each room). The corresponding settings
page in the app can be accessed with the button in the lower right corner.
7.3 Linking the Wi-Fi dimmer
For conguration, your smartphone and Wi-Fi thermometer/hygrometer should be connec-
ted to the same Wi-Fi network.
Important:
Please note that only 2.4 GHz Wi-Fi networks are supported.
Before connecting your Wi-Fi dimmer to the app, ensure the connection mode is enabled.
Important:
The connection mode cannot be activated without a consumer! If it has not already been
done, connect the lamp rst.
Pull the control knob out of the Wi-Fi dimmer and then press and hold down the “Reset”
button for approx. 5 seconds.
The “Indicator” LED rst ashes quickly and then 8 times within 5 seconds. Then release
the button.

When setup is complete, the display should
look like the right-hand screenshot. If
anything went wrong, repeat the process.
Tap the pencil icon to assign an individual
name to the new device.
If you have previously created a prole with
rooms, you can assign the device to a room.
Tap the desired room under the name of the
device so that it is highlighted with a dark
background.
Finally, tap the blue lettering at the top to
complete the setup.
The newly added device will be displayed on the main page (see the rst screenshot in
the next section).
If you assigned the device to a room, it will also be shown under the respective room.
If you tap to switch to a room, you will only see the devices that are linked to that room.
8 Using the app
Tapping on the device on the app‘s main
page opens the page with advanced features
and settings.
You can delete the Wi-Fi dimmer from the
app by tapping on the device on the main
page until the delete button appears on the
display below. Then tap the button and con-
rm.
The current status is always displayed on the
Wi-Fi dimmer page. It doesn‘t matter whether
you operate the Wi-Fi dimmer via the app or
manually. If the display is as shown in the
screenshot, the Wi-Fi dimmer is on. Otherwi-
se, the lamp in the middle has a grey back-
ground.
Tapping the bottom left button with the on/off
symbol turns the lamp connected to the Wi-Fi
dimmer on or off.
The dimming function cannot be used when
the Wi-Fi dimmer is off. Use the slider to ad-
just the brightness.
Tapping the middle button at the very bottom
activates the timer. Simply set any time you
need and conrm it. The timer can turn the
dimmer on and off. It depends on whether the
dimmer is switched off or on when the timer
is activated.
The bottom right menu (gear symbol) enab-
les you to set the dimming range.
Tapping the pencil icon at the top right opens
the current device‘s settings.
Here you can update the rmware or, for example, connect the device to Alexa or Google
Assistant.
9 Cleaning and care
Important:
– Never use aggressive detergents, rubbing alcohol or other chemical solutions, as these
may damage the casing or cause the product to malfunction.
– Do not immerse the product in water.
Use a dry, lint-free cloth to clean the product.
10 Disposal
10.1 Product
This symbol must appear on any electrical and electronic equipment placed on the
EU market. This symbol indicates that this device should not be disposed of as
unsorted municipal waste at the end of its service life.
Owners of WEEE shall dispose of it separately from unsorted municipal waste.
Spent batteries and accumulators, which are not enclosed by the WEEE, as well
as lamps that can be removed from the WEEE in a non-destructive manner, must
be removed by end users from the WEEE in a non-destructive manner before it is
handed over to a collection point.
Distributors of electrical and electronic equipment are legally obliged to provide free take-back
of waste. Conrad provides the following return options free of charge (more details on our
website):
in our Conrad ofces
at the Conrad collection points
at the collection points of public waste management authorities or the collection points set
up by manufacturers or distributors within the meaning of the ElektroG
End users are responsible for deleting personal data from the WEEE to be disposed of.
It should be noted that different obligations about the return or recycling of WEEE may apply in
countries outside of Germany.
11 Declaration of Conformity (DOC)
Conrad Electronic SE, Klaus-Conrad-Straße 1, D-92240 Hirschau, hereby declares that this
product conforms to Directive 2014/53/EU.
Click on the following link to read the full text of the EU declaration of conformity:
www.conrad.com/downloads
Enter the product item number in the search box. You can then download the EU declaration of
conformity in the available languages.
12 Specications
12.1 Power supply
Input voltage................................. 220 – 240 V/AC, 50 Hz
12.2 Dimmer
Dimming mode ............................. phase cut-off
Control type.................................. one-way control
12.3 Connected load
LED lamps.................................... 5 – 100 W
Incandescent lamps...................... 10 – 100 W
LV halogen lamps ......................... 10 – 100 W (with electronic transformers)
12.4 Wireless module
Wi-Fi ............................................. IEEE802.11b/g/n, 2.4 GHz
Frequency..................................... 2.412 – 2.472 GHz
Transmission power...................... <16 dBm
Wi-Fi range................................... max. 40 m (in open space)
12.5 Other
Supported operating systems....... AndroidTM 6.0 or later; Apple iOS 10.0 or later
Dimensions (W x H x D) ............... approx. 55 x 115 x 87 mm
Weight .......................................... approx. 111 g
12.6 Ambient conditions
Operating conditions..................... -10 to +45 °C, 10 to 90 % RH (not condensing)
Storage conditions........................ -20 to +60 °C, 10 to 95% RH (non-condensing)
This is a publication by Conrad Electronic SE, Klaus-Conrad-Str. 1, D-92240 Hirschau (www.conrad.com).
All rights including translation reserved. Reproduction by any method, e.g. photocopy, microlming, or the capture in
electronic data processing systems require the prior written approval by the editor. Reprinting, also in part, is prohibited.
This publication represent the technical status at the time of printing.
Copyright 2022 by Conrad Electronic SE. *2464453_V1_0122_02_m_RR_VTP_EN

5.4 Gebruik
Raadpleeg een expert wanneer u twijfelt over het juiste gebruik, de veiligheid of het aans-
luiten van het apparaat.
Als het niet langer mogelijk is het product veilig te gebruiken, stel het dan buiten bedrijf
en zorg ervoor dat niemand het per ongeluk kan gebruiken. Zie er ABSOLUUT vanaf het
product zelf te repareren. Veilig gebruik kan niet langer worden gegarandeerd wanneer
het product:
– zichtbaar is beschadigd,
– niet meer naar behoren werkt,
– gedurende langere tijd onder ongunstige omstandigheden werd opgeslagen of
– onderhevig is geweest aan ernstige transportgerelateerde belastingen.
5.5 Voedingsspanning
Breng geen wijzigingen aan de elektrische componenten van het product aan.
Er bestaat gevaar voor een levensgevaarlijke elektrische schok!
Zorg ervoor dat het netsnoer van het apparaat goed is aangesloten.
Als een van de elektrische componenten beschadigd is, stop dan het ap-
paraat te gebruiken.
Breng geen wijzigingen aan de elektrische componenten aan.
Als spanningsbron voor het product mag alleen een standaard stopcontact worden gebruikt
dat is aangesloten op het openbare elektriciteitsnet. Controleer voor het aansluiten of de
spanningsweergave op het product overeenkomt met de spanning in uw huishouden.
Sluit het product aan op een stopcontact dat altijd eenvoudig toegankelijk is.
Het product mag niet met natte handen worden aangesloten of losgekoppeld.
Als het product is beschadigd, raak het dan niet aan, omdat dit kan leiden tot een dodelijke
elektrische schok! Ga als volgt te werk:
– Schakel allereerst de spanning van het stopcontact waarop het product is aangesloten
uit (schakel de bijbehorende installatieautomaat uit of draai de zekering los, schakel
vervolgens de aardlekschakelaar uit zodat het stopcontact volledig is losgekoppeld
van de spanning).
– Trek de stekker van het product uit het stopcontact.
Een beschadigd product mag alleen worden gerepareerd door de fabrikant, een door de
fabrikant aangestelde werkplaats of een gelijkaardig gekwaliceerd persoon om gevaarlijke
situaties te voorkomen.
Koppel het product om veiligheidsredenen altijd los van de voeding tijdens onweer.
Trek de stekker van het product uit het stopcontact wanneer langere tijd niet wordt gebruikt.
6 Ingebruikname/bediening
6.1 Ingebruikname
Volg de veiligheidsaanwijzingen en alle andere informatie op die in deze gebru-
iksaanwijzing staat!
Raadpleeg de gebruiksaanwijzing van de aangesloten lamp om te bepalen of
deze dimbaar is. Neem de betreffende minimum- en maximumbelastingen in het
hoofdstuk „Technische gegevens“ in acht.
De wi-dimmer is niet geschikt voor spaarlampen of uorescentielampen.
Steek de wi-dimmer in een goed geaard stopcontact (wandcontactdoos).
Sluit een geschikte dimbare LED-lamp of lamp aan op het stopcontact van de wi-dimmer.
6.2 Bediening
Druk kort op de toets (draaiknop) om de aangesloten LED/lamp in of uit te schakelen. De
wi-dimmer onthoudt de ingestelde helderheid.
Draai aan de knop om de helderheid van de aangesloten LED/lamp aan te passen. Door
de knop met de klok mee naar rechts te draaien, wordt de helderheid verhoogd. Als u de
knop naar links draait, neemt de helderheid af.
Als u de toets van de draaiknop ingedrukt houdt, wordt bij eerste keer drukken naar ma-
ximale helderheid en de volgende keer dat u de toets ingedrukt houdt, dimt het naar mini-
male helderheid.
Ook wanneer de lamp die u aansluit op de wi-dimmer door de fabrikant als „dimbaar“
gemarkeerd is, kan het voorkomen dat de lamp niet goed gedimd kan worden.
Het kan bijvoorbeeld voorkomen dat de lamp knippert als de helderheid laag is of dat dit
knipperen alleen optreedt bij een bepaalde dimmerstand.
Sommige LED-lampen (hoewel gemarkeerd als „dimbaar“) kunnen niet onder een bepaal-
de minimale helderheid worden gedimd (dimmen is bijvoorbeeld alleen mogelijk tussen
60% en 100%, maar niet onder 60%).
Dit is geen fout van de wi-dimmer, maar wordt technisch veroorzaakt door de elektronica
in de lamp. Door het grote aantal verschillende producten kan niet gegarandeerd worden
dat een aangesloten lamp op de wi-dimmer correct kan dimmen.
Gebruiksaanwijzing
Wi-dimmer 5 - 100 W
Bestelnr. 2464453
1 Gebruik volgens de voorschriften
Het product beschikt over een stopcontact waarop een geschikte dimbare LED of lamp kan
worden aangesloten. De helderheid van de LED/lamp kan traploos met de draaiknop worden
aangepast, ook de LED/lamp kan hier worden uitgeschakeld.
Verder kan het product of de daarop aangesloten led/lamp via de app „Smart Life - Smart
Living“ worden bediend of geprogrammeerd. Voor het gebruik ervan is een gratis account
vereist. Deze dient bij de eerste installatie van de app te worden aangemaakt.
Via de app kan het product ook worden gekoppeld aan andere apparaten die ook met uw app
zijn verbonden. Stembediening wordt ook ondersteund via de app.
De voeding wordt geleverd via het stopcontact waarop het product is aangesloten.
Het apparaat is uitsluitend bedoeld voor gebruik binnenshuis. Gebruik het dus niet in de open-
lucht. Het contact met vocht moet in ieder geval worden voorkomen.
Als het product voor andere doeleinden wordt gebruikt dan de hiervoor beschreven doeleinden,
kan het product worden beschadigd. Onjuist gebruik kan leiden tot kortsluiting, brand, elektri-
sche schokken of andere gevaren.
Het product voldoet aan alle wettelijke, nationale en Europese normen. In verband met vei-
ligheid en normering zijn geen aanpassingen en/of wijzigingen aan dit product toegestaan.
Lees de gebruiksaanwijzing zorgvuldig door en bewaar deze goed. Geef het product uitsluitend
samen met de gebruiksaanwijzing door aan derden.
Alle vermelde bedrijfs- en productnamen zijn handelsmerken van de respectievelijke eigena-
ren. Alle rechten voorbehouden.
AndroidTM is een geregistreerd handelsmerk van Google LLC.
2 Leveringsomvang
Wi-dimmer Gebruiksaanwijzing
3 Nieuwste productinformatie
Download de meest recente gebruiksaanwijzing via onderstaande link www.conrad.com/down-
loads of scan de afgebeelde QR-code. Volg de instructies op de website.
4 Symbolen in dit document
Het symbool waarschuwt voor gevaren die tot persoonlijk letsel kunnen leiden. Lees
de informatie zorgvuldig door.
Het symbool waarschuwt voor gevaarlijke spanning, die tot letsel als gevolg van een
elektrische schok kan leiden. Lees de informatie zorgvuldig door.
5 Veiligheidsinstructies
Lees de gebruiksaanwijzing zorgvuldig door en let vooral op de veiligheidsin-
structies. Als u de veiligheidsinstructies en informatie voor correct gebruik in
deze handleiding niet in acht neemt, dan aanvaarden wij geen aansprakelijk-
heid voor letsel of materiële schade. Bovendien vervalt in dergelijke gevallen
de aansprakelijkheid/garantie.
5.1 Algemeen
Het product is geen speelgoed. Houd het buiten bereik van kinderen en huisdieren.
Laat het verpakkingsmateriaal niet zomaar rondslingeren. Dit kan gevaarlijk materiaal wor-
den voor spelende kinderen.
Volg ook de veiligheidsinstructies voor alle apparaten die op het product zijn aangesloten.
Als u vragen hebt die niet met dit document kunnen worden beantwoord, neem dan contact
op met onze technische klantenservice of een andere vakman.
5.2 Gebruik
Behandel het product met zorg. Schokken, stoten of vallen van kleine hoogte kunnen het
product beschadigen.
5.3 Werkomgeving
Stel het product niet bloot aan welke mechanische belasting dan ook.
Bescherm het product tegen extreme temperaturen, sterke schokken, ontvlambare gas-
sen, dampen en oplosmiddelen.
Bescherm het product tegen hoge vochtigheid en nattigheid.
Bescherm het product tegen direct zonlicht.
Vermijd een gebruik van het apparaat in de onmiddellijke buurt van sterke magnetische of
elektromagnetische velden, zendantennes of HF-generatoren. Anders bestaat de mogeli-
jkheid dat het product niet naar behoren functioneert.

Als de wi-dimmer al in verbindingsmodus
staat (LED „Indicator“ knippert 8x binnen 5
seconden) en de app is actief, kan de app het
apparaat automatisch vinden en de congu-
ratie aanbieden. Tik dan op de knop om het
apparaat toe te voegen en volg vervolgens de
instructies in de app tot het punt waar u het
nieuwe apparaat kunt hernoemen.
Om handmatig een nieuw apparaat toe te
voegen, tikt u rechtsboven op de hoofdpagina
van de app op de “+” en vervolgens op de
selectie om een nieuw apparaat toe te voe-
gen. Als alternatief kunt u ook direct onder in
het midden op de blauwe toets tikken.
Om de wi-dimmer in de app toe te voegen,
selecteer het bovenste punt in de linkerkolom
voor elektrische schakelaars (zie linker zwart
vierkantje in de afbeelding).
Selecteer vervolgens de „Dimmer Switch
(Wi-Fi)“ in de vierde categorie (zie rechter
zwart vierkantje in de afbeelding).
Zodra u erop tikt, wordt u doorgestuurd naar
de volgende conguratiepagina.
Als uw wi-netwerk hier niet automatisch
wordt overgenomen, selecteert u dit eerst (tik
op de dubbele pijl naar rechts) en voert u ver-
volgens het wi-wachtwoord in.
Tik op de blauwe knop om de selectie te be-
vestigen en verder te gaan.
Als de LED „Indicator“ nog steeds 8x binnen
5 seconden knippert, tik dan op de onderste
blauwe knop in de app.
Belangrijk:
De tijd vanaf het moment dat u het apparaat
in de verbindingsmodus hebt gezet en de in-
stallatie begint te zoeken naar het apparaat
(na bevestiging in de volgende afbeelding),
mag niet te lang duren. Anders kan het ge-
beuren dat het zoeken niet met succes kan
worden voltooid omdat het apparaat niet
meer in de verbindingsmodus staat.
Als de LED „Indicator“ nog steeds 8x binnen
5 seconden knippert, tik dan op de rechter-
knop om te bevestigen dat de LED snel knip-
pert.
Belangrijk:
Als er problemen zijn, dan kunt u hier op de
linkerknop klikken, vervolgens wordt een
handmatige modus gestart waarin u eerst
uw smartphone moet verbinden met de wi-
hotspot van de wi-dimmer. Volg in dat geval
de verdere instructies van de app.
Het nieuwe apparaat wordt gezocht en ingesteld. Dit kan een paar minuten duren.
6.3 Aanpassen van de minimale helderheid
Om de minimale helderheid aan te passen, trek dan eerst de draaiknop los van de wi-
dimmer.
Als de LED/lamp waarvoor u de minimale helderheid wilt instellen nog niet verbonden is
met de wi-dimmer, sluit deze dan nu aan.
Schakel de LED/lamp in (druk eenmaal op de draaiknop) en stel de helderheid zo laag
mogelijk in, of totdat de LED/lamp niet meer brandt.
Pak een kleine platte schroevendraaier en draai de kleine regelaar onder de draaiknop
langzaam naar rechts totdat de gewenste minimale helderheid is bereikt.
Plaats de draaiknop terug op de as van de dimmer. Hiermee is de instelling afgesloten.
6.4 Functies van de toets/draaikop/status-LED
Toets/draaikop/LED Actie Functie
Toets (draaiknop) 1x kort Schakelt de aangesloten LED/
lamp in of uit.
Draaiknop Naar rechts draaien
(met de klok mee)
Verhoogt de helderheid
Draaiknop Naar links draaien
(tegen de klok in)
Verlaagt de helderheid
Resettoets
(onder draaiknop)
ong. 5 sec. ingedrukt houden Zet het product in verbindings-
modus voor de app
Status-LED
(onder draaiknop)
wanneer de wi-dimmer in
verbindingsmodus staat
knippert ong. 8x binnen
5 seconden
7 Conguratie en bediening van de wi-dimmer in de app
7.1 Installatie van de app
Open de desbetreffende appstore op uw smartphone. Open bij Andro-
idTM “Google Play”. Als u een apparaat van Apple gebruikt, open dan
de „App Store“ van Apple.
Zoek naar de app “Smart Life - Smart Living” (blauwe achtergrond
met huissymbool) en installeer deze.
Als alternatief kunt u heel eenvoudig de bijbehorende QR-code hieronder scannen of op
de naam hierboven tikken. U wordt dan doorgestuurd naar de pagina van de juiste store.
Google Play Apple iOS
7.2 Eerste keer opstarten van de app
Open de hiervoor geïnstalleerde app “Smart Life - Smart Living”.
Als u nog geen gratis account hebt aangemaakt, registreer dan en volg alle instructies.
Meld u nu aan op de app met uw account.
Als u meerdere apparaten gebruikt, dan kunt u het beste eerst een proel voor uw huis
aanmaken. Hier kunt u bijvoorbeeld ook meerdere kamers aanmaken, enz. U komt in de
app met de knop rechtsonder op de bijbehorende instelpagina.
7.3 Aanleren van de wi-dimmer
Voor de conguratie moet uw smartphone verbonden zijn met de wi dat u ook voor de
wi-thermometer/hygrometer wilt gebruiken.
Belangrijk:
Houd er rekening mee dat alleen wi-netwerken met 2,4 GHz worden ondersteund.
Om de wi-dimmer met de app te kunnen verbinden, moet deze in de verbindingsmodus
staan.
Belangrijk:
De verbindingsmodus werkt niet zonder verbruikers! Indien nog niet gedaan, sluit dan
eerst een lamp aan.
Trek aan de draaiknop van de dimmer en houd vervolgens de toets „Reset“ ongeveer 5
seconden ingedrukt.
De LED „Indicator“ knippert eerst snel en daarna 8x binnen 5 seconden. Laat vervolgens
de toets weer los.

Als alles werkt, dan zou het scherm eruit
moeten zien als op de afbeelding rechts. Als
iets niet functioneert, herhaal dan het proces.
Als u op de pen tikt, dan kunt u een individu-
ele naam aan het nieuwe apparaat toewijzen.
Als u eerder een proel met kamers hebt
aangemaakt, kunt u het apparaat ook aan
een ruimte toewijzen. Tik onder de naam van
het apparaat op de gewenste ruimte zodat
deze een donkere achtergrond heeft.
Tot slot tikt u bovenin op het blauwe opschrift
om de installatie te voltooien.
Nu kunt u het nieuw toegevoegde apparaat op de hoofdpagina zien (zie eerste afbeelding
in het volgende hoofdstuk).
Als u het apparaat aan een ruimte hebt toegewezen, dan is dit natuurlijk ook te zien onder
de betreffende ruimte.
Als u door erop te tikken van ruimte wisselt, dan ziet u alleen de apparaten die met de
betreffende kamer zijn verbonden.
8 Bediening in de app
Op de hoofdpagina van de app kunt u door
op het apparaat te tikken de pagina met de
uitgebreide bedieningsfuncties en instellin-
gen openen.
Om de wi-dimmer weer uit de app te verwij-
deren, tikt u op de hoofdpagina zolang op het
apparaat totdat onderaan een toets verschijnt
voor het verwijderen van het apparaat. Tik
vervolgens op de toets en bevestig dit.
De actuele status wordt altijd weergegeven
aan de zijkant van de wi-dimmer. Het maakt
niet uit of u de wi-dimmer via de app of
handmatig bedient. Als de weergave is zoals
op de afbeelding, is de wi-dimmer ingescha-
keld. Anders heeft de lamp in het midden een
grijze achtergrond.
Om de op de wi-dimmer aangesloten lamp
in of uit te schakelen, tikt u linksonder op de
knop met het aan-/uitsymbool.
Om de dimfunctie te kunnen gebruiken, moet
de wi-dimmer ingeschakeld zijn. Vervolgens
kunt u de schuifregelaar gebruiken om de hel-
derheid aan te passen.
Als u op de middelste knop onderaan tikt,
kunt u een timer activeren. Stel eenvoudig de
gewenste tijd in en bevestig deze. De timer
kan zowel de dimmer in- als uitschakelen. Af-
hankelijk van of deze is uit- of ingeschakeld
wanneer deze is geactiveerd.
In het menu rechtsonder (tandwiel) kunt u het
dimbereik instellen.
Als u rechtsboven op de pen tikt, worden de instellingen van het huidige apparaat geopend.
Hier kunt u bijvoorbeeld de rmware updaten of het apparaat verbinden met Alexa of Goog-
le Assistant.
9 Reiniging en onderhoud
Belangrijk:
– Gebruik in geen geval agressieve reinigingsmiddelen, reinigingsalcohol of andere che-
mische producten omdat de behuizing beschadigd of de werking zelfs belemmerd kan
worden.
– Dompel het product niet onder in water.
Gebruik een droog, pluisvrij doekje voor de reiniging van het product.
10 Verwijdering
10.1 Product
Alle elektrische en elektronische apparatuur die op de Europese markt wordt ge-
bracht, moet met dit symbool zijn gemarkeerd. Dit symbool geeft aan dat dit ap-
paraat aan het einde van zijn levensduur gescheiden van het ongesorteerd geme-
entelijk afval moet worden weggegooid.
Iedere bezitter van oude apparaten is verplicht om oude apparaten gescheiden van
het ongesorteerd gemeentelijk afval af te voeren. Eindgebruikers zijn verplicht oude
batterijen en accu's die niet bij het oude apparaat zijn ingesloten, evenals lampen
die op een niet-destructieve manier uit het oude toestel kunnen worden verwijderd,
van het oude toestel te scheiden alvorens ze in te leveren bij een inzamelpunt.
Distributeurs van elektrische en elektronische apparatuur zijn wettelijk verplicht om oude ap-
paratuur gratis terug te nemen. Conrad geeft u de volgende gratis inlevermogelijkheden (meer
informatie op onze website):
in onze Conrad-lialen
in de door Conrad gemaakte inzamelpunten
in de inzamelpunten van de openbare afvalverwerkingsbedrijven of bij de terugnamesyste-
men die zijn ingericht door fabrikanten en distributeurs in de zin van de ElektroG
Voor het verwijderen van persoonsgegevens op het te verwijderen oude apparaat is de eind-
gebruiker verantwoordelijk.
Houd er rekening mee dat in landen buiten Duitsland andere verplichtingen kunnen gelden
voor het inleveren van oude apparaten en het recyclen van oude apparaten.
11 Conformiteitsverklaring (DOC)
Hiermee verklaart Conrad Electronic SE, Klaus-Conrad-Straße 1, D-92240 Hirschau dat het
product voldoet aan richtlijn 2014/53/EU.
De volledige tekst van de EU-conformiteitsverklaring is beschikbaar op het volgende inter-
netadres: www.conrad.com/downloads.
Voer het bestelnummer van het product in het zoekveld in; vervolgens kunt u de EU-conformit-
eitsverklaring downloaden in de beschikbare talen.
12 Technische gegevens
12.1 Voeding
Ingangsspanning.......................... 220 - 240 V/AC, 50 Hz
12.2 Dimmer
Dimmodus .................................... fasesectie
Soort regeling............................... Eenwegsturing
12.3 Aansluitvermogen
LED-lampen.................................. 5 - 100 W
Gloeilampen ................................. 10 - 100 W
LV-halogeenlampen...................... 10 - 100 W (met elektronische transformatoren)
12.4 Zendergestuurde module
Wi................................................ IEEE802.11b/g/n, 2,4 GHz
Frequentie/zendvermogen............ 2,412 - 2,472 GHz, < 16 dBm
Bereik wi ..................................... max. 40 m (in vrije veld)
12.5 Andere
Ondersteunde besturingssystemen AndroidTM 6.0 of hoger; Apple iOS vanaf versie 10.0
Afmetingen (B x H x D)................. ong. 55 x 115 x 87 mm
Gewicht......................................... ong. 111 g
12.6 Omgevingsomstandigheden
Bedrijfsomstandigheden............... -10 tot +45°C, 10 tot 90% RV (niet condenserend)
Opslagomstandigheden................ -20 tot +60 °C, 10 tot 95% RV (niet condenserend)
Dit is een publicatie van Conrad Electronic SE, Klaus-Conrad-Str. 1, D-92240 Hirschau (www.conrad.com).
Alle rechten, vertaling inbegrepen, voorbehouden. Reproducties van welke aard dan ook, bijvoorbeeld fotokopie,
microverlming of de registratie in elektronische gegevensverwerkingsapparatuur, vereisen de schriftelijke toestemming
van de uitgever. Nadruk, ook van uittreksels, verboden. De publicatie voldoet aan de technische stand bij het in druk
bezorgen.
Copyright 2021 by Conrad Electronic SE *2464453_V1_0122_02_m_RR_VTP_NL

5.4 Funzionamento
Rivolgersi a un esperto in caso di dubbi relativi al funzionamento, alla sicurezza o alle
modalità di collegamento dell’apparecchio.
Nel caso non sia più possibile l’uso in piena sicurezza, disattivare il prodotto ed evitare
che possa essere utilizzato in modo improprio. È ASSOLUTAMENTE VIETATO riparare il
prodotto da soli. La sicurezza d’uso non è più garantita, se il prodotto:
– presenta danni visibili,
– non funziona più correttamente,
– è stato conservato per periodi prolungati in condizioni ambientali sfavorevoli oppure
– è stato esposto a considerevoli sollecitazioni dovute al trasporto.
5.5 Tensione di rete
Non apportare modiche ai componenti elettrici del prodotto. Sussiste un elevato
rischio di scosse elettriche letali!
Assicurarsi che la spina di alimentazione dell'unità sia correttamente colle-
gata.
Se uno dei componenti elettrici è danneggiato, non continuare ad usare l'ap-
parecchio.
Non apportate alcuna modica ai componenti elettrici.
come fonte di alimentazione del prodotto può essere utilizzata solo una presa domestica
standard collegata alla rete elettrica pubblica. Prima del collegamento, controllare che le
informazioni sul voltaggio del prodotto corrispondano al voltaggio di casa.
Inserire il prodotto in una presa facilmente accessibile in ogni momento.
Non collegare o scollegare il prodotto con le mani bagnate.
Se il prodotto mostra segni di danneggiamento, non toccarlo in quanto ciò può provocare
una scossa elettrica mortale! Procedere nel modo seguente:
– Prima di tutto disinserire la tensione di rete alla presa a cui è collegato il prodotto
(disinserire l’interruttore automatico associato o svitare il fusibile, quindi disinserire l’in-
terruttore differenziale in modo che tutti i poli della presa di rete siano scollegati dalla
tensione di rete).
– Scollegare il prodotto dalla presa di corrente.
Per evitare qualsiasi rischio, un prodotto danneggiato può essere riparato solo dal produt-
tore, da un’ofcina incaricata dal produttore o da una persona parimenti qualicata.
Per ragioni di sicurezza, durante un temporale disconnettere sempre il prodotto dall’ali-
mentazione.
Se non viene utilizzato per un lungo periodo di tempo, scollegare il prodotto dalla presa
di corrente.
6 Messa in funzione/Funzionamento
6.1 Messa in funzione
Osservare le avvertenze per la sicurezza e tutte le altre informazioni di questo
manuale.
Consultare le istruzioni per l'uso dell'apparecchio di illuminazione che si sta col-
legando per vedere se è dimmerabile. Osservare il rispettivo carico minimo e
massimo nel capitolo "Dati tecnici".
Il dimmer WLAN non è adatto alle lampade a risparmio energetico o alle lampade
uorescenti.
Inserire il dimmer WLAN in una presa di corrente adeguata con contatto di protezione
(presa a muro).
Collegare una lampada o un apparecchio d’illuminazione a LED dimmerabile adatto alla
presa frontale del dimmer WLAN.
6.2 Funzionamento
Per accendere o spegnere il LED/la lampada collegata, premere brevemente il pulsante
(manopola). Il dimmer WLAN ricorda l’impostazione della luminosità.
Per regolare la luminosità del LED/lampada collegato, ruotare la manopola. Ruotando la
manopola in senso orario verso destra si aumenta la luminosità. Se ruota la manopola
verso sinistra, la luminosità si riduce.
Se si tiene premuto il pulsante dalla manopola, si attenua alla luminosità massima quando
viene premuto per la prima volta e alla luminosità minima quando viene premuto di nuovo.
Anche se l'apparecchio di illuminazione collegato al dimmer WLAN è etichettato dal pro-
duttore come "dimmerabile", potrebbe non essere possibile dimmerare correttamente
l'apparecchio.
Può succedere, per esempio, che l'apparecchio sfarfalli a bassa luminosità o che questo
sfarfallamento si verichi solo con una certa impostazione del dimmer.
Alcuni apparecchi a LED (anche se etichettati come "dimmerabili") non possono essere
dimmerati al di sotto di una certa luminosità minima (ad esempio, la dimmerazione è
possibile solo tra il 60% e il 100%, ma non sotto il 60%).
Questo non è un difetto del dimmer WLAN, ma è tecnicamente causato dall'elettronica
dell'apparecchio. A causa del gran numero di prodotti diversi, non è purtroppo possibile
garantire che il dimmer WLAN possa dimmerare correttamente una lampada collegata.
Istruzioni per l’uso
Dimmer WLAN 5 - 100 W
N. d’ordine 2464453
1 Utilizzo conforme
Il prodotto dispone di una presa a cui può essere collegato un LED o un apparecchio di illu-
minazione dimmerabile adatto. La luminosità del LED/lampada può essere regolata continua-
mente tramite la manopola rotante, e il LED/lampada tramite questa può anche essere spento.
Inoltre, il prodotto o il LED/lampada ad esso collegato può essere azionato o programmato tra-
mite l’app “Smart Life - Smart Living”. Per l’utilizzo è necessario un account gratuito. Questo
deve essere creato quando l’app viene congurata per la prima volta.
Tramite l’app, il prodotto può anche essere messo in rete con altri dispositivi anch’essi collegati
alla tua app. L’app supporta anche il controllo vocale.
L’alimentazione viene fornita attraverso la presa di corrente in cui viene inserito il prodotto.
L’apparecchio è destinato esclusivamente all’uso in ambienti interni. Quindi non utilizzarlo all’a-
perto. Il contatto con l’umidità deve essere assolutamente evitato.
Nel caso in cui il prodotto venga utilizzato per scopi diversi da quelli precedentemente descritti,
potrebbe subire dei danni. L’uso improprio può provocare cortocircuiti, incendi, scosse elettri-
che o altri pericoli.
Il prodotto è conforme alle norme di legge nazionali ed europee. Per motivi di sicurezza e di
autorizzazioni, il prodotto non deve essere trasformato e/o modicato.
Leggere attentamente le istruzioni per l’uso e rispettarle. Cedere il prodotto a terzi solo insieme
a queste istruzioni.
Tutti i nomi di società e di prodotti citati sono marchi di fabbrica dei rispettivi proprietari. Tutti
i diritti riservati.
AndroidTM è un marchio registrato di Google LLC.
2 Contenuto della confezione
Dimmer WLAN Istruzioni per l’uso
3 Ultime informazioni sul prodotto
Scaricare le ultime informazioni sul prodotto su www.conrad.com/downloads o scansionare il
codice QR in gura. Seguire le istruzioni sul sito web.
4 Simboli in questo documento
Il simbolo avverte di pericoli che possono causare lesioni personali. Leggere atten-
tamente le informazioni.
Il simbolo avverte di una tensione pericolosa che può causare lesioni da scosse
elettriche. Leggere attentamente le informazioni.
5 Avvertenze per la sicurezza
Leggere attentamente le istruzioni per l'uso e rispettare in particolare le avver-
tenze di sicurezza. In caso di mancato rispetto delle istruzioni per la sicurezza
e delle informazioni sul corretto utilizzo contenute nel presente manuale, si
declina qualsiasi responsabilità per eventuali danni a persone o cose. In tali
casi, la garanzia decade.
5.1 Informazioni generali
Questo prodotto non è un giocattolo. Tenerlo fuori dalla portata di bambini e animali do-
mestici.
Non lasciare incustodito il materiale di imballaggio. Potrebbe trasformarsi in un gioco pe-
ricoloso per i bambini.
Osservare anche le istruzioni di sicurezza di tutti i dispositivi che vengono collegati al pro-
dotto.
Se sussistono domande che non trovano risposta in questo documento, contattare il nostro
servizio tecnico di assistenza clienti o un altro professionista.
5.2 Utilizzo
Maneggiare il prodotto con cautela. Urti, colpi o cadute da un’altezza ridotta possono dan-
neggiare il prodotto.
5.3 Ambiente operativo
Non sottoporre il prodotto ad alcuna sollecitazione meccanica.
Proteggere il prodotto da temperature estreme, forti scosse, gas inammabili, vapori e
solventi.
Proteggere il prodotto da umidità elevata.
Proteggere il prodotto dalla luce diretta del sole.
Evitare il funzionamento nelle immediate vicinanze di forti campi magnetici ed elettroma-
gnetici, antenne trasmittenti o generatori ad alta frequenza. In caso contrario sussiste la
possibilità che il prodotto non funzioni correttamente.

Se il dimmer WLAN è già in modalità di con-
nessione (il LED „Indicator“ lampeggia 8
volte entro 5 secondi) e l’app è attiva, l’app
può trovare automaticamente l’apparecchio e
offrire di impostarlo. Ora toccare il pulsante
per aggiungere il dispositivo e seguire le
istruzioni nell’app no al punto in cui è possi-
bile rinominare il nuovo dispositivo.
Per aggiungere un nuovo dispositivo manual-
mente, toccare il “+” nell’angolo in alto a de-
stra della pagina principale dell’app e poi se-
lezionare aggiungere un nuovo dispositivo. In
alternativa, è anche possibile toccare il pul-
sante blu direttamente in basso al centro.
Per aggiungere il dimmer WLAN nell’app,
selezionare la voce in alto per gli interruttori
elettrici nella colonna di sinistra (vedi quadra-
to nero a sinistra nell’immagine).
Poi selezionarel “Dimmer Switch (Wi-Fi)”
nella quarta sezione (vedi quadrato nero a
destra nell’immagine).
Non appena viene selezionato, si viene rein-
dirizzati alla pagina successiva per la con-
gurazione.
Se la propria rete WLAN non viene abilitata
automaticamente, per prima cosa selezionar-
la (toccare la doppia freccia a destra) e poi
inserire la password WLAN.
Toccare il tasto blu per salvare la selezione
e continuare.
Se il LED “Indicator” lampeggia ancora 8
volte entro 5 secondi, toccarel pulsante blu
inferiore nell’app.
Importante:
Il tempo tra il momento in cui l'unità viene
messa in modalità di connessione e l'inizio
della ricerca dell'unità da parte del setup
(dopo la conferma nella schermata succes-
siva) non dovrebbe essere troppo lungo.
Altrimenti, la ricerca potrebbe non essere
completata con successo perché l'unità non
è più in modalità di connessione.
Se il LED “Indicator” continua a lampeggiare
8 volte entro 5 secondi, toccare il pulsante
destro per confermare che il LED sta lampeg-
giando rapidamente.
Importante:
Se ci sono problemi, qui è possibile cliccare
sul pulsante a sinistra e verrà avviata una
modalità manuale in cui prima bisogna colle-
gare il proprio smartphone all'hotspot WLAN
del dimmer WLAN. In questo caso, seguire
le ulteriori istruzioni dell'applicazione.
Cercare e impostare il nuovo dispositivo. La procedura può richiedere qualche minuto.
6.3 Regolazione della luminosità minima
Per regolare la luminosità minima, prima slare la manopola del dimmer WLAN.
Se il LED/la lampada per la quale si vuole impostare la luminosità minima non è ancora
collegata al dimmer WLAN, collegarla ora.
Accendere il LED/lampada (premere una volta la manopola) e regolare la luminosità il più
basso possibile o nché il LED/lampada non è più accesa.
Prendete un piccolo cacciavite a taglio e girar lentamente verso destra il piccolo controllo
sotto la manopola no a raggiungere la luminosità minima desiderata.
Riposizionare la manopola sull’asse del dimmer. Questo completa l’impostazione.
6.4 Funzioni del pulsante/manopola/LED di stato
Pulsante/manopola/
LED
Azione Funzione
Pulsante (manopola) 1x breve Accende o spegne il LED/lampada
collegata
Manopola Ruotare a destra
(in senso orario)
Aumenta la luminosità
Manopola Ruotare a sinistra
(in senso antiorario)
Riduce la luminosità
Pulsante di reset
(sotto la manopola)
Tenere premuto per circa
5 secondi.
Mette il prodotto in modalità di
connessione per l'app
LED di stato
(sotto la manopola)
quando il dimmer WLAN
è in modalità di connessione
lampeggia circa 8 volte entro
5 secondi
7 Congurazione e funzionamento del dimmer WLAN nell’app
7.1 Installazione dell’App
Aprire il rispettivo App Store sul proprio smartphone. Se si utilizza un
dispositivo AndroidTM aprire “Google Play”. Se si utilizza un dispositivo
Apple, aprire il rispettivo “App Store” di Apple.
Effettuare la ricerca dell’app “Smart Life - Smart Living” (simbolo del-
la casa con sfondo blu) e installarla.
In alternativa, è semplicemente scansionare il codice QR corrispondente qui sotto o clicca-
re sul nome Poi si viene reindirizzati alla pagina dello Store corrispondente.
Google Play Apple iOS
7.2 Primo avvio dell’app
Aprire l’app installata in precedenza “Smart Life – Smart Living”.
Se non è ancora stato creato un account gratuito, registrarsi e seguire tutte le istruzioni.
Ora accedere all’app con le credenziali del proprio account.
In caso di utilizzo di più dispositivi, è preferibile creare prima un prolo per la propria casa.
Inoltre, sarà possibile ad esempio, creare diverse stanze, ecc. Si potrà accedere alla pagi-
na delle impostazioni corrispondenti nell’app con il pulsante in basso a destra.
7.3 Insegnare il dimmer WLAN
Per la congurazione, lo smartphone deve essere collegato alla WLAN che si vuole usare
anche per il termometro/igrometro WLAN.
Importante:
Si prega di notare che sono supportate solo le reti WLAN a 2,4 GHz.
Afnché il dimmer WLAN possa essere collegato all’app, deve essere in modalità di con-
nessione.
Importante:
Senza apparecchio inserito, la modalità di connessione non funziona! Se non ancora è
stato inserito, inserire prima un apparecchio di illuminazione.
Estrarre la manopola dal dimmer e poi tenere premuto il pulsante “Reset” per circa 5 se-
condi.
Il LED “Indicator” lampeggia prima rapidamente e poi 8 volte entro 5 secondi. Poi rilasciare
di nuovo il pulsante.

Una volta effettuati correttamente tutti i pas-
saggi, il display dovrebbe apparire come nel-
la gura a destra. Se qualcosa non ha funzio-
nato, ripetere il processo.
Toccando il simbolo della penna, è possibile
assegnare un nome personalizzato al nuovo
dispositivo.
Se in precedenza è stato creato un prolo
con delle stanze, sarà possibile assegnare il
dispositivo a una di esse. Toccare la stanza
desiderata sotto il nome del dispositivo in
modo tale che venga evidenziata.
Inne, toccare la scritta blu in alto per termi-
nare la congurazione.
A questo punto, nella pagina principale sarà possibile visualizzare il nuovo dispositivo ag-
giunto (si veda la prima immagine del capito successivo).
Se al dispositivo è stata assegnata una stanza, ovviamente anch’esso potrà essere visua-
lizzato sotto la rispettiva stanza.
Quando si passa a una stanza toccandola, saranno visibili solamente i dispositivi associati
a tale stanza.
8 Utilizzo dell’App
Nella pagina principale dell’applicazione, toc-
cando il dispositivo, è possibile aprire la pagi-
na con le funzioni operative avanzate e le
impostazioni.
Per rimuovere di nuovo il dimmer WLAN
dall’app, toccarel dispositivo nella pagina
principale nché non appare in basso un pul-
sante per la rimozione del dispositivo. Quindi
toccare il pulsante e confermare.
Sul lato del dimmer WLAN viene sempre
visualizzato lo stato attuale. Non importa se
i dimmer WLAN vengono comandati tramite
l’app o manualmente. Se la visualizzazione
è come nell’immagine, il dimmer WLAN è ac-
ceso. Altrimenti, l’apparecchio ha uno sfondo
grigio al centro.
Per accendere o spegnere l’apparecchio col-
legato al dimmer WLAN, toccare il pulsante
con il simbolo on/off in basso a sinistra.
Per utilizzare la funzione di dimmerazione,
il dimmer WLAN deve essere acceso. Poi si
può regolare la luminosità con il cursore.
Se si tocca il pulsante centrale in basso, è
possibile attivare un timer. Basta impostare il
tempo desiderato e confermarlo. Il timer può
accendere e spegnere il dimmer. A seconda
che questo sia spento o acceso quando vie-
ne attivato.
Nel menu in basso a destra (ruota dentata), è
possibile impostare il livello di dimmerazione.
Se si tocca la matita in alto a destra, si apro-
no le impostazioni del dispositivo corrente.
Qui è possibile ad es., aggiornare il rmware, o associare il dispositivo ad Alexa o Google
Assistant.
9 Pulizia e manutenzione
Importante:
– Non utilizzare in nessun caso detergenti aggressivi, alcool isopropilico o altre soluzioni
chimiche in quanto queste possono aggredire l’alloggiamento o addirittura pregiudicare
la funzionalità del prodotto.
– Non immergere il prodotto in acqua.
Utilizzare un panno asciutto e privo di lanugine per pulire il prodotto.
10 Smaltimento
10.1 Prodotto
Tutte le apparecchiature elettriche ed elettroniche introdotte sul mercato europeo
devono essere etichettate con questo simbolo. Questo simbolo indica che l'appa-
recchio deve essere smaltito separatamente dai riuti urbani non differenziati al
termine della sua vita utile.
Ciascun proprietario di RAEE è tenuto a smaltire gli stessi separatamente dai riuti
urbani non differenziati. Gli utenti nali sono tenuti a rimuovere senza distruggere le
batterie e gli accumulatori esauriti che non sono integrati nell'apparecchiatura, non-
ché a rimuovere le lampade dall'apparecchiatura destinata allo smaltimento prima
di consegnarla presso un centro di raccolta.
I rivenditori di apparecchiature elettriche ed elettroniche sono tenuti per legge a ritirare gra-
tuitamente le vecchie apparecchiature. Conrad mette a disposizione le seguenti opzioni di
restituzione gratuite (ulteriori informazioni sono disponibili sul nostro sito internet):
presso le nostre liali Conrad
presso i centri di raccolta messi a disposizione da Conrad
presso i centri di raccolta delle autorità pubbliche di gestione dei riuti o presso i sistemi di
ritiro istituiti da produttori e distributori ai sensi della ElektroG
L’utente nale è responsabile della cancellazione dei dati personali sul vecchio dispositivo
destinato allo smaltimento.
Tenere presente che in paesi al di fuori della Germania possono essere applicati altri obblighi
per la restituzione e il riciclaggio di vecchie apparecchiature.
11 Dichiarazione di conformità (DOC)
Con la presente Conrad Electronic SE, Klaus-Conrad-Straße 1, D-92240 Hirschau, dichiara
che questo prodotto soddisfa la direttiva 2014/53/UE.
Il testo completo della Dichiarazione di conformità UE è disponibile al seguente indirizzo
Internet: www.conrad.com/downloads.
Inserire il numero d’ordine nel campo di ricerca; successivamente sarà possibile scaricare la
dichiarazione di conformità UE nelle lingue disponibili.
12 Dati tecnici
12.1 Alimentazione
Tensione d’ingresso.........................220 - 240 V/AC, 50 Hz
12.2 Dimmer
Modalità di dimmerazione................Sezione di fase
Modalità di controllo.........................Controllo unidirezionale
12.3 Potenza
Lampade a LED...............................5 - 100 W
Lampade a incandescenza..............10 - 100 W
Lampade alogene LV.......................10 - 100 W (con trasformatori elettronici)
12.4 Modulo ricetrasmittente
WLAN ..............................................IEEE802.11b/g/n, 2,4 GHz
Frequenza .......................................2,412 - 2,472 GHz
Potenza di trasmissione ..................< 16 dBm
Portata WLAN..................................max. 40 m (campo aperto)
12.5 Altre
Sistemi operativi supportati (App)....AndroidTM 6.0 o superiore; Apple iOS 10.0 o superiore
Dimensioni (L x A x P)......................circa 55 x 115 x 87 mm
Peso ................................................circa 111 g
12.6 Condizioni ambientali
Condizioni di funzionamento ...........da -10 a +45 a °C, 10 – 90% UR (senza condensazione)
Condizioni di immagazzinamento....da -20 a +60 °C, da 10 a 95% rH (senza condensa)
Questa è una pubblicazione da Conrad Electronic SE, Klaus-Conrad-Str. 1, D-92240 Hirschau (www.conrad.com).
Tutti i diritti, compresa la traduzione sono riservati. È vietata la riproduzione di qualsivoglia genere, quali fotocopie,
microlm o memorizzazione in attrezzature per l‘elaborazione elettronica dei dati, senza il permesso scritto dell‘editore.
È altresì vietata la riproduzione sommaria. La pubblicazione corrisponde allo stato tecnico al momento della stampa.
Copyright 2022 by Conrad Electronic SE. *2464453_V1_0122_02_m_RR_VTP_IT
Table of contents
Languages:
Other Sygonix Dimmer manuals
Popular Dimmer manuals by other brands

Crestron
Crestron CLX-1DELV4 Specification sheet

Oase
Oase InScenio Dimmer operating instructions

Acclaim Lighting
Acclaim Lighting AL-DIMMER-3F HP User instructions

Jula
Jula 015579 quick start guide

hidealite
hidealite LED Extend G2 Dimmer quick start guide

Leviton
Leviton DMX-512 Installation and operating guide

Lucci LEDlux
Lucci LEDlux 290998 installation instructions

Ekinex
Ekinex EK-GO1-DL quick start guide

Dove Lighting Systems
Dove Lighting Systems DimmerMaster user manual

Contro l4
Contro l4 C4-TV120277 installation guide

GENERI
GENERI SR-2400RB-US instruction manual

smart home
smart home INSTEON KeypadLinc V2 Dimmer user guide