Syntech MAX AIR 2271PS-100 User manual

P/N 08023020 Rev BPage 1
2271PS-100
DLC Single Hood
User Instructions
CAUTION
Before use, thoroughly read MAXAIR®CAPR®P/N 03521015 User Instruction received with all CAPR Helmets
and available at www.maxair-systems.com.
!
WARNING
Failure to follow User Instructions P/N 03521015 and the instructions
contained herein may be hazardous to the user’s health.
Use only if package is received unopened and contents are
undamaged. If damage is noted, contact the shipper for replacement
or repair.
Prior to using any MAXAIR®System or component, be sure to be
familiar with the system’s NIOSH approved conguration.
DO NOT use if any component is damaged. If any components are
damaged or contaminated and therefore unt for safe and eective
use, they should be replaced immediately.
Only trained and experienced personnel who have read and
understand the User Instructions should use MAXAIR Products.
The institution using this product in any application is responsible
for determining the appropriateness of this equipment relative to
regulatory requirements. Bio-Medical Devices Intl, Inc. does not
recommend the appropriate systems for a particular institution or
facility.
Use only MAXAIR Systems/ NIOSH approved compatible
components.
NOT for use in atmospheres immediately dangerous to life or health
(IDLH), and atmospheres containing less than 19.5% oxygen, or
more than 25% oxygen.
Flammability Level I: fabric may burn if exposed to open ame.
Follow current local regulations governing biohazard waste to safely
dispose of single use MAXAIR Products.
If you need more information, contact your BMDI Sales
Representative, or call BMDI customer service at 1-800-443-3842.
!
Intended Use
The MAXAIR CAPR Hood Systems lter aerosolized and droplet
particulates when used with a MAXAIR CAPR Powered Air Purifying
Respirator (PAPR) Helmet.
Hoods are designed for single use applications.
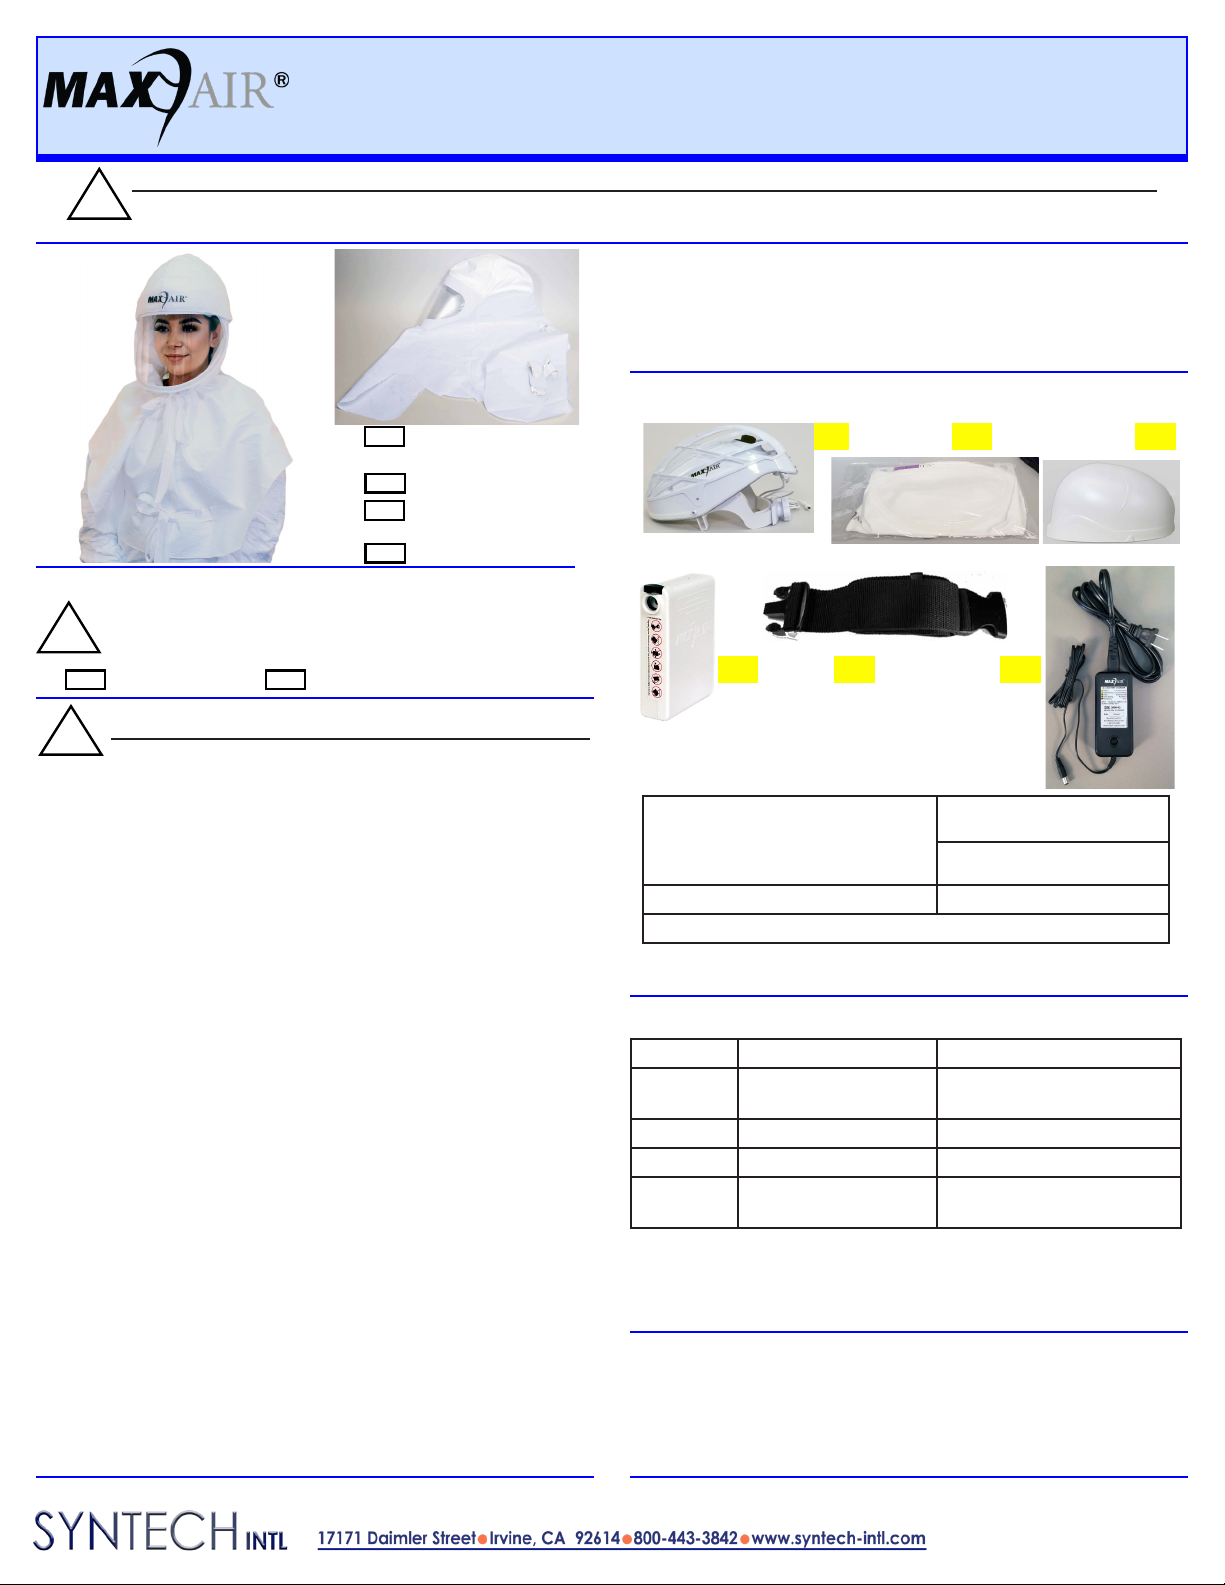
Standard CA-CAPR-36 System with 2271PS-07 DLC
Single Hood
1. 2081-03 Helmet
(includes 2051-07 SnapOn
Cage, 2071-08 Liner, 2590-05
Power Cord)
2. 2271PS-100 Hood
3. 2061-05 HFR FCC
4. 2500-36TSC Battery* 5. 2000-76 Battery Belt
6. 2600-02 Battery Charger**
*Alternate Batteries include the 2500-37TSC and 2500-30TSC.
**Alternate Charger includes the 2600-01.
Regulatory
NIOSH PAPR100-N
1
5 6
32
4
Specications
Recommended System Temperature Limits
Use/Handling: 0oC to 540C at a maximum 80% Relative Humidity.
Charging: 0oC to 450C at a maximum 80% Relative Humidity.
Storage: 0oC to 350C at a maximum 80% Relative Humidity.
MATERIAL TYPE FLUID RESISTANCE
Body
(Shroud)
Polypropylene/
Polyethylene
ASTM F1671
Lens Polycarbonate Impervious
Hood Filter Polypropylene AATCC TM127 ≥50cm H2O
HFR FCC Polypropylene/
modacrylic blend
Impervious
Warning, Caution, or Note
Catalog Number NIOSH Number
!
Symbol Denitions
REF P/N
2271PS-100SM
(Small-Medium)
08031013
2271PS-100ML
(Medium-Large)
08031014
REF
REF
P/N
P/N

P/N 08023020 Rev BPage 2
2271PS-100
DLC Single Hood
User Instructions
1. Remove all System Components from their packaging, ensure they are ready for use, and lay them on a clean counter with labels facing you.
5. Attach (snap) one side
Hood-Lens mounting
hole to respective Hel-
met side mounting post.
Repeat on other side.
3. Attach (snap) center
Hood-Lens mounting
hole over Helmet cen-
ter mounting post.
6. Grasp the back of the
Hood Filter and begin
to pull the Hood up and
over the Helmet.
2. Assemble the Battery onto a double layer of Belt. Place
top edge of Belt under the Battery Clip, up to the Clip
top, so the Clip Detent rests on the Clip Base and NOT
the Belt. Place the belt comfortably around the waist
with the battery near the side-back of the right hip.
7. Continue pulling the Hood
over the Helmet down to
within about 1-2 inches from
the top rear Helmet Snap.
10. Ensure the Cu Flap-
pers are away from the
Lens and in front of the
Liner Side Tabs.
4. Gently pull Cu and
Flappers away from
Lens to ensure they are
not stuck together.
8. If the Hood Filter is folded over the front,
“ip” the fold up, then pull the Hood down
further in back to remove the wrinkles
from the Hood Filter over the Helmet
front and top.
9. Connect Helmet Power Cord
to Battery. Push Power
Cord Connector into Battery
Receptacle until Secure
Connection audibly clicks.
13. Slide ngers between Cu
and face from temples down
and under chin to pull Cu
Flappers away from Lens, and
to properly position the Cu.
11. Loosen the ratchet
adjustment knob
counter-clockwise to
ensure the Helmet will
easily t over the head.
12. Hold the Helmet in one hand, pull
the front top edge of the Cu down,
and place your chin into the Cu.
Then, pull the Helmet over and
down on to your head.
WARNING
If conditions 1 and 2 both are not achieved, switch to other size DLC and repeat Assembly and Donning steps 1-13point.
Condition 1: Ensure the DLC Flappers are away from
the Lens, positioned perpendicular to your temples,
and in front of the FCC Side Tabs.
Condition 2: Ensure slight tension is felt while sliding the index
or rst nger between cu and face all along chin and up to
temples, from right side of the face to the left.
DLC Flappers
FCC Side Tabs
Assembly and Donning - Baery, Belt, Helmet and Hood

P/N 08023020 Rev B Page 3
2271PS-100
DLC Single Hood
User Instructions
16. Don appropriate body gown per
gown manufacturer’s protocol. Keep
Hood Shroud up while closing gown
so Hood is outside of gown.
15. Pull Hood Shroud
down all around.
14. Tighten Ratchet Knob (clockwise)
as tight as possible without causing
discomfort to secure Helmet on head
for all anticipated activities.
Don the Oponal HFR FCC (High Fluid Resistance Filter Cover Cap)
Do the Oponal HFR FCC (High Fluid Resistance Filter Cover Cap)
3. Hold the underneath back of the
Helmet steady with the thumb while
pulling the back of the HFR FCC fully
down to even with the bottom rear of
the Helmet.
2. Pull HFR FCC over and down in
back to cover the entire Hood
Filter.
1. Align the front centerline of the HFR
FCC with the front centerline of the
Hood and position the HFR FCC
over the Hood so that both front
bottoms align.
3. Continue lifting until the HFR FCC is
completely clear of the Helmet; de-
con appropriately for next use.
2. Continue to lift the HFR FCC
rear up and o the Hood/
Helmet.
1. Holding the front of the HFR FCC
steady, push up its rear to begin
lifting it up and o the Helmet.

P/N 08023020 Rev BPage 4
2271PS-100
DLC Single Hood
User Instructions
WARNING
Refer to Users Instructions (P/N 03521015)
for details on chargers and charging batteries.
The entire CAPR System may be
decontaminated, cleaned and/or
stored at this time.
Do the Hood, Helmet, Baery and Belt
!
10. With Charger connected to safe
power source, connect Charger Cord
to the Battery. Push Charger Cord
Connector into Battery Receptacle until
fully seated.
WARNING
Discard all
disposables
and body
gown per
Instuonal
protocol for
contaminated
waste.
!
1. Untie both neck and
body Ties, pull through
their loops and discard
appropriately.
2. Roll up Hood from Shroud back bottom up
and over to top front of Helmet.
3. Unsnap each side Flapper
and continue moving rolled
Hood forward and o front
Helmet Mounting Post.
4. With Hood com-
pletely o Helmet
discard appropri-
ately.
8. Unbuckle Belt and
remove Battery and
Belt from around the
waste.
5. Do body
gown per gown
manufacturer’s
protocol and
discard appro-
priately.
6. Loosen the rear Headband
Adjustment Knob (turn
counterclockwise).
7. Lift Helmet up and o
head.
9. Disconnect the Helmet
Power Cord from the Bat-
tery - Press down on the
Secure Lock (Black) Button
to release, then pull the cord
connector out from the Bat-
tery connection receptacle.
Other Syntech Protection Device manuals
Popular Protection Device manuals by other brands

RMS
RMS 2V164-S user guide

Trend Micro
Trend Micro TippingPoint TPS TX Series Hardware Specification and Installation Guide

Lazer Safe
Lazer Safe LS-CS-M-066 Operation manual

ABB
ABB Relion 615 series Applications manual

Victron energy
Victron energy BatteryProtect 48/100 manual

CXS
CXS ALTHEA Information for users