Taconova TACOTHERM FRESH PETA ES 5941S User manual

CONTACT AND FURTHER INFORMATION TACONOVA.COM
Taconova Group AG | Neunbrunnenstrasse 40 | CH-8050 Zurich | T +41 44 735 55 55 | F +41 44 735 55 02 | [email protected]
03/2017 | Art.-Nr. 212788 | EA-Nr. 1243 | en
CONTROLLER MANUAL
TACOTHERM FRESH PETA
FRESH HOT WATER STATION
Bedienungsanleitung
Frischwasserregler
ES 5941

2
Table of contents
1 Safety guidelines................................................................................................. 3
2 Technical data ..................................................................................................... 4
3 Installation and connection................................................................................ 5
3.1 Installation ............................................................................................................. 5
3.2 Electrical connection ............................................................................................. 6
4 Display and operating elements ........................................................................ 7
4.1 Display and operation ........................................................................................... 7
4.2 Display .................................................................................................................. 7
5 Start-up ................................................................................................................ 8
6 Hydraulic applications ...................................................................................... 10
6.1 Hydraulic variant 1 .............................................................................................. 10
6.2 BAS05 Circulation ............................................................................................... 11
6.3 BAS06 Thermal disinfection................................................................................ 11
6.4 BAS07 Return layering........................................................................................ 12
6.5 BAS08 Warming function .................................................................................... 12
6.6 BAS09 Recharging, primary................................................................................ 13
7 Operation ........................................................................................................... 14
7.1 Selecting the operating mode ............................................................................. 14
7.2 INFO parameter overview ................................................................................... 15
7.3 Querying temperatures and operating data ........................................................ 16
7.4 Values on information level ................................................................................. 17
7.5 Parameters MENU overview............................................................................... 19
7.6 Enter password ................................................................................................... 20
7.7 Clock program..................................................................................................... 21
7.8 Settings ............................................................................................................... 22
7.9 Settings ............................................................................................................... 23
8 Functions ........................................................................................................... 26
8.1 Fresh water production ....................................................................................... 26
8.2 Circulation mode ................................................................................................. 26
8.3 Tapping support .................................................................................................. 27
8.4 Calibrating circulation volumes ........................................................................... 28
8.5 Thermal disinfection ............................................................................................ 28
8.6 Primary protective function.................................................................................. 29
8.7 Return layering.................................................................................................... 30
8.8 Recharging, primary............................................................................................ 30
8.9 Cascade .............................................................................................................. 31
8.10 Collective fault message..................................................................................... 35
9 Troubleshooting help ....................................................................................... 34
9.1 Error message..................................................................................................... 34
9.2 Info message....................................................................................................... 35
9.3 Sensor resistance values .................................................................................... 36
9.4 Explanation of terms and abbreviations .............................................................. 37
10 Index................................................................................................................... 38

3
1 Safety guidelines
Danger: This device is electrically
operated. Incorrect installation or in-
correct repair attempts can cause dan-
ger to life by electrical shock.
Warning: Make sure that, before
wiring work, all lines are at zero poten-
tial! Never touch the wires and connec-
tion terminals of the device. Any
electrically live wiring work or terminal
coupling can lead to destruction of the
device and dangerous electric shock!
Installation and commissioning may
only be carried out by authorized skilled
personnel. Please pay particular attention
to the applicable accident prevention regu-
lations, the relevant standards and regula-
tions, as well as the installation and
operating instructions of additional plant
components. The controller is not repla-
cing any safety related equipment which
might be necessary on site!
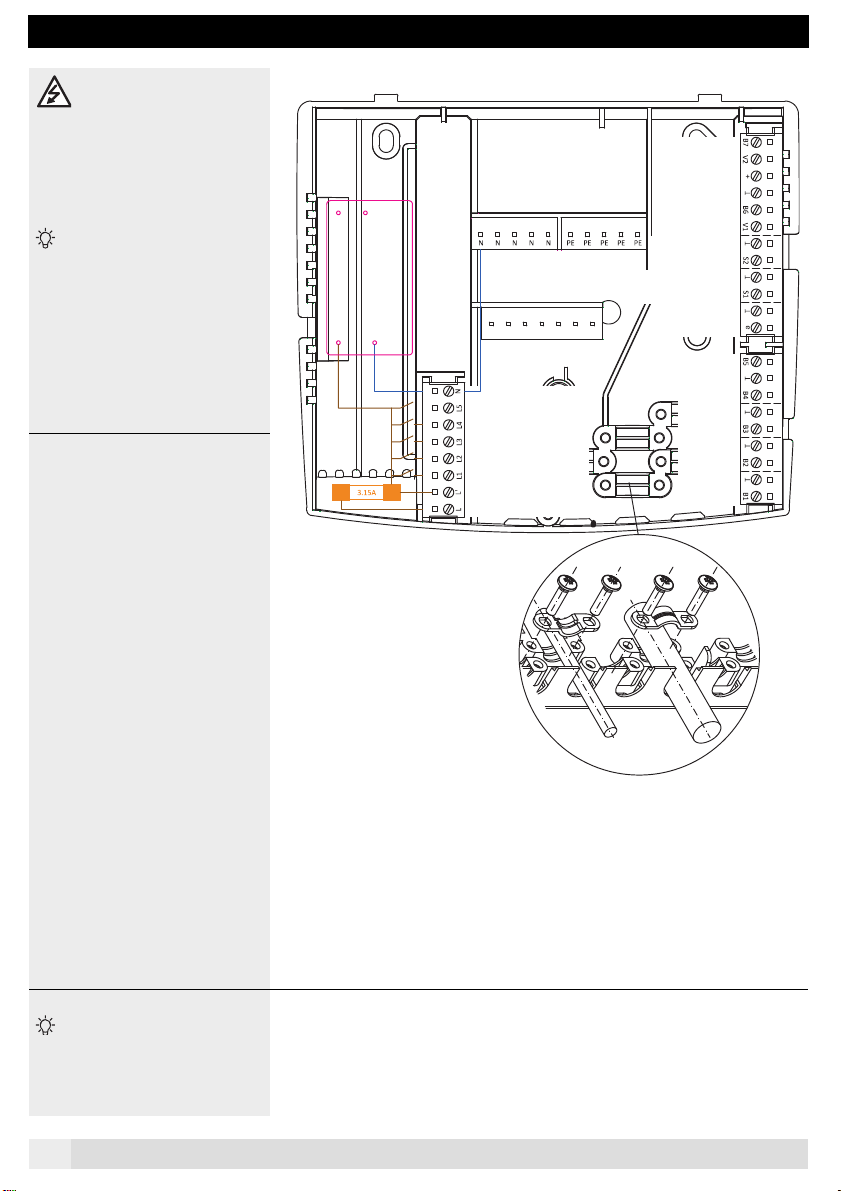
Mains connection regulations:
Electric installation and fusing must com-
ply with local regulations
According to EN 60335, for stationary
devices a separator for switching off
from mains, must be installed in com-
pliance with installation regulations
(a switch for example)
The distance or the insulation from
any potential heat source must be
chosen such that the allowed ambient
temperature during operation is never
exceeded. (See technical data)
Device wiring from sensors, room de-
vices, operating devices, communica-
tion bus etc. should be separated
spatially from high voltage lines
It may be necessary to electrically
suppress strong inductive loads in
the vicinity of the controller (contac-
tors, solenoid-operated valves, etc.).
This can be done by connecting RC
circuit directly to the coil terminals of
the disturbing components.
Recommended RC circuit:: 0.047 mF,
275 VAC.
Operating requirements:
Under normal conditions the device must
be powered continuously, to ensure ope-
ration at all times. Preceding switches
should therefore be limited to emergency
or main switches that are permanently
"on".
Danger: Never connect or reconnect
an electrically live device or operate
device when open. Never run device in
a potentially explosive environment.
Never mount device on a flammable
underground. Never run device above
or below limit values as listed under the
technical data. When it’s expected that
a safe operation isn’t possible anymore
then immediately shut down device.
(For example when damage or mal-
function is obvious)
Operating instructions:
The mounting and operating instruction
provides fundamental advice and im-
portant information concerning safety,
mounting, commissioning, maintenance
and optimal use of the device. These de-
vice instructions should be completely
readand followed by installer, specialist
and plant operator before mounting, com-
missioning and operating.
All hydraulic schemes illustrated in
this manual only indicate the principle
diagrams; they do not replace a pro-
fessional installation design, which is
why in case of direct reproduction
functionality can not be guaranteed!
Technical descriptions can change wi-
thout prior notice. Possible misprints
or intermediate changes of any kind do
not entitle to any claims.
For the operator:
Let yourself be instructed by the specialist
extensively about functionality and opera-
tion of the controller. Always keep this ma-
nual near to the controller.
Warranty and liability:
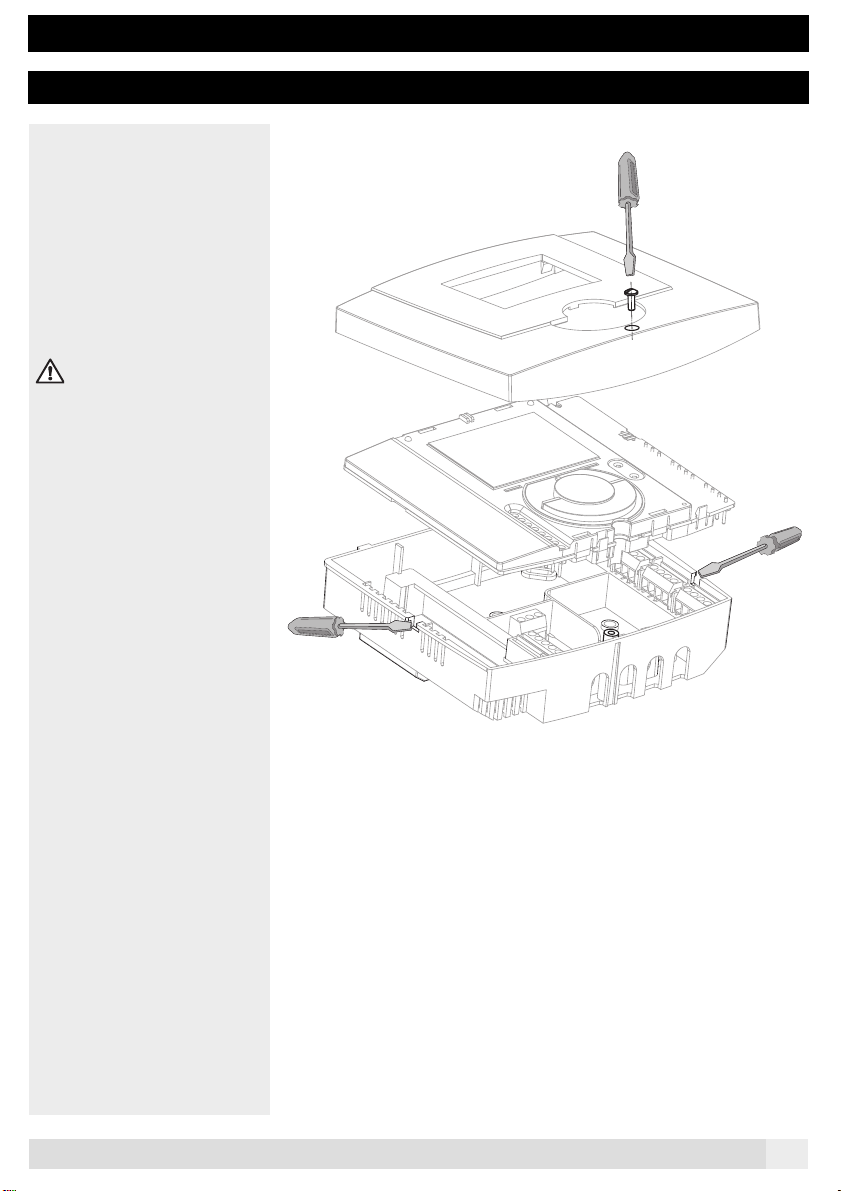
Refrain from opening device or accesso-
ries. Repairs may only be carried out by
manufacturer. Only genuine parts and ac-
cessories may be used. Warranty claims
expires in case of improper installation,
commissioning, maintenance and repair of
the device, disregard of these mounting
and operating instructions or unintended
or misuse of the device.
Device settings:
By means of the integrated long-term
memory, individually entered installation
parameters as switching times remain
stored after RESET or longer power down
periods, guaranteeing reliable operation
over many years.
Declaration of conformity:
If all applicable installation and manu-
facturer instructions are taken into consi-
deration then this device complies to the
requirements of the relevant guidelines
and standards.
Waste disposal:
The device complies with the Euro-
pean ROHS directive 2002/95/EG for the
restriction on the use of certain hazardous
substances in electrical and electronic
equipment.
Under no circumstances should this
device be disposed with household waste.
The device should only be disposed at
specific waste collection points or at the
distributor.

4
2 Technical data
DESIGNATION/TYPE ES 5941S
Power supply 230 V AC ± 10 % 50 – 60 HZ
Power consumption, standby < 1 VA
Max. power consumption 5 VA
Fuse 3.15 AT
OUTPUTS (high voltage)
Electromechanical relay 5
Switching capacity 6 (2) A
Information, HE pumps 15 A - 4 s or 20 A - 0.4 s for 10 % switching duration
OUTPUTS (low voltage)
Signal output PWM or 0 - 10 V 2
INPUTS (low voltage)
Inputs, sensors 7 - NTC 5 kOHm or PT 1000, switchable
Inputs, analog (0 ... 5 V) 2 (4)
Inputs, pulse 1 (2)
HOUSING
Installation Wall mounting
Dimensions W / H / D in mm 153.5 x 135.3 x 48.7
Display LCD segment display
Background lighting yes
Operation 4 push-buttons
Ambient / (storage) temperature 0 … 50 °C (- 20 ... 60 °C), max. 85 %; non-condensing
eBUS x
Capacity max. 180 mA
eBus feed 50 mA
Bus line – length, cross section 2-wire bus, twisted, max. 50 m, min. 0.5 mm²
TESTS/REQUIREMENTS
Degree of protection IP 40 EN 60529
Protection class I EN 60730-1
Safety EN 60730-1
EMC immunity EN 60730-1 / EN 61000-6-2
EMC emissions EN 60730-1 / EN 61000-6-3
ErP product data
Temperature controller class / control class -
Value - % (contribution of the controller to seasonal space heating energy efficiency)
INFORMATION
The controller complies with the
eco-design directive
yes
TEMElesta Greenline yes ( internal voltage supply with switching power supply)

5
3 Installation and connection
3.1 Installation
Opening the controller for installation
and wiring
In order for the controller base to be able
to be mounted and wired, it must first be
dismounted.
1. Lift up the front cover.
2. Using a screwdriver, lift the controller
board out of the base; see the figure
at the right.
Make sure that, before begin-
ning wiring work, all lines are at zero
potential. Before applying or remov-
ing, the controller must be switched
off (voltage-free). Never touch the
wires, rear side of the print or the con-
nections.

6
3.2 Electrical connection
230 V are applied to the mains
voltage connections on the left side,
L/ L’/ 1-5/ N. These terminals may only
be touched when de-energized, since
otherwise there is life-threatening
danger due to electric shock.
The terminal assignments
depend on and vary depending on the
selected hydraulic variant and option
marked with " * ".
eBUS connection and sensor cables
are to be installed so that they are
physically separated from the high-
voltage lines.
Information regarding installation
• The strain relief (cable ties) can be
mounted normally or reversed,
depending on the used cable thick-
ness, in order to optimally secure the
wiring.
• The electric installation and the pro-
tection have to comply with the local
regulations.
• The controller must be constantly
connected to the power supply in
order to ensure its function at all
times.
• Upstream mains switches are there-
fore to be limited to emergency or
main switches which are usually left
in operation.
• Before set-up, it is to be checked
whether all components are properly
electrically connected.
Note If there are strongly inductive loads near the controller (contactor, solenoid valves, etc.), sup-
pression might be necessary using RC elements directly at the coil connections of the dis-
turbing components. Recommended RC elements: 0.047 μF, 100 Ωfor 250 VAC (e.g.
Bosch, RIFA, etc.).
* Sensor T1O
not used
Voltage supply 5V DC
GND
Sensor TWW
Flow sec.
not used
not used
(-) GND
(+) Signal 1 PWM/ 0...10 V
(-) GND (Masse)
(+) eBUS
Sensor TKW
GND
Sensor TPV
GND
* Sensor TBZ
GND
* Sensor TPR
GND
* Sensor TU1
Neutral conductor
* WWL, reheating, error, M-
* ZV cascade, ASV, M+
* RLS return layering
* WWC circulation pump
FRIWA primary pump
Support phase 230 V AC
Phase net 230 V AC 50 Hz
Neutral conductor PE (Ground)
(connected at the factory)

7
4 Display and operating elements
4.1 Display and operation
4.2 Display
MENU
°C
INFO
1
Act
14
2 4
Overview of display
Operating
mode
Display value
IIdentification
display value
Hydraulic
diagram
Menu controll
changing settings -
Menu controll
changing settings +
Cancel Enter
IInformation
Adjuster
Pumps and valves are animated. If the primary or circulation pump is in operation, it flashes slowly. In the case of the switching
valves, the switching state is indicates AB-A or AB-B, and the mixer position Open + or Closed -.
MENU
kWh
°C
K
INFO
1
2
3
onoffSet Act
14
3
2 4
L min
°F
%
MWh
4
maxmin /
Display with all segments
Sensor 1
collector 1
Diverting valve
storage tank 2
Diverting valve exchanger
Pump collector 2
Pump storeage tank 2
Pump collector 1
Storage tank 1
Sensor 2
Storage tank 2
Diverting valve return
Heating system
Auxillary heater
Sensor 4
Sensor 4
collector 2
Sensor 3
pump rehaet

8
5 Start-up
Before start-up,
check the following:
• The system main switch (if available) is switched on.
• The controller is switched on or supplied with power.
• All segments of the display are shown for a short time (page 7).
• The software number and version appear (e.g. 519803 / SW 1.01).
If the controller then switches to the normal display, or, in the case of initial start-up or factory reset, to the
start menu, the internal function test was successful.
When started for the first time or af-
ter a factory reset BAS12 RESET, the
commissioning menu will appear. This is
for setting the basic parameters.
1 2
Example:
Change the language;
ENGLISH is active.
3. To select DEUTSCH, for example,
press the keys; DEUTSCH
will flash.
4. Confirm the selection with the
key. You can find further information
in section 7.9, page 23
COM01 LANGUAGE SELECTION.
The next parameter, BAS09 TIME, is
jumped to automatically.
3 4
5. Adjust BAS09 TIME using the keys
.
6. The setting is confirmed with
and the next value will appear.
5 6
The device will be restarted
when set-up is finished.
Input can be canceled with the key; the program then jumps to item 1. Important: The start-up menu must be carried out up to the
confirmation of the hydraulic variant and the restart.
deutsch
english
english
BAS09
time
0000
:
°CkWh
K %
L/hmin
BAS09
time
01 32
:
°CkWh
K %
L/hmin
BAS09
time
0132
:
°CkWh
K %
L/hmin

9
Adjusters in the commissioning
menu
Code
Text Function Setting
range
Factory
setting
Unit Start-up
Dat.:
ID
KOM01 LANGUAGE SELECTION 0÷6 50 -04:056
0:
1:
2:
3:
4:
5:
6:
7:
8:
INTER
ENGLISH
DEUTSCH
FRANCAIS
ITALIANO
ESPANOL
POLSKI
CZESKY
PORTUGUES
KAS01 TIME 00:00 - 24:00 - - 02:072
BAS09 TIME 00:00 - 24:00 - - 02:072
BAS10 DATE YYYY DD:MM - - 02:070
BAS01 TSET DOMESTIC HOT WATER
(DHW) 10÷90 60 °C 05:051
KAS01 STATION OPERATING MODE 0÷2 0 - 36:018
ZIR06 CIRC. CALIBRATION 0÷2 0 - 36:010
0:
1:
2:
Off
Manual
Automatic
Additional adjusters for cascade:
In the case of cascade systems, the master and slave devices are defined with KAS01 OP-
ERATING MODE. Hereby, the following settings must also be made.
KOM04 EBUS ADDRESS 2 ÷ 16 2 - 04:020
KOM05 EBUS FEED on/off on -04:036
Caution: In order for all functions to run smoothly, when using a circulation pump, the flow in the circu-
lation line must always be calibrated.
ZIR 06 CIRC. CALIBRATION;
see also "8.4 Calibrating circulation volumes", page 29
After start-up,
check the following:
• The nominal temperature values are correctly set.
• The temperatures (actual values) of the connected sensors can be read off and their val-
ues are plausible.
• Domestic hot water processing possible due to a tapping process.
After start-up: Now one can continue with the hydraulic variant-specific setting/adjustment of the controller.
The most important adjusters for the selected variant are shown on the following pages.
Hydraulic applications All of the following figures are only to be understood to be pictorial schematics for illustrating
the respective system hydraulics; this does not replace the detailed planning of the fitter ac-
cording to the local conditions and no claim is made of completeness. The controller in no way
replaces the safety-related devices. Depending on the application, other system and safety
components might be required, such as shut-off valves, non-return valves, safety temperature
limiters, scalding protection etc., and must therefore be provided.

10
6 Hydraulic applications
6.1 Hydraulic variant 1 Fresh water station
The flow rate FLOW and the inlet tempera-
ture TKW into the heat exchanger and the
outlet temperature TWW out of the heat
exchanger are measured. The goal is to
reach the set temperature on the TWW sen-
sor at the heat exchanger outlet and to hold
it.
For this purpose, the heat supply is control-
led on the primary side via the FRIWA pump
with a speed controller, which attempts to
reach the set point on the TWW sensor and
to hold it.
*) The TPV supply sensor for the plate heat
exchanger optimizes the fresh-water control
since the temperature of the heat source is
included in the formation of the control varia-
ble for the primary pump.
Sensor side
-B7
V2
+
-
Voltage 5 V DC
Ground GND
TWW DHW sensor B6
Flow, sec. V1
-GND
-S2
Ground GND
PWM/ 0 ... 10 V S1
Ground GND
eBUS e
Mains side TKW cold-water sensor B5
NGround GND
5TPV sensor, prim. Supply B4
4-
-
GND
3B3
2-
-
GND
1PP primary pump B2
L’ Support phase -GND
LPhase 230 V -B1

11
6.2 ZIR00 Circulation Options
Option CIRCU - Circulation function, to en-
hance the DHW comfort, circulation of the
standing DHW volume in the lines. In this op-
tion, one can choose among various options
for operating and triggering the circulation
pump.
6.3 LEG00 Thermal disinfection Options
Adjuster active, if
BAS05 CIRCULATION MODE
not equal to
0.
If the enable is given through the time pro-
gram LEG05 THM.DISINF. TIME PRO-
GRAM, thermal disinfection is carried out.
The domestic hot water is heated to the nom-
inal temperature value LEG01 THERM.DIS-
INFECT. TEMP. and held for the LEG02
TEMP. HOLDING TIME. The circulation
pump is active during the protection function.
Sensor side
-B7
V2
+
-
Voltage 5 V DC
Ground GND
TWW sensor B6
Flow, sec. V1
-GND
-S2
Ground GND
PWM/ 0 ... 10 V S1
Ground GND
eBUS e
Mains side TKW sensor B5
NGround GND
5TPV sensor B4
4Ground GND
3TBZ circulation sensor B3
2WWC circulation pump -GND
1PP primary pump -B2
L’ Support phase -GND
LPhase 230 V -B1

12
6.4 SCH00 Return layering Options
RLS option - Return layering is for ensuring
the temperature layering, e.g. in solar stor-
age tanks. With the VSR switching valve, the
return water can be charged in the storage
tank at 2 different heights.
Cable connections according to system
installation manual. The logic of the di-
verting valve can be set with parameter
SCH00 (see 7.9, page 23).
No voltage AB - A - (middle of storage tank)
Voltage AB - B (bottom of storage tank)
Attention: Phase for OPEN only:
Valve must be spring-loaded or go
to continuous voltage L'.
6.5 NAC00 Warming function Options
STAND option - Ready/warming function is
for providing the DHW nominal temperature
value.
BAS01 TSET DHW plus minimal tempera-
ture loss
STE14 MIN. TDIFF HEAT EXCH on the heat
exchanger. The heat exchanger is held at
this temperature.
Sensor side
-B7
V2
+
-
Voltage 5 V DC
Ground GND
TWW sensor B6
Flow, sec. V1
-GND
-S2
Ground GND
PWM/ 0 ... 10 V S1
Ground GND
eBUS e
Mains side TKW sensor B5
NGround GND
5TPV sensor B4
4 - GND
3RLS valve, return layer. -B3
2 WWC circulation pump Ground GND
1PP primary pump TPR sensor, prim. Return B2
L’ Support phase Ground GND
LPhase 230 V TU1 sens. Tank, bottom B1
Sensor side
-B7
V2
+
-
Voltage 5 V DC
Ground GND
TWW DHW sensor B6
Flow, sec. V1
-GND
-S2
Ground GND
PWM/ 0 ... 10 V S1
Ground GND
eBUS e
Mains side TKW cold-water sensor B5
NGround GND
5TPV sensor, prim. Supply B4
4-
-
GND
3B3
2-
-
GND
1PP primary pump B2
L’ Support phase -GND
LPhase 230 V -B1

13
6.6 BAS05 Recharging, primary Options
Option - (Re-)charging the storage tank.
If the temperature at the top storage tank
sensor TO1 is less than the current set point
T1Oset, recharging is enabled or heat is
requested.
If the current set point is exceeded at the top
storage tank sensor TO1, recharging is disa-
bled or the heat request is ended. Recharg-
ing can be additionally restricted via a time
program.
Sensor side
TO1 sens. Tank, top B7
V2
+
-
Voltage 5 V DC
Ground GND
TWW sensor B6
Flow, sec. V1
-GND
-S2
Ground GND
PWM/ 0 ... 10 V S1
Ground GND
eBUS e
Mains side TKW sensor B5
NGround GND
5WWL recharging, primary TPV sensor B4
4 - GND
3 - B3
2- -GND
1PP primary pump -B2
L’ Support phase -GND
LPhase 230 V -B1

14
7 Operation
7.1 Selecting the operating mode
The desired operating mode can be se-
lected with the "Enter" key and the
selection keys .
The symbol at the left in the display indi-
cates which operating mode is active.
1 2
Example:
1. The operating mode
Automatic program is active.
To switch to Manual mode , press
the key. The operating mode
symbol will flash.
2. Select Manual mode with the
key.
3. Confirm with the key. Manual
mode is active.
3 4
4. Test/Manual mode is active.
Operating modes:
Standby • AUS options, DHW production still
active.
Automatic mode • The control functions are active
according to the selected hydraulic
type and parameterization
Test/Manual mode • The output functions can be set and
checked in the menu.
Attention: No protective functions are active.
A selection can be canceled with the key before this has been confirmed.
The controller jumps back to the previous operating mode.
STA01
STATUS
9
°CkWh
K %
L/hmin
Automatic
STA01
STATUS
6
°CkWh
K %
L/hmin
STA01
STATUS
6
°CkWh
K %
L/hmin
STA01
STATUS
9
°CkWh
K %
L/hmin
Test/Manual mode

15
7.2 INFO parameter overview INFO
INFO Menu Value
STA
STATUS
STA01 Status
STA02 Circ. calibration
STA03 Thm.disinfection info
STA04 Speed, pri. pump
STA05 Output, circ. pump
STA06 Current control variable A3
STA07 Current control variable A4
STA08 Current control variable A5
STN1... 5 Station casc. status
PRI PRIMARY PRI01 Tank temp, top
PRI02 Tset tank, top
PRI03 Tank temp, bottom
PRI04 Supply temperature
PRI05 Return temperature
SEK SECONDARY SEK01 Temperature, domestic hot
water
SEK02 Tset, domestic hot water
SEK03 Temperature, cold water
SEK04 DHW flow rate
SEK05 Temperature, circulation
SEK06 Tset circulation
OFF
EVALUATION
AUS02 Max. tapped volume 24 h
AUS03 Withdrawn energy, prim.
AUS04 Total energy withdrawn
AUS05 Prim. pump operating hours
AUS06 Circ. pump operating hours
AUS07 Recharging operating hours
AUS08 l Day tapping quantity
AUS09 cbm Day tapping quantity

16
7.3 Querying temperatures and operating data INFO
On the information level, the nominal
temperature values and actual tempera-
ture values as well as data can be que-
ried in succession.
1 2
1. To switch to the information level,
press the key.
The INFO symbol will appear.
2. To query the information, press the
key. The submenu selection will
appear.
3. The desired submenu can be
selected with the key.
3 4
4. To query the information in a sub-
menu, press the key. The first
value will appear.
5. One can navigate among the values
with the key.
5 6
6. The submenu selection is jumped to
again by pressing the key.
If another submenu should be selected,
go to step 3.
One jumps to the menu selection by
pressing the key again; see step 1.
After a timeout of approx. 2 minutes, the controller jumps back to the selected operating mode.
STA01
STATUs
6
°CkWh
K %
L/hmin
STA01
STATUs
6
°CkWh
K %
L/hmin
INFO
STATUs
°CkWh
K %
L/hmin
INFO
SECONDARy
°CkWh
K %
L/hmin
INFO
SEC01
hot water
45 6
.
°CkWh
K %
L/hmin
INFO
next
value
SECONDARy
°CkWh
K %
L/hmin
INFO

17
7.3.1 Adapting the standard display
Accept value on standard display: Select the measured temperature or data value to be accepted as described in sect. 7.3,
page 16. Keep the key pressed until "YES" appears on the display. The value is
shown on the standard display.
7.3.2 Resetting energy data
Reset energy in kWh:
The energy can be reset manually. The current value is set to zero by pressing the
key for a few seconds. If the key is pressed, the display in kWh is reset to "0" again.
7.4 Values on information level INFO
The visible values vary depending on the selected hydraulic variant, as well as the option, and depend on the input password, "Key" column;
see sect. 7.6, page 20.
Menu Description Range Unit Value Key ID
INFO
STA STATUS
STA01 Status Status of the DHW produc-
tion
0 : Switched off
2 : Thermal disinfection / comfort mode
5 : Fault
6 : Tapping/ DHW withdrawal
7 : Warning
8 : Nominal value reduction
10 : Reheating
11 : Cancel charging
14 : Standby station in cascade
0 ... 11 - - 0 02:052
STA02 Circ. Calibration Status of circulation flow
calibration
0: Inactive
Calibration not done yet or last calibration obso-
lete.
1..8: Active, measurements 1..8.
If measurements 1..4 OK, transition into 9; other-
wise, carry out measurements 5..8 and then eval-
uate.
9: Calibration successful.
10: Start.
11: Error - Flow despite pump being switched off.
12: Error - Flow rate fluctuations too great with the
pump switched on.
0
STA03 Thm.disinfection info Information about thermal
disinfection
... with time specified when this was successfully car-
ried out.
yyyy
dd:mm
- - 0 02:127
STA04 Speed, pri. pump Current control variable Output 1 0 ... 100 % - 0 22:031
STA05 Output, circ. pump Current control variable Output 2 0 ... 100 % - 0 22:032
STA06 Current control variable A3 Current control variable Output 3 0 ... 100 % - 0 22:033
STA07 Current control variable A4 Current control variable Output 4 0 ... 100 % - 0 22:034
STA08 Current control variable A5 Current control variable Output 5 0 ... 100 % - 0 22:035
STN1 Station casc. status Status during cascade op-
eration
... of the station in the FW cascade manager:
Digit 1:
Sequence number of the station, range 0..5,
0: Station not available
Digits 2..4: Control signal s of the KM for this station:
0: Off
1..100: Override with s%
101: Not ready, no energy
102: Standby
103: Control
00 ... 1103 - - 0 02:123
STN2 Station casc. status Status during cascade op-
eration
00 ... 2103 - - 0
STN3 Station casc. status Status during cascade op-
eration
00 ... 3103 - - 0
STN4 Station casc. status Status during cascade op-
eration
00 ... 4103 - - 0
STN5 Station casc. status Status during cascade op-
eration
00 ... 5103 - - 0

18
PRI PRIMARY
PRI01 Tank temp, top Temperature of consumer,
top TXO
Display of the current temperature in the buffer / tank
(top).
0 ... 120 °C - 0 00:015
PRI02 Tset, tank, top Nominaltemperaturevalue
of consumer, top
Display of the calculated set point in the buffer / tank
(top). This value is calculated from the DHW set point
and the flow-dependent temperature loss.
0 ... 120 °C -25 01:015
PRI03 Tank temp, bottom Temperature of consumer,
bottom TXU
Display of the current temperature in the buffer / tank
(bottom).
0 ... 120 °C - 0 00:016
PRI04 Supply temperature Supply temperature, PWT
TPV
Display of the current supply temperature on the pri-
mary plate heat exchanger, heat source.
0 ... 120 °C - 0 21:023
PRI05 Return temperature Return temperature, PWT
TPR
Display of the current return temperature on the prima-
ry plate heat exchanger.
0 ... 120 °C - 0 21:024
SEK SECONDARY
SEK01 Temperature, domestic hot
water
DHW temperature, TWW Display of the current withdrawal temperature at the
secondary plate heat exchanger.
0 ... 120 °C - 0 00:067
SEK02 Tset, domestic hot water DHW nominal temperature
value, TWW
Display set point BAS01 TSET DHW or LEG01
THERM.DISINFECT. TEMP. when legionella protec-
tion is active, as well as fixed
10 °C frost protection in standby mode.
0 ... 120 °C -25 01:067
ATTENTION: Nominal value reduction when too little primary energy available, TPV < TPVset = BAS01 TSET DHW + STE14 MIN. TDIFF HEAT EXCH.
Reduced set point TWWsetred = TPV - STE14 MIN. TDIFF HEAT EXCH.
SEK03 Temperature, cold water Cold water temperature,
TKW
Display of the current cold water inlet temperature at
the secondary plate heat exchanger.
0 ... 120 °C - 0 00:068
SEK04 DHW flow rate Flow rate FLOW Display of the current water throughput at the second-
ary plate heat exchanger.
0 ... 999.9 l/min - 0 00:069
NOTE: Local value as pulse, analog or switch, see setting STE07 TYPE FLOW SENSOR. Attention: For paddle switches, no volumes are read in. Here, the value STE17 MAX.
TAPPING RATE is used and displayed.
SEK05 Temperature, circulation Circulation temperature,
TBZ
Display of the current circulation temperature, local
value depending on sensor selection ZIR03 CIRCU-
LATION SENSOR of TKW, TBZ or TWW.
0 ... 120 °C - 0 00:118
SEK06 Tset, circulation Circulation nominal tem-
perature value
Display of the circulation set point from BAS01 TSET
DHW minus ZIR01 TD CIRCULATION NOM.
0 ... 120 °C -25 01:118
ATTENTION: Nominal value reduction when too little primary energy available, TPV < TPVset = BAS01 TSET DHW + STE14 MIN. TDIFF HEAT EXCH.
Reduced set point TWWsetred = TPV - STE14 MIN. TDIFF HEAT EXCH.
OFF EVALUATION
AUS02 Max. tapped volume 24 h Max. tapped volume in 24
h
0 ... 999.9 l/min -25 02:126
AUS03 Withdrawn energy, prim. Partial energy requirement
E
Display of energy requirement for DHW production in
kWh. The meter goes back to 0 after reaching 1 MWh.
Thus, the total amount can be read off in MWh plus the
partial amount in kWh.
0 ... 999.9 kWh - 0 23:006
AUS04 Total energy withdrawal Total energy requirement
TOT
0 ... 9999 MWh - 0 23:013
AUS05 Prim. pump operating
hours
Operating hours, primary
pump FRIWA
0 ... 9999 h - 0 02:120
AUS06 Circ. pump operating hours Operating hours, circula-
tion pump WWC
0 ... 9999 h - 0 02:121
AUS07 Recharging operating
hours
Operating hours, recharg-
ing NALAD
0 ... 9999 h - 0 02:121
AUS08 L Day tapping quantity Day tapping quantity l Accumulated flow / flow from the volume meas-
urement part volume in l.
0 ... 9999 h - 0 02:121
AUS09 CBM Day tapping quanti-
ty
Day tapping quantity m3 Accumulated flow / flow from the volume meas-
urement to the total volume in m3.
By displaying the daily volume in liters an accu-
rate reading is possible.
0 ... 9999 h - 0 02:121
The visible values vary depending on the selected hydraulic variant, as well as the option, and depend on the input password, "Key" column;
see sect. 7.6, page 20.
Menu Description Range Unit Value Key ID

19
7.5 Parameters MENU overview MENU
MENU Menu Value
BAS
BASIC
BAS01 Tset, domestic hot water
BAS02 Scalding protection
BAS03 TWW sensor type
BAS04 TKW sensor type
ZIR00 Circulation mode
SCH00 Therm. Disinfection
LEG00 Return layering
NAC00 Warming function
BAS05 Recharging, primary
BAS09 Time
BAS10 Date
BAS15 Tmin. heat source
PAR PARAMETER ZIR CIRCULATION ZIR00 Circulation mode
ZIR01 TD circulation nom
ZIR02 Tmax circulation
ZR04 TBZ sensor type
ZIR05 Circ. calib. tolerance
ZIR06 Circ. calibration
ZIR07 Circulation flow rate
ZIR10 Circ. pulse run-time
ZIR11 Circ. pulse off-time
ZIR12 Circ.time program
ZIR13 Circ. mode with consumpt.
ZIR14 Hysteresis circulation
SCH LAYERING SCH00 Return layering
SCH01 Diff. return layering
SCH02 TU sensor type
SCH03 TPR sensor type
SCH04 Fix value TU1 tank bottom
LEG THERM. DISINFECTION LEG00 Therm.disinfect.
LEG01 Therm.disinfect. temp.
LEG02 Temp. holding time, .thm.dis
LEG03 TSET hysteresis, thm.dis
LEG04 Man. Therm.disinfect.
LEG05 Thm.Disinf.Time.program
NAC RECHARGING NAC00 Recharging primary
NAC03 Hysteresis recharging
NAC04 TO sensor type
NAC05 Tmin.heat source
KOM COMMUNICA-
TION
KOM01 Language selection
KOM03 Collective fault message
KOM04 eBUS address
KOM05 eBUS feed
STE CONTROL STE11 TPV sensor selection
STE12 MinRuntime, cycles
STE13 MinOfftime, cycles
MAN MANUAL MAN01 Prim. pump speed
MAN02 Circ. pump speed

20
MENU
NOTE:
Adjusters only have one function when Manu-
al/Test mode is selected; see "7.1 Selecting
the operating mode", page 14.
Menu Value
MAN03 Return layering
MAN04 Cascade zone valve
MAN05 Recharging, primary
KAS CASCADE KAS01 Station operating mode
STN1 eBUS master number eBUS master address
STN2 eBUS master number eBUS address of 1st slave
STN3 eBUS master number eBUS address of 2nd slave
STN4 eBUS master number eBUS address of 3rd slave
STN5 eBUS master number eBUS address of 4th slave
KAS02 Sequence changeover
KAS03 Station delay
KAS04 Cas. switch-off threshold
KAS05 Cas. switch-on threshold
KAS06 Cas. flow rate measurement
KAS07 Central cas. circ. pump
COD CODE COD01 Password
7.6 Enter password MENU
STA01
STATUs
6
°CkWh
K %
L/hmin
STA01
STATUs
6
°CkWh
K %
L/hmin
MENU
BASic
°CkWh
K %
L/hmin
MENU
COD
password
25
°CkWh
K %
L/hmin
MENU
COD
password
0
°CkWh
K %
L/hmin
MENU
password
°CkWh
K %
L/hmin
MENU
Table of contents
Other Taconova Controllers manuals

Taconova
Taconova NOVASTAT EL BASIC User manual

Taconova
Taconova NOVASTAT EL DIGITAL User manual

Taconova
Taconova Tacosol Load EXA L User manual

Taconova
Taconova H3000 E User manual

Taconova
Taconova NOVASTAT RF MINI User manual

Taconova
Taconova FWCK Operating instructions

Taconova
Taconova NOVASTAT RF DIGITAL User manual

Taconova
Taconova RF LOGIC User manual

Taconova
Taconova NOVASTAT RF WEEK User manual

Taconova
Taconova RK 56 User manual