Tacony R30 User manual

R30
Revision: 1.0
Issued: 06-27-2016
Tandem Air Vacuum
Service Manual


Page 3
WARNING! To reduce the risk of re, electric shock, or injury:
1. Do not leave vacuum unattended when plugged in. Unplug from outlet when not in
use and before servicing.
2. Do not attempt to service the unit while vacuum is plugged in.
3. WARNING: ELECTRIC SHOCK COULD OCCUR IF USED OUTDOORS OR ON WET
SURFACES.
4. Do not allow to be used as a toy. Close attention is necessary when used by or near
children.
5. Use only as described in this manual. Use only manufacturer’s recommended
attachments.
6. Do not use with damaged cord or plug. If vacuum is not working as it should, has
been dropped, damaged, left outdoors, or dropped into water, return it to a service
center.
7. Do not pull or carry by cord, use cord as a handle, close a door on cord, or pull cord
around sharp edges or corners. Do not run vacuum over cord. Keep cord away from
heated surfaces.
8. Do not unplug by pulling on cord. To unplug, grasp the plug, not the cord.
9. Do not handle plug or vacuum with wet hands.
10. Turn off all controls before unplugging.
11. Do not put any object into openings. Do not use with any opening blocked; keep free
of dust, lint, hair and anything that may reduce air ow.
12. Keep hair, loose clothing, ngers and all parts of body away from openings and
moving parts.
13. Do not pick up anything that is burning or smoking, such as cigarettes, matches or
hot ashes.
14. Do not use without vacuum bag and/or lters in place.
15. Use extra care when cleaning on stairs.
16. Do not use to pick up ammable or combustible liquids such as gasoline or use in
areas where they may be present.
17. For grounded models, connect to a properly grounded outlet only. See Grounding
Instructions.

Page 4
Table of Contents
I. Basic Assembly and Operation
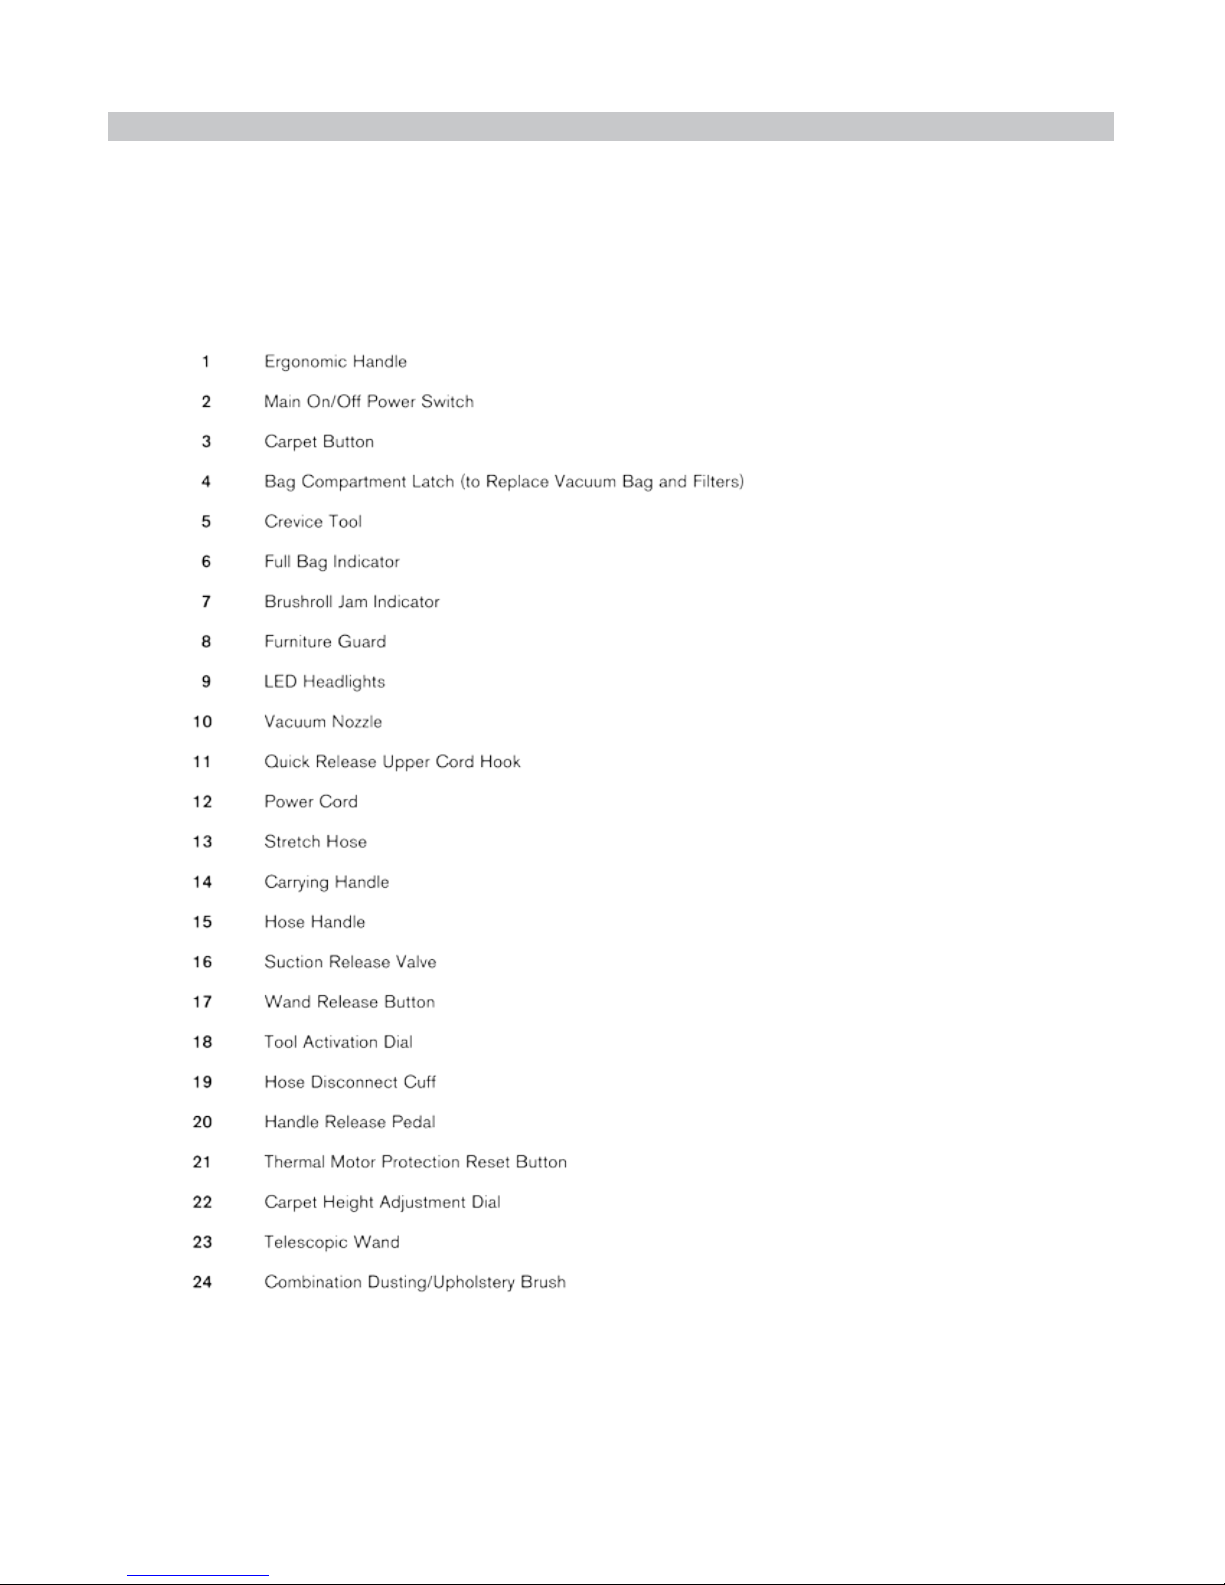
A. Parts Identication .........................................................................................................................6-7
B. General Performance ......................................................................................................................... 8
C. Installing the Handle ......................................................................................................................... 8
D. Operation ........................................................................................................................................... 9
E. Thermal Reset Switch ...................................................................................................................... 10
II. Maintenance and Repairs
A. How to Change the Vacuum Bag .................................................................................................... 11
B. How to Replace the Filters .............................................................................................................. 12
C. Removing the Baseplate .................................................................................................................. 13
D. Replacing the Belt ........................................................................................................................... 14
E. Agitator Disassembly (Replacing the Brush Strips) ...................................................................15-16
F. Replacing the Dust Cover Latch ...................................................................................................... 17
G. Replacing the Hose Guide ............................................................................................................... 18
H. Replacing the Upholstery Tool Clip ................................................................................................ 18
I. Replacing the Upper Crevice Tool Clip ............................................................................................ 19
J. Replacing the Lower Crevice Tool Holder/Wand Dock ................................................................... 19
K. Replacing the Upper Cord Hook ..................................................................................................... 20
L. Replacing the Upper Cord Hook Mount ......................................................................................... 21
M. Replacing the Lower Cord Hook .................................................................................................... 22
N. Replacing the On/Off Switch .....................................................................................................23-24
O. Replacing the Power Cord .............................................................................................................. 25
P. Replacing the Handle Harness ....................................................................................................26-29
Q. Replacing the Bag Holder Assembly .............................................................................................. 30
R. Removing the Back Cover .........................................................................................................31-32
S. Replacing the Height Adjust Assembly ........................................................................................... 33
T. Replacing the Height Adjust Wheels ............................................................................................... 34
U. Replacing the Rear Wheels ............................................................................................................. 35
V. Separating the Nozzle from the Dust Compartment Body .........................................................36-37
W. Accessing the Motor Compartment ...........................................................................................38-39
X. Fan Replacement ............................................................................................................................. 40
Y. Reassemble the Motor Compartment .........................................................................................41-45
Z. Replacing the Foot Pedal Assembly or Tilt Lock Spring ...........................................................46-47
AA. Replacing the Hall Sensor Assembly ........................................................................................... 48
AB. Replacing the Main PC Board ...................................................................................................... 49
AC. Replacing the Thermal Reset Switch ........................................................................................... 50
AD. Replacing the Direct Air Motor .................................................................................................... 51
AE. Replacing the Clean Air Motor ..................................................................................................... 52
AF. Checking the Roto-Valve Micro Switch ....................................................................................... 53
III. Troubleshooting
A. Vacuum Does Not Pick up Well ...................................................................................................... 54
B. Vacuum is Hard to Push .................................................................................................................. 55
C. Belt Stretching or Breaking Prematurely ....................................................................................... 56

Page 5
Table of Contents
D. Machine Will Not Power on Section 1: Check Thermal Breaker .................................................. 57
D. Machine Will Not Power on Section 2: Check Handle ................................................................... 58
D. Machine Will Not Power on Section 3: Power Cord .................................................................... 59
D. Machine Will Not Power on Section 4: Check On/Off Switch ..................................................... 60
D. Machine Will Not Power on Section 5: Check Thermal Reset ..................................................... 61
D. Machine Will Not Power on Section 6: Check Wire Harness ....................................................... 62
D. Machine Will Not Power on Section 7: Check The Motor ........................................................... 63
E. Direct Air Motor Stops Running and Brushroll Jam Light is on ................................................64-65
F. Excessive Vibration or Motor Noise ................................................................................................ 66
G. Direct Air Motor Does Not Run or is Intermittant- Part 1: Check Roto-Switch ............................ 67
G. Direct Air Motor Does Not Run or is Intermittant- Part 2: Check Wing Switch ............................ 68
H. Thermal Breaker Trips Repeatedly ................................................................................................. 69
I. Motor Going on and Off or Not Starting (Even with the Hall Sensor Bypassed) ........................... 69
J. Power Cord Gets Warm to the Touch .............................................................................................. 69
IV. Diagrams
A. Handle Wiring ................................................................................................................................. 70
B. Motor Compartment Wiring ............................................................................................................ 71
V. Contact Information ...................................................................................................................... 72

Page 6
A. Parts Identication
I. Basic Assembly and Operation

Page 7
A. Parts Identication (Continued)
I. Basic Assembly and Operation

Page 8
The vacuum cleaner and the handle are packed seperately. To assemble handle:
1. Remove the handle screw (Fig. A.)
2. Insert the handle by sliding into the opening in the top of the vacuum (Fig. B.)
3. Reinstall handle screw (Fig. C.)
C. Installing the Handle
• Keep machine and all accessories clean and in good operating condition.
• Change vacuum bags and lters as recommended to maintain optimum cleaning efciency.
• Always use genuine bags, belts and parts, as use of other products may result in poor cleaning or
ltration performance. Tacony ltration products are designed for maximum performance.
• Store machine carefully in dry area.
I. Basic Assembly and Operation
B. General Performance
Fig. A Fig. B
Fig. C

Page 9
1. On/Off Switch
To Turn the vacuum on push the handle switch to the on position (Fig. A.)
To turn the vacuum off, push the handle switch to the off position. (Fig. B)
2. Carpet/Floor Switch
When the machine is rst turned on it is always in carpet mode. To turn off the second motor and
disengage the agitator for bare oor or tool cleaning press the carpet oor switch (Fig. C.) The
switch light and headlights will turn off.
3. How to Lower the Handle
To release the handle, step on the pedal at the left rear corner of the vacuum cleaner (Fig. D) and
pull back on the handle.There are two adustment levels. Press the pedal a second time to reach
the lowest position.
Fig. A
Fig. C
I. Basic Assembly and Operation
D. Operation
Fig. B
Fig. D

Page 10
Thermal Reset Switch
Your vacuum cleaner comes equipped with a thermal protection switch. This is designed to protect
your vacuum cleaner from damage due to overheating in a clogged condition. Should this situation
occur, the thermal protector will safely shut off your vacuum cleaner to avoid any potential damage.
To reset the thermal protector:
CAUTION: Unplug the vacuum cleaner before servicing.
1. Check for problem (obstruction or clog in the nozzle inlet, direct air motor, hose, or wand, overfu
bag, or clogged lter.)
2. Correct problem.
3. Locate and press the thermal reset switch on the back of the vacuum cleaner (Fig. A and B.)
4. Plug vacuum cleaner in and begin using again.
Fig. A
I. Basic Assembly and Operation
E. Thermal Reset Switch
Fig. B

Page 11
CAUTION: Unplug the vacuum cleaner before servicing.
NOTE: Always operate the vacuum cleaner with a vacuum bag installed.
1. Unplug the vacuum cleaner.
2. Remove the dust cover.
3. Remove the old bag by pulling the tab as shown (Fig. A.)
4. Pull up on the tab to close the bag and remove it from the holder (Fig. B.)
5. Install the new vacuum bag by sliding it into the holder (Fig. C.)
6. Then press the top of the bag collar back until it locks onto the post. (Fig. D)
7. Reinstall the dust cover.
II. Maintenance and Repairs
A. How to Change the Vacuum Bag
Fig. A Fig. B
Fig. C Fig. D

Page 12
CAUTION: Unplug the vacuum cleaner before servicing.
1. Remove the dust cover.
2. Remove the HEPA lter located on the front of the motor cover and discard (Fig. A.) Press the new
lter into place.
3. Locate the secondary lter inside the bag compartment and remove as shown in Fig. B. Reinstall the
new lter as shown in Fig C.
4. Lay the machine at to expose the direct air motor lter on the motor cover. Remove the direct air
motor lter cartridge (Fig. D) and discard. Install the new direct air motor cartridge.
5. Reinstall the dust cover.
II. Maintenance and Repairs
B. How to Replace the Filters
Fig. A Fig. B
Fig. C Fig. D

Page 13
II. Maintenance and Repairs
CAUTION: Unplug the vacuum cleaner before servicing.
1. Flip the vacuum over so the baseplate is showing.
2. Remove the four (4) screws shown in Fig. A.
3. Pull the baseplate off (Fig. B.)
C. Removing the baseplate
Fig. A Fig. B
Fig. C

Page 14
CAUTION: Unplug the vacuum cleaner before servicing.
NOTE: The R30 has a lifetime belt. The belt should only be replaced if it is broken or damaged.
1. Remove the baseplate as shown on page 13.
2. Remove the four (4) screws holding the nozzle cover (Fig. A.)
3. Flip the machine over to remove the nozzle cover.
4. Flip the machine back over and remove the agitator. (Fig. B.)
5. Discard the old belt and place the new belt around the motor shaft pulley (Fig. C.)
6. Position the belt underneath the hall sensor pulley as shown in Fig. D.
7. Loop the belt around the agitator pulley and roll it into place.
8. Reinstall the nozzle cover. Be sure to lock the front tabs into place rst.
9. Reinstall the baseplate. Start by locking the front tabs and then reinstall the four (4) screws.
II. Maintenance and Repairs
D. Replacing the Belt
Fig. A Fig. B
Fig. C Fig. D

Page 15
CAUTION: Unplug the vacuum cleaner before servicing
1. Remove the baseplate as shown on page 13. Remove the agitator.
2. Remove the rubber end caps. Using two ratchets with 7/16” sockets set to opposite directions loosen
until one of the nuts breaks loose (Fig. A.)
3. Remove the nut and metal end cap. Remove the two (2) screws securing the felt ring retainer.
(Fig. B.)
4. Remove the part underneath the ring retainer (either the pulley or the bearing cartridge depending on
which side of the agitator you are working on.) It may be necessary to use a small screwdriver or
other tool to pry the bearing cartridge or pulley out of the agitator core (Fig. C.)
5. Grip the agitator shaft with a pair of vice grips and use one of the rachets with the 7/16” socket to
remove the remaining endcap (Fig. D.)
Continued on Next Page
Fig. A Fig. B
Fig. C
II. Maintenance and Repairs
E. Agitator Disassembly (Replacing the brush strips)
Fig. D

Page 16
CAUTION: Unplug the vacuum cleaner before servicing
5. Remove the two (2) screws securing the felt ring retainer or the pulley on the opposite side (Fig. A.)
6. Slide out brush strips from the ends of the core. Use needle nose pliers to grip strips if necessary
(Fig. B.)
7. New brush strips will be stiff. If they are difcult to install warm them with a heat gun or other
method to soften.
8. Fig. C: A fully disassembled agitator.
II. Maintenance and Repairs
E. Agitator Disassembly (Replacing the brush strips) Continued
Fig. A
Fig. C
Fig. B

Page 17
II. Maintenance and Repairs
CAUTION: Unplug the vacuum cleaner before servicing.
1. Remove the dust cover.
2. Remove the two screws holding the latch in place (Fig. A.)
3. Discard the old latch and install the new one shown in Fig. B. Secure with the two (2) screws.
F. Replacing the Dust Cover Latch
Fig. A Fig. B

Page 18
CAUTION: Unplug the vacuum cleaner before servicing.
1. Remove the wand and hose.
2. Remove the screw securing the hose guide (Fig. A) and remove hose guide (Fig. B.)
3. Install new hose guide with screw. Reattach wand and hose.
II. Maintenance and Repairs
G. Replacing the Hose Guide
Fig. A Fig. B
Fig. C
CAUTION: Unplug the vacuum cleaner before servicing.
1. Remove the screw holding the clip (Fig. C) and remove clip.
H. Replacing the Upholstery Tool Clip

Page 19
II. Maintenance and Repairs
Fig. A Fig. B
Fig. C
CAUTION: Unplug the vacuum cleaner before servicing.
1. Remove screw securing clip (Fig. A.)
2. Remove old clip and reinstall new one as shown. in Fig. B.
I. Replacing the Upper Crevice Tool Clip
Fig. D
CAUTION: Unplug the vacuum cleaner before servicing.
1. Remove screw securing clip (Fig. C.)
2. Remove old clip and reinstall new one as shown. in Fig. D.
J. Replacing the Lower Crevice Tool Holder/Wand Dock

Page 20
CAUTION: Unplug the vacuum cleaner before servicing.
1. Remove the screw holding the upper cord hook (Fig. A.)
2. Remove the cord hook, screw, washer and spring (Fig. B.)
3. Place the screw through the washer and then place the spring after the washer. Insert the screw into
the upper cord hook as shown (Fig. C.) and install on handle.
II. Maintenance and Repairs
K. Replacing the Upper Cord Hook
Fig. A Fig. B
Fig. C
Table of contents
Other Tacony Vacuum Cleaner manuals

Tacony
Tacony Powr-Flite Comfort Pro FREEDOM 6 CPF6 Series Installation and operation manual

Tacony
Tacony Simplicity S65 User manual

Tacony
Tacony Riccar RPT-P1 User manual

Tacony
Tacony Powr-Flite PF716DC User manual

Tacony
Tacony TRUVOX Valet Battery Backpack User manual

Tacony
Tacony TRUVOX INTERNATIONAL Valet Single Motor... User manual

Tacony
Tacony POWER-FLITE PF19SV Guide

Tacony
Tacony Truvox VBPIIe User manual

Tacony
Tacony Powr-Flite PF712DC User manual

Tacony
Tacony Powr-Flite Comfort Pro BP6 Series Installation and operation manual