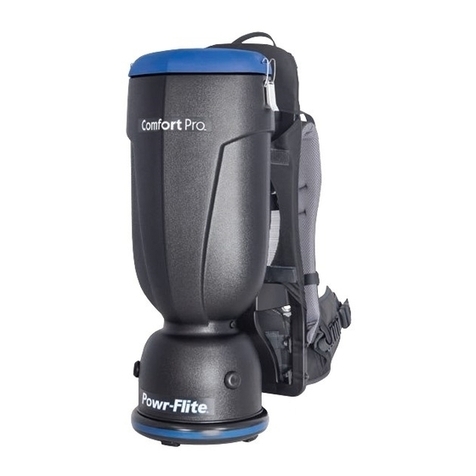
Tacony Powr-Flite Comfort Pro FREEDOM 6 CPF6 Series Installation and operation manual

OPERATOR’S MANUAL & PARTS LIST
WARNING: OPERATOR MUST READ AND UNDERSTAND THIS MANUAL
COMPLETELY BEFORE OPERATING THIS EQUIPMENT.
©Tacony, Inc., All rights reserved
Save These Instructions
Comfort Pro FREEDOM
Backpack Vacuum
CPF6 Series
CPF-MAN 5/2016

NOTES
Model Number: __________________________________________________________________
Serial Number:___________________________________________________________________
Date of Purchase: ________________________________________________________________
Retain this manual as a permanent record of your purchase.

3
IntroductIon
Check the carton for shipping damage. Carefully unpack and
inspect your new Powr-Flite vacuum for shipping damage.
Each unit is tested and thoroughly inspected prior to shipping.
If damage is discovered, immediately notify the transportation
company that delivered your machine and request an
inspection. As a manufacturer, we are unable to act upon any
claim for concealed damage; you must originate the claim.
Be sure to keep the carton, packing inserts, packing lists, and
carrier’s receipt until the inspector has verified your claim.
MANUAL
This manual has important information for the use and safe operation of the Comfort Pro. Read
this manual carefully before starting the machine. Keep the manual available at all times and
instruct all operators to read this manual.
Introduction ...................................................3
Safety Instructions ........................................4
Storage ...........................................................4
Grounding Instructions.................................6
Operating Instructions..................................7
Troubleshooting ..........................................10
Machine Specications............................... 11
Schematic and Parts List............................13
PROTECT THE ENVIRONMENT
Please dispose of packaging materials in an
environmentally safe way according to local
waste disposal regulations.
Always remember to recycle
Powr-Flite.com
REPLACEMENT / ACCESORIES
MODEL
COMFORT PRO 6 - CPF6S & CPF6P
BATTERY
X1200
CHARGER
X1194
MICRO HEPA FILTER BAG (10 PK)
X9678
CLOSED MOUTH PAPER BAG (10 PK)
X9735
OPEN MOUTH PAPER BAG (10 PK)
X9737
MICRO CLOTH BAG
X9679
INLET FILTER
X9683
EXHAUST FILTER
X9682
REPLACEMENT BRUSH STRIP FOR POWR-GLIDE
CT192

4
Safety WarnIngS and PrecautIonS
BATTERY AND CHARGING SYSTEM:
To reduce the risk of electric shock, fire, battery explosion, or injury, use appliances only with specifically designed
battery packs.
1. Use only Powr-Flite charger X1194 and Powr-Flite battery pack X1200. Use of any other battery packs may create a
risk of injury and fire.
WARNING!
Safety WarnIngS and PrecautIonS
Read all instructions before using. Save these instructions.
Following the cleaning instructions will prolong the life of your Powr-Flite vacuum.
When using an electrical appliance, basic precautions should always be followed.
1. Use only as instructed in this manual. Use only the recommended attachments and replacement parts.
2. Do not use outdoors or on wet surfaces.
3. Do not use to pick up liquids. This vacuum is for Dry Pickup only.
4. Do not allow to be used as a toy. Close attention is necessary when used by or near children.
5. If the unit is not working as it should, has been dropped, damaged, left outdoors, or exposed to water, return it to a
service center before using.
6. Do not vacuum up hard or sharp objects, as they may damage the hose, vacuum bag or the vacuum motor.
7. Do not use without paper vacuum bag, cloth bag and filters in place.
8. Do not operate the vacuum while it is standing on high-pile carpet. The exhaust airflow is restricted and will cause
the unit to overheat.
9. Do not put any objects into openings. Do not use with any opening blocked. Keep free of dust, lint, hair and any-
thing that might reduce airflow.
10. Keep hair, loose clothing, fingers, and all parts of body away from openings and moving parts.
11. Use with extra care when cleaning stairs.
12. Do not vacuum flammable or combustible materials or anything that is burning or smoking, such as cigarettes,
matches, or hot ashes.
13. Do not use with dust bag not in place.
14. Sparks inside the motor can ignite flammable vapors or dust. To reduce the risk or fire or explosion, do not use near
combustible liquids, gases, or dusts, such as gasoline or other fuels, lighter fluid, cleaners, oil-based paints, or
natural gas.
15. To reduce the risk of inhaling toxic vapors do not vacuum or use near toxic or hazardous materials.
16. Keep children and unauthorized persons away from the vacuum when in use.
17. This machine is not intended for use by persons with reduced physical, sensory or mental capabilities, or lack of
experience and knowledge.
18. Do not attempt to service the vacuum yourself. Repair by anyone other than an authorized repair service center
may void the warranty.
WARNING!
800.880.2913
Storage
Always store the vacuum in cool, dry place.
IMPORTANT SAFETY INSTRUCTIONS
Save These Instructions

5
2. Disconnect the battery pack from the machine before making any adjustments, changing accessories or storing machine.
3. DO NOT expose battery packs to temperatures above 122°F (50°C). Never leave battery packs in automobiles on hot
days, where temperatures can be much higher than the outside temperature.
4. DO NOT use or store vacuum or batteries in wet or moist conditions, or with flammable or combustible materials.
5. DO NOT charge batteries or store battery for extended periods,1 month or more, in temperatures above 90°F (32°C) or
below 40°F (5°C).
6. When charging, make sure that the charger has at least 6 inches of clearance on all sides. Adequate airflow is required
to cool the charger when in use.
7. Connect charging cord to a properly grounded outlet only. See Grounding Instructions.
8. DO NOT use a damaged cord or plug for charging.
9. DO NOT pull on charger’s cord to unplug. Grasp and pull the plug, not the cord.
10. DO NOT handle the charger’s cord plug with wet hands when inserting into electrical outlet.
11. Keep sparks and flames away from batteries. DO NOT smoke near batteries or charger.
12. DO NOT charge the unit outdoors.
13. DO NOT attempt to repair, service, or modify the battery system or charger. Have servicing performed by a qualified
repair person using only identical replacement parts. This will ensure that the safety of the product is maintained.
Contact Powr-Flite Customer Service with any issues.
14. DO NOT short-circuit the battery or charger terminals with conductive items such as paper clips. This can deliver high
current, resulting in heat and fire.
15. DO NOT crush, drop, incinerate or damage the battery pack. DO NOT use a battery pack that has been damaged in any
way. DO NOT incinerate the battery even if it is severely damaged or nonworking. The battery can explode in a fire.
16. Under abusive conditions, liquid may be ejected from the battery; avoid contact. If contact accidentally occurs, flush with
water. If liquid contacts eyes, seek additional medical help. Liquid ejected from the battery may cause irritation or burns.
17. Follow all charging instructions and do not charge the battery pack or appliance outside of the temperature range
specified in the instructions. Charging improperly or at temperatures outside of the specified range may damage the
battery and increase the risk of fire.
18. Do not modify or attempt to repair the appliance or the battery pack (as applicable) except as indicated in the instructions
for use and care.
To avoid damage to the battery contacts, turn off power switch before reconnecting the battery.
Battery must be fully engaged to insure proper electrical connection.
INSTALLING BATTERY PACK INTO VACUUM
1. Holding battery by the front, carefully slide the battery into lower housing until it clicks in
place (Fig. A).
2. Connector is spring-loaded. Battery will need to be pushed fully into position. (Fig. B)
BATTERY FUEL GAUGE
The battery fuel gauge indicates the approximate run time remaining on the battery. When the
battery button is pressed, one to four indicators will light up, indicating the approximate battery
charge remaining (Fig. C) as follows:
All 4 lights on: Full Charge
3 lights on: 70% Charge
2 lights on: 45% Charge
1 light on: 25% Charge
1 light on and blinking: Low battery, charge when possible
CAUTION
Powr-Flite.com
Fig. A
Fig. B
Fig. C
6
THE COMFORT PRO FREEDOM BATTERY CHARGER MUST BE GROUNDED. If the charger should malfunc-
tion or stop working, grounding provides a path of least resistance for electrical current, thereby reducing the risk of
electrical shock. This unit is equipped with a cord that has an equipment-grounding conductor and grounding plug.
The plug must be inserted in an appropriate outlet that is properly installed and grounded in accordance with all local
codes and ordinances. Cutting off the ground wire or using a cord that is not equipped with a ground plug will void the
warranty on the unit, and Powr-Flite will accept NO liability associated with the unit.
The vacuums are for use on a nominal 120-volt circuit, and have a grounded plug that looks like the plug illustrated
in Figure A. A temporary adapter that looks like the adapter illustrated in Figure B and C may be used to connect this
plug to a 2-pole receptacle as shown in Figure B if a properly grounded outlet is not available. The temporary adapter
should be used only until a properly grounded outlet (Figure A) can be installed by a qualified electrician. The green
colored rigid ear, lug, or the like, extending for the adapter must be connected to a permanent ground such as a prop-
erly grounded outlet box cover. Whenever the adapter is used, it must be held in place by a metal screw.
Note: In Canada, the use of a temporary adapter is not permitted by the Canadian Electrical Code.
The replacement or repair of damaged wiring should only be performed by a qualified
electrician or service engineer from the manufacturer or authorized service center.
charger groundIng InStructIonS
Improper connection of the equipment-grounding conductor can result in a risk of
electric shock. Check with a qualified electrician or service person if you are in doubt
as to whether the outlet is properly grounded. Do not modify the plug provided with
the appliance. If it will not fit the outlet, have a proper outlet installed by a qualified
electrician.
WARNING!
WARNING!

7
oPeratIng InStructIonS
Please read the following instructions carefully. They will help to get the best performance from this professional commer-
cial vacuum cleaner and to maintain it in optimum condition. Always make sure the main power of the vacuum is off and
the unit is not plugged in when doing any maintenance on the vacuum.
PREPARING TO VACUUM
1. Remove vacuum hose from top of unit. (Fig. 1)
2. Release the two latches and lift off lid. (Fig. 2)
3. Ensure Micro Cloth bag is fully seated on Comfort Pro tank
housing. (Fig. 3)
4. Fold the bottom 2” of the HEPA bag up and hold into place.
(Fig. 4)
5. Insert HEPA bag inside of micro cloth bag. (Fig.5)
6. Squeeze bag just below the cardboard collar and drop onto
rubber gasket. (Fig. 6)
7. Ensure that white bag is not protruding under cardboard collar.
(Fig. 7)
8. NOTE: Cardboard must be properly seated inside gasket
groove.Cardboardwillbeushwithgasket.(Fig.8)
9. Replace lid, lock down the two latches and install hose.
(Fig. 9).
OPERATING THE BACKPACK VACUUM
1. Fasten the ends of the top and bottom wand together.
2.Attachtheoortooltoendofwand.Alignthesteelringwith
thegrooveontheoortooltoensureasecuretandtighten.
4. Turn the unit on, and proceed with vacuuming.
5. The on/off switch is conveniently located on the body of the
backpack vacuum (Fig. 10)
PROPER VACUUMING MOTION FOR LARGE AREAS
1. Begin with the wand parallel to your body.
2. Draw the top of the wand in toward your waist and twist at the
waist walking backward or forward, in a side-to-side motion.
3. The motion is similar to mopping and keeps the upper body
and arms from tiring.
800.880.2913
IMPORTANT!
PERFORM PROPER INSTALLATION OF HEPA BAGS AND CORD
IN COMFORT PRO BACKPACK VACUUMS.
1. 2.
3.
5.
4.
7. 8.
9. 10.
6.

8
Always unplug machine before cleaning, or making any
adjustments or repairs.
Thebackpackvacuumhasfourlevelsofltration:thepapervacuumbag,amicro
clothlter,apre-motorlterandanexhaustlter.Thesebagsandlterscapture
nedustparticlesandprotectthemotorfromdirt.Itisimportanttoreplacethe
paperbagwhenitisnomorethan½fullandtocleantheltersonaregular
schedule and replace as necessary.
Paper Vacuum Bag
1. Remove paper bag. Insert a new paper bag into the cloth bag, making sure the
cardboarddiskiscenteredontheexiblesealingring.Whenyoureplacethelid,
the short nozzle in the center of the lid will be closed over the central hole of the
cardboard disk of the paper vacuum bag providing a seal. (Fig. A)
2. Replace the lid. Fasten latches and replace hose. (Figs. C-D)
Micro Cloth Filter
Aftereachuse,theclothlterbagshouldbeinspected.Handwashtheclothlter
bag every 6 months using cold water and no detergent. Line dry.
3. Remove the micro cloth bag, clean and replace. (Fig. B)
4. Replace paper vacuum bag and lid. Fasten latches and insert hose. (Figs. C-D)
Pre-Motor Filter
Thepre-motorlterislocatedunderthemicroclothlter.Inspectaftereachuse.
Theltercanbewashedusingcoldwaterandnodetergent.Layattodry.Replace
every 6 months.
5. Remove the lid, the paper vacuum bag, and the cloth bag to expose the pre-
motorlter.
6.Removethefoampre-motorlterfromthedustcompartment,cleanandreplace.
Iflterisextremelydirty,rinseoutandairdrybeforereplacingbackintovacuum.
(Fig. E)
7. Reinstall the cloth bag, the paper vacuum bag and replace the lid, fasten latches
and insert the hose. (Figs. C-D)
Exhaust Filter
Theexhaustlterisaneasy-accesswashable,reusablepost-motorlterlocatedon
the bottom of the vacuum. For average use of the vacuum, remove and clean the
exhaustmotorlterevery3months.Theltercanbewashedusingcoldwaterand
nodetergent.Layattodry.Replaceonceayear.
8.Removethefoampostmotorlter,cleanandreplace.
9.Reinstallthelteratthebottomofthevacuum.(Fig.F)
800.880.2913
WARNING!
C.
D
A.
E.
B.
F.

9
800.880.2913
3. Place the hip belt over your hip and connect the buckle. Your hip bones should be centered between the top and bot-
tom of the belt. Pull the straps forward to tighten the hip belt. (Fig. 1)
4. Pull down the shoulder straps to tighten the backpack on your shoulders. (Fig. 2) Do not tighten too tight. The main
weight of the vacuum should be on the hip belt. The anchor points of the shoulder straps should ideally be between the
shoulderblades.AdjusttheVariQuickheightadjusterifnecessarytoproperlytthevacuumtoyourbacklength.
5. Adjust the sternum strap on a comfortable part of your chest and close the strap. (Fig. 3)
6.Loosenortightenthestabilizerstrapsasneeded,totyourback.(Fig.4)
7.Donaladjustmentsontheshoulderandstabilizerstrapsasneededtobalancetheweightofthevacuumonthehips.
Wearing the Backpack Vacuum
The backpack is designed to balance the weight of the vacuum on the hips, not the shoulders.
1. Adjust the VariQuick height adjuster to your back length.
2. Loosen all of the straps and place the vacuum on your back.
Stabilizer Straps
VariQuick Height Adjuster
Shoulder Straps
Sternum Strap
Hip Belt
FIG. 1 FIG. 2 FIG. 3 FIG. 4

10
TROUBLESHOOTING
1. If the vacuum will not operate, check the following:
a. The battery pack connection to the vacuum.
b. The battery pack is charged.
c. That the switch is in the “on” position and functioning properly.
2. If the battery pack is not charging, check that the charger is plugged into 120 Volt
outlet and that the battery is properly connected to the charger. Also check fuse in
charger.
3. If the exhaust air from the bottom of the vacuum is warmer than usual, check, clean
orreplacealllters.
4. If loss of suction occurs, check the following:
a.Checkthatdebrisisnotpluggingthehose,wand,and/oroortool.
b.Check,cleanorreplacebothInterceptMicroandMicroClothlters.
c.Checkthatthehosecuffsarettingtightlyonthehoseandarenotcracked.
d. Check that the cap is properly attached to the vacuum body.
5. If the charger’s LED indicator is off and there is no output voltage when plugged in,
check both ends of the power cord.
Thebackpackvacuumhasbeenttedwithathermaloverloadswitchtoprotectthe
motoragainstdamageshouldtheairowbeblockedforextendedperiods.Thismay
occur if the vacuum bag is overfull, the micro cloth bag is clogged, or if the vacuum
hose or exhaust is blocked. The vacuum motor will stop before it can get too hot. If this
happens,emptyandthoroughlycleanthevacuumbagandlters,orfreeanyblock-
ageandensurethatadequateairowisrestored.Afterthemotorcools,youwillbeable
to restart the machine – this may take up to 20 minutes.
troubleShootIng
Powr-Flite.com

11
SPecIfIcatIonS
Specications and parts are subject to change without notice.
Please refer to www.Powr-Flite.com for the latest schematic drawing and parts list.
PRODUCT SPECIFICATIONS
MODEL
COMFORT PRO FREEDOM 6 COMFORT PRO FREEDOM 6 PREMIUM
ITEM#
CPF6S CPF6P
TOOL KIT*
Standard Hands-Free
BODY
High Density Polyethylene High Density Polyethylene
DIMENSIONS (L X W X H)
10 in x 12.5 in x 26.5 in
25.4 cm x 31.8 cm x 67.3 cm
10 in x 12.5 in x 26.5 in
25.4 cm x 31.8 cm x 67.3 cm
MACHINE WEIGHT (LBS. / KG)
8.75 lbs. / 3.96 kg 8.75 lbs. / 3.96 kg
HARNESS WEIGHT (LBS. / KG)
3.2 lbs. / 1.45 kg 3.2 lbs. / 1.45 kg
BATTERY WEIGHT (LBS. / KG)
5.75 lbs. / 2.61 kg 5.75 lbs. / 2.61 kg
CORD LENGTH / TYPE
50 ft. / 15 m, direct plug 50 ft. / 15 m, direct plug
CAPACITY (QUARTS / LITERS)
6 qt. / 5.69 l 6 qt. / 5.69 l
FILTRATION
5 stage HEPA 5 stage HEPA
WATERLIFT
62 in. / 157 cm 62 in. / 157 cm
CFM /CMM
70 cfm / 1.98 cmm 70 cfm / 1.92 cmm
CLEANING PRODUCTIVITY
7,407 sq. feet per hour
688 sq. meters per hour
7,407 sq. feet per hour
688 sq. meters per hour
SOUND LEVEL
62 dBa 62 dBa
BATTERY RUN TIME
55 minutes 55 minutes
BATTERY CHARGE TIME
2.5 hours 2.5 hours
APPROVALS
CRI Silver Level Approved CRI Silver Level Approved

12
tool KItS
Standard Tool Kit
Fits: CPF6S
J1006
4′ Rigid Hose
W/90° Bend & Cuff
CT194
Powr-Glide
Carpet Tool
W/Clip
CT227
Scalloped
Floor Tool
W/Clip
B352-PF10
Carpet Tool
W/Clip
CT184
3″ Dusting Tool
W/Clip
C352-PF20
Hard Floor Tool
W/Clip
CT188
5″ Upholstery Tool
W/Clip
CT176
17″ Crevice Tool
W/Clip
CT171
2 Bend Wand
Premium Tool Kit
Fits: CPF6P
J1005
2'- 6' Stretch Hose
W/90° Bend & Cuff
CT184
3″ Dusting Tool
W/Clip
C352-PF20
Hard Floor Tool
W/Clip
CT188
5″ Upholstery Tool
W/Clip
CT176
17″ Crevice Tool
W/Clip
CT170
Single Bend Telescopic Wand W/Clip
J1007
1 Bend Adapter B352-PF10
Carpet Tool
W/Clip
To properly attach one-bend
adapter (#J1007) to the one-bend
telescopic wand (#CT170):
Install the adapter on the wand with
the line pointing to the center of the
notches on the wand.
Installoortoolontoadapterand
tighten plastic nut to secure.
Installtheoortooltotheendofthe
wand. Align the brass ring with the
grooveontheoortooltoensurea
securet.
Tools
Item# TK58
Tools
Item# TK57
CT194
Powr-Glide
Carpet Tool
W/Clip
CT227
Scalloped
Floor Tool
W/Clip

13
10
13
12
3A
8A
1113
12
toolS SchematIcS and PartS lISt
PREMIUM TOOL KIT - FITS CPF6P
ITEM DESCRIPTION PART NO. OTY
1 CARPET TOOL W/CLIP B352-PF10 1
2 HARD FLOOR TOOL W/CLIP C352-PF20 1
3SINGLE BEND TELESCOPING WAND W/CLIP CT170 1
4 17" CREVICE TOOL W/CLIP CT176 1
5 3" DUSTING TOOL W/CLIP CT184 1
6 5" UPHOLSTERY TOOL W/CLIP CT188 1
7 POWR-GLIDE CARPET TOOL W/CLIP CT194 1
8A 2' - 6' STRETCH HOSE W/90° CUFF J1005 1
9 ONE BEND WAND ADAPTOR J1007 1
10 14” SCALLOPED FLOOR TOOL CT227 1
11 90 DEGREE SWIVEL CUFF J1004 1
12 NUT J1009 1
13 RING J1010 1
STANDARD TOOL KIT - FITS CPF6S
ITEM DESCRIPTION PART NO. OTY
1 CARPET TOOL W/CLIP B352-PF10 1
2 HARD FLOOR TOOL W/CLIP C352-PF20 1
3A DOUBLE BEND WAND CT171 1
4 17" CREVICE TOOL W/CLIP CT176 1
5 3" DUSTING TOOL W/CLIP CT184 1
6 5" UPHOLSTERY TOOL W/CLIP CT188 1
7 POWR-GLIDE CARPET TOOL W/CLIP CT194 1
8 4' CRUSH PROOF HOSE W/90° CUFF J1006 1
10 14” SCALLOPED FLOOR TOOL CT227 1
11 90 DEGREE SWIVEL CUFF J1004 1
12 NUT J1009 1
13 RING J1010 1

14
SchematIc
X9679
X9739
X9666
X9676
X9690
X9747
01575
X9691
X1208
X1203
X1206
X1241
A352-9402
X1333
X1197
X1195
X1152
X9682
X9667
A352-9401
X1261
X9079
X1202
X1259
X9698 X9752
02568
X9664
X9685
X9683
X9668
A352-3300
X9688
X9671
X9713
X1205
X9755
X9669
X8248 X9758
X1260
X9681
X1200
X1201
X9754
X9734
X9733
X1263
X1198
X1004
X9717
X1207 X9753
X1204
X9697
A732-8314
X9687
X1395

15
PartS lISt
PART NO. DESCRIPTION OTY
02568 HARNESS MOUNTING WASHER 2
7CM004 WASHER 3/8 USS FLAT 18-8 SS 1
A352-3300 LID LATCH 2
A352-9401 FEMALE RIVOT FOR BELT PANEL 4
A352-9402 BELT PANEL MOUNTING SCREW 4
A732-8314 8-18 HI-LO SCREW 7
CPF-MAN COMFORT PRO FREEDOM MANUAL 1
N/A BAG FOR MACHINE 1
N/A BOX TAPE 5
N/A BUBBLE WRAP FOR CREVICE TOOL 1
PFBURDEN BURDEN 23
X1004 SMALL MADE IN THE USA LABEL 1
X1152 DEUTER HARNESS 1
X1194 CHARGER, 36V 5 AMP LITHIUM ION 1
X1195 CRI SILVER LABEL 1
X1196 WARNING LABEL 1
X1197 COMFORT PRO LABEL 1
X1198 SCREW, #4 X .5" HIGH LOW (ZP) PHIL FLAT HEAD 2
X1200 SAMSUNG SDI BATTERY 1
X1201 SAMSUNG SDI BATTERY CONNECTOR 1
X1202 HARNESS FRAME 1
X1203 BATTERY BOX COVER 1
X1204 TERMINAL PLATE 1
X1205 MOTOR PLATE GASKET 1
X1206 BATTERY EJECT SPRING 1
X1207 SPRING LOADED PLUNGER 1
X1208 5.1" VACUUM MOTOR 1
X1241 BELT CLIP W/ RETAINER 2
X1260 RUBBER FOOT 2
X1261 FREEDOM POWER HARNESS 1
X1263 SCREW, 8-18 HIGH-LOW 3/8" PHIL FLAT HEAD ZP 2
X1333 DPST ROCKER SWITCH 1
X1395 PLUG, ROUND HOLE .187" DIA 1
X1523 SWITCH,MOMENTARY,42VDC 40A INRUSH 1
X1526 CPF SWITCH MOUNTING BRACKET 1
X8248 NUT 5/16 LOCK W/ NYLON INSERT 2
X8257 6-32 NYLON LOCK NUT 2
X8449 WARRANTY CARD 1
X8450 POLY BAG FOR MANUALS 1
X8451 BOX LABEL 1
X8459 SERIAL LABEL 1
X9079 GASKET 3/8" DONUT MOTOR SEAL 1
X9664 HOUSING 6QT COMFORT VAC 1
X9666 6 QUART LID 1
X9667 EXHAUST FILTER PLATE 1
X9669 MOTOR SHIELD 1
X9671 MOTOR MOUNTING BRACKET 1
PART NO. DESCRIPTION OTY
X9676 8-18 3/4 LONG HI LO SCREW 2
X9679 6 QUART CLOTH BAG 1
X9681 RUBBER MOTOR MOUNT 3
X9682 EXHAUST FILTER 1
X9685 HOUSING BUMPER 1
X9687 POWR-FLITE LABEL 1
X9688 MOTOR MOUNTING BOLT 5
X9690 8-18 HI-LO SCREW 7
X9698 HARNESS LABEL 1
X9706 BACKPACK BOX 1
X9708 BOX FOR BACKPACK TOOLS 1
X9713 MOTOR MOUNTING WELDNUT 3
X9717 SOUND DAMPING FOAM RING 1
X9733 SCREW CAP BASE 2
X9734 SCREW CAP 2
X9739 6 QUART HEPA BAG 2
X9747 #10 USS FLAT WASHER BLACK 4
X9748 SCREW, 6-32 X 5/8 L FHD,BLK 2
X9750 WAND BOX COMFORT PRO 1
X9751 SIDE PAD CARDBOARD 1
X9752 HARNESS MOUNTING GASKET 1
X9753 STEEL MOUNTING PLATE 1
X9758 RIVET 4
X9760 6QT LID GASKET 1
X9936 BAG INSTALLATION SHEET 1

A Tacony Company
3101 Wichita Court • Ft. Worth, TX 76140-1755
1-800-880-2913 • Fax: 1-817-551-0719 • www.Powr-Flite.com
PoWr-flIte lImIted Warranty
Powr-Flite will repair or exchange parts for your vacuum in the event of a
manufacturing defect as follows:
PARTS: New or comparable rebuilt parts, for three years after original
purchase. Lifetime warranty on molded body.
LABOR: Labor warranty for one year. Carry-in service can be obtained
during the warranty period by taking your vacuum to an Authorized Powr-Flite
Warranty Service Center.
IMPORTANT WARRANTY CONDITIONS: A purchase receipt or other proof
of date of original consumer purchase also will be required before warranty
service is rendered.
This warranty covers normal use and does not cover damage which occurs in
shipment or failure resulting from alteration, accident, misuse, abuse, neglect,
or improper maintenance.
STATEMENT: This warranty is not transferable and extends only to the
original purchaser when a new Powr-Flite vacuum is purchased from an
Authorized Powr-Fite Dealer. This warranty gives you specific legal rights,
and you may have other rights that vary from state to state.
CPF-MAN 5/2016
This manual suits for next models
2
Table of contents
Other Tacony Vacuum Cleaner manuals

Tacony
Tacony Powr-Flite PF716DC User manual

Tacony
Tacony Powr-Flite Comfort Pro BP6 Series Installation and operation manual

Tacony
Tacony Simplicity S65 User manual

Tacony
Tacony Riccar RPT-P1 User manual

Tacony
Tacony TRUVOX Valet Battery Backpack User manual

Tacony
Tacony Powr-Flite PF712DC User manual

Tacony
Tacony TRUVOX INTERNATIONAL Valet Single Motor... User manual

Tacony
Tacony R30 User manual

Tacony
Tacony Truvox VBPIIe User manual

Tacony
Tacony POWER-FLITE PF19SV Guide