Tacony Powr-Flite Comfort Pro BP6 Series Installation and operation manual

OPERATOR’S MANUAL & PARTS LIST
WARNING: OPERATOR MUST READ AND UNDERSTAND THIS MANUAL
COMPLETELY BEFORE OPERATING THIS EQUIPMENT.
©Tacony, Inc., All rights reserved
Save These Instructions
Comfort Pro Backpack Vacuum
BP6 - BP10 Series
X9712 5/2017
10 quart model
Hands free
tool kit
6 quart model

NOTES
Model Number: __________________________________________________________________
Serial Number:___________________________________________________________________
Date of Purchase: ________________________________________________________________
Retain this manual as a permanent record of your purchase.

3
IntroductIon
Check the carton for shipping damage. Carefully unpack and
inspect your new Powr-Flite vacuum for shipping damage.
Each unit is tested and thoroughly inspected prior to shipping.
If damage is discovered, immediately notify the transportation
company that delivered your machine and request an
inspection. As a manufacturer, we are unable to act upon any
claim for concealed damage; you must originate the claim.
Be sure to keep the carton, packing inserts, packing lists, and
carrier’s receipt until the inspector has verified your claim.
MANUAL
This manual has important information for the use and safe operation of the Comfort Pro. Read
this manual carefully before starting the machine. Keep the manual available at all times and
instruct all operators to read this manual.
Introduction ...................................................3
Safety Instructions ........................................4
Storage ...........................................................4
Grounding Instructions.................................6
Operating Instructions..................................7
Maintenance................................................. 11
Troubleshooting .......................................... 11
Machine Specications...............................12
Schematic and Parts List............................14
PROTECT THE ENVIRONMENT
Please dispose of packaging materials in an
environmentally safe way according to local
waste disposal regulations.
Always remember to recycle
Powr-Flite.com
REPLACEMENT / ACCESORIES
MODEL
COMFORT PRO 6 - BP6S & BP6P COMFORT PRO 10 - BP10S & BP10P
MICRO HEPA FILTER BAG (10 PK)
X9739 X9737
CLOSED MOUTH PAPER BAG (10 PK)
X9735 X9736
OPEN MOUTH PAPER BAG (10 PK)
X9737 X9738
MICRO CLOTH BAG
X9679 X9692
INLET FILTER
X9683 X9683
EXHAUST FILTER
X9682 X9682
50'POWER CORD
X9714 X9714

4
Safety WarnIngS and PrecautIonS
Read all instructions before using. Save These Instructions.
Following the cleaning instructions will prolong the life of your Powr-Flite vacuum.
When using an electrical appliance, basic precautions should always be followed.
1. Use only as instructed in this manual. Use only the recommended attachments and replacement parts.
2. Do not leave vacuum cleaner plugged in when not in use. Unplug vacuum before servicing.
3. Do not use outdoors or on wet surfaces.
4. Do not use to pick up liquids. This vacuum is for Dry Pickup only.
5. If the unit is not working as it should, has been dropped, damaged, left outdoors, or exposed to water, return it to a
service center before using.
6. Do not vacuum up hard or sharp objects, as they may damage the hose, vacuum bag or the vacuum motor.
7. Do not use without paper vacuum bag, cloth bag and filters in place.
8. Do not operate the vacuum while it is standing on high-pile carpet. The exhaust airflow is restricted and will cause
the unit to overheat.
9. Do not use with damaged cord or plug.
10. Do not kink or twist the power cord.
11. Do not pull or carry by the cord, use the cord as a handle, close a door on cord, or pull cord around sharp edges or
corner. Do not run vacuum cleaner over cord. Keep cord away from heated surfaces.
12. Do not pull on the cord to unplug. Grasp and pull the plug, not the cord. Turn off the vacuum before unplugging.
13. Do not handle the cord, plug, switch or vacuum with wet hands.
14. Do not use outlets with inadequate current capacity.
15. Do not use an extension cord with this vacuum.
16. Do not put any objects into openings. Do not use with any opening blocked. Keep free of dust, lint, hair and
anything that might reduce airflow.
17. Keep hair, loose clothing, fingers, and all parts of body away from openings and moving parts.
18. Use with extra care when cleaning stairs.
19. Do not vacuum flammable or combustible materials or anything that is burning or smoking, such as cigarettes,
matches, or hot ashes.
20. Do not use with dust bag not in place.
21. Sparks inside the motor can ignite flammable vapors or dust. To reduce the risk or fire or explosion, do not use
near combustible liquids, gases, or dusts, such as gasoline or other fuels, lighter fluid, cleaners, oil-based paints, or
natural gas.
22. To reduce the risk of inhaling toxic vapors do not vacuum or use near toxic or hazardous materials.
23. Keep children and unauthorized persons away from the vacuum when in use.
24. This machine is not intended for use by persons with reduced physical, sensory or mental capabilities, or lack of
experience and knowledge.
25. Do not attempt to service the vacuum yourself. Repair by anyone other than an authorized repair service center
may void the warranty.
26. Store the vacuum indoors in a cool, dry area.
WARNING!
800.880.2913
Storage
Always store the vacuum in cool, dry place.
IMPORTANT SAFETY INSTRUCTIONS
Save These Instructions

5
conSIgneS deSécurIté etPrécautIonS a Prendre
DANGER!
Stockage
Stocker l’aspirateur a l’interieur dans une piece fraiche et séche.
IMPORTANT SAFETY INSTRUCTIONS
Save These Instructions
Powr-Flite.com
1. N’utiliser l’appereil que selon les instructions données dans ce manuel. N’utiliser que dls accessoires et pièces déta- chées
recommandées.
2. Ne pas laisser l ‘aspirateur branché après utilisation. Toujours le débrancheravant toute intervention aur la machine.
3. Ne pas l’utiliser à l’extérieur ou sur des surfaces mouillées.
4. Ne pas utiliser pour aspirer des liquides. l’appareil est uniquement destine à aspirer de matières sèches
5. Si la machine ne fonctionne pas comme elle devrait, ai elle à fait une chute, si elle est endommagée, ai elle a ete laissee a
l’extérieur ou exposer a l’eau ou a l’humidite, rapporter la dans un centre technique avant de l’utiliser a nouveau.
6. Ne pas aspirer d’objets coupants ou trop durs, car ila pourraient endommager le exible, la sac à pouesiére ou le moteur.
7. Ne pas utiliser sans sac à poussière, ltre tissue et les autres ltreas,tous correctement adjustes.
8. Ne pas utiliser l ‘aspirateur aur une moquette ou tapis à poils longs fe ux d’extraction s’en trouve réduit et le moteur va
surchauffer.
9. Ne pas utiliser si la corde ou la prise sont endommagées.
10. Le cordon d’alimentation ne doit pas être tordu ni pince.
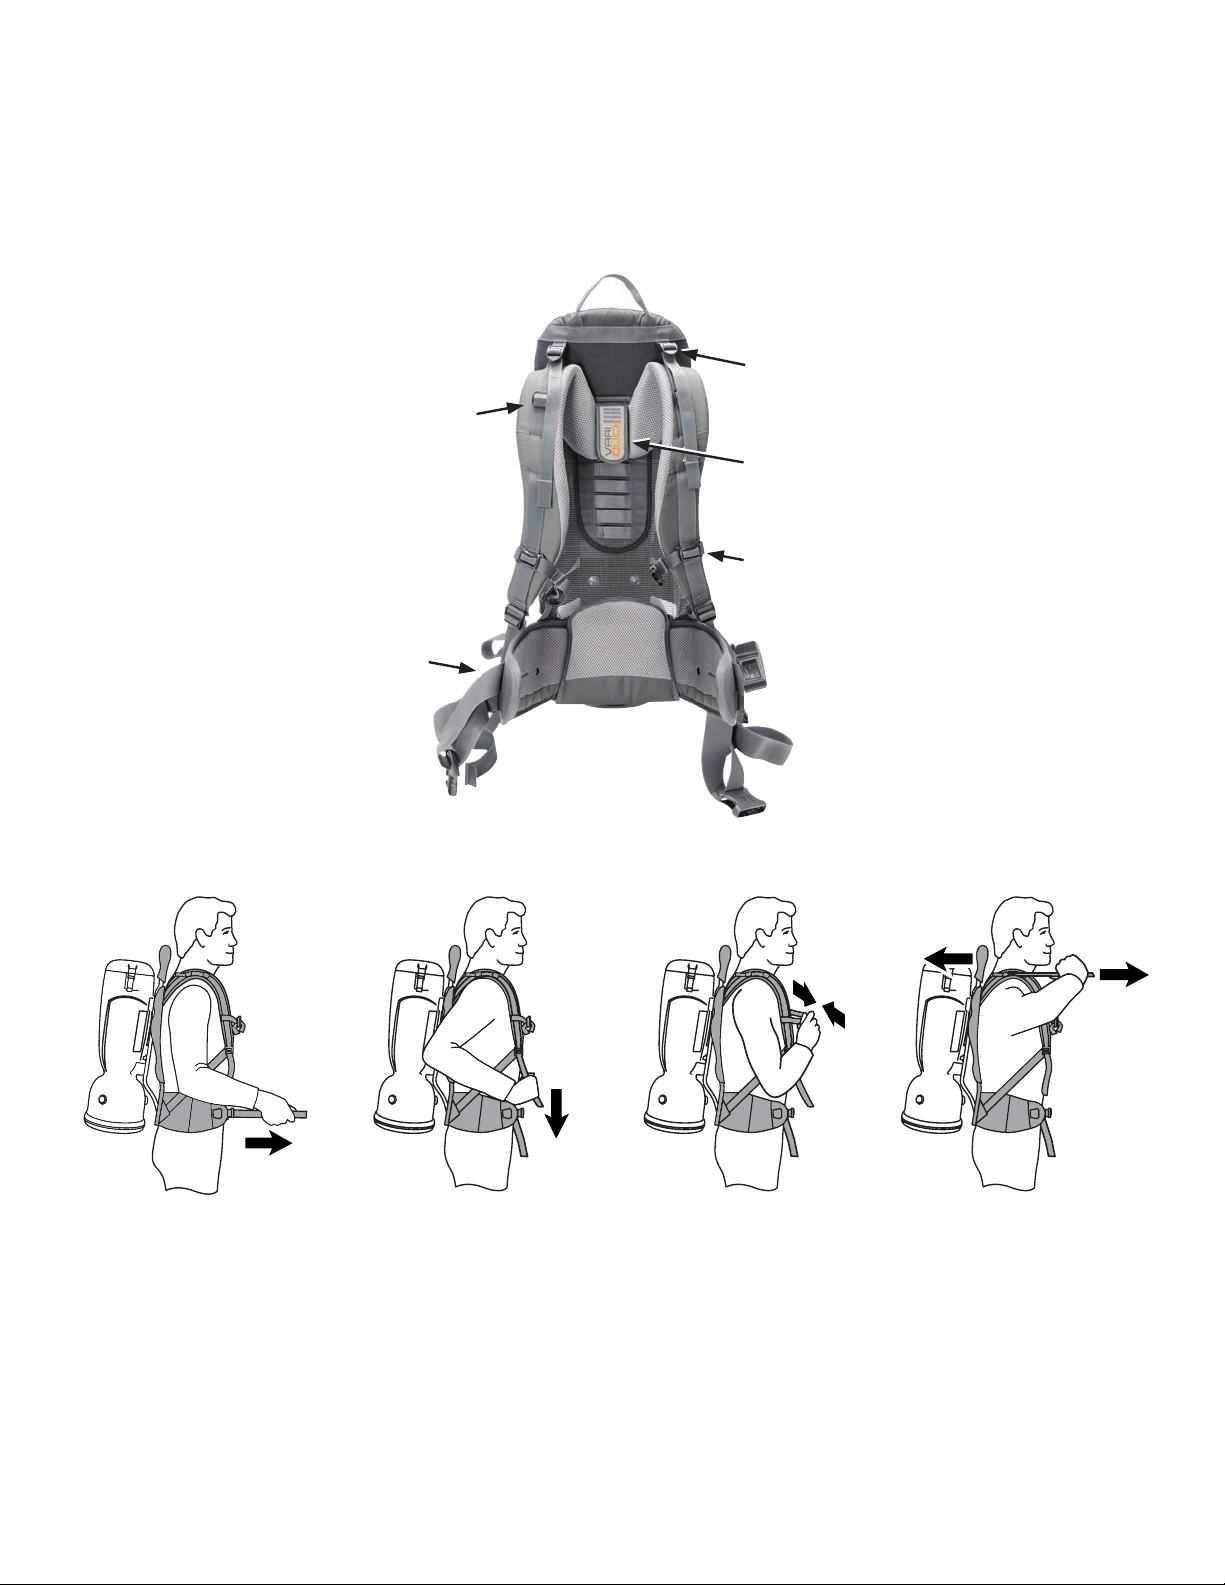
11. Ne pas tirer ou porter l’appareil par le cable, ne pas utiliaer le cable comme une poignee, ne pas fermer une porte dessus,
ou faire passer le cable dans des bords ou des coins saillants. Ne faites pas rouler l’aspirateur pas-dessus le cable.
Éloigner le cable des sources de chaleur.
12. Ne pas tirer sur le cable pour débrancher la prise. Saisir et débrancher la prise, pas le cable. Arreter l’aspirateur avant de le
débrancher.
13. Ne pas manipuler le cable, la prise, l’interrupteur pour l’aspirateur avec les mains mouillées.
14. Ne pas brancher sur une prise électrique dont la puissance en Volts n’est pas adaptée.
15. Ne pas utiliser de rallonge électrique avec cet aspirateur.
16. N’introduire aucun object dans les orices. Ne pas utiliser ai l’un des orices est bouchè; dègager toute poussière,
peluches, cheveu et quoi que ce soit qui puisse réduire le ux d’air
17. Eloigner cheveux, vêtements, doigts, et toutes parties du corps des orices ainsi que des parties amovibles.
18. Être extremement attentif lors du nettoyage d’escaliers.
19. Ne pas aspirer de particules inammables ou combustibles, ou toute autre matiere incandescente ou fumante, comme les
cigarettes, les allumettes ou le contenu d’un cendrier encore chaud.
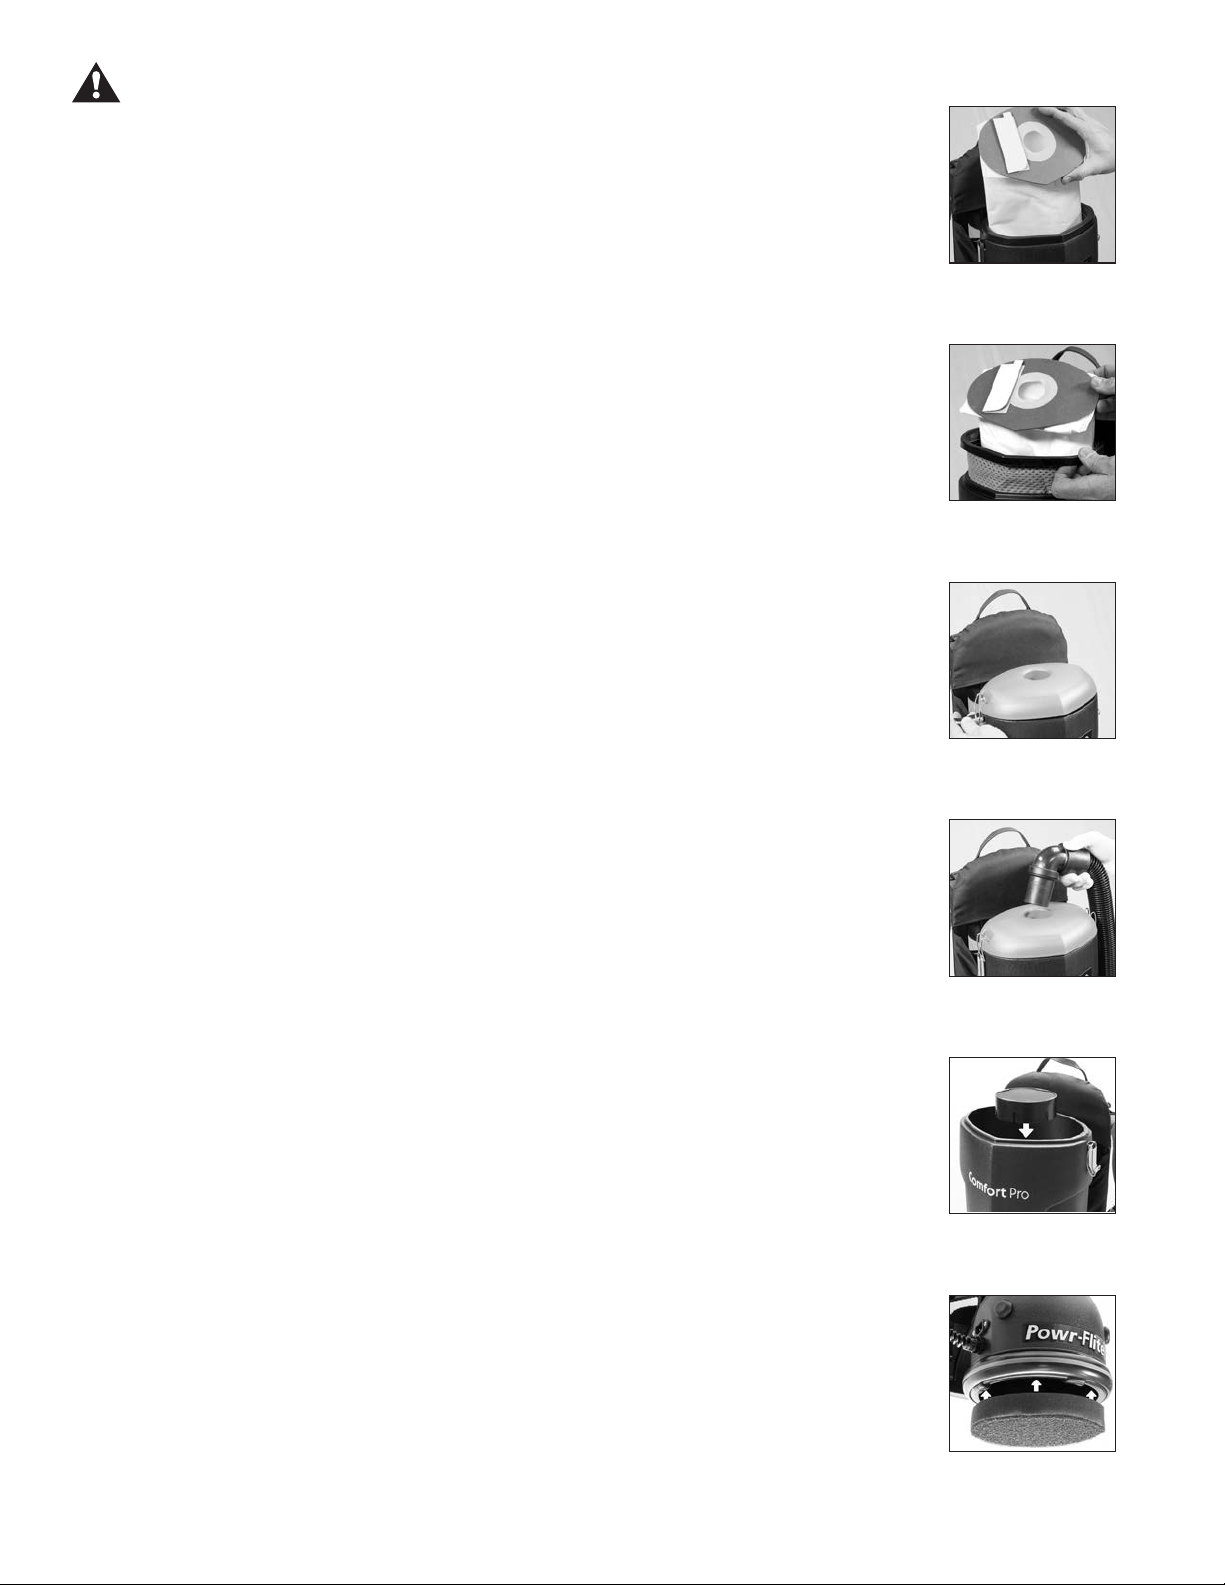
20. Ne pas utiliser sans un sac à poussière correctement positionné.
21. Les étincelles a l’interieur du poteur peuvent enammer les vapeurs d’un produit ou d’une poussières inammables. Pour
réduire ce risque de feu ou d’explosion, ne pas utiliser a proximite d’un liquide combustible, d’une source de gaz ou de
poussières, d’une reserve de carburant (gazoil, et autres carburants); liquide uorescents, produits de nettoyage, peintures
et derives, gaz naturel.
22. Pour éviter tout risque d’inhalation de vapeurs toxiques ne pas utiliser l ‘aspirateur a proximite de produits toxiques ou
inconnus.
23. Eloigner les enfants et les personnes non-autorisées de l’appareil lorsqu’il est en marche.
24. Cet appareil n’est pas étudié pour être utilisé par des personnes a mobilite reduite ou decience men- tale, ou manquant
d’expérience ou de formation.
25. Ne pas tenter de réparer l’aspirateur vous-même. Toute intervention réalisée par une autre personne que les techniciens
des centres technique agréé entrainera l’annulation de la garantie.
26. Stocker l’aspirateur a l’interieur dans une piece fraiche et séche.
Lisez toutes les instructions avant de l’utiliser . Conserver ces instructions . Suivre
les instructions de nettoyage prolonger la vie de votre aspirateur Powr - Flite
Lors de l’utilisation d’un appareil électrique, certainies précautions de base être suivies.

6
This vacuum must be grounded! Grounding is a safety measure to reduce the risk of electrical shock to the operator
should the machine malfunction or stop working. Grounding provides the path of least resistance for electric current
and will trip the circuit breaker, stopping the flow of electricity.
This unit is equipped with a cord that has an equipment-grounding conductor and grounding plug. The plug must
be inserted in an appropriate outlet that is properly installed and grounded in accordance with all local codes and
ordinances. Cutting off the ground wire or using a cord that is not equipped with a ground plug will void the warranty
on the unit. Powr-Flite will accept NO liability associated with the unit.
The vacuums are for use on a nominal 120-volt circuit, and have a grounded plug that looks like the plug illustrated
in Figure A. A temporary adapter that looks like the adapter illustrated in Figure B and C may be used to connect this
plug to a 2-pole receptacle as show in Figure B if a properly grounded outlet is not available. The temporary adapter
should be used only until a properly grounded outlet (Figure A) can be installed by a qualified electrician. The green
colored rigid ear, lug, or the like, extending for the adapter must be connected to a permanent ground such as a
properly grounded outlet box cover. Whenever the adapter is used, it must be held in place by a metal screw.
Note: In Canada, the use of a temporary adapter is not permitted by the Canadian Electrical Code.
The replacement or repair of damaged wiring should only be performed by a qualified
electrician or service engineer from the manufacturer or authorized service center.
groundIng InStructIonS
Improper connection of the equipment-grounding conductor can result in a risk of
electric shock. Check with a qualified electrician or service person if you are in doubt
as to whether the outlet is properly grounded. Do not modify the plug provided with
the appliance. If it will not fit the outlet, have a proper outlet installed by a qualified
electrician.
WARNING!
WARNING!
CONNECT TO A PROPERLY GROUNDED OUTLET ONLY!
See Grounding Instructions

7
oPeratIng InStructIonS
Please read the following instructions carefully. They will help to get the best performance from this professional commer-
cial vacuum cleaner and to maintain it in optimum condition. Always make sure the main power of the vacuum is off and
the unit is not plugged in when doing any maintenance on the vacuum.
Preparing To Vacuum
1. Remove vacuum hose from top of unit. (Fig. 1)
2. Release the two latches and lift off lid. (Fig. 2)
3. Ensure Micro Cloth bag is fully seated on Comfort Pro tank
housing. (Fig. 3)
4. Fold the bottom 2” of the HEPA bag up and hold into place.
(Fig. 4)
5. Insert HEPA bag inside of micro cloth bag. (Fig.5)
6. Squeeze bag just below the cardboard collar and drop onto
rubber gasket. (Fig. 6)
7. Ensure that white bag is not protruding under cardboard collar.
(Fig. 7)
8. NOTE: Cardboard must be properly seated inside gasket
groove. Cardboard will be ush with gasket. (Fig. 8)
9. Replace lid, lock down the two latches and install hose.
(Fig. 9).
10. Ensure the extension cord is wrapped around the cord retainer
on the harness with 6 inches of cord from the retainer to the
end of the plug. (Fig. 10)
Always use the cord retainer. There is
a risk of electrical shock/damage to the
backpack vacuum if cord retainer is not
used. (Fig. 10)
11. Then plug the extension cord to the plug receptacle.
12. Store the power cord on the cord hook located on the harness
after each use. (Fig. 11)
800.880.2913
WARNING!
IMPORTANT!
PERFORM PROPER INSTALLATION OF HEPA BAGS AND CORD
IN COMFORT PRO BACKPACK VACUUMS.
1. 2.
3.
5.
4.
7. 8.
9. 10.
11.
6.

8
Always unplug machine before cleaning, or making any
adjustments or repairs.
The backpack vacuum has four levels of ltration: the paper vacuum bag, a micro
cloth lter, a pre-motor lter and an exhaust lter. These bags and lters capture
ne dust particles and protect the motor from dirt. It is important to replace the
paper bag when it is no more than ½ full and to clean the lters on a regular
schedule and replace as necessary.
Paper Vacuum Bag
1. Remove paper bag. Insert a new paper bag into the cloth bag, making sure the
cardboard disk is centered on the exible sealing ring. When you replace the lid,
the short nozzle in the center of the lid will be closed over the central hole of the
cardboard disk of the paper vacuum bag providing a seal. (Fig. A)
2. Replace the lid. Fasten latches and replace hose. (Figs. C-D)
Micro Cloth Filter
After each use, the cloth lter bag should be inspected.
3. Remove the micro cloth bag, clean and replace. (Fig. B)
4. Replace paper vacuum bag and lid. Fasten latches and insert hose. (Figs. C-D)
Pre-Motor Filter
The pre-motor lter is located under the micro cloth lter. Inspect after each use.
The lter can be washed using cold water and no detergent. Lay at to dry. Replace
every 6 months.
5. Remove the lid, the paper vacuum bag, and the cloth bag to expose the pre-
motor lter.
6. Remove the foam pre-motor lter from the dust compartment, clean and replace.
If lter is extremely dirty, rinse out and air dry before replacing back into vacuum.
(Fig. E)
7. Reinstall the cloth bag, the paper vacuum bag and replace the lid, fasten latches
and insert the hose. (Figs. C-D)
Exhaust Filter
The exhaust lter is an easy-access washable, reusable post-motor lter located on
the bottom of the vacuum. For average use of the vacuum, remove and clean the
exhaust motor lter every 3 months. The lter can be rinsed using cold water and
no detergent. Lay at to dry. Replace once a year.
8. Remove the foam post motor lter, clean and replace.
9. Reinstall the lter at the bottom of the vacuum. (Fig. F)
800.880.2913
WARNING!
C.
D
A.
E.
B.
F.

9
800.880.2913
3. Place the hip belt over your hip and connect the buckle. Your hip bones should be centered between the top and
bottom of the belt. Pull the straps forward to tighten the hip belt. (Fig. 1)
4. Pull down the shoulder straps to tighten the backpack on your shoulders. (Fig. 2) Do not tighten too tight. The main
weight of the vacuum should be on the hip belt. The anchor points of the shoulder straps should ideally be between the
shoulder blades. Adjust the Vari-Quick height adjuster if necessary to properly place the vacuum to your back length.
5. Adjust the sternum strap on a comfortable part of your chest and close the strap. (Fig. 3)
6. Loosen or tighten the stabilizer straps as needed, to t your back. (Fig. 4)
7. Do nal adjustments on the shoulder and stabilizer straps as needed to balance the weight of the vacuum on the hips.
Wearing the Backpack Vacuum
The backpack is designed to balance the weight of the vacuum on the hips, not the shoulders.
1. Adjust the Vari-Quick height adjuster to your back length.
2. Loosen all of the straps and place the vacuum on your back.
Stabilizer Straps
VariQuick Height Adjuster
Shoulder Straps
Sternum Strap
Hip Belt
FIG. 1 FIG. 2 FIG. 3 FIG. 4

10
Powr-Flite.com
Active Cooling (Premium Model)
To turn Active Cooling on, raise silver metal bar. (Fig. 5)
Warm air will be pulled into machine and circulate cooler air through mesh on Deuter harness.
Active Cooling can be turned off by lowering silver metal bar. (Fig. 6)
Active Cooling can stay open all the time.
OPEN
CLOSED
FIG. 5
FIG. 6

11
©Powr-Flite, All Rights Reserved
Before Each Use
1. Inspect power cord for fraying, cuts or damage; do not use if damaged.
2. Verify that paper vacuum bag is installed.
3. Place the hip belt over your hip and connect the buckle. Your hip bones should be centered between the top and
bottom of the belt. Pull the straps forward to tighten the hip belt.
4. Pull down the shoulder straps to tighten the backpack on your shoulders. Do not tighten too tight. The main weight of
the vacuum should be on the hip belt. The anchor points of the shoulder straps should ideally be between the shoulder
blades. Adjust the Vari-Quick height adjuster if necessary to properly place the vacuum to your back length.
5. Adjust the sternum strap on a comfortable part of your chest and close the strap.
6. Loosen or tighten the stabilizer straps as needed, to t your back.
7. Do nal adjustments on the shoulder and stabilizer straps as needed to balance the weight of the vacuum on the hips.
After Each Use
1. Unplug cord from wall outlet by pulling on the plug - not the cord.
2. Lay plug on ground.
3. Start at machine and loosely wrap (loop) power cord.
4. Secure the end of the power cord to itself using latch on the plug of the power cord.
5. Hang cord on cord hook.
Periodic Maintenance
1. Inspect all electrical connections.
2. Check the power cord for any breaks, fraying, separations, or cuts.
3. Make sure the ground pin or grounding prong is intact.
If the vacuum will not turn on:
1. Make sure the power cord is rmly connected to the unit and is in good condition.
2. Check sure the power cord is rmly seated in the wall outlet.
3. Check to see if the building circuit breaker is tripped. If circuit is overloaded, move
the unit to another circuit.
The backpack vacuum has been tted with a thermal overload switch to protect the
motor against damage should the airow be blocked for extended periods. This may
occur if the vacuum bag is overfull, the micro cloth bag is clogged, or if the vacuum
hose or exhaust is blocked. The vacuum motor will stop before it can get too hot. If this
happens, empty and thoroughly clean the vacuum bag and lters, or free any blockage
and ensure that adequate airow is restored. After the motor has cooled to a safe
operating temperature, locate the thermal reset switch on the bottom of the unit, under
the post motor lter and push it back in. There will be a slight audible click. Now the
motor will restart.
trouble ShootIng
MaIntenance
Routine maintenance can signicantly increase the life of your backpack vacuum. The applications and amount
of use varies, so the recommendations listed below are for average-to-high volume use. Constant operation may
require additional maintenance.

12
SPecIfIcatIonS
Specications and parts are subject to change without notice.
Please refer to www.Powr-Flite.com for the latest schematic drawing and parts list.
PRODUCT SPECIFICATIONS
MODEL
COMFORT PRO 6 COMFORT PRO 10 COMFORT PRO 6 PREMIUM COMFORT PRO 10 PREMIUM
ITEM#
BP6S BP10S BP6P BP10P
TOOL KIT*
Standard Standard Hands-Free Hands-Free
BODY
High Density Polyethylene High Density Polyethylene High Density Polyethylene High Density Polyethylene
DIMENSIONS (L X W X H)
10 in x 12.5 in x 26.5 in
25.4 cm x 31.8 cm x 67.3 cm
13” x 11.5” x 26.5”
33 cm x 29.2 cm x 67.3 cm
10 in x 12.5 in x 26.5 in
25.4 cm x 31.8 cm x 67.3 cm
13” x 11.5” x 26.5”
33 cm x 29.2 cm x 67.3 cm
MACHINE WEIGHT (LBS. / KG)
8.62 lbs. / 3.22 kg 9.62 lbs. / 4.3636 kg 8.75 lbs. / 3.9689kg 9.75 lbs. / 4.4225 kg
HARNESS WEIGHT (LBS. / KG)
3.2 lbs. / 1.45 kg 3.2 lbs. / 1.45 kg 3.2 lbs. / 1.45 kg 3.2 lbs. / 1.45 kg
CORD LENGTH / TYPE
50 ft. / 15 m, direct plug 50 ft. / 15 m, direct plug 50 ft. / 15 m, direct plug 50 ft. / 15 m, direct plug
CAPACITY (QUARTS / LITERS)
6 qt. / 5.69 l 10 qt. / 9.46 l 6 qt. / 5.69 l 10 qt. / 9.46 l
FILTRATION
5 stage HEPA 5 stage HEPA 5 stage HEPA 5 stage HEPA
WATERLIFT
110 in. / 279 cm 110 in. / 279 cm 110 in. / 279 cm 110 in. / 279 cm
CFM /CMM
130 cfm / 3.68 cmm 130 cfm / 3.68 cmm 130 cfm / 3.68 cmm 130 cfm / 3.68 cmm
CLEANING PRODUCTIVITY
7,407 sq. feet per hour
688 sq. meters per hour
7,407 sq. feet per hour
688 sq. meters per hour
7,407 sq. feet per hour
688 sq. meters per hour
7,407 sq. feet per hour
688 sq. meters per hour
SOUND LEVEL
62 dBa 62 dBa 62 dBa 62 dBa
VACUUM MOTOR
1200 W / 10 Amp 1200 W / 10 Amp 1200 W / 10 Amp 1200 W / 10 Amp
POWER
120V / 60Hz 120V / 60Hz 120V / 60Hz 120V / 60Hz
APPROVALS
CRI Gold Level Approved CRI Gold Level Approved CRI Gold Level Approved CRI Gold Level Approved
230V AVAILABLE
Yes Yes Yes Yes
10 quart model
6 quart model

13
tool kItS
Standard Tool Kit
Fits: BP6S - BP10S
J1006
4′ Rigid Hose
W/90° Bend & Cuff
CT194
Powr-Glide
Carpet Tool
W/Clip
B352-PF10
Carpet Tool
W/Clip
CT184
3″ Dusting Tool
W/Clip
C352-PF20
Hard Floor Tool
W/Clip
CT188
5″ Upholstery Tool
W/Clip
CT176
17″ Crevice Tool
W/Clip
CT171
2 Bend Wand
Premium Tool Kit
Fits: BP6P - BP10P
J1005
2'- 6' Stretch Hose
W/90° Bend & Cuff
CT184
3″ Dusting Tool
W/Clip
C352-PF20
Hard Floor Tool
W/Clip
CT188
5″ Upholstery Tool
W/Clip
CT176
17″ Crevice Tool
W/Clip
CT170
Single Bend Telescopic Wand W/Clip
J1007
1 Bend Adapter
CT194
Powr-Glide
Carpet Tool
W/Clip
B352-PF10
Carpet Tool
W/Clip
To properly attach one-bend
adapter (#J1007) to the one-bend
telescopic wand (#CT170):
Install the adapter on the wand with
the line pointing to the center of the
notches on the wand.
Install oor tool onto adapter and
tighten plastic nut to secure.
Install the oor tool to the end of the
wand. Align the brass ring with the
groove on the oor tool to ensure a
secure t.
Tools
Item# TK58
Tools
Item# TK57

14
toolS ScheMatIcS and PartS lISt

15
PREMIUM TOOL KIT - FITS BP6P - BP10P
ITEM DESCRIPTION PART NO. OTY
1 CARPET TOOL W/CLIP B352-PF10 1
2 HARD FLOOR TOOL W/CLIP C352-PF20 1
3SINGLE BEND TELESCOPING WAND W/CLIP CT170 1
4 17" CREVICE TOOL W/CLIP CT176 1
5 3" DUSTING TOOL W/CLIP CT184 1
6 5" UPHOLSTERY TOOL W/CLIP CT188 1
7 POWR-GLIDE CARPET TOOL W/CLIP CT194 1
8A 2' - 6' STRETCH HOSE W/90° CUFF J1005 1
9 ONE BEND WAND ADAPTOR J1007 1
10 POWR-GLIDE CARPET TOOL BODY W/CLIP CT190 1
11 90 DEGREE SWIVEL CUFF J1004 1
STANDARD TOOL KIT - FITS BP6S - BP10S
ITEM DESCRIPTION PART NO. OTY
1 CARPET TOOL W/CLIP B352-PF10 1
2 HARD FLOOR TOOL W/CLIP C352-PF20 1
3A DOUBLE BEND WAND CT171 1
4 17" CREVICE TOOL W/CLIP CT176 1
5 3" DUSTING TOOL W/CLIP CT184 1
6 5" UPHOLSTERY TOOL W/CLIP CT188 1
7 POWR-GLIDE CARPET TOOL W/CLIP CT194 1
8 4' CRUSH PROOF HOSE W/90° CUFF J1006 1
10 POWR-GLIDE CARPET TOOL BODY W/CLIP CT190 1
11 90 DEGREE SWIVEL CUFF J1004 1

16
ScheMatIc – bP6S - bP10S
14
13
15
16
17 18
19
20
22
20
21
23
24
25
26
30
29
31
32
33
34
35
36
38
37
39
40
41
42
43
43
44
44
46
47
48
49
50
51
52
54
53
55
57
58 59
60
2
1
3
4
5
6
7
8
10
9
11
12
62
61

17
PartS lISt - bP6S - bP10S
ITEM DESCRIPTION PART NO.
1 #6 FLAT WASHER ZP 01575
2 HARNESS MOUNTING WASHER 02568
3 WASHER #10 INT TOOTH, LOCK 7CY001
4 LID LATCH A352-3300
5FEMALE RIVOT FOR BELT PANEL A352-9401
6 BELT PANEL MOUNTING SCREW A352-9402
7 THERMAL RESET SWITCH B333-0400B
85.1" VACUUM MOTOR B395-2000
9 STRAIN RELIEF PD8
10 SMALL MADE IN THE USA LABEL X1004
11 PLUG COVER, COMFORT PRO X1042
12 8-32 POST MOLD INSERT X1075
13 12A CIRCUIT BREAKER X1141
14 BACKPACK SWITCH ASSEMBLY X1151
15 PAN HEAD SHOULDERED PHILLIPS M4X7 BLACK X1257
16 NEOPRENE RUBBER NUT X1466
17 NUT, LOCK, 1/2" STEEL CONDUIT X8008N
18 6-32 NYLON LOCK NUT X8257
19 10-24 NYLON LOCK NUT ZP X8271
20 SCREW 8-32 X 1/2 PAN X8278
21 BOLT 1/4-20 X 1" HEX X8282
22 LABEL, SERIAL NUMBER, PLAIN X8459
23 MOUNTING RIVOT X8946
24 GASKET 3/8" DONUT MOTOR SEAL X9079
25 DEUTER HARNESS X9658
26 HOUSING 10QT COMFORT VAC WITH FILTER X9663-F
27 HOUSING 6QT COMFORT VAC WITH FILTER X9664-F
28 10 QUART LID X9665
29 6 QUART LID X9666
30 EXHAUST FILTER PLATE X9667
31 MOTOR SHIELD X9669
32 HARNESS FRAME X9670
33 MOTOR MOUNTING BRACKET X9671
34 BELT CLIP PANEL X9672
35 8-18 3/4 LONG HI LO SCREW X9676
36 PLUG RECEPTICLE X9677
37 6 QUART CLOTH BAG X9679
38 RUBBER MOTOR MOUNT X9681
39 EXHAUST FILTER X9682
40 MOTOR PLATE GASKET X9684
41 HOUSING BUMPER X9685
42 POWR-FLITE LABEL X9687
43 MOTOR MOUNTING BOLT X9688
44 8-18 HI-LO SCREW X9690
45 10 QUART SMS BAG X9692
46 9" LONG PIPE INSULATION X9693
47 WARNING LABEL X9697
48 HARNESS LABEL X9698
49 MOTOR MOUNTING WELDNUT X9713
ITEM DESCRIPTION PART NO.
50 18 GAGE 50' YELLOW EXTENSION CORD X9714
51 CORD HOOK X9718
52 COMFORT PRO LABEL X9729
53 SCREW CAP BASE X9733
54 SCREW CAP X9734
55 6 QUART HEPA BAG X9739
56 10 QUART HEPA BAG X9740
57 CRI GOLD LABEL X9742
58 10-24 X 1.75" PHIL PAN HEAD SCREW BLACK X9746
59 #10 USS FLAT WASHER BLACK X9747
60 6-32 X 5/8 PHIL PAN SCREW BLACK X9748
61 MOTOR RESET LABEL X9755
62 RIVET X9758

18
14
13
15
16
17
18
19
20
22
21
23
24
25
26
27
28
30
32
33
34
35
36
38
37
39
40
41
42
43
44
46
46
45
45
48
49
50
51
52
54
53
55
56
57
58
59
2
1
3
4
5
6
7
8
10
9
11
12
62
61
63
64
65
66
67
68
ScheMatIc – bP6P - bP10P

19
PartS lISt - bP6P - bP10P
ITEM DESCRIPTION PART NO.
1 #6 FLAT WASHER ZP 01575
2 HARNESS MOUNTING WASHER 02568
3 SCREW, 1/4-20X1/2 PHIL PAN BLACK 18-8 SS 7BS003-BLK
4 WASHER #10 INT TOOTH, LOCK 7CY001
5 LID LATCH A352-3300
6FEMALE RIVOT FOR BELT PANEL A352-9401
7 BELT PANEL MOUNTING SCREW A352-9402
8 THERMAL RESET SWITCH B333-0400B
95.1" VACUUM MOTOR B395-2000
10 STRAIN RELIEF PD8
11 SMALL MADE IN THE USA LABEL X1004
12 PLUG COVER, COMFORT PRO X1042
13 8-32 POST MOLD INSERT X1075
14 12A CIRCUIT BREAKER X1141
15 BACKPACK SWITCH ASSEMBLY X1151
16 PAN HEAD SHOULDERED PHILLIPS M4X7 BLACK X1257
17 NEOPRENE RUBBER NUT X1466
18 NUT, LOCK, 1/2" STEEL CONDUIT X8008N
19 SCREW #8 X 3/8 PHIL PAN TYPE B X8201
20 6-32 NYLON LOCK NUT X8257
21 10-24 NYLON LOCK NUT ZP X8271
22 SCREW 8-32 X 1/2 PAN X8278
23 BOLT 1/4-20 X 1" HEX X8282
24 LABEL, SERIAL NUMBER, PLAIN X8459
25 MOUNTING RIVOT X8946
26 GASKET 3/8" DONUT MOTOR SEAL X9079
27 DEUTER HARNESS X9658
28 HOUSING 10QT COMFORT VAC WITH FILTER X9663-F
29 HOUSING 6QT COMFORT VAC WITH FILTER X9664-F
30 10 QUART LID X9665
31 6 QUART LID X9666
32 EXHAUST FILTER PLATE X9667
33 MOTOR SHIELD X9669
34 HARNESS FRAME X9670
35 MOTOR MOUNTING BRACKET X9671
36 BELT CLIP PANEL X9672
37 8-18 3/4 LONG HI LO SCREW X9676
38 PLUG RECEPTICLE X9677
39 6 QUART CLOTH BAG X9679
40 RUBBER MOTOR MOUNT X9681
41 EXHAUST FILTER X9682
42 MOTOR PLATE GASKET X9684
43 HOUSING BUMPER X9685
44 POWR-FLITE LABEL X9687
45 MOTOR MOUNTING BOLT X9688
ITEM DESCRIPTION PART NO.
46 8-18 HI-LO SCREW X9690
47 10 QUART SMS BAG X9692
48 9" LONG PIPE INSULATION X9693
49 AC GASKET COMFORT PRO X9695
50 WARNING LABEL X9697
51 HARNESS LABEL X9698
52 AHE LEVER X9699
53 MOTOR MOUNTING WELDNUT X9713
54 18 GAGE 50' YELLOW EXTENSION CORD X9714
55 SOUND DAMPING FOAM RING X9717
56 CORD HOOK X9718
57 COMFORT PRO LABEL X9729
58 SCREW CAP BASE X9733
59 SCREW CAP X9734
60 6 QUART HEPA BAG X9739
61 10 QUART HEPA BAG X9740
62 CRI GOLD LABEL X9742
63 10-24 X 1.75" PHIL PAN HEAD SCREW BLACK X9746
64 #10 USS FLAT WASHER BLACK X9747
65 6-32 X 5/8 PHIL PAN SCREW BLACK X9748
66 MOTOR RESET LABEL X9755
67 AC LEVER LABEL X9756
68 RIVET X9758

A Tacony Company
3101 Wichita Court • Ft. Worth, TX 76140-1755
1-800-880-2913 • Fax: 1-817-551-0719 • www.Powr-Flite.com
PoWr-flIte lIMIted Warranty
Powr-Flite will repair or exchange parts for your vacuum in the event of a
manufacturing defect as follows:
PARTS: New or comparable rebuilt parts, for one year after original
purchase. Lifetime warranty on molded body.
LABOR: Labor warranty for one year. Carry-in service can be obtained
during the warranty period by taking your vacuum to an Authorized Powr-Flite
Warranty Service Center.
IMPORTANT WARRANTY CONDITIONS: A purchase receipt or other proof
of date of original consumer purchase also will be required before warranty
service is rendered.
This warranty covers normal use and does not cover damage which occurs in
shipment or failure resulting from alteration, accident, misuse, abuse, neglect,
or improper maintenance.
STATEMENT: This warranty is not transferable and extends only to the
original purchaser when a new Powr-Flite vacuum is purchased from an
Authorized Powr-Fite Dealer. This warranty gives you specific legal rights,
and you may have other rights that vary from state to state.
X9712 5/2017
This manual suits for next models
5
Table of contents
Other Tacony Vacuum Cleaner manuals

Tacony
Tacony Riccar RPT-P1 User manual

Tacony
Tacony Powr-Flite Comfort Pro FREEDOM 6 CPF6 Series Installation and operation manual

Tacony
Tacony Truvox VBPIIe User manual

Tacony
Tacony TRUVOX Valet Battery Backpack User manual

Tacony
Tacony Simplicity S65 User manual

Tacony
Tacony Powr-Flite PF716DC User manual

Tacony
Tacony Powr-Flite PF712DC User manual

Tacony
Tacony TRUVOX INTERNATIONAL Valet Single Motor... User manual

Tacony
Tacony R30 User manual

Tacony
Tacony POWER-FLITE PF19SV Guide