Tanco I75 Service manual
OPERATOR’S
handbook
I75 - Multi Shear
I75/V.01-14-ENG
Innovation in Agricultural Machinery

1
Tanco Autowrap - I75 Multi Shear
Operator’s Manual
TABLE OF CONTENTS
Chapter Contents Page
1 SAFETY DECLAS 2
2 INTRODUCTION 3
3 TECHNICAL SPECIFICATIONS 5
4 SAFETY PRECAUTIONS 6
5 OPERATING INSTRUCTIONS 8
6 MAINTENANCE 12
7 GUARANTEE 13
8 DECLARATION OF CONFORMITY 14

Tanco Autowrap - I75 Multi Shear
Operator’s Manual
2
1. WARNING SIGNS / STICKERS
1. Read the operator’s manual carefully
3. Hoses are under pressure at all times
4. Ensure that nuts are kept tight at all times
2. Do not stand on or under implement
5. Danger Keep hands clear of sharp blades
5
3
1
4
2

3
Tanco Autowrap - I75 Multi Shear
Operator’s Manual
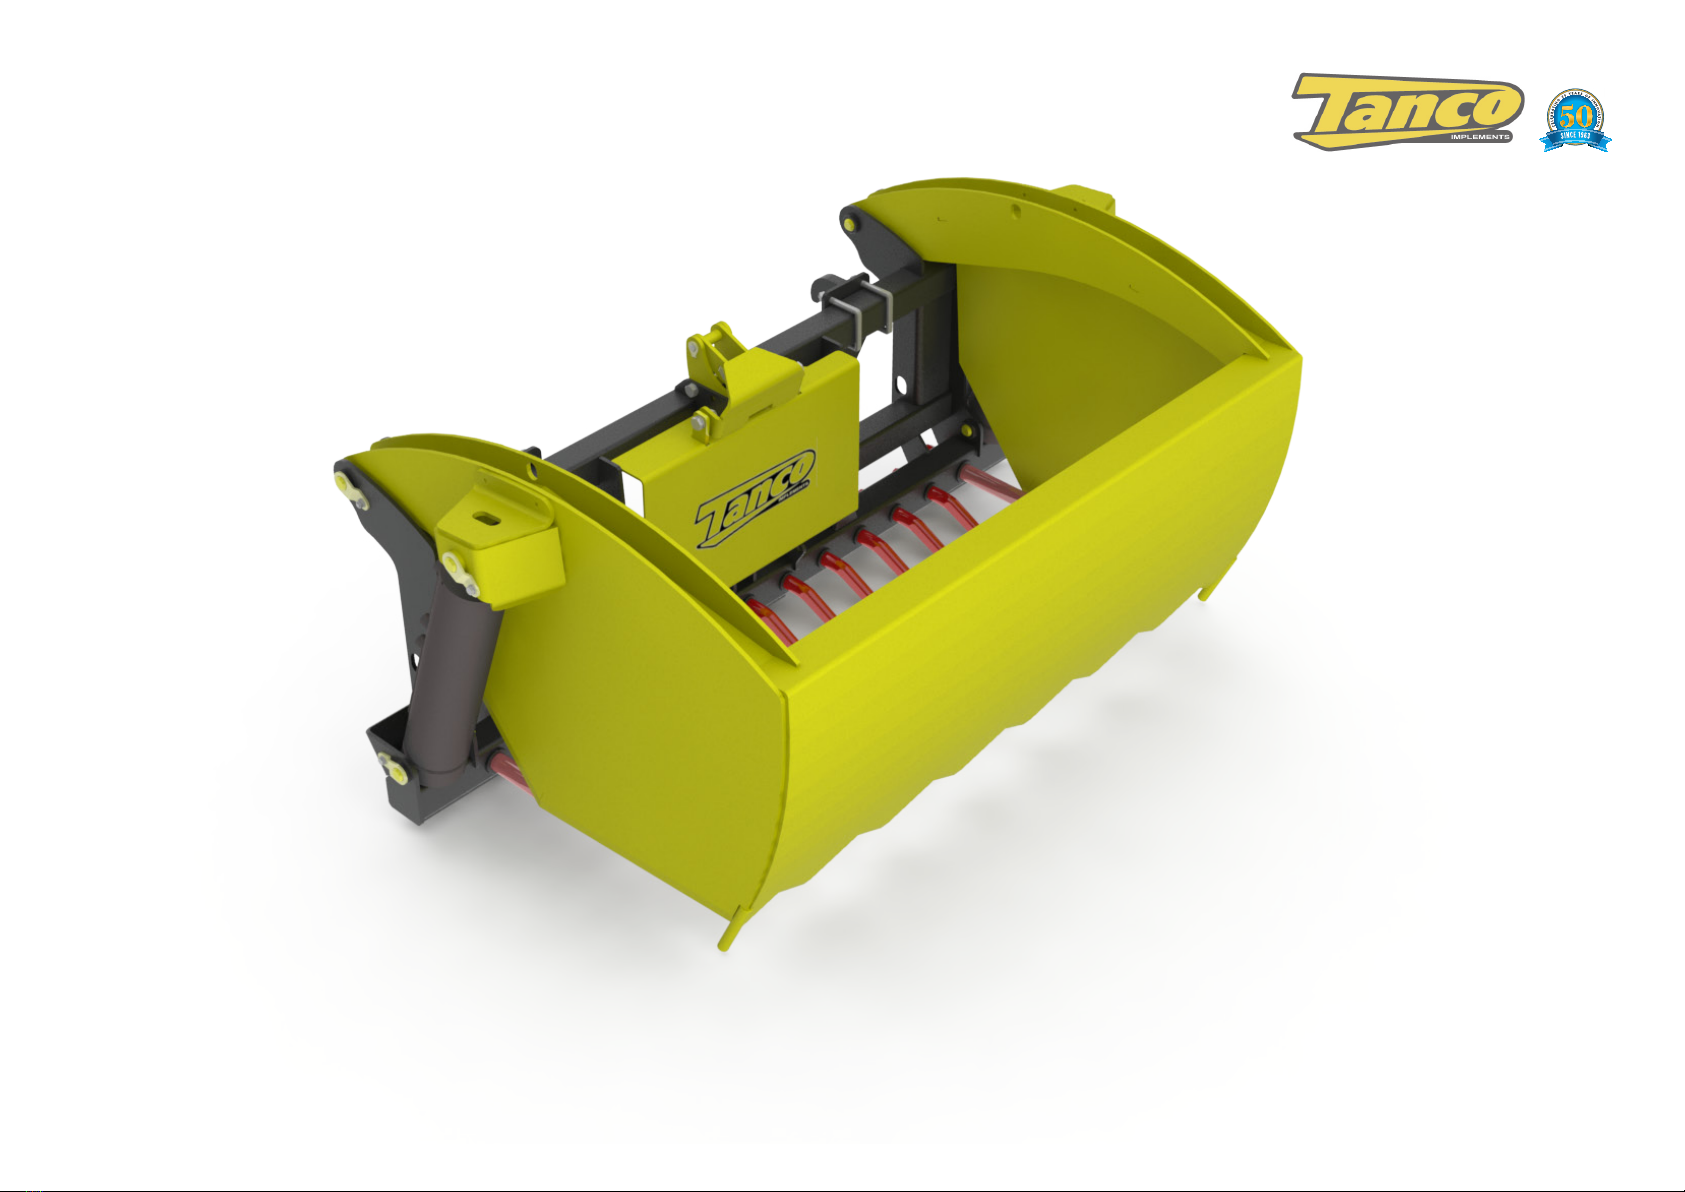
2. INTRODUCTION
Tanco Autowrap Ltd congratulates you on your choice of the TANCO AUTOWRAP I75 Multi Shear. We are certain you will be satised with the machine, and that you will have the pleasure
of your investment for many years.
The I75 Multi Shear system changes the way round bales are fed, making feeding this way ecient and economical. The I75 Multi Shear uses a Patented system for gripping the plastic
wrap whilst splitting the bale in half making it ideal for feeding round bales along feed passages and into diet feeders.
The fact that no knives are required to strip the plastic wrap o silage bales, has huge safety advantages, especially when getting o the tractor. It can slice hay, straw or silage bales with
consummate ease.
The unique system of automatic plastic grab and bale split, using just one standard hydraulic coupling, makes it ideal for front loader use. Chopping the bale in half when loading a
diet/feeder-wagon, makes for more ecient mixing and less wear and tear on the feeder.
Read carefully through this manual, and especially the safety instructions, before starting the machine. Follow the instructions thoroughly, if problems should occur, check the
troubleshooting guide to try to establish the problem. Ask your dealer for advice before you attempt anything that may make the problem worse.
Tanco Autowrap - I75 Multi Shear
Operator’s Manual
4
2. INTRODUCTION
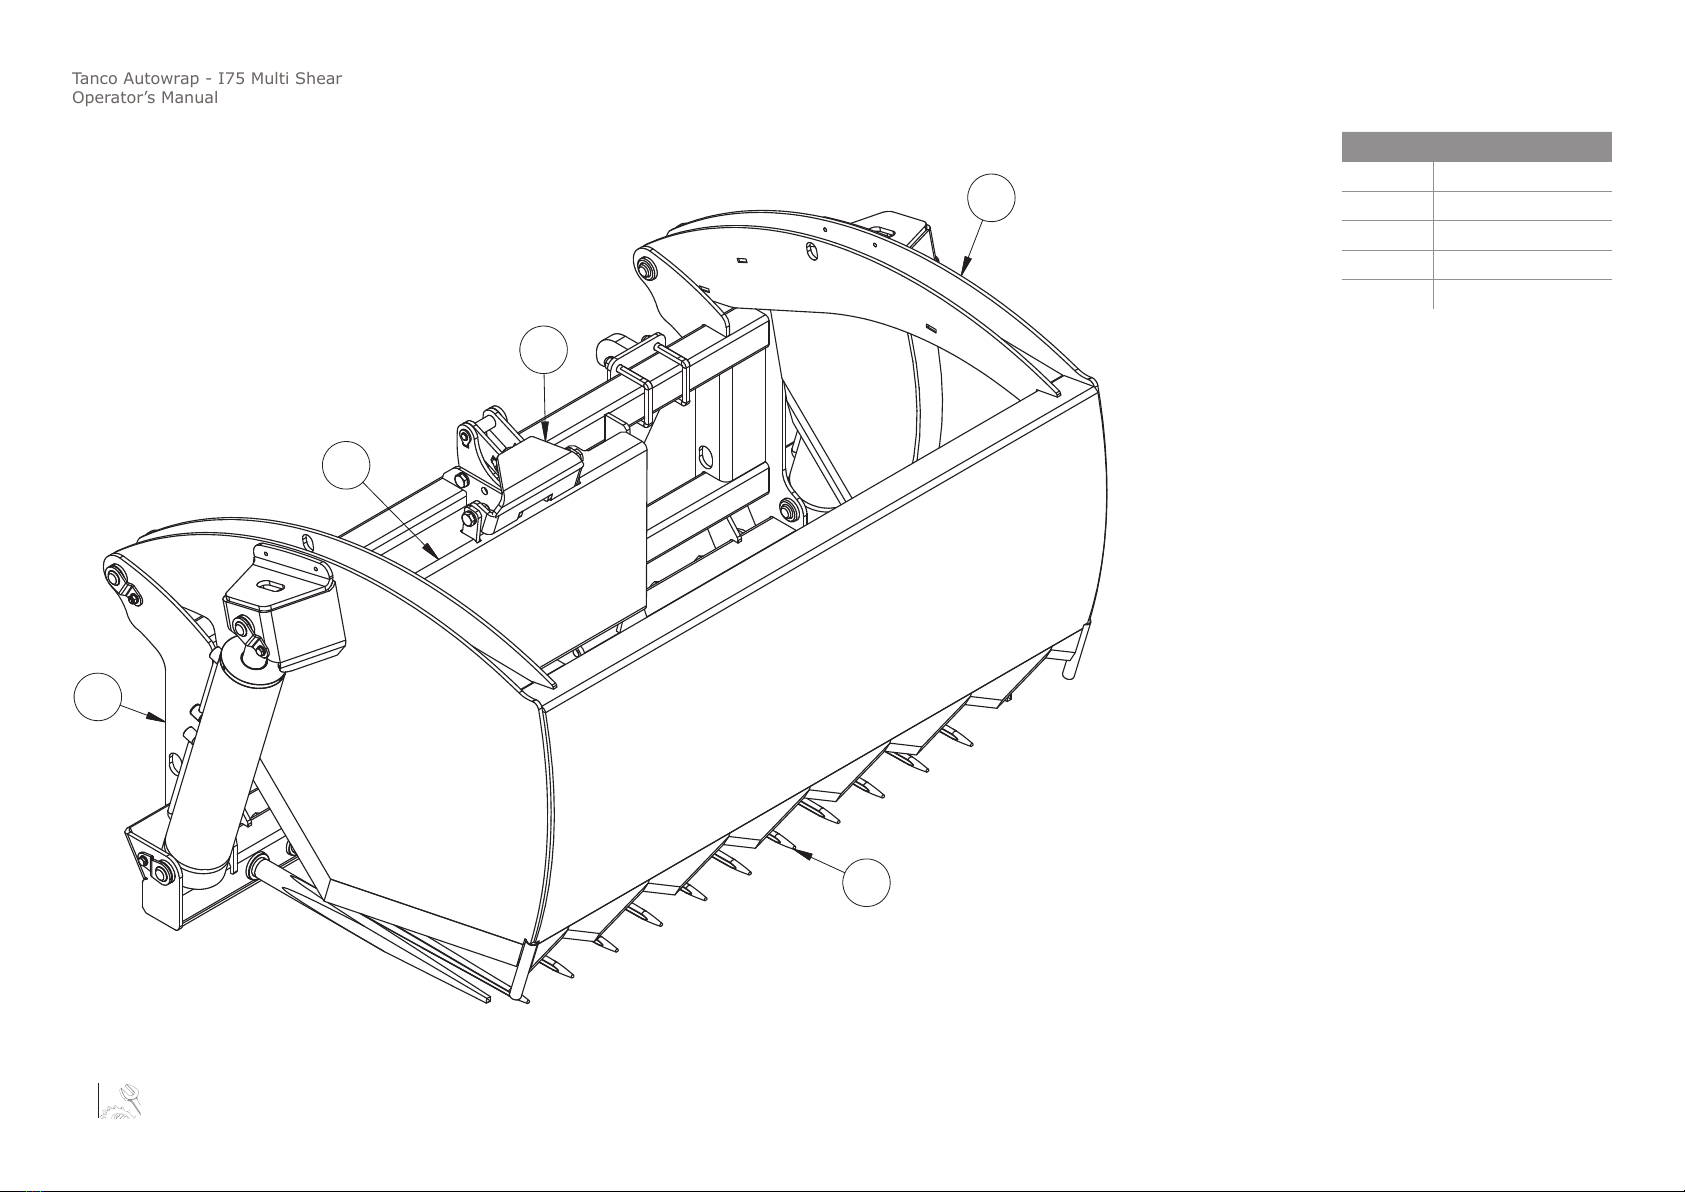
Item No. Description
1 Main Frame
2 Back Plate
3 Gripper Mechanism
4 Cutter Frame
5 Bale Tine
2
3
4
5
1
5
Tanco Autowrap - I75 Multi Shear
Operator’s Manual
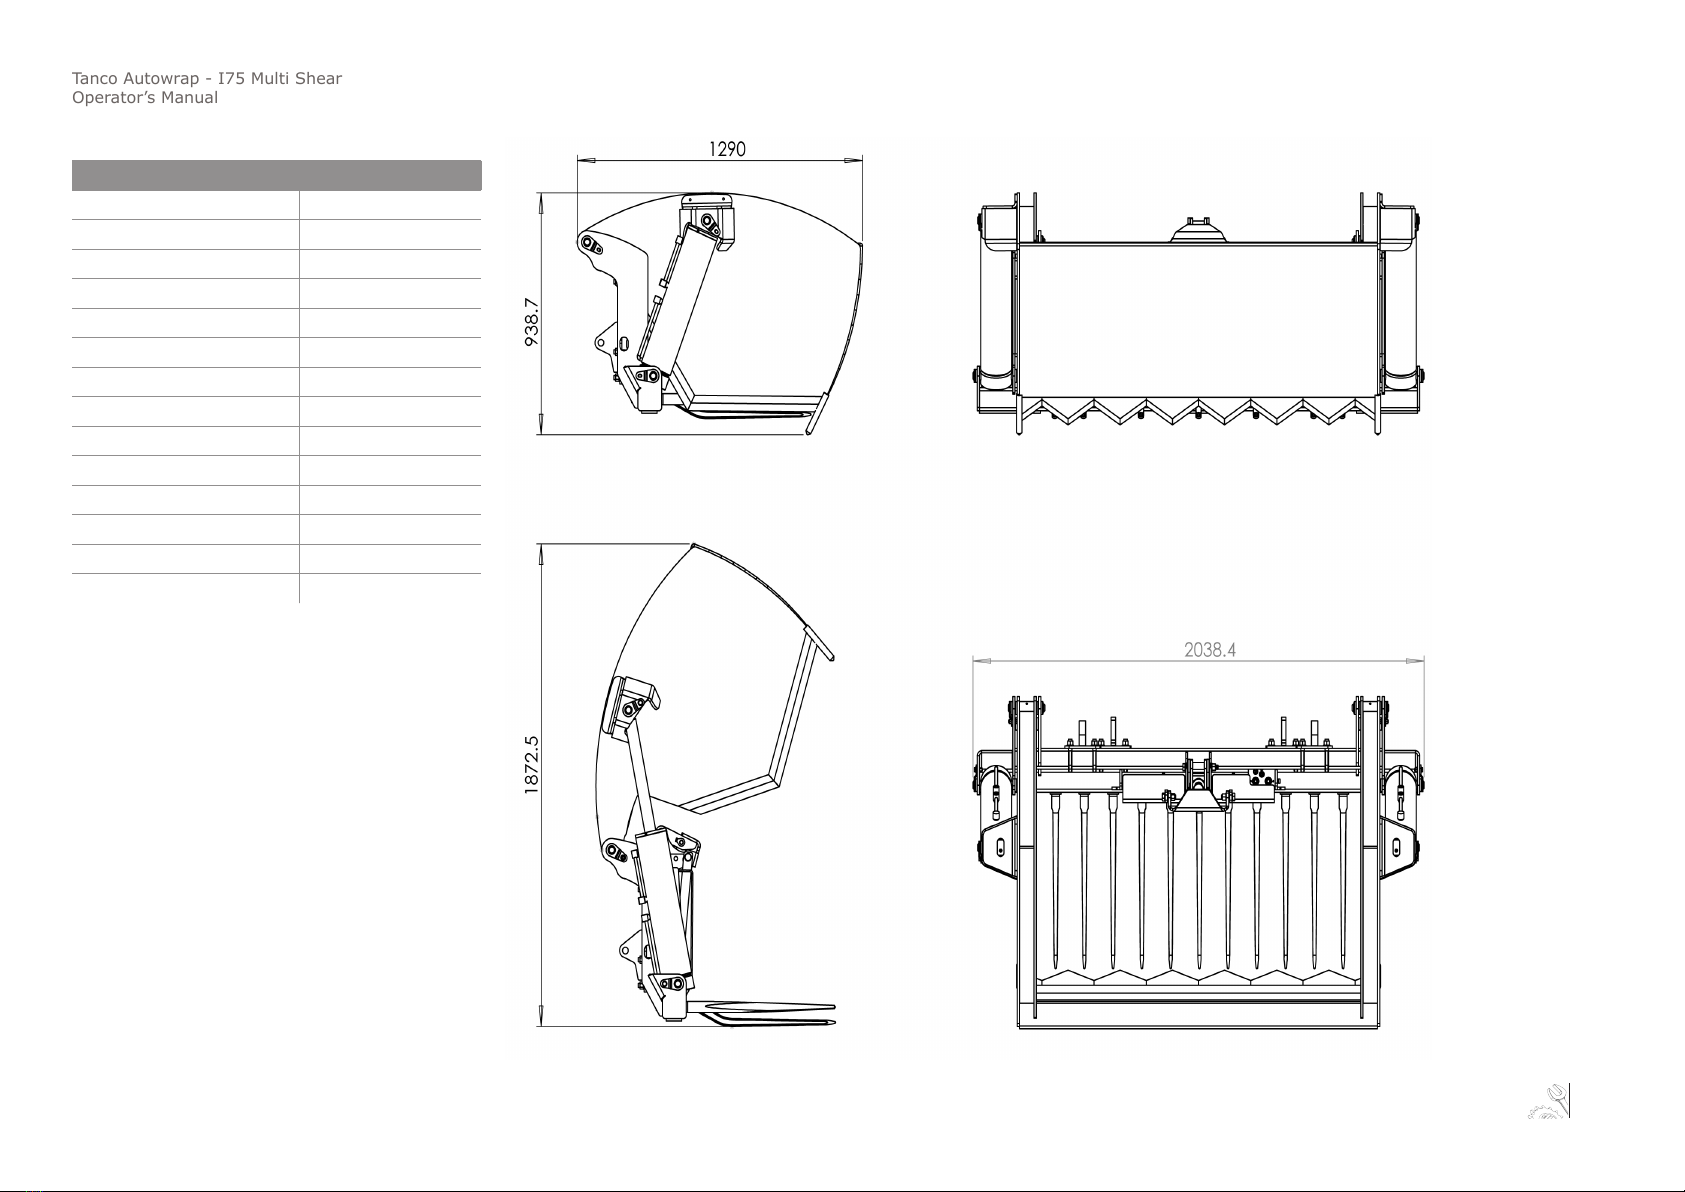
Technical Specications I75 Multi Shear
Height (Closed) 0.9 m
Height (Open) 1.75 m
Width 2 m
Length 1.3 m
Weight 630 kgs
Maximum Bale Length 1.4 m
Maximum Bale Diameter 1.55 m
Maximum Bale Weight 1400 kgs
Hydraulic Connection Double acting service
Oil Pressure (Max / Min.) 210 bar / 150 bar
Oil Amount (Max / Min.) 70 lts / 20 lts
Maximum Counter Pressure 15 bar
NB: Tanco Autowrap Ltd. reserves the right to modify the
construction and/or technical specications without
warning and without rights to changes on already delivered
products.
3. TECHNICAL SPECIFICATIONS

Tanco Autowrap - I75 Multi Shear
Operator’s Manual
6
4. SAFETY PRECAUTIONS
Tanco Autowrap Ltd does not take responsibility for damages that may occur to machine, persons or other equipment, because of the machine NOT being used as described in this
manual, or because of the safety precautions NOT being followed.
IMPORTANT!
Always make sure nobody is in the hazard area of the Multi Shear when the machine is in-use.
The machine must not be operated by persons who do not know enough about how to safely operate the machine, or by persons under the age of 16 years.
Dangerous Areas
Tanco Autowrap Ltd. has given the safety to the operator the highest priority, but it is still impossible to secure oneself of every danger area on the machine. Therefore we have
highlighted below some of the dangers that can occur when using the I75 Multi Shear.
Hydraulic Fluid
Never use your hands to search for hydraulic uid leaks, use a piece of paper or cardboard for this purpose. Remember that escaping uids under high pressure can be invisible, but can
easily penetrate the skin and cause serious and sometimes permanent injury.
Machine Operation.
Always stop the tractor, lower the attachment to ground level and shut o the engine when leaving the machine.
Never keep the tractor running whilst installing or servicing the Multi Shear.
Safety Shutdown Procedure
Work of any type on farm machinery is always more dangerous when the tractor is running.
Therefore before cleaning, lubricating, or servicing this unit, the following Safety Shutdown Procedure should always be
followed:
1. Move the Tractors drive control and the hydraulic control valve to their neutral positions and idle the engine down.
2. Position the Multi Shear so that it is completely resting on the ground.
3. Engage the tractors parking brake.
4. Move the tractors throttle to slow idle, shut the engine o and remove the ignition key.
It is the responsibility of the operator to ensure that all steps of the I75 Multi Shear operating procedures are followed. Failure to do so may result in the I75 Multi Shear being
inadvertently closed or opened due to incorrect installation/operation.

7
Tanco Autowrap - I75 Multi Shear
Operator’s Manual
4. SAFETY PRECAUTIONS
Safety Principles
The blades on the Multi Shear are very sharp. You must always take care to keep any risk of an accident down to a minimum. Please adopt the following safety principles when operating
the I75 Multi Shear.
DO NOT Leave the Multi Shear open when not in use.
DO NOT Allow people or animals near any moving parts of the machine.
DO NOT Leave the Multi Shear open if leaving the machine unattended for any length of time, however short it is.
DO NOT Restrict the movement of any moving part of the machine.
DO NOT Drive on the road with the Multi Shear in open position.
Always, as far as possible, make sure there are no foreign objects in the bales which could damage the blades.
Always check the height of the loader boom when entering or leaving a building, or when passing under overhead cables.
Tanco Autowrap - I75 Multi Shear
Operator’s Manual
8
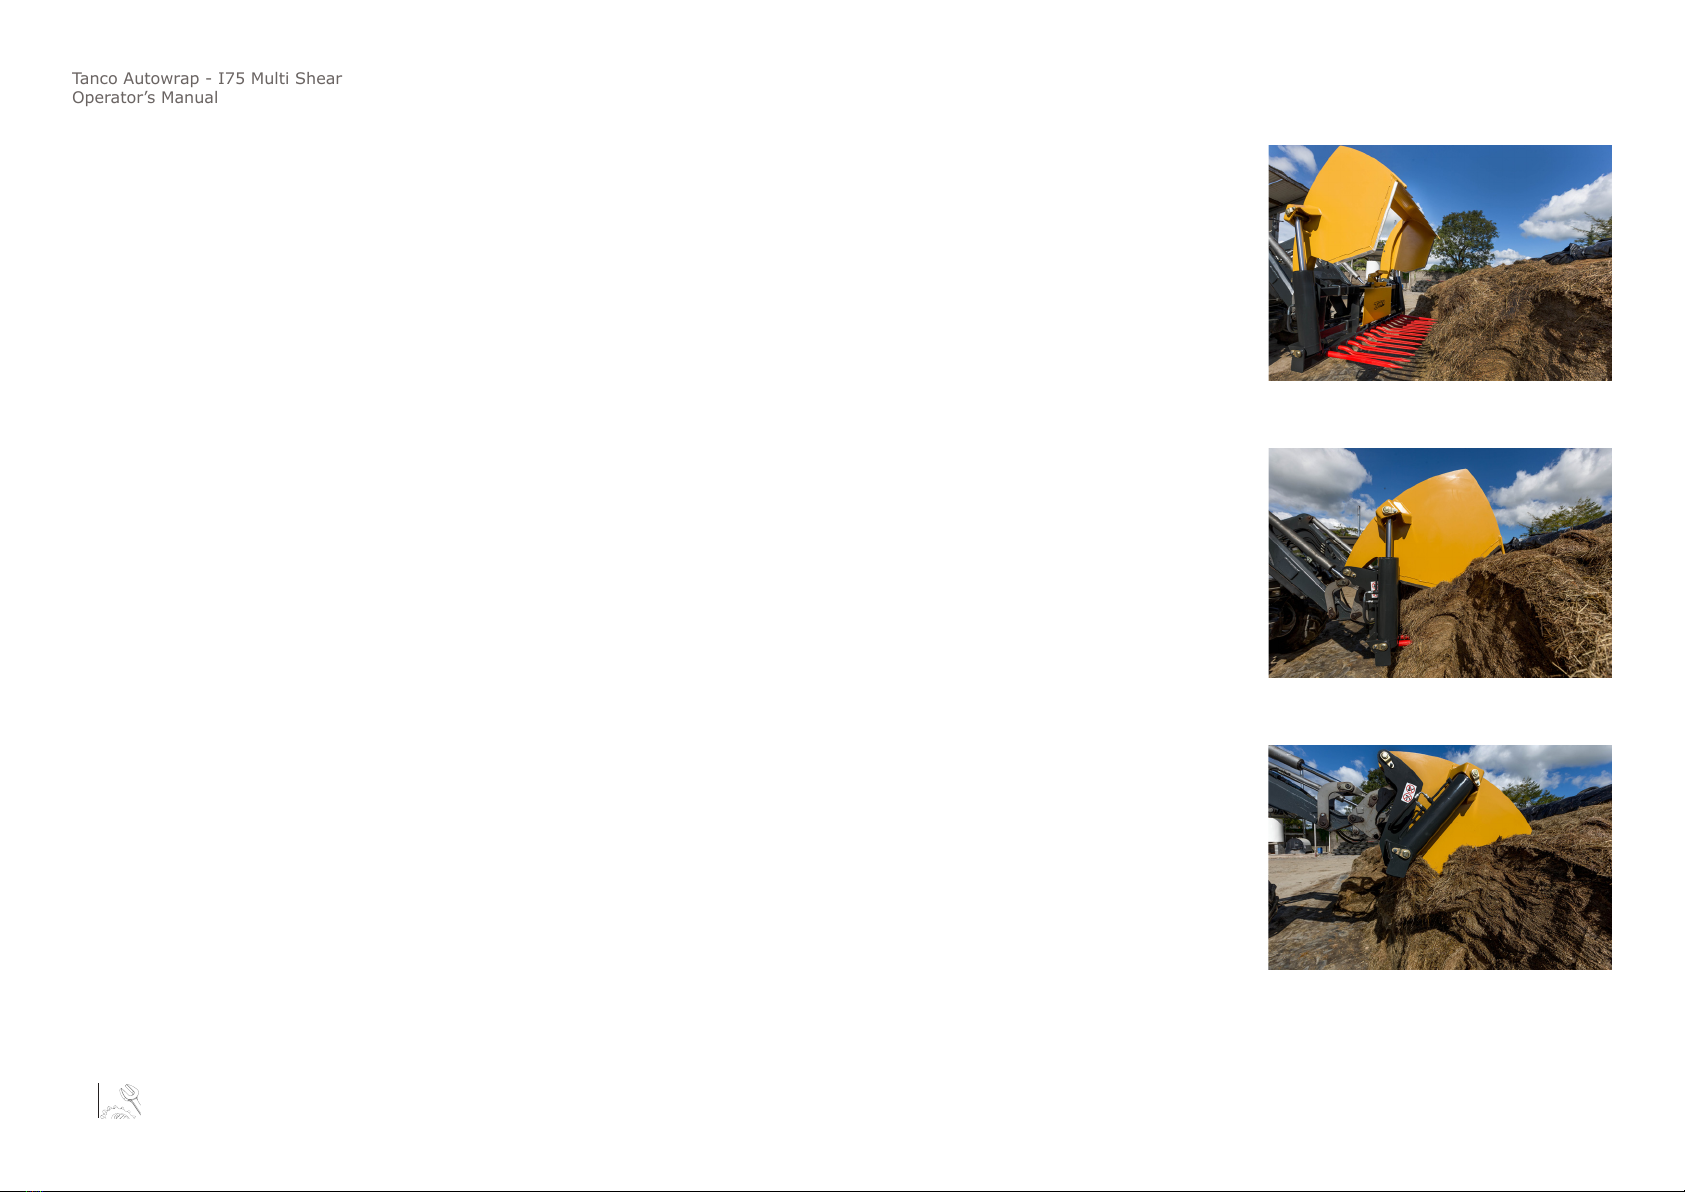
Operating the Multi Shear for a pit silage
1. With the Multi Shear fully open, approach the pit and move the tractor forward until the Shear Grabs’ main frame is pressed
tightly against the pit.
2. Move the hydraulic control lever to close the shear frame down onto the pit, cutting a clean block of silage and leaving a
sealed face to prevent secondary fermentation.
3. When cutting remove a block of silage from the left hand side of the pit rst, then remove a block from the very right hand
side, and nally remove a block from the middle of the pit. This ensures even cutting pressure preventing buckling.
5. OPERATING INSTRUCTIONS

9
Tanco Autowrap - I75 Multi Shear
Operator’s Manual
4. The silage block can then be transported to a feed passage, feed trailer, ring feeder or diet feeder. Once the silage
block has been cut remember to keep the grab closed during transportation to feeding area.
5. Operate the control levers to fully open the Multi Shear and tilt forward to eject the load. If the Multi Shear is being
used to ll a feeder avoid contact between the Multi Shear and all metal surfaces and moving parts. When feeding
livestock ensure blades and tines do not come into contact with the livestock.
6. Ensure the Multi Shear is in the closed position when not in use.
5. OPERATING INSTRUCTIONS
Table of contents
Other Tanco Power Tools manuals


