tanning essentials Classic Installation guide
Australia • China • United Kingdom • USA
SIMPLY UNCOMPLICATED
TANNING SYSTEMS
Training Manual
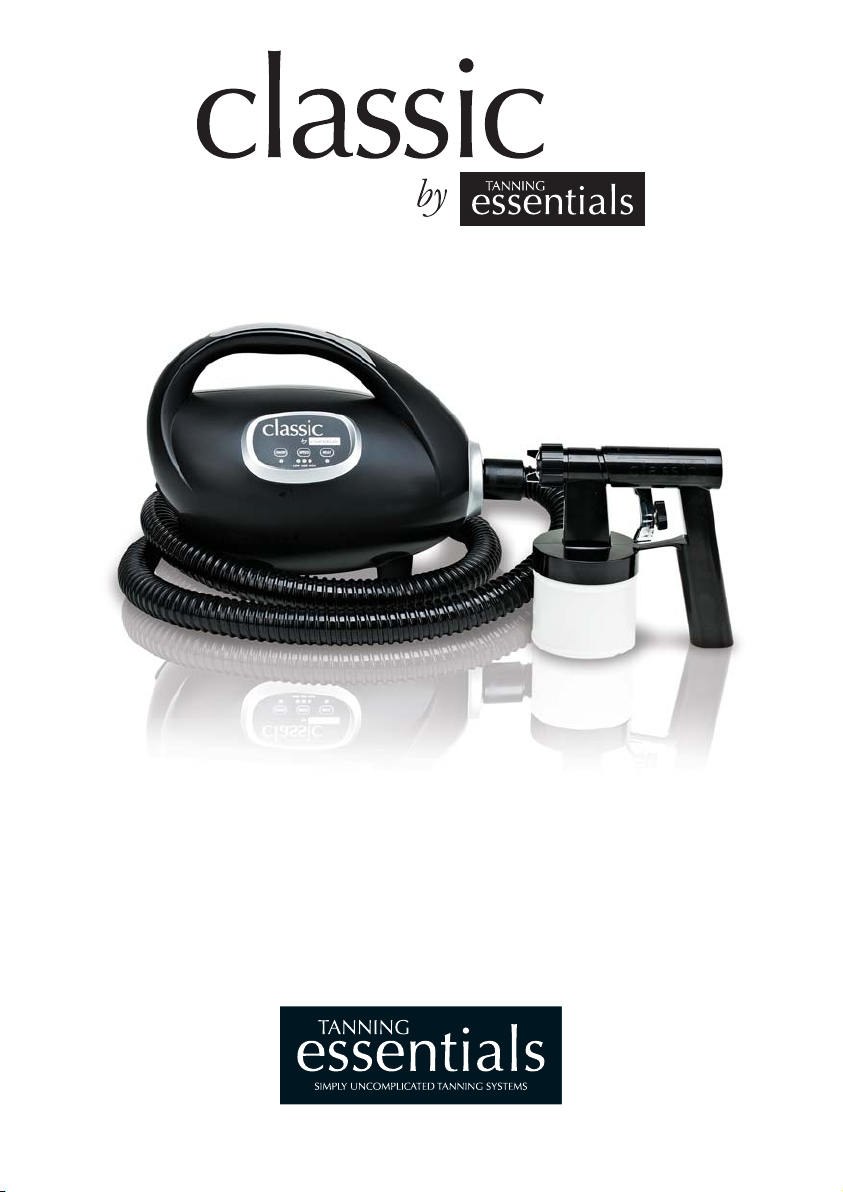
WELCOME
Thank you for choosing the Tanning Essentials Classic Spray Tan System.
Please read the following to enjoy your new system for many happy
tanning applications.
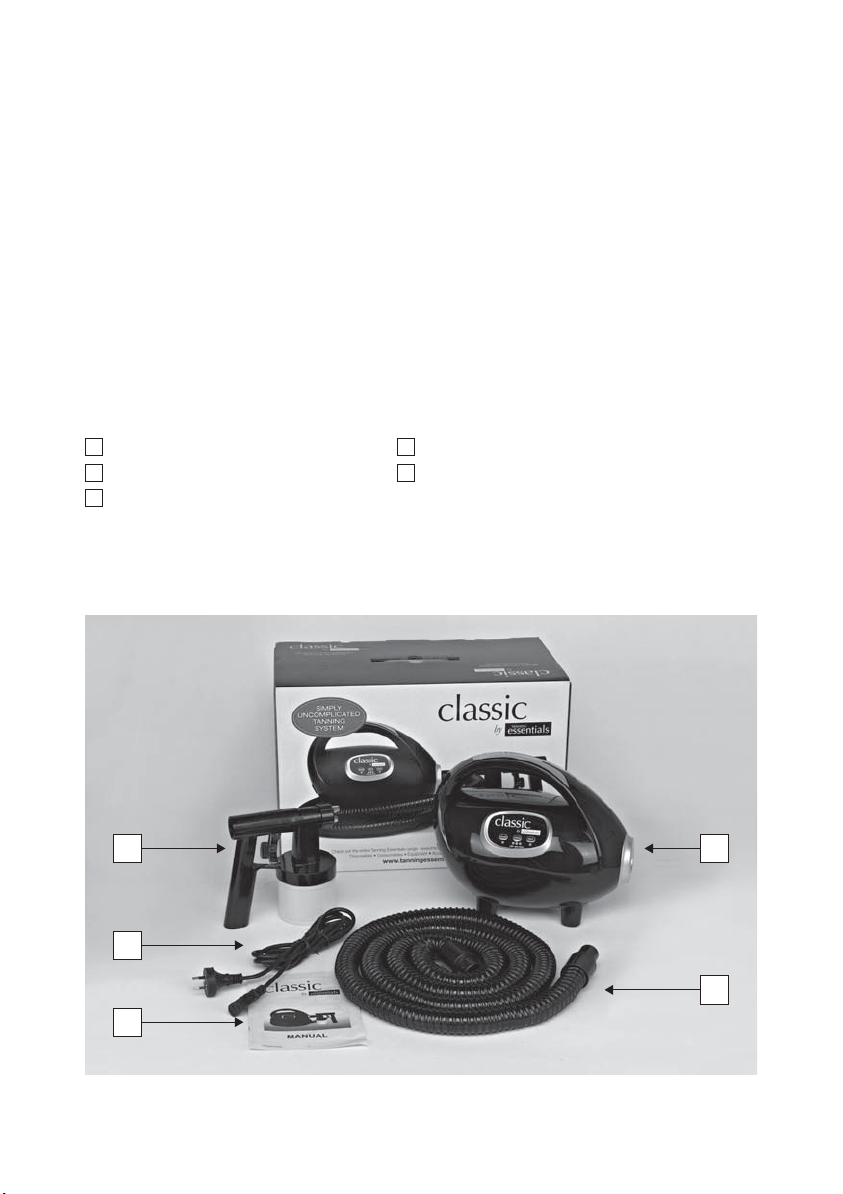
QUICK SET UP GUIDE
The Tanning Essentials Classic Spray Tan System contains the following:
1 x Classic Spray Unit 1 x Classic Spray Applicator
1 x Classic Spray Hose 1 x Power Cord
1 x Manual
* Additional solution cups with lids can be purchased through your
dealer to conveniently change solutions and keep solution air tight.
1
3
5
2
4
2
4
5
1
3

ON/OFF SPEEDHEAT
LOW MEDHIGH
SPRAY SYSTEM
SPRAY APPLICATOR
Control Panel
(see page 5 for
more information)
Hose
Connector
Shock
Ansorbing Feet
Carry
Handle
Power
Connector
(At Rear)
Washable
Air Filter
(Underneath)
Adjustable
Spray
Nozzle
Solution Cup
Hose
Connector
Solution Knob
Trigger
Handle
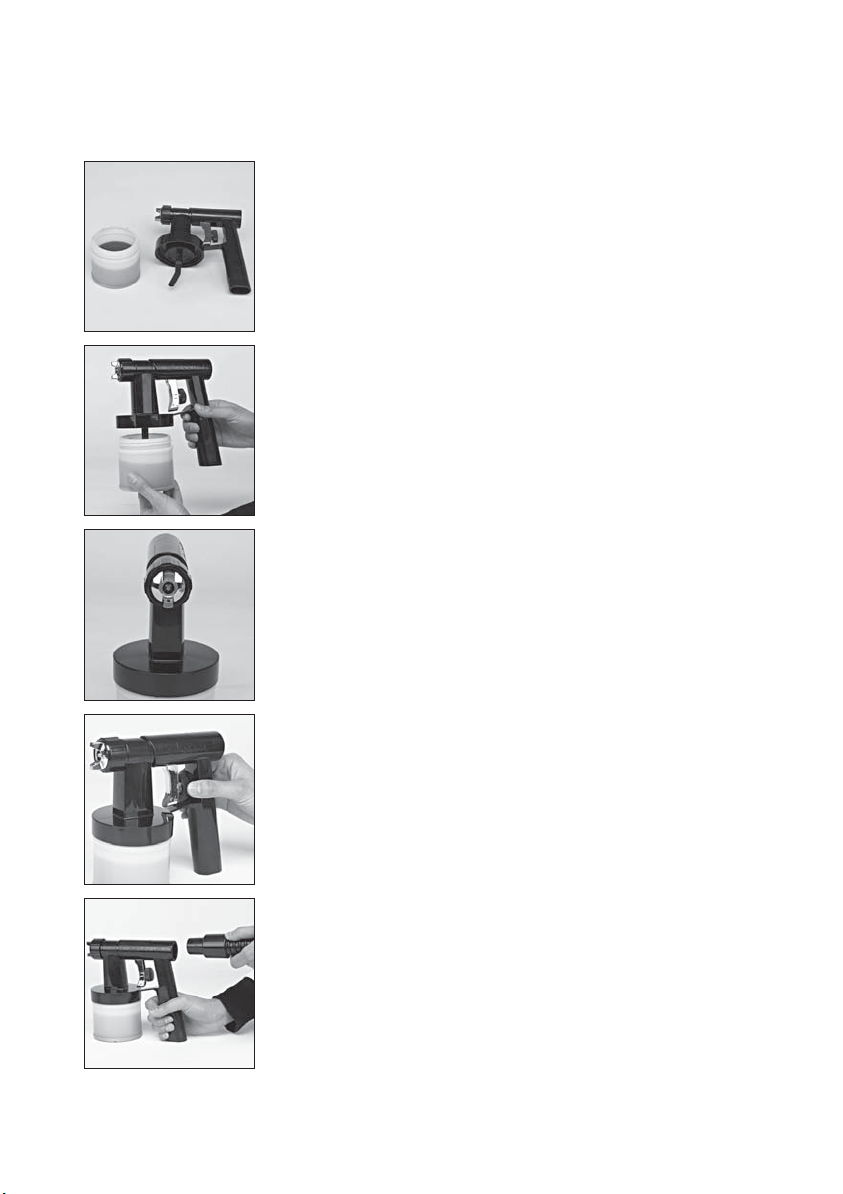
SPRAY APPLICATOR
STEP 1
Unscrew solution cup and Fill Solution Cup no
more than ½ - ¾ full. Over filling the solution cup
may cause the cup to leak.
STEP 2
Insert Cup into applicator and screw tightly.
Being careful not to cross thread the solution cup
STEP 3
Set the spray pattern by turning the silver nozzle,
aligning the nozzle in a vertical position for
up/down spraying and horizontal position for left
to right spraying.
STEP 4
Adjust Solution Dial behind the trigger to desired
level. Start with the dial hard against the trigger
resulting in maximum solution spraying from the
applicator, then wind out until the desired result is
obtained.
STEP 5
Attach Hose. Insert the hose into the back of the
spray applicator until firmly in place.

SPRAY UNIT
STEP 1
Attach Hose to Unit. Insert hose into the unit with
the bayonet style fitting and turn anti-clockwise
until firmly in place. Avoid over tightening as this
may result in broken components.
STEP 2
Attach power cord and turn power on at the wall
switch.
STEP 3
Turn the unit on and start spraying. The unit is
controlled via three buttons on the front of the
Spray Unit (see below).
ON/OFF SPEED
(Low, Medium & High)
this controls the air flow
HEAT (On/Off)
The unit will heat
the air to warm.
The most common setting is Medium air flow with heat On.
ON/OFF SPEED HEAT
LOW MED HIGH

MAINTENANCE GUIDE
SPRAY APPLICATOR
Step 1 Remove hose.
Step 2 Unscrew solution cup and empty any excess solution. It is
recommended that this be done over a sink or a wet area.
Step 3 Rinse the empty solution cup with warm water.
Step 4 With warm water in the solution cup, spray the water through
the applicator. Use the highest setting for maximum water
spraying when cleaning.
Step 5 Empty solution cup and re-set the solution dial on the back
of the gun to the regular spray setting.
Step 6 Wipe any excess water from the applicator with a cloth and
warm water.
SPRAY UNIT
Step 1 Clean the Spray Unit with a cloth. Avoid using anything
abrasive. Windex and Mr. Sheen are useful products for
maintaining the gloss finish on your Spray Unit.
Step 2 Clean the filter. Remove the filter from the base of the unit
and rinse in warm water. Wait until filter is completely
dry before re-fitting. Positioning the spray unit behind the
spray technician when in use will ensure the unit stays
cleaner for longer.
TROUBLE SHOOTING
If you experience problems with this unit, in the first instance please
read carefully the relevant sections of this User Manual and this Trouble
Shooting section. If you can not solve your problem please contact your
supplier via phone for assistance.
Problem
The Spray
Unit will
not turn on
The spray
applicator
is leaking
The spray is
spluttering
Cause What to do
Power cord not attached Ensure that the power cord
is pushed in firmly to the base
of the unit and wall socket
Electricity not turned on Ensure the power point is on
The unit is not turned on Press the On/Off Button on the
control panel and watch for the
LED light to indicate ON.
Spray Cup is not tight enough Tighten the solution cup
Solution cup seal missing Insert the rubber cup seal
Too much solution Empty some solution from
the spray cup
Nozzle may be blocked Spray warm water through
the applicator
Solution cup low Add solution to the cup
Air speed is set too low Check the filter for blockages
Angled applicator too Keep the applicator on a
sharply while spraying lesser angle while spraying
Nozzle may be blocked Spray warm water through
the applicator
Filter could be blocked Ensure the filter underneath
the Spray Unit is clean
Spray applicator control Wind in solution knob below
dial is set too low the hose connecter of the gun

Problem
No solution
is coming out
of the spray
applicator
The applicator
is continuing
to spray
Hose coming
out of unit
Cause What to do
Nozzle may be blocked Spray warm water through
the applicator
Solution cup low Add solution to the cup
Trigger is jamming Spray warm water through the
applicator repeatedly ensuring
the Solution Dial is allowing
maximum water through the
applicator
Solution Dial on Wind in the solution dial
applicator set too low on applicator
Trigger or nozzle is jamming Spray warm water through the
applicator repeatedly ensuring
the Solution Dial is allowing
maximum water through the
applicator
Hose not correctly Ensure the fitting is inserted
fitted to unit and quick connect fitting is
locked into place.
Hose fitting broken Contact your supplier
from over tightening or service agent

TIPS AND TRICKS
Problem
The solution is
sitting on the
skin or beading
on the client
The client has
tanning solution
in areas they
don’t wish to
tan
The client
appears orange
The spray tan
has not
developed as
dark as desired
Cause
Too much tanning solution has
been sprayed onto the skin
Client has not prepared their
skin correctly i.e. moisturiser
or perfume on the skin
Client maybe excessively
hot and perspiring
The technician has sprayed
the area incorrectly
Client has touched part of their
body with a spray tanned area
Too much tanning solution has
been sprayed onto the skin
The client may have left a
rapid tanning solution on
too long
The client may have low
toleranceto DHA
The spray tan solution used
may be old or heat affected
reducing the reaction in the
skin. Sometimes a green hue
will appear to indicate this
A different solution was
sprayed or the spray
application dial was set lighter
The client may have showered
or perspired before the tan
could develop
Other factors may affect the
tan’s development, including
diet, hormones and medication.
Please refer to the client
What to do
Dab area gently with a clean
dry towel and re-spray lightly,
blending the tan in
Exfoliate the area using tan
removing product for best
results or a cloth and soap
Exfoliate the skin before
re-spraying and ensure the
spray application is lighter
Be sure to keep the solution
in a cool dry place and ensure
the solution is fresh.
Ensure the client has followed
the correct recommendations
for preparation and post spray
tan care.
The client can be resprayed if
required after their minimum
8 hours and after a shower has
been taken

WARRANTY INFORMATION
IMPORTANT
Please keep your proof of Purchase and User Manual in a safe place as
you will require these to make a warranty claim. Prior to making a
claim you should read through the trouble shooting section in the
manual and contact your supplier via phone. Any warranty claims
should be made directly to your supplier.
If within one (1) year from the date of purchase, the product fails due to
a defect in material or workmanship, we will repair if possible or
replace it free of charge with a comparable unit which may be new or
refurbished. This warranty applies only to the original purchaser and is
not transferable. The goods must be returned to the seller with proof of
purchase to be assessed at the purchasers cost.
Warranties shall not apply to any defect, failure or damage caused by
improper use or improper or inadequate maintenance and care. The
manufacturer shall not be obligated under these warranties:
a) to repair damage resulting from attempts by personnel other than
authorised representatives to install, repair or service the product,
b) to repair damage, malfunction, or degradation of performance result-
ing from improper use or incompatible solution,
c) to perform maintenance or cleaning or to repair damage, malfunc-
tion, or degradation of performance resulting from failure to perform
user maintenance and cleaning as prescribed,
d) to repair damage, malfunction, or degradation of performance result-
ing from use of the product in an environment not meeting the oper-
ating specifications,
To activate your warranty, please complete the information below and
post to your supplier within 14 days of purchase.
This manual suits for next models
1
Table of contents
Other tanning essentials Personal Care Product manuals

tanning essentials
tanning essentials Tanning Curtain Installation guide

tanning essentials
tanning essentials Turbo Twister Spray Station Installation guide

tanning essentials
tanning essentials Turbo Twister User manual

tanning essentials
tanning essentials PROV Operating instructions

tanning essentials
tanning essentials PROV Installation guide

tanning essentials
tanning essentials SPRAY STATION Installation guide

tanning essentials
tanning essentials CORDLESS Installation guide

tanning essentials
tanning essentials TURBO TWISTER TOWER Installation guide

tanning essentials
tanning essentials Pro Installation guide


