Windows Setup
To ensure the best Windows performance, please be sure to update your
host PC Display Adaptor and USB 3.0 Drivers. These updates are often
available from your IT department or from the PC manufacturer if you have
Administrator rights to download and install drivers for your PC.
Welcome to your Targus Universal Docking Station DisplayLink Manager. The
DisplayLink Manager software, if not already installed, can be downloaded
from a Windows Update server or from www.targus.com. It is represented
by the icon in the Windows Task Tray and allows you to easily connect
additional monitors to your laptop or desktop via the Targus Docking Station.
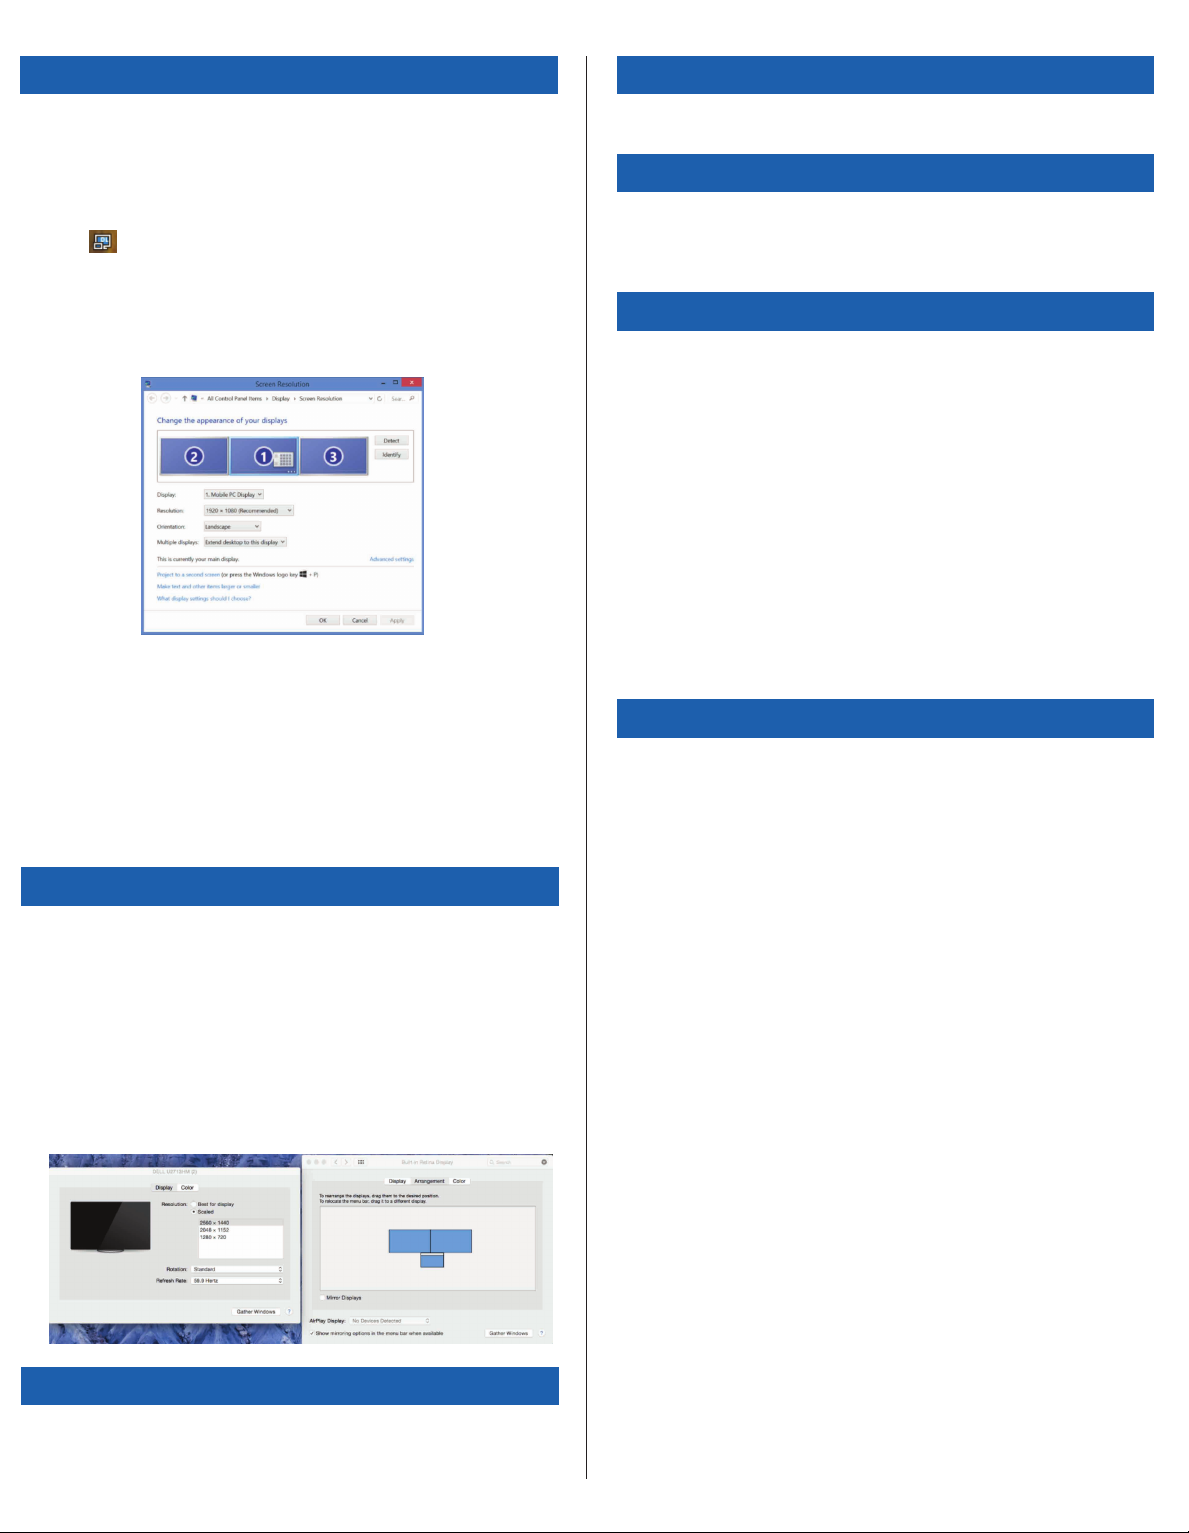
Using the Windows Control Panel Display Screen Resolution window, the
connected monitors can be configured to either mirror your main screen, or
extend the Windows desktop allowing visibility of more applications at the
same time. The DisplayLink USB Graphics devices can also be configured to
be the main display.
The DisplayLink Manager allows full configuration of all additional USB
displays, including:
• Support for addition USB Displays in Windows 7, 8, 8.1, 10 and later
• Resolution up to 2560 x 1600 for Displayport, 2560 x 1440 for HDMI,
2048 x 1152, for DVI-I (Resolution higher than 2048 x 1152 only available
at single video output mode)
• Display orientation and location modification
• Layout of displays
DisplayLink software also provides drivers for Sound and Ethernet built into
the DL-3000 family. These can also be selected in the Windows Control
Panel.
OS-X Setup
Three Year Warranty
Regulatory Compliance
FCC Statement (Tested to Comply)
Upon installation of the DisplayLink software for OS-X available at
www.targus.com, Macbook users can use the System Preferences for
Displays to adjust the external monitors. OS-X allows configuration of all
additional USB displays, including:
• Support for additional USB Displays in OS-X 10.9 or later
• Resolution up to 2560 x 1600 for Displayport, 2560 x 1440 for HDMI,
2048 x 1152 for DVI-I (Resolution higher than 2048 x 1152 only available
at single video output mode)
• Display orientation and location modification
• Layout of displays
DisplayLink software also provides drivers for Sound and Ethernet built into
the DL-3000 family.
Android Setup
Install the DisplayLink Desktop application for Android 5.0 and later from the
Google Play Store. Enable USB Debugging/Host mode on your Android
device.
1. Targus warrants to the original purchaser that its products are free from
defects in materials and workmanship for three years. This warranty is limited
to defects, materials and workmanship. 2. The benefits to the consumer
given by the warranty are in addition to other rights and remedies of the
consumer under law in relation to the goods to which the warranty relates. 3.
The warranty is given by (i) Targus Australia, (ii) Targus Australia’s business
address is: Suite 2, Level 8, 5 Rider Boulevard, Rhodes NSW 2138
Australia, (iii) Targus Australia’s telephone number is 1800 641 645, Email:
New Zealand, the telephone number is: 0800 633 222, or the goods may be
returned to the supplier in New Zealand. 4. What the purchaser must do to
entitle the purchaser to claim warranty:- (i) The purchaser must call the
telephone number for Australia or New Zealand set out above, (ii) The
purchaser must provide the purchaser’s name, daytime contact number,
business hours delivery address, the Targus model number on the product,
date and place of purchase with receipt for purchase if required, and
describe the fault condition. 5. What Targus must do:- (i) Targus will provide
the purchaser with store return information or a return authorisation so that
the purchaser may return the product for warranty inspection, (ii) If after
inspection Targus finds the product is defective in materials or workmanship,
Targus shall replace (or repair) the defective product at the discretion of
Targus and ship the product from Targus warehouse at its expense within
three business days (Monday to Friday excluding public holidays) of
receiving the returned goods. If the product is no longer available Targus
reserves the right to replace with the nearest corresponding product of no
lesser quality, (iii) Targus will bear the cost of return delivery to the purchaser
regardless of the inspection test result. The purchaser must bear the cost of
the delivery to Targus. There is no charge for inspection. 6. Our goods come
with guarantees that cannot be excluded under the Australian Consumer
Law. You are entitled to a replacement or refund for a major failure and for
compensation for any other reasonable foreseeable loss or damage. You are
also entitled to have the goods repaired or replaced if the goods fail to be of
acceptable quality and the failure does not amount to a major failure. 7.
Please note: (i) Features and specifications of all Targus products are subject
to change without notification, (ii) In some instances: Goods presented for
repair may be replaced by refurbished goods of the same type rather than
being repaired. Refurbished parts may be used to repair the goods, (iii) If
goods accepted for repair retain user-generated data: During the process of
repair some or all of your stored data may be lost. Please ensure that you
have saved this data elsewhere prior to repair.
This device complies with Part 15 of the FCC Rules. Operation is subject to
the following two conditions: (1) This device may not cause harmful
interference, and (2) This device must accept any interference received,
including interference that may cause undesired operations.
This equipment has been tested and found to comply with the limits of a
Class B digital device, pursuant to Part 15 of the FCC Rules. These limits are
designed to provide reasonable protection against harmful interference in a
residential installation. This equipment generates, uses, and can radiate radio
frequency energy and if not installed and used in accordance with the
instructions, may cause harmful interference to radio communications.
However, there is no guarantee that interference will not occur in a particular
installation. If this equipment does cause harmful interference to radio or
television reception, which can be determined by turning the equipment off
and on, the user is encouraged to try to correct the interference by one or
more of the following measures:
• Reorient or relocate the receiving antenna
• Increase the separation between the equipment and receiver
• Connect the equipment into an outlet on a circuit different from the one
that the receiver is connected
• Consult the dealer or an experienced radio/TV technician for help
Changes or modifications not authorized by the party responsible for
compliance could void the user’s authority to operate this product.
US Technical Support
• www.targus.com/support • www.targusblog.com
• 877-482-7487


