Tarrington House HIGHBURY CQ01-01 User manual

CQ01-01
"HIGHBURY"

1 x1 6 x1
2x1 7 x1
3x4 8 x2
4x1 9 x1
5x1 10 x1
AM4-10 x6
BM5 x2
CM5 x2
12
8
10 17
10 17
A x4 A x2
B x2 C x2
10 17

34
tAssembly instructions
Please take a few minutes before starting operation of the appliance and read the following operating instructions.
USE OUTDOORS ONLY!
READ THE INSTRUCTIONS BEFORE USING THE APPLIANCE!
WARNING! ACCESSIBLE PARTS MAY BE VERY HOT. KEEP YOUNG CHILDREN AWAY!
THIS APPLIANCE MUST BE KEPT AWAY FROM FLAMMABLE MATERIALS DURING USE!
DO NOT MOVE THE APPLIANCE DURING USE!
TURN OFF THE GAS SUPPLY AT THE GAS CYLINDER VALVE OR PRESSURE REGULATOR AFTER USE!
DO NOT MODIFY THE APPLIANCE! ANY MODIFICATION OF THE APPLIANCE MAY BE DANGEROUS.
PARTS SEALED BY THE MANUFACTURER OR HIS AGENT MUST NOT BE ALTERED BY THE USER.
SOME PARTS OF THIS APPLIANCE BECOME VERY HOT, TAKE SPECIAL CARE WHEN CHILDREN OR ELDERLY ARE
PRESENT.
DO NOT STORE OR USE GASOLINE OR MENTHOLATED FUELS OR ANY OTHER FLAMMABLE VAPORS AND LIQUIDS IN
THE VICINITY OF THIS OR ANY OTHER APPLIANCE.
NEVER LIGHT A GAS GRILL WITH GASOLINE OR COMPARABLE FLUIDS!
DO NOT CHANGE THE ASSEMBLY THAT THE MANUFACTURER PACKAGED.
RISK OF EXPLOSION!
INTENDED USE
This barbecue is intended to grill different kinds of foodstuff in well-ventilated outdoor areas. The appliance must be operated with low pressure propane or
butane liqueed petroleum gas (LPG). It may not be supplied with natural gas.
This appliance is intended for private use only and may not be used for any commercial or industrial use. It must not be used for any purposes other than
those described to avoid personal injury or damage to property.
SAFETY WARNINGS
Read this instruction manual carefully before using the appliance. Familiarise yourself with the operation, adjustments and functions of
switches. Internalise and follow the safety and operation instructions in order to avoid possible risks and hazards.
Keep the instruction manual for future reference and provide to other when passing the appliance.
QA21-0000001726
2531
21

4
GENERAL BARBECUE WARNINGS
1. WARNING! Danger of carbon monoxide poisoning! The use of this appliance in enclosed areas can be dangerous and is PROHIBITED. Never operate
the appliance in enclosed areas such as garages or sheds, as this leads to a carbon monoxide build-up resulting in personal injury or death.
2. WARNING! Danger of explosion! Never operate the appliance in enclosed areas such as garages or sheds, as this leads to gas accumulation in case of a
leakage which may result in an explosion.
3. Place the appliance on a secure level, stable and non-flammable surface, away from any heat source, prior to use.
4. Do not move the appliance while it is in use.
5. Do not attempt to modify the appliance in any way. Only use attachments and accessories recommended by the manufacturer. Any alterations made to the
appliance, improper use or non-compliance with the instructions lead to danger.
6. The appliance must not have any overhead obstruction, e.g., trees, shrubs, roofs, a pavilion, sun umbrella or the like. The appliance must be installed with a
minimum clearance of 1 m around it.
7. Do not use the appliance near flammable objects. Keep distance of at least 1 m around the appliance to such objects.
8. Do not use the appliance in the immediate presence of aerosol cans, flammable liquids, volatile gases or other flammable substances. Keep open flames
such as candles or torches away from the appliance.
9. Do not store any flammable liquids or volatile gases near the appliance.
10. Do not leave the appliance unattended during use.
11. Do not use liquid fuels with this appliance.
12. Never lean over cooking surface while lighting the appliance or during cooking.
13. This appliance is not intended to be used by persons (including children) with reduced physical, sensory or mental capabilities, or lack of experience and
/ or knowledge of the appliance and its properties, unless they have been given supervision or instruction concerning use of the appliance by a person
responsible for their safety.
14. Supervise children at all times to ensure that they do not play with the appliance.
15. Keep any electrical supply cord and the gas hose away from any heated surfaces.
16. Do not heat any unopened glass or metal food containers on the appliance. Pressure may build up and cause the container to burst, possibly resulting in
serious personal injury or damage to the appliance.
17. WARNING! The maximum loading of the side tables (2 kg) must not be exceeded.
GAS BARBECUE WARNINGS
1. This appliance is configured to work with low pressure propane & butane liquefied petroleum gas (LPG). Do not use natural gas supply.
2. Open the cover before igniting the appliance.
3. Open the cover very carefully when the appliance is being used. Hot steam could collect inside the cover and escape quickly when opened.
4. Only cover the appliance when it has completely cooled off.
5. Never use charcoal or other solid fuels in this appliance.
6. When the wind speed is above 2m/s, don’t use the appliance facing to the wind.
7. Be prepared if an accident or fire should occur. Know where the first aid kit and fire extinguishers are and know how to use them.
8. It is recommended to have the appliance serviced by a competent engineer of your local gas dealer at least once a year. Do not attempt to service this
appliance yourself.
GAS CONNECTIONS / GAS CYLINDER / PRESSURE REGULATOR WARNINGS
1. Check the appliance and all connections regularly and each time the gas cylinder is replaced for possible gas leaks (→ Testing for gas leaks).
2. Never check for gas leaks using a match or any other open flame.
3. Never alter or modify the pressure regulator or gas supply assembly.
4. Always turn the gas supply off on the gas cylinder and / or the pressure regulator and disconnect the gas hose after use.
5. Never store gas cylinders indoors or close to heat or ignition sources.
6. Always store gas cylinders in upright position, never in horizontal position. This could cause the gas cylinder to leak or gas could leak into the gas hose.
7. Never use the appliance without the pressure regulator.
8. Only use pressure regulators approved for liquid petroleum gas (LPG) and complying with national regulations. Observe the technical data (→ TECHNICAL DATA).
9. Never mount the gas cylinder under the appliance as this could result in serious injury to the user, other people and/or property.
10. Do not attempt to disconnect any gas fitting part on the appliance or the pressure regulator / gas cylinder when the appliance is being used.
GAS HOSE WARNINGS
1. Inspect the gas hose prior and after each use - look for any cuts, cracks, excessive wear or other damage. If the hose is found to be faulty in any way do not
attempt to use the appliance.
2. Let the gas hose be replaced every one to two years (or when national conditions require it) by a qualified technician or the retailer only. Have brittle gas
hoses and their connections exchanged. In case of doubts, ask a local specialist.
3. Protect the gas hose against damages. Do not let it hang over sharp edges, do not twist, squeeze or bend it, and do not subject it to undue tension. Keep the
gas hose away from hot surfaces and ensure that nobody can trip over it.
4. Only use a gas hoses approved for liquid petroleum gas (LPG) and complying with national regulations. Observe the technical data (→ TECHNICAL DATA).
5. Every kind of work or replacement of the hoses is to be conducted according to manufacturer’s instruction, by qualified personal or specialists.
6. Use flexible gas hoses heatproof higher than 80°C.
IF YOU SMELL GAS
1. Never light the appliance if you smell gas.
2. Immediately turn the gas supply off on the appliance as well as on the gas cylinder and / or the pressure regulator.
3. Extinguish all open flames near the appliance, such as candles or torches. Switch all electric appliances in the surrounding off.
4. Make sure the area is well-ventilated with fresh air.
5. Open the cover of the appliance in order to let the gas escape.
6. Do not use the appliance any longer and have it repaired by an authorized professional only, should it still smell of gas.
SCOPE OF DELIVERY
Refer to the illustration pages in the front section of this instruction manual for details.
Make sure the scope of delivery is complete and free of any damage. Contact the dealer from whom you purchased the appliance if you find that parts are
missing or show damage (→ WARRANTY).
Do not use the appliance unless missing parts have been delivered in addition or defective parts have been replaced. Using an incomplete or damaged
appliance leads to personal injury and property damage.
ACCESSORIES
To operate this appliance safely and correctly, some accessories, i. e. tools and attachments, are necessary. Refer to the illustration pages in the front section of
this instruction manual for details.
Ensure that you have the accessories and tools needed for commissioning and operation available. This also includes suitable personal protective equipment.
Accessories and tools are available through your authorised dealer. When buying always consider the technical requirements of this appliance (→ TECHNICAL DATA).
GB

5
If you are not certain, ask a qualified specialist and get advice from your trusted dealer.
NOTE: This instruction manual contains information and suggestions for several attachments and their uses. The attachments depicted are not
necessarily included in the shipment, but are meant to indicate additional possibilities for using this appliance.
BEFORE FIRST USE
UNPACKING
1. Unpack all parts and lay them on a flat, stable surface.
2. Remove all packing materials and shipping devices (if applicable).
WARNING!
The appliance and the packaging are not children’s toys! Children must not play with plastic bags, sheets and small parts! There is a danger of
choking and suffocation!
ASSEMBLING
1. Assemble the appliance completely and make all required adjustments prior to operation.
2. Follow the assembly and operation instructions closely. Use the figures as visual guide.
3. Pay attention to small parts such as screws and nuts that are loosened or removed for assembly or during adjustments. Keep them safe in order to avoid
losing them.
WARNING!
• Although we take every effort to ensure that the assembly process is as easy as possible, it is inherent with steel parts that corners and
edges can cause cuts if improperly handled during assembly procedures. Be careful while handling any parts during assembly. It is strongly
recommended that you protect hands with a pair of work gloves.
• Use the appliance only after it has been completely assembled and adjusted!
Choosing gas
1. Propane gas cylinders can be used throughout the entire year. Butane gas cylinders work best during the summer. They are distinctly less efficient at
temperatures under +10 °C.
2. The net weight of gas cylinders must not be above 15 kg.
3. The height of the gas cylinder must be below 80cm, and the width below 35cm.
4. Do not allow cylinders to be filled beyond 80% capacity. Over-filled cylinders can create a dangerous condition due to build-up pressure and cause the valve
to expel propane gas vapours. The vapour is combustible and if it comes in contact with a spark source or flame an explosion causing severe burns, bodily
harm, or death could occur.
5. Always use a protective cylinder cap when appliance is not connected to the cylinder.
Gas connections
WARNING! Be aware of flashback!
Make sure there is no debris, spiders, small insects or webs inside the head of the gas cylinder, pressure regulator, burner, burner tube or hose,
before any connection is made. They can obstruct the gas flow, which could result in a fire in and around the burner tube. This kind of fire is known
as “flash-back” and can cause serious damages. Check and clean (→ CLEANING, MAINTENANCE AND REPAIR) all the parts of the appliance
before assembling it, to reduce the chance of its occurrence.
Connecting / exchanging gas cylinders
WARNING!
Only use the provided or equivalent pressure regulator (→ TECHNICAL DATA) in order to guarantee that it functions safely and efficiently. Using an
improper or a defective pressure regulator is dangerous. Consult your specialised dealer concerning suitable pressure regulators. The type of the
pressure regulator to be used must indicate that it complies with the relevant standard and requirement (EN 16129).
Consult your local gas retailer regarding suitable gas cylinders and pressure regulators (→ TECHNICAL DATA).
NOTE: Gas connections are equipped with left handed threads; the screw-nut needs to be turned counter clockwise!
1. Ensure that there are no ignition sources like cigarettes, open flames, sparks and other heat sources nearby when connecting or replacing gas cylinders.
2. Turn the orange cap of the gas cylinder so that the arrow is pointing to the gap in the shroud.
3. Remove the orange safety cap by pulling the lanyard out. Do not use tools. Leave the cap hanging.
4. Make sure that the black sealing washer is fitted inside the cylinder valve.
5. Place the gas cylinder on level ground on the right side of the appliance. Keep in mind that the gas cylinder must be kept away from heat and in a safe
position. The hose dimension is 8-10 mm diameter.
6. Make sure that the control knob on the appliance is in the off position OFF.
7. Make sure that the gas valve of the gas cylinder and / or the gas regulator is closed.
8. Connect the gas hose to the gas line of the appliance (Fig. 1). Do not overtighten the connections. Use only the delivered hardware to secure the
connections. Do not use sealing tape or a liquid sealant.
9. Connect the pressure regulator to the gas cylinder valve by turning the pressure regulator counter clockwise (Fig. 2). Secure the connection with the
retention nut.
10. Connect the other end of the gas hose to the pressure regulator (Fig. 3).
11. Check all connections for gas leaks (→ Testing for gas leaks).
1 2
1.
2.
3
1.
2.
GB

6
How to disconnect a gas cylinder
1. Except for twin-cylinder installations with a changeover valve,
turn off the gas tap if fitted to the appliance. Wait until the burner
and pilot light have gone out. For installations with a changeover
valve, it is only necessary to close the empty cylinder.
2. Place the orange safety cap on the empty cylinder.
Testing for gas leaks
WARNING! Risk of explosion!
Never check for gas leaks using a match or any other
open flame!
Test all connections, fittings and all gas hoses for gas leaks every
time prior use of the appliance, or each time the gas cylinder is
changed. Make sure this procedure is carried out in a well ventilated
area away from flames, sparks or any heat sources. Do not attempt
to light the appliance if you smell gas.
1. Make sure that the control knob on the appliance is in the off position OFF.
2. Open the gas valve of the gas cylinder and / or the pressure regulator.
3. Apply leak detector spray or half water / half soap solution with a brush to all the connection points.
4. Turn the gas supply on the valve of the gas cylinder and or the pressure regulator off immediately, if you spot gas bubbles forming on the interested areas.
Tighten all connections again and repeat the test.
5. Do not use the appliance but contact your retailer if gas bubbles keep forming.
Burning-off
Before first use, remove any production residue and clean the appliance.
1. Operate the appliance at high temperature with the cover opened for about 10 - 15 minutes to burn-off production residues (→ IGNITING THE BURNER).
2. Turn the appliance off; allow it to cool and clean all parts (→ CLEANING, MAINTENANCE AND REPAIR) afterwards.
OPERATION
WARNING! Before attempting to light the appliance, you must refer to the lighting instructions and warning / safety points.
WARNING! Danger of burns!
• This appliance generates heat and escaping steam during use! Take proper precautions to prevent risk of burns, fires, or other damages to
people and property! Wear protective oven mittens or gloves. Use proper tools like barbecue tong and prongs to turn over grillables!
• After the cover was closed for 5 minutes, it must be opened for 1 minute to let the appliance release heat.
WARNING! The black area of the handle (see fig. on the right) will become hot
when the appliance is in use, BE CAREFUL! Do not touch the black area.
COOKING TIPS
1. Brush the grill grates with cooking or vegetable oil, before using the appliance. Use a brush with a long handle. The juices from the food drip onto the heater
during cooking and vaporise. The steam arising from this process contributes to the taste of the food.
2. Set the control knob to the desired temperature in order to reach your desired cooking results. The built-in thermometer could be used as reference (not
calibrated).
3. Keep the cover closed in order to achieve a more consistent result and to cook larger pieces of meat or whole chickens.
4. Avoid opening the cover too often as accumulated heat escapes each time and the grilling time increases as a result.
ENERGY SAVING TIPS
1. Reduce the opening time of the cover.
1. Turn the appliance off as soon as cooking is completed.
2. Preheat the appliance for 10 to 15 minutes only (except for the first use).
3. Do not preheat longer than recommended.
4. Do not use a higher setting than required.
Connect the hose and regulator to the gas cylinder at the right side of the appliance. Keep in mind that the gas cylinder must be kept away from heat and in a
safe position. The hose dimension is 8-10 mm diameter. The length of the hose shall be max. 1.5m.
IGNITING THE BURNER
The burner can be ignited with the built-in electronic ignitor or alternatively manually with a match.
1. Wait 5 minutes after all connections are made and make sure no gas is leaking (→ Testing for gas leaks).
2. Open the cover of the appliance. Refer to the illustration pages in the front section of this instruction manual for details. Turn the control knob to the off
position OFF.
3. Open the valve of the gas cylinder and / or the pressure regulator.
4. Keep your face and body as far away from the appliance as possible while igniting.
WARNING! Risk of explosion!
Always ignite the burner within 5 seconds after turning the control knob to a position in between Low and HI. Gas can collect inside the appliance
causing an explosion on ignition.
WARNING!
Turn the control knob to the off positions OFF, if the burner does not ignite within 5 seconds. Wait for 5 minutes to let the gas dissipate and try
again.
GB

7
WARNING!
If the burner still does not ignite after a few tries, it could indicate a problem with the gas supply. Turn the gas supply off on the appliance
as well as on the gas cylinder and / or the pressure regulator. Do not use the appliance until the cause of the problem has been found (→
TROUBLESHOOTING).
Igniting the burner with the electronic ignitor
1. Push the control knob (A) and hold it in this position for 3-5 seconds to allow gas flow. Then turn it anticlockwise to HI (B) (Fig. 1). It can spark to the burner
lighting tube (C) (Fig. 2).
2. You will hear a “snap” from the ignitor and see an orange flame coming from the burner lighting tube at the left side of the burner (D) (Fig. 2).
3. Continue to hold the control knob in for two seconds after the “snap”, this will allow gas to flow completely down the burner tube (E) and ensure ignition (Fig.
2).
4. Set the control knob between HI and Low position to adjust the heat.
1 2 Igniting the burner with a match
WARNING! Wear fireproof and heat-resistant
gloves during this procedure.
1. Remove the cooking grid and heat diffuser (hotplate ) and
turn the valve anticlockwise to 90°.
2. Light the appliance with a BBQ lighter at a distance of 5mm
to the burner fire hole.
3. Replace the cooking grid and heat diffuser (hotplate).
APPEARANCE OF THE FLAME
• The flame should appear blue and stable, with a minimum of orange flame (Fig. 1). There should be no yellow
sparks, loud noises nor should there be distance between the base of the flame and the nozzle.
• A yellow flame indicates insufficient oxygen supply. Loud noises and the flame being distant from the nozzle
indicate excessive oxygen supply.
• At HI setting the burner flame should be approximately 12-20mm high.
• Check the appearance of the flame at every use. Contact a specialist to reset the appliance, should the
appearance differ from normal.
1
TIPS REGARDING BURNING GREASE
WARNING!
Protect yourself and your hands from spurts of flames. Never try to put out a grease fire with water! Turn the control knob to the off position OFF if a
grease fire occurs. Turn the gas supply on the gas cylinder and / or the pressure regulator off and wait until the fire goes out by itself.
• Grease and juice that drips from meat onto the heater produces short spurts of flames which also contribute to the grilling taste.
• If too many spurts of flames are produced, the meat could burn.
• Only use meat that is suitable for grilling. Try to avoid grilling meat with excessive fat.
• Cut away as much fat as possible and do not overuse marinade to prevent meat from burning, before grilling meat.
AFTER USE
1. Close the valve on the gas cylinder and / or the pressure regulator, wait until the flame extinguishes completely in the appliance.
2. Turn the control knob to off position OFF and let the appliance cool for about 45 minutes. The cover must be open at this time.
3. Disconnect the gas cylinder from the appliance, clean (→ CLEANING, MAINTENANCE AND CARE) and store the appliance (→ STORAGE AND
TRANSPORTATION), if you do not plan to use the appliance again soon.
TROUBLESHOOTING
Suspected malfunctions, errors or damage are often due to causes that the users can fix themselves. Therefore check the appliance using below table before
contacting a qualified specialist. In most cases the problem can be solved quickly.
WARNING!
Only perform the steps described within this instruction manual! All further inspection, maintenance and repair work must be performed by an
authorised service centre or a similarly qualified specialist!
Problem Possible cause Solution
Gas leaking from cracked/cut/
burned hose.
Damaged hose. Turn off gas at gas cylinder. Make a gas leak test and check the
connection of the regulator to the gas cylinder. If hose is cut or cracked,
replace hose.
Gas leaking from gas cylinder. Mechanical failure due to resting or mishandling. Turn off gas cylinder valve.
Gas leaking from gas cylinder
valve.
Failure of cylinder valve from mishandling or
mechanical failure.
Turn off gas cylinder valve. Return gas cylinder to gas supplier.
Gas leaking between gas
cylinder and regulator
connection.
Improper installation, connection not tight, failure
of rubber seal.
Turn off gas cylinder valve, remove regulator from cylinder and visually
inspect rubber seal for damage. Make a gas leak test and check the
connection of the regulator to the gas cylinder.
Fire coming through control
panel.
Fire in burner tube section of burner due to partial
blockage.
Turn off control knob and gas cylinder valve. After fire is out and
appliance is cold, remove burner and inspect for spider nests or rust.
Refer to chapter CLEANING, MAINTENANCE AND REPAIR.
GB

8
Grease fire or continuous
excessive flames above
cooking surface.
Too much grease buildup in burner area. Turn off gas cylinder. Leave cover open to allow flames to die down.
After cooling, clean food particles and excess grease from inside
firebox area, grease cup/pan/tray, and other surfaces.
Burner does not light using
ignitor.
Gas issues:
1. Trying to light wrong burner.
2. Burner not engaged with control valve.
3. Obstruction in burner.
4. No gas flow.
5. Vapor lock at coupling nut to gas cylinder.
6. Coupling nut and gas cylinder valve not fully
connected.
1. See instructions on control panel, operation and cleaning.
2. Make sure valve is positioned inside of burner tubes.
3. Ensure burner tubes are not obstructed with spider webs or other
matter, see instructions on cleaning.
4. Make sure gas cylinder is not empty. If gas cylinder is not empty,
refer to point “Sudden drop in gas flow or low flame” in this table.
5. Turn off knob and disconnect coupling nut from gas cylinder.
Reconnect and retry.
6. Turn the coupling nut approximately one-half to three-quarters.
Burner does not light using
ignitor.
Electrical issues:
1. Electrode cracked or broken; sparks at crack.
2. Electrode tip not in proper position.
3. Wire and/or electrode covered with cooking
residue.
4. Wires are loose or disconnected.
5. Wires are shorting (sparking) between ignitor
and electrode.
6. Control knob is stuck at bottom; sparking
between ignitor and electrode.
1. Replace electrode.
2. Tip of electrode should be pointing toward port hole in burner. The
distance should be 0.32 cm to 0,48 cm. Adjust if necessary.
3. Clean wire and/or electrode with rubbing alcohol and a clean swab.
4. Reconnect wires or replace electrode/wire assembly.
5. Replace ignitor wire.
6. Replace ignitor.
7. Inspect wire insulation and proper connection. Replace wires if
insulation is broken.
Burner does not match-light. 1. See ”Gas issues” under point “Burner does not
light using ignitor”.
2. Improper method of match-lighting.
1. See solution for ”Gas issues” under point “Burner does not light
using ignitor”.
2. See “Igniting the burner with a match” section of Operation chapter.
Sudden drop in gas flow or
low flame.
Flare-up.
1. Grease build-up.
2. Excessive fat in meat.
3. Excessive cooking temperature.
1. Clean burners and inside of grill/firebox.
2. Trim fat from meat before grilling.
3. Adjust (lower) the temperature.
Flames blow out. 1. High or gusting winds.
2. Low on gas.
3. Excess flow valve tripped.
1. Turn front of appliance to face wind or increase flame height.
2. Refill gas cylinder.
3. Refer to point “Sudden drop in gas flow or low flame” in this table.
Persistent grease fire. Grease trapped by food build-up around burner
system.
Turn knob to OFF. Turn gas off at gas cylinder. Leave cover in position
and let fire burn out. After appliance cools, remove and clean all parts.
Flashback (fire in burner
tube).
Burner and burner tubes are blocked. Turn knob to OFF. Clean burner and/or burner tubes. Refer to cleaning
chapter.
Unable to fill gas cylinder. Some dealers have older fill nozzles with worn
threads.
Turn worn nozzles that don’t have enough “bite” to engage the valve.
Try a second gas cylinder dealer.
CLEANING, MAINTENANCE AND REPAIR
WARNING!
Always switch the appliance off and let it cool down completely before performing inspection, maintenance and cleaning work or before storing the
appliance!
Do not immerse the burner into water or other liquids. If it becomes wet, let it dry thoroughly and check the function afterwards.
Cleaning
1. Wipe all surfaces with a wet soft cloth after each use. Use a mild detergent to remove grease.
2. The interior surfaces of the appliance housing should be cleaned with hot, soapy water. Use a wire brush, steel wool or a scouring pad to remove stubborn
dirt.
3. Grids should be cleaned periodically by soaking and washing in soapy water.
NOTES:
• Do not use chemical, alkaline, abrasive or other aggressive detergents or disinfectants to clean this appliance as they might be harmful to its
surfaces.
• Don’t obstruct the fire opening of the cylinder compartment. If the fire opening is obstructed, please use a Ø 1.6mm round stick to clean it.
• Take care not to enlarge burner ports or orifice/nozzle openings when cleaning the burner or valves.
Grease tray
1. Avoid grease tray overflows. Empty regularly during use.
2. Clean the grease tray after each use with warm water and a mild detergent.
MAINTENANCE
Before and after each use, check the appliance or accessories or attachments for wear and damage. If required, exchange them for new ones as described in
this instruction manual. Observe the technical requirements (→ TECHNICAL DATA).
Thorough maintenance of the appliance is recommended every 90 days, but it is absolutely necessary once a year. By doing so, you will extend the life of the
appliance.
1. Periodically check the burner to see that it is free from insects and spiders which may clog the gas system, deflecting gas flow. Ensure to clean the venturi
pipes on the burner very carefully, make sure that there are no obstructions. We recommend to use a pipe cleaner to clean the venturi pipe area.
GB

9
2. Perform a visual check of the burner flames regularly, do as follows:
a. Remove cooking grids and flame tamers.
b. Light the burner.
c. Turn control knob from HI to Low. Check the flame status, the flame in Low position should be smaller than in HI position
(see fig. on the right).
Always check flame before each use, if anything seems out of the ordinary (→ TROUBLESHOOTING).
1
MAX MIN
REPAIR
This appliance does not contain any parts that can be repaired by the consumer. Contact a qualified specialist to have it checked and repaired.
WARNING!
Always make sure all safeguards, if available, have been reinstalled safely and correctly after each cleaning or maintenance! Never use the
appliance without its safeguards!
STORAGE AND TRANSPORTATION
STORAGE
1. Switch the appliance off.
2. Clean the appliance as described above.
3. Cover the burner with aluminium foil so that no dust or insects collect inside.
4. Disconnect the gas cylinder from the appliance. Ensure that you are outdoors and away from any sources of ignition before attempting to disconnect the gas
cylinder from the appliance.
5. Store the gas cylinder in a well-ventilated outdoor location. Make sure that the gas cylinder is not stored near heat or ignition sources or in direct sunlight.
6. Do not store a spare gas cylinder under or near this appliance.
7. Store the appliance and its accessories in a dry, frost-free place. The ideal storage temperature is between 10 °C and 30 °C.
8. If the appliance is stored outdoors ensure to check that all areas under the front panel are free from any obstructions (insects etc.) This area must be kept
free as this may affect the flow of combustion or ventilation air.
9. Always store the appliance in a place that is inaccessible to children.
10. We recommend using the original package for storage where possible or covering the appliance with a suitable cloth to protect it against dust.
11. Clean the appliance itself and the burner thoroughly before use, if the appliance has been stored for a long period of time. Ensure to check for gas leaks and
check for any obstructions in the burner etc. before use.
TRANSPORTATION
1. Switch the appliance off.
2. Attach transportation guards, if applicable.
3. Protect the appliance from any heavy impact or strong vibrations which may occur during transportation in vehicles.
4. Secure the appliance to prevent it from slipping or falling over.
DISPOSAL
Environmental Protection
Discarded electric appliances are recyclable and should not be discarded in the domestic waste! Please actively support us in conserving resources
and protecting the environment by returning this appliance to the collection centres.
TECHNICAL DATA
Nominal heat input 3.5 kW x 1
Gas consumption Butane: 255 g/h
Propane: 249 g/h
Cooking area (W x D) 50 x 38 cm
Cooking height (H) 22 cm
Dimensions (H x D x W) 110 x 50 x 34 cm
Max. length gas hose 1.5 m (for Finland only 1.2 m)
Appliance category I3+ (28-30/37) I3B/P (30) I3B/P (50) I3B/P (37)
Gas type and pressure G30 (Butane) at 28-30 mbar /
G31 (Propane) at 37 mbar
G30 (Butane),
G31 (Propane) and their mixtures at 30 mbar
G30 (Butane),
G31 (Propane) and their
mixtures at 50 mbar
G30 (Butane),
G31 (Propane) and their
mixtures at 37 mbar
Main burner(s) orifice size ø 0.93 mm ø 0.93 mm ø 0.82 mm ø 0.86 mm
Destination country BE, FR, IT, LU, LV, IE, GB,
GR, PT, ES, CY, CZ, LT, SK,
CH, SI
LU, NL, DK, FI, SE, CY, CZ, EE, LT, LV, MT,
SK, SI, BG, IS, NO, TR, HR, RO, IT, HU
AT, DE, CH, LU, SK PL
Pressure regulator type included for different destination countries ( → PRESSURE REGULATOR TYPES)
PRESSURE REGULATOR TYPES
Destination country Pressure regulator type Gas pressure [mbar] Gas consumption [kg/h]
RU A300i-A310i 30
1.5
BG
A235
30
PT 28-30/37
ES
RO
A300i-A310i
30
NL
HU
IT
PL 37
BE 28-30/37
DE 50
AT
GB

10
WARRANTY
A statutory warranty applies for this product.
Damages caused by wrong treatment or operation, by false placement or storage, improper connection or installation, as well as force or other external
influences are not covered by this warranty. We recommend careful reading of the operating instructions as it contains important information.
Note:
1. In case this product does not function correctly, please firstly check if there are other reasons, e.g. for electrical appliances interruption of the power supply,
or generally incorrect handling are the cause.
2. Please note that, where possible, the following documents or rather information should be provided together with your faulty product:
– Purchase receipt
– Model description/Type/Brand
– Describe the fault and problem as detailed as possible
In the case of a claim for guarantee or defects, please contact the seller.
GWL 8/14 EN
Art. No.: CQ01-01
QA21-0000001726
210930
MCC Trading international GmbH
Schlüterstraße 5
40235 Düsseldorf
Germany
Made in China
{ Aufbauanleitung
Bitte nehmen Sie sich einige Minuten Zeit, bevor Sie das Gerät in Betrieb nehmen, und lesen Sie die nachfolgende
Gebrauchsanweisung durch.
NUR IM FREIEN VERWENDEN!
LESEN SIE DIE BEDIENUNGSANLEITUNG VOR INBETRIEBNAHME DES GERÄTES!
ACHTUNG! ZUGÄNGLICHE TEILE KÖNNEN SEHR HEISS SEIN. KINDER FERNHALTEN!
DAS GERÄT MUSS WÄHREND DES BETRIEBS VON BRENNBAREN MATERIALIEN FERNGEHALTEN WERDEN!
DAS GERÄT WÄHREND DES BETRIEBS NICHT BEWEGEN!
NACH GEBRAUCH DIE GASZUFUHR AM GASFLASCHENVENTIL ODER DRUCKREGLER SCHLIESSEN!
KEINE VERÄNDERUNGEN AM GERÄT VORNEHMEN! JEDE ÄNDERUNG DES GERÄTS KANN GEFÄHRLICH SEIN.
TEILE, DIE VOM HERSTELLER ODER SEINEN VERTRETER VERSIEGELT WURDEN, DÜRFEN VOM BENUTZER NICHT
VERÄNDERT WERDEN.
EINIGE TEILE DIESES GERÄTS WERDEN SEHR HEISS. GEBEN SIE BESONDERS ACHT, WENN KINDER ODER ÄLTERE
MENSCHEN ANWESEND SIND.
LAGERN ODER VERWENDEN SIE KEIN BENZIN ODER MENTHOLIERTE KRAFTSTOFFE ODER ANDERE ENTZÜNDLICHE
DÄMPFE UND FLÜSSIGKEITEN IN DER UMGEBUNG DIESES ODER EINES ANDEREN GERÄTS.
NIEMALS EINEN GASGRILL MIT BENZIN ODER VERGLEICHBAREN FLÜSSIGKEITEN ANZÜNDEN!
VERÄNDERN SIE NICHT DIE VOM HERSTELLER ABGEPACKTEN MONTAGEELEMENTE.
EXPLOSIONSGEFAHR!
BESTIMMUNGSGEMÄSSER GEBRAUCH
Dieser Grill ist geeignet zum Grillen von Lebensmitteln in gut belüfteten Außenbereichen. Das Gerät muss mit Niederdruck-Propan oder -Butan-Flüssiggas
(LPG) betrieben werden. Verwenden Sie kein Erdgas.
Dieses Gerät ist nur für den privaten Haushaltsgebrauch, nicht für gewerbliche oder industrielle Nutzung bestimmt. Es darf nicht zu anderen Zwecken als
beschrieben verwendet werden, um Personen- und Sachschäden zu vermeiden.
SICHERHEITSHINWEISE
Lesen Sie diese Bedienungsanleitung vor dem ersten Gebrauch des Gerätes aufmerksam durch. Machen Sie sich mit der Nutzung,
Einstellmöglichkeiten und Funktionen der Schalter vertraut. Verinnerlichen Sie Sicherheitshinweise und Anweisungen und befolgen Sie
diese, um mögliche Risiken und Gefahren zu vermeiden.
Bewahren Sie die Bedienungsanleitung für spätere Bezugnahme auf und händigen Sie diese mit aus, wenn Sie das Gerät an andere
Benutzer weitergeben.
ALLGEMEINE SICHERHEITSHINWEISE FÜR GRILLS
1. WARNUNG! Gefahr von Kohlenmonoxidvergiftung! Die Verwendung dieses Geräts in geschlossenen Räumen kann gefährlich sein und ist VERBOTEN.
Verwenden Sie das Gerät niemals in geschlossenen Umgebungen, wie Garagen oder Hütten, da dies zu einer Ansammlung von Kohlenmonoxid führen
kann und dies wiederum Verletzungen oder Tod zur Folge haben kann.
2. WARNUNG! Explosionsgefahr! Verwenden Sie das Gerät niemals in geschlossenen Umgebungen, wie Garagen oder Hütten, da dies zu einer
Gasansammlung infolge eines Lecks führen kann und dadurch Explosionen verursacht werden können.
3. Stellen Sie das Gerät vor dem Gebrauch auf einen sicheren, ebenen, stabilen und nicht brennbaren Untergrund und nicht in die Nähe von Wärmequellen.
4. Bewegen Sie das Gerät nicht während des Gebrauchs.
5. Nehmen Sie keinerlei Veränderungen an dem Gerät vor. Verwenden Sie nur Aufsätze und Zubehörteile, die vom Hersteller empfohlen werden.
Modifikationen am Gerät, ein unsachgemäßer Gebrauch oder die Nichteinhaltung von Anleitungen können Gefahrensituationen verursachen.
6. Über dem Gerät dürfen sich keine Hindernisse befinden, z. B. Bäume, Sträucher, Dächer, Pavillons, Sonnenschirme oder ähnliches. Das Gerät muss mit
einem Mindestabstand von 1 m auf allen Seiten installiert werden.
7. Verwenden Sie das Gerät nicht in der Nähe brennbarer Objekte. Halten Sie einen Sicherheitsabstand von mindestens 1 m zu solchen Objekten.
8. Verwenden Sie das Gerät nicht in unmittelbarer Nähe von Sprühdosen, brennbaren Flüssigkeiten, flüchtigen Gasen oder anderen brennbaren Substanzen.
QA21-0000001726
2531
21
GB
DE

11
Halten Sie offene Flammen, wie Kerzen oder Fackeln, fern vom Gerät.
9. Lagern Sie keine brennbaren Flüssigkeiten oder flüchtige Gase in der Nähe des Geräts.
10. Lassen Sie das Gerät während des Gebrauchs nicht unbeaufsichtigt.
11. Verwenden Sie keine flüssigen Brennstoffe mit dem Gerät.
12. Lehnen Sie sich während des Anzündens des Geräts oder des Kochens nicht über die Grillfläche.
13. Dieses Gerät ist nicht geeignet für den Gebrauch durch Personen (einschließlich Kinder) mit eingeschränkten körperlichen, sensorischen oder geistigen
Fähigkeiten, sowie ohne Erfahrung und Wissen, es sei denn, sie werden von einer für ihre Sicherheit zuständigen Person beaufsichtigt und erhielten von
dieser Anweisungen, wie das Gerät zu benutzen ist.
14. Beaufsichtigen Sie Kinder stets, um sicherzustellen, dass sie nicht mit dem Gerät spielen.
15. Halten Sie alle Stromkabel und den Gasschlauch von erhitzten Oberflächen fern.
16. Erhitzen Sie keine ungeöffneten Lebensmittelbehälter aus Glas oder Metall auf dem Gerät. Es kann sich Druck aufbauen und der Behälter platzen, was zu
schweren Verletzungen oder Schäden am Gerät führen kann.
17. WARNUNG! Die maximale Belastung der Seitentische (2 kg) darf nicht überschritten werden.
SICHERHEITSHINWEISE FÜR GAS-GRILLS
1. Dieses Gerät wurde für die Verwendung mit Niederdruck-Propan und -Butan-Flüssiggas (LPG) entwickelt. Verwenden Sie kein Erdgas.
2. Öffnen Sie die Abdeckung, bevor Sie das Gerät anzünden.
3. Öffnen Sie die Abdeckung während des Gebrauchs sehr vorsichtig. Heißer Dampf, der sich im Inneren der Abdeckung ansammelt, kann beim Öffnen der
Abdeckung schnell entweichen.
4. Decken Sie das Gerät erst ab, wenn es vollständig abgekühlt ist.
5. Verwenden Sie niemals Holzkohle oder andere feste Brennstoffe in diesem Gerät.
6. Wenn die Windgeschwindigkeit 2 m/s überschreitet, verwenden Sie das Gerät nicht in Windrichtung.
7. Seien Sie vorbereitet, wenn es zu einem Unfall oder Brand kommen sollte. Wissen Sie, wo sich der Erste-Hilfe-Kasten und die Feuerlöscher befinden und
wissen Sie, wie man sie benutzt.
8. Es wird empfohlen, das Gerät mindestens einmal im Jahr von einem kompetenten Techniker Ihres örtlichen Gashändlers warten zu lassen. Versuchen Sie
nicht, dieses Gerät selbst zu warten.
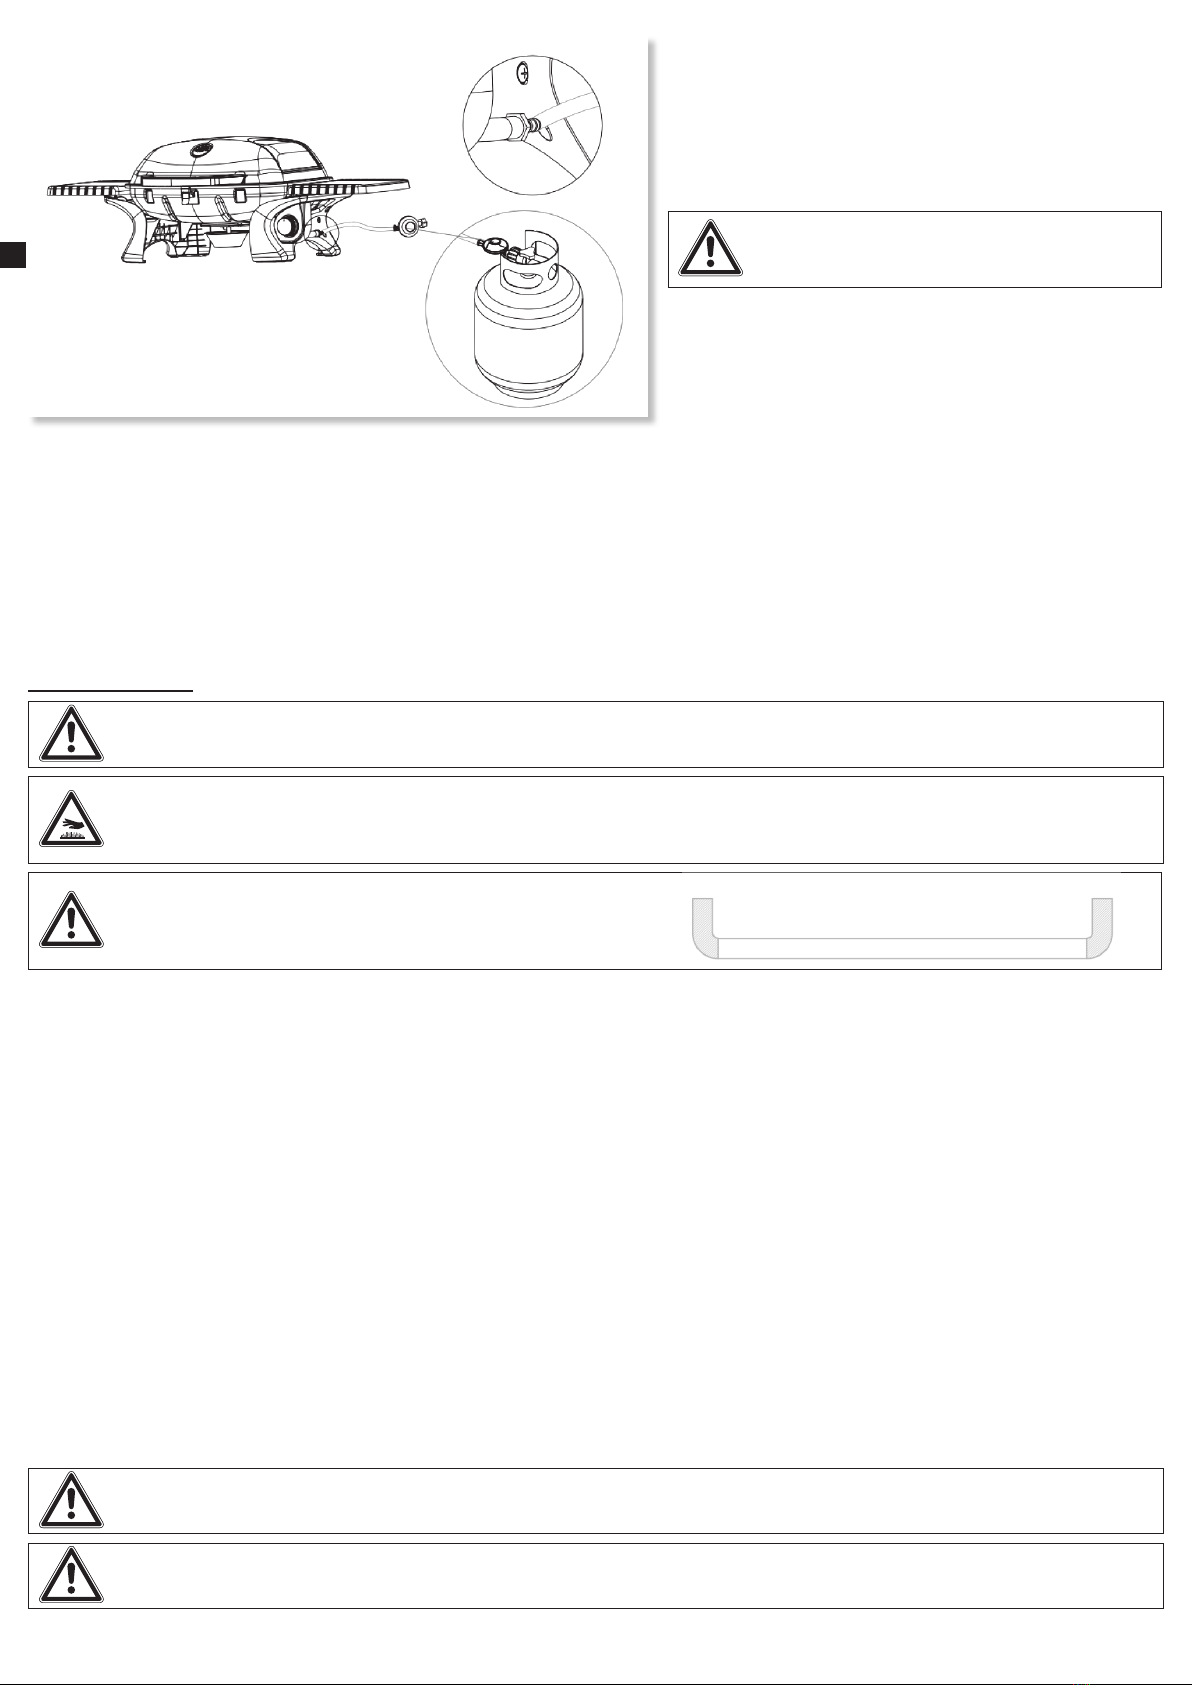
SICHERHEITSHINWEISE FÜR GASANSCHLÜSSE / GASFLASCHEN / DRUCKREGLER
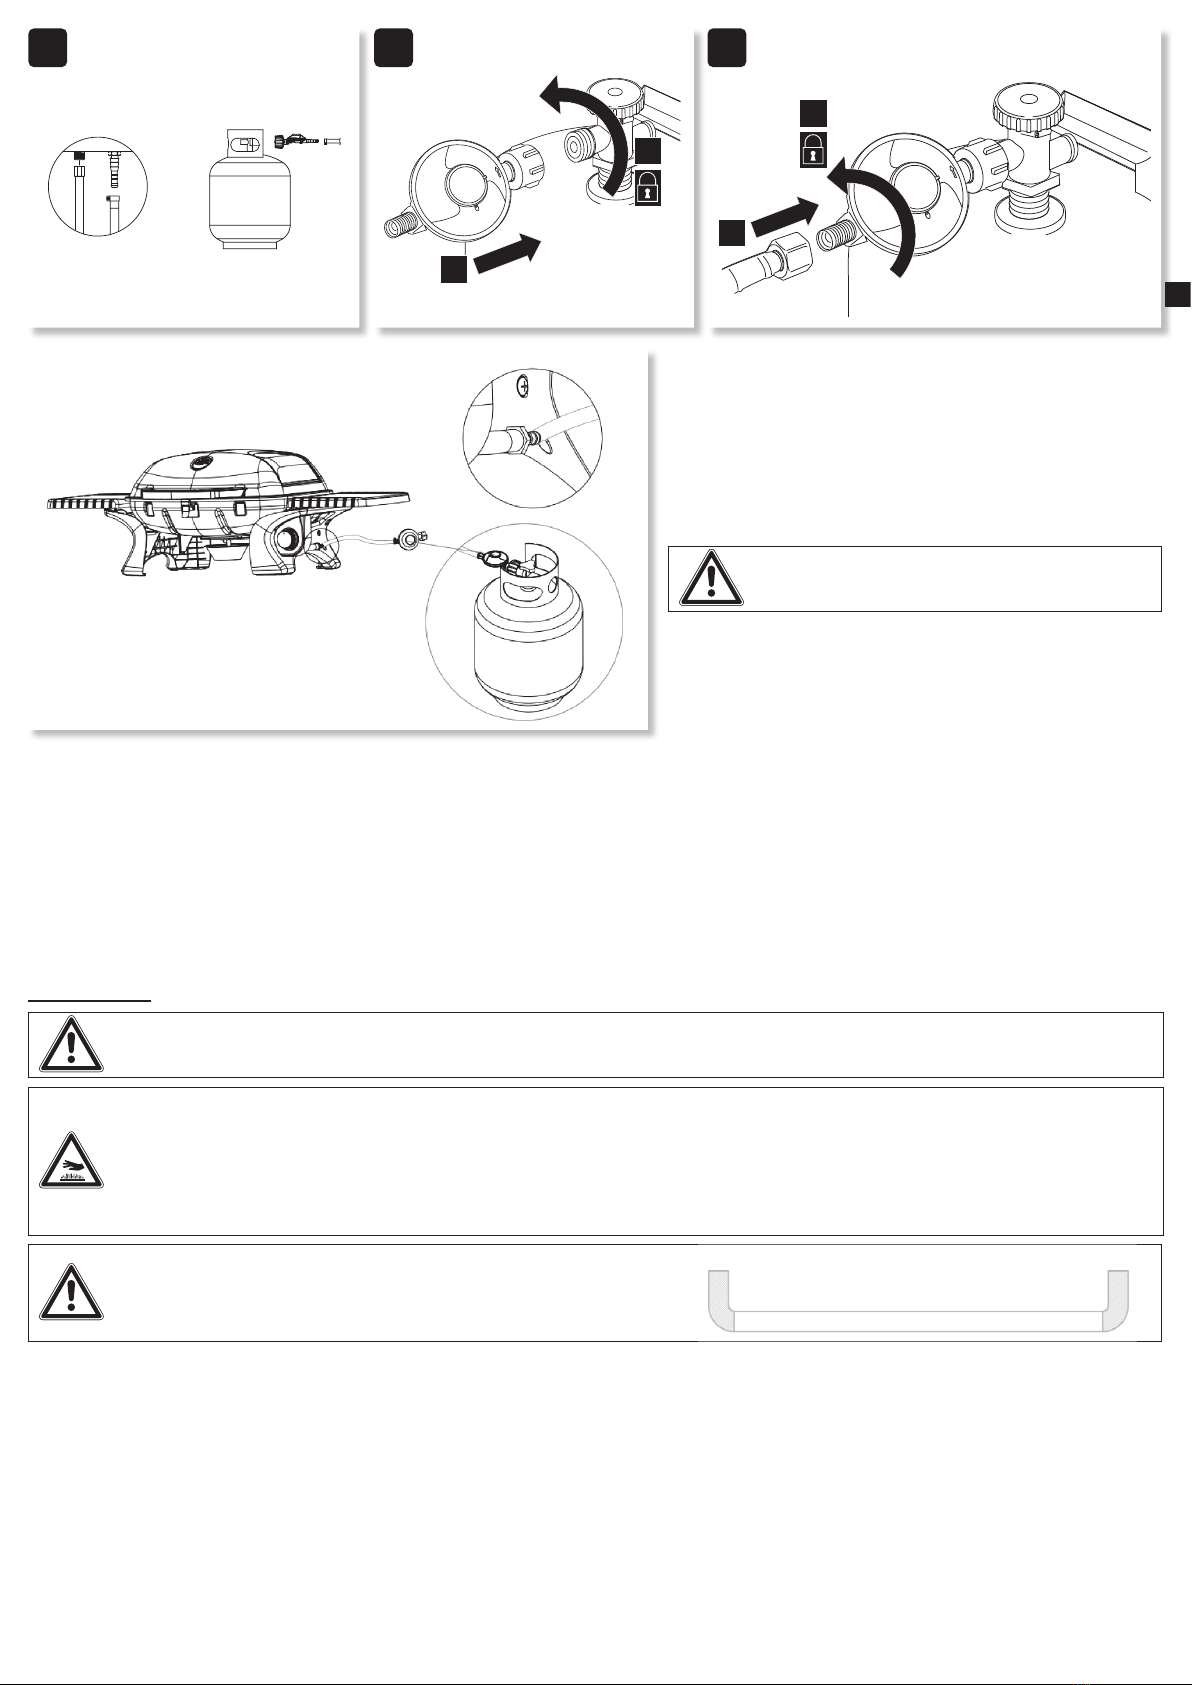
1. Überprüfen Sie das Gerät und die Anschlüsse regelmäßig und nach jedem Wechsel der Gasflasche auf Gasaustritt (→ Dichtigkeitsprüfung).
2. Verwenden Sie weder Streichhölzer noch anderes offenes Feuer, um nach undichten Gasstellen zu suchen.
3. Verstellen oder modifizieren Sie niemals den Gasregler oder die Gasversorgungseinheit.
4. Schließen Sie nach jedem Gebrauch die Gaszufuhr an der Gasflasche und / oder am Druckregler und trennen Sie den Gasschlauch.
5. Lagern Sie Gasflaschen nicht in Innenräumen oder in der Nähe von Wärme- oder Zündquellen.
6. Lagern Sie die Gasflasche senkrecht und niemals waagerecht, um ein Auslaufen zu verhindern und damit kein Gas unkontrolliert in die Gasleitung fließen
kann.
7. Verwenden Sie das Gerät nicht ohne den Druckregler.
8. Verwenden Sie ausschließlich Druckregler, die für den Gebrauch mit Flüssiggas (LPG) zugelassen sind und nationalen Vorschriften entsprechen. Beachten
Sie die technischen Daten (→ TECHNISCHE DATEN).
9. Stellen Sie die Gasflasche niemals unter dem Gerät auf, da dies zu schweren Verletzungen des Benutzers, anderer Personen und/oder Sachschäden
führen kann.
10. Versuchen Sie nicht, Gasverbindungen am Gerät oder am Druckregler / der Gasflasche zu trennen, wenn das Gerät verwendet wird.
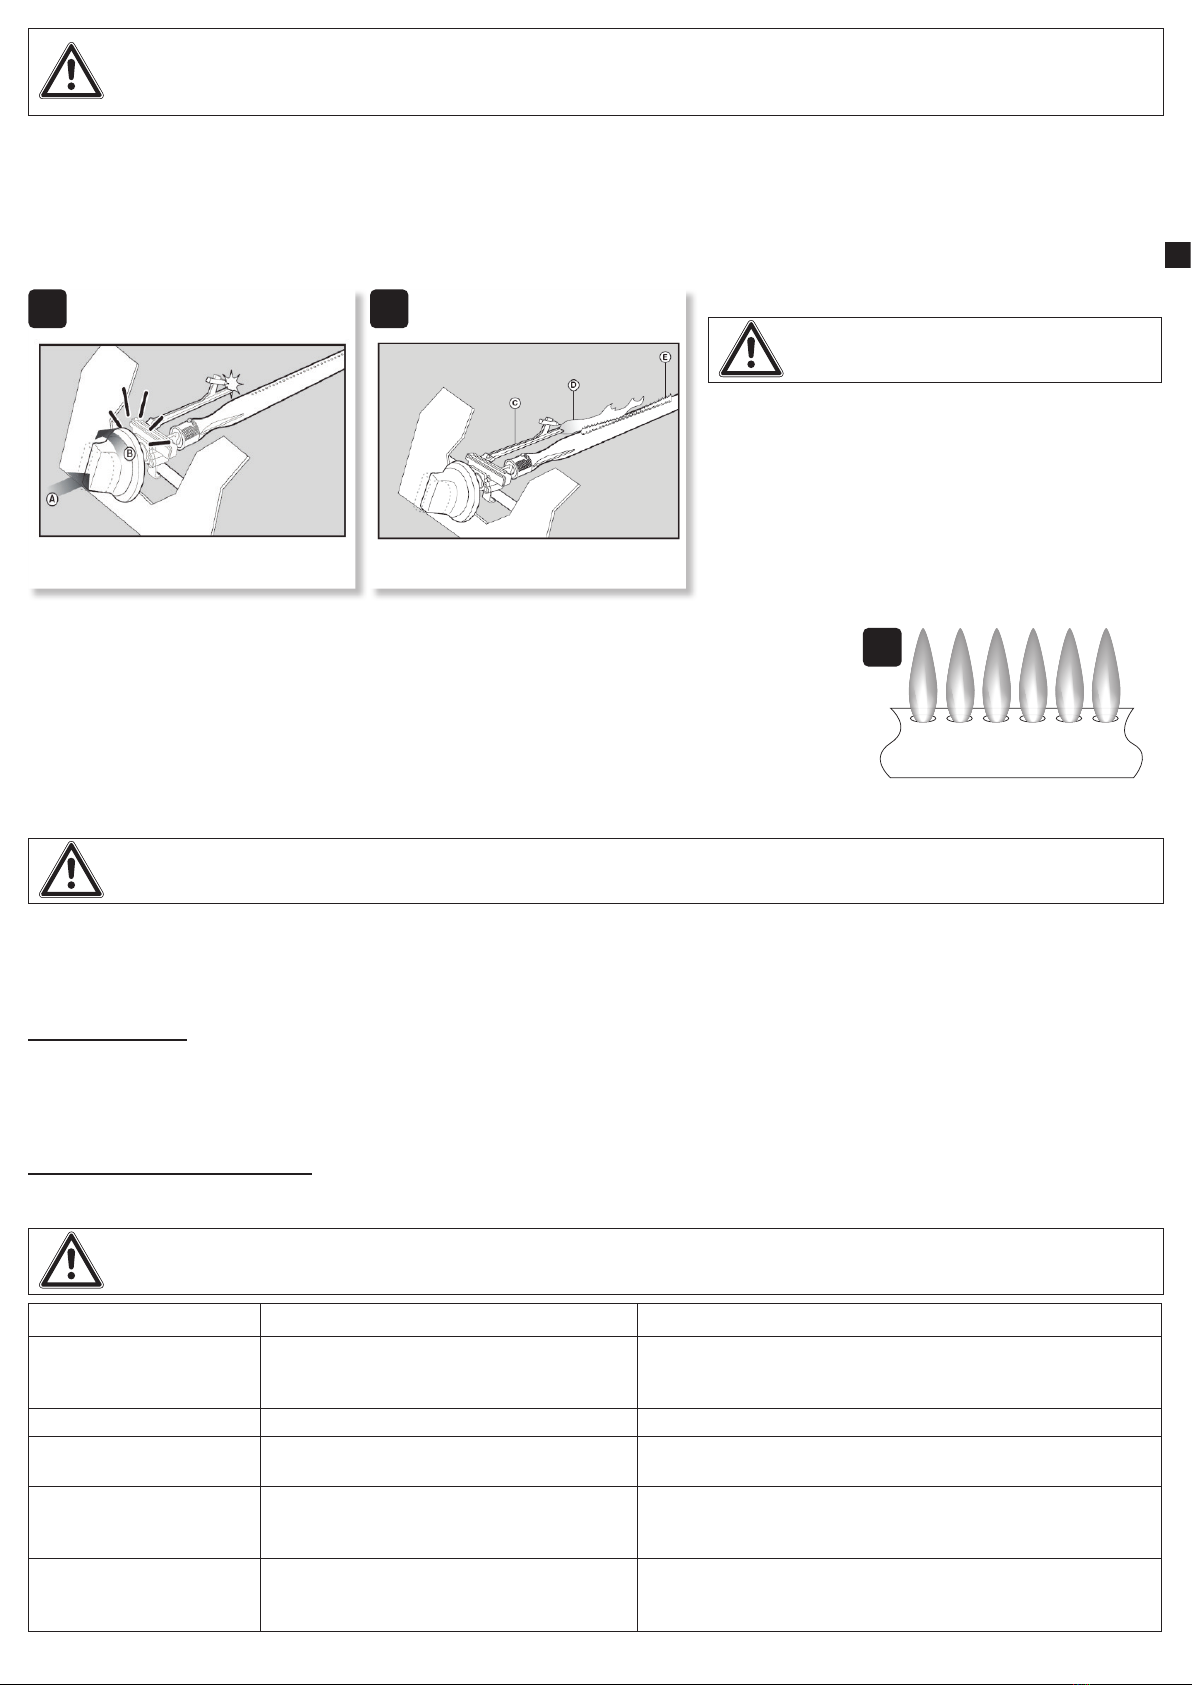
SICHERHEITSHINWEISE FÜR GASSCHLÄUCHE
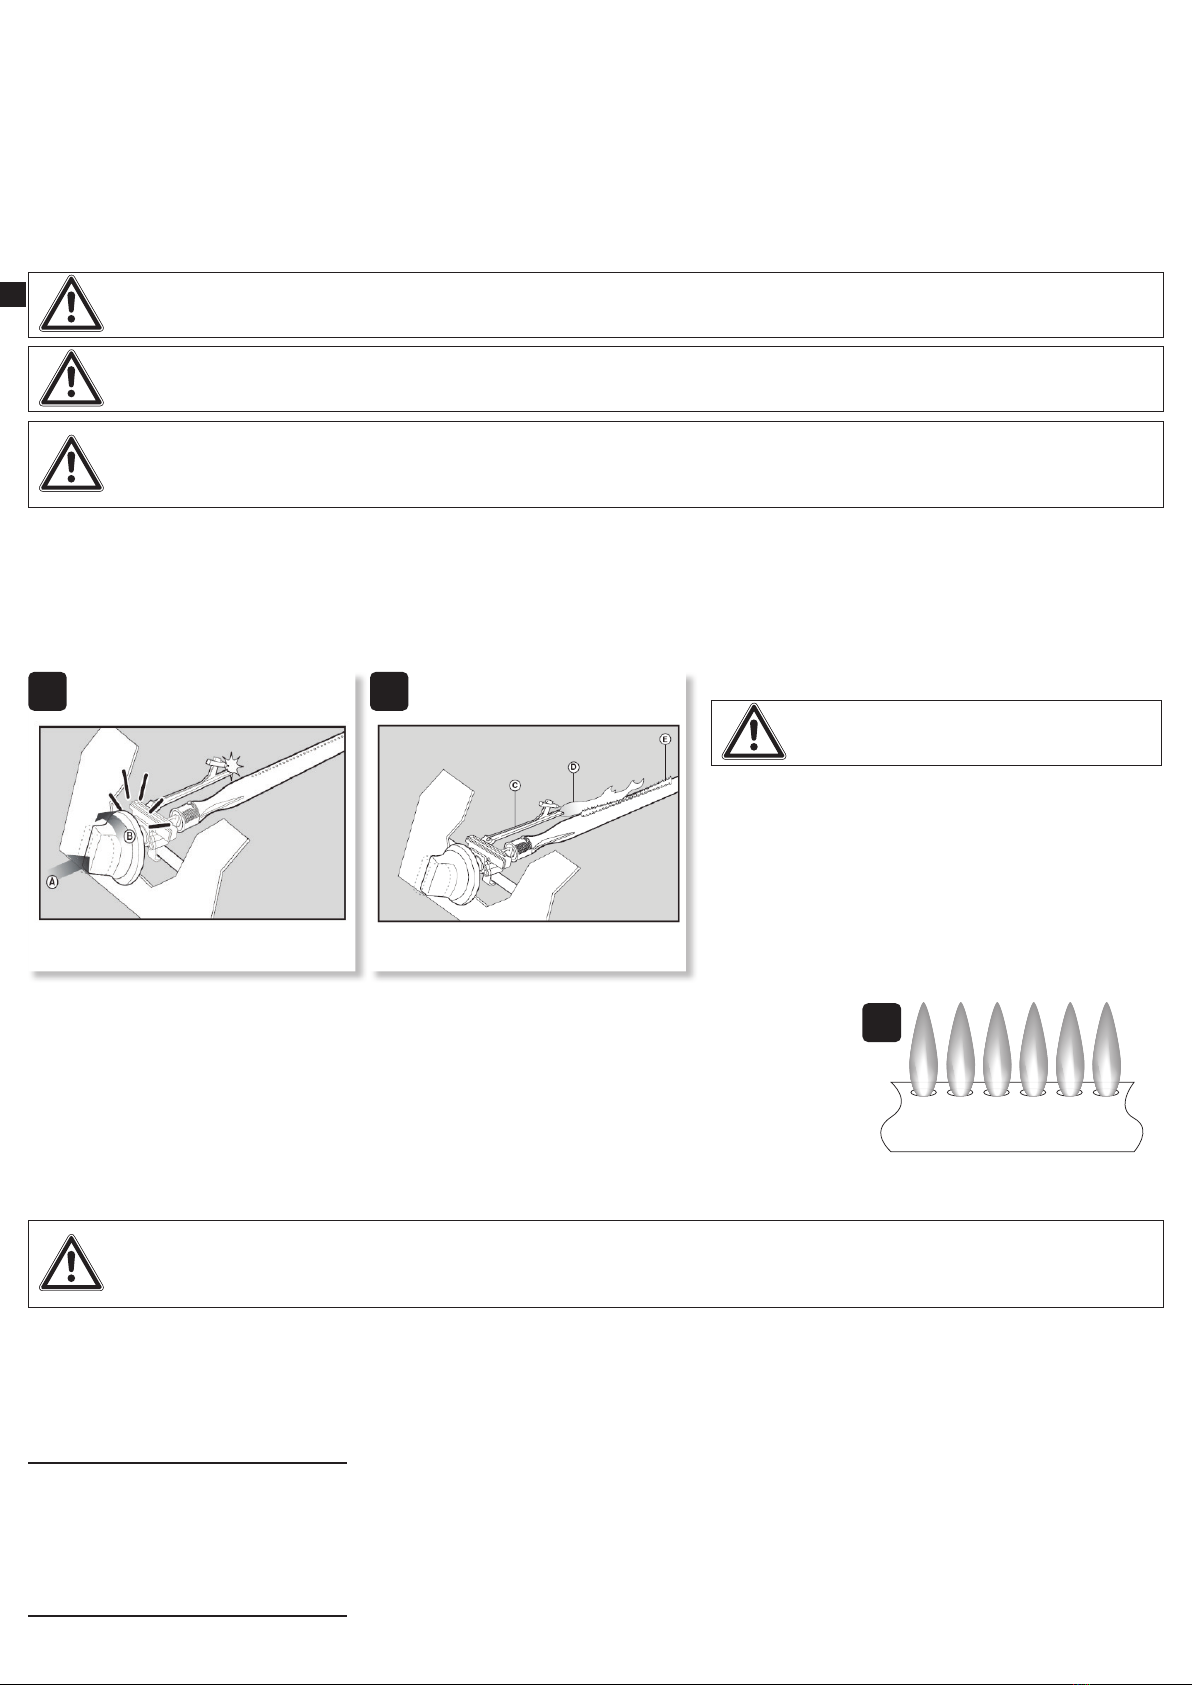
1. Überprüfen Sie den Gasschlauch vor und nach jedem Gebrauch - suchen Sie nach Schnitten, Rissen, übermäßiger Abnutzung oder anderen Schäden.
Wenn der Schlauch in irgendeiner Weise defekt ist, versuchen Sie nicht, das Gerät zu benutzen.
2. Lassen Sie den Gasschlauch alle ein bis zwei Jahre (oder wenn es die nationalen Bestimmungen erfordern) nur von einem qualifizierten Techniker oder
Ihrem Einzelhändler austauschen. Lassen Sie brüchige Gasschläuche und deren Verbindungen austauschen. Fragen Sie einen Spezialisten, falls Sie
Zweifel haben.
3. Schützen Sie den Gasschlauch vor Beschädigungen. Lassen Sie diesen nicht über scharfe Kanten hängen, verdrehen, pressen oder knicken Sie ihn nicht,
und setzen Sie ihn nicht übermäßiger Zugkraft aus. Halten Sie den Gasschlauch von heißen Oberflächen fern und stellen Sie sicher, dass niemand darüber
stolpern kann.
4. Verwenden Sie ausschließlich Gasschläuche, die für den Gebrauch mit Flüssiggas (LPG) zugelassen sind und nationalen Vorschriften entsprechen.
Beachten Sie die technischen Daten (→ TECHNISCHE DATEN).
5. Arbeiten an Schläuchen oder deren Ersatz dürfen nur von einem qualifizierten Experten oder Spezialisten und gemäß den Herstellerangaben durchgeführt
werden.
6. Verwenden Sie flexible Gasschläuche, die über 80°C hitzebeständig sind.
FALLS SIE GAS RIECHEN
1. Zünden Sie das Gerät niemals an, falls Sie Gas riechen.
2. Schließen Sie umgehend die Gaszufuhr am Gerät sowie an der Gasflasche und / oder am Druckregler.
3. Löschen Sie alle offenen Flammen in der Nähe des Geräts, wie z. B. Kerzen oder Fackeln. Schalten Sie alle elektrischen Geräte in der Umgebung aus.
4. Sorgen Sie für eine ausreichende Belüftung des Bereichs mit frischer Luft.
5. Öffnen Sie die Abdeckung des Geräts, um das Gas entweichen zu lassen.
6. Beenden Sie den Gebrauch und lassen Sie es nur von einer autorisierten Fachkraft reparieren, sollte das Gerät noch immer nach Gas riechen.
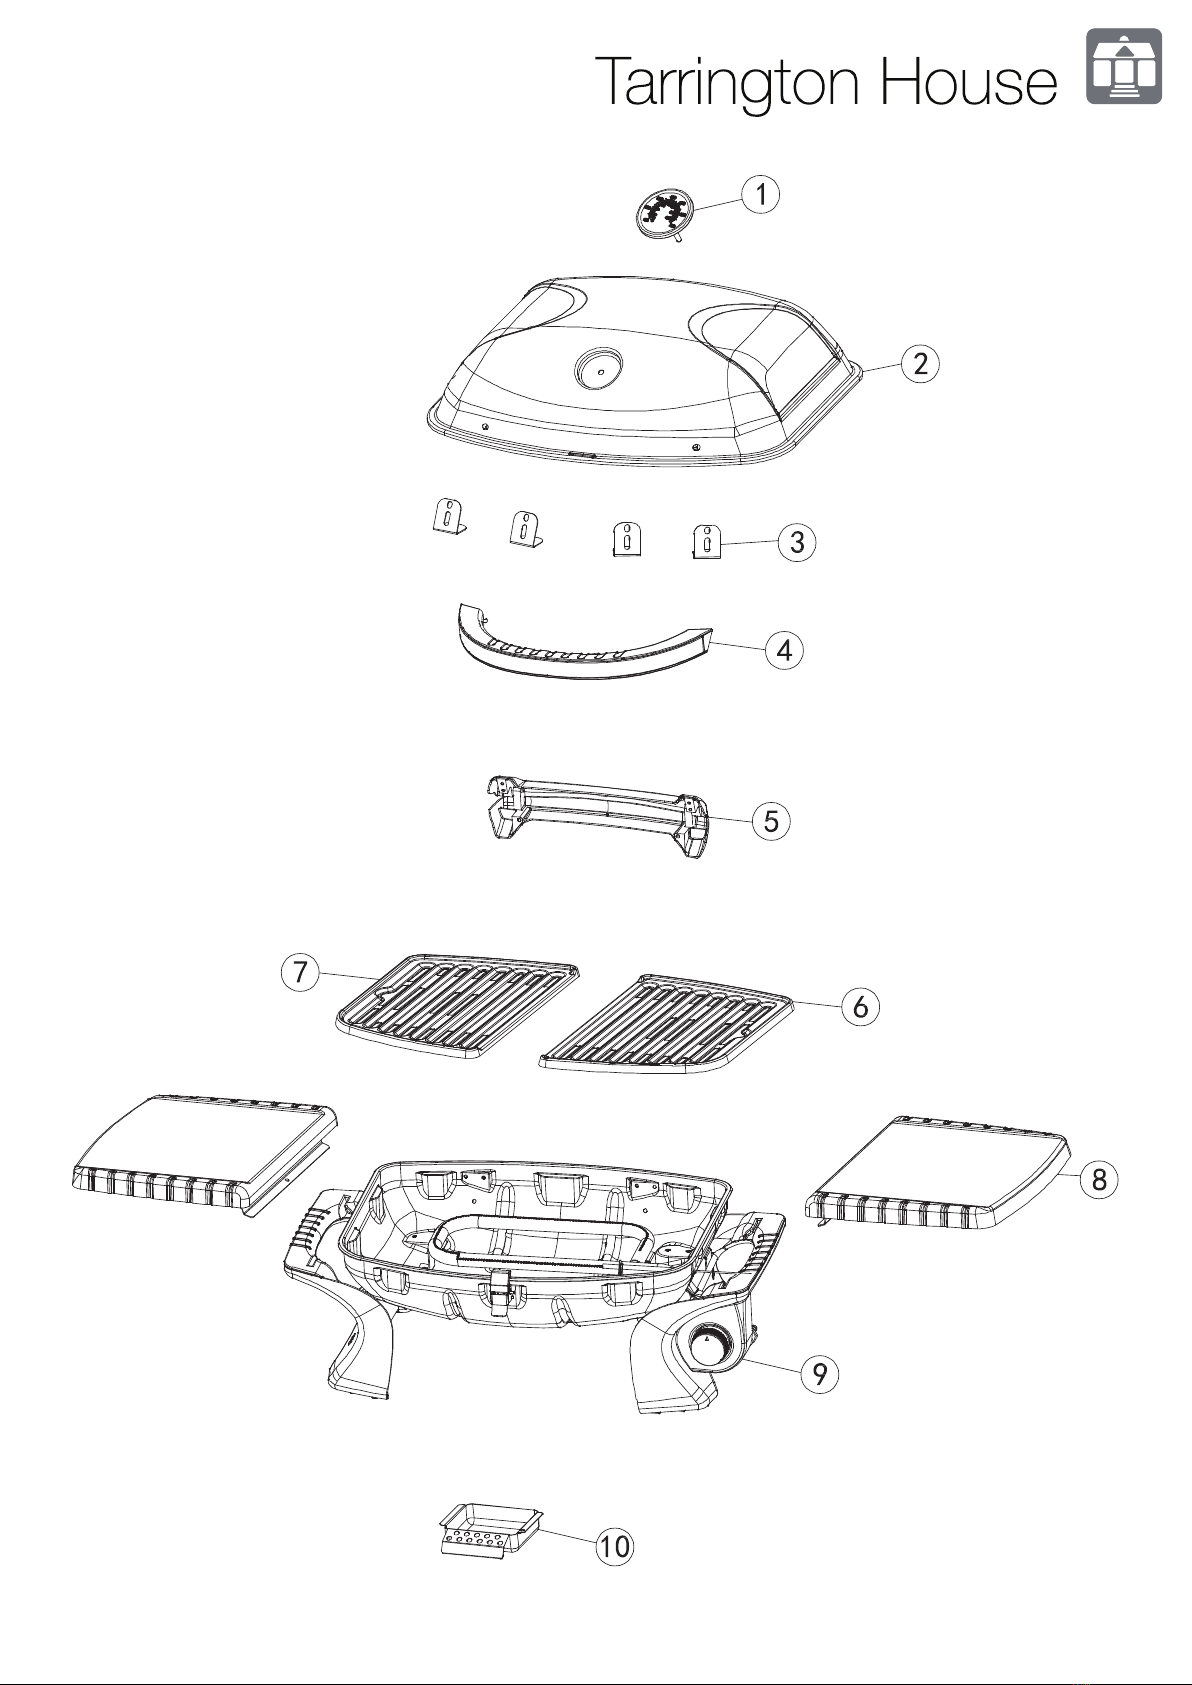
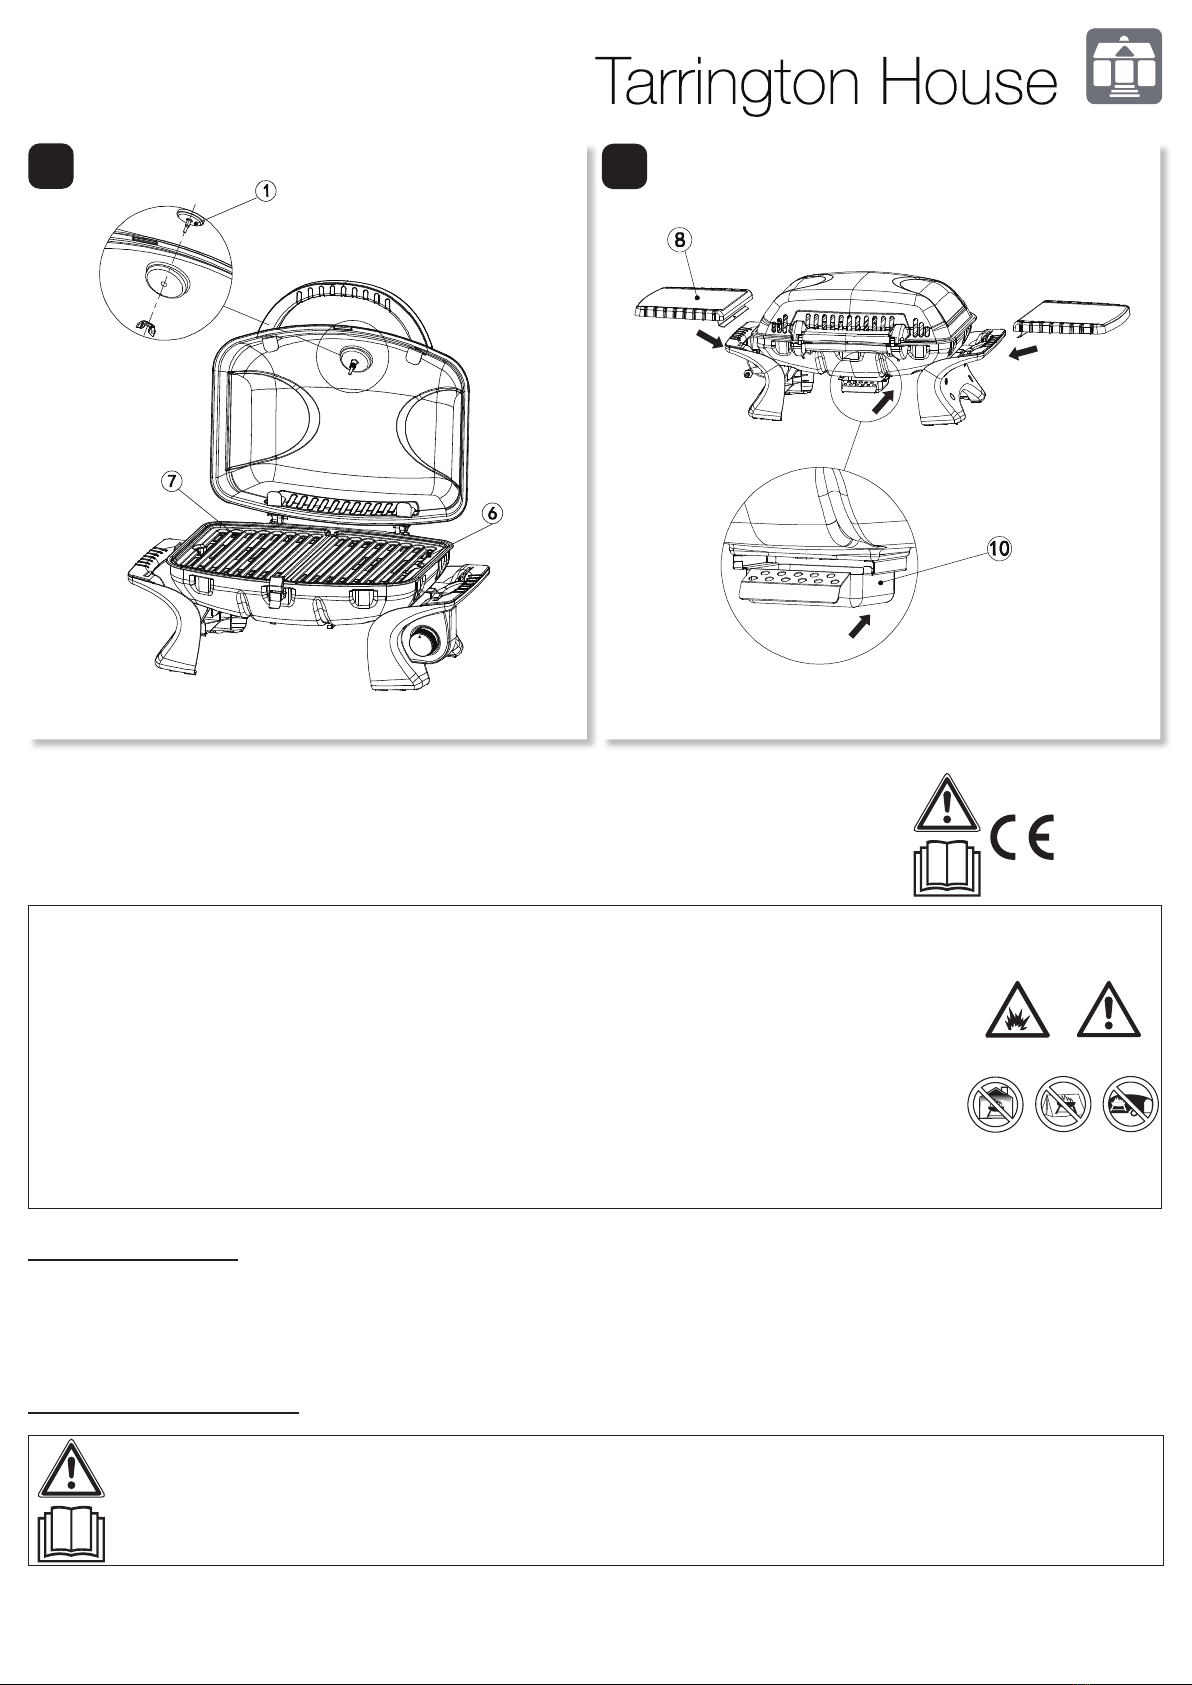
LIEFERUMFANG
Siehe Illustrations-Seiten am Anfang dieser Bedienungsanleitung für Details.
Stellen Sie sicher, dass der Lieferumfang vollständig und frei von möglichen Schäden ist. Wenden Sie sich an den Händler, bei dem Sie dieses Produkt gekauft
haben, wenn Sie feststellen sollten, dass Teile fehlen oder fehlerhaft sind (→ GEWÄHRLEISTUNG).
Verwenden Sie das Gerät nicht, bevor fehlende Teile nachgeliefert oder defekte Teile ersetzt worden. Die Verwendung eines unvollständigen oder beschädigten
Produkts führt zu Personen- und Sachschäden.
ZUBEHÖR
Für den sicheren und ordnungsgemäßen Gebrauch dieses Geräts werden unter anderem Zubehörteile wie z. B. Werkzeuge und Hilfsmittel benötigt: Siehe
Illustrations-Seiten am Anfang dieser Bedienungsanleitung für Details.
Versichern Sie sich, dass Sie über nötiges Zubehör und Werkzeuge für die Inbetriebnahme und Benutzung verfügen. Dies schließt eine geeignete persönliche
Schutzausrüstung ein.
Zubehör und Werkzeuge erhalten Sie im Fachhandel. Beachten Sie beim Erwerb immer die technischen Anforderungen dieses Produkts (→ TECHNISCHE
DATEN).
Fragen Sie bei Unsicherheit eine qualifizierte Fachkraft und lassen Sie sich von Ihrem Fachhändler beraten.
DE

12
HINWEIS:
In dieser Bedienungsanleitung finden Sie Informationen und Hinweise zu verschiedenen Hilfsmitteln und deren Einsatzbereichen. Die dargestellten
Hilfsmittel sind nicht zwingend im Lieferumfang enthalten, sondern zeigen die Einsatzmöglichkeiten dieses Produkts auf.
VOR DEM ERSTEN GEBRAUCH
AUSPACKEN
1. Packen Sie alle Teile aus und legen Sie diese auf eine flache, stabile Oberfläche.
2. Entfernen Sie das Verpackungsmaterial und Verpackungs- / und Transportsicherungen (falls vorhanden).
WARNUNG!
Das Gerät und Verpackungsmaterialien sind kein Kinderspielzeug! Kinder dürfen nicht mit Kunststoffbeuteln, Folien und Kleinteilen spielen! Es
besteht Verschluckungs- und Erstickungsgefahr!
ZUSAMMENBAU
1. Bauen Sie das Produkt vor dem Gebrauch vollständig zusammen und nehmen Sie alle nötigen Einstellungen vor.
2. Halten Sie sich strikt an die Aufbauschritte und Bedienhinweise. Nutzen Sie die Abbildung zur visuellen Unterstützung.
3. Achten Sie auf kleine Teile wie z. B. Schrauben und Muttern, die während des Zusammenbaus oder beim Einstellen gelöst und entfernt werden. Legen Sie
diese sicher zur Seite, um zu vermeiden, dass sie verloren gehen.
WARNUNG!
• Obwohl wir alle Anstrengungen unternehmen, um sicherzustellen, dass der Montageprozess so einfach wie möglich ist, ist es bei Stahlteilen
inhärent, dass Ecken und Kanten bei unsachgemäßer Handhabung während des Montagevorgangs Schnitte verursachen können. Seien Sie
vorsichtig beim Umgang mit Teilen während der Montage. Es wird dringend empfohlen, die Hände mit einem Paar Arbeitshandschuhen zu
schützen.
• Verwenden Sie das Gerät nur, nachdem es vollständig zusammengebaut und alle Einstellungen vorgenommen wurden!
Gasauswahl
1. Propangasflaschen können das ganze Jahr über verwendet werden. Butangasflaschen sind am besten für die Sommerzeit geeignet, da sie bei
Temperaturen unter +10 °C deutlich weniger effizient arbeiten.
2. Das Nettogewicht der Gasflaschen darf maximal 15 kg betragen.
3. Die Höhe der Gasflasche muss unter 80 cm und die Breite unter 35 cm liegen.
4. Gasflaschen dürfen nicht über 80% gefüllt sein. Überfüllte Gasflaschen können gefährlich sein durch entstehenden Staudruck und verursachen Propangas-
Dämpfe um das Ventil. Die Dämpfe sind brennbar, und wenn in Kontakt mit einer Funkenquelle oder der Flammzündung können sie eine Explosion
verursachen, die schwere Verbrennungen, Verletzungen oder zum Tod führen kann.
5. Verwenden Sie immer eine Schutzkappe für das Ventil, wenn das Gerät nicht mit der Gasflasche verbunden ist.
Gasanschlüsse
WARNUNG! Nehmen Sie sich vor Flammenrückschlag in Acht!
Vergewissern Sie sich vor dem Anschluss, dass das Kopfstück der Gasflasche, der Regler, der Brenner, die Brennerleitung bzw.
der Brennerschlauch frei von Rückständen, Spinnen, kleinen Insekten oder Spinnenweben sind. Solche Hindernisse können den
Gasfluss beeinträchtigen, wodurch wiederum Feuer in bzw. um die Brennerröhre herum verursacht werden kann. Solche Feuer werden
„Flammenrückschlag“ genannt und können schwerwiegende Schäden verursachen. Überprüfen und reinigen (→ REINIGUNG, WARTUNG UND
PFLEGE) Sie alle Teile des Geräts vor dessen Montage, um dies zu verhindern.
Gasflasche verbinden / ersetzen
WARNUNG!
Verwenden Sie nur den mitgelieferten oder äquivalente Druckregler (→ TECHNISCHE DATEN), um eine sichere und effiziente Funktionsweise zu
gewährleisten. Die Verwendung eines unsachgemäßen oder defekten Druckreglers ist gefährlich. Lassen Sie sich von Ihrem Fachhändler über geeignete
Druckregler beraten. Verwenden Sie nur Druckregler, die ausgewiesen sind, den einschlägigen Normen und Anforderungen (EN 16129) zu entsprechen.
Informieren Sie sich bei Ihrem Gashändler vor Ort über geeignete Gasflaschen und Druckregler (→ TECHNISCHE DATEN).
HINWEIS: Gasanschlüsse haben Linksgewinde, die Mutter wird also gegen den Uhrzeigersinn festgeschraubt!
1. Halten Sie beim Anschließen oder Austauschen von Gasflaschen alle Zündquellen wie Zigaretten, Flammen oder Funken fern.
2. Drehen Sie den orangefarbenen Verschluss der Gasflasche so, dass der Pfeil auf den Spalt in der Haube zeigt.
3. Entfernen Sie die orangefarbene Sicherheitskappe, indem Sie das Verbindungsmittel herausziehen. Verwenden Sie keine Werkzeuge. Lassen Sie die
Kappe hängen.
4. Stellen Sie sicher, dass die schwarze Dichtungsscheibe im Flaschenventil angebracht ist.
5. Stellen Sie die Gasflasche auf einer ebenen Oberfläche auf der rechten Seite des Geräts auf. Denken Sie daran, dass die Flasche vor Hitze geschützt
werden und sich in einer sicheren Position befinden muss.
6. Vergewissern Sie sich, dass der Regler am Gerät auf der Aus-Position OFF steht.
7. Vergewissern Sie sich, dass das Gasventil der Gasflasche und / oder des Druckreglers geschlossen ist.
8. Verbinden Sie den Gasschlauch mit der Gasleitung am Gerät (Abb. 1). Ziehen Sie die Verbindungen nicht zu stark fest. Sichern Sie die Verbindungen nur
mit den gelieferten Verbindungsmitteln. Verwenden Sie weder Dichtungsband noch flüssige Dichtungsmittel.
9. Verbinden Sie den Druckregler mit dem Ventil der Gasflasche, indem Sie ihn gegen den Uhrzeigersinn drehen (Abb. 2). Sichern Sie die Verbindung mit der
Überwurfmutter.
10. Verbinden Sie das andere Ende des Gasschlauchs mit dem Druckregler (Abb. 3).
11. Überprüfen Sie alle Verbindungen auf Gasaustritt (→ Dichtigkeitsprüfung).
DE

13
1 2
1.
2.
3
1.
2.
Gasflasche vom Gerät trennen
1. Außer bei Zweiflaschen-Installationen mit Umschaltventil den
Gashahn schließen, falls am Gerät vorhanden. Warten Sie, bis
Brenner und Kontrolllampe erloschen sind. Bei Anlagen mit
Umschaltventil muss nur die leere Flasche geschlossen werden.
2. Setzen Sie die orangefarbene Sicherheitskappe auf die leere
Flasche.
Dichtigkeitsprüfung
WARNUNG! Explosionsgefahr!
Verwenden Sie weder Streichhölzer noch anderes
offenes Feuer, um nach undichten Gasstellen zu suchen.
Überprüfen Sie alle Anschlüsse, Verbindungen und alle
Gasschläuche vor jedem Gebrauch oder nach jedem Wechsel der
Gasflasche auf Gasaustritt. Führen Sie diese Prüfung an einem gut
belüfteten Ort und fern von Flammen, Funken oder Wärmequellen
durch. Falls Sie Gas riechen, versuchen Sie nicht, das Gerät
anzuzünden.
1. Vergewissern Sie sich, dass der Regler am Gerät auf der Aus-Position OFF steht.
2. Öffnen Sie das Gasventil der Gasflasche und / oder des Druckreglers.
3. Tragen Sie Lecksuchspray oder eine Lösung, die jeweils zur Hälfte aus Wasser und Seife besteht, mit einem Pinsel auf, um alle Verbindungen zu prüfen.
4. Schließen Sie umgehend die Gaszufuhr am Ventil der Gasflasche und / oder des Druckreglers, falls sich an den überprüften Stellen Gasblasen bilden.
Ziehen Sie alle Anschlüsse fest und führen Sie dann den Test erneut durch.
5. Verwenden Sie das Gerät nicht und wenden Sie sich an Ihren Händler, falls sich weiterhin Gasblasen bilden.
Abbrand
Brennen Sie vor dem erstmaligen Gebrauch des Geräts Herstellungsrückstände ab.
1. Betreiben Sie das Gerät bei geöffneter Abdeckung und hoher Temperatur für etwa 10-15 Minuten (→ DEN BRENNER ANZÜNDEN).
2. Schalten Sie das Gerät aus, lassen Sie es abkühlen und reinigen Sie es anschließend (→ REINIGUNG, WARTUNG UND PFLEGE).
BETRIEB
WARNUNG! Bevor Sie versuchen, das Gerät anzuzünden, müssen Sie die Anweisungen zum Anzünden und die Warn- / Sicherheitshinweise
beachten.
WARNUNG! Verbrennungsgefahr!
• Dieses Gerät erzeugt während des Gebrauchs Hitze und es tritt Dampf aus. Treffen Sie geeignete Vorkehrungen, um die Gefahr von
Verbrennungen, Feuer oder anderen Personen- und Sachschäden zu vermeiden. Verwenden Sie Topflappen oder Grillhandschuhe.
Verwenden Sie Grillzangen oder -gabeln zum Wenden von Grillgut!
• Wenn die Abdeckung für 5 Minuten geschlossen war, muss sie danach 1 Minute lang geöffnet werden, damit das Gerät Wärme ablassen
kann.
WARNUNG! Der schwarze Bereich des Griffs (siehe Abb. rechts) wird während
des Betriebs heiß, SEIEN SIE VORSICHTIG! Berühren Sie nicht den schwarzen
Bereich.
HINWEISE ZUM GRILLEN
1. Bestreichen Sie das Grillgitter vor dem Gebrauch des Produkts mit Speise- oder Pflanzenöl. Verwenden Sie dafür einen Pinsel mit langem Griff. Während
des Grillens verdampfen die Bratensäfte, die vom Fleisch auf das Heizelement tropfen. Der so erzeugte Dampf trägt zum Geschmack des Grillguts bei.
2. Stellen Sie mit dem Temperaturregler die gewünschte Temperatur ein, um die gewünschten Grillergebnisse zu erzielen. Das eingebaute Thermometer dient
als Referenz (nicht kalibriert.)
3. Schließen Sie die Abdeckung, um ein gleichmäßigeres Ergebnis zu erzielen und um größere Lebensmittel wie Fleisch oder ganze Hühnchen zuzubereiten.
4. Öffnen Sie die Abdeckung nicht zu oft, da jedes Mal angestaute Hitze entweicht und sich die Grilldauer dadurch erhöht.
TIPPS ZUM ENERGIESPAREN
1. Verkürzen Sie die Öffnungszeit der Abdeckung.
2. Schalten Sie das Gerät aus, sobald der Garvorgang abgeschlossen ist.
3. Heizen Sie das Gerät nur 10 bis 15 Minuten vor (bis auf den ersten Gebrauch).
4. Nicht länger als empfohlen vorheizen.
5. Verwenden Sie keine höhere Einstellung als erforderlich.
DE

14
Schließen Sie den Schlauch und den Regler an die Gasflasche auf der rechten Seite des Geräts an. Denken Sie daran, dass die Flasche vor Hitze geschützt
werden und sich in einer sicheren Position befinden muss. Die Schlauchabmessung beträgt 8-10 mm Durchmesser. Eine Schlauchlänge von 1,5 m darf nicht
überschritten werden.
DEN BRENNER ANZÜNDEN
Der Brenner kann mit der eingebauten elektronischen Zündvorrichtung oder alternativ manuell mit einem Streichholz angezündet werden.
1. Warten Sie 5 Minuten, nachdem alle Anschlüsse angeschlossen wurden, und vergewissern Sie sich, dass kein Gas unkontrolliert austritt (→
Dichtigkeitsprüfung).
2. Öffnen Sie die Abdeckung des Geräts. Siehe Illustrations-Seiten am Anfang dieser Bedienungsanleitung für Details. Stellen Sie den Regler auf die Aus-
Position OFF.
3. Öffnen Sie das Ventil der Gasflasche und / oder des Druckreglers.
4. Halten Sie Ihr Gesicht und Ihren Körper während des Anzündens so weit wie möglich weg vom Gerät.
WARNUNG! Explosionsgefahr!
Zünden Sie immer den Brenner innerhalb von 5 Sekunden, nachdem Sie den Regler auf eine Position zwischen Low und HI gestellt haben. Gas
kann sich im Inneren des Geräts ansammeln, das bei Zündung zu einer Explosion führt.
WARNUNG!
Drehen Sie den Regler auf die Aus-Position OFF, falls der Brenner nicht innerhalb von 5 Sekunden zündet. Warten Sie 5 Minuten, bis sich das
Gas verflüchtigt hat, und versuchen Sie es dann erneut.
WARNUNG!
Falls sich der Brenner nach mehreren Versuchen nicht anzünden lässt, weist dies möglicherweise auf ein Problem in der Gaszufuhr hin. Schließen
Sie die Gaszufuhr am Gerät sowie an der Gasflasche und / oder dem Druckregler. Verwenden Sie das Gerät nicht, bis Sie die Ursache für das
Problem gefunden haben (→ STÖRUNGSBEHEBUNG).
Den Brenner mit der elektronischen Zündvorrichtung anzünden
1. Drücken Sie den Regler (A) und halten Sie ihn 3-5 Sekunden lang in dieser Position, damit das Gas fließen kann. Dann gegen den Uhrzeigersinn auf HI
drehen (B) (Abb. 1). So wird ein Funke im Zündrohr des Brenners (C) erzeugt (Abb. 2).
2. Sie hören ein „Klicken“ des Zünders und sehen eine orangefarbene Flamme aus dem Brennerzündrohr auf der linken Seite des Brenners kommen (D) (Abb. 2).
3. Halten Sie den Regler nach dem „Klicken“ noch zwei Sekunden lang gedrückt, damit das Gas vollständig durch das Brennerrohr (E) fließen kann und die
Zündung gewährleistet ist (Abb. 2).
4. Stellen Sie den Regler auf eine Position zwischen HI und Low (Abb. 2), um die Temperatur einzustellen.
1 2 Den Brenner mit einem Streichholz anzünden
WARNUNG! Tragen Sie während dieses Vorgangs
feuerfeste und hitzebeständige Handschuhe.
1. Nehmen Sie den Grillrost und den Hitzeverteiler (die
Kochplatte ) heraus und drehen Sie das Ventil auf 90°
gegen den Uhrzeigersinn.
2. Zünden Sie das Gerät mit einem Grillanzünder im Abstand
von 5 mm zum Feuerloch des Brenners an.
3. Bringen Sie den Grillrost und den Hitzeverteiler (die
Kochplatte) wieder an.
AUSSEHEN DER FLAMME
• Die Flamme muss blau und gleichmäßig sein mit einem Minimum an oranger Flamme (Abb. 1). Es dürfen keine
gelben Funken, lauten Geräusche oder Abstände zwischen der Unterseite der Flamme und der Düse zu sehen
bzw. zu hören sein.
• Eine gelbe Flamme weist auf eine unzureichende Sauerstoffversorgung hin. Laute Geräusche und Abstände
zwischen der Flamme und der Düse sind Anzeichen für eine übermäßige Sauerstoffversorgung.
• Bei Einstellung HI sollte die Brennerflamme ca. 12-20 mm hoch sein.
• Überprüfen Sie das Erscheinungsbild der Flamme bei jedem Gebrauch. Wenden Sie sich an einen Spezialisten,
sollte die Flamme abnormal aussehen.
1
HINWEISE ZUM VERBRENNEN VON FETT
WARNUNG!
Schützen Sie sich und Ihre Hände vor Stoßflammen. Fettbrände niemals mit Wasser löschen! Stellen Sie den Regler auf die Aus-Position OFF,
sollte ein Fettfeuer ausbrechen. Schließen Sie das Ventil der Gasflasche und / oder des Druckreglers und warten Sie, bis das Feuer von allein
ausgeht.
• Fett und Saft, die vom Fleisch auf das Heizelement tropfen, erzeugen kurze Stoßflammen, die ebenfalls den Geschmack des Grillguts beeinflussen.
• Bei zu häufigen Stoßflammen kann Fleisch jedoch verbrennen.
• Verwenden Sie nur Fleisch, das zum Grillen geeignet ist. Fleisch mit übermäßig viel Fett sollte nicht gegrillt werden.
• Schneiden Sie vor dem Grillen von Fleisch so viel Fett wie möglich ab und verwenden Sie nicht zu viel Marinade, um ein Verbrennen des Fleischs zu
vermeiden.
NACH DEM GEBRAUCH
1. Schließen Sie das Ventil der Gasflasche und / oder des Druckreglers, warten Sie bis Flamme im Gerät vollständig ausgeht.
2. Stellen Sie den Regler nach jedem Gebrauch auf die Aus-Position OFF und lassen Sie das Produkt ungefähr 45 Minuten lang abkühlen. Während dieser
Zeit muss die Abdeckung geöffnet sein.
3. Trennen Sie die Gasflasche vom Gerät, reinigen (→ REINIGUNG, WARTUNG UND PFLEGE) und lagern Sie das Gerät (→ LAGERUNG UND
TRANSPORT), falls Sie nicht vorhaben das Gerät bald wieder zu verwenden.
STÖRUNGSBEHEBUNG
Vermeintliche Fehlfunktionen, Störungen oder Schäden sind häufig auf Ursachen zurückzuführen, die vom Benutzer selbst behoben werden können. Überprüfen
DE

15
Sie das Gerät deshalb vor dem Kontaktieren einer qualifizierten Fachkraft anhand der untenstehenden Tabelle. In den meisten Fällen lassen sich Störungen so
schnell beheben.
WARNUNG!
Führen Sie nur solche Arbeiten durch, die in dieser Bedienungsanleitung erklärt sind! Alle weiteren Inspektions-, Wartungs- und Reparaturarbeiten
müssen von einer autorisierten Kundendienststelle oder einer ähnlich qualifizierten Fachkraft durchgeführt werden!
Problem Mögliche Ursache Lösung
Gas tritt aus gerissenem/
aufgeschnittenem/
verbranntem Schlauch
aus.
Beschädigter Schlauch. Gas an der Gasflasche abdrehen. Führen Sie eine Dichtigkeitsprüfung durch
und überprüfen Sie die Verbindung des Reglers mit der Gasflasche. Wenn
der Schlauch durchtrennt oder gerissen ist, ersetzen Sie den Schlauch.
Gas tritt aus der
Gasflasche aus.
Mechanischer Ausfall durch Ruhen oder falsche
Handhabung.
Gasflaschenventil schließen.
Gas tritt aus dem
Gasflaschenventil aus.
Ausfall des Flaschenventils durch falsche
Handhabung oder mechanisches Versagen.
Gasflaschenventil schließen. Geben Sie die Gasflasche an den
Gaslieferanten zurück.
Gasaustritt zwischen
Gasflasche und
Regleranschluss.
Unsachgemäße Installation, Anschluss nicht dicht,
Gummidichtung defekt.
Schließen Sie das Gasflaschenventil, entfernen Sie den Regler von der
Flasche und überprüfen Sie die Gummidichtung visuell auf Beschädigungen.
Führen Sie eine Dichtigkeitsprüfung durch und überprüfen Sie die Verbindung
des Reglers mit der Gasflasche.
Feuer kommt durch das
Bedienfeld.
Brand im Brennerrohrabschnitt des Brenners
durch Teilverstopfung.
Drehregler und Gasflaschenventil ausschalten. Nachdem das Feuer
erloschen ist und das Gerät kalt ist, entfernen Sie den Brenner und
untersuchen Sie ihn auf Spinnennester oder Rost. Siehe Kapitel
REINIGUNG, WARTUNG UND PFLEGE.
Fettfeuer oder
anhaltende übermäßige
Flammen über der
Kochfläche.
Zu viel Fettansammlung im Brennerbereich. Gasflasche abstellen. Lassen Sie die Abdeckung offen, damit die Flammen
ersticken. Entfernen Sie nach dem Abkühlen Speisereste und überschüssiges
Fett aus dem Bereich des Feuerraums, der Fettschale/-pfanne/-schale und
anderen Oberflächen.
Brenner zündet nicht mit
Zündgerät.
Gasprobleme:
1. Versuch, den falschen Brenner anzuzünden.
2. Brenner nicht mit Regelventil verbunden.
3. Verstopfung im Brenner.
4. Kein Gasfluss.
5. Dampfsperre an der Überwurfmutter zur
Gasflasche.
6. Überwurfmutter und Gasflaschenventil nicht
vollständig angeschlossen.
1. Siehe Anweisungen zu Bedienfeld, Bedienung und Reinigung.
2. Stellen Sie sicher, dass sich das Ventil innerhalb der Brennerrohre
befindet.
3. Stellen Sie sicher, dass die Brennerrohre nicht durch Spinnweben oder
andere Gegenstände verstopft sind, siehe Anweisungen zur Reinigung.
4. Stellen Sie sicher, dass die Gasflasche nicht leer ist. Wenn die
Gasflasche nicht leer ist, siehe Punkt „Plötzlicher Abfall des Gasflusses
oder niedrige Flamme“ in dieser Tabelle.
5. Drehregler ausschalten und Überwurfmutter von der Gasflasche trennen.
Erneut verbinden und versuchen.
6. Überwurfmutter etwa halb bis dreiviertel drehen.
Brenner zündet nicht mit
Zündgerät.
Elektrische Probleme:
1. Elektrode gerissen oder gebrochen; Funken
am Riss.
2. Elektrodenspitze nicht in der richtigen Position.
3. Draht und/oder Elektrode mit Kochrückständen
bedeckt.
4. Drähte sind lose oder getrennt.
5. Drähte sind kurzgeschlossen (Funkenbildung)
zwischen Zünder und Elektrode.
6. Regler klemmt unten; Funkenbildung zwischen
Zünder und Elektrode.
1. Elektrode ersetzen.
2. Die Spitze der Elektrode sollte zur Öffnung im Brenner zeigen. Der
Abstand sollte 0,32 cm bis 0,48 cm betragen. Bei Bedarf anpassen.
3. Reinigen Sie den Draht und/oder die Elektrode mit Reinigungsalkohol und
einem sauberen Tupfer.
4. Schließen Sie die Drähte wieder an oder ersetzen Sie die Elektroden-/
Draht-Einheit.
5. Zündkabel ersetzen.
6. Zündgerät ersetzen.
7. Überprüfen Sie die Kabelisolierung und den ordnungsgemäßen
Anschluss. Ersetzen Sie die Drähte, wenn die Isolierung beschädigt ist.
Brenner zündet nicht mit
Streichholz.
1. Siehe „Gasprobleme“ unter Punkt „Brenner
zündet nicht mit Zündgerät“.
2. Unsachgemäße Methode der
Streichholzanzündung.
1. Siehe Lösung für „Gasprobleme“ unter Punkt „Brenner zündet nicht mit
Zündgerät“.
2. Siehe Abschnitt „Den Brenner mit einem Streichholz anzünden“ im Kapitel
„Betrieb“.
Plötzlicher Abfall des
Gasflusses oder niedrige
Flamme.
Aufflammen.
1. Fettaufbau.
2. Zu viel Fett im Fleisch.
3. Zu hohe Gartemperatur.
1. Reinigen Sie die Brenner und das Innere des Grills/der Feuerbox.
2. Vor dem Grillen Fett vom Fleisch entfernen.
3. Passen Sie die Temperatur an bzw. reduzieren Sie diese.
Flammen erlöschen. 1. Starker oder böiger Wind.
2. Wenig Gas.
3. Überströmventil hat ausgelöst.
1. Drehen Sie die Vorderseite des Geräts in Windrichtung oder erhöhen Sie
die Flammenhöhe.
2. Gasflasche auffüllen.
3. Siehe Punkt „Plötzlicher Abfall des Gasflusses oder niedrige Flamme“ in
dieser Tabelle.
Anhaltender Fettbrand. Fett hat sich in der Nähe des Brennersystems
durch Essensrückstände angesammelt.
Drehen Sie den Regler auf OFF. Gas an der Gasflasche abdrehen. Lassen
Sie die Abdeckung in Position und lassen Sie das Feuer ausbrennen.
Nachdem das Gerät abgekühlt ist, entfernen und reinigen Sie alle Teile.
Flammenrückschlag
(Feuer im Brennerrohr).
Brenner und Brennerrohre sind verstopft. Drehen Sie den Regler auf OFF. Brenner und/oder Brennerrohre reinigen.
Siehe Kapitel Reinigung.
Gasflasche kann nicht
gefüllt werden.
Einige Händler haben ältere Fülldüsen mit
abgenutzten Gewinden.
Drehen Sie abgenutzte Düsen, die nicht genug “Biss” haben, um das Ventil
zu betätigen.
Versuchen Sie es mit einem zweiten Gasflaschenhändler.
DE

16
REINIGUNG, WARTUNG UND PFLEGE
WARNUNG!
Schalten Sie das Gerät stets aus und lassen Sie es vollständig abkühlen, bevor Sie Inspektions-, Wartungs- oder Reinigungsarbeiten durchführen
oder das Gerät lagern!
Tauchen Sie den Brenner nicht in Wasser oder andere Flüssigkeiten. Lassen Sie ihn vollständig trocknen, falls dieser nass wird und prüfen Sie
danach die Funktion.
REINIGUNG
1. Wischen Sie nach jeder Benutzung alle Oberflächen mit einem feuchten, weichen Tuch ab. Verwenden Sie ein mildes Reinigungsmittel zur Entfernung von Fett.
2. Die Innenflächen des Gerätegehäuses sollten mit heißem Seifenwasser gereinigt werden. Verwenden Sie eine Drahtbürste, Stahlwolle oder einen
Scheuerschwamm, um hartnäckigen Schmutz zu entfernen.
3. Grillroste sollten regelmäßig durch Einweichen und Waschen in Seifenwasser gereinigt werden.
HINWEISE:
• Verwenden Sie keine chemischen, alkalischen, schmirgelnde oder andere aggressive Reinigungs- oder Desinfektionsmittel, um das Gerät zu
reinigen, da diese die Oberflächen beschädigen können.
• Blockieren Sie nicht die Feueröffnung des Flaschenraums. Wenn die Feueröffnung verstopft ist, verwenden Sie bitte einen Stab mit einem
Durchmesser von 1,6 mm zur Reinigung.
• Achten Sie beim Reinigen des Brenners oder der Ventile darauf, die Brenneröffnungen oder Düsen-/Düsenöffnungen nicht zu vergrößern.
Fettauffangschublade
1. Vermeiden Sie, dass die Fettauffangschublade überläuft . Entleeren Sie diese regelmäßig während des Gebrauchs.
2. Reinigen Sie die Fettauffangschublade nach jedem Gebrauch mit warmem Wasser und mildem Reinigungsmittel.
WARTUNG
Überprüfen Sie das Gerät und Zubehör oder Hilfsmittel vor und nach jeder Benutzung auf Verschleiß und Beschädigungen. Tauschen Sie diese gegebenenfalls
wie in dieser Bedienungsanleitung beschrieben gegen neue aus. Beachten Sie dabei die technischen Anforderungen (→ TECHNISCHE DATEN).
Eine gründliche Wartung des Gerätes wird alle 90 Tage empfohlen, ist jedoch einmal im Jahr unbedingt erforderlich. Dadurch verlängern Sie die Lebensdauer
des Gerätes.
1. Überprüfen Sie den Brenner regelmäßig, um sicherzustellen, dass er frei von Insekten und Spinnen ist, die das Gassystem verstopfen und den Gasstrom
ablenken könnten. Achten Sie darauf, die Venturirohre am Brenner sehr sorgfältig zu reinigen und darauf, dass keine Verstopfungen vorhanden sind. Wir
empfehlen die Verwendung eines Pfeifenreinigers zur Reinigung des Venturirohrbereichs.
2. Überprüfen Sie regelmäßig die Flammen des Brenners; gehen Sie wie folgt vor:
a. Entfernen Sie die Grillroste und die Flammenverteiler.
b. Zünden Sie den Brenner an.
c. Drehen Sie die Regler von Position HI zur Position Low. Überprüfen Sie den Zustand der Flamme. Die Flamme bei
Position Low muss kleiner sein als bei Position HI (siehe Abb. rechts).
Überprüfen Sie die Flamme vor jedem Gebrauch, bei Unregelmäßigkeiten (→ STÖRUNGSBEHEBUNG).
1
MAX MIN
REPARATUR
An diesem Gerät befinden sich keine Teile, die vom Benutzer repariert werden können. Wenden Sie sich an eine qualifizierte Fachkraft, um das Gerät
überprüfen und instand setzen zu lassen.
WARNUNG!
Stellen Sie nach Ausführung jeglicher Reinigungs- und Wartungsarbeiten sicher, dass alle Schutzeinrichtungen, sofern vorhanden, wieder
ordnungsgemäß und sicher angebracht wurden! Benutzen Sie das Gerät niemals ohne Schutzeinrichtungen!
LAGERUNG UND TRANSPORT
LAGERUNG
1. Schalten Sie das Gerät aus.
2. Reinigen Sie das Gerät wie oben beschrieben.
3. Decken Sie den Brenner mit Aluminiumfolie ab, damit sich im Inneren weder Staub noch Insekten ansammeln können.
4. Trennen Sie die Gasflasche vom Gerät. Stellen Sie sicher, dass Sie sich im Freien und fern von Zündquellen aufhalten, bevor Sie versuchen, die Gasflasche
vom Gerät zu trennen.
5. Lagern Sie die Gasflasche im gut belüfteten Außenbereich. Sorgen Sie dafür, dass Gasflaschen nicht in der Nähe von Wärme- oder Zündquellen oder bei
direkter Sonneneinstrahlung gelagert werden.
6. Bewahren Sie Ersatzgasflaschen nicht unter oder in der Nähe dieses Geräts auf.
7. Lagern Sie das Gerät und sein Zubehör an einem trockenen, frostfreien Ort. Die ideale Lagertemperatur beträgt 10 °C bis 30 °C.
8. Wenn das Gerät im Freien gelagert wird, stellen Sie sicher, dass alle Bereiche unter der Frontplatte frei von Hindernissen (Insekten usw.) sind. Dieser
Bereich muss freigehalten werden, da dies den Verbrennungs- oder Lüftungsluftstrom beeinträchtigen kann.
9. Bewahren Sie das Gerät immer außer Reichweite von Kindern auf.
10. Wir empfehlen, das Gerät nach Möglichkeit in seiner Originalverpackung aufzubewahren oder es mit einem geeigneten Tuch abzudecken, um es gegen
Staub zu schützen.
11. Reinigen Sie das Gerät und den Brenner gründlich vor dem Gebrauch, wenn das Gerät über einen längeren Zeitraum gelagert wurde. Stellen Sie sicher,
dass der Brenner vor der Verwendung auf Gaslecks und auf Verstopfungen usw. überprüft wird.
TRANSPORT
1. Schalten Sie das Gerät aus.
2. Bringen Sie, falls vorhanden, Transportschutzvorrichtungen an.
3. Schützen Sie das Gerät gegen Schläge und starke Vibrationen, die insbesondere beim Transport in Fahrzeugen auftreten.
4. Sichern Sie das Gerät gegen Verrutschen und Kippen.
DE

17
ENTSORGUNG
Hinweise zum Umweltschutz
Alt-Elektrogeräte sind Wertstoffe, sie gehören daher nicht in den Hausmüll! Wir möchten Sie daher bitten, uns mit Ihrem aktiven Beitrag bei der
Ressourcenschonung und beim Umweltschutz zu unterstützen und dieses Gerät bei den eingerichteten Rücknahmestellen abzugeben.
TECHNISCHE DATEN
Nominale Heizleistungsaufnahme 3,5 kW x 1
Gas-Verbrauch Butan: 255 g/h
Propan: 249 g/h
Kochzone (B x T) 50 x 38 cm
Grillhöhe (H) 22 cm
Abmessungen (H x B x T) 110 x 50 x 34 cm
Max. Länge Gasschlauch 1,5 m (für Finnland nur 1,2 m)
Kategorie des Gerätes I3+ (28-30/37) I3B/P (30) I3B/P (50) I3B/P (37)
Gastyp und -druck G30 (Butan) bei 28-30 mbar /
G31 (Propan) bei 37 mbar
G30 (Butan),
G31 (Propan) und deren
Gemische bei 30 mbar
G30 (Butan),
G31 (Propan) und deren
Gemische bei 50 mbar
G30 (Butan),
G31 (Propan) und deren
Gemische bei 37 mbar
Größe der Einspritzdüse der / des
Hauptbrenners ø 0,93 mm ø 0,93 mm ø 0,82 mm ø 0,86 mm
Bestimmungsland BE, FR, IT, LU, LV, IE, GB,
GR, PT, ES, CY, CZ, LT, SK,
CH, SI
LU, NL, DK, FI, SE, CY, CZ,
EE, LT, LV, MT, SK, SI, BG,
IS, NO, TR, HR, RO, IT, HU
AT, DE, CH, LU, SK PL
Druckregler-Typ enthalten für verschiedene Bestimmungsländer (→ DRUCKREGLER TYPEN)
DRUCKREGLER TYPEN
Bestimmungsland Druckregler-Typ Gasdruck (mbar) Gasverbrauch (kg/h)
RU A300i-A310i 30
1,5
BG
A235
30
PT 28-30/37
ES
RO
A300i-A310i
30
NL
HU
IT
PL 37
BE 28-30/37
DE 50
AT
GEWÄHRLEISTUNG
Für dieses Produkt gilt die gesetzliche Gewährleistung.
Schäden, die durch unsachgemäße Behandlung oder Bedienung, durch falsches Aufstellen oder Aufbewahren, durch unsachgemäßen Anschluss oder
Installation, sowie durch höhere Gewalt oder sonstige äußere Einflüsse entstehen, fallen nicht unter die Gewährleistung. Falls produktspezifische Hinweise
beiliegen, empfehlen wir dringend diese zu lesen und zu beachten.
Hinweise:
1. Sollte Ihr Produkt nicht mehr richtig funktionieren, prüfen Sie bitte zunächst, ob andere Gründe, wie z. B. eine unterbrochene Stromversorgung (insofern es
sich um ein elektronisches Gerät handelt) oder generell eine falsche Handhabung, die Ursache sein könnten.
2. Beachten Sie bitte, dass Sie Ihrem defekten Produkt nach Möglichkeit folgende Unterlagen bzw. Informationen beifügen oder diese bereithalten:
– Kaufquittung
– Gerätebezeichnung / Typ / Marke
– Beschreibung des aufgetretenen Mangels mit möglichst genauer Fehlerangabe
Bei Gewährleistungsansprüchen oder Störungen wenden Sie sich bitte an Ihre Einkaufsstätte.
GWL 8/14 DE
Art. No.: CQ01-01
QA21-0000001726
210930
MCC Trading international GmbH
Schlüterstraße 5
40235 Düsseldorf
Germany
Made in China
DE

18
} Instrucciones de montaje
Por favor, dedique unos minutos a leerse las siguientes instrucciones antes de empezar a utilizar el aparato.
¡USE EL APARATO ÚNICAMENTE EN EXTERIORES!
¡LEA LAS INSTRUCCIONES ANTES DE UTILIZAR EL APARATO!
¡ADVERTENCIA! LAS PIEZAS ACCESIBLES PODRÍAN ESTAR MUY CALIENTES. ¡NO DEJE QUE LOS NIÑOS SE
ACERQUEN AL APARATO!
¡ESTE APARATO DEBE MANTENERSE ALEJADO DE MATERIALES INFLAMABLES CUANDO SE UTILICE!
¡NO MUEVA EL APARATO DURANTE EL USO!
¡APAGUE EL SUMINISTRO DE LA BOMBONA DE GAS DESDE LA VÁLVULA O EL REGULADOR DE PRESIÓN TRAS SU USO!
¡NO MODIFIQUE EL APARATO! MODIFICAR EL APARATO PUEDE SER PELIGROSO.
EL USUARIO NO DEBE ALTERAR LAS PIEZAS SELLADAS POR EL FABRICANTE O SU AGENTE.
LA TEMPERATURA DE ALGUNAS DE LAS PIEZAS DEL APARATO AUMENTA CONSIDERABLEMENTE. PRESTE
ESPECIAL ATENCIÓN EN PRESENCIA DE NIÑOS O PERSONAS MAYORES.
NO GUARDE NI USE GASOLINA NI COMBUSTIBLES CON MENTOL O CUALQUIER OTRO VAPOR O LÍQUIDO
INFLAMABLE CERCA DE ESTE APARATO O DE CUALQUIER OTRO.
NUNCA ENCIENDA LA PARRILLA DE GAS CON GASOLINA O FLUIDOS SIMILARES.
EL USUARIO NO DEBE MODIFICAR EL CONJUNTO EMPAQUETADO POR EL FABRICANTE.
¡RIESGO DE EXPLOSIÓN!
USO PREVISTO
Esta barbacoa está diseñada para asar diferentes tipos de alimentos en zonas exteriores bien ventiladas. Este aparato funciona con gas propano a baja presión
o gas butano licuado de petróleo (GLP). No se debe suministrar gas natural.
Este aparato está destinado solo para uso privado y no puede utilizarse con fines comerciales ni industriales. No debe usarse para ningún otro fin que no sean
los especificados para evitar lesiones personales o daños a la propiedad.
ADVERTENCIAS DE SEGURIDAD
Lea detenidamente este manual de instrucciones antes de usar el aparato. Familiarícese con su funcionamiento, ajustes y funciones de
los botones. Comprenda y siga las instrucciones de seguridad y funcionamiento para evitar posibles riesgos y peligros.
Guarde el manual de instrucciones en un lugar seguro para futuras consultas y no olvide entregarlo con el aparato si decide entregarlo a
otra persona.
ADVERTENCIAS GENERALES SOBRE LA BARBACOA
1. ¡ADVERTENCIA! ¡Peligro de envenenamiento por monóxido de carbono! Se PROHÍBE el uso de este aparato en zonas cerradas, ya que puede ser
peligroso. No utilice nunca el aparato en zonas cerradas como garajes o hangares, ya que se produciría una acumulación de monóxido de carbono que
podría ocasionar lesiones personales o incluso la muerte.
2. ¡ADVERTENCIA! ¡Peligro de explosión! No utilice nunca el aparato en zonas cerradas como garajes o hangares, debido a que se produciría una
acumulación de gas en caso de fuga que podría provocar una explosión.
3. Antes de su uso, coloque el aparato sobre una superficie segura, estable y no inflamable, lejos de cualquier fuente de calor.
4. No mueva el aparato mientras lo utiliza.
5. No intente reparar el aparato ni modificarlo de ningún modo. Use únicamente los complementos y accesorios recomendados por el fabricante. Cualquier
alteración del aparato, uso incorrecto o incumplimiento de las instrucciones podría provocar una situación de peligro.
6. El aparato no debe tener ninguna obstrucción en la parte superior, como árboles, arbustos, tejados, pérgolas, sombrillas o similares. El aparato debe
instalarse con un espacio libre mínimo de un metro a su alrededor.
7. No use el aparato cerca de objetos inflamables. Mantenga una distancia mínima de 1 m alrededor del aparato respecto a dichos objetos.
8. No utilice el aparato con aerosoles, líquidos inflamables, gases volátiles u otras sustancias inflamables cerca. Mantenga las llamas abiertas, como velas o
antorchas, alejadas del aparato.
9. No almacene líquidos inflamables o gases volátiles cerca del aparato.
10. No deje el aparato sin vigilancia mientras lo utiliza.
11. No use combustibles líquidos con este aparato.
12. Nunca se apoye sobre la superficie de cocinado mientras enciende el aparato ni durante su funcionamiento.
13. Este aparato no está diseñado para que lo utilicen personas (incluidos niños) con discapacidades físicas, sensoriales o mentales, o falta de experiencia y
conocimiento del aparato y sus propiedades, a menos que una persona responsable de su seguridad les facilite instrucciones acerca del uso del aparato y
les supervise.
14. Se debe supervisar a los niños en todo momento para garantizar que no jueguen con el aparato.
15. Mantenga el cable del suministro eléctrico y la manguera de gas lejos de superficies calientes.
16. No caliente ningún recipiente para alimentos de cristal o metálico cerrado en el aparato. La presión puede acumularse y hacer que el recipiente explote,
dando como posible resultado graves lesiones personales o daños en el aparato.
17. ¡ADVERTENCIA! No debe superarse la carga máxima de las mesas auxiliares (2 kg).
ADVERTENCIAS SOBRE LA BARBACOA DE GAS
1. Este aparato está configurado para que funcione con gas propano a baja presión o gas butano licuado de petróleo (GLP). No utilice gas natural como
suministro.
2. Abra la tapa antes de encender el aparato.
3. Abra la tapa con mucho cuidado cuando utilice el aparato. El vapor caliente podría acumularse dentro de la tapa y escapar rápidamente al abrirla.
4. No cubra el aparato hasta que se haya enfriado por completo.
5. No utilice carbón u otros combustibles sólidos en este aparato.
6. Cuando la velocidad del viento supere los 2 m/s, no use el aparato de cara al viento.
7. Esté preparado contra accidentes o incendios. Familiarícese con la ubicación del botiquín de primeros auxilios y los extintores y aprenda a utilizarlos.
8. Se recomienda que un ingeniero competente de su distribuidor local de gas revise el aparato una vez al año. No intente realizar el mantenimiento usted
mismo.
QA21-0000001726
2531
21
ES

19
ADVERTENCIAS SOBRE LAS CONEXIONES DE GAS/BOMBONA DE GAS/REGULADOR DE PRESIÓN
1. Compruebe periódicamente el aparato y todas las conexiones, así como cada vez que se reemplace la bombona de gas, en busca de posibles fugas de
gas (→ Comprobación de fugas de gas).
2. Nunca compruebe si hay alguna fuga de gas encendiendo una cerilla o cualquier otro tipo de llama.
3. Nunca cambie ni modifique el regulador de presión ni el conjunto de suministro de gas.
4. Apague siempre el suministro de gas en la bombona o el regulador de presión y desconecte la manguera de gas después de usarla.
5. Nunca almacene las bombonas de gas en interiores o cerca de fuentes de calor o ignición.
6. Guarde siempre las bombonas de gas en posición vertical, nunca en posición horizontal. Esto podría provocar fugas en la bombona de gas o podría filtrarse
gas en la manguera de gas.
7. Nunca use el aparato sin el regulador de presión.
8. Solamente utilice reguladores de presión aprobados para gas licuado de petróleo (GLP) y que cumplan con las normativas a nivel nacional. Tenga en
cuenta los datos técnicos (→ DATOS TÉCNICOS).
9. Nunca coloque la bombona de gas debajo del aparato, ya que podría causar graves lesiones en el usuario, otras personas y la propiedad.
10. No intente desconectar ninguna pieza de conexión de gas del aparato ni el regulador de presión o la bombona de gas cuando el aparato esté en uso.
ADVERTENCIAS SOBRE LA MANGUERA DE GAS
1. Inspeccione la manguera de gas antes y después de cada uso. Compruebe si tiene cortes, grietas, si está muy desgatada o si tiene cualquier otro tipo de
daño. Si encuentra daños en la manguera no use el aparato.
2. Es necesario que un técnico cualificado o el minorista sustituya la manguera de gas cada uno o dos años (o cuando la normativa nacional lo requiera).
Cambie las mangueras de gas que parezcan frágiles y sus conexiones. En caso de duda, pregunte a un especialista local.
3. Proteja la manguera de gas de cualquier daño. No la deje colgando sobre bordes afilados, no la gire, apriete ni doble, y no la someta a demasiada tensión.
Mantenga la manguera de gas alejada de superficies calientes y asegúrese de que nadie pueda tropezar con ella.
4. Solamente utilice mangueras de presión aprobadas para gas licuado de petróleo (GLP) y que cumplan con las normativas nacionales. Tenga en cuenta los
datos técnicos (→ DATOS TÉCNICOS).
5. Cualquier tipo de trabajo o sustitución de las mangueras se debe llevar a cabo en conformidad con las instrucciones del fabricante, por parte de personal
cualificado o especialistas.
6. Use mangueras de gas flexibles que resistan temperaturas superiores a 80 °C.
SI HUELE A GAS
1. Nunca encienda el aparato si huele a gas.
2. Apague inmediatamente el suministro de gas del aparato, además de la bombona de gas y/o el regulador de presión.
3. Apague todas las llamas abiertas cerca del aparato, como velas o antorchas. Apague todos los aparatos que se encuentren alrededor.
4. Asegúrese de ventilar bien la zona con aire fresco.
5. Abra la tapa del aparato para dejar escapar el gas.
6. Si aún huele a gas, deje de usar el aparato y haga que lo repare un profesional autorizado solamente.
CONTENIDO DE LA ENTREGA
Consulte las páginas de ilustración en la parte frontal de este manual de instrucciones para obtener más información.
Compruebe que el contenido de la entrega esté completo y no esté dañado. Póngase en contacto con el distribuidor donde adquirió el aparato si nota que faltan
piezas o parece dañado (→ GARANTÍA).
No use el aparato a menos que se hayan entregado las piezas que faltaban o que se hayan sustituido piezas defectuosas. El uso de un aparato que no esté
completo o esté dañado podría ocasionar lesiones personales y daños a la propiedad.
ACCESORIOS
Para utilizar este aparato de forma segura y correcta, son necesarios algunos accesorios, es decir herramientas y complementos. Consulte las páginas de
ilustración en la parte frontal de este manual de instrucciones para obtener más información.
Asegúrese de tener disponibles los accesorios y herramientas necesarios para la puesta en servicio y el funcionamiento. Esto también incluye un equipo de
protección personal adecuado.
Los accesorios y herramientas se encuentran disponibles a través de su distribuidor autorizado. Cuando realice una compra, tenga en cuenta en todo momento
los requisitos técnicos de este aparato (→ DATOS TÉCNICOS).
Si no está seguro, consulte con un especialista cualificado y obtenga asesoramiento de su distribuidor de confianza.
NOTA: Este manual de instrucciones contiene información y sugerencias para varios accesorios y sus usos. Es posible que los accesorios que
aparecen en el manual no estén incluidos en el envío, pero su objetivo es indicar otros posibles usos de este dispositivo.
ANTES DEL PRIMER USO
DESEMBALAJE
1. Desembale todas las piezas y colóquelas en una superficie plana y estable.
2. Retire todos los materiales de embalaje y dispositivos de envío (si los hay).
¡ADVERTENCIA!
¡El aparato y el embalaje no son juguetes! ¡Los niños no deben jugar con las bolsas de plástico, láminas y piezas de pequeño tamaño! ¡Existe
peligro de asfixia y estrangulamiento!
MONTAJE
1. Monte el aparato por completo y realice todos los ajustes necesarios antes de utilizarlo.
2. Siga al detalle las instrucciones de montaje y funcionamiento. Utilice las figuras como orientación visual.
3. Preste atención a las piezas de pequeño tamaño como tornillos y tuercas que se aflojan o se retiran para el montaje o durante los ajustes. Guárdelas en un
lugar seguro para evitar que se pierdan.
¡ADVERTENCIA!
• A pesar de que hemos hecho todo lo posible para garantizar que el proceso de montaje sea lo más sencillo posible, las esquinas y los bordes
con piezas de acero pueden causar cortes si no se manipulan correctamente durante el proceso de montaje. Tenga cuidado al manipular las
piezas durante el montaje. Se recomienda encarecidamente que se proteja las manos con un par de guantes de trabajo.
• ¡Solamente utilice el aparato cuando haya terminado de realizar el montaje y los ajustes!
Selección del gas
1. Las bombonas de gas propano se pueden usar durante todo el año. Las bombonas de gas butano funcionan mejor en verano. Son definitivamente menos
eficientes a temperaturas por debajo de +10 °C.
ES

20
2. El peso neto de las bombonas de gas no debe ser superior a 15 kg.
3. La altura de la bombona de gas debe ser inferior a 80 cm y, la anchura, inferior a 35 cm.
4. No llene las bombonas por encima del 80% de su capacidad. Si se llenan las bombonas por encima del 80% se puede acumular presión que provoque que
la válvula expulse los vapores de gas propano creando una situación peligrosa. El vapor es combustible y si entra en contacto con chispas o llamas, podría
producirse una explosión que podría provocar quemaduras graves, lesiones corporales o incluso la muerte.
5. Utilice en todo momento una tapa protectora para la bombona cuando el aparato no esté conectado a la misma.
Conexiones de gas
¡ADVERTENCIA! ¡Tenga en cuenta el retroceso de la llama!
Antes de realizar cualquier conexión, asegúrese de que no haya residuos, arañas, pequeños insectos ni telarañas dentro del cabezal de la
bombona de gas, el regulador de presión, el fogón, el tubo del fogón o la manguera. Pueden obstruir el flujo de gas, lo que podría provocar un
incendio dentro y alrededor del tubo del fogón. Este tipo de fuego se conoce como "retroceso de la llama" y puede causar daños importantes.
Compruebe y limpie (→ LIMPIEZA, MANTENIMIENTO Y REPARACIÓN) todas las piezas del aparato antes de montarlo, para evitar que se pueda
producir un retroceso de la llama.
Conexión/cambio de las bombonas de gas
¡ADVERTENCIA!
Utilice únicamente el regulador de presión provisto o equivalente (→ DATOS TÉCNICOS) para garantizar que funcione de manera segura y
eficiente. Puede resultar peligroso usar un regulador de presión que no sea el correcto o esté defectuoso. Consulte a su distribuidor especializado
sobre los reguladores de presión adecuados. El tipo de regulador de presión que se debe utilizar, tiene que cumplir con la norma (EN 16129) y los
requisitos correspondientes.
Consulte con su distribuidor local de gas sobre las bombonas de gas y reguladores de presión adecuados (→ DATOS TÉCNICOS).
NOTA: Las conexiones de gas disponen de roscas para zurdos; ¡la tuerca se debe girar hacia la izquierda!
1. Verifique que no haya fuentes de ignición como cigarrillos, llamas, chispas y otras fuentes de calor cerca cuando conecte o sustituya las bombonas de gas.
2. Gire la tapa naranja de la bombona de gas de modo que la flecha apunte hacia el hueco de la cubierta.
3. Retire la tapa de seguridad naranja tirando del cordón y extrayéndola. No use herramientas. Deje la tapa colgando.
4. Asegúrese de que la arandela de sellado negra esté encajada dentro de la válvula de la bombona.
5. Coloque la bombona de gas en una superficie plana en el lado derecho del aparato. Tenga presente que la bombona de gas debe estar alejada de fuentes
de calor y colocada en una posición segura. La manguera mide 8 - 10 mm de diámetro.
6. Compruebe que el mando de control del aparato esté en la posición OFF.
7. Asegúrese de cerrar la válvula de la bombona de gas o el regulador.
8. Conecte la manguera de gas a la línea de gas del aparato (Fig. 1). No apriete demasiado las conexiones. Solamente utilice el equipo que se entrega para
fijar las conexiones. No use cinta de embalar o un sellador líquido.
9. Conecte el regulador de presión a la válvula de la bombona de gas girando el regulador de presión en la dirección contraria a las agujas del reloj (Fig. 2).
Fije la conexión con la tuerca de retención.
10. Conecte el otro extremo de la manguera de gas al regulador de presión (Fig. 3).
11. Compruebe que no haya fugas de gas en todas las conexiones (→ Comprobación de fugas de gas).
1 2
1.
2.
3
1.
2.
Cómo desconectar la bombona de gas
1. Quite la tapa del gas si está encajada en el aparato, excepto
para instalaciones de dos bombonas con una válvula
selectora. Espere hasta que el quemador y la llama piloto se
hayan apagado. Para las instalaciones con válvula selectora,
solamente es necesario cerrar la bombona vacía.
2. Coloque la tapa de seguridad naranja en la bombona vacía.
Comprobación de fugas de gas
¡ADVERTENCIA! ¡Riesgo de explosión!
¡Nunca compruebe si hay alguna fuga de gas
encendiendo una cerilla o cualquier otro tipo de llama!
Compruebe todas las conexiones, los accesorios y todas las
mangueras de gas para detectar fugas siempre antes de usar el
aparato o cada vez que cambie la bombona de gas. Debe realizar
este procedimiento en una zona bien ventilada y alejada de llamas,
chispas o cualquier fuente de calor. Si huele a gas, no intente
encender el aparato.
1. Compruebe que el mando de control del aparato esté en la posición OFF.
2. Abra la válvula de gas de la bombona de gas y/o del regulador de presión.
3. Aplique un espray detector de fugas o una solución mitad agua/mitad jabón con un cepillo en todos los puntos de conexión.
4. Cierre inmediatamente el suministro de gas en la válvula de la bombona de gas y/o el regulador de presión si observa que se forman burbujas de gas en
las áreas de interés. Apriete otra vez todas las conexiones y repita la prueba.
5. No use el aparato y póngase en contacto con su distribuidor si se siguen formando burbujas de gas.
ES
Table of contents
Languages:
Other Tarrington House Grill manuals

Tarrington House
Tarrington House K103M1BME3-1 User manual

Tarrington House
Tarrington House BURNABY User manual

Tarrington House
Tarrington House CALGARY User manual

Tarrington House
Tarrington House CG FLAME TAMER 21 User manual

Tarrington House
Tarrington House LOUISIANA User manual

Tarrington House
Tarrington House NAGGADO User manual

Tarrington House
Tarrington House MEMPHIS User manual

Tarrington House
Tarrington House DJ12803 User manual

Tarrington House
Tarrington House QA18-0000001813 User manual