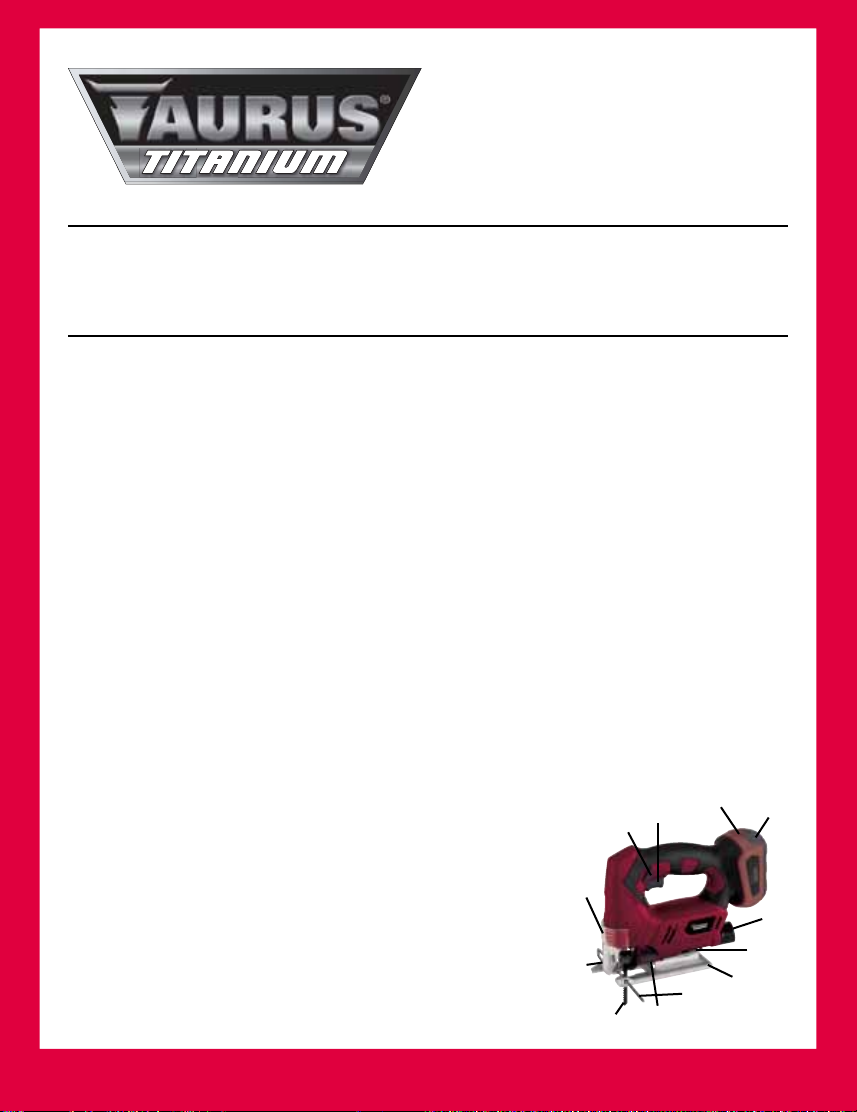
Taurus BT-CK 18 2B-1.5 Kit User manual

LI-ION 18V
POWER TOOL SET 5PC
BT-CK 18 2B-1.5 Kit
QUICK START GUIDE
Easy steps to getting started.
1. Charger/ Battery Pg. 1
2. Cordless Drill Pg. 2
3. Cordless Circular Saw Pg. 3
4. Cordless Jigsaw Pg. 4
5. Cordless Reciprocating Saw Pg. 5
6. Cordless Lamp Pg. 6

CHARGER/BATTERY
BT-CK 18 2B
QUICK START GUIDE
Easy steps to getting started.
1. Carefully remove all items from the packaging, take care that you have all parts supplied in the
packaging before discarding.
2. To check the charge of the battery pack (2), press the button for the battery capacity indicator (3). The battery
capacity indicator (4) indicates the charge state of the battery on 3 colored LEDs. For more detail, refer to Section
3.4.2 of the User Guide.
3. Timely recharging of the battery pack(2) will help it serve you well for a long time.You must recharge the battery
pack (2) when you notice that the power of the cordless product drops.
4. Insert the power plug of the charger (1) into the mains socket outlet.The green LED (a) will then begin to ash.
5. To charge the Li-Ion battery pack (2), insert the battery pack into the charger. The red LED (b) will light up to
indicate that the battery pack (2) is being charged.When the charging is nished, the green LED (a) will shine
with a steady light. Discharged battery packs require approx. 1 hour for charging.
6. If both LEDs (a, b) ash after the battery pack has been inserted, the battery pack is defective. In this case pull out
the charger plug immediately and remove the defective battery pack (2). Do not use the defective battery pack
(2) again.
7. If both LEDs (a, b) light up after the battery pack (2) has been inserted, the charging temperature is either low
or too high. In this case, pull out the mains plug of the charger and charge the battery pack (2) in an environment
in which the temperature is either warmer or colder.
8. If the battery pack (2) fails to charge, please check
– whether there is voltage at the socket outlet
– whether there is good contact at the charging contacts of the charging unit
If the battery pack (2)still fails to
charge, please call our customer
service on 1300 922 271.
9. IF IN DOUBT PLEASE REFER TO THE
USER GUIDE PROVIDED.
2
b
a1
3
4
1

CORDLESS DRILL
BT-CD 18/2 Li
QUICK START GUIDE
Easy steps to getting started.
1. Carefully remove all items from the packaging, take care that you have all parts supplied in the
packaging before discarding.
2. To mount the battery pack (4) , push the battery pack (4) onto the equipment until it latches in place.
3. To remove the battery pack , press the pushlock button (5) to remove the battery pack (4) from the equipment.
4. To charge the battery pack (4), follow the instruction on page 1 of the Quick Start Guide.
5. For screwdriving select the torque with the torque selector (1), refer to the User Guide, Section 4.6.1 for more
information. Important! The tool must be at a standstill when you set the torque with the setting ring.
6. For drilling, move the torque selector (1) to the last step“Drill“.
7. Use the Forward/Reverse switch (2) to select the direction of rotation.
8. You can adjust the speed. The further you press the On/OFF switch (3), the higher the speed.
9. To change the accessory, open the chuck (7) by turning it counterclockwise. Place the accessory into the tool
and tighten the chuck by turning it clockwise. Important! Set the Forward/Reverse switch (2) to its centre
position whenever carrying out any work on the tool.
10. By adjusting the selector switch (6), you can work with a faster or slower turning speed. Important! Change the
gear only when the drill is at a standstill.
11. IF IN DOUBT PLEASE REFER TO THE USER GUIDE PROVIDED. 716
2
3
5
4
2

CORDLESS CIRCULAR
SAW
BT-CS 18 Li
QUICK START GUIDE
Easy steps to getting started.
1. Carefully remove all items from the packaging, take care that you have all parts supplied in the
packaging before discarding.
2. To mount the battery pack (12) , push the battery pack (12) onto the equipment until it latches in place.
3. To remove the battery pack (12), press the pushlock button (13) to remove the battery pack (12) from the
equipment.
4. To charge the battery pack (12), follow the instruction on page 1 of the Quick Start Guide.
5. To set the cutting depth, release the lever on the rear of the guard hood for adjusting the cutting depth. Place the
soleplate (9) at on the surface of the workpiece and raise the saw until the saw blade (15) is at the required
cutting depth.
6. To adjust the mitre setting, release the locking lever for miter setting (8) on the front of the soleplate (9). Adjust
the cutting angle. Keep an eye on the cutting angle scale (6) as you do so. Refasten the locking lever for
miter setting (8). Check the lever is securely fastened.
7. To assemble the parallel stop (21), loosen the locking lever (7) on the soleplate (9). Slide the parallel stop (21)
into the guide (a) on the soleplate (9). Set the required spacing and then tighten the locking lever (7) again.To
use the parallel stop(21), position the parallel stop (21) at on the edge of the workpiece and start the cut.
8. To switch on the saw, press the locking button (3) and the ON/OFF switch (2) at the same time. Note: Allow the
saw blade (15) to accelerate until it reaches full speed. Then slowly move the saw blade along the cutting
line. Only exert gentle pressure on the saw blade as you do so.
9. To switch o the saw, release the locking button (3) and the ON/OFF switch
(2). Important! Do not put down the machine until the saw blade has
reached a complete standstill.
10. The laser (14) switches on automatically when the On/O switch (2) is
pressed.
11. To change the saw blade (15), refer to Section 5.6.4 of the User Guide.
12. IF IN DOUBT PLEASE REFER TO THE USER GUIDE PROVIDED.
3213 12
9
15
21
a
7
86
3

CORDLESS JIGSAW
BT-JS 18 Li
QUICK START GUIDE
Easy steps to getting started.
1. Carefully remove all items from the packaging, take care that you have all parts supplied in the
packaging before discarding.
2. To mount the battery pack (5) , push the battery pack (5) onto the equipment until it latches in place.
3. To remove the battery pack (5), press the pushlock button (1) to remove the battery pack (5) from the equipment.
4. To charge the battery pack (5), follow the instruction on page 1 of the Quick Start Guide.
5. To assemble the parallel stop (11), loosen the locking screw (13) on the soleplate (7). Slide the parallel stop (11) into
the guide on the soleplate (7).You can t the parallel stop (11) on either the left or right of the equipment.The
guide strip must always face downwards. Set the required distance using the measurement scale on the parallel stop
(11) and retighten the locking screw (13).
6. To adjust the mitre setting, use the Allen key (4) to loosen the screws for the soleplate on the bottom of the adjustable
soleplate (7). Pull the soleplate (7) slightly forward and move the soleplate (7) into the required position (maximum
45° to the left and right) and refasten the screw securing the soleplate.
7. To connect the jigsaw to a vacuum cleaner, use the adaptor for dust extraction (6). Attach the adaptor (6) in a way that
it is securely seated in the housing. Fit the vacuum tube of the vacuum cleaner onto the adaptor opening (6). Check that
the connections are airtight.
8. To switch on the saw, press the locking button (2) and the ON/OFF switch (3) at the same time. Note: Allow the saw
blade (12) to accelerate until it reaches full speed.Then slowly move the saw blade along the cutting line. Only
exert gentle pressure on the saw blade as you do so.
9. To switch o the saw, release the locking button (2) and the ON/OFF switch
(3). Important! Do not put down the machine until the saw blade has
reached a complete standstill.
10. To set the pendulum action, adjust the selector switch for pendulum action (8)
to the required setting. For more detail, refer to section 6.6.2 of the User Guide.
11. The laser (16) switches on automatically when the On/O switch (3) is pressed.
12. For more details on how to perform cuts, refer to Section 6.6.5, 6.6.6 and 6.6.7
of the User Guide.
13. To change the saw blade (12), refer to Section 6.5.3 of the User Guide.
14. IF IN DOUBT PLEASE REFER TO THE USER GUIDE PROVIDED.
2315
6
4
7
11
8
12
13
16
4

CORDLESS
RECIPROCATING SAW
BT-AP 18 Li
QUICK START GUIDE
Easy steps to getting started.
1. Carefully remove all items from the packaging, take care that you have all parts supplied in the
packaging before discarding.
2. To mount the battery pack (3) , push the battery pack (3) onto the equipment until it latches in place.
3. To remove the battery pack (3), press the pushlock button (7) to remove the battery pack (3) from the equipment.
4. To charge the battery pack (3), follow the instruction on page 1 of the Quick Start Guide.
5. To switch on the saw, press the locking button (2) and the ON/OFF switch (1) at the same time. Note: Allow the
saw blade (4) to accelerate until it reaches full speed. Then slowly move the saw blade along the cutting
line. Only exert gentle pressure on the saw blade as you do so.
6. To switch o the saw, release the locking button (2) and the ON/OFF switch (1). Important! Do not put down the
machine until the saw blade has reached a complete standstill.
7. To change the saw blade (4), turn the ring (a) on the blade holder (6) until the blade (4) lets itself be slipped into
the slot of the blade holder (6). Let go of the ring (a) again and the ring (a) should return to its starting position.
If this fails to happen, try turning the ring (a) by hand into its starting position. Pull on the blade (4) to
check whether it sits tightly in the blade holder (6).
8. IF IN DOUBT PLEASE REFER TO THE USER GUIDE PROVIDED.
4a61
2
7
3
5

CORDLESS LAMP
BT-CL 18 Li
QUICK START GUIDE
Easy steps to getting started.
1. Carefully remove all items from the packaging, take care that you have all parts supplied in the
packaging before discarding.
2. To mount the battery pack (5) , push the battery pack (5) onto the equipment until it latches in place.
3. To remove the battery pack (5), press the pushlock button (6) to remove the battery pack (5) from the equipment.
4. To charge the battery pack (5), follow the instruction on page 1 of the Quick Start Guide.
5. To switch on the lamp press the ON/OFF switch (1).
6. Switch the lamp ON/ OFF:
By pressing the ON/OFF button (1) for the rst time, 3 LED lights illuminate.
By pressing the ON/OFF button (1) for the second time, 6 LED lights illuminate.
By pressing the ON/OFF button (1) for the third time, 9 LED lights illuminate.
By pressing the ON/OFF button (1) for the fourth time, the equipment is switched o.
7. The adjustable head (2) can be adjusted back and forth.
8. The handle (3) can be adjusted in 6 dierent positions.To change the handle position, press the locking button
for the handle (4) and move the handle in the appropriate position.
9. IF IN DOUBT PLEASE REFER TO THE USER GUIDE PROVIDED.
1
2
3
4
6
5
6

7
Other manuals for BT-CK 18 2B-1.5 Kit
1
This manual suits for next models
6
Table of contents
Other Taurus Power Tools manuals