TCL 3189 User manual

For more information on how to use the phone, please go to tcl.com and download the complete user manual.
The website will also provide you with answers to frequently asked questions.

1 2
1 Table of Contents
1 Your mobile....................................................... 5
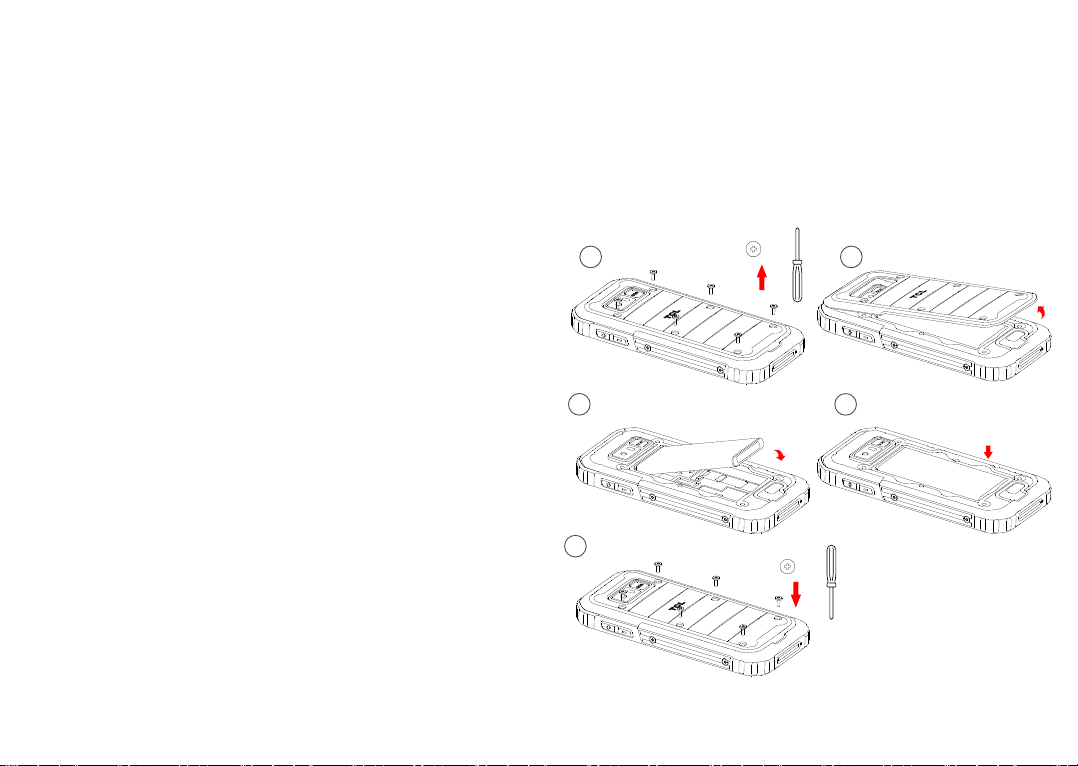
1.1 Keys and connectors ................................ 5
1.2 Getting started........................................... 8
1.3 Home screen........................................... 12
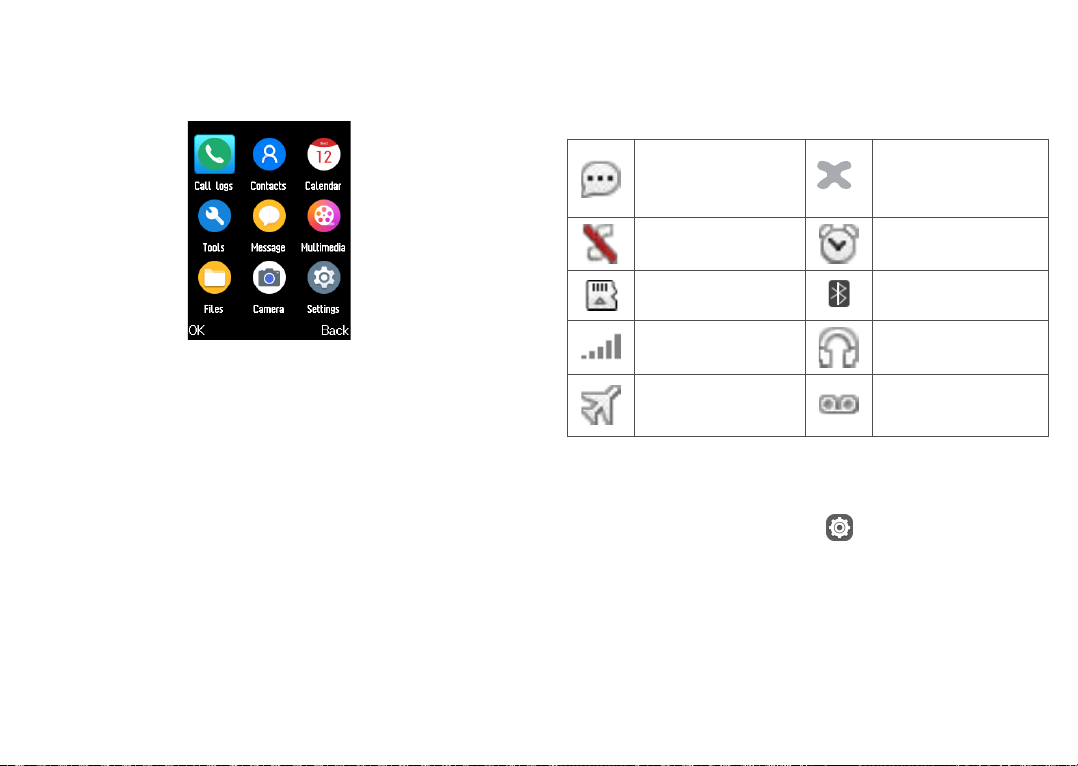
1.4 App list .................................................... 13
2 Call logs .......................................................... 15
2.1 Making a call ........................................... 15
2.2 Answer or decline a call.......................... 16
2.3 Accessing voicemail ............................... 16
3 Contacts .......................................................... 17
3.1 Consult your Contacts............................. 17
3.2 Adding a contact ..................................... 18
3.3 Editing your contacts............................... 18
3.4 Deleting a contact ................................... 19
3.5 Available options ..................................... 19
4 Calendar .......................................................... 20
4.1 Multimode view ....................................... 20
4.2 Add a new event ..................................... 21
4.3 Event reminder........................................ 22
5 Tools ................................................................ 22
5.1 Alarm....................................................... 22
Note:
This is a user manual for TCL 3189D
There may be certain differences between the user manual description
and the phone’s operation, depending on the software release of your
phone or specific operator services.
Help
Refer to the following resources to get more FAQ, software, and service
information.
Consulting FAQ
Go to www.tcl.com/global/en/service-support-mobile/faq.html
Finding your serial number or IMEI
You can find your serial number or International Mobile Equipment
Identity (IMEI) on the packaging materials. Or, on the phone, press
*#06#. or Settings > Regulatory & safety > IMEI.
Obtaining warranty service
First follow the advice in this guide or go to www.tcl.com/global/en/
service-support-mobile.html. Then check hotlines and repair centre
information through www.tcl.com/global/en/service-support-mobile/
hotline&service-center.html
Viewing legal information
On the phone, go to Settings > About > Privacy and User Terms

3 4
5.2 Calculator ................................................ 22
5.3 Bluetooth ................................................. 22
5.4 Converter ................................................ 22
5.5 Fake call.................................................. 23
5.6 Voice alarm ............................................. 23
5.7 World clock.............................................. 23
5.8 SIM Toolkit............................................... 23
5.9 Call Filter................................................. 23
5.10 Torch ....................................................... 24
5.11 Browser ................................................... 24
6 Message .......................................................... 25
6.1 Write messages ...................................... 25
6.2 Send a multimedia message .................. 26
6.3 How to type a message .......................... 26
6.4 Settings ................................................... 27
7 Multimedia....................................................... 29
7.1 Image ...................................................... 29
7.2 Video gallery ........................................... 32
7.3 Recorder ................................................. 32
8 Files ................................................................. 32
9 Camera ............................................................ 33
9.1 Camera ................................................... 33
9.2 Video ....................................................... 33
10 Settings ........................................................... 34
10.1 Phone settings ........................................ 34
10.2 Call settings............................................. 35
10.3 Profiles .................................................... 36
10.4 Network selection.................................... 37
10.5 Connections ............................................ 37
10.6 Security ................................................... 38
10.7 Assistance (SOS).................................... 39
10.8 Update..................................................... 40
10.9 Regulatory & Safety ................................ 40
10.10Restore factory settings .......................... 40
10.11 About....................................................... 40
11 Troubleshooting ............................................. 41
12 Specifications ................................................. 47
13 Accessories .................................................... 49
14 Licences .......................................................... 49

5 6
1
4
2
8
5
6
7
9
3
1. OK key
• Confirm an option (press the middle of the key)
• Press: access to the app list (Home screen)
2. Left soft key
3. Call key
• Pick up/send a call
• Press: enter call log (from Idle screen)
4. Right soft key
5. End key
• Return to the previous screen, or close a dialog
box.
1 Your mobile........................
1.1 Keys and connectors
5
1
23
4
6
1. Torch
2. Volume key
3. Camera
4. Assistant (SOS) key
5. Headset connector
6 USB port

7 8
• Press: end a call
6. Navigation key
• Move to top, bottom, left or right menus.
• Press (from Idle screen):
• Up: to access Profiles
• Down: to access Alarm
• Right: to access Camera
• Left: to access Messages
7. “5” key
• In idle screen:
• Press: Input "5"
• Long press: switch on/off the torch
8. “*” key
• In idle screen
• Press: Input “*”
• Long press: lock screen
• In Edit mode:
• Press: insert symbols
9. “#” key
• Idle screen
• Press: Input "#"
• Long press: Vibrate mode on/off
• In edit mode
• Press: change the input method
1.2 Getting started
1.2.1 Set up
Removing the back cover and installing the battery
1 2
34
5
*6
*6

9 10
Removing and installing the frame deco
*4
*4
1 2
34
Inserting or removing the SIM/micro SD card
Place the SIM card with the chip facing downwards and
slide it into its housing. Make sure that it is correctly
inserted. To remove the card, press it and slide it out.
Power off your phone before inserting or removing the
SIM/micro SD card.
Charging the battery
Connect the battery charger to your phone and plug
into the socket.
• Be careful not to force the plug into the socket.
• Make sure the battery is correctly inserted before
connecting the charger.
• The mains socket must be near to the phone and
easily accessible (avoid electric extension cables).

11 12
To reduce power consumption and energy waste,
disconnect your charger when the battery is fully
charged; switch off Bluetooth. In Settings you
can also lower the brightness of the screen, and
shorten the length of time before the screen goes
to sleep.
IMPORTANT: IP68 means this phone is “dust-resistant”
and can be “immersed in 1.5 meters of freshwater
for up to 30 minutes. However it is emphasized to
end users to tighten the screws on the battery cover
and properly fit the rubber protections for USB port
and headphone jack close to keep your phone from
dust and water damage as this may cause the IP68
protection is not guaranteed.
1.2.2 Power on your phone
To turn your phone on, hold down the End key until the
phone powers on. It will take a few seconds before the
screen lights up. Press Left soft key to unlock your
phone.
Set up your phone for the first time
The first time you power on the phone, you should set
the following options:
• Select the phone's language, then press the Right
soft key to continue.
Even if no SIM card is installed, your phone will still
power on and you will be able to use some of the
phone's features.
1.2.3 Power off your phone
To turn your phone off, hold down the End key.
1.3 Home screen
1
1Status bar
• Status/Notifications

13 14
1.4 App list
Press the Left soft key or OK key from the Home
screen to access the App list.
1.4.1 Status bar (1)
The Status bar appears at the top of your Home
screen. Icons indicate your phone’s status and new
notification alerts appear in the Status bar.
New message
or multimedia
message
No SIM card
installed
Silent mode Alarm is set
SD card installed Bluetooth is on
Level of network
reception
Headset
connected
Flight mode New voicemail
1.4.2 Change Home screen wallpaper
• From the Home screen, press the OK key,
select the Settings icon , and then press the
Navigation key to select Phone settings > Display
>Wallpaper settings > Static wallpaper or More
pictures.
(1) The icons and illustrations in this guide are provided for
information purposes only.

15 16
• Select a new image and press the Left soft key to
save. Exit and the new image will then be displayed
on your Home screen.
2 Call logs .......................
2.1 Making a call
Dial the desired number, press the Call key to place
the call, or press the Right soft key to select a
contact from Contacts. Use the up or down action of
the Navigation key to select the desired contact and
press the Call key. If you make a mistake, you can
delete the incorrect digits by pressing the Left soft
key. To hang up the call, press the End key.
International call
To dial an international call, press twice to enter
“+”, then enter the international country prefix followed
by the full phone number and finally press the Call key.
Emergency call
If your phone has network coverage, dial the emergency
number and press
the Call key
to make an emergency
call.
2.2 Answer or decline a call
When you receive a call:
• Press the Left soft key or
Call key
to answer.
• Press the Right soft key or End key to decline.
2.3 Accessing voicemail (1)
• Press and hold to call voicemail.
(1) Contact your network operator to check service
availability.

17 18
3.2 Adding a contact
In your contacts list screen, select Add contacts, or
press the Left soft key to select Options > New to
add new contacts with detailed information.
When finished, press the Left soft key to save.
3.3 Editing your contacts
Select a contact, press the OK key to access Details,
select Options > Edit, and press the OK key to edit.
• Follow the prompts to set up your voicemail account.
3 Contacts .......................
3.1 Consult your Contacts
Contacts enables quick and easy access to the
contact you want to reach.
You can access this function by:
• pressing the OK key from the Home screen and
select Contacts.
• pressing the Right soft key from the Home screen.
2
3
1
1Press the Left soft key to access more options.
2Press the OK key to enter contact details.
3Press the Right soft key to return to the Home
screen.

19 20
3.4 Deleting a contact
In your contacts list screen, press the Left soft key to
access Options, select Delete, and press the OK key
to delete.
3.5 Available options
From the contact list, you can access the following
options:
New message
Send an SMS/MMS to a contact you've selected from
Contacts.
Import/Export
• Import contacts
Import contacts to your phone.
• Export contacts
Export contacts from your phone or SIM card.
Others
• Set speed dial contacts
Set one or more speed dial contacts at a time.
4 Calendar .....................
Use the Calendar to keep track of important meetings,
appointments, etc.
To access this function, press the OK key from the
Home screen and select Calendar.
4.1 Multimode view
You can display the Calendar in Day, Week or Month
view. Press the Left soft key and select Options to
change your Calendar view.

21 22
Day view
Week view
Month view
4.2 Add a new event
Press the Left soft key to add a new event from any
Calendar view.
• Fill in all the required information for this new event.
If it is a whole-day event, you can select All-day
event.
• When finished, press the Left soft key to save.
More important options are available by pressing the
Left soft key from the Calendar main screen:
• Go to date
To go to whatever date you want.
• View events
Press the OK key to view the events you've added
to the Calendar.
4.3 Event reminder
If a reminder is set for an event, the upcoming event
will appear on the screen when the reminder time
arrives.
5 Tools .............................
5.1 Alarm
Your phone has a built-in alarm clock with snooze
feature. You can set up to five alarms with different
wake-up times.
5.2 Calculator
Press the up, down, left, right and OK key to select
"+, -, ×, ÷" and "=" respectively.
5.3 Bluetooth
You can exchange data, such as video, images, and
audio, with other Bluetooth supported devices within a
limited range after pairing.
5.4 Converter
Convert supports weight conversion and length
conversion.

23 24
5.5 Fake call
You can create a fake call through this function. It
helps you to politely escape from social situations at
any time you wish.
5.6 Voice alarm
With this menu, you can create a voice file and set it
as the alarm.
5.7 World clock
The first clock displays the time based on your
location when you set up your phone. You can add
other cities to show the time in their time zones.
5.8 SIM Toolkit
This phone supports various service functions. The
specific items depend on your SIM card and network.
The Service menu will be automatically added to the
phone menu when supported by your network and
SIM card.
Note: Consult the local network operator for related
fees and set-up details.
5.9 Call Filter
You can create a call blacklist using this function.
From the Call Filter screen, the following options are
available:
Blacklist
You can add contacts to the blacklist by using the
following methods:
1. From Blacklist > Options > New
- Enter a name and number or press OK to select one
contact from the Contacts list at a time, then press Left
soft key to save.
2. From Blacklist > Options > Import contacts
- Select the contacts you want to add to the blacklist,
then press OK > Save
Settings
Enable/disable the call and message functions for
contacts on your blacklist.
5.10 Torch
Turn on/off the torch.
5.11 Browser
This function enables you to surf the Internet with
your phone and customise your preferences.

25 26
Note: Consult with your service provider for related
fees and specific setup information.
6 Message .......................
Use the messaging feature to send and receive text
(SMS) and multimedia (MMS) messages.
6.1 Write messages
• From the Home screen, press the OK key and
select Message.
• Press the OK key to write text messages.
• Enter the phone number of the recipient in the To
bar or press the OK key to add recipients.
• Press the Message bar to enter the text of the
message.
• Press the OK key or Left soft key to send your
messages.
6.2 Send a multimedia message
MMS enables you to send video clips, images, photos,
contacts and sounds. From the Message screen,
select Options > Add to and select the attachment.
An SMS will be converted to MMS automatically when
media files (image, video, audio, etc.) are attached.
6.3 How to type a message
When in edit mode, the default input method is
English. You can press the Keypad to change the input
method to access numbers 1,2,3... or long press the
corresponding key to get the number you want.
You can enter text using predictive text input, or press
# to set your desired text input.
• For normal text input, press a number key, 2-9,
repeatedly until the desired character is displayed. If

27 28
the next letter you want is located on the same key
as the present one, press the key repeatedly until
the next cursor is displayed.
• Press the key to switch between "abc--> ABC-
-> 123" modes.
• To insert a punctuation mark or special character,
press the key.
• If you want to delete any previously typed letters or
symbols, press the Right soft key to delete them
one by one.
6.4 Settings
SMS settings
• Message centre
You can view your message centre number here.
• Message validity period
You can set your message validity period as 1 hour, 6
hours, 24 hours, 72 hours, 1 week or Maximum.
• Status report
You can choose to enable or disable status reports.
• Reply path
Mark the checkbox to enable reply path.
• Preferred storage
Set the path for the location of your saved messages.
• Export SMS
Set the SMS path you want to export from.
• Auto signature
Select to apply an auto signature to your messages.
• Signature
Input your signature.
MMS settings
• MMS account
Select your data account for multimedia messages.
• Receive options
You can set receive settings.
• Send options
You can set send settings.
• File storage
You can set the path for the location of saved MMS
files.
• Play audio
You can set whether or not to play audio files.
• Restore default.
Restore your phone to its default settings.
WAP Push messages

29 30
• WAP Push messages
Mark / unmark the checkbox to accept / reject WAP
Push messages.
• Service loading operation
You can set Service loading operation as Always,
Alert or Never.
7 Multimedia....................
7.1 Image
Image acts as a media player for you to view photos.
In addition, a set of further picture operations are
available for you to choose from.
To access this function, press the OK key from the
Home screen and select Multimedia > Image.
You can select Camera to take a photo or select a
picture from Photos.
2
3
1
1Press the Left soft key toaccess more options.
2Press the OK key toview the selected picture.
3Press the Right soft key toreturn to Multimedia.
Modifying your picture
More options are available by pressing the Left soft
key from the picture screen.

31 32
• Set as wallpaper
Enables you to set the picture as wallpaper.
• Screen saver
Enables you to set the picture as screen saver.
• Set as contact icon
Enables you to set the picture as contact icon.
• Delete
Delete the selected picture.
• Share
Share the picture via MMS or Bluetooth.
• Mark
Mark the selected picture.
• Rename
Enables you to rename the picture.
• Slideshow
Press to view your Gallery pictures as a slideshow.
• Details
View picture information, such as name, size,
image type, etc.
7.2 Video gallery
Use this function to play video files. Press OK key to
play/pause the video player, short press up or down
of Navigation key to tune volume, press left or right
Navigation key to last or next video.
7.3 Recorder
Use this function to record audio files. The phone
supports AMR. When completed, the file will be stored
in Audio automatically.
8 Files ..............................
To access this function, press the OK key from the
Home screen and select Files.
Your phone provides internal storage space for you to
manage files and also supports a micro SD card. The
contents of the micro SD card are editable. You can
create a new folder and delete, edit, search, mark, and
view the details and files it contains.

33 34
9 Camera .........................
Your mobile phone is equipped with a camera for
taking photos and shooting videos.
9.1 Camera
To access this function, press the OK key from the
Home screen and select Camera.
To take a picture
The screen acts as the viewfinder. Position the object
or landscape in the viewfinder, and press the OK
key to take pictures, it will be automatically saved, or
press Left soft key to save.
9.2 Video
To shoot a video
• Press the Left soft key to switch to Video mode
from Camera mode.
• Press the OK key to shoot a video.
• When finished, press the Left soft key to save. You
can view the file by selecting Options > View video
directory.
10 Settings ......................
To access this function, press the OK key from the
Home screen and select Settings.
10.1 Phone settings
To modify the Phone settings, select Phone settings
and you will see Display, Time & date, Language
settings, Shortcut settings and Auto power on/off.
• Display
This function allows you to select Wallpaper settings,
Idle display settings, Set screensavers, Contrast,
Backlight and Keypad backlight time.
• Time & date
It allows you to modify date and time settings,
including 12/24h format and date format (Year-Mon-
Day/Mon-Day-Year/Day-Mon-Year). You can also
choose to update the time display automatically by
selecting Update settings > Auto update time.
• Language settings
Choose the display language for messages here. You
can choose display language and input language in
this menu.
• Shortcut settings

35 36
Set shortcuts for Up, Down, Left and Right key.
• Auto power on/off
You can set the power on/off times using this function.
10.2 Call settings
• Dual-SIM
You can set Standby mode, Reply by original SIM,
and Set SIM name.
• Call divert
You can activate, cancel or verify the status of call
forwarding to voicemail or to a specified number. The
following configurations are possible:
Call forwarding unconditional: systematic forwarding
of all your calls.
Call forwarding on busy: if your line is busy, if you
don’t answer or if you are outside the network range.
Call forwarding on no reply: if you do not want to
reply.
Divert if unreachable
Cancel all diverts
• Call waiting
Activate/Deactivate the notification of a second
incoming call by a beep. You can also check the
status of waiting calls.
• Call barring
The following configurations are possible:
All outgoing calls
All outgoing calls are barred.
All incoming calls
All incoming calls are barred.
Incoming calls when roaming
All incoming calls are barred when roaming.
• ISD calling
All ISD calls are barred.
Outgoing calls when roaming
Outgoing international calls except those to your
country of subscription are barred.
Cancel all barring
Deactivate all call barring.
• Hide ID
You can choose to hide ID, show your number or
display ID by network.
• Others
You can activate/deactivate Call time minute
reminder, Vibration when connected, Reply SMS
after reject and Auto record voice calls in this
menu.
10.3 Profiles
With this menu, you can set the sound mode to
Normal, Silent, Meeting, Flight mode, Indoor or
outdoor.

37 38
10.4 Network selection
Network connection can be switched between Auto
select and Manual select.
10.5 Connections
• Network account
You can set your network account.
• GPRS service
You can turn on/off GPRS service according to your
need.
• Data roaming
Data services can be used while roaming overseas.
• Prefer SIM
Select SIM1 or SIM2 as your preferred SIM.
• Preferred network type
You can select 4G/3G/2G Multi mode, 3G/2G Dual
mode, 2G Only mode as your preferred network type.
• VoLTE
Your device supports VoLTE function, mark the
checkbox to activate it. Consult with the operator to
get more details.
10.6 Security
You can protect your phone by activating and
changing the PIN and password, its initial one is
1234. This feature also allows you to lock your phone
by activating the PIN2 for Fixed dial number.
• PIN
The SIM card protection code is requested each time
the phone is powered on.
• Modify PIN2
A protection code for certain SIM card features (FDN)
will be requested if you attempt to access the card
when the code is activated. Select to update it with a
new one (between 4 and 8 digits).
• Phone locked
An unlock code is requested each time the phone is
powered on.
• Modify the phone password
Change the phone's password (the initial one is
1234).
• Privacy
This allows applications to be locked. Enter the
password, (the initial one is 1234) and mark
the checkbox to activate the lock for Call logs,
Messages, Camera, Contacts, Files, Ebook,
This manual suits for next models
1
Table of contents
Other TCL Telephone manuals