TDR Eco Pro User manual

©Total Disc R epair Ltd | www. totaldiscr epair.co.uk | Technical Support: 0800 412 5424 - support@ totaldiscr epair.co.uk | Sales: 01202 489 500 - sales@ totaldiscr epair.co.uk
What’s In This User Guide?
Getting started - repair a disc right now
Getting to know your machine and how it works
Advanced features of your machine
Maintenance and other useful information

©Total Disc R epair Ltd | www. totaldiscr epair.co.uk | Technical Support: 0800 412 5424 - support@ totaldiscr epair.co.uk | Sales: 01202 489 500 - sales@ totaldiscr epair.co.uk
Getting Started
Initial setup
Basic operation
Inspecting a repaired disc
With the machine you will nd a setup sheet which
includes a list of contents and briey explains the
setup of the machine. Once the machine is ready to
go, the display will show “CD/DVD” and will display
the number of minutes remaining on the chip.
Choose a disc for repair. For information on what
can and cannot be repaired please refer to the
“Disc Types” sheet.
For this rst disc, we
will run a light, 30
second repair cycle.
Choose a CD, DVD,
game or data disc (not
a PS3/Blu-ray at this
stage - we will discuss
these later).
The disc should come out of the machine clean, dry
and warm. Have a look at the repaired side; the light
repair should have made a visible improvement.
If a more heavily damaged disc was chosen, the disc
may need an additional repair.
Repair process:
1. The lid will automatically open when you turn the
power on.
2. Place the disc shiny side up on the turntable.
3. Close the lid rmly until it clicks.
4. The machine will automatically start a 30 second
cycle.
5. Once the cycle has nished, the lid will open.
6. Remove the repaired disc.
Polishing pads
Power switch
Chip slot
Display Start
button
Stop
button
Polish bottle
Feed tubes
Bottle Holder
Water bottle
Power Inlet
Turntable
WARNING - Closing the lid without a disc may
cause damage to the pads and turntable. Always
place a disc on the turntable if closing the lid
when the machine is switched on.
Parts of the machine
Function
button
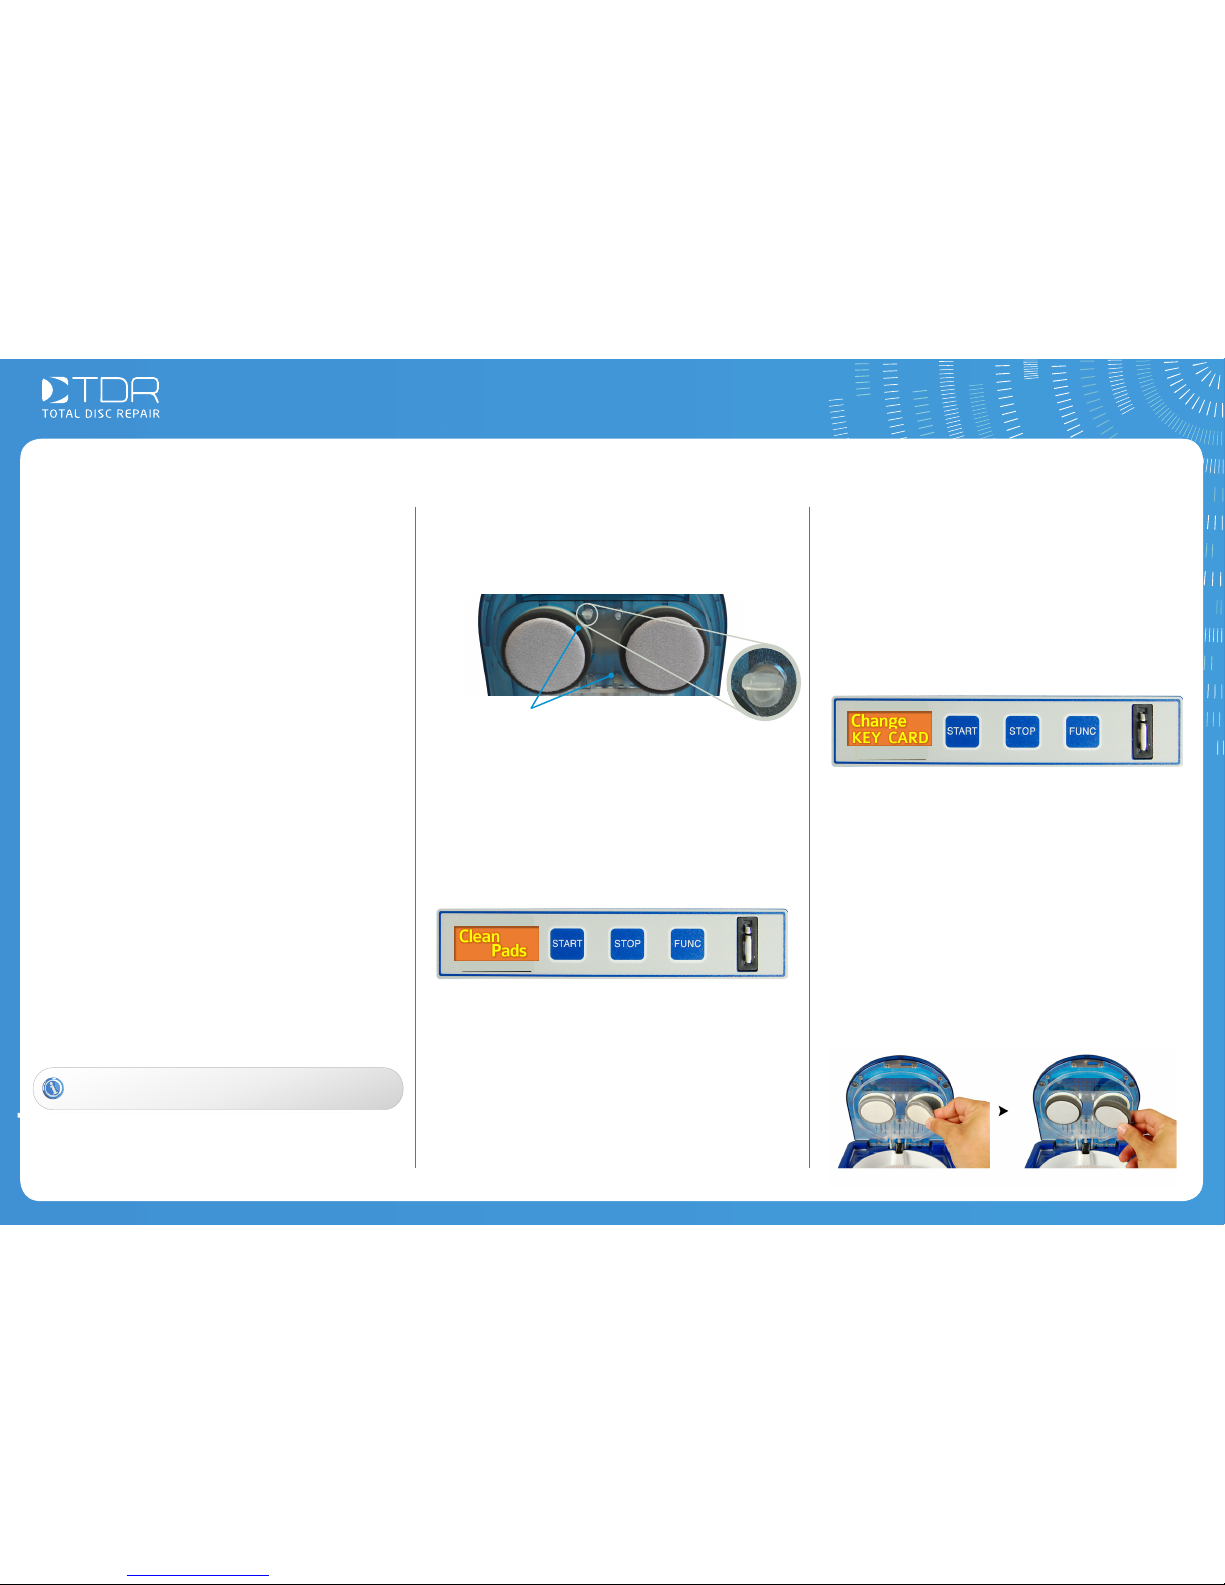
Disc Well
Polishing
pads
Compound
nozzle valve
Water drip
feed
Compound
nozzle valve
Water drip
feed
Filter
©Total Disc R epair Ltd | www. totaldiscr epair.co.uk | Technical Support: 0800 412 5424 - support@ totaldiscr epair.co.uk | Sales: 01202 489 500 - sales@ totaldiscr epair.co.uk
Getting To Know The Machine
Understanding the repair cycle
Cleaning the pads
Setting up the consumables
The Eco Pro uses a single-stage disc repair process.
In other words, the machine applies a constant,
gradual repair to the disc in one operation.
A combination of abrasive liquid and heat is used to
perform a repair. The plastic playing surface is heated
up and softened, and then the liquid abrasive grinds
away a thin layer of plastic, removing the scratches
within it.
The machine uses two soft foam pads to apply both
the liquid abrasive and water solution to the disc. The
liquid abrasive removes the scratches while the water
solution is used to stop the disc overheating.
With this process, the longer the disc is being
repaired the more scratches are removed.
For a clean and dry disc every time it is important
to clean the pads regularly. There is a reminder
programed into the machine which displays every 20
repair cycles. The message is “Clean Pads”.
Press any button to clear the message.
Simply rinse the pads with water from a tap until all
visible signs of polish residue are removed. We advise
waiting until the pads have dried out before re-tting
them in the machine.
If you choose not to clean the pads at this stage you
will start to see some residue transfer to the disc.
This may not directly aect the repair, but will require
you to wipe each disc after each repair.
Everything you need to operate your machine is
included within the consumables pack. Each pack is
designed to last for a set time – 800 minutes.
There will be a little surplus polish in the container
when the chip expires. This is normal. The bottle is
overlled a little to ensure you do not run out. There
is no reason to keep this surplus as the new bottle is
also a little overlled - please discard it with the used
pads and the chip.
The pads are attached with Velcro and are very
simple to change.
1. Peel the pads away from the edge of the pad
holder.
2. Position the new pads to line up with the pad
holder and rmly stick them down.
Replacing the pads
When the consumables have expired the message
“Change KEY CARD” (Change Consumables) will
appear. Discard the used pads, polish, water and chip
before installing new ones.
Unlike most disc repair machines, the Eco Pro does
not create any signicant waste, however because
of the heat generated by the machine, any leftover
compound dries and so a small powdery residue will
build up over time.
The well inside the machine is designed to catch most
of this residue (please refer to the Maintenance section
on how to clear this).
There are two other parts of the machine which collect
reside and will ultimately eect the repair over time.
Always remember these important points,
Please read the next sections on how to combat this
and how to get the most from your machine.
Compound considerations
Clearing the nozzle valves
The two nozzle valves are designed to stop the
compound drying in the lines. However these will over
time become blocked with dried compound.
Before using the machine, remove the nozzle valves,
roll them between your ngers to clear any dried
polish and then reinstall them on the machine.
Blocked nozzle valves will damage your machine
Dirtypadswillgiveapoornish
Nozzle valves
©Total Disc R epair Ltd | www. totaldiscr epair.co.uk | Technical Support: 0800 412 5424 - support@ totaldiscr epair.co.uk | Sales: 01202 489 500 - sales@ totaldiscr epair.co.uk
Getting To Know The Machine
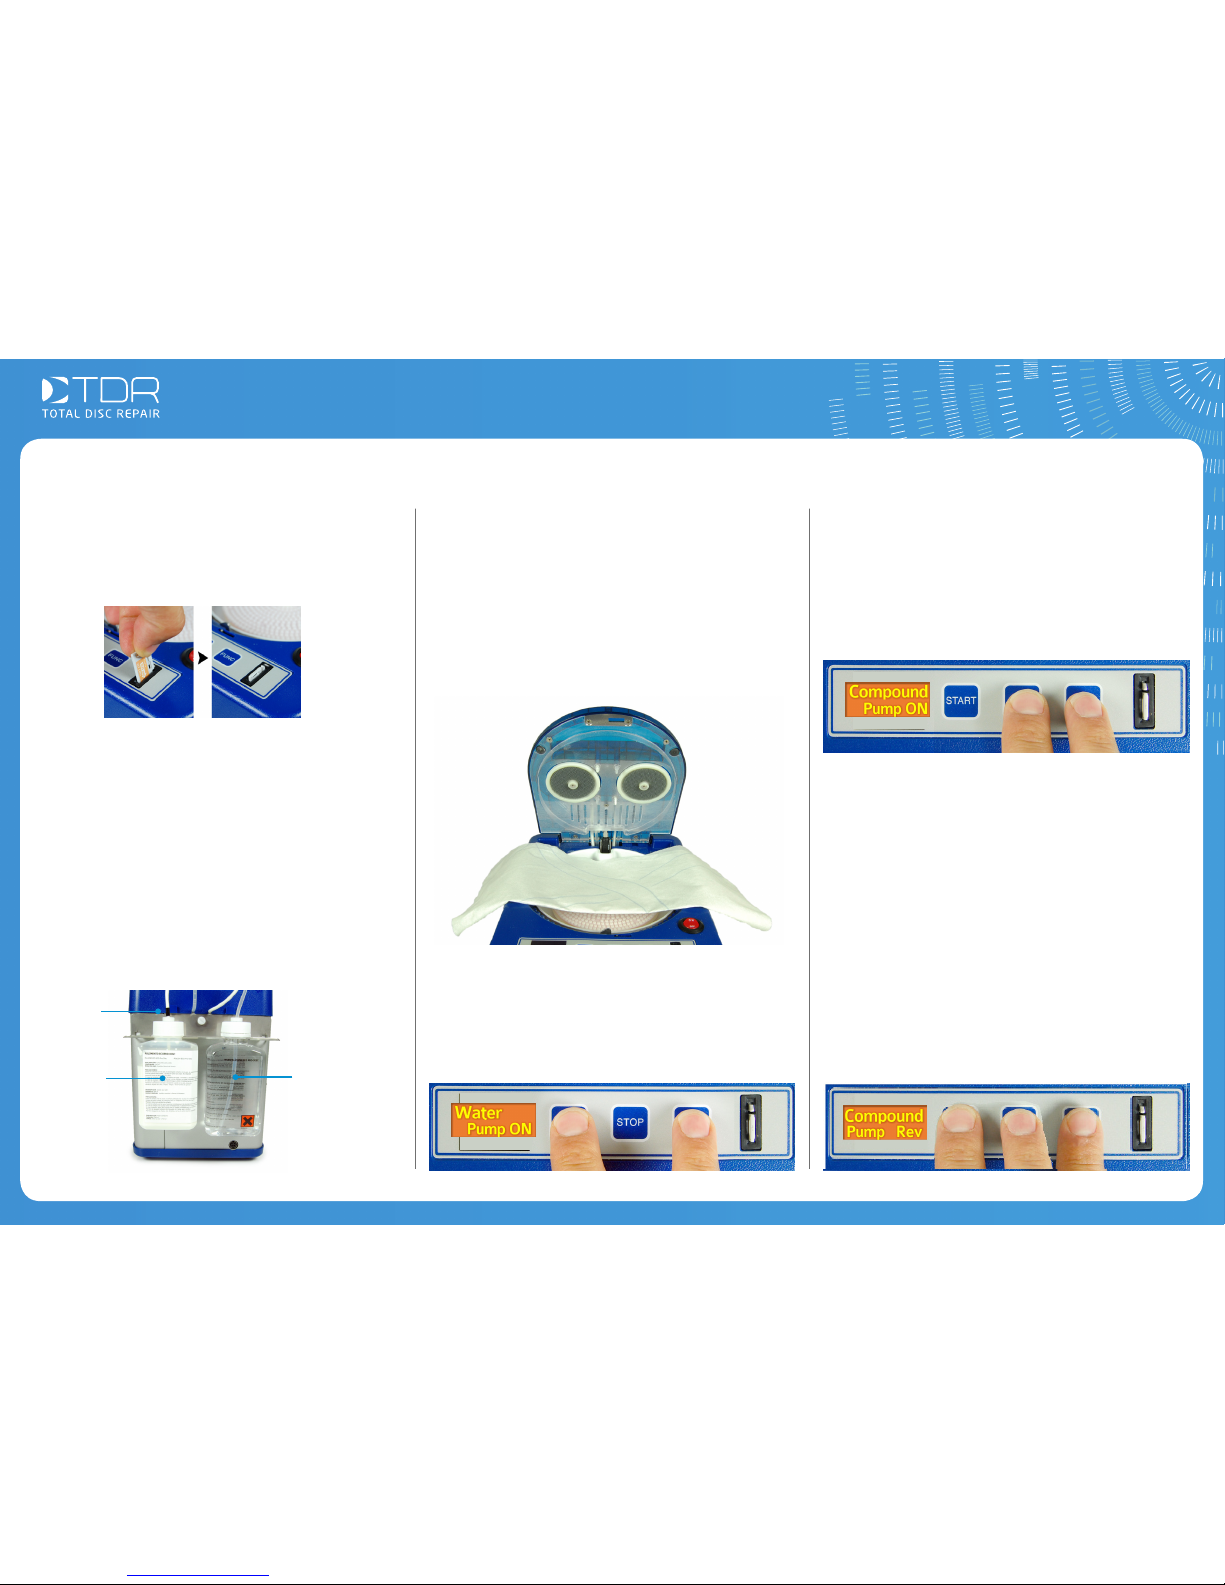
Installing the chip
Changing the polish & water
Priming the pumps
Clearing the polish tube
There is a chip attached to a card in each
consumables pack, which monitors consumables
usage and ensures the highest quality repairs.
The replacement polish is included in the consumables
pack. To change this:-
1. Unscrew the old bottle and replace with the new
one.
2. Ensure the marker on the polish tube is at the top
of the cap.
3. Rell the water bottle from the tap.
4. Ensure the water tube does not sit on the bottom
of the bottle.
Your machine will have already arrived with the polish
and water pumps primed and ready to go. However it
is important to understand how to do this yourself as
you will need to prime the pumps again if the tubes
become cleared of liquid for any reason.
If you are not going to use the machine for a while
it is important to clear the polish tube of polish so
that it doesn’t dry in the tube.
1. Press and hold “START” followed by “FUNC” to
start water pump. “Water Pump on” will show on
the display.
2. Once you see water coming out of the drip feed,
press any button to stop the pump.
Step 1 - Preparation
When priming pumps, place a tissue under the drip
feeds as shown to stop the turntable getting wet.
Step 2 - Priming the water
Step 3 - Priming the polish
1. Press and hold “STOP” followed by “FUNC” to
start polish pump. “Compound Pump on” will
show on the display.
2. Once you see polish coming out of the drip feed,
press any button to stop the pump.
1. Press and hold “START” and “STOP” together
followed by “FUNC” to start the polish pump in
reverse. “Compound Pump Rev” will show on
the display.
2. Once the tubes are empty press any button to
stop the pump.
Water
solution
Polish
* The slots are
dierent sizes
and cannot be
confused.
Marker
©Total Disc R epair Ltd | www. totaldiscr epair.co.uk | Technical Support: 0800 412 5424 - support@ totaldiscr epair.co.uk | Sales: 01202 489 500 - sales@ totaldiscr epair.co.uk
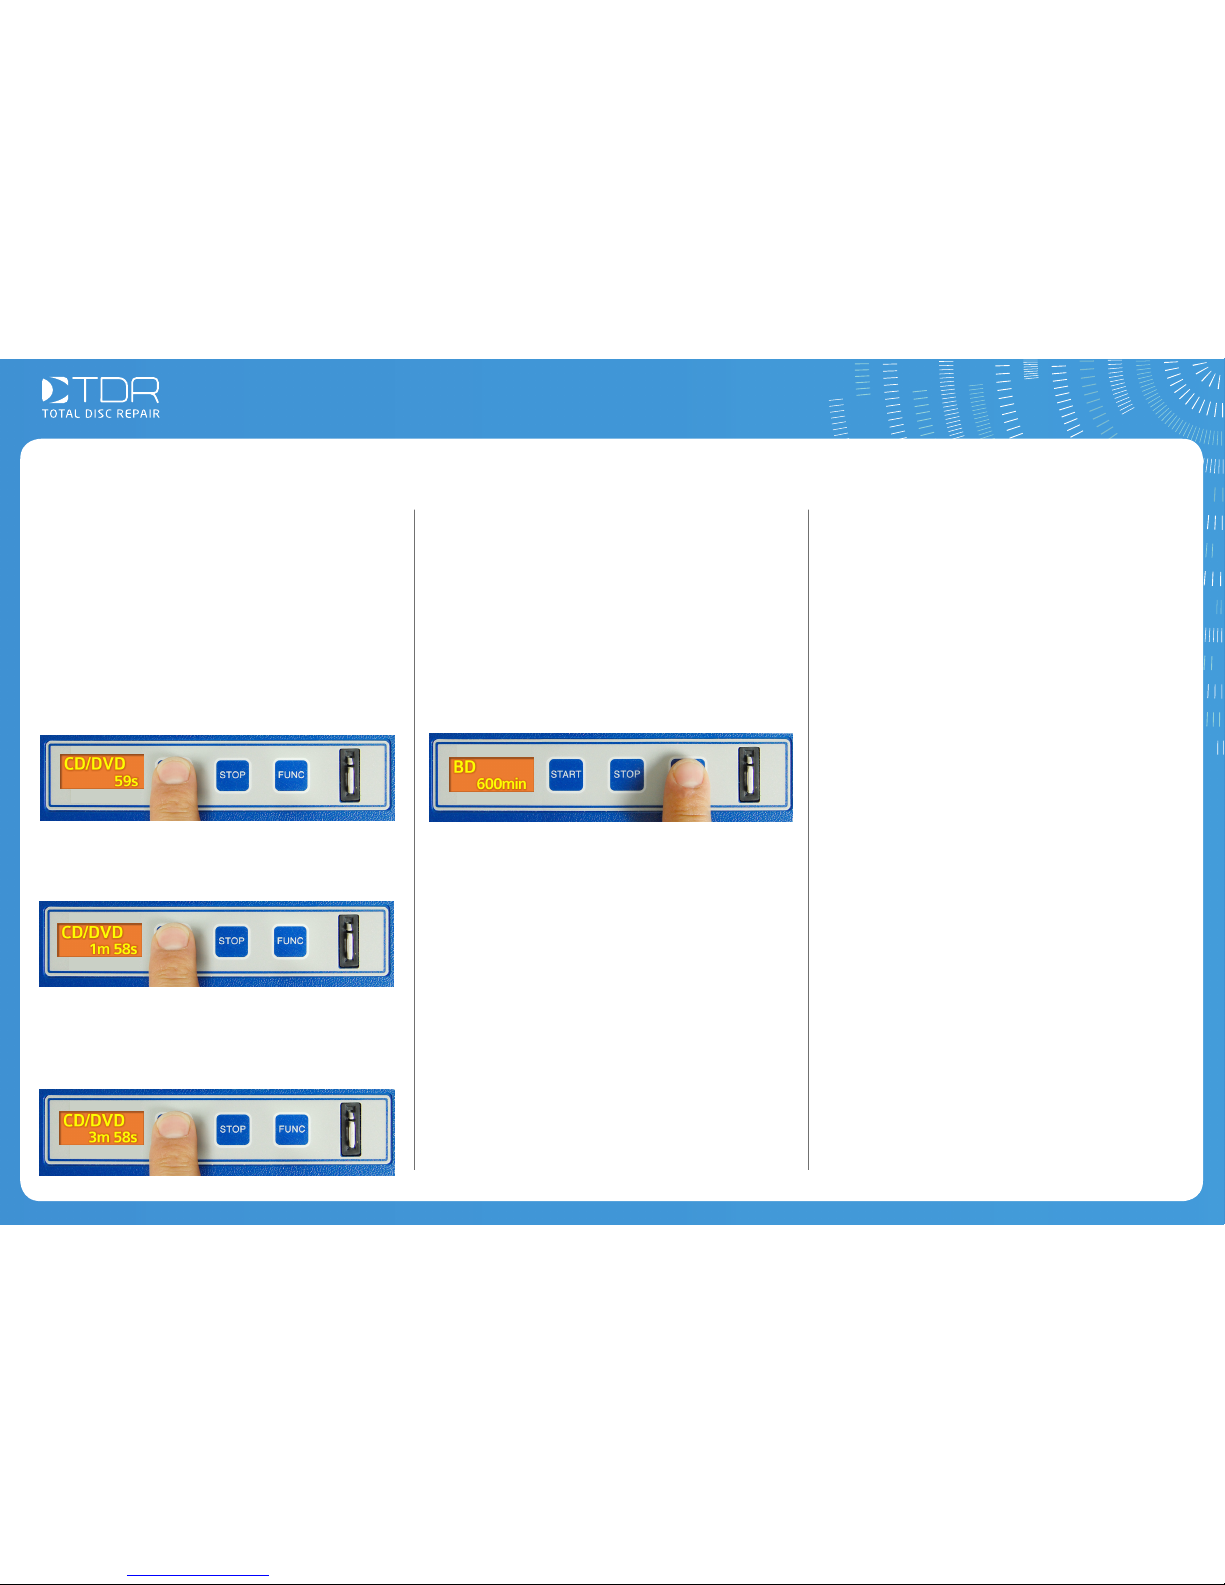
The Eco Pro is a single stage repair machine. The
depth of repair is dictated by the length of time that
the disc is processed for.
When you close the lid, the standard repair cycle will
start, which lasts for 30 seconds. However, you may
wish to extend this repair cycle for more heavily
damaged discs.
• Closing the lid starts a 30 second repair, pressing
the “START” button once during this repair will
extend the total repair time to one minute.
Advanced Features
Extended cycles Using the Blu-ray cycle Notes
Your Eco Pro disc repair machine has already been
installed with the Blu-ray software required to repair
Blu-ray discs. Refer to the “Disc Types” section for
more information on the dierences with Blu-ray
discs.
To switch to Blu-ray repairs:
• Press the “FUNC” button. The display will change
from “CD/DVD” to “BD” when in Blu-ray mode.
• Pressing the “START” button twice after closing the
lid, will add an additional minute, extending the total
repair time to two minutes. • The Bluray timings are the same as the standard
timings (30 seconds, 1 minute, 2 minutes, 4 minutes).
• Just press the “START” button repeatedly to
increase the timings.
• Press the “FUNC” button to go back to standard
disc mode.
• Finally, pressing the “START” button three times
after closing the lid, will add an additional two
minutes, extending the total repair time to four
minutes.
Table of contents
Popular Office Equipment manuals by other brands

hushoffice
hushoffice hushtwin HUS-BX-019 Maintenance and safety manual

silen
silen Space 2 Assembly manual

Middle Atlantic Products
Middle Atlantic Products LD Series instruction sheet

SHFL
SHFL DECK MATE BLACKJACK Service manual

VITRA
VITRA Stefan Hürlemann Dancing Wall Assembly instructions

BISLEY
BISLEY Glide V2 Assembly instructions


