TDR Eco Clever User manual

©Total Disc Repair Ltd | www.totaldiscrepair.co.uk | Technical Support: 0800 412 5424 - support@totaldiscrepair.co.uk | Sales: 01202 489 500 - sales@totaldiscrepair.co.uk
What’s In This User Guide?
Getting started - repair a disc right now
Getting to know your machine and how it works
Advanced features you will want to know
Maintenance and other useful information

©Total Disc Repair Ltd | www.totaldiscrepair.co.uk | Technical Support: 0800 412 5424 - support@totaldiscrepair.co.uk | Sales: 01202 489 500 - sales@totaldiscrepair.co.uk
Getting Started
Initial setup
Basic operation
Inspecting a repaired disc
Parts of the machine
With the machine you will nd an initial set up guide
which includes a list of contents and also explains the
setup of the machine.
Choose a disc for repair. For this rst disc we will run
a light (average) repair cycle.
The disc should come out of the machine clean and
dry. Have a look at the repaired side, the light repair
should have made a visible improvement.
If a more heavily damaged disc was chosen the disc
may need an additional repair. Now, using the cycles
1-4, try dierent levels of damage to get a better
understanding of what the machine can do.
For Blu-ray and heavily damaged discs (Level 5)
please refer to the Advanced Features section.
1. Press ‘mode/stop’ to open the front door.
2. Place the disc shiny side up on the turntable.
3. Gently close the door.
4. Press the ‘3’ button (light repair).
AL 12 - if this shows on the display please check that
the pad holders are positioned correctly. For any other
alarm codes or issues please consult the Maintenance
and Information sheet or contact Technical Support.
Polish/
Water entry
and splash
back tray
Operation panel
Front door latch
Pad turret
Positioning of the
pad holders and
polishing pads.
Disc turntable
This is where the disc is
positioned for the repair. It
sits with shiny side facing up.
Front
Back
Display
Stage
MODE/
STOP
button
The LCD indicates:
Repair cycle options
Time remaining
Warnings
Waste exit
Please ensure the tube is connected
during operation.
Power
switch,
fuse and
AC inlet
Fan
Feed tubes
Compound
pump Water
pump
Place shiny
side up
on the
turntable

©Total Disc Repair Ltd | www.totaldiscrepair.co.uk | Technical Support: 0800 412 5424 - support@totaldiscrepair.co.uk | Sales: 01202 489 500 - sales@totaldiscrepair.co.uk
Getting To Know The Machine
Understanding the repair cycle Setting up consumables Replacing the pads
The Eco Clever is a multi stage disc repair machine.
In other words, during the repair cycle the machine
uses dierent grade pads in stages to repair the disc.
Sound complicated? Don’t worry the Eco Clever does
all of these stages automatically.
Inside the machine there are four colour coded
abrasive pads from coarse to ne.
The machine automatically engages each pad in
sequence. The coarsest pad will remove the most of
the scratch whereas the nest pad produces the high
quality nish.
You will have also received blue and violet pads and a
violet pad holder with the machine. Please put these
aside as they will be used in Advanced Features
later.
With the door open, press the corresponding cycle
button to display the counter reading.
To reset the counter press the button again and hold
it down until the counter changes to zero.
Press any button to cancel the alarm. Then change
the relevant pad. Once the pad has been changed
you need to reset the counter on the machine.
The basic setup for the machine uses pads with red,
green, yellow, and black coloured velcro and these
will have been pre-installed.
Each pad is attached using Velcro to a matching
coloured pad holder. The pad holder is then held in
the machine by a magnet.
Try removing and replacing the pad holders.
On the turret there is a coloured label showing where
the corresponding coloured pad should go.
When a pad needs changing the machine displays an
alarm code. These codes are:
Button Repair Mode Description
4 Medium Raised scratches
3 Light Narrow scratches
2 Very Light Light scus
1 Clean/Polish Dirt/ngerprints
ST LED Time LED Description
Al 01 Exchange Pad #1
02 Exchange Pad #2
03 Exchange Pad #3
04 Exchange Pad #4
05 Change Compound
Match each coloured pad holder to the
corresponding colour tab:
Pad changing sequence:
Refer to Advanced operation for deep gouges. (level 5)
Clean/Polish
Light
Very Light
1. Lift o pad holder
3. Attach new pad
2. Remove used pad
4. Re-attach pad holder
Yellow tab
indicates
yellow
pad holder
location
See
Advanced
Features
for violet
pad use
Medium

©Total Disc Repair Ltd | www.totaldiscrepair.co.uk | Technical Support: 0800 412 5424 - support@totaldiscrepair.co.uk | Sales: 01202 489 500 - sales@totaldiscrepair.co.uk
Getting To Know The Machine
Topping up polish and water Priming the pumps
Polish supply
On the back of the machine is a small
bottle which contains a thick white
polish. Ensure that this bottle is at
least 1/3 full before operation.
Make sure that the tube inside the
bottle reaches the bottom of the
bottle. The bottle feeds polish to the
pump marked with a blue dot.
Water supply
In each cycle the machine uses
water as a coolant and to remove
the waste product. Added to the
water is a small amount of additive
which helps with the process.
Using the syringe supplied add 5ml of additive for
every 1 litre of water in the container. (if you are
ling the bottle from empty add 20ml of additive and
ll the bottle to the 4 litre line).
For best results use mineral or deionised water.
Coming from the pump with the red dot will be a long
tube with a stone lter on the end. Feed the tube in
to the top of the water bottle ensuring that the stone
lter reaches the bottom of the bottle.
Step 1 - Preparation
1. When priming pumps place a tissue under the drip
feeds as shown to stop the turntable getting wet.
Step 2 – Pump operation mode
Waste collection
Ensure that the tube coming from the front of the
machine has a clear run to the waste bottle otherwise
the waste could back up. You should cut down the
waste tube so that it does not sag or kink.
Empty the waste bottle every time you ll the water
bottle.
Your machine will have already arrived with the polish
and water pumps primed and ready to go. However it
is important to understand how to do this yourself.
2. Press and hold MODE/STOP and ‘5’ at the same
time. A ‘P’ will appear in the ‘ST’ display.
3. To exit this mode press MODE/STOP.
4. Once you are in Pump Operation Mode it is simple
to prime each pump.
5. Press ‘1’ again to stop the pump when you see
water coming out of the drip feed.
If you are not going to use the machine for a while it
is important to clear the polish tube of polish so that
it doesn’t dry in the tube.
6. Press ‘2’ again to stop the pump when you see
polish coming out of the drip feed.
Press ‘3’ to start this process. It will return all of the
polish in the tube back to the bottle. Press ‘3’ again
to stop the pump.
Step 3 – Priming the water (Press 1)
Step 4 – Priming the polish (Press 2)
Clearing the polish tube
4ltr
20ml

©Total Disc Repair Ltd | www.totaldiscrepair.co.uk | Technical Support: 0800 412 5424 - support@totaldiscrepair.co.uk | Sales: 01202 489 500 - sales@totaldiscrepair.co.uk
Maintenance And Information
Troubleshooting Daily checks Ordering consumables
If the door won’t open
It can be opened manually by inserting a card into
the slot on top of the machine and moving the card
to the left to open the catch.
Understanding the display codes
Centre seal
Ensure that the rubber
has not deteriorated and
the part is still creating an
eective seal. Operating
with a poor seal could
damage the machine.
Pad xing plate
Ensure this is kept clean,
remove any rust left from
rusty pad holders.
Drain exit
Wipe clean regularly to
avoid blockages.
Pad holders
When changing pads check the pad holder to make
sure that the Velcro has not deteriorated.
Check the rear plate on the pad holder to ensure it is
clean and contains no rust. Occasionally apply a little
spray lubricant to the plate to deter rusting. After
time the pad holder will need replacing.
Consumable Packs
A single pack with the correct consumables for 500
repairs of either Light, Medium, or Heavy repairs.
Mega Pack Light: 5055378130830
Mega Pack Medium: 5055378130847
Mega Pack Heavy: 5055378130854
Red pad: 5055378101816
(Heavy)
Blue pad: 5055378101793
(Very Heavy)
Violet pad: 5055378101823
(Blu-ray)
Black pad: 5055378101786
(Bu)
Yellow pad: 5055378101830
(Light)
Green pad: 5055378101809
(Medium)
Polish (125ml): 5055378101847
(MSDS found at: totaldiscrepair.com/CleverSupport)
Water additive (200ml): 5055378101845
(MSDS found at: totaldiscrepair.com/CleverSupport)
Individual Items
Or you can purchase items individually
It is advised to replace this regularly.
ST TIME Comment
CD 01-05 Normal 1-5 operation mode
BD 01-04 Blu-Ray repair cycle selected
AL 11 Front door open
AL 12 Check Pad Holder
P1 -- Pump operation mode
(prime water)
P- 2- Pump operation mode
(prime polish)
P- -3 Pump operation mode
(reverse polish)
88 88 Initiation/setup leave for a
few seconds
E 1-5 21-90 Note error code and contact
Tech Support 0800 412 5424

©Total Disc Repair Ltd | www.totaldiscrepair.co.uk | Technical Support: 0800 412 5424 - support@totaldiscrepair.co.uk | Sales: 01202 489 500 - sales@totaldiscrepair.co.uk
Advanced Features
Deep scratch cycle Using the Blu-ray cycle Your notes...
In the starter pack you will nd a blue pad. This is
the deep scratch ‘heavy’ pad. This is if you have a
disc that you feel needs a longer repair than the
standard ‘4’ cycle will repair.
The machine can only hold four pads at a time and
so to run the fth, heavy cycle you need to exchange
the blue pad with the red pad for the 5th stage.
Please follow the sequence below for using the
‘5, heavy’ cycle:
Your Eco Clever disc repair machine has already
been installed with the Blu-ray software required to
repair Blu-ray discs. See the ‘Disc Types’ data sheet
for more information on the dierences with Blu-ray
discs.
Follow the procedure below to change your machine
to Blu-ray repairs:
1. Open the front door.
2. Remove yellow pad and holder from the turret.
3. Fit violet pad and holder in its place.
4. With the door open, press and hold MODE/STOP
button until changes to
5. Place disc on turntable, close door and select a
cycle based on level of damage - there is no level 5
in Blu-ray repair mode.
6. When you’ve nished, press and hold MODE/STOP
again to return to mode and replace the yellow
pad.
1. Remove the red pad holder from the machine and
remove the red pad from the holder.
2. Attach the blue pad on to the red pad holder and
replace the pad holder on to the machine.
3. Place the heavy damaged disc on to the platen as
normal, close the lid and press ‘5’.
4. The display will count down the ‘5’ cycle.
5. When it moves on to cycle 4 press any button. This
will pause the repair and open the drawer.
6. Now exchange the blue pad with the red pad, close
the door and press ‘4’.
7. The machine will now nish stages 4 to 1 as normal.
©Total Disc Repair Ltd | www.totaldiscrepair.co.uk | Technical Support: 0800 412 5424 - support@totaldiscrepair.co.uk | Sales: 01202 489 500 - sales@totaldiscrepair.co.uk
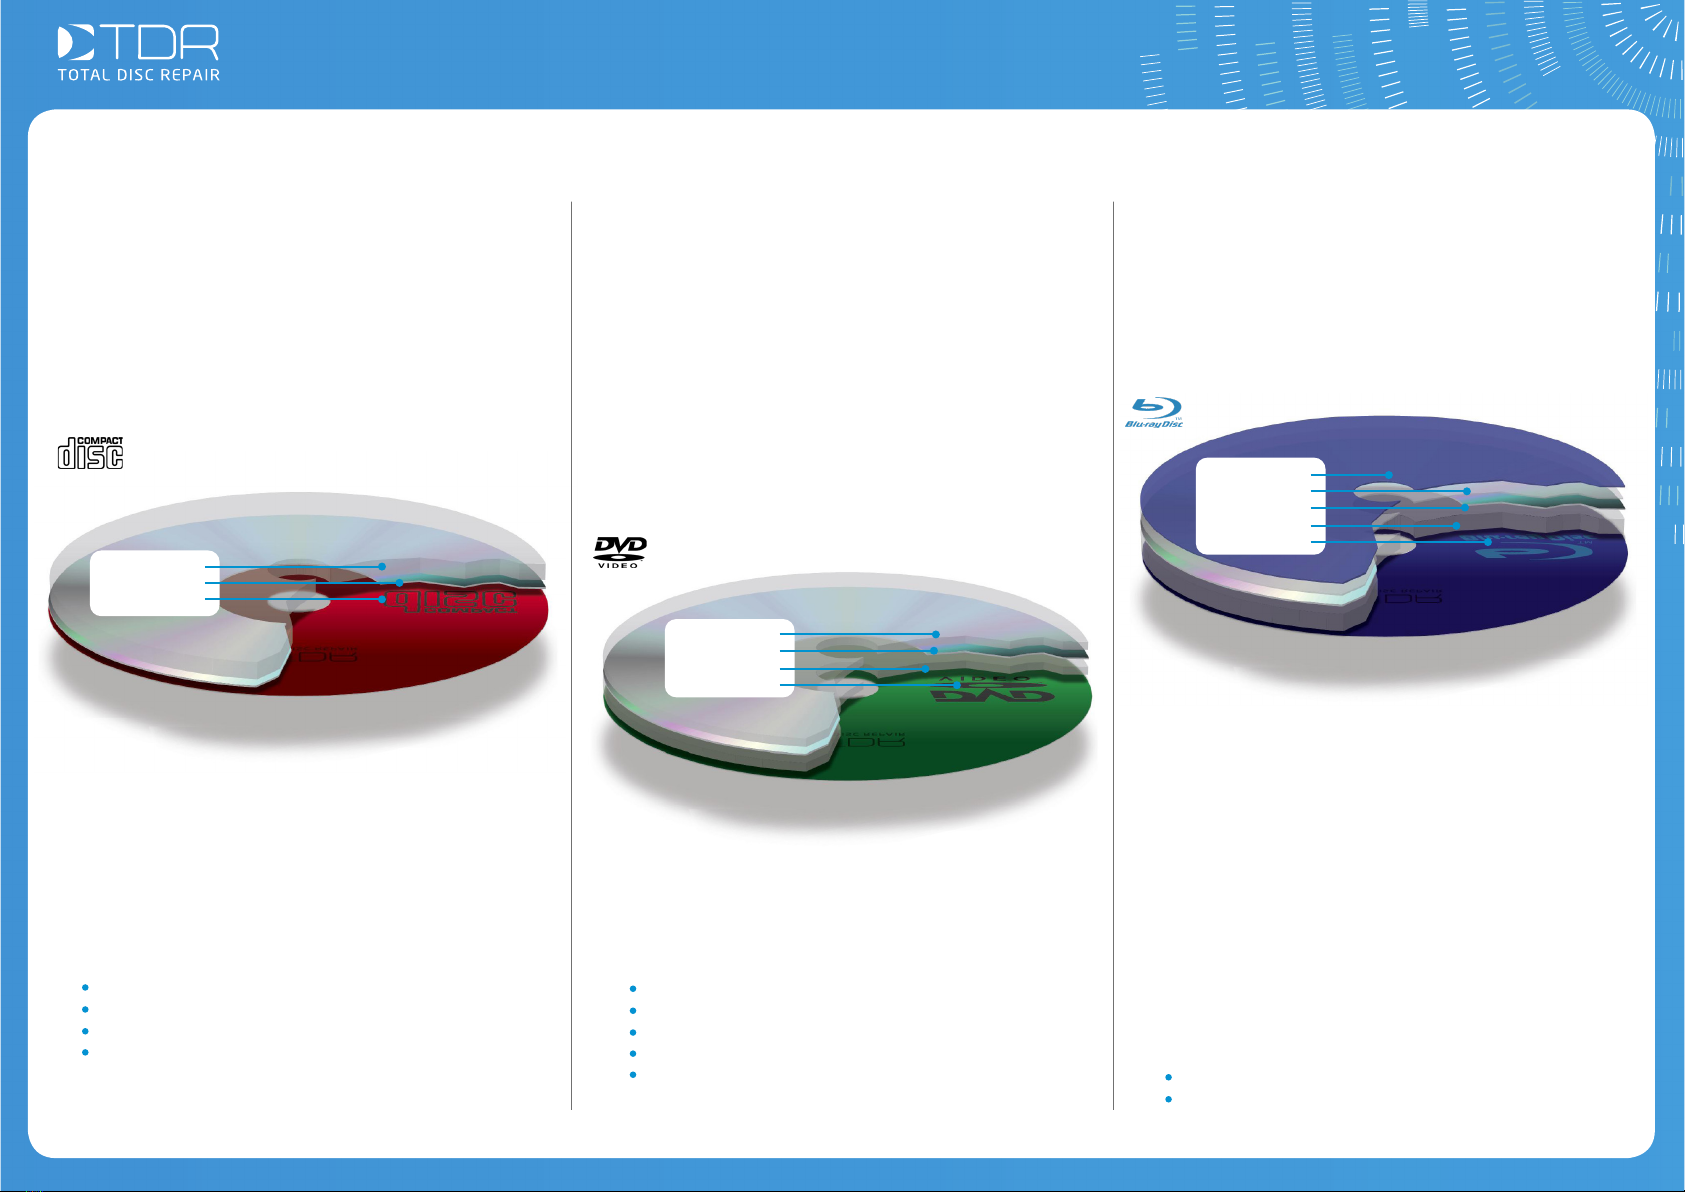
Hard coat
Polycarbonate
Data
Polycarbonate
Label
Polycarbonate
Data
Label
Polycarbonate
Data
Polycarbonate
Label
Disc Types
When discs were invented the process of
construction was quite simple. These are what
we call CD discs. To produce the disc, a solid
polycarbonate disc was made. Then the data layer
was applied to the top surface of the disc. To protect
this data layer, a lacquer, or label, was then applied
over the top of the data layer.
The early CDs were mainly used for audio and so
often a small scratch was not enough to disrupt
the data. However, as the data on discs became
more complicated it became more important to
protect the data layer. On DVD discs the data layer
is sandwiched in the middle of the disc between two
pieces of polycarbonate. This protects the data layer
and makes the disc virtually indestructible. The only
issue with this type of disc is that the two layers of
disc can separate around the hole in the centre of
the disc, although this is quite rare.
Because the data is so protected virtually all DVD
discs can be repaired by the disc repair process.
With the invention of High Denition (HD) there was
a need to carry more information on a disc and soon
the data space on a DVD was not enough. Sony
solved this with the invention of the Blu-ray disc.
It is essentially the same as a DVD with 2 main
dierences:
1. The polycarbonate on the bottom of the discs is
much thinner than a DVD and so the number of
times that the same disc can be repaired falls to
around 10-15.
2. The polycarbonate on the bottom of the disc
has a hard coated lacquer on top of it. This hard
coat reduces the chance of the disc being
scratched in the rst place, but nonetheless
scratches can still happen - just repair using the
Blu-ray pad as normal.
Formats:
Blu-ray lm
Playstation 3
This made the data layer quite vulnerable because
any scratch to the label could damage the data layer
beneath. If a scratch has reached the data layer
it is not repairable. Disc repair can only repair the
polycarbonate on the underside of the disc.
CDs DVDs Blu-rays
Formats:
Audio Books
Audio CDs
CD-ROMS
Playstation 1
Formats:
DVDs
Playstation 2
Xbox / Xbox 360
Wii
DVD ROM

©Total Disc Repair Ltd | www.totaldiscrepair.co.uk | Technical Support: 0800 412 5424 - support@totaldiscrepair.co.uk | Sales: 01202 489 500 - sales@totaldiscrepair.co.uk
Table of contents
Popular Service Equipment manuals by other brands

Magneti Marelli
Magneti Marelli ATF EXTRA PRO user manual

Hyundai
Hyundai Midtronics GRX-5100 instruction manual

Tronair
Tronair 01-1229-0011 Operation & service manual

ULTIMATE SPEED
ULTIMATE SPEED HG02236 Assembly and Safety Advice

CEMB
CEMB DWA1000CWAS manual

Invacare
Invacare TDX SP Assembly, installation and operating instructions


