TE 1725837 User manual

409--10053
Customer Manual
SDE Battery Powered Crimp
1of 8
LOC B
E2011 Tyco Electronics Corporation, a TE Connectivity Ltd. Company
All Rights Reserved
TE logo is a trademark.
*Trademark. Other product names, logos, or company names might be trademarks of their respective owners.
TOOLING ASSISTANCE CENTER
1--800 -- 722 -- 1111
This controlled document is subject to change.
For latest revision and Regional Customer Service,
visit our website at www.te.com
23 MAR 11 Rev H
Tool Kit 1725837- [ ]
READ THIS FIRST ! 2.........................
SAFETY PRECAUTIONS
1. INTRODUCTION 5...................................................
2. RECEIVING/INSPECTION 5............................................
3. INSTALLATION/REMOVAL OF SDE CRIMP DIES 5...........................
3.1. Installation of SDE Crimp Dies 6......................................
3.2. Removal of Shouldered Dies 6.......................................
4. OPERATION 7......................................................
4.1. Battery Installation and Removal 7....................................
4.2. Operation of the SDE Battery Powered Crimp Tool 7.......................
5. PREVENTIVE MAINTENANCE 7........................................
5.1. Daily Maintenance 7..............................................
5.2. Yearly Maintenance 8..............................................
6. SPARE PARTS 8....................................................
7. TROUBLESHOOTING 8...............................................
8. RETURN/REPAIR 8..................................................
9. REVISION SUMMARY 8...............................................
-- -- -- --
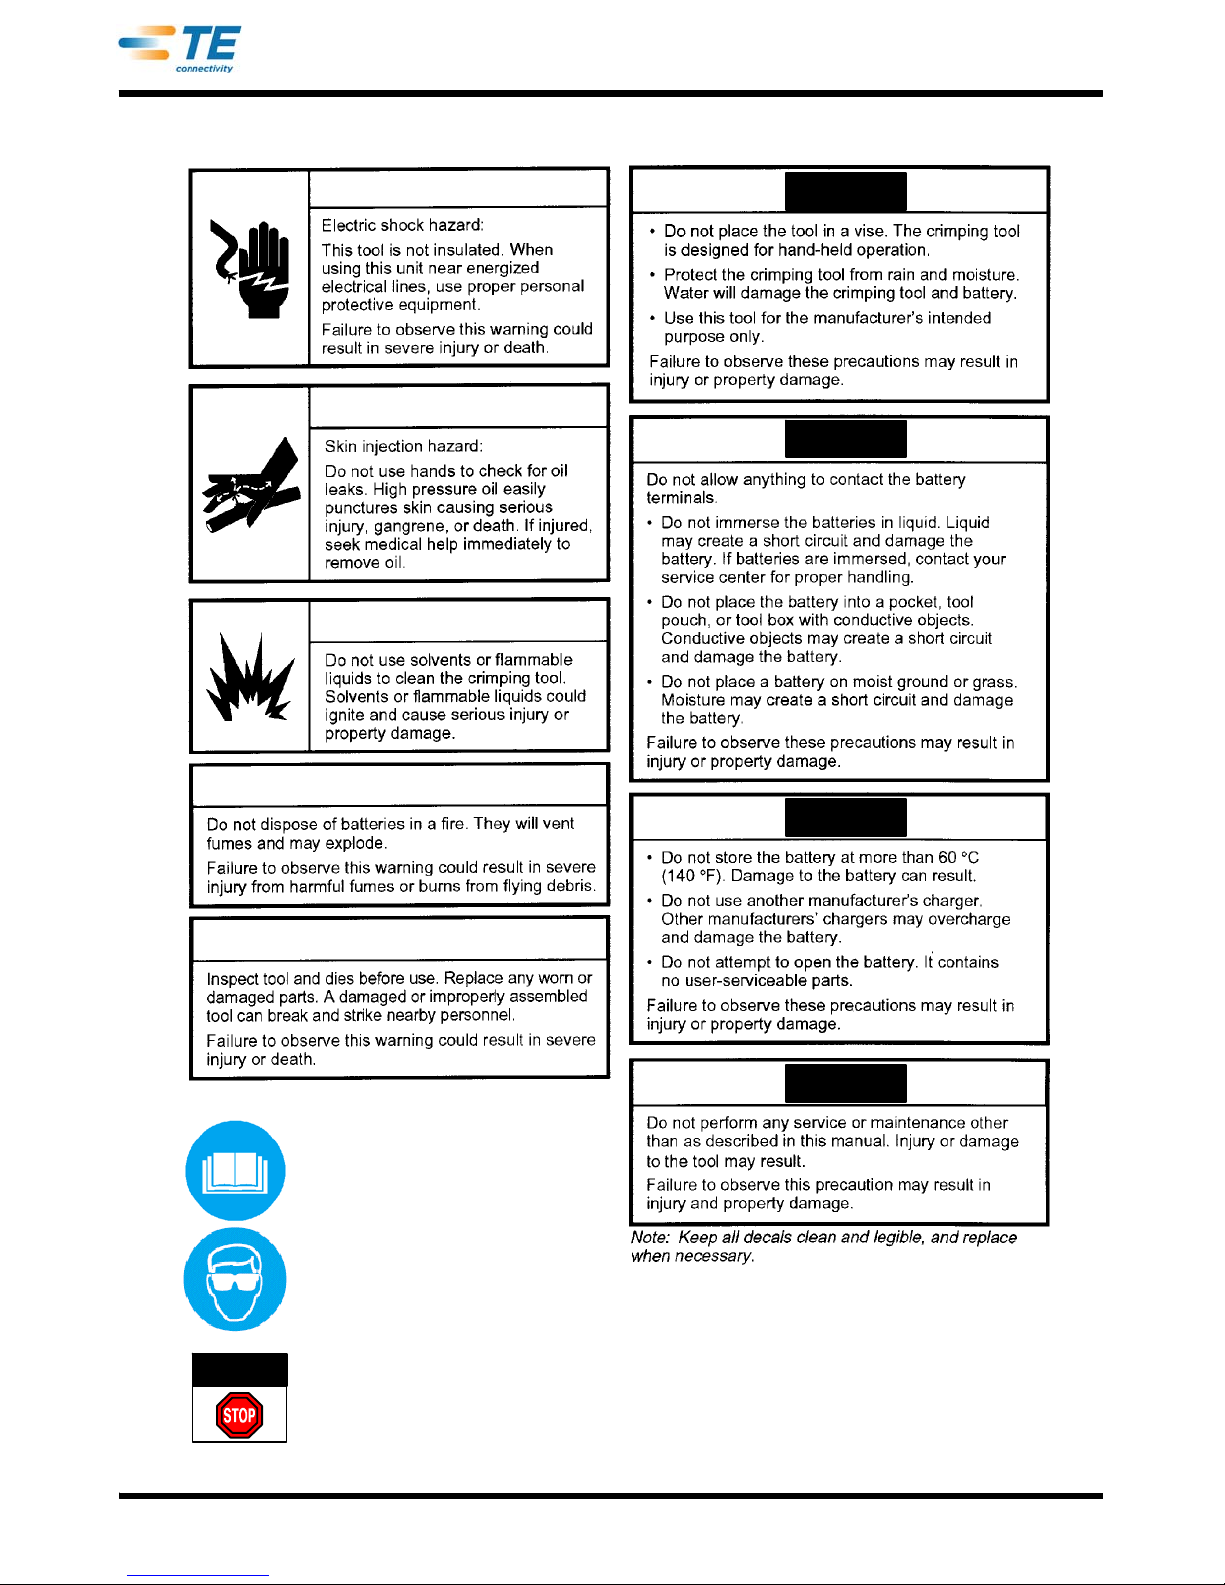
Safeguards are designed into this application equipment to protect operators
and maintenance personnel from most hazards during equipment operation.
However, certain safety precautions must be taken by the operator and repair
personnel to avoid personal injury, as well as damage to the equipment. For best
results, application equipment must be operated in a dry, dust--free environment.
Do not operate equipment in a gaseous or hazardous environment.
Carefully observe the following safety precautions before and during operation of
the equipment:
DALWAYS wear appropriate ear protection.
DALWAYS wear appropriate eye protection.
DALWAYS wear approved eye protection when operating powered equipment.
DALWAYS keep guard(s) in place during normal operation.
DNEVER wear loose clothing or jewelry that may catch in moving parts of the
application equipment.
DNEVER insert hands into installed application equipment.
DNEVER alter, modify, or misuse the application equipment.
ORIGINAL INSTRUCTIONS
409- 10053
Rev H2of 8
CAUTION
CAUTION
CAUTION
CAUTION
DANGER This unit should only be used by trained
competent personnel.
SAFETY PRECAUTIONS ---- IMPORTANT SAFETY INFORMATION
Read and understand the entire manual
before using the equipment.
Always wear approved eye protection
when using the equipment.

409- 10053
Rev H 3of 8
SAFETY PRECAUTIONS AVOID INJURY
Safeguards are designed into this application equipment to protect operators and maintenance personnel from
most hazards during equipment operation. However, certain safety precautions must be taken by the operator
and repair personnel to avoid personal injury, as well as damage to the equipment. For best results, application
equipment must be operated in a dry, dust--free environment. Do not operate equipment in a gaseous or
hazardous environment.
Carefully observe the following safety precautions before and during operation of the equipment:
DALWAYS wear appropriate ear protection.
DALWAYS wear approved eye protection when operating powered equipment.
DALWAYS keep guard(s) in place during normal operation.
DALWAYS insert power plug into a properly grounded receptacle to avoid electrical shock.
DALWAYS turn off the main power switch and disconnect electrical cord from the power source when
performing maintenance on the equipment.
DNEVER wear loose clothing or jewelry that may catch in moving parts of the application equipment.
DNEVER insert hands into installed application equipment.
DNEVER alter, modify, or misuse the application equipment.
TOOLING ASSISTANCE CENTER
CA LL TOLL FREE 1--800--722--1111 (CONTINENTAL UNITED STATES AND PUERTO RICO ONLY)
The Tooling Assistance Center offers a means of providing technical assistance when required.
In addition, Field Service Specialists are available to provide assistance in the adjustment or repair of the
application equipment when problems arise which your maintenance personnel are unable to correct.
INFORMATION REQUIRED WHEN CONTACTING THE TOOLING ASSISTANCE CENTER
When calling the Tooling Assistance Center regarding service to equipment, it is suggested that a person
familiar with the device be present with a copy of the manual (and drawings) to receive instructions. Many
difficulties can be avoided in this manner.
When calling the Tooling Assistance Center, be ready with the following information:
01. Customer name
02. Customer address
03. Person to contact (name, title, telephone number, and extension)
04. Person calling
05. Equipment number (and serial number if applicable)
06. Product part number (and serial number if applicable)
07. Urgency of request
08. Nature of problem
09. Description of inoperative component(s)
10. Additional information/comments that may be helpful
DANGER
409- 10053
Rev H4of 8
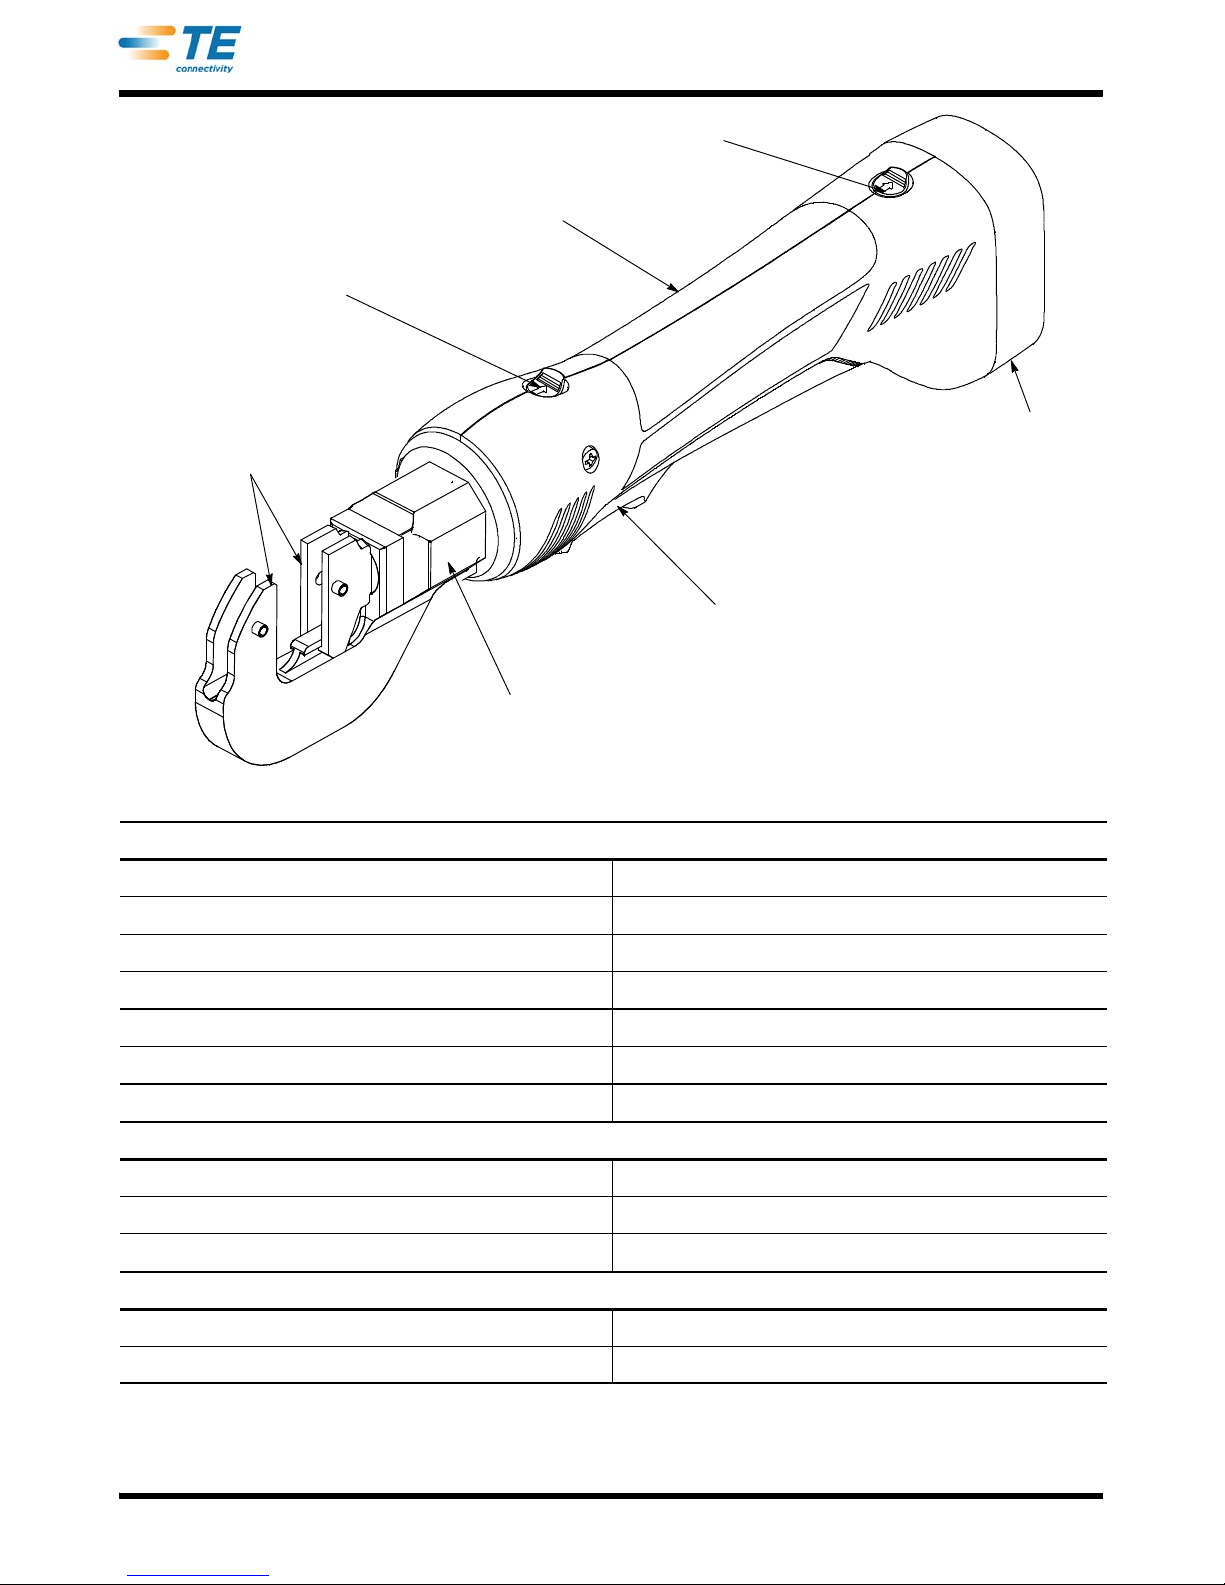
SDE Crimp Die
Location
SDE Crimp Head
Release Switch
(1725837--1, --2,
and --5 Only)
Battery
Lock
Battery
Cartridge
1725839--1
Trigger
SDE Battery Powered
Crimp Tool 1725838--1
CRIMPING TOOL (with Battery Installed)
Length 356 mm [14 In.]
Width 60 mm [2 3/8 In.]
Depth 80 mm [3 1/8 In.]
Mass/Weight (w/Battery) 1.5kg[3.4lb.]
Sound Level 75 dBA at 1 Meter
Vibration <2.5m/s2
Hydraulic Oil Shell TellusT15
CRIMPING CAPACITIES
Maximum Crimping Force 15.6 kN [1.75 Tons]
Average Crimping Time 2 Seconds
Average Crimps Per Charge Approximately 150
BATTERY
Charging Voltage 9.6 V
Charging Time 40 Min
Figure 1

409- 10053
Rev H 5of 8
1. INTRODUCTION
SDE Battery Powered Crimp Tool Kit 1725837--[ ] consists of the SDE Battery Powered Crimp Tool 1725838--1,
as well as two rechargeable battery cartridges (1725839--1) to power the tool used to terminate terminals to
wire. See Figure 1. Each kit has a battery charger. The battery charger part number, its voltage, and the kit’s
region of use are listed in the table below. A battery tool may have a release switch to retract the ram as listed
in the table below. The SDE Battery Powered Crimp Tool is designed to accept interchangeable die assemblies
used in PRO--CRIMPER* Hand Tools for crimping various types of connectors.
BATTERY TOOL KIT REGION OF USE BATTERY CHARGER BATTERY CHARGER
VOLTAGE
RAM RETRACT
SWITCH
1725837--1 North America 1725840--1 110 V Yes
1725837--2 Europe 1725840--2 220 V Yes
1725837--3 North America 1725840--1 110 V No
1725837--4 Europe 1725840--2 220 V No
1725837--5 United Kingdom 1725840--3 220 V Yes
2. RECEIVING/INSPECTION
SDE Battery Powered Crimp Tool Kit 1725837--[ ] is thoroughly inspected during and after assembly. Prior to
packaging and shipping, a final series of tests and inspections is made to ensure proper function of the tool.
The following inspection should be performed as a safeguard against potential problems generated in transit.
1. In a well--lighted area, carefully uncrate the tool and inspect each component as it is removed from
the crate.
2. Thoroughly inspect each component for evidence of damage that may have occurred in transit. If any
of the components are damaged, file a claim against the carrier and notify TE Connectivity immediately.
3. Keep this manual and all drawings and product samples with the tool for the benefit of operation and
maintenance personnel.
The crimp tool should be inspected at regularly scheduled intervals, depending on care, degree of operator
skill, the type and size of product being crimped, and environmental conditions.
At a minimum, the tool should be inspected after every 40 hours of use.
3. INSTALLATION/REMOVAL OF SDE CRIMP DIES
Do not operate the tool without the SDE Crimp Head Installed. Damage to the ram or seals can result.
Do not operate the tool without the SDE dies. Damage to the crimp head can result.
The SDE Battery Powered Crimp Tool comes with the crimp head already installed on the battery--powered
hand tool. The only installation required is the installation of the SDE dies.
To avoid personal injury, be sure to exercise extreme caution when handling the crimp tool. Remove the battery before
installing or removing crimp dies.
CAUTION
!
CAUTION
!
DANGER
409- 10053
Rev H6of 8
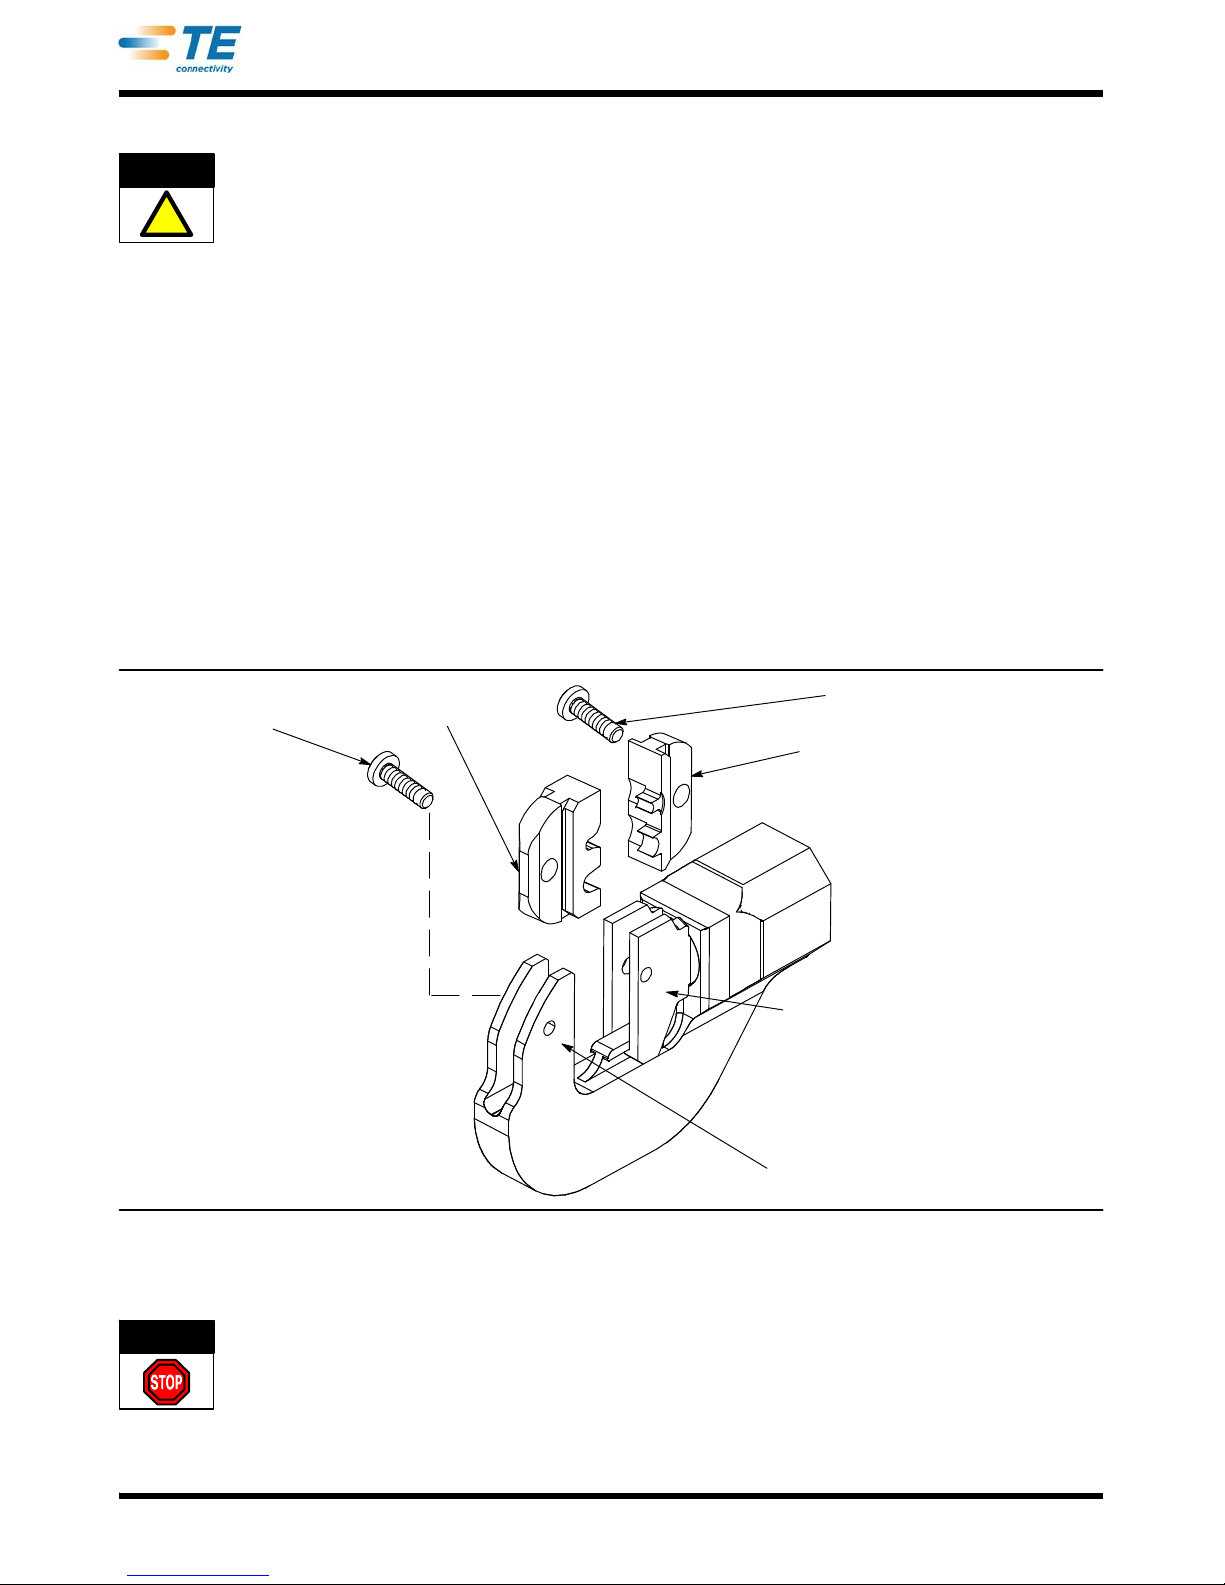
3.1. Installation of SDE Crimp Dies
These instructions are specific to the use of TE SDE Crimp Dies. Be Sure to use ONLY TE Crimp Dies.
Installation of Shouldered Dies (Figure 2 )
1. Remove the battery from the tool.
2. Remove the two die retaining screws from the crimp head.
3. Place the upper die in the upper jaw of the tool head so that the largest indenter is facing inward.
4. Insert the die retaining screw through the upper jaw and through the die. Tighten the screw just
enough to hold the die in place. Do NOT tighten the screw completely at this time. See Figure 2.
5. Place the lower die in the moving jaw of the crimp head so that the largest anvil is facing inward.
6. Insert the die retaining screw through the lower jaw and through the die. Tighten the screw just
enough to hold the die in place. Do NOT tighten the screw completely at this time.
7. Replace the battery and pulse the trigger to slowly close the crimp head, making sure the anvils and
indenters are properly aligned.
8. When the anvils and indenters are aligned, tighten the retaining screws.
Figure 2
Upper Jaw
Upper SDE Die
Upper Die
Retaining
Screw Lower SDE Die
Moving Jaw
Lower Die Retaining Screw
3.2. Removal of Shouldered Dies
To avoid personal injury, remove the battery before removing the dies.
To remove dies from the crimp head, remove the die retaining screws and slide the dies out of the crimp head.
CAUTION
!
DANGER

409- 10053
Rev H 7of 8
4. OPERATION
4.1. Battery Installation and Removal (Refer to Figure 1)
The batteries Directive 2006/66/EC introduces new requirements from September 2008 on removability of batteries
from waste equipment in EU Member States. To comply with this Directive, this device is designed to allow the
rechargeable battery pack to be easily removed by the end--user when it needs to be replaced.
To install the battery, slide the battery into the bottom of the crimp tool until it can go no further. There will be an
audible “click” of the battery lock to indicate that the battery has been properly installed.
To remove the battery, disengage the battery lock by applying pressure on the lock toward the bottom of the
tool and slide the battery away from the tool.
Always dispose of the old battery pack in an environmentally--responsible way, in accordance with local waste
regulations. Where possible, please recycle the battery cartridge. Contact your local authority for details of battery
recycling locations in your area.
The following procedure provides only general information concerning crimping. Refer to the instructions
packaged with the dies for detailed information, including wire stripping dimensions and instructions for
positioning terminals and splices in the dies.
4.2. Operation of the SDE Battery Powered Crimp Tool
To operate the SDE Battery Powered Crimp Tool:
To avoid personal injury, keep fingers clear of the crimping area.
1. Insert the terminal into the dies.
2. Depress the trigger to advance the moving jaw in order to hold the terminal in place. Do NOT deform
the terminal body.
3. Place a pre--stripped wire in the barrel of the terminal.
4. Depress and hold the trigger to complete the crimp. The crimp tool returns automatically to the first
position of its cycle when the crimp is complete.
If it is necessary to retract the ram before a crimping cycle is completed, push the release switch. Pushing the release
switch will result in the complete retraction of the ram. Only kits 1725837--1, --2, and --5 have a release switch.
This tool is not designed for continuous operation. After 100 cycles, allow the crimp tool to cool for 15 minutes.
5. PREVENTIVE MAINTENANCE
5.1. Daily Maintenance
Perform the following maintenance on a daily basis:
1. Inspect the dies for wear or damage such as cracks, gouges, or chips.
2. Inspect the tool for damage or leaks. If damage is detected, return the tool to TE for repair
3. Clean the tool, removing accumulations of dirt and grease on the head, particularly in areas where
dies are installed and terminals are crimped. Wipe the entire tool frequently with a clean, lint--free cloth.
5.2. Yearly Maintenance
Once a year, or every 10,000 cycles (whichever comes first) The SDE Battery Powered Crimp Tool should be
returned to TE for inspection.
NOTE
i
DANGER
DANGER
NOTE
i
CAUTION
!

409- 10053
Rev H8of 8
6. SPARE PARTS
1. Battery: Part Number 1725839--1
2. 120 V Charger: Part Number 1725840--1
3. 220 V Charger: Part Number 1725840--2
7. TROUBLESHOOTING (Figure 3)
Prior to beginning troubleshooting procedures, be sure the battery is operational.
1. Be sure that the battery is charged. Recheck the battery after several minutes to ensure that the
battery is holding its charge.
2. Use a nonflammable contact cleaner or pencil eraser to clean the the electrical contacts on the
battery and crimp tool.
3. Reinstall the battery and check the crimp tool again.
PROBLEM PROBABLE CAUSE REMEDY
Dirt, contaminants, etc, in ram area of tool. Return tool to TE.
Tool is inoperative. Crimp tool battery contacts damaged. Reform the contacts.
Tool components are worn or damaged. Return tool to TE.
Oil level is low. Return tool to TE.
Dies stop during operation.
Air in the hydraulic system.
Pull the trigger and hold the retract button
simultaneously. Hold for approximately 10
seconds.
Crimp tool loses oil. Damaged internal seal. Return tool to TE.
Figure 3
8. RETURN/REPAIR
Order replacement parts through your TE Representative, or call 1.800.526.5142; or send a facsimile of your
purchase order to 1.717.986.7605; or write to:
CUSTOMER SERVICE (38--35)
TYCO ELECTRONICS CORPORATION
PO BOX 3608
HARRISBURG PA 17105--3608
9. REVISION SUMMARY
SUpdated document to corporate requirements
SNew logo
SAdded new information to Section 4, OPERATION
Table of contents
Other TE Power Tools manuals


Popular Power Tools manuals by other brands


EGAmaster
EGAmaster MASTERMATIC-PRO operating instructions

Emax
Emax EATHM10S1P Operator's manual

FLORABEST
FLORABEST FBK 4 B2 Translation of the original instructions

MasterForce
MasterForce Utila-Tool 241-0853 Operator's manual

Hellermann Tyton
Hellermann Tyton EVO7 operating instructions

AME
AME Fasy-Flate 24868 manual


