TECHNOSAFE TT Series User manual

ISTRUZIONI D’USO
CASSAFORTE ELETTRONICA A MURO SERIE “TT”
INSTRUCTION FOR USE
ELECTRONIC WALL SAFE “TT” SERIES
INSTRUCTION D’UTILISATION
COFFRE-FORT A EMMURER ELECTRONIQUE SERIE “TT”
ISTRUZIONI D' USO CASSAFORTE ELETTRONICA
TECHNOSAFE MODELLO “TT3 New – TT4 New”
1. INFORMAZIONI UTILI:
2. IMPOSTAZIONI INIZIALI:
3. APERTURA/CHIUSURA CON CODICE DI SERVIZIO “1234” (porta aperta e catenacci rientrati
4. PROGRAMMAZIONE DEL CODICE PERSONALE: (solo con porta aperta e catenacci rientrati)
5. PER CHIUDERE LA PORTA:
6. APERTURA CON CODICE PERSONALE:
7. SEGNALAZIONE DELLO STATO DELLE BATTERIE INTERNE
8. APERTURA Dl EMERGENZA A BATTERIE INTERNE SCARICHE
9. APERTURA CON CHIAVE DI EMERGENZA (operazione da effettuare solo con catenacci fuori):
• Leggere attentamente le istruzioni d’uso prima della messa in funzione della cassaforte.
• La cassaforte é fornita con codice di servizio “1234”.
• Il codice personale deve essere composto da un minimo di 3 ad un massimo di 4 cifre.
• Conservare il codice personale in un luogo sicuro, si consiglia di non utilizzare riferimenti personali quali, data di
nascita, numeri di telefono ..ecc.
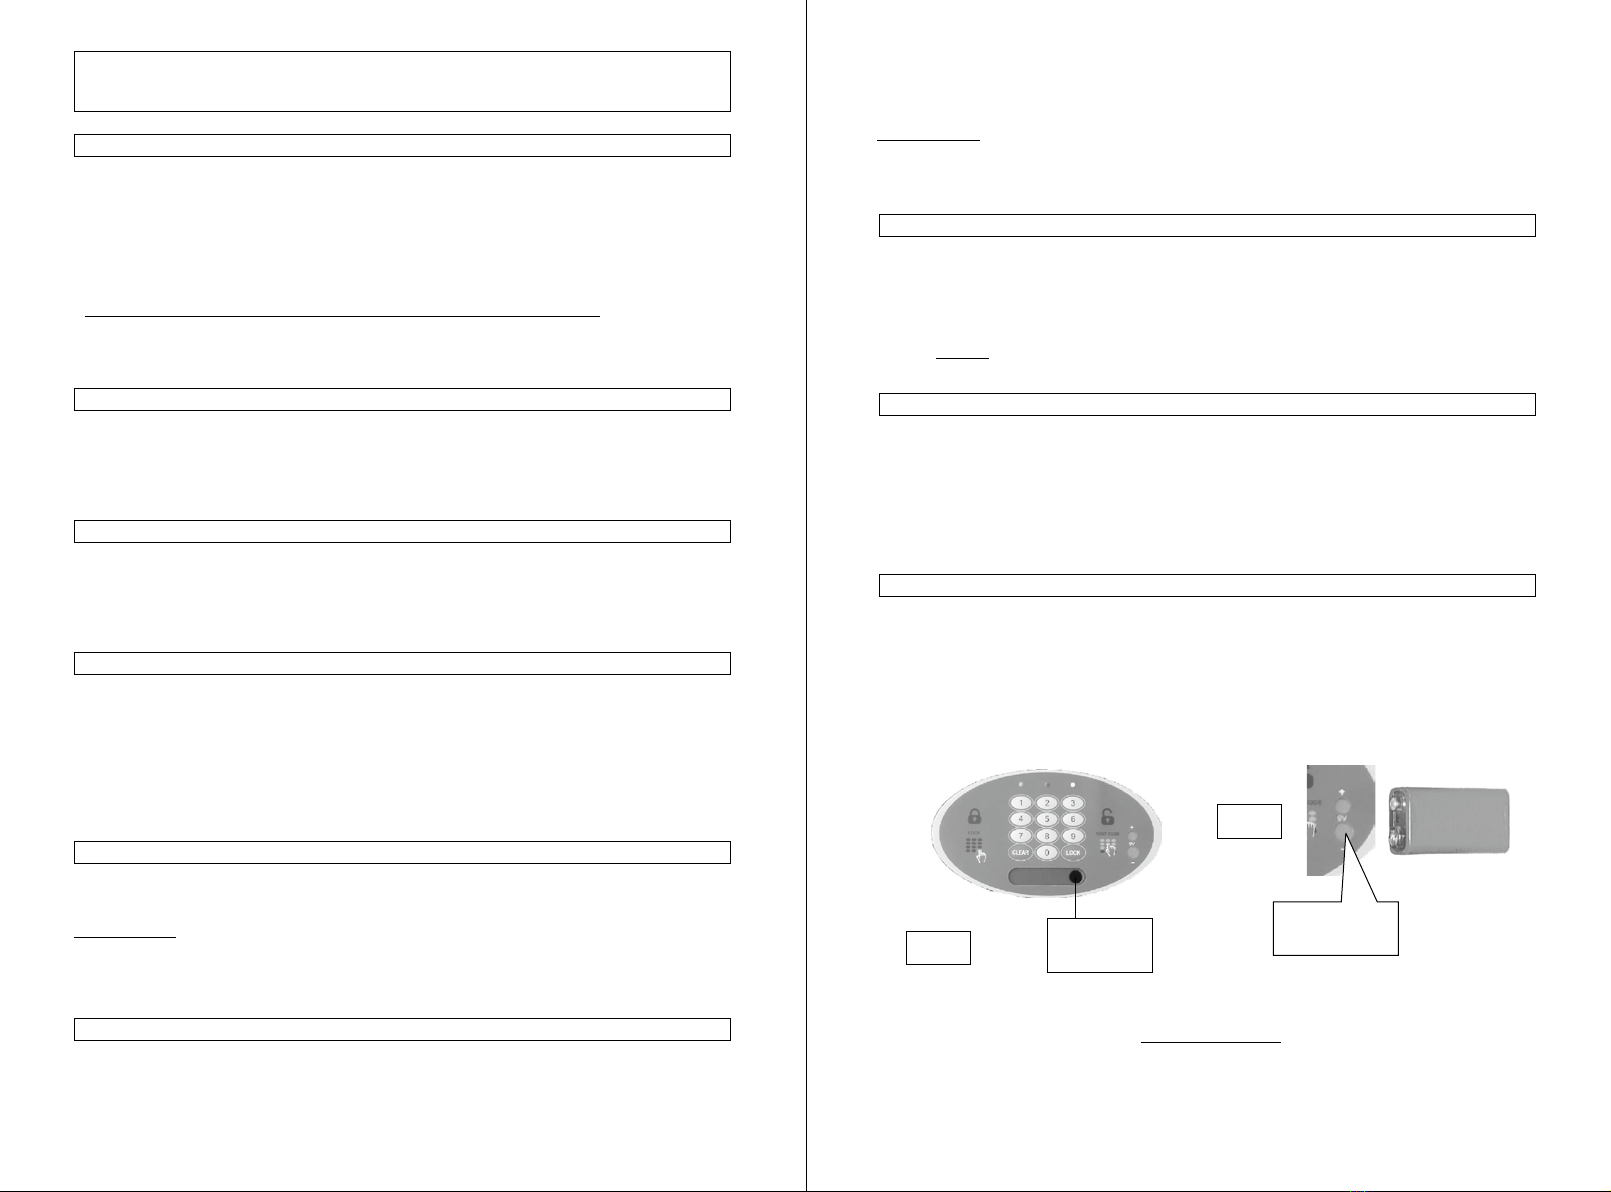
• Questa cassaforte è dotata di una serratura a chiave (2 chiavi in dotazione) per apertura della porta in caso di
emergenza (FIG. 1).
Conservare le chiavi di emergenza in un luogo sicuro, ma mai all'interno della cassaforte.
• E’ consigliata la sostituzione delle batterie interne ogni anno (usare solo batterie alcaline da 1,5 V. LR6 AA).
• Se la cassaforte non viene utilizzata per un lungo periodo si consiglia di togliere le batterie interne.
• Prima dell’installazione, vericate il buon funzionamento della cassaforte da eseguire a porta aperta.
• La cassaforte è fornita con la porta aperta e con la confezione delle batterie poste all’interno della stessa.
• Togliere il coperchio del vano batterie situato nella parte interna della porta, installare le 4 batterie fornite
rispettando la polarità indicata e riposizionare il coperchio nella sua sede. L' emissione di un "beep" e l’accensione
di tutti i LED sulla tastiera indica che il sistema è attivo.
• Mantenendo la porta aperta, premere il tasto " LOCK ". Sulla tastiera si accenderà il LED ROSSO ed i catenacci
usciranno automaticamente.
• Digitare il codice di servizio “1234”. Sulla tastiera si illuminerà il LED VERDE ed i catenacci rientreranno
automaticamente.
• Digitare il vs./ codice personale. Sulla tastiera si illuminerà il LED VERDE e la porta si aprirà automaticamente,
ATTENZIONE:
• Quando vengono inseriti codici errati sulla tastiera si illuminerà il LED GIALLO.
• Chiudere la porta e, mantenendola in appoggio al battente, premere il tasto "LOCK". Sulla tastiera si illuminerà il
LED ROSSO e la serratura si chiuderà automaticamente.
ATTENZIONE: Se qualcosa ostacolasse l’uscita dei catenacci, il LED GIALLO inizierà a lampeggiare ed i
catenacci rientreranno automaticamente. Rimuovere l'ostacolo e ripetere l'operazione. Se i
catenacci, a causa di un colpo si fossero piegati e non dovessero fuoriuscire, occorrerà riportarli
nella giusta posizione e ripetere l’operazione di chiusura.
• Premere 2 volte consecutive il tasto "CLEAR", sulla tastiera si illumineranno i led ROSSO e VERDE.
• Mentre i LED ROSSO e VERDE sono accesi, digitare il vs./ codice personale da 3 a 6 cifre e premere il tasto
" LOCK ".
• Digitare una seconda volta il vs./ codice personale e premere il tasto "LOCK", i LED ROSSO e VERDE si
spegneranno e il vs./ nuovo codice personale è stato programmato con successo.
* Effettuare ora, mantenendo la porta aperta, qualche chiusura ed apertura della serratura utilizzando il vs./
codice personale precedentemente impostato.
• Dopo quattro immissioni consecutive di codici errati, sulla tastiera si illumineranno contemporaneamente i tre
LED e la serratura elettronica si bloccherà per 15 minuti. Trascorsi i 15 minuti, la serratura ritornerà a funzionare
normalmente.
In caso di carica insufciente delle batterie interne, procedere all’apertura di emergenza nel modo seguente:
• Munirsi di una batteria alcalina nuova da 9 Volt tipo LR61.
• Mantenendo una certa pressione, appoggiare i contatti della batteria da 9V sui corrispondenti contatti che si trovano
sulla tastiera, facendo attenzione a posizionarli in modo corretto (il – della pila in corrispondenza del contatto più
grande ed il + della pila in corrispondenza del contatto più piccolo);
• Digitare il vs./ codice personale. Sulla tastiera si illuminerà il LED VERDE e la porta si aprirà automaticamente.
• Togliere l’adesivo posto sulla porta contrassegnato dalla scritta “TECHNOSAFE” ".
• Inserire la chiave nel foro (VEDI FIG. 1) con l’incavo presente sulla testa verso alto e ruotarla in senso orario sino
al fermo. Sulla tastiera si illuminerà il LED VERDE.
• Aprire la porta, ruotare la chiave in senso antiorario ed estrarla. Premere il tasto "LOCK". Sulla tastiera si
illuminerà il LED VERDE ed i catenacci rientreranno automaticamente.
• Riposizionare l’etichetta nella sua sede.
• In qualsiasi momento, a porta chiusa, è possibile vericare lo stato delle batterie interne semplicemente premendo il
tasto “LOCK”.
L’accensione del LED GIALLO signica che le batterie sono in fase di esaurimento e, quindi, si rende necessario
sostituirle rapidamente. Qualora non vengano sostituire per tempo, non sarà più possibile l’apertura della porta;
In tal caso, si può procedere all’apertura utilizzando l’alimentazione esterna di emergenza tramite una batteria
alcalina NUOVA da 9V LR61 (FIG. 2), oppure utilizzando la chiave di emergenza.
ATTENZIONE: Se qualcosa ostacolasse il rientro dei catenacci, il LED GIALLO inizierà a lampeggiare. Questo
potrebbe accadere, per esempio, se i catenacci, a causa di un colpo, si fossero piegati a tal punto da
forzare sulla battuta interna. Spingere la porta verso l’interno e ripetere l’operazione di apertura.
Fig. 1 Chiave di
Emergenza
SERVIZIO TECNICO
TEL. 0375 - 310281
FAX 0375 - 310282
Contatti per
batteria esterna
Pic. 2
1 2
3 4
NOTICE D’UTILISATION DE COFFRES-FORTS ELECTRONIQUES DIGITAUX
TECHNOSAFE MODELES “TT3 New – TT4 New”
1. INFORMATIONS UTILES:
7. CHANGEMENT DES PILES:
9. OUVERTURE DU COFFRE AVEC LA CLE DE SECOURS (pênes rentrés):
8. OUVERTURE D’URGENCE LORSQUE LES PILES SONT DECHARGEES:
2. INSERTION DES PILES:
3. TEST POUR L’OUVERTURE/FERMETURE EN UTILISANT LE CODE D’USINE “1234” (porte
ouverte et pênes rentrés)
4. PROGRAMMATION DE VOTRE CODE PERSONNEL (avec la porte ouverte et les pênes rentrés)
5. FERMETURE DU COFFRE:
6. OUVERTURE DU COFFRE EN UTILISANT LE CODE PERSONNEL:
• BIEN LIRE LES INSTRUCTIONS AVANT TOUTE UTILISATION DU COFFRE.
• Le coffre est fourni avec un code pré programmé “1234”.
• Votre code personnel doit être de 3 chiffres minimum, jusqu’à 6 chiffres maximum.
• Conservez vos codes personnels dans un endroit sûr.
• Ne pas utiliser de données personnelles (dates de naissance, n° de téléphone, etc…).
• Il est conseillé de changer les piles chaque année.
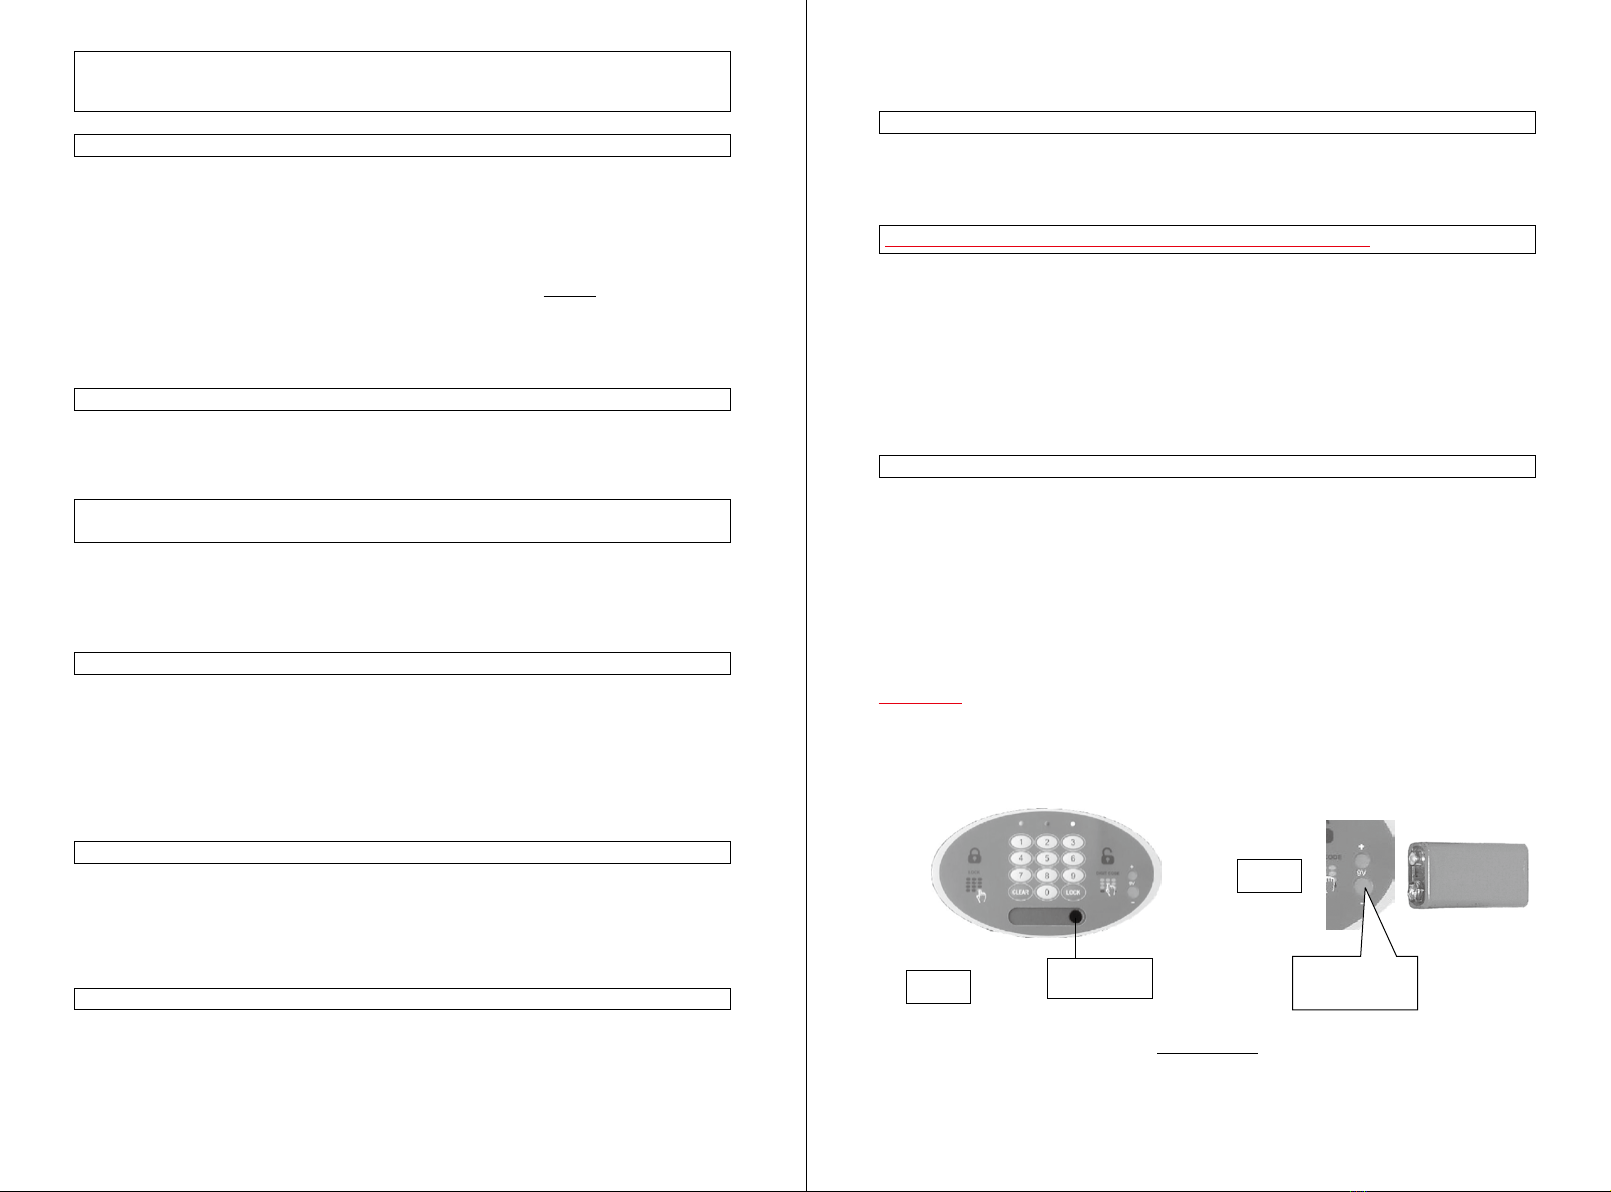
• Le coffre est livré avec 2 clés de secours. Conservez-les dans un endroit sûr, mais JAMAIS dans le coffre.
• Si le coffre n’est pas utilisé durant une longue période, retirer les piles.
• Avant de faire l’installation du coffre, vérifiez l’ouverture et la fermeture de la porte, porte ouverte, en
utilisant le code pré programmé « 1234 ».
• Le coffre est livré avec la porte ouverte. Garder la porte ouverte, enlever le cache du boîtier des piles au dos de
la porte et insérer les 4 piles en vous assurant qu’elles sont correctement insérées (+ et -). Refermer le boîtier des
piles. Un Bip sera émis et toutes les LED s’allumeront pour indiquer que le système électronique est activé.
• Fermer la porte complètement et appuyez sur la touche “LOCK”. Les pênes sortiront automatiquement. La LED
rouge s’allumera pour indiquer la fermeture de la porte.
• Composer le code pré-programmé d’usine “1234” et la porte s’ouvrira automatiquement (la LED verte s’allumera
pour signaler que la porte est ouverte)
• Appuyez 2 fois sur la touche “CLEAR” (les LED verte et rouge s’allumeront).
• Composez votre code personnel (minimum 3 chiffres et maximum 6 chiffres) et appuyez sur la touche “LOCK” (le
coffre bippera 2 fois).
• Composez à nouveau votre code personnel et appuyez sur la touche “LOCK” (les LED verte et rouge s’éteindront).
• Votre code personnel est programmé.
Si des erreurs ont été commises lors de l’enregistrement de votre nouveau code, répétez la procédure depuis le début.
* Avant de fermer votre coffre, procédez plusieurs fois à l’ouverture et à la fermeture avec la porte ouverte. Si
tout fonctionne correctement, vous pouvez refermer la porte.
• Fermez complètement la porte.
• Appuyez sur la touche “LOCK” (les pênes ressortiront automatiquement. La LED rouge s’allumera pour indiquer
que la porte est ouverte).
* Si quelque chose empêchait la sortie des pênes, cela serait signalé par la LED jaune qui s’allumerait. Les pênes
rentreront automatiquement. Otez l’obstacle et répétez l’opération depuis le début.
• Entrez votre code personnel (les pênes rentreront automatiquement et la LED verte s’allumera).
Si quoi que ce soit bloquait la rentrée des pênes, la LED jaune s’allumerait après la LED verte. Ceci peut survenir
si, par exemple, les pênes forçaient sur la partie intérieure du cadre. Dans ce cas, il serait nécessaire de pousser la
porte et de répéter la procédure d'ouverture depuis le début.
* En cas de 4 faux codes consécutifs t le coffre se bloquera pendant 15 minutes. Les LED verte, rouge et jaune
s’allumeront. Après 15 minutes, le coffre sera de nouveau prêt à fonctionner.
• A tout moment, l’état d’usure des piles peut être contrôlé en appuyant sur la touche “LOCK” quand la porte est
fermée (pênes sortis). La LED jaune s’allumera pour indiquer que les piles sont déchargées et qu’elles doivent être
remplacées par des piles neuves (4 piles alcalines de 1,5V- type AA).
Si les piles sont complètement déchargées lorsque vous appuyez sur le clavier, vous pouvez ouvrir le coffre de la
manière suivante :
• Vous devez utiliser une pile alcaline neuve de 9V LR61 en extérieur (voir Fig. 2);
• Appuyer fermement les contacts de la pile de 9V sur les pôles correspondants sur le clavier, en vous assurant qu’ils
sont positionnés correctement (le “-“ de la pile doit toucher le grand contact et le “+” de la pile doit toucher le petit
contact).
• Composez votre code personnel pour ouvrir la porte.
• Changez les piles à l’intérieur (merci de veiller les recycler).
La clé de secours est à utiliser quand le coffre est bloqué !
• Quand votre coffre est fermé et que vous ne pouvez plus l’ouvrir avec votre code personnel ou pour changer les
piles, vous disposez alors d’une ouverture grâce à une clé de secours.
• Enlevez l’étiquette adhésive marquée “Technosafe” et vous verrez un trou.
• Insérer la clé de secours dans le trou (voir Fig. 1).
• Tournez la clé dans le sens des aiguilles d’une montre jusqu’à un point d’arrêt. La LED verte s’allumera.
• Tournez la clé dans le sens contraire des aiguilles d’une montre et retirez la clé.
• Pressez la touche “LOCK” et les pênes se rétracteront automatiquement.
• Maintenant, vous pouvez programmer votre code personnel en suivant les instructions.
ATTENTION
Il est rappelé que parfois, pour différentes raisons, des piles neuves peuvent être défectueuses ou avoir un délai de vie
très bref. En cas de panne, commencez par remplacer les piles alcalines.
La Société décline toute responsabilité en cas de non-respect des instructions données. Tout défaut de mauvaise
utilisation du coffre entraînerait l’annulation de la garantie.
Fig. 1 Clé d’urgence
S.A.V. FRANCE
TEL. 02 40920726
Contacts de pile
extérieure
Fig. 2
5 6
INSTRUCTION MANUAL OF ELECTRONIC DIGITAL SAFE
TECHNOSAFE MOD. TT/3 NEW – TT/4 NEW
1. USEFUL INFORMATIONS:
7. CHARGING CHECK OF THE INTERNAL BATTERIES
8. EMERGENCY OPENING BY DISCHARGED INTERNAL BATTERIES
9. OPEN THE DOOR USING A MECHANICAL EMERGENCY KEY (only by door closed/bolts out:
2. INITIAL SETTINGS:
3. OPENING/CLOSING USING THE SERVICE CODE “1234” (with door open and bolts retracted)
4. PERSONAL CODE PROGRAMMING (with the door open and the bolts retracted)
5. TO CLOSE:
6. TO OPEN USING A PERSONAL CODE:
• Read the instructions carefully before using the safe.
• The safe is supplied with a service code “1234”
• Keep your personal code in a safe place.
• Do not use personal data like birthdays, telephone numbers…etc.
• It will be convenient to replace the batteries every year using a 9V alkaline battery type LR61.
• The safe is supplied with 2 emergency keys to use in case of emergency. Please, never leave the keys in the safe
itself.
• If the safe will not be used for a long time, please, take out the batteries.
• Before installing the safe, please, verify the opening and closing with the door open utilizing a service code 1234.
• At any time, the battery level of the safe can be checked by pressing the “LOCK” key when the door is closed (bolts
out). Yellow indicator light shine means that the level of the internal batteries is low and you need to change the
batteries using 4 x 1,5 V. AA size alkaline batteries.
* If the internal batteries goes completely discharged, it is necessary to open the safe using the external batteries or
the emergency key.
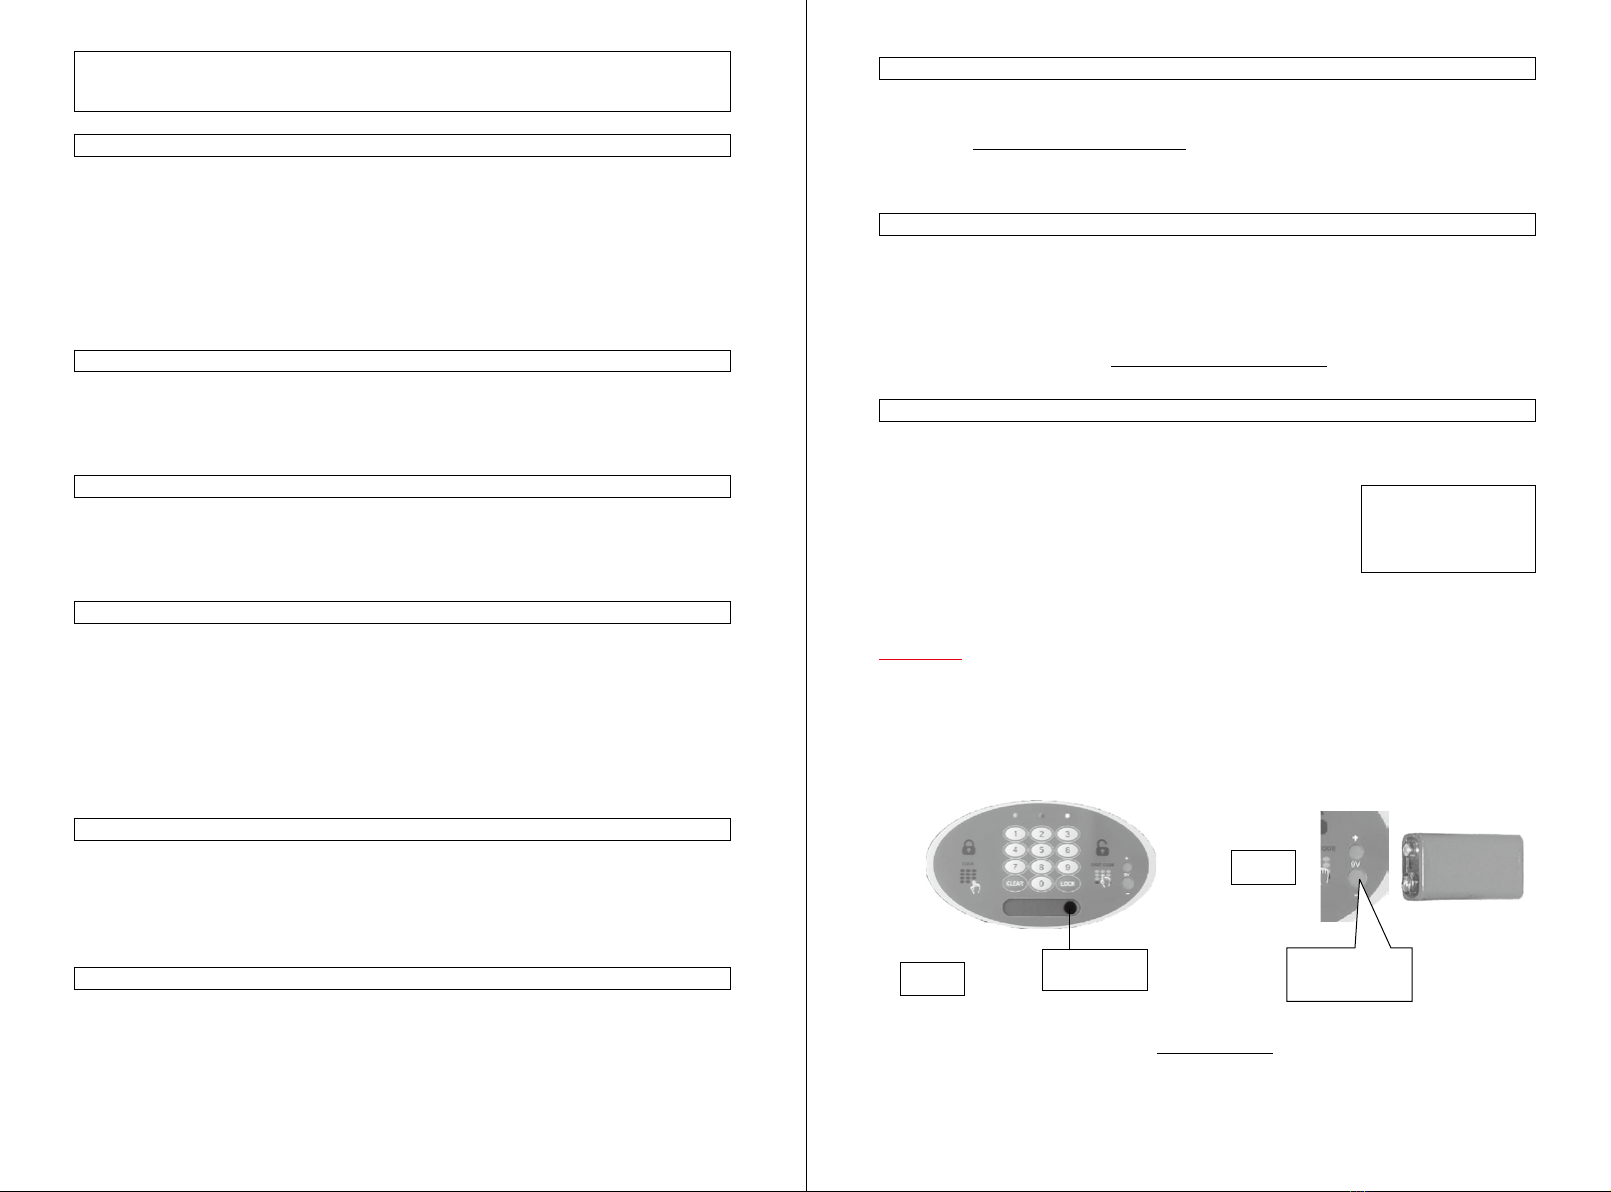
• It is necessary to have a new 9V LR61 alkaline battery
• Press the 9V battery contacts firmly on the corresponding contacts on the keyboards, ensuring that they are
positioned correctly the “-“ of the battery touching the bigger contact and the “+” of the battery touching the small
contact (see Pic. 2).
• Digit your personal code to open the door.
• Change the internal batteries using new 4 x 1,5 V. AA size alkaline batteries.
When the safe is closed and you cannot open it by your Code or for change the batteries, then you have an emergency
opening with an override key
• Remove the adhesive label marked with “TECHNOSAFE”.
• Insert the emergency key with the cut on the top-side in the hole (see Pic. 1).
• Turn the key clockwise until the stop point. The green indicator light will shine.
• Turn the key anti-clockwise and take out the key.
• Press the “LOCK” key and the bolts will be automatically retract.
• Now, you need to program your new personal code following the instructions below at the point 4.
• The safe is delivered with the door unlocking. Put the safe in his normal position, so the spring open the door.
• Remove the battery cover located on the back of the door and install the 4 batteries included, ensuring they are
tted with correct polarity (+ and -) and close the battery compartment. One beep tone will sound and all LED will
shine, to indicate that the electronic system is activated.
• Close the door completely and press the “LOCK” key. The bolts will be automatic out. The red LED will shine to
signal that the door now is locked.
• Digit the service code “1234” and the door will be automatic open. The green LED will shine to signal that the
door now is opened.
• Close the door completely.
• Press “LOCK” key. The bolts will be automatic out and the red LED will shine to signal that the door now is
locked.
* If yellow indicator light shine after red light, that means the bolts are blocked by closing and the bolts return in the
open position. Please, remove the obstacle and repeat the operation from the beginning.
• Digit your personal code. The bolts will be automatic retract and the green indicator light will shine.
• If something block the return of the bolts, yellow indicator light shine after green light. This could happen, for
example, if the bolts are bended and they force on the internal part of the frame. In this case, it is necessary to push
the door and repeat the opening procedure from the beginning.
* After 4 attempts with incorrect codes, the keyboard will be disabled for 15 minutes. After 15 minutes, you can use
the safe again. Before wait-time, it will be possible to open the door using the emergency key.
• Press twice the “CLEAR” key. The green and red LED will shine.
• With both LED illuminated, digit your personal code with a minimum of 3 to maximum of 6 digits and press
“LOCK” key
• Digit your personal code again and press the “LOCK” key. The green and red LED will turn off and your personal
code is programmed.
If errors have been made while setting your new code, repeat the procedure for setting your new personal code
again, starting from the beginning.
* Before close the safe, it is advisable to check that everything it is OK by operating the opening and closing
procedure for a number of times with door open. If all it will be good, you can close the door.
WARNING!
NEVER LEAVE YOUR
EMERGENCY KEY IN
THE SAFE
CAUTION
It must be remembered that even new, packed batteries can sometimes be defective, for various reasons, or have a
brief duration. In the event of failure of the motor release, or other faults, rst, replace the battery with new alkaline
batteries.
The manufacture declines all responsibility for failure to observe the instructions given, or for improper use of the
safe, thus causing the warranty to lapse.
Pic. 1 Emergency key
After sales service :
ASK TO YOUR RETAIL STOCKIST
Contacts for
external battery
Pic. 2
This manual suits for next models
2
Table of contents
Languages:
Other TECHNOSAFE Safe manuals

Popular Safe manuals by other brands

Homak
Homak First Watch HS10131310 Owner's manual & operating instructions

aidapt
aidapt VM844 Fitting And Usage Instructions

Clarke
Clarke STRONG-ARM CS250D Information

Burtonsafes
Burtonsafes HOTEL POP UP User instructions

Burtonsafes
Burtonsafes KEYGUARD ELECTRONIC SIZE 1 User instructions

Burtonsafes
Burtonsafes BURTON HOME G1 instructions


