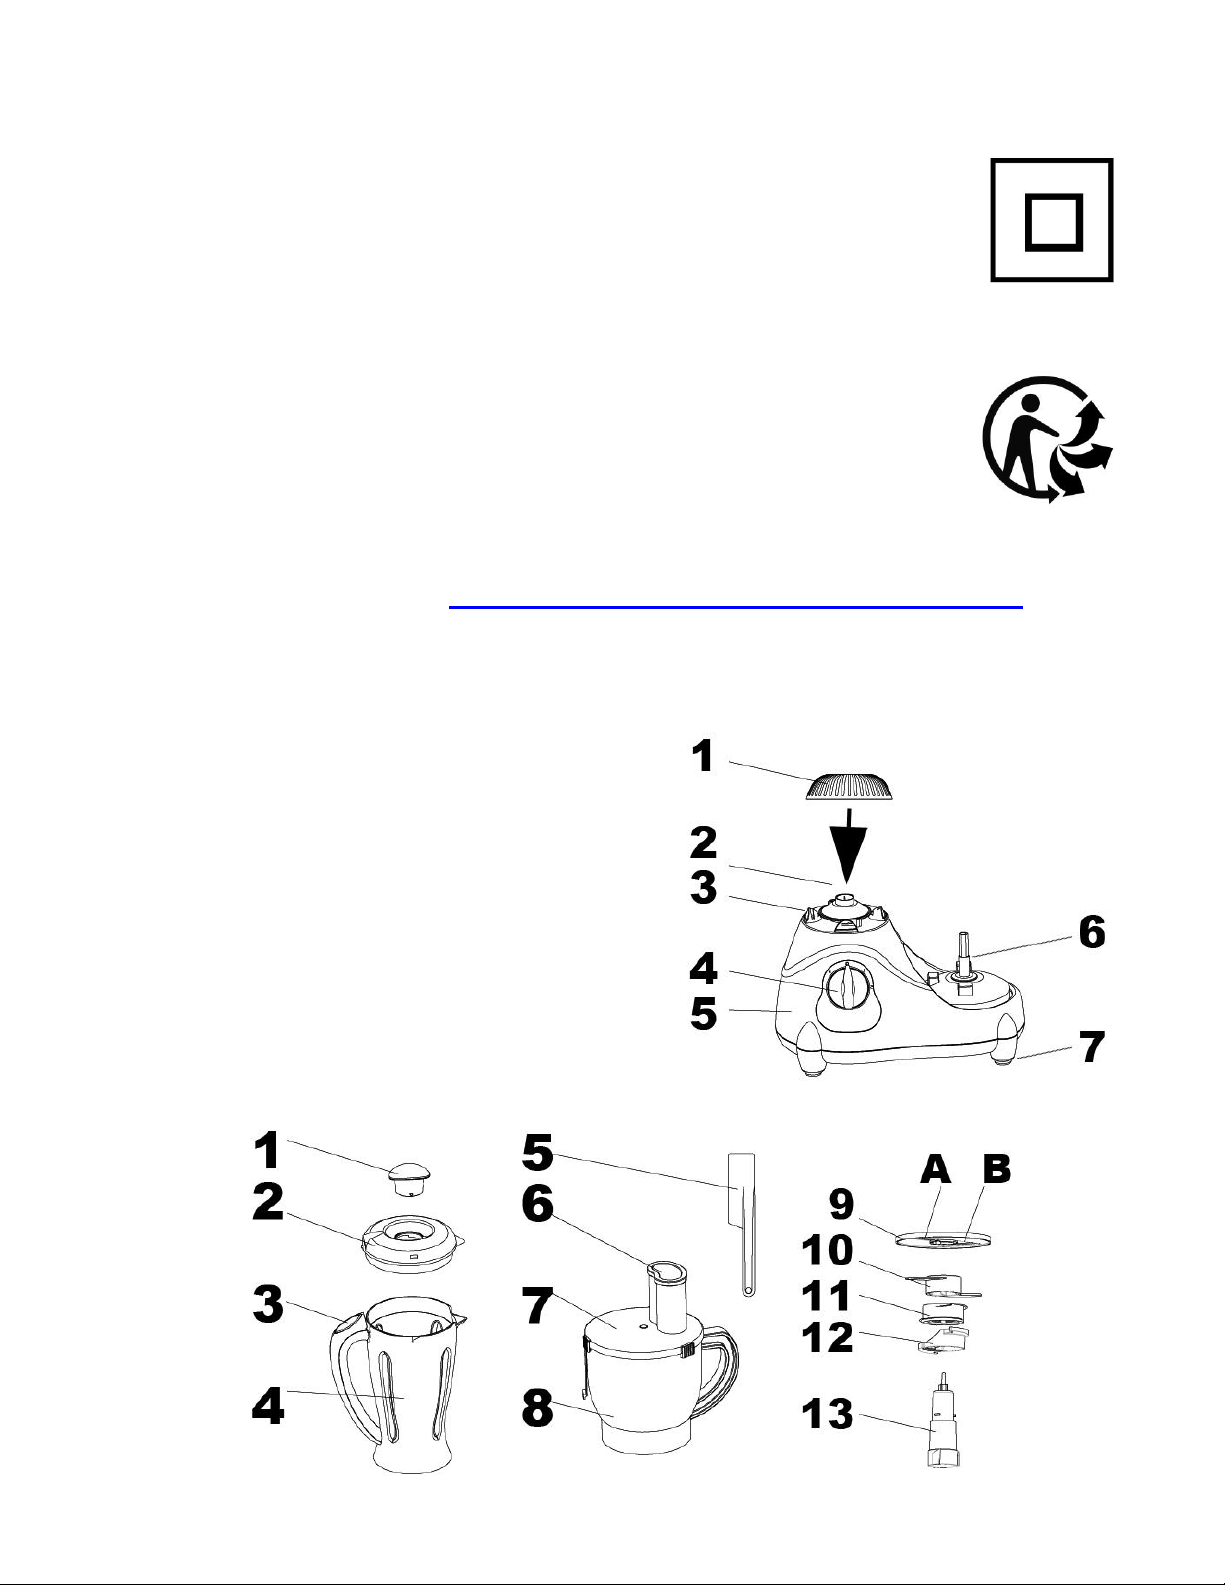
TECHWOOD TRO-6092 User manual

1
MULTIFUNCTIONAL KITCHEN MACHINE
INSTRUCTION MANUAL
Dear consumer, Please read these instructions carefully before use in order
to avoid damage due to incorrect use and to better understand the functions
of this product. Please pay particular attention to the safety guide. If you
pass the device on to a third party, these Operating Instructions must also
be handed over.
Please keep them for future references.
TRO-6092

2
IMPORTANT SAFEGUARDS
❑Please read these instructions carefully before use.
❑Keep present instructions for future references.
❑Check that your mains voltage corresponds to that stated on
the appliance.
❑Only use the appliance for domestic purposes and household
or similar applications such as:
-staff kitchen areas, in shops, offices and other working
environments;
-by clients in hotels, motels and other residential type
environments;
- Environment type like :
• Farm Houses • Bed and Breakfast.
❑Only use the appliance in the way indicated in these
instructions.
❑Never use this unit near bathtub, shower, wash-hand basins
or other containers with water.
❑Never use this apparatus near water projections.
❑Never use this apparatus with the wet hands.
❑If, unfortunately the apparatus is wet, immediately withdraw
the cord of the socket-outlet.
❑Inform potential users of these instructions.
❑Never leave the appliance unsupervised when in use.
❑The appliance must be used only for its intended purpose. No
responsibility can be taken for any possible damage caused
by incorrect use or improper handling.
❑This appliance shall not be used by children.
❑This appliance can be used by persons with reduced
physical, sensory or mental capabilities or lack of experience
and knowledge if they have been given supervision or
instruction concerning use of the appliance in a safe way and

3
if they understand the hazards involved.
❑This device is not a toy, children must not play with.
❑Keep the appliance and its cord out of reach of children,
when it is energized, on stand by or cooling down.
❑Cleaning and maintenance must not be made by children.
❑In order to ensure your children‘s safety, please keep all
packaging (plastic bags, boxes, polystyrene etc.) out of their
reach.
❑Caution ! Do not allow small children to play with the foil :
THERE IS A DANGER OF SUFFOCATION !
❑From time to time check the cord for damages. Never use the
appliance if cord or appliance shows any signs of damage.
❑Never immerse the appliance in water or any other liquid for
any reason whatsoever.
❑Never place it into the dishwasher.
❑Never use the appliance near hot surfaces.
❑If the supply cord is damaged, it must be replaced by the
manufacturer, its service agent or similarly Competent
qualified person(*) in order to avoid a hazard.
❑Disconnect the power source cable before any operation of
cleaning of maintenance and accessories assembly.
❑Never use the appliance outside and always place it in a dry
environment.
❑Never use accessories, which are not recommended by the
producer. They could constitute a danger to the user and risk
to damage the appliance.
❑Never use any other connector than the one provided.
❑Never move the appliance by pulling the cord. Make sure the
cord cannot get caught in any way.
❑Never wind the cord around the appliance and do not bend it
❑Ensure that the power cord does not come into contact with
hot parts of this unit.

4
❑Make sure the appliance has cooled down before cleaning
and storing it.
❑The temperature of accessible surfaces may be very high
when the appliance is operating. Never touch these parts, of
apparatus, to avoid burning itself.
❑Make sure the appliance never comes into contact with
flammable materials, such as curtains, cloth, etc...& the
power cord and plug do not come in contact with water.
❑Before cleaning, always unplug the appliance from the power
supply and let it cool down.
❑This appliance is not intended to be operated by means of an
external timer or separate remote-control system.
❑Always place the unit on a flat surface. Ensure, also, not to
cover the device and not to put anything on it.
❑Always remove the plug from the wall socket when the
appliance is not in use.
❑When using an extension lead always make sure that the
entire cable is unwound from the reel. Use solely CE
approved extension leads. Input power must be at least 16A,
250V, 3000W.
❑Incorrect operation and improper use can damage the
appliance and cause injury to the user.
❑This device, designed for home use, complies with standards
relating to this type of product.
(*) Competent qualified person : after sales department of the
producer or importer or any person who is qualified, approved
and competent to perform this kind of repairs.

5
GENERAL INFORMATION
The symbol "OPEN BOOK" means a recommendation
to read important things contained in the record.
The symbol "BIN" crossed out, abbreviation WEEE
(Waste of Electrical and Electronic Equipment) means
that at the end of life, it should not be discarded with
household waste, but filed to the sorting of the locality.
Waste recovery can help preserve our environment.
The symbol "CE" is the guarantee of compliance with
harmonized European standards, voluntary, reflecting
the essential requirements into technical
specifications. These standards are not mandatory
but are guarantees of compliance with essential
requirements.
The symbol "GLASS / FORK" means that the device is
compatible and can come into contact with foodstuffs.
The symbol ROHS (Restriction of use of some
Hazardous Substances) on the Environmental
Protection, certifies that for each of the five hazardous
substances • Lead • Mercury • (hexavalent) chromium •
products for protection against flames PBB and PBDE,
the peak concentration is equal to or less than 0.1% of
the weight of homogeneous material, and 0.01% for the
6th • cadmium.

6
The symbol "DOUBLE SQUARE" means a double
insulated. A basic insulation and supplementary
insulation. This device requires no connection to the
mass of a protective conductor grounded. The
materials are said : double insulation class II.
The symbol "TRIMAN" indicates that the consumer is
invited to dispose the product as part of a separate
collection (eg recycling bin, waste, voluntary intake
point).
For more information : http://www.quefairedemesdechets.fr
LOCATION OF CONTROL
1 - Cover Replacement of the blender
2 - Axis blender motor
3 - Fixing system of the Blender
4 - speed selector and Impulsion
5 - Unit
6 - Finger Training mixer / grinder
7 - Anti-slip Foot

7
1 - Filling cap
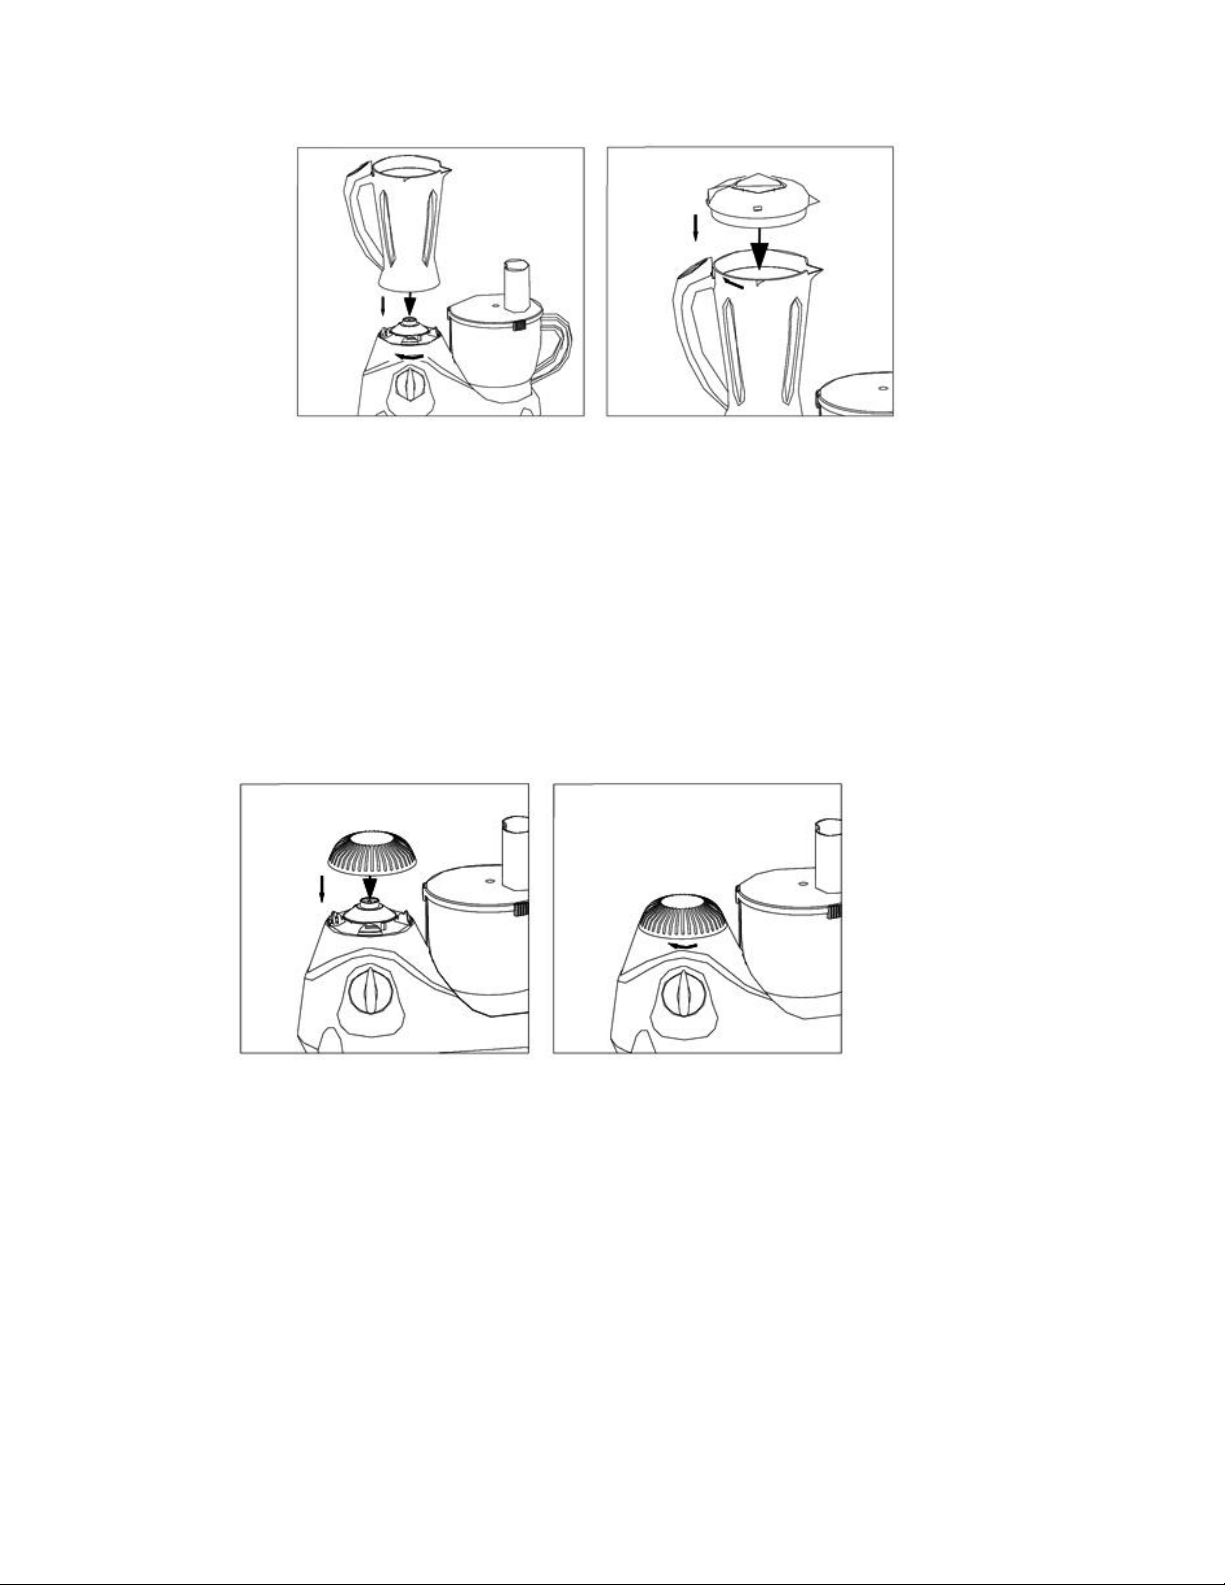
2 - Cover the blender
3 - Release cover button of blender
4 - Bowl
5 - Spatula
6 - Push and feeding tube of mixer
7 - Cover of mixer / grinder
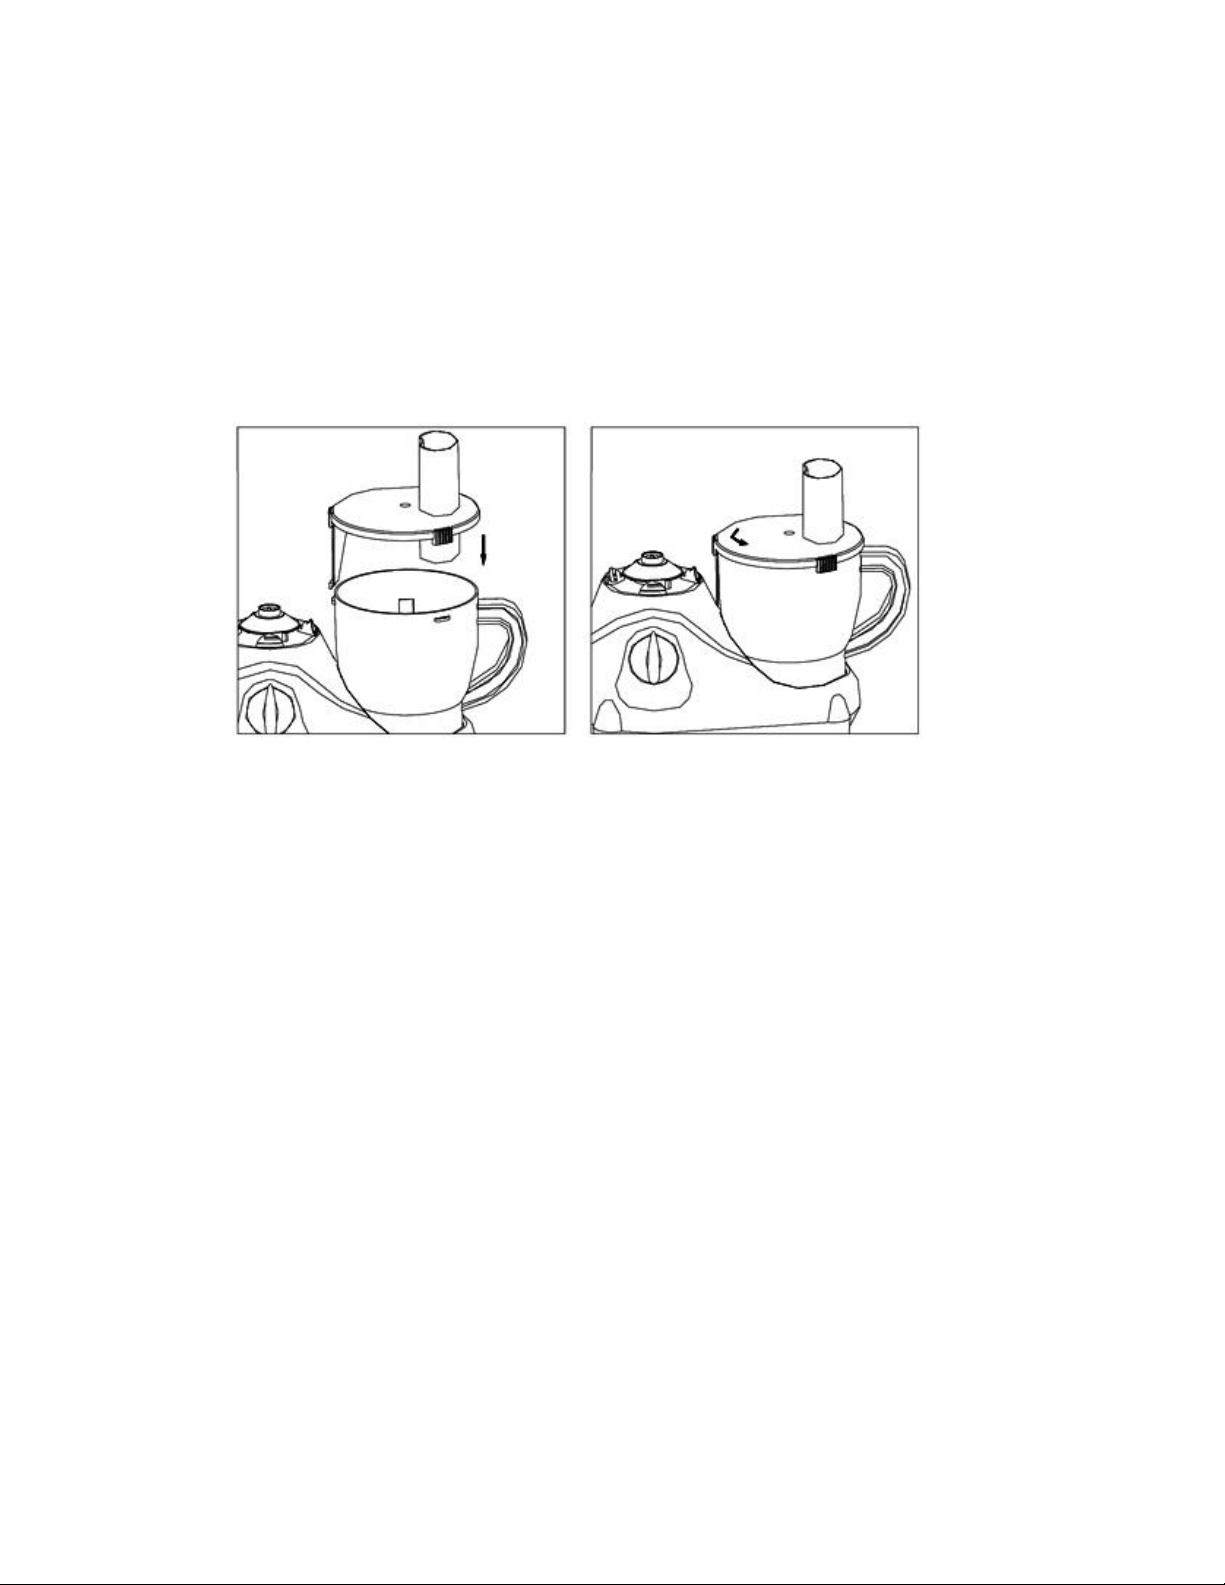
8 –Mixing Bowl
9 - A Slicer side / B Grating side of the
cutting disc
10 - Knife with stainless steel blade
11 - Mixer
12 - Kneader
13 - Finger Training
SPECIAL WARNING FOR FOOD PROCESSOR
Caution !
•Always disconnect from power supply if it is left unattended and before
assembling, disassembling or during cleaning.
•Switch off the appliance and disconnect from supply before changing
accessories approaching parts that move in use.
•Potential injuries can occur with misuse. Care shall be taken when handling the
sharp cutting blades, emptying the bowl and during cleaning, as they are
extremely sharp.
•Regarding the instructions for cleaning surfaces in contact with food or oil,
thanks to refer to the below paragraph "cleaning" in manual.
•Regarding the instructions for the use of accessories, operation times and
speed settings, refer to the below paragraphs.
•Before placing the container, check that the device is disconnected and the
gear selector is in "0" position.
•Never exceed the maximum quantities below and never pour liquids hotter than
75℃into the bowl and/or blender
•Follow the instructions given below every time you use it:
•-Never leave the appliance unattended while it is on.
•-Never make the appliance work while it is empty.
•-Never touch the moving parts.
•-Never put your fingers or utensils inside the lid opening.
•-Never press down the ingredients into the lid opening with your hands.
•-Do not use the appliance to work hard ingredients (e.g., frozen meat, crusts of
cheese…), rubbery (e.g. candied peel…), uneatable parts of ingredients (e.g.
bones, fishbone…) or crush ice.
•-Do not remove the lid and never replace accessories without switching off the
appliance and if the accessory being used has not stopped working.
•-Do not remove the ingredients from the bowl before removing the blade

8
SAFETY
This device has 4 securities
1 on the lid of the Blender
1 based on the Blender
1 on the chopper lid
1 on the chopper base
VERY IMPORTANT: FOR SAFETY REASONS,
THE UNIT WORKS ONLY WHEN THE BLENDER
& THE MIXER AND ARE PERFECTLY IN PLACE
AND SAFETY ENGAGED.
IF THE UNIT DOES NOT START, IT IS NOT
NECESSARILY IN TROUBLE, ANY PARTS MAY
NOT BE IN PLACE OR LOCKED WELL.
ANY QUESTIONS REGARDING THE START OR PERFORMANCE
OF THE FOOD PROCESSOR,
CALL THE FOLLOWING PHONE NUMBER :
(33) 01 48 93 93 10 (call with no surcharge).
FIRST USE
Before first use, remove the unit and all accessories carefully and paying attention
to the sharp accessories.
Clean with soap and water bowls and all accessories and dry thoroughly.
Clean the exterior trim and interior of the unit with a damp cloth and wipe dry.
This appliance is intended exclusively for domestic use.
1 / Place the base unit on a dry, level surface.
DO NOT CONNECT THE UNIT AS IT IS NOT FULLY ASSEMBLED.
2 / Place the bowl and turn clockwise to lock it in the safety position.
The triangle on the base & on the bowl must be aligned one above the other.
3 / Insert the rod into the hole in the centre of the base.
4 / Put knife, or kneader, or slicer on the drive shaft.

9
SETTING UP THE MIXER COVER
1 / Place the lid on the container.
2 / Turn the lid clockwise to lock it to the container.
NOTES: The triangle of the base and of the bowl must be aligned one above
the other. Use the pusher to pass food through the chimney.
Put the plunger in place during operation to avoid splashing
SETTING UP THE BLENDER AND COVER OF BLENDER
The Blender
1 / Take the blender by the handle and position it on the base.
2 / Turn clockwise to lock in safety position.
The triangle of the base and of the blender must be aligned one above the other.
Note: the knife inside the blender is not removable. Do not touch it with your
fingers
THE BLADE IS VERY SHARP, USE EXTREME CAUTION WHEN HANDLING
(INSTALLATION, CLEANING OUT THE WOUND AND FOOD) TO REDUCE THE
RISK OF INJURY.
The cover
1 / Place the lid on the blender jar. On the cover, The line must be in front of the
line on the bowl.
2 / Turn the lid to cover the protrusion recessed into the top of the handle.
NOTE: • The opening in the lid of the blender is used to add liquid and solid foods
during operation.
• Use the pusher to move food through the opening of the cover.
• It is advisable to close the blender with the cap during operation to avoid
splattering out of bowl.

10
To prevent the blender running empty, when using the mixer / grinder, it is
preferable to replace the blender with the lid provided for this purpose.
IMPORTANT NOTE: THIS WITHOUT COVER OR BLENDER IN PLACE, UNIT
WILL NOT START!
1 / Place the lid on the blender site.
2 / Turn the cover clockwise to lock it in a safe position.
The triangle of the base and that of the cover must be aligned one above the
other.
MIXING, CHOPPING, SLICING OR GRATING FUNCTION
To cut, mix, cream, crumble, etc..
• Place the container on the mixing base.
• Assemble the knife on the drive shaft.
• insert the drive shaft in the container.
• Put food in the container.
• Put the lid on the container and fix it, then put the pusher in the hole lid.
• Select the desired speed.

11
A: Mixing Bowl
I. Chopping Function
-Put the protect cover onto the body tightly, as shown in Diagram 1
-Put the plastic bowl on power unit and turn the handle in clock-wise direction, as
shown in Diagram2&3
- Put the blade support on the axis in the middle of the bowl, and press it to the
bottom. Then fix the chopping blade to the blade support, as shown in Diagram
4&5.
Warning: The blade in sharp. Please only hold the plastic part while using.
- Put the food (egg. Meet) into the bowl, as shown in Diagram 6. Big piece food
needs to be cut into small pieces. (2 cm x 2 cm x 2 cm).
- Put the cover on the bowl, and turn it until hearing the chattering sound, as
shown in Diagram7.
-Fix the plug to the electric socket, Turn the knob to the required level, as shown
in Diagram 8. (Levels increase the speed. PULSE is the highest level. Turn the
knob to the PULSE for any intervallic operation. )
-When the chopping is finished, turn the knob to the“0”. After the blade stops, pure
out the food.
II. Whisking Function
Mixing function has almost the same operating steps as chopping function. Only
change the chopping blade to shredding blade. It is used for mixing and whisking
of food, egg & soup.
III. Slicing & Shredding Function
- Put the protect cover onto the body tightly;
- Fix the slicing/shredding knife to the knife support, as shown in Diagram 9.
Slicing knife makes the food into slices. Shredding knife make the food into
shreds.
- Put the bowl on the power unit first, and then turn the bowl in clock-wise
direction, until hearing the chattering sound. Then put the knife support on the axis
in the middle of the bowl, as shown in Diagram 10.
- Put the cover on the bowl, and turn it until hearing the chattering sound. Then fix
the plug to the electric socket, turn the switch to choose the level. Put into the
clean food in strip from the entrance of the cover, and push the food down slowly.
When the food strip is short, push them down with the measuring cup, as shown
in Diagram 11&12.
- When the operation is finished, turn the knob to the“0”. After the blade stops
completely, pure out the food.

12
TIPS
Cut food into 3cm cubes. Arrange evenly in the container.
The device axe very quickly. SO ! operate intermittently for very short periods.
Do not let the unit run long continuously.
If foods are attached to the knife or multi-container, disconnect the device, wait for
complete shutdown of the knife, remove the cover, remove food or knife attached
to the inside of the container with a spatula.
To add food during use:
The opening in the lid of the mixer should be used to add nutrients such as oil or
juice during the operation of the apparatus.
To do this, remove the small cover in the centre of the lid and pour the food.
It may be that you have to stop the device from time to time to remove pieces of
food in the bowl. In this case,
• Unplug the unit, wait a full stop, remove the cover.
• Remove food attached to the inside with a spatula, keep the spatula away from
the blades of the mixer.
After use, put the switch to "0", after complete shutdown of the unit, unplug the
power cord from the socket outlet.
KNEADING AND / OR MIXING
• Place the container on the base.
• Assemble the kneader on the axis drive.
• Put the drive shaft in the container.
• Put ingredients (flour, eggs etc..) Into the container.
• Put the lid on the container and the pusher on the opening lid.
• Choose the highest speed.
• Start the unit for 1 minute.
BLENDER JUG
THE BLENDER WILL WORK ONLY IF ITS COVER IS IN PLACE
• Before use, do not plug the appliance into the socket until the blender container
and multifunction are properly implemented.
• After use, disconnect the unit from the outlet before removing the blender bowl
base.
• Do not fill the blender bowl with food exceeding 80 °C.
• To avoid splashing, do not put more than 1 litter of liquid food into the blender
bowl.

13
• Never remove the lid of the blender during operation.
• The opening in the lid of the blender should be used to add foods such as oil or
juice blender during operation.
• To do this, remove the cap in the centre of the lid and pour the food.
It may be that you have to stop the device from time to time to remove pieces of
food in the bowl attached. In this case, disconnect the device, wait a full stop,
remove the cover
Remove food attached to the inside with a spatula, keep the tip away from the
blender blade.
• After use, put the switch to "0" after complete shutdown of the unit and unplug
the power cord from the socket outlet.
DO NOT OPERATE THE BLENDER FOR MORE THAN 1 MINUTE.
COOL 1 MINUTE BEFORE RESTART THE DEVICE.
CLEANING AND MAINTENANCE
Before cleaning, Always : switch off the appliance, disconnect the apparatus and
let it cool.
Clean the outside of the apparatus with a sponge or slightly wet linen.
The parts (removable) in contact with food like plate, bowl, forks, Spatula etc. can
be washed in hot water with sponge and soft detergent or put in the dishwasher.
Never plunge the apparatus in water or all other liquid !
Do not use abrasive cleaners, gritting, or metal brush or another cutting object.
When you have finished cleaning make sure the parts controlled by the bowl
safety system (motor unit at the point where the lip of the lid fits into place) and for
models with blender jugs (jug housing on the motor unit, blender jug and lid), are
not obstructed by solid waste. If necessary use a soft brush to clean eventual
residuals with the appliance unplugged from the mains.
The blades cannot be sharpened. Replace them if they are not cutting properly or
are worn.
STORAGE
-Make sure your appliance and all its accessories are completely dry before
putting them away.
-Your food processor has a space-saving storage system where all accessories
can be put away tidily in the bowl.
--Do not wrap the cord around the appliance, as this will cause damage.
--Keep the appliance in a cool, dry place.
CAUTION ! To avoid damages never use the appliance with accessories still
inside.

14
GUARANTEE
Before being delivered, all our products are subjected to a rigorous control.
This apparatus is guaranteed 24 months starting from the date of purchase by the
consumer.
The documents in proof of guarantee are :
• The invoice and
• The filled and stamped warrantee plate (located on side or bottom of the gift
box). Without these documents in proof, no free replacement, nor no free repair,
can be carried out.
During the warranty period, we deal for free, the defects of the apparatus or the
accessories, rising from a defect of materials or manufacture by repair or,
replacement. The services within the framework of the guarantee do not involve
any extension of the warranty period and does not give right to a new guarantee !
In the event of recourse to the guarantee, bring back the complete apparatus to
your retailer, in its original packing, accompanied by the proofs of purchase.
The breakage of parts out of glass or plastic is, in all the cases, not warranted.
Defects on the accessories or the wearing parts (for example: coals of engines,
hooks, drive belts, remote control of replacement, teeth brushes of replacement,
webs etc) as well as cleaning, maintenance or it replacement of wearing parts are
not guaranteed and are thus to pay !
In the event of foreign intervention, the guarantee becomes null and void.
After flow of the warranty period, repairs can be carried out, against payment, by a
specialized trade or a repair service.
SPECIFICATIONS
Power supply 220-240V~ 50/60Hz
POWER 500W
NORM CLASS II
Using Time 1 minute Made in P.R.C
The characteristics can change without preliminary preventing

15
CAUTION: In order to minimize the risks of electric shock, In the event of
breakdown, not to open the case but to call upon a qualified technician for repairs.
This apparatus satisfied EC directives, it was controlled according to all the
European current directives, like: electromagnetic compatibility (EMC) and low
tension (LVD).
This apparatus was designed and manufactured in respect of the last safety
regulations and technical specifications.
Produit importé par Sotech International
" LE PERIPOLE " N°A107
33, Avenue du Marechal de Lattre de Tassigny
94120 Fontenay sous bois –France
The symbol " CMIM " is the guarantee of compliance
with optional harmonized Moroccan Standards, which
reflect the essential requirements in terms of technical
specifications.
These standards are not mandatory but ensuring compliance
with the essential requirements.
Table of contents
Other TECHWOOD Food Processor manuals
Popular Food Processor manuals by other brands

Philips
Philips HR7950 user manual

Cuisinart
Cuisinart HFP-300BK - PrepExpress Handheld Food... INSTRUCTION AND RECIPE BOOKLET

Cuisinart
Cuisinart Elite FP-14N Series Instruction/recipe booklet

Philips
Philips HR7625 instruction manual

Sunbeam
Sunbeam MultiChopper FC7500 user manual

Cuisinart
Cuisinart CTG-00-SPIC Instruction and recipe book