TECO T8 User manual

T8 LED Light Tube
Dimension(mm)
Please read the instruction carefully before installing the product, and save it for future reference.
Caution:
Corrosive chemicals will cause the destruction of lamp shell protection.
For indoor use only.
Warning:
Do not connect the high voltage power supply before installing.
If the lamp is damaged, it must be maintained or replaced by a qualified electrician.
Beware of fire accident, electricity and vibration.
Main technical parameters:
Model Input
Voltage Power Light
source Brightness Dimensions
(L x D)
1198 x 25.4mm
100-240VAC
50/60Hz SMD2835
LED 1498 x 25.4mm
TLT060NWHR18LN
TLT120NWHR18LN
TLT150NWHR18LN
15W
25W
33W
588 x 25.4mm1500LM
2500LM
3250LM
D
L

T8 LED Light Tube
1.This product is a single end conductive LED T8 tube which can accept direct voltage input thanks to professional internal
driver design.
Product Notes (Read carefully before using the product):
2.This product can directly replace a traditional fluorescent tube. Before taking out the original fluorescent tube and
installing the LED tube, the user should take out some electronic parts from the bracket. Please check the bracket
configuration carefully and follow the right A, B or C installation guide.
3.During all operations such as product installation, repair, maintenance and removal, the power supply must be switched
off to avoid any accidents.
A Installation Guide:
According to diagram A, step 1, directly connect the external power wire to the light shelves. Then according to diagram A,
step 2, install the LED tube, and rotate the tube 90° according to diagram A step 3. It can then be lit up when powered.
B Installation Guide:
If the light shelves have a starter, please remove the starter according to diagram B step 1. Then according to diagram B,
step 2, install the LED tube, and rotate the tube 90° according to diagram B step 3. It can then be lit up when powered.
C Installation Guide:
If the light shelves have a ballast, first cut off the power cord on the two ends of the ballast, according to diagram C step1,
then connect the wire according to diagram A step 1. Then according to diagram C, step 2, install the LED tube, and rotate
the tube 90° according to diagram C step 3. It can then be lit up when powered.
Attention : after having performed this installation, it is not allowed to install traditional fluorescent (non-LED) TL tubes
anymore !
Direct installation Guide
ballast
Exemal power wire
Bracket Bracket
Bracket
LED Tube
LED Tube
LED Tube
ballast
Power on this side
Starter
Direct installation Guide
LED Tube

Tube T8 LED
Dimension(mm)
Veuillez lire ces instructions avant l’installation du produit, et garder ce document pour futures références.
Attention:
Les produits chimiques corrosifs peuvent engendrer la destruction de l’enveloppe de la lampe.
Pour usage intérieur uniquement.
Attention:
Ne pas mettre sous tension avant installation
Si la lampe est endommagée, elle doit être réparée ou remplacée par un électricien qualifié.
Faites attention aux risques d’accidents causés par le feu, l’électricité ou les vibrations.
Principales caractéristiques techniques:
Modèle Tension et
fréquence Puissance Source
Lumineuse Luminosité Dimensions
(L x D)
1198 x 25.4mm
100-240VAC
50/60Hz LED 1498 x 25.4mm
L
D
TLT060NWHR18LN
TLT120NWHR18LN
TLT150NWHR18LN
15W
25W
33W
SMD2835 1500LM
2500LM
3250LM
588 x 25.4mm

Tube T8 LED
Notice d’installation (A lire avec attention avant d’installer le produit):
1.Ce produit est un tube T8 LED à une extrémité conductrice et accepte une tension d’entrée directe grâce à la conception
professionnelle de son driver interne.
2.Ce produit peut directement remplacer un tube fluorescent traditionnel. Avant de retirer le tube fluorescent d’origine et
d’installer le tube LED, veuillez retirer certains éléments électriques de la base. Vérifiez avec soin le type de base dont vous
disposez et suivez le schéma d’installation approprié A, B ou C.
3.Durant toute operation, comme l’installation du produit, sa reparation, son entretien ou son emplacement, le courant
d’alimentation doit être coupé pour éviter tout risque d’accident.
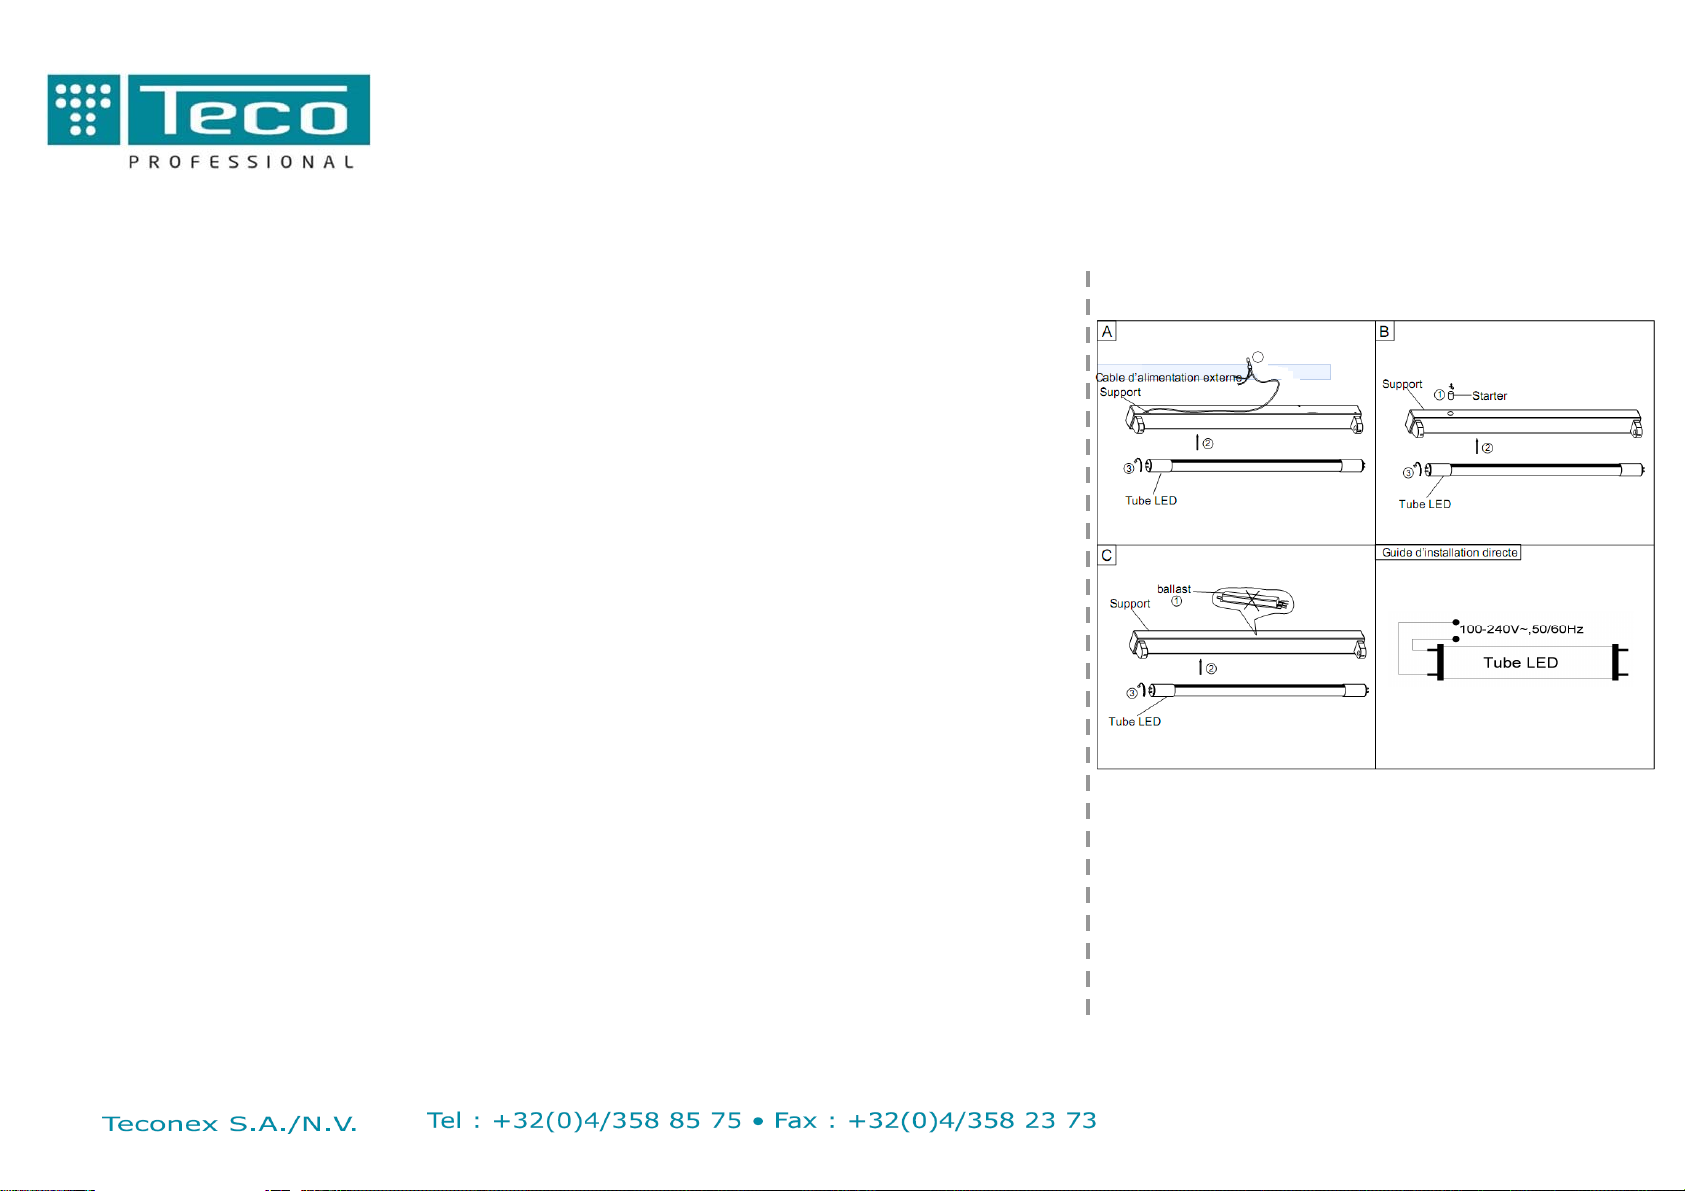
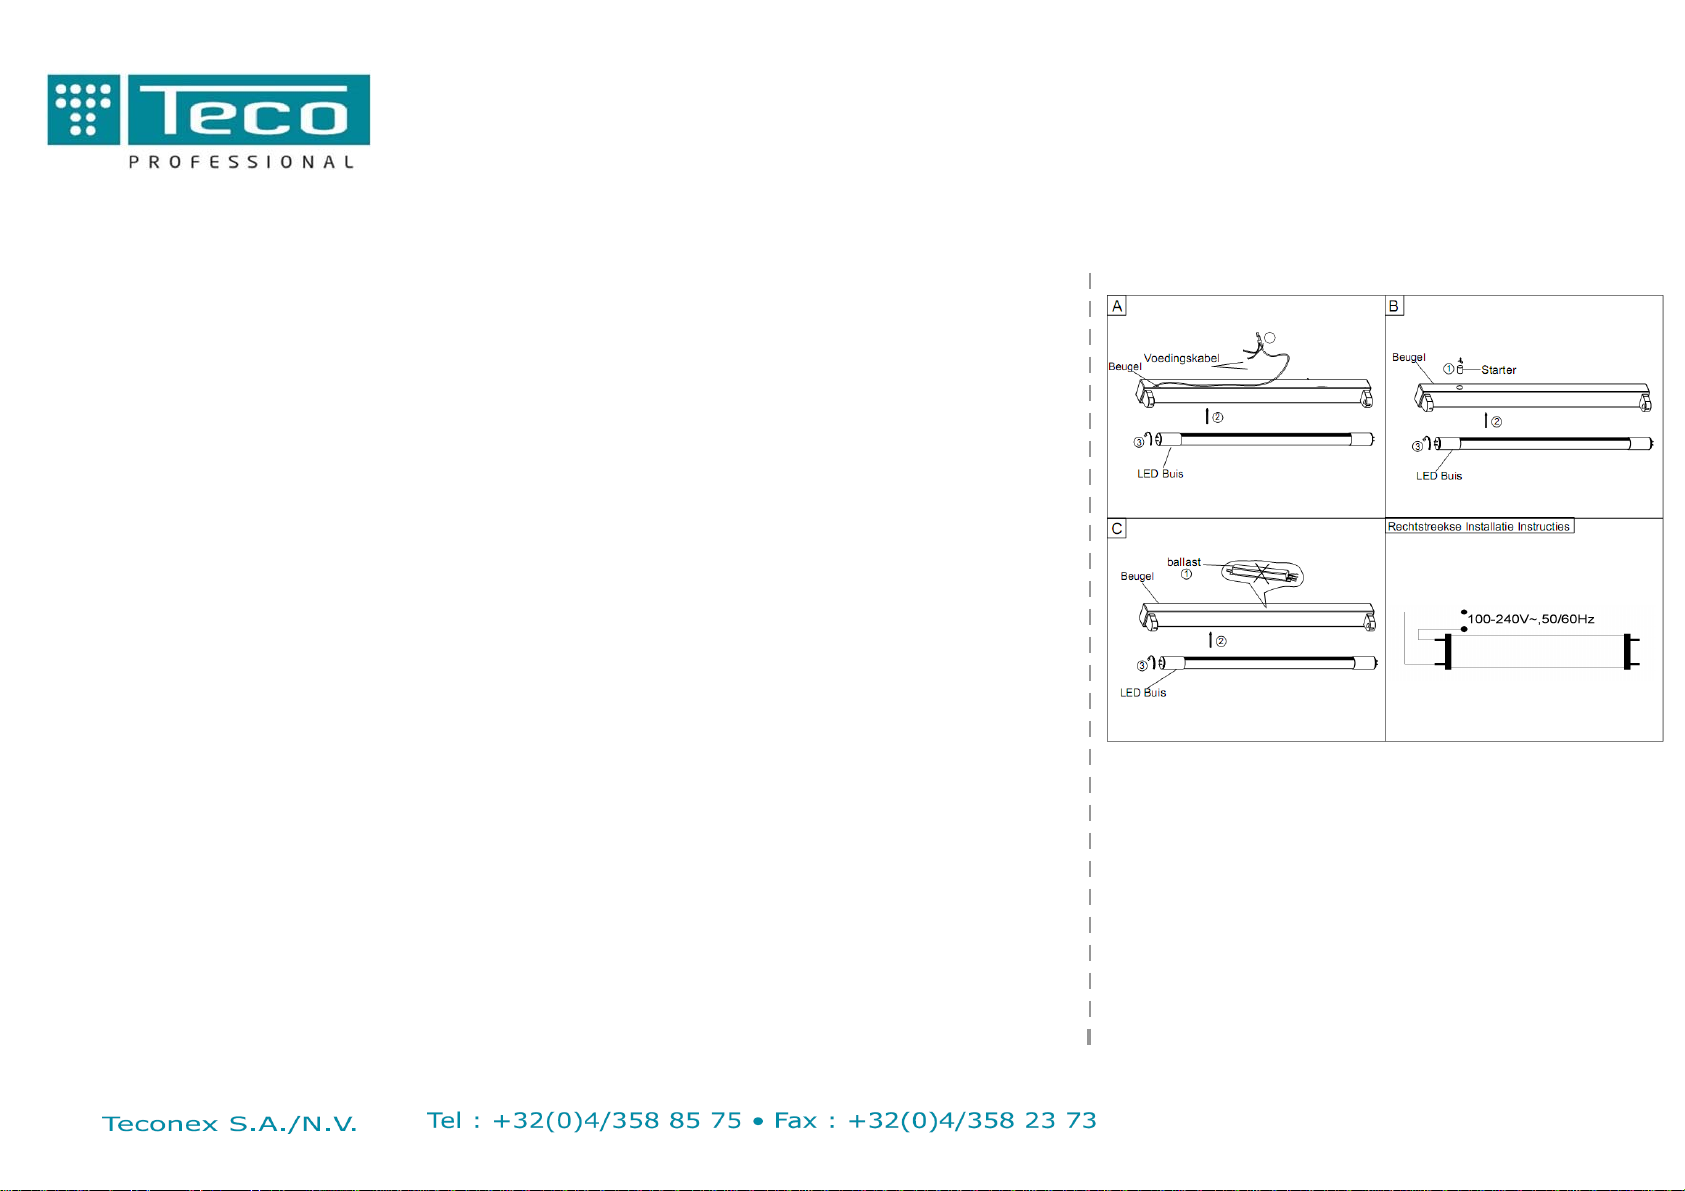
Schéma d’installation A:
Suivant le schéma A, étape 1, connectez le cable d’alimentation externe directement aux supports de lampe . Ensuite,
suivant le schéma A, étape 2, installez le tube LED, et faites le tourner de 90° suivant le schéma A, étape 3. Il peut alors être
mis sous tension et allumé.
Schéma d’installation B:
Si les supports de lampe ont un starter, veuillez retirer ce dernier suivant le schéma B, étape 1. Ensuite, suivant le schéma
B, étape 2, installez le tube LED, et faites le tourner de 90° suivant le schéma B, étape 3. Il peut alors être mis sous tension
et allumé.
Schéma d’installation C:
Si les supports de lampe ont un ballast, veuillez d’abord sectionner le cable d’alimentation aux deux extrémités du ballast,
suivant le schéma C, étape 1. Ensuite, connectez les cables selon le schéma A, étape 1. Ensuite, suivant le schéma C,
étape 2, installez le tube LED, et faites le tourner de 90° suivant le schéma C, étape 3. Il peut alors être mis sous tension et
allumé.
Attention : après avoir réalisé cette installation, il n’est plus permis d’installer des tubes TL fluorescents traditionnels
(non-LED) !
1
Power on this side

T8 LED Buis
Afmetingen(mm)
Gelieve deze handleiding met aandacht te lezen voor het gebruik. Deze handleiding moet behouden worden voor
latere referenties.
Opgelet
Corrosieve chemische stoffen kunnen tot het zwaar beschadigen van de lamp leiden.
Enkel bestemd voor gebruik binnen gebouwen.
Opgelet:
Niet onder spanning zetten voor installatie.
Als de lamp beschadigd is, moet die hersteld of vervangen worden door een bekwame elektricien.
Let op ongevalrisico’s door vuur, elekticiteit of trillingen.
Voornaamste technische eigenschappen:
Model Spanning en
frekwentie Vermogen Lichtbron Lichtopbrengst Afmetingen
(L x D)
1198 x 25.4mm
100-240VAC
50/60Hz LED 1498 x 25.4mm
TLT060NWHR18LN
TLT120NWHR18LN
TLT150NWHR18LN
15W
25W
33W
1500LM
2500LM
3250LM
SMD2835 588 x 25.4mm
D
L

T8 LED Buis
Installatie instructies (Met aandacht lezen voor de installatie van het product):
1.Dit product is een LED buis met één electriciteitsleidend einde en aanvaardt directe invoerspanning dankzij haar
professionele interne driverconstructie.
2.Dit product kan een traditionele TL-buis rechtstreeks vervangen. Voor dat U de bestaande TL-buis verwijdert en de LED
buis installeert, gelieve bepaalde elektrische elementen uit het armatuur te trekken. Gelieve goed na te zien over welk type
armatuur U beschikt en volg het gepaste installatieschema A, B of C na.
3.Tijdens alle behandelingen zoals de installatie van het product, zijn herstelling, zijn onderhoud of zijn vervanging, moeten
alle voedingsbronnen uitgezet worden om alle ongevalrisico’s te vermijden.
Installatieschema A:
Volgens schema A, stap 1, sluit de externe voedingskabel rechtstreeks op de lampbeugels aan . Volgens schema A, stap 2,
installeer dan de LED buis, en laat die met 90° draaien volgens schema A, stap 3. Die mag dan onder spanning gezet
worden.
Installatieschema B:
Als het armatuur over een starter beschikt, gelieve eerst deze te verwijderen volgens schema B, stap 1. Volgens schema B,
stap 2, installeer dan de LED buis, en laat die met 90° draaien volgens schema B, stap 3. Die mag dan onder spanning gezet
worden.
Installatieschema C:
Als het armatuur over een ballast beschikt, gelieve eerst de voedinskabel aan beide einden van de ballast te snijden, volgens
schema C, stap 1. Sluit daarna de kabels aan volgens schema A, stap 1. Volgens schema C, stap 2, installeer dan de LED
buis, en laat die met 90° draaien volgens schema C, stap 3. Die mag dan onder spanning gezet worden.
Let op : na het uitvoeren van deze installatie is het niet meer toegestaan om traditionele fluorescente (niet-LED) TL
buizen te installeren !
1
Power on this side
LED Buis
This manual suits for next models
3
Table of contents
Languages:
Other TECO Lighting Equipment manuals
Popular Lighting Equipment manuals by other brands

mbt Lighting
mbt Lighting LZ600RG user manual

LED World
LED World FA36M57-2M-12V-X Important instructions

BeLuce
BeLuce MAXIMA TSL instructions

NANLITE
NANLITE DSA Series user manual

Pool Cover Specialists
Pool Cover Specialists Mini Infinity 2 installation guide

American DJ
American DJ AGGRESSOR User instructions