TECO TBF86WMTAG User manual

REFRIGERATOR / FREEZER
User Manual
IMPORTANT NOTE:
Thank you for selecting a TECO quality Refrigerator. Please
read this manual carefully before installing or operating your new
appliance. Make sure to save this manual for future reference.
The design and specifications are subject to change without prior
notice for product improvement.
Model:
TBF86WMTAG
TBF86SMTAG
TBF86BMTAG


TABLE OF CONTENTS
Parts and features...................................................................... 4
5
5
6
6
7
7
8
8
10
11
12
13
Important safety instructions...................................................
Installation instructions............................................................
Operating instructions..............................................................
Cleaning.....................................................................................
Defrosting..................................................................................
Power failure.............................................................................
Vacation.....................................................................................
Moving the refrigerator............................................................
Troubleshooting tips...............................................................
Reversing the door.................................................................
Replacement of interior light.................................................
Specifications.........................................................................
Repairs, service & warranty..................................................
1

Thank you for purchasing our product and thank you for placing your
confidence in us.
Read this manual carefully before use. Follow instructions and keep
the manual for future reference.
Follow the operating instructions and safety notices in this manual.
If any trouble arise, do not attempt to fix it yourself. Please contact
TECO service on 1300 660 037 (8:30am - 4pm Mon~Fri AEST).
This refrigerator is designed and approved for use with flammable
R600a refrigerant.
The appliance is specifically constructed for domestic use only.
The appliance has not been designed or manufactured for
professional use. TECO declines all responsibility for damage
deriving from improper use of the appliance. The refrigerator
has undergone the necessary tests on the tightness of the
refrigeration circuit and complies with the safety regulations
for electrical appliances.
All images, illustrations and photos contained in this manual are for
illustration purposes only and may differ from your appliance.
R600a
WARNING
CAUTION
IMPORTANT SAFETY INSTRUCTIONS
1

R600a Isobutane Refrigerant
•This appliance contains a small quantity of
flammable, non-synthetic R600a refrigerant.
•The room for installing the appliance must be at
least 1m3 per 8g of refrigerant. The amount of
refrigerant in the appliance can be found on the
rating plate attached to the appliance.
Risk of fire
•If the refrigerant circuit should become damaged.
Avoid open flames and sources of ignition.
Disconnect the appliance from the mains power.
Thoroughly ventilate the room in which the
appliance is situated for several minutes.
•The refrigerator is designed to operate on a single phase
power supply within a voltage range of 220~240V/50Hz.
•The refrigeration system contains refrigerant. Do not allow
any sharp objects to come in contact with the refrigerant
system to avoid damage the refrigerant circuit.
•This product is for indoor use only.
•Do not place electrical items or cooking equipment nearby.
Keep away from substances which could cause ignition
and good ventilation shall be always maintained.
•Do not place objects on top of the appliance which are
magnetic, heavy or filled with water.
•If the supply cord is damaged, it must be replaced by
authorised TECO service personal, service agent or similarly
qualified persons in order to avoid a hazard.
•Do not store flammable, explosive, volatile and highly
corrosive materials in the refrigerator. Containers with
flammable gases or liquids can leak at low temperature. There
is a risk of explosion or fire.
•Do not splash water on the appliance. It may cause malfunction
or electric shock.
•Always switch off and unplug appliance before cleaning.
WARNING
WARNING
2

•Keep ventilation openings, in the appliance enclosure or in the
built-in structure, clear of obstruction.
•Do not use mechanical devices or other means to accelerate the
defrosting process, other than those recommended by the
manufacturer.
•Do not use electrical appliances inside the food storage
compartments of the appliance.
•For appliances which use flammable insulation blowing gases,
Please keep the products away from the fire or similar glowing
substance.
•This appliance is intended to be used in household and similar
applications such as:
- staff kitchen areas in shops, offices and other working environments;
- farm houses and by clients in hotels, motels and other residential type
environments;
- bed and breakfast type environments;
- catering and similar non-retail applications.
•This appliance is not intended for use by persons
(including children) with reduced physical, sensory or
mental capabilities, or lack of experience and
knowledge, unless they have been given supervision
or instruction concerning use of the appliance by a
person responsible for their safety.
•Young children should be supervised to ensure that they do not
play with the appliance.
•Packing (e.g. wraps, polystyrene etc.) can be dangerous
for children. There is a risk of suffocation. Keep packaging
materials away from children.
•Contact your local authorities for correct method of disposal.
Dispose of all packaging in a responsible manner in accordance
with local regulations.
Dispose of old appliances in accordance with local
regulations. Remove the doors, cut off the main cable,
break or remove spring or bolt catches if fixed to prevent
children getting trapped or involve themselves in other
dangers.
WARNING
3

PARTS AND FEATURES
4
1
6
7
2
3
4
5
1. Freezer compartment
2. Interior light and temperature control knob
3. Removable glass shelf
4. Glass crisper cover
5. Vegetable crisper
6. Bottle storage
7. Can dispenser

INSTALLATION INSTRUCTIONS
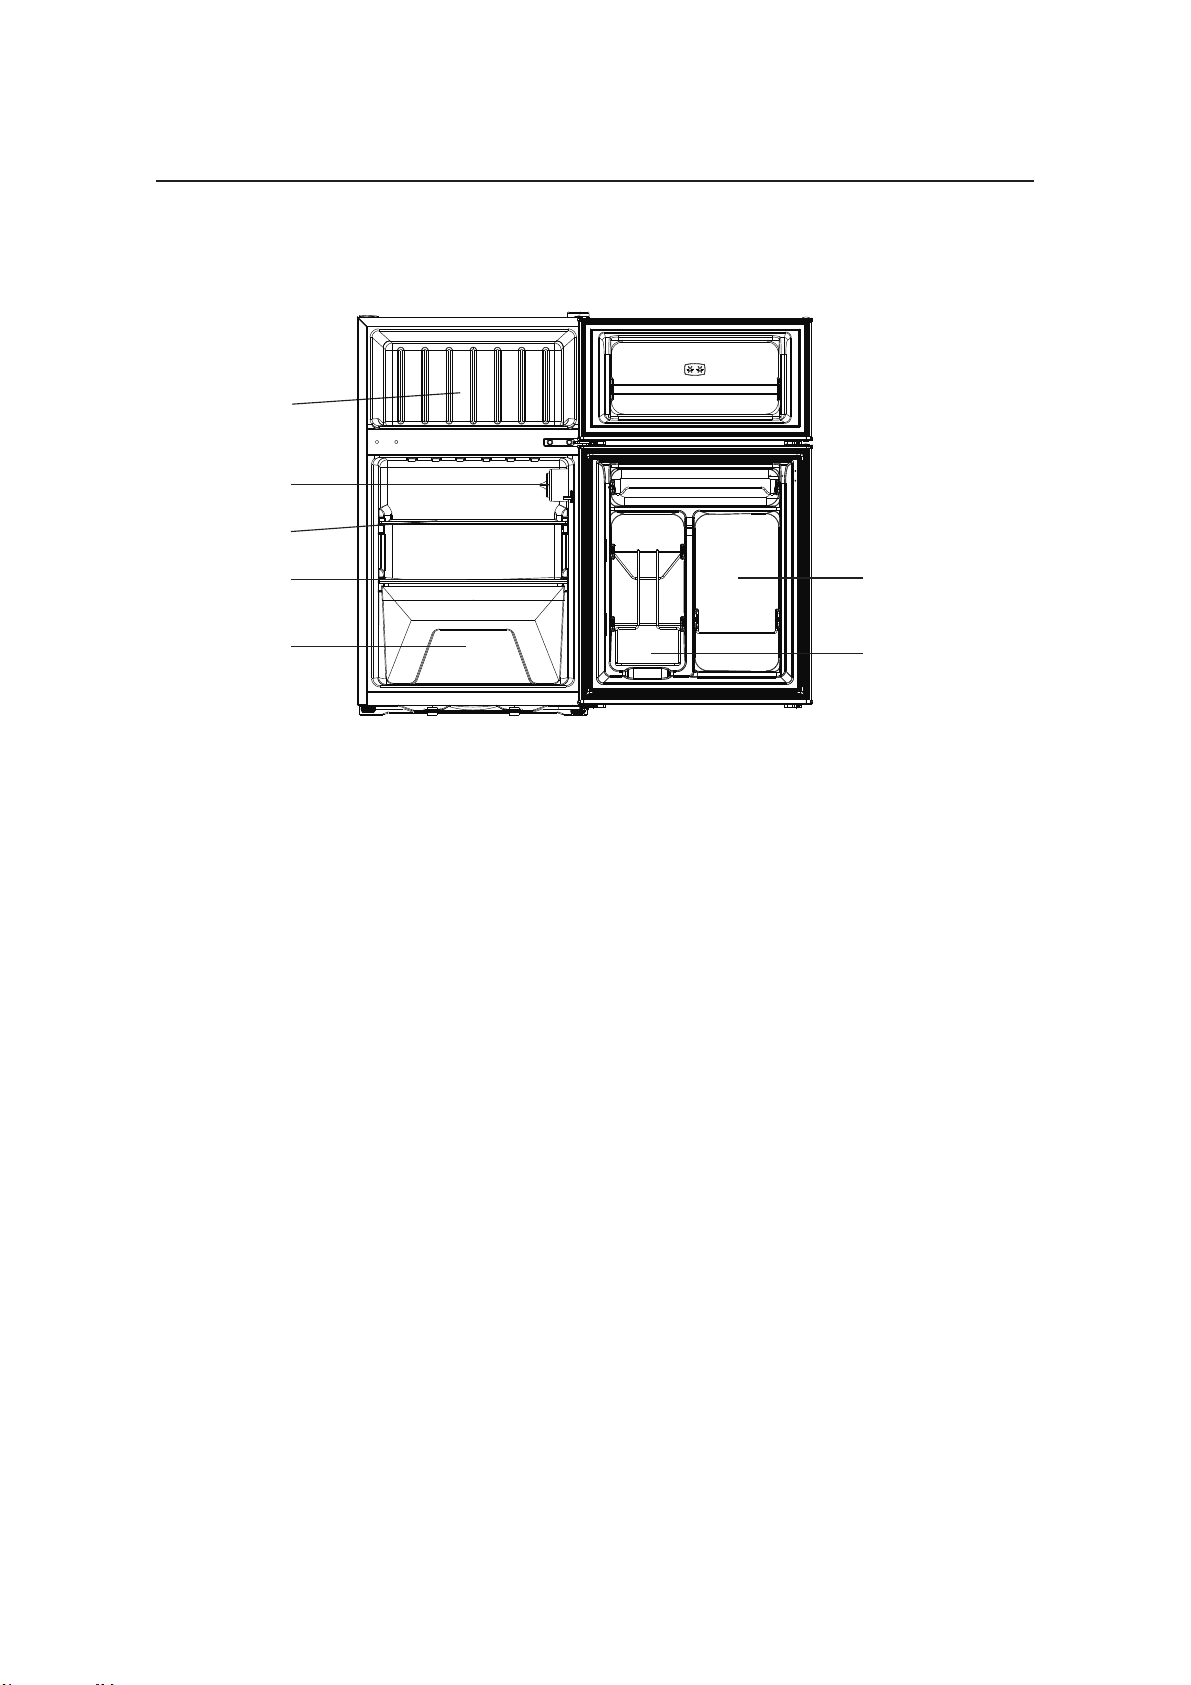
1. Before using the refrigerator for the first time, remove all of the
packing materials, including the foam base and adhesive tape holding
accessories in place.
2. The refrigerator should be located on a firm, flat surface that is strong
enough to support the refrigerator when it is fully loaded.
3. Choose a location that is not exposed to direct sunlight, high
temperatures, heat sources such as a stove or radiator, or in a moist
area. Do not choose a location where the temperature will go below
12°C as this could cause the refrigerator to not function properly.
4. Leave a minimum of 50mm between each side of the appliance and
the wall. The top of the appliance should have a minimum of 300mm
clearance. This allows for proper air circulation. This appliance is
intended to be free-standing and should not be built-in or placed in a
recessed area.
5. The refrigerator legs must be adjusted during installation in order to
function properly. The leveling legs on the front corners can be
adjusted by turning clockwise to raise the appliance, and counter-
clockwise to lower it. Be sure to have the appliance slope slightly
backward to ensure that the door closes tightly.
OPERATING INSTRUCTIONS
1. Allow refrigerator to stand up right for 4 hours before using.
2. Plug into a grounded outlet.
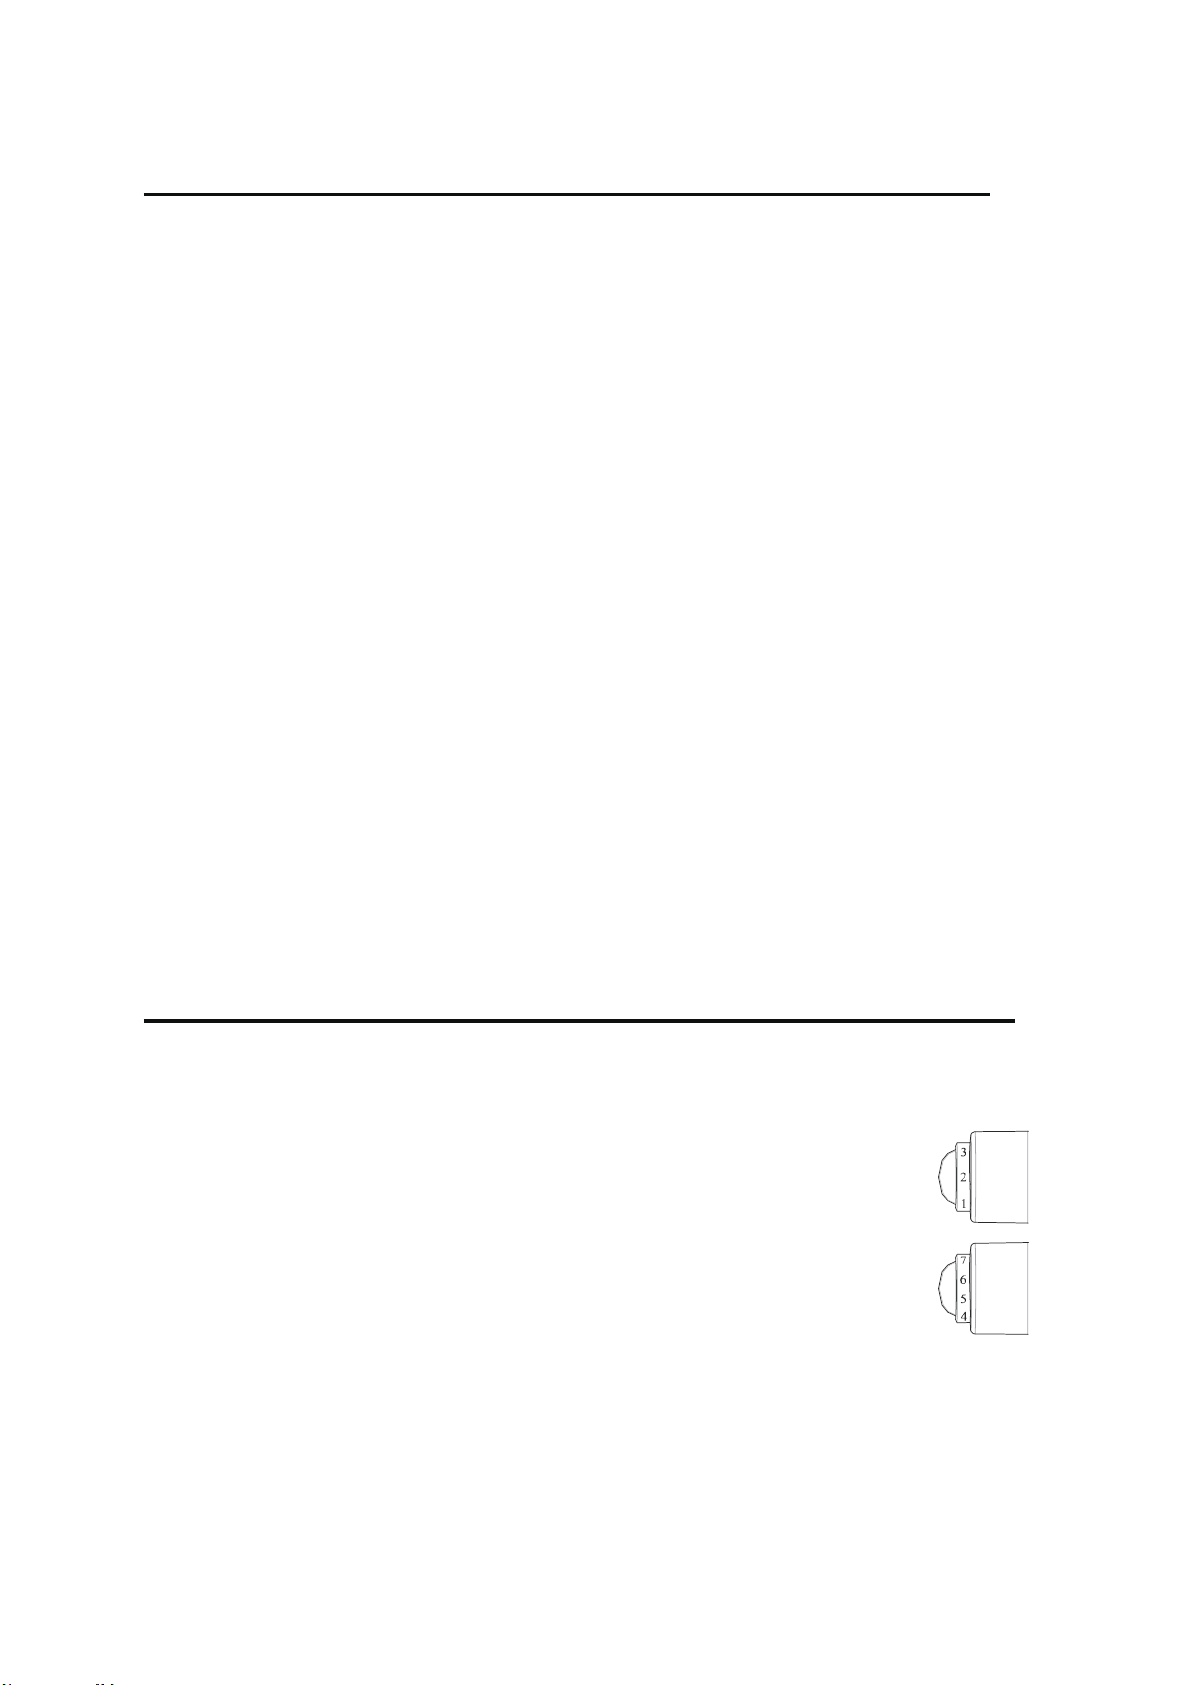
3. Use the control dial to control the temperature of the
refrigerator manually. As shown in Figure, The numbers
shown on the dial does not represent the temperature,
instead the larger number is, cooler the interior
temperature. To stop the cooling, turn the dial to "0".
Do not switch off the power.
•Turn the knob to number "4" for normal use.
•Turn the knob to number "5-7", when cooler temperature needed.
•Turn the knob to number "1-3", when warmer temperature needed.
5

4. Food should be kept in a sealed container to prevent odors or
drying.
5. Hot food should be cooled down before placing into the appliance
to prevent an increase in interior temperature and power
consumption. Adding food in too soon will impact the performance.
6. Reducing the frequency of door opening can lower power
consumption.
CLEANING
Interior
Clean the interior of the appliance with a mixture of warm water and
baking soda, using about 1–2 tablespoons per liter of water. Use a
sponge or soft cloth and be sure to wring excess moisture out before
cleaning around the controls.
Rinse thoroughly with warm water and dry with a clean, soft cloth.
Exterior
The exterior surface can be cleaned using warm water and a mild
detergent.
Rinse thoroughly and dry with a clean, soft cloth.
Door Gasket
The door gasket must be kept clean to ensure a proper seal. Be sure
to clean the gasket frequently, using the method described above.
DEFROSTING
Frost build-up on the walls of the ice making section will increase
energy consumption and reduce the efficiency of the appliance.
Defrost the section whenever the frost reaches a thickness of 5mm.
1. Remove food from the refrigerator and ice making compartment.
6
The appliance should be maintained and cleaned
frequently. For your safety, unplug the appliance from
the mains power source before performing any
maintenance.
WARNING

2. If your model has a drip tray, be sure to place it under the ice making
compartment to collect water. It may be necessary to empty the drip
tray during the defrosting process.
3. Turn the unit off and unplug it from the outlet.
4. The defrosting process can take several hours. Open the door to
speed up the process.
5. When defrosting is completed, wipe the compartment with a soft cloth
to remove any remaining water.
6. Reset the refrigerator to the desired temperature.
7. Refer to Operating Instructions.
POWER FAILURE
When a power failure occurs, the refrigerator can normally store food
for several hours. Do not put additional food into the appliance during a
power failure, and do not operate door. Disconnect the plug from the
outlet, and reconnect when the power has been restored. Always
inspect for, and discard, any spoiled or thawed food in the
refrigerator before resuming use of the appliance.
VACATION
Before leaving on any vacation, remove food that could spoil while you
are gone. If you plan to be gone for an extended period of time, we
recommend that all of the food should be removed from the appliance
and it should be turned off and unplugged from the outlet. Clean the
interior according to the directions provided in the CLEANING section of
this manual, and leave the door open.
7
ATTENTION: Do not use sharp or pointed objects to
remove frost or ice from the surfaces of the ice
making compartment. This can cause damage to the
compartment walls and cooling coils, and will void the
warranty.
CAUTION

MOVING THE REFRIGERATOR
1. Turn off the refrigerator and unplug from the outlet.
2. Remove all food; securely tape down all loose items inside.
3. Tape the door shut.
4. Do not lift or pull the door or door handle during transportation.
5. When moving, the appliance cannot be tilted over 45 degrees as
possible damage to the sealed system could occur.
6. Take care to avoid strong vibration or impact to the appliance.
TROUBLESHOOTING TIPS
Problem Possible Cause What to do
Refrigerator does
not operate
•
Not plugged in
correctly
•
Tripped circuit
breaker or blown
fuse
•
Problem with
electrical outlet
•
Unplug, wait 10
seconds, then
plug in again
•
Replace fuse or
reset circuit
breaker
•
Consult with a
professional
electrician
Refrigerator
seems too warm/
food does not
seem to cool
•
Temperature
setting may be too
warm
•
Door not closed
tightly
•
Door opened
too frequently
•
Lower the
temperature
setting
•
Check to make
sure nothing
inside is causing
the door to not
close
•
This is normal
8

Problem Possible Cause What to do
Compressor runs
too long, or cycles
on and off
frequently
•
Hot weather
•
Door opened
too frequently
•
Door not
closed tightly
•
Temperature
control set at
coldest setting
•
Large amounts of
food placed in
refrigerator
•
This is normal
•
This is normal
•
Check to be sure
nothing inside the
refrigerator is
preventing the
door from closing
•
Adjust
temperature to a
warmer setting
•
This is normal
Moisture forms on
the outside of the
appliance
•
This is normal
during periods of
high humidity
•
The door is
slightly open
•
Wipe the surface
dry using a soft
cloth
•
Close the door
tightly
Moisture forms on
the inside of the
appliance
•
This is normal
during periods of
high humidity
•
Door is opened
too long or too
frequently
•
This is normal
•
Do not open the
door too long or too
frequently
Vibration noise
•
Refrigerator is on
an uneven surface
•
Refrigerator is
touching a wall
•
Adjust the leveling
legs
•
Move the
refrigerator away
from the wall
The following are normal conditions that can be encountered
during the operation of this appliance:
•
The flow of refrigerant through the coils can cause a noise.
•
The sides of the appliance may become warm as a result of
the cooling function.
9

REVERSING THE DOOR
10
1. Top hinge cover
2. Top hinge screws
3. Top hinge
4. Freezer door
5. Cabinet plugs
6. Refrigerator door
7. Middle plug
8. Middle hinge
9. Refrigerator door
plug
10. Middle hinge
screws
11. Leveling legs
12. Bottom hinge
screws
13. Bottom hinge
1
2
3
5
74
5
9
8
10
11 12 13
1. Remove top hinge cover and 3 top hinge screws which are below it.
Then remove top hinge.
2. Remove the freezer door.
3. Remove 2 cabinet plugs and 1 door handle plug.
4. Remove middle hinge screws and middle hinge.
5. Remove the refrigerator door.
6. Remove right and left leveling legs.
7. Remove 3 bottom hinge screws and bottom hinge.
8. Install the bottom hinge on the other side of the leveling legs with 3
bottom hinge screws.
9. Install right and left leveling legs. There are two holes below the
refrigerator to fit the two leveling legs.
10.Install the refrigerator door.
11.Install the middle hinge on the other side.
12.Install the freezer door with top hinge and 3 top hinge screws. Then
install top hinge cover.
13.Adjust the leveling legs.

Uninstall the cover and replace the light with a 220V, 10W bulb.
Refer to the illustrations and instructions below:
1. Slide the light cover 30-50mm to the left as shown by arrow.
2. Pull and remove the light cover as shown.
3. Twist bulb in counterclockwise direction to remove.
4. Install new bulb and reinstall light cover.
REPLACEMENT OF INTERIOR LIGHT
11

SPECIFICATIONS
I
220 - 240
50
0.6
0 - 8 °C
≤ -18
<42
Voice [dB(A)]
Interior
temperature
Capacity (L) Freezer
Refrigerator
Freezer
Refrigerator
Voltage (V)
Frequency (Hz)
Current (A)
Electric shock protection type
Refrigerant
Net Weight (kg)
Climate class
Dimension
(mm)
Width
Depth
Height
T
60
26
R600a/30g
25
486
536
840
NOTE: This product is subject to continuous improvement,
specifications are subject to change without prior notice.
This product was tested in accordance with Electrical safety of
electrical appliances AS/NZS 60335, Energy consumption and
performance AS/NZS 4474.1 and Energy labelling and
minimum energy performance AS/NZS 4474.2.
Model Number
TBF86WMTAG
TBF86SMTAG
TBF86BMTAG
12

REPAIRS, SERVICE & WARRANTY
It is hazardous for anyone installing, removing, altering, repairing,
servicing, testing or certifying the gas system of a gas device (i.e.
charging, discharging or breaking into the refrigeration system that
uses hydrocarbon refrigerants).
Only an Authorised Service Person can carry out servicing or
repairs to this appliance. In Queensland the authorised person must
hold a Gas Work Authorisation for hydrocarbon refrigerants, before
carrying out servicing or repairs which involve the removal of
covers.
IF SERVICE IS REQUIRED:
If you have a problem, and the problem persists after you have
made the checks mentioned in this manual, contact:
TECO Australia’s Service on 1300 660 037 (8:30am - 4pm Mon~Fri
AEST).
For warranty details please visit
www.teco.com.au
Service Email : [email protected]
Spare Parts : [email protected]
13

Did you know?
TECO Australia's product range also
includes:
Top Load Clothes Washers
Front Load Clothes Washers
Auto Sensing Vented Clothes Dryers
Heat Pump Clothes Dryer
Refrigerators
Chest and Vertical Freezers
Bar Fridges
Televisions
Air Curtains
Air Conditioners
Visit www.teco.com.au for our full range.

TECO
RRANTY INFORMATION
TECO
.teco.com.au
GCB-V1
This manual suits for next models
2
Table of contents
Other TECO Refrigerator manuals

TECO
TECO TAF237WMPA User manual

TECO
TECO THCF200WMGM User manual

TECO
TECO THCF145WMGM User manual

TECO
TECO TFF270WNTBM User manual

TECO
TECO TFF536WNMATEBF User manual

TECO
TECO TBF84WMTA User manual

TECO
TECO TFF210WNTBM User manual

TECO
TECO TFF278WNTAG User manual

TECO
TECO TFF400WNTBM User manual

TECO
TECO TFF470WNTA User manual

TECO
TECO TBF134WMDB User manual

TECO
TECO TSXS582SNCM User manual

TECO
TECO TSXS580WNA User manual

TECO
TECO THF268WNTAM User manual

TECO
TECO TFF400WNTCM User manual

TECO
TECO TAF230WMPCM User manual

TECO
TECO TFF210WNTAM User manual

TECO
TECO TFF203WNTDM User manual

TECO
TECO TFF411WNBRM User manual

TECO
TECO TBF75WMDA User manual