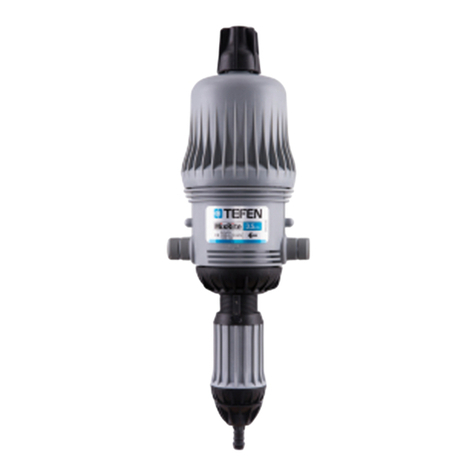
tefen MixRite 2.5 User manual

™
Propotional Pump
Nahsholim 30815 Israel, Tel 972-4-6395554, Fax 972-4-639-0813
User Manual

Tefen is pleased to welcome you as a new client.
We highly appreciate your choice of our quality MixRite series product. Our MixRite
proportional dosing pumps were designed to provide precision, efficiency and easy
operation. We wish you an excellent user experience with our product.
Please read this manual carefully before using the product and follow the safety
guidelines.
For support, please contact our service department.
YOUR MixRite
Please record your MixRite serial number.
This information will come in handy when you call
your distributor for
information, parts, and service.
Model S/N Purchase Date

3/4” BSPT
male thread
water outlet
Additive suction
tube
Water engine
Air release
valve
3/4” BSPT
male thread
water inlet
Suction unit
with adjustable
proportional dosing
Tefen’s MixRite line of water-driven proportional dosing pumps are used to ensure
precise additive injection directly into the water or fluid line, with various flow rates,
feed ratios and pressure ranges. These pumps are extremely durable,
manufactured from engineered composite materials to withstand the rigors of the
elements, as well as chemicals and acids for injection.
The Tefen MixRite water powered dosing pump is a simple, user friendly and
ingenious system that has demonstrated its value over 90 countries.
Tefen is ISO 9001 2015 certified.

CONTENTS
1. Safety and Responsibility ..................................................................................5
2. Technical data....................................................................................................5
2.1. MixRite Operational Conditions.................................................................5
3. Configuration......................................................................................................7
4. Installation..........................................................................................................8
4.1. Mounting the MixRite.................................................................................8
4.1.1. Mounting on Wall...............................................................................8
4.1.2. Mounting on Stand*...........................................................................9
4.2. MixRite Installation...................................................................................10
4.2.1. Installing the MixRite on a Direct Line (in line) ................................11
4.2.2. Installing the MixRite on a Bypass Line (offline)..............................12
5. Operation .........................................................................................................13
5.1. Adjusting the MixRite...............................................................................13
5.2. Air-Release Valve....................................................................................14
5.3. On/Off System .........................................................................................14
6. Maintenance ....................................................................................................15
6.1. Rinsing and Cleaning the Unit.................................................................16
6.2. Cleaning and Refitting the Suction Check Valve......................................16
7. Troubleshooting...............................................................................................17
8. Specifications...................................................................................................19
9. Limited Warranty..............................................................................................20

1. SAFETY AND RESPONSIBILITY
- Follow the instructions in this manual when installing, operating, and maintaining
the MixRite pump and take additional safety measures appropriate to the liquid
being pumped and the temperature of the water.
- During any action, the operator must stay in front of the MixRite and wear
protective eyewear, clothing and gloves and use proper tools. DO NOT USE
METALLIC TOOLS.
- It is the responsibility of the owner/operator to make sure water flow and
pressure do not exceed the MixRite specifications.
- An air inlet, impurity or chemical damage to a seal can interrupt the dosing
function. It is recommended to periodically check that the solution is being
correctly drawn up into the MixRite.
- Be extremely careful in the presence of hazardous substances (e.g. corrosives,
toxins, solvents, acids, caustic, flammables, etc.).
- Before applying any aggressive chemicals, please consult your distributor to
confirm compatibility with the dosing pump.
- The user must respect the recommendations given by the manufacturer of the
chemical product.
- Change the suction tube as soon as it seems damaged by the chemical.
- It is advised to relieve the pressure after use.
2. TECHNICAL DATA
2.1. MixRite Operational Conditions
Minimum Flow Rate
10 L/H (2.64 Gal/H)*
Maximum Flow Rate
2,500 L/H (660 Gal/H)
Minimum Temperature
4°C (39°F)
Maximum Temperature
40°C (104°F)
Operation Pressure Range
0.2 Bar to 8 Bar (2.9 to 120 PSI)
*7 L/H (1.85 Gal/H) in P0 model only.

L (Height)
Air Release
On/Off
Max.
496 (19.5”)
528 (20.7”)
Min.
457 (17.9”)
497 (19.5”)
160 (6.3”)
L
A
A
A
A
L
160 (6.3”)
219 (8.62”)
260 (102”)

3. CONFIGURATION
01=0.1%-0.9%
04=0.4%-4%
05=0.5%-5%
22=0.2% Fix
28=0.8% Fix

4. INSTALLATION
4.1. Mounting the MixRite
Important!
- The MixRite inlet and outlet must reach the inlet and outlet pipes.
- The MixRite must be positioned above the liquid additive container.
- Do not install the MixRite above an acid container, (fumes may damage the
MixRite) and protect it from possible contact with corrosive products.
- The MixRite must be protected from frost and excessive heat.
4.1.1. Mounting on Wall
Phillips
screw (x2) MixRite
Bracket
MixRite 2.5
Lug (x2)
MixRite
Bracket

4.1.2. Mounting on Stand*
* Stand delivered upon request.

4.2. MixRite Installation
Important!
- When connecting a MixRite either to the public water supply or to its own water
source, you must respect the regulations in force concerning protection of the
source i.e. backflow prevention, etc.
- Use 120 mesh –130 micron filter.
- For water with high particle content, use 250 mesh –60 micron filter depending
on your water quality.
- Use plastic record.
- Ensure water flow is according to the arrows on the unit.
- If the water line is higher than the MixRite itself, there is a possible risk of water
and additive flowing back through the MixRite. In such a case, installing a non-
return valve downstream is necessary.
- It is recommended to place an anti-siphon valve on the downstream side of the
dosing pump in installations in which there is a risk of siphoning.
- The strainer must be suspended at least 10 cm (4") above the bottom of the
additive tank to avoid sucking up the insoluble particles that may damage the
pump assembly. Do not put the strainer on the ground.
- Water hammer/excessive flow :
•For installations subject to water hammer, a protection device such as a
check valve or union ball check must be fitted (pressure/flow control system).
•For automatic installations, slow opening and closing solenoid valves are
preferable.
•In an installation where the MixRite serves several sectors, the closing of one
sector and the opening of another sector must be done at the same time
(simultaneous operation of the solenoid valves).
* Where water is supplied at a higher flow rate than the working flow rate of the
pump, or where the pump is not needed for continuous operation, the MixRite
must be installed on bypass line (see page 12).

4.2.1. Installing the MixRite on a Direct Line (in line)

4.2.2. Installing the MixRite on a Bypass Line (offline)

5. OPERATION
5.1. Adjusting the MixRite
Important!
- It is the responsibility of the owner/operator of the MixRite, to determine the
correct amount of solution and injection ratio to obtain the desired result
- Adjustment must be made when there is no pressure in the MixRite. Turn off
the water supply and allow the pressure to drop to zero.
- Do not remove the lower U-Latch (For maintenance purpose only)!
Every stroke of the MixRite moves a predetermined volume of water with a
predetermined volume of liquid additive. Adjust the volume of liquid additive as
follows:

5.2. Air-Release Valve
After initial operation of the MixRite, press the cap
(air release valve) for several seconds to open
valve that allows trapped air to escape. This air
release is accompanied by a slight loss of water.
Release the cap to close the valve.
5.3. On/Off System
Important!
On pumps with On/Off knob there is no air-release
valve.
It is highly recommended to use the On/Off knob
when the additive container is empty, or if there is a
need for the water flow to continue without the
additive.
ON position- The knob should be in its high position;
the pump is working and pumping.
To turn on, push and turn CCW.
OFF position- The knob should be in its low
position; the water flow continues without the
pumping action.
To turn off, push and turn CW.
Air release valve

6. MAINTENANCE
Important!
- To maintain the dosing pump in good condition, it is advisable to operate the
pump with suction of clean water after each use.
- Regular yearly maintenance will help extend the lifespan of your MixRite dosing
pump. In addition, kit seals need to be replaced every year.
- Regularly clean the water filter at the pump inlet and the fertilizer suction filter.
- If the pump is planned to be out of use for a long period of time, operate the
pump for a few minutes with the suction tube immersed in a tank with clean
water to remove fertilizer residues from the pump, preventing them solidifying in
the pump.
- If there is a fear of frost, and the temperature falling below 4°C (39ºF), empty
the water from the pump. To do this, close the entry and exit valves securely.
Open and dismantle record nut that connects the suction pipe. Press the
backflow prevention valve using a finger or a thin rod, allowing all the water that
has collected in the pump to drain out while pressing the air-release valve at the
top of the pump.
- It is advisable to carry out the maintenance of the pump body whenever soluble
products are used. To carry out the maintenance, remove the pump body and
wash it thoroughly with plenty of clean water. When finished and before
reassembly onto the motor body, lubricate the seal with silicone.
ACTION
FREQUENCY
Cleaning cycle
After each use
General check
Yearly
Replace seals
Yearly
Replace other components
As needed

6.1. Rinsing and Cleaning the Unit
Rinsing of the MixRite is required when changing chemicals and before handling
the MixRite, to avoid any contact with the chemical.
Rinse the MixRite as follows:
1. Rinse the unit by pumping clean water from the additive container.
2. Wash the external surface of the unit with clean water.
6.2. Cleaning and Refitting the Suction Check Valve
Before removing Suction Check Valve, turn off the water supply and allow the
pressure to drop to zero.
Remove Suction Check Valve according to the steps shown.
Rinse parts of Suction Check Valve with clean water, re-assemble them in the order
shown and ensure that the spring is in good working condition.
Re-assemble Suction Check Valve in the reverse order.

7. TROUBLESHOOTING
Subject
Check
Solution
The pump does not
work.
Direction of arrows on the pump is
the same as water flow.
Install the pump so that the
arrows point in direction of
water flow.
Inlet and outlet valves are open.
Open the valve
Inlet filter is not clogged.
Clean the filter.
Line’s water pressure.
Make sure there is water
pressure in the line –check
the system input filter and
make sure it is clean.
Springs are not broken.
Change the motor.
Cylinder is not scratched.
Change cylinder.
Piston seals are not damaged.
Change the seals.
Bypass installation* pump test at
low pressure.
Disconnect the water outlet
hose from the outlet, by
installing a bypass make
sure there is no water
returning to the pump. If
the pump is working check
the ΔP –as described in
the item below.
Bypass installation* make sure
the pressure difference.
The water pressure at the
outlet of the pump is equal
to or greater than the water
pressure at the main line.
The pump has
stopped working.
There is no water flow at the
appropriate pressure. Open the
main valve. Open the nut locking
the motor cover, remove the
motor cover, and remove the
mechanism. Check if the motor
seals are defective.
Replace the motor seals.
Check if the springs are broken.
Replace the motor.
Check if one of the parts of the
mechanism is broken.
Replace the motor.

Subject
Check
Solution
MixRite does not
draw additive.
The suction filter is blocked.
Clean the filter.
Dismantle the pump unit and
check if the suction seal is
defective.
Replace the suction seal.
The non-return valve is defective.
Replace the non-return
valve.
MixRite makes
scratching noises.
Check if there is liquid in the
additive container.
Add liquid to the container.
Check if the suction pipe is
immersed and not folded.
Straighten or change the
pipe.
Check suction filter to see if it is
blocked and if it is immersed in
the additive tank.
Clean and rinse suction
filter. Fill liquid into tank to
cover filter
Water flowing back
into additive
container.
Check valve.
Clean or replace the check
valve.

8. SPECIFICATIONS
7

9. LIMITED WARRANTY
Tefen Flow and Dosing Technologies Ltd. (“Tefen”) will replace all parts shown to
be defective in material or workmanship during a period of twelve months from the
date of purchase by the original purchaser (“Warranty Period”). Warranty shall be
limited to Warranty Period and shall not be extended in any event.
To obtain warranty replacement of a part, the MixRite must be returned with original
proof of purchase receipt to Tefen or authorized distributor and thereafter
recognized as defective after examination by the technical services of the
manufacturer or distributor.
The MixRite must be flushed of any chemical and sent to the manufacturer or
distributor prepaid but will be returned free of charge once repairs are made if found
to be covered by the warranty.
This warranty only covers circumstances where the part has failed due to defects
caused by the manufacturing process. This warranty is invalid if the defects are
found to be due to the product’s misuse, inappropriate use of tools, negligence,
changes and/or alterations made in the Product not by Tefen, combination and/or
use with other products not manufactured by Tefen, lack of maintenance and/or
defective installation or environmental accidents or corrosion by foreign bodies and
liquids found within or in proximity to the MixRite.
The seals and “O” rings are not covered under warranty, nor is damage to the
MixRite caused by water impurities such as sand. A filter (200 Mesh) must be used
in front of the unit for this warranty to be valid.
Tefen declines any responsibility if the MixRite is not used in compliance with the
operating instructions and tolerances as indicated herein.
There are no warranties, express or implied, which will extend beyond those
described above.
TEFEN OR AUTHORIZED DISTRIBUTOR SHALL NOT BE LIABLE FOR ANY
LOSS OF USE, SALES OR PROFIT OR FOR ANY INDIRECT, CONSEQUENTIAL
OR INCIDENTAL DAMAGES CAUSED BY OR SUFFERED AS A RESULT OF
THE SALE OR USE OF THE PRODUCT AND SHALL BE LIMITED TO THE
CONSIDERATION ACTUALLY PAID BY YOU FOR THE PRODUCT.
This warranty is personal, and you may not assign, transfer, sell, indorse, pledge
its rights under this warranty to any third party without Tefen’s prior written consent.
Any dispute arising in connection with this warranty shall be referred to the
competent court in Tel Aviv Israel, which shall have exclusive jurisdiction in relation
to all matters which may arise out of or in connection with this warranty. The
provisions of the substantive law prevailing in Israel shall govern this warranty.
Table of contents
Other tefen Water Pump manuals
Popular Water Pump manuals by other brands

Travaini Pumps USA
Travaini Pumps USA PVL 10-15 Installation and operation manual

Linear Technology
Linear Technology 909 quick start guide
SHG
SHG Mini-CHIEMSEE Series operating manual

Tuthill
Tuthill AC Installation and service instructions

STA-RITE
STA-RITE SG11200 Series owner's manual
Alcatel Vacuum Technology
Alcatel Vacuum Technology ATP 100 Service manual & troubleshooting guide
