G3 CHUCK
QUICK START
Thank you for purchasing the PRO-TEK G3 Chuck – a new addition to our Nova woodturning
chuck range with advanced features to enhance your chuck performance. It provides a
versatile and easy method for fast and secure work holding for all face turning – bowls,
egg cups, vases, boxes, goblets and an endless variety of similar projects.
YOUR SAFETY
Keep these instructions in a safe place for future reference.
WARNING: This chuck is capable of contributing to serious injury (as with any other power
tool accessory) if this manual guidance is not followed or if it is used improperly on the lathe.
Read and understand also the lathe owner's manual. If you do not have a manual, contact
the supplier of your lathe to obtain one before using the lathe and chuck. User must be
professionally trained to use this chuck. Vocational school courses or other expert tuition is
recommended.
As with other work holding methods, an extremely cautious and sensible approach is
necessary. With the PRO-TEK G3 Chuck it is not possible to give exact directions as to the
amount of tightening pressure required for adequate work holding or approved chisel
cutting techniques. Follow closely strict guidelines in this manual for different jaw types on
wood blank diameters and length, plus strictly follow recommended lathe speeds.
Safe Operation
Eye Protection: Woodturning operations can result in objects being thrown into your eyes
which can result in severe eye damage. Protective eye wear must be used at all times.
Everyday vision wear is not protective eye wear. We recommend a full-face shield. Always
wear eye protection which complies with current ANSI Standard Z87 (USA)
Noise Protection: Use ear plugs or ear defenders. Particularly if the noise exceeds 85dB.
Exposure to high levels of noise can lead to hearing problems.
Dust Protection: Use respiratory protective equipment (dust mask, portable respirator
device). Exposure to high levels of irritating dust when turning or sanding hardwoods, soft
woods and manufactured composite boards (MDF) can result in serious health problems. In
addition, adequate workshop dust extraction must be used.
OPENING AND CLOSING OF JAWS
ATTACHING AND REMOVING
G3 CHUCK JAWS
The PRO-TEK G3 chuck includes a set of PRO-TEK 50mm (2”) jaws.
The jaws must be properly attached on the chuck to function as intended.
Before installation, ensure the jawslide top surfaces are clear of any dust or debris
before attaching the jaws on the chuck.
Follow the steps shown below to attach the jaws on the chuck:
Firmly tighten the Nova Star
screws
using the included
Star Screw Tool.
To remove the jaws, loosen and remove
the Nova
Star screws from the chuck.
Tip: After removal, wipe down the jaws
and add rust protection before storing.
1. Arrange the jaw segments so that the
dot pattern matches with the same dot
pattern on the next segment.
Loosely
attach the jaw segments on the jawslide
with the
appropriate screws and firmly
close the jaws to make sure no light is
visible between the jaw
segments.
Note: Always mount the jaws clockwise,
and match the icons on the side of jaws
Chuck is properly secured on lathe spindle: Follow mounting instructions for your lathe
for faceplates and other spindle fixtures. Do not rotate chuck under power unless
workpiece is firmly clamped.
WARNING: LATHE SPEED: Excessive speed is a serious lathe hazard. Always turn at
the slowest speed possible. Ideal speed will vary with wood blank size. The larger the
blank the slower the speed. Consult your lathe manual or lathe information plate for speed
guidelines. Do not attempt to use the chuck unless the recommended lathe speeds to size
of wood blank are known. In addition, you must strictly follow the maximum speed limits
set out in the operating section of this manual. Do not exceed them under any
circumstances.
CHECK WORKPIECE: Examine wood blank carefully before mounting on chuck/lathe.
Only mount wood that has no cracks, splits, holes or any other weaknesses (e.g. rotten or
spongy sections). Do not use poorly jointed or laminated wood. Irregular or out of balance
stock needs to be turned at the slowest possible speed until it is in balance.
Make sure wood is clamped firmly. Follow mounting instructions for different gripping
modes and jaw types. In the expansion mode do not use undue force or jaws may split
the wood.
Do not exceed maximum guidelines in this manual for wood blank diameters/length set
out in this manual for different modes and jaw types.
Check wood is securely held in chuck, before operation. Check grip by vigorously
wrenching wood blank back and forth. If any loosening occurs, re-examine holding area
for adequate grip (Following mounting guidelines) and any damage to holding area. Rotate
manually to make sure of clearance before switching power on.
DUPLICATOR OR JIGS: Do not use chuck for work holding with a duplicator or jigs.
Safe Practice
CHISEL USE: Use only hand held woodturning chisels to shape wood being held in chuck.
Use the recommended chisel for the job. Use safe and commonly approved techniques.
WARNING: Never attempt to place hands on a moving chuck on a lathe. Wait for the
chuck to come to a complete stop before hands are anywhere near the chuck. Trying to
grab at a moving chuck could result in SERIOUS INJURY.
JAW SLIDES: For safe operation do not extend the jaw slides beyond the chuck body
under any circumstances. Wherever possible stand to one side of the revolving wood.
WEAR SUITABLE CLOTHING: Do not wear any loose clothing, neck ties, gloves,
bracelets, rings or other jewellery that could get caught in moving parts. Wear protective
hair covering to contain long hair.
DRUGS, ALCOHOL, MEDICATION: Do not operate chuck or lathe while under the
influence of drugs, alcohol or any medication.
KEEP CHILDREN AND VISITORS AWAY: All children and visitors should be kept safe
distance from the work area.
MOUNTING THE G3
CHUCK ON THE LATHE
There are two configurations available for the PRO-TEK G3 chuck:
• Insert model: Requires an insert for chuck to be mounted on the lathe.
See full manual online for a list of lathe spindle thread inserts available.
• Direct Thread model: 1” 8TPI and M33
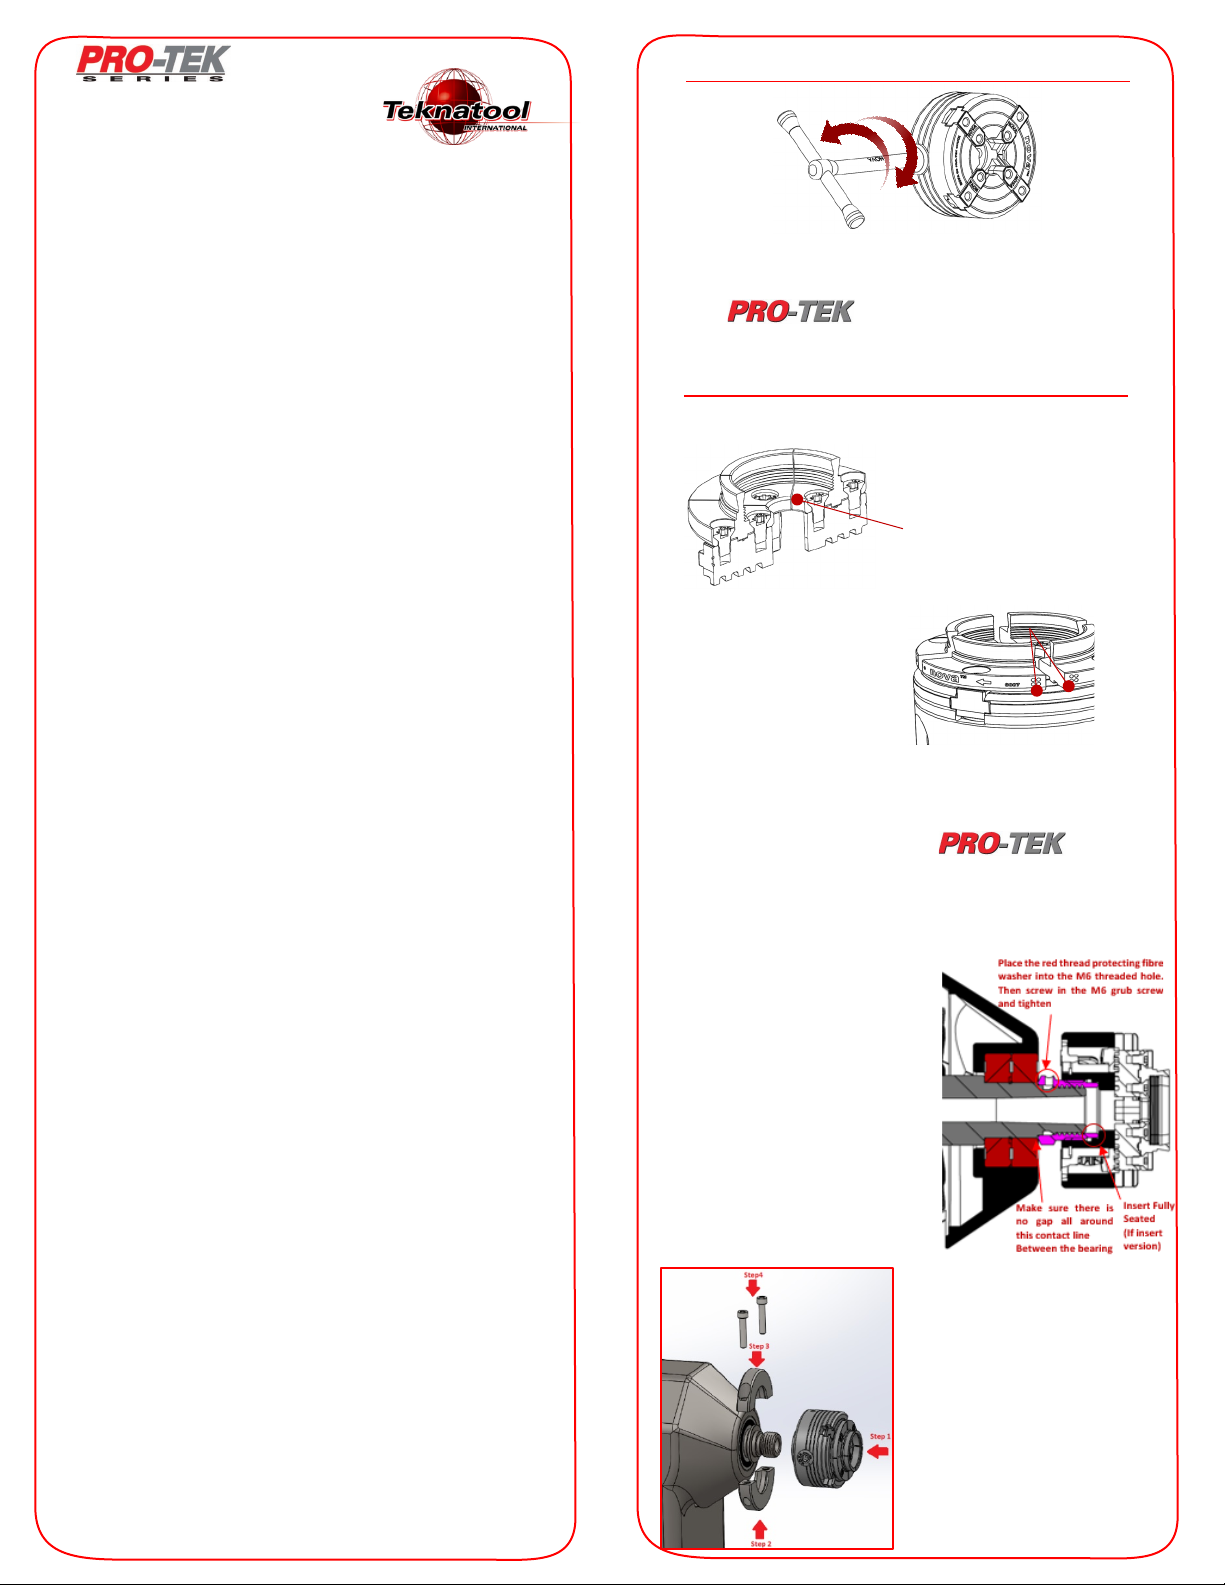
Step 1: If the chuck is an insert model,
ensure the insert is fully seated out in the
chuck body before mounting on the lathe.
Step 2: For Both Insert & Direct Thread
model: Thread the chuck on the lathe
spindle until the chuck comes firmly in
contact with the bearing/spindle shoulder
with no gaps between.
Step 3: Place red thread protecting washer
into the M6 Threaded hole. Then screw the
M6 grub screw in position and tighten with
M3 Allen key (provided) to prevent the
chuck from loosening on lathe spindle.
*Using the ASR M33 Thread locking ring (Only
applicable to
ASR M33 model)
Tighten the ASR M33 chuck to the
spindle on the lathe, make sure the rings
on the spindle and chuck have been
clamped.
:
Put the lower part of locking ring
under the clamped rings
.
:
Put upper part of the locking ring
to the clamped rings as well.
:
Using the Allen key to tighten up
two bolts on the locking ring.