TEKTELIC Communications Kona All-in-One Home Sensor Series User manual

TEKTELIC COMMUNICATIONS INC.
Document type:
User Guide
Document number:
T0005370_UG
Document version:
0.5
Document Status:
Approved
Product name:
Kona All-in-One Home Sensor
Product codes:
See Table 1
TEKTELIC Communications Inc.
7657 10th Street NE
Calgary, AB, Canada T2E 8X2
Phone: (403) 338-6900
© 2018 TEKTELIC Communications Inc., All rights reserved.
All products, names and services are trademarks and registered trademarks of their respective companies.
Disclaimer:
Material contained in this document is subject to change without notice. The material herein is solely for
information purposes and does not represent a commitment by TEKTELIC or its representatives. TEKTELIC has
prepared the information contained in this document solely for use by its employees, agents, and customers.
Dissemination of this information and/or concepts to other parties is prohibited without the prior written consent
of TEKTELIC. In no event will TEKTELIC be liable for any incidental or consequential damage in connection with the
furnishing, performance or use of this material.
TEKTELIC reserves the right to revise this publication in accordance with formal change control procedures defined
by TEKTELIC.

Kona All-in-One Home Sensor User Guide T0005370_UG Version 0.5
TEKTELIC Communications Inc. Confidential Page 2 of 32
Revision History
Version
Date
Status
Editor
Comments
0.1
Jan. 31, 2018
Obsolete
D. Smith
First release
0.2
Feb. 12, 2018
Obsolete
Z. Herasymiuk
Added Compliance Statements
0.3
Feb. 14, 2018
Obsolete
D. Smith
Added extra safety disclaimers, installation
equipment, and removed network server
provisioning guide.
0.4
Mar 29, 2018
Obsolete
K. Strom
Added section for battery replacement
0.5
Apr. 02, 2018
Approved
S. M.
Added more battery information.

Kona All-in-One Home Sensor User Guide T0005370_UG Version 0.5
TEKTELIC Communications Inc. Confidential Page 4 of 32
Table of Contents
1Product Description................................................................................................................. 6
1.1 Overview .......................................................................................................................... 6
1.2 Physical Interfaces............................................................................................................ 7
1.3 Specifications.................................................................................................................... 8
2What is in the Box.................................................................................................................. 10
2.1 Product and installation material................................................................................... 10
3Installation ............................................................................................................................. 11
3.1 Safety Precautions.......................................................................................................... 11
3.2 Unpacking and Inspection.............................................................................................. 11
3.3 Required Equipment for Installation.............................................................................. 11
3.4 Kona All-In-One Home Sensor Mounting....................................................................... 11
3.5 External Connector Cable Installation............................................................................ 12
4Power UP and Commissioning and Monitoring .................................................................... 13
4.1 Required Equipment ...................................................................................................... 13
4.2 Power Up/Down Procedure ........................................................................................... 13
5Operation, Alarms & Management ....................................................................................... 14
5.1 Configuration.................................................................................................................. 14
5.2 Default Configuration..................................................................................................... 14
5.3 LED Behaviour ................................................................................................................ 14
6Battery Replacement............................................................................................................. 15
7Compliance Statements......................................................................................................... 17
8Description du produit........................................................................................................... 18
8.1 Aperçu ............................................................................................................................ 18
8.2 Interfaces physiques ...................................................................................................... 19
8.3 Caractéristiques.............................................................................................................. 20
9Qu'est ce qu'il y a dans la boite ............................................................................................. 22
9.1 Produit et matériel d'installation ................................................................................... 22
10 Installation ............................................................................................................................. 23

Kona All-in-One Home Sensor User Guide T0005370_UG Version 0.5
TEKTELIC Communications Inc. Confidential Page 5 of 32
10.1 Précautions de sécurité.................................................................................................. 23
10.2 Déballage et inspection.................................................................................................. 23
10.3 Équipement requis pour l'installation............................................................................ 23
10.4 Kona tout-en-un Accueil capteur de montage............................................................... 23
10.5 Installation du câble de connecteur externe ................................................................. 24
11 Mise sous tension et mise en service et surveillance............................................................ 26
11.1 Équipement requis ......................................................................................................... 26
11.2 Marche / Arrêt Procédure.............................................................................................. 26
12 Fonctionnement, alarmes et gestion .................................................................................... 27
12.1 Configuration.................................................................................................................. 27
12.2 Configuration par défaut................................................................................................ 27
12.3 Comportement des LED ................................................................................................. 27
13 Remplacement de la Batterie................................................................................................ 29
14 Déclarations de conformité................................................................................................... 31

Kona All-in-One Home Sensor User Guide T0005370_UG Version 0.5
TEKTELIC Communications Inc. Confidential Page 6 of 32
1Product Description
1.1 Overview
The Kona All-in-One Home Sensor is a multi-purpose LoRaWAN IoT sensor packed into a very
small form factor. The Home Sensor is ideal for monitoring and reporting temperature,
humidity, light, shock and open/closed doors and window in the home environment. Additional
sensing features such as leak and motion detection, as well counting pulses from an external
device are also support with the appropriate Home Sensor model. Table 1 presents the
currently available Kona All-in-One Home Sensor models.
Table 1: Kona All-in-One Home Sensor Models
Product Code
Description
RF Region
T0004885
HOME SENSOR MODULE, NA, PIR
NA
T0004886
HOME SENSOR MODULE, NA, EXTERNAL CONNECTION
NA
T0004893
HOME SENSOR MODULE, NA, BASE
NA
The Kona All-in-One Home Sensor line supports the following sensing applications:
Movement Detection: Configurable triggers allow the sensor to detect if it has been
moved.
Digital On/Off Sensing: An internal magnetic switch or external contact can be used to
monitor on/off states and count events.
Light detection: On board light sensor is able to report the presence or absence of light
using a configurable intensity threshold.
Temperature and Humidity Measurements: The Home Sensor is able to monitor and
report the temperature and humidity of its local environment.
Moisture / Leak Detection: Ability to detect pooling water for flood and leak detection.
Motion Detection (PIR): Equipped sensors can detect people moving within the sensors
field of view.
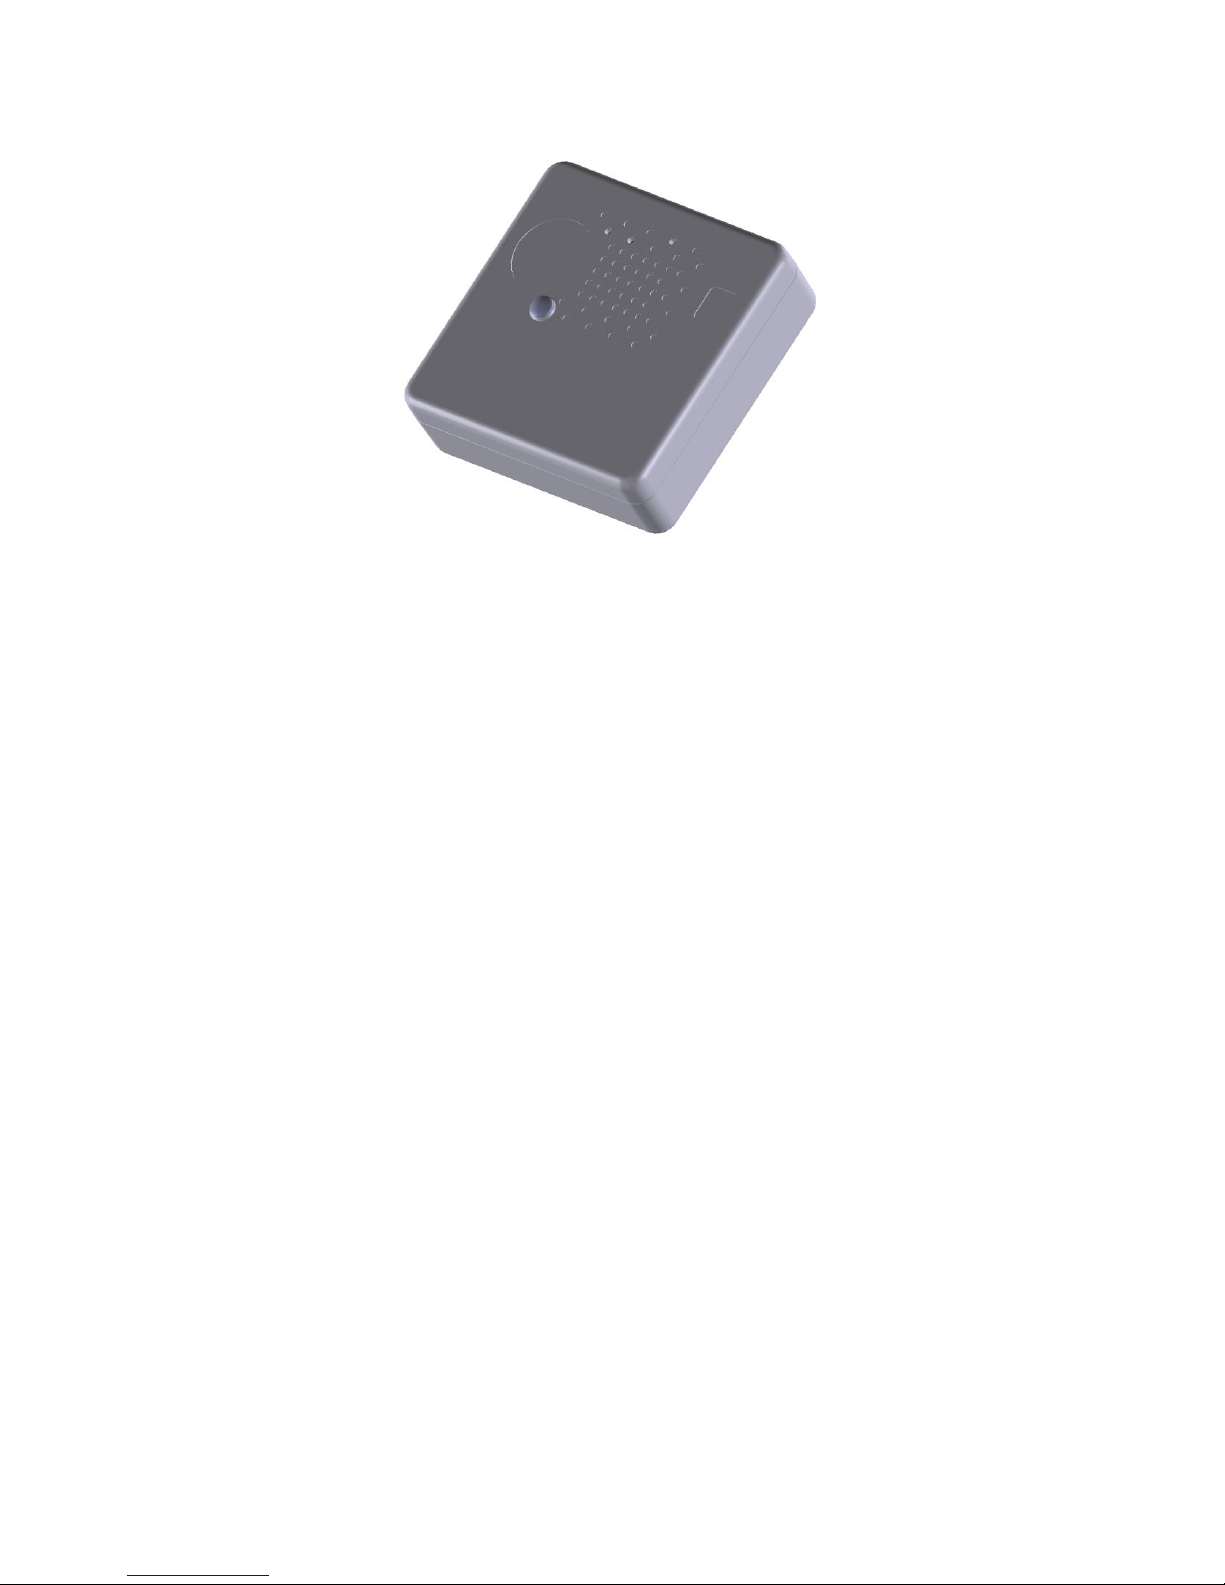
Figure 1 illustrates the Kona All-in-One Home Sensors external form-factor. All models share the
same mechanical form-factor.
Kona All-in-One Home Sensor User Guide T0005370_UG Version 0.5
TEKTELIC Communications Inc. Confidential Page 7 of 32
Figure 1: Kona All-in-One Home Sensor
1.2 Physical Interfaces
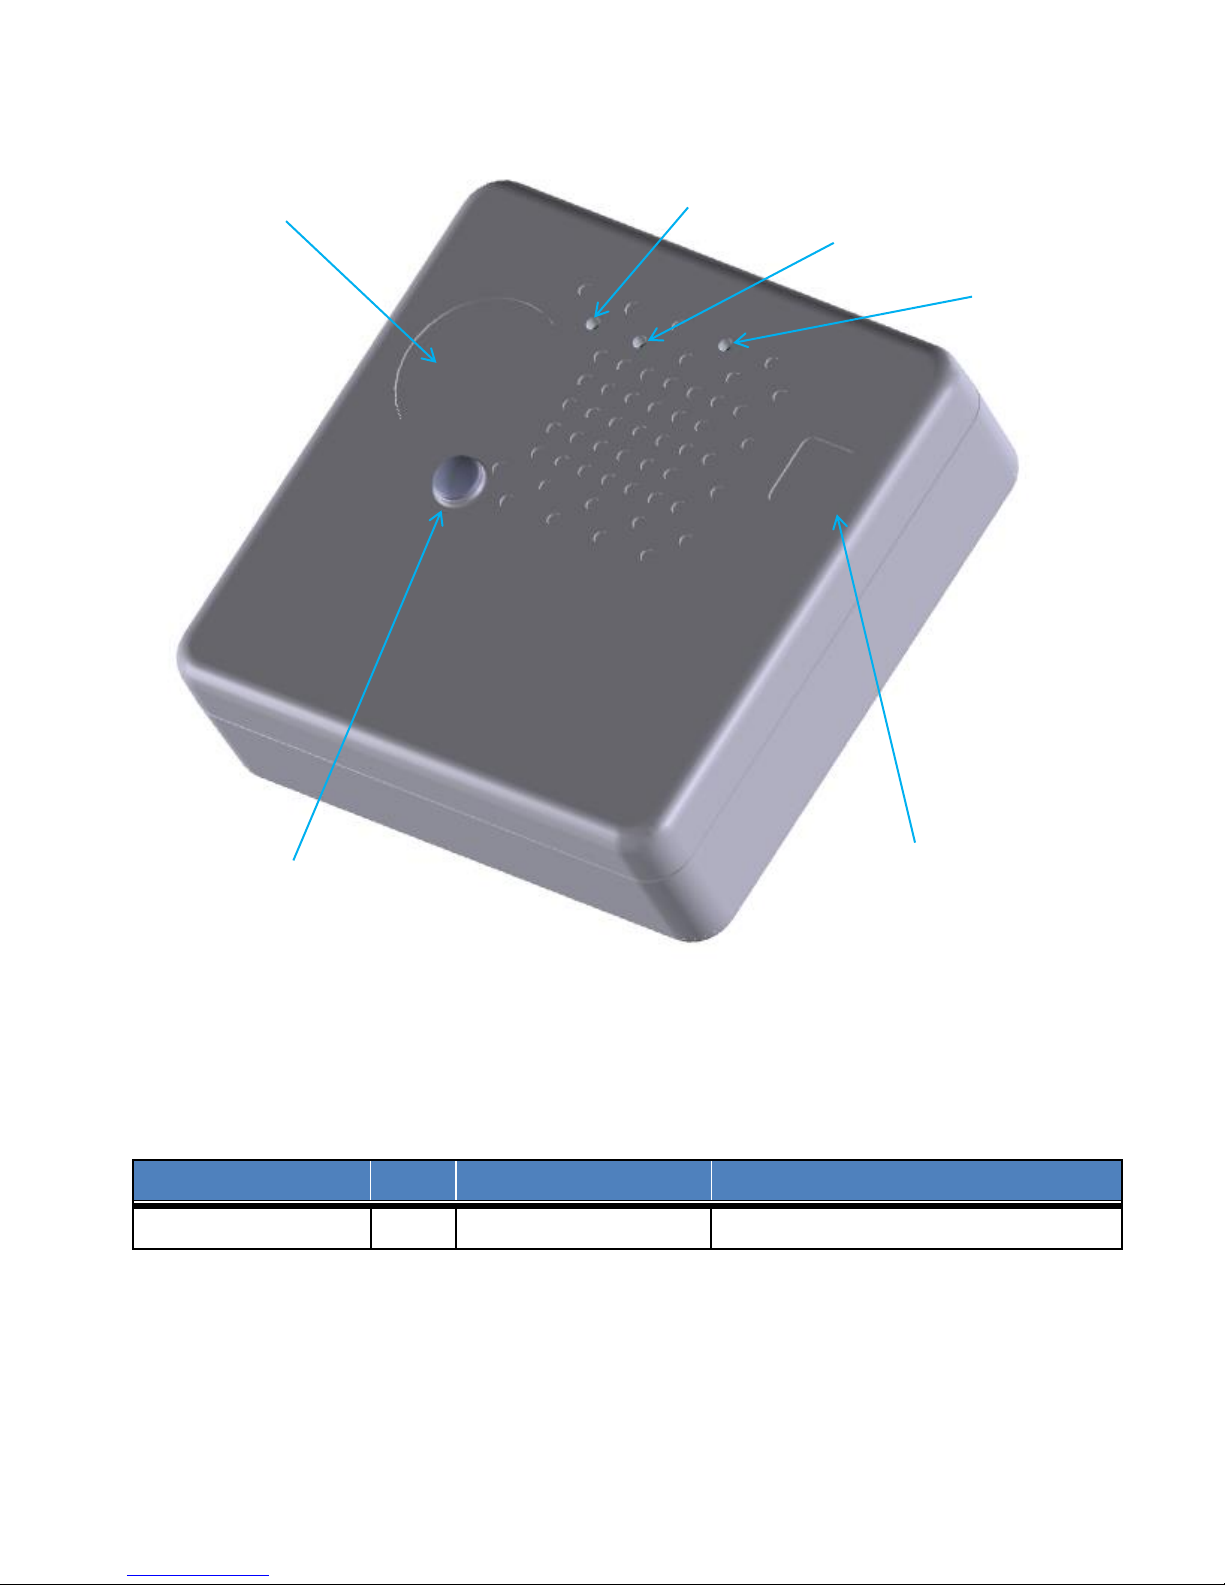
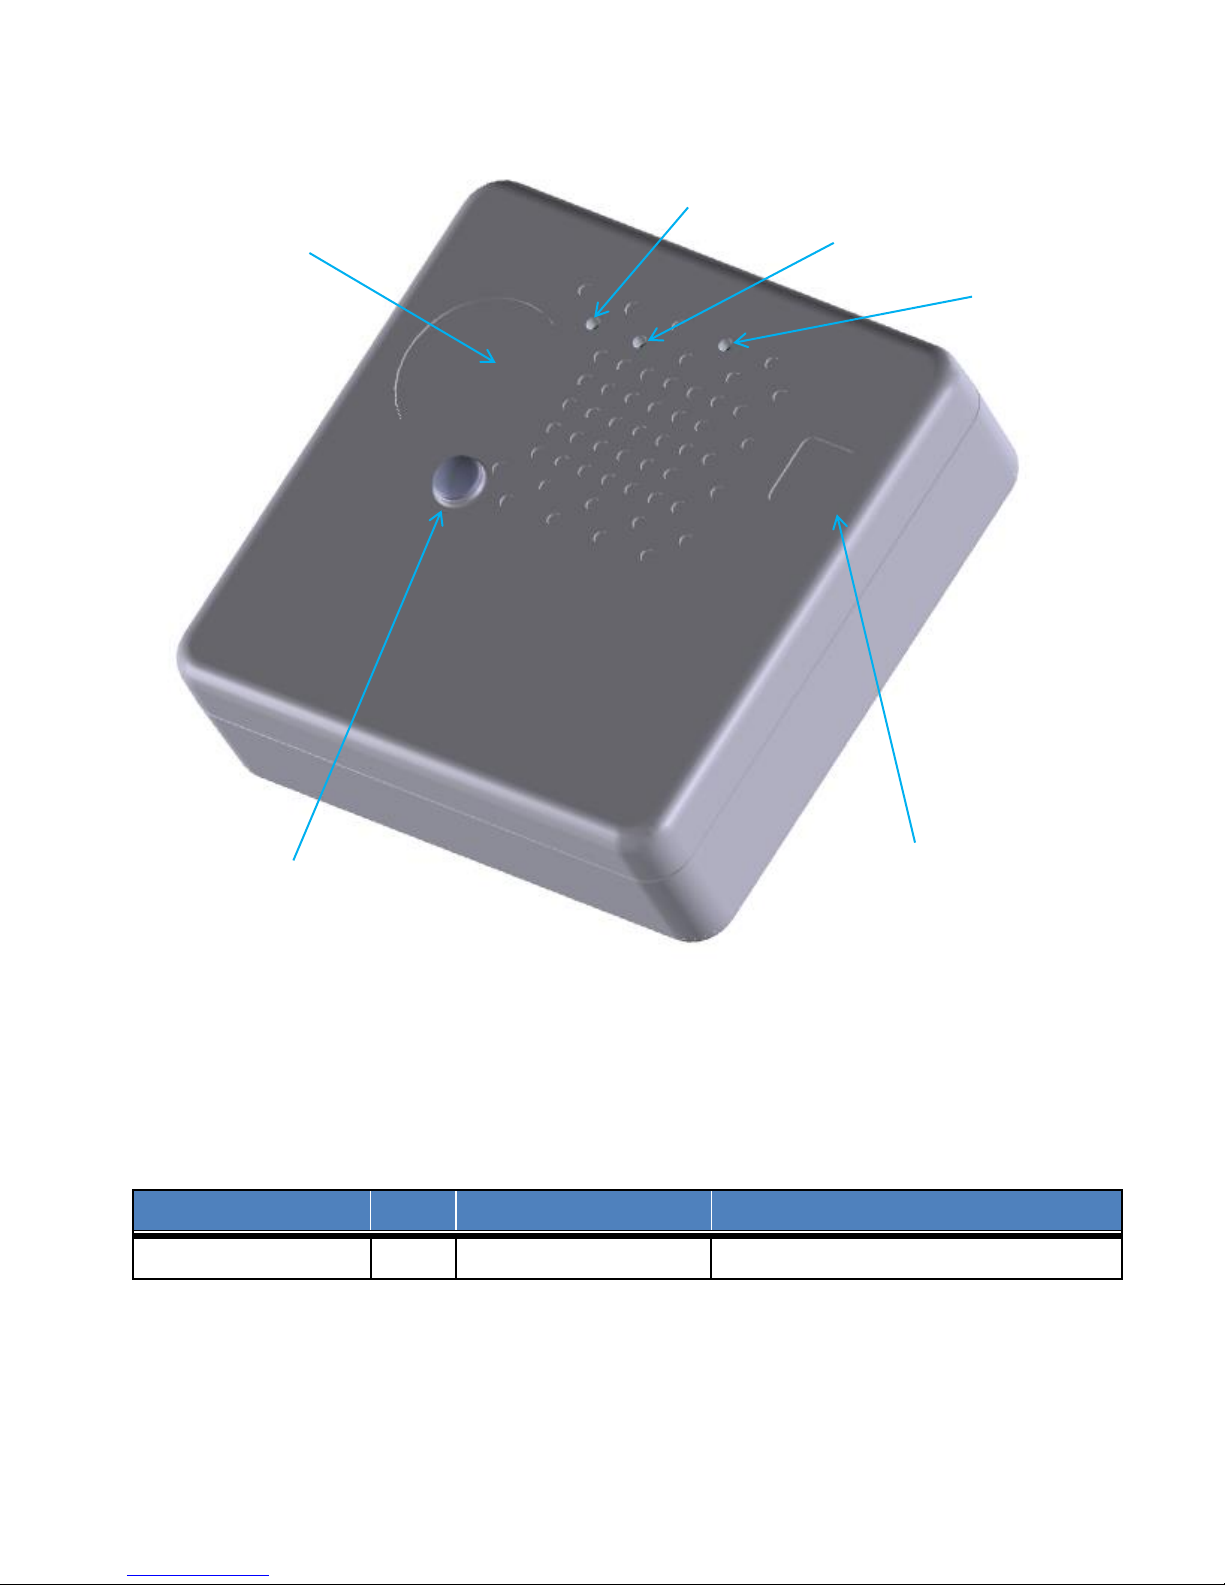
Figure 2 illustrates the I/O layout for the Kona All-in-One Home Sensor. All models share the
same layout, though only functional I/O is exposed on the case.
Kona All-in-One Home Sensor User Guide T0005370_UG Version 0.5
TEKTELIC Communications Inc. Confidential Page 8 of 32
Figure 2: Kona All-in-One Home Sensor External Connector I/O Layout
Connector types and their mating connectors are listed in Table 2.
Table 2: Kona All-in-One Home Sensor Interface Connector Types
Interface
QTY
Connector Type
Mating Connector
External Connector
0 or 1
JST B2B-ZR(LF)(SN)
JST ZHR-2
1.3 Specifications
The Kona All-in-One Home Sensor specifications are listed in Table 3.
Humidity Sensor
Aperture
LoRa LED
Magnetic Switch
(External Connector)
PIR Lens
(PIR model only)
Light Sensor
System
LED

Kona All-in-One Home Sensor User Guide T0005370_UG Version 0.5
TEKTELIC Communications Inc. Confidential Page 9 of 32
Table 3: Kona All-in-One Home Sensor Specifications
Attribute
Specification
Dimensions
42 mm (1.65”) wide x 42 mm (1.65”) deep x 14mm (0.55”) tall
Weight
20g (0.71 oz)
Operating Temperature
10°C to 40°C (50°F to 104°F)
Ingress Protection
IP30
Battery
CR2450 (replaceable)
Panasonic (Model CR2450)
Sony (Model CR2450B)
EVE Energy (Model CR2450)
FDK Corporation (Model CR2450)
Regulatory Compliance
IEC 60950-1 (CE)
ETSI EN 300 019-2-1, 300 019-2-2
ETSI EN 300 019-2-3, 300 019-2-4
FCC 15.247 RSS-247
FCC 15.209 RSS-Gen

Kona All-in-One Home Sensor User Guide T0005370_UG Version 0.5
TEKTELIC Communications Inc. Confidential Page 10 of 32
2What is in the Box
2.1 Product and installation material
Kona All-In-One Home Sensor
Mounting Bracket

Kona All-in-One Home Sensor User Guide T0005370_UG Version 0.5
TEKTELIC Communications Inc. Confidential Page 11 of 32
3Installation
3.1 Safety Precautions
The Kona All-in-One Home Sensor is intended for indoor use only.
The Kona All-in-One Home Sensor contains a lithium coin cell battery.
NEVER allow small children near batteries: if battery is swallow, immediately notify
doctor.
To reduce risk of fire, explosion or chemical burns: replace only with approved 3V
CR2450 coin batteries; DO NOT recharge, disassemble, heat above 100°C (212°F) or
incinerate.
The Kona All-in-One Home Sensor requires an external magnet for use with the internal
magnetic switch.
Keep magnets away from all children. Small magnets can pose a serious choking hazard.
If multiple magnets are swallowed, contact doctor immediately.
3.2 Unpacking and Inspection
The following should be considered during the unpacking of a new Kona All-in-One Home
Sensor.
1. Inspect the shipping carton and report any significant damage to TEKTELIC.
2. Unpacking should be conducted in a clean and dry location when possible.
3. Do not discard the shipping box or foam inserts as they will be required if a unit is
returned for repair or re-configuration.
3.3 Required Equipment for Installation
There are no tools required for Kona All-in-One Home Sensor installation.
3.4 Kona All-In-One Home Sensor Mounting
Kona All-in-One Home Sensor is designed to be mounted using the supplied mounting bracket.
The bracket can be attached using screws or tape (not included).
When mounting on a vertical surface, ensure that the Home Sensor will not be orientated with
the case retaining screws towards the ceiling. This could cause the Home Sensor to accidently
slip off the mount and fall. There are no orientation concerns when the Home Sensor is
mounted to a horizontal surface.

Kona All-in-One Home Sensor User Guide T0005370_UG Version 0.5
TEKTELIC Communications Inc. Confidential Page 12 of 32
3.5 External Connector Cable Installation
The Kona All-in-One Home Sensor with External Connect installation requires connection to the
external device. The external device cable attaches to the 2-pin connector located on the top of
the Home Sensor.
Figure 3: Kona All-in-One Home Sensor External Connector Signals
Figure 3: Kona All-in-One Home Sensor External Connector shows the external connector signal
locations. The connector is designed to be attached to an open-drain output, however the
signal line can also be driven with digital signals at 1.8V logic levels. Connection cable length
should NOT exceed 3 meters. Do not connect to an outdoor device.
Signal
Connection
Ground
Connection

Kona All-in-One Home Sensor User Guide T0005370_UG Version 0.5
TEKTELIC Communications Inc. Confidential Page 13 of 32
4Power UP and Commissioning and Monitoring
4.1 Required Equipment
No special equipment is required to power on the Kona All-in-One Home Sensor.
4.2 Power Up/Down Procedure
Once the sensor information has been added to the NS, pull the tab to engage the battery.
To reset or turn off the device the battery must be removed, refer to the Battery Replacement
Section.

Kona All-in-One Home Sensor User Guide T0005370_UG Version 0.5
TEKTELIC Communications Inc. Confidential Page 14 of 32
5Operation, Alarms & Management
5.1 Configuration
The Kona All-In-One home sensor supports a full range of Over-the-Air (OTA) configuration
options. Specific technical details are available in the Home Sensor Technical Reference
Manual.
All configuration commands need to be sent OTA during a sensor’s downlink windows.
5.2 Default Configuration
The default configuration on the Home Sensor is:
oReport Temperature and Humidity every one (1) hour.
oReport Battery Voltage every twenty-four (24) hours.
oReport actuation of the digital input element every one (1) actuation.
5.3 LED Behaviour
During Boot and Join Procedure:
Both LED’s will come on briefly when power is first applied.
After a small delay ( < 1 second ) the LED’s will turn off and one of them will blink briefly.
oIf the System LED blinks, then all health checks on the board passed.
oIf the LoRa LED blinks, then one of the health checks failed. Consider replacing
the battery, or moving the sensor to an environment within temperature range.
Immediately after, the Join Procedure will begin. During the time the System LED will
blink continuously until the sensor has joined a network.
The LoRa LED will now blink whenever LoRa activity occurs on the sensor (Transmitting
or Receiving packets)
During normal operation:
The LoRa LED will blink whenever LoRa activity occurs on the sensor (Transmitting or
Receiving packets)
The System LED can be controlled via the downlink command interface.

Kona All-in-One Home Sensor User Guide T0005370_UG Version 0.5
TEKTELIC Communications Inc. Confidential Page 15 of 32
6Battery Replacement
The Kona All-in-One Home Sensor is powered by a standard CR2450 coin cell. Use only
approved CR2450 cells when replacing the battery:
Panasonic (Model CR2450)
Sony (Model CR2450B)
EVE Energy (Model CR2450)
FDK Corporation (Model CR2450)
In order to access the battery the two screws securing the case must be removed. The screws
are accessible on the bottom of the sensor case and require a T-3 Torx screwdriver.
Opening the case:
Remove the two T-3 screws on the bottom of the case
While holding the sensor with the bottom facing up, remove the bottom of the case
With the bottom removed, the coin cell holder is accessible
Remove the coin cell from the holder by gently pinching and lifting the end of the cell
indicated in the image below

Kona All-in-One Home Sensor User Guide T0005370_UG Version 0.5
TEKTELIC Communications Inc. Confidential Page 16 of 32
Place the new cell in the holder, first hooking the top of the cell under the two metal
fingers as shown below
oThe top of the coin cell is marked with a + symbol indicating the positive
terminal. This positive terminal must face up when replacing the cell
Push the other end of the cell into the holder until it clips positively into the holder
When reinserting battery ensure the metal hooks on the battery holder are above the
battery before pushing it in. Failure to do so will damage the power leads on the sensor.

7Compliance Statements
Federal Communications Commission
This device complies with Part 15 of the FCC Rules.
Operation is subject to the following two conditions:
1. This device may not cause harmful interference,
and
2. This device must accept any interference
received, including interference that may cause
undesired operation.
Changes or modifications not expressly approved by the
party responsible for compliance could void the user’s
authority to operate the equipment
This equipment has been tested and found to comply with
the limits for a Class B digital device, pursuant to Part 15 of
the FCC Rules. These limits are designed to provide
reasonable protection against harmful interference in a
residential installation. This equipment generates uses and
can radiate radio frequency energy and, if not installed and
used in accordance with the instructions, may cause
harmful interference to radio communications. However,
there is no guarantee that interference will not occur in a
particular installation. If this equipment does cause
harmful interference to radio or television reception,
which can be determined by turning the equipment off
and on, the user is encouraged to try to correct the
interference by one of the following measures:
Reorient or relocate the receiving antenna.
Increase the separation between the equipment
and receiver.
Connect the equipment into an outlet on a
circuit different from that to which the receiver
is connected.
Consult the dealer or an experienced radio/TV
technician for help.
To comply with FCC exposure limits for general population
/ uncontrolled exposure, this device should be installed at
a distance of 20 cm from all persons and must not be co-
located or operating in conjunction with any other
transmitter.
Industry Canada
This Device complies with Industry Canada License-exempt
RSS standard(s). Operation is subject to the following two
conditions:
This device may not cause interference, and
This device must accept any interference,
including interference that may cause undesired
operation of the device.
Under Industry Canada regulations, this radio transmitter
may only operate using an antenna of a type and
maximum (or lesser) gain approved for the transmitter by
Industry Canada. To reduce potential radio interference to
other users, the antenna type and its gain should be so
chosen that the equivalent isotropically radiated power
(e.i.r.p.) is not more than that necessary for successful
communication.
This radio transmitter (identify the device by certification
number, or model number if (Category II) has been
approved by Industry Canada to operate with the antenna
types listed below with the maximum permissible gain and
required antenna impedance for each antenna type
indicated. Antenna types not included in this list, having a
gain greater than the maximum gain indicated for that
type, are strictly prohibited for use with this device. This
device complies with IC radiation exposure limits set forth
for an uncontrolled environment.
This device should be installed and operated with
minimum distance 0.2 m between the radiator and your
body.

Kona All-in-One Home Sensor User Guide T0005370_UG Version 0.4
TEKTELIC Communications Inc. Confidential Page 18 of 32
8Description du produit
8.1 Aperçu
Le capteur maison tout-en-un Kona est un capteur LoRaWAN IoT multi-usage compacté dans un
très petit format. Le Home Sensor est idéal pour surveiller et signaler la température,
l'humidité, la lumière, les chocs et les portes et fenêtres ouvertes / fermées dans
l'environnement domestique. Des fonctions de détection supplémentaires telles que la
détection de fuite et de mouvement, ainsi que le comptage des impulsions d'un appareil
externe sont également pris en charge avec le modèle de capteur de domicile approprié. Le
Tableau 1 présente les modèles de capteurs domestiques Kona tout-en-un actuellement
disponibles.
Tableau 1: Modèles de détecteurs de maison tout-en-un Kona
Product Code
Description
RF Region
T0004885
HOME SENSOR MODULE, NA, PIR
NA
T0004886
HOME SENSOR MODULE, NA, EXTERNAL CONNECTION
NA
T0004893
HOME SENSOR MODULE, NA, BASE
NA
La gamme de capteurs domestiques tout-en-un Kona prend en charge les applications de
détection suivantes:
Détection de mouvement: Les déclencheurs configurables permettent au capteur de
détecter s'il a été déplacé.
Détection numérique marche / arrêt: Un interrupteur magnétique interne ou un contact
externe peut être utilisé pour surveiller les états marche / arrêt et compter les
événements.
Détection de la lumière: Le capteur de lumière embarqué est capable de signaler la
présence ou l'absence de lumière en utilisant un seuil d'intensité configurable.
Mesures de température et d'humidité: Le capteur Home est capable de surveiller et de
signaler la température et l'humidité de son environnement local.
Détection de l'humidité / des fuites: Possibilité de détecter l'eau de la piscine pour
détecter les inondations et les fuites.
• Détection de mouvement (PIR): Les capteurs équipés peuvent détecter les personnes se
déplaçant dans le champ de vision des capteurs.

Kona All-in-One Home Sensor User Guide T0005370_UG Version 0.4
TEKTELIC Communications Inc. Confidential Page 19 of 32
La Figure 1 illustre le facteur de forme externe Kona All-in-One Home Sensors. Tous les modèles
partagent le même facteur de forme mécanique.
Figure 1: Capteur maison Kona tout-en-un
8.2 Interfaces physiques
La Figure 2 illustre la configuration des E / S pour le capteur Home Kona All-in-One. Tous les
modèles partagent la même disposition, mais seules les E / S fonctionnelles sont exposées sur
le boîtier.
Kona All-in-One Home Sensor User Guide T0005370_UG Version 0.4
TEKTELIC Communications Inc. Confidential Page 20 of 32
Figure 2: Disposition des E / S du connecteur externe Kona All-in-One Home Sensor
Les types de connecteurs et leurs connecteurs correspondants sont répertoriés dans le Tableau
2.
Tableau 2: Types de connecteurs d'interface de capteur domestique tout-en-un Kona
Interface
QTY
Type de connecteur
Connecteur compatible
Connecteur externe
0 or 1
JST B2B-ZR(LF)(SN)
JST ZHR-2
8.3 Caractéristiques
Les spécifications du capteur domestique tout-en-un Kona sont indiquées dans le tableau 3.
Ouverture du
capteur
d'humidité
LoRa LED
Interrupteur magnétique
(Connecteur externe)
Lentille PIR (modèle
PIR uniquement)
Capteur de
lumière
LED
système

Kona All-in-One Home Sensor User Guide T0005370_UG Version 0.4
TEKTELIC Communications Inc. Confidential Page 21 of 32
Tableau 3: Spécifications du capteur domestique tout-en-un Kona
Attribut
Spécification
Dimensions
42 mm (1.65”) largeur x 42 mm (1.65”) profondeur x 14mm (0.55”) grand
Poids
20g (0.71 oz)
Température de
fonctionnement
10°C to 40°C (50°F to 104°F)
Protection contre la
pénétration
IP30
Batterie
CR2450 (replaceable)
Panasonic (modèle CR2450)
Sony (modèle CR2450B)
EVE Energy (modèle CR2450)
FDK Corporation (modèle CR2450)
Conformité
réglementaire
IEC 60950-1 (CE)
ETSI EN 300 019-2-1, 300 019-2-2
ETSI EN 300 019-2-3, 300 019-2-4
FCC 15.247 RSS-247
FCC 15.209 RSS-Gen
This manual suits for next models
3
Table of contents
Languages:
Other TEKTELIC Communications Accessories manuals

TEKTELIC Communications
TEKTELIC Communications TUNDRA User manual

TEKTELIC Communications
TEKTELIC Communications T0005982 User manual

TEKTELIC Communications
TEKTELIC Communications TUNDRA User manual

TEKTELIC Communications
TEKTELIC Communications Kiwi User manual

TEKTELIC Communications
TEKTELIC Communications Kona All-in-One Home Sensor User manual

TEKTELIC Communications
TEKTELIC Communications Kona Product manual

TEKTELIC Communications
TEKTELIC Communications T0006623 User manual

TEKTELIC Communications
TEKTELIC Communications T0004893 Product manual

TEKTELIC Communications
TEKTELIC Communications T0004437 User manual


