tell Compact GSM II User manual

For device version v2.71 (18.11.2020)
Compact GSM II
QUICK GUIDE FOR INSTALLERS
Dear Customer!
Thank you for choosing our product. The full Installation
and Application Manual is available on our website at:
https://tell.hu/en/products/gsm-communicators/compact-gsm-ii-enn
PUTTING INTO OPERATION:
1. Choose the SIM card services according to the module functions you would
like to use (voice call, SMS service).
2. Enable the caller ID presentation and caller identification services on the
SIM card at the mobile service provider.
3. Disable the following services on the SIM card: PIN code request,
voicemail, and notification about missed calls.
4. Install the SIM card as shown in the picture below. Push the card into the
socket until you hear a click.
5. Check the installation environment for avoiding weak signal and other
problems (strong electromagnetic disturbances, high humidity).
6. Connect the antenna.
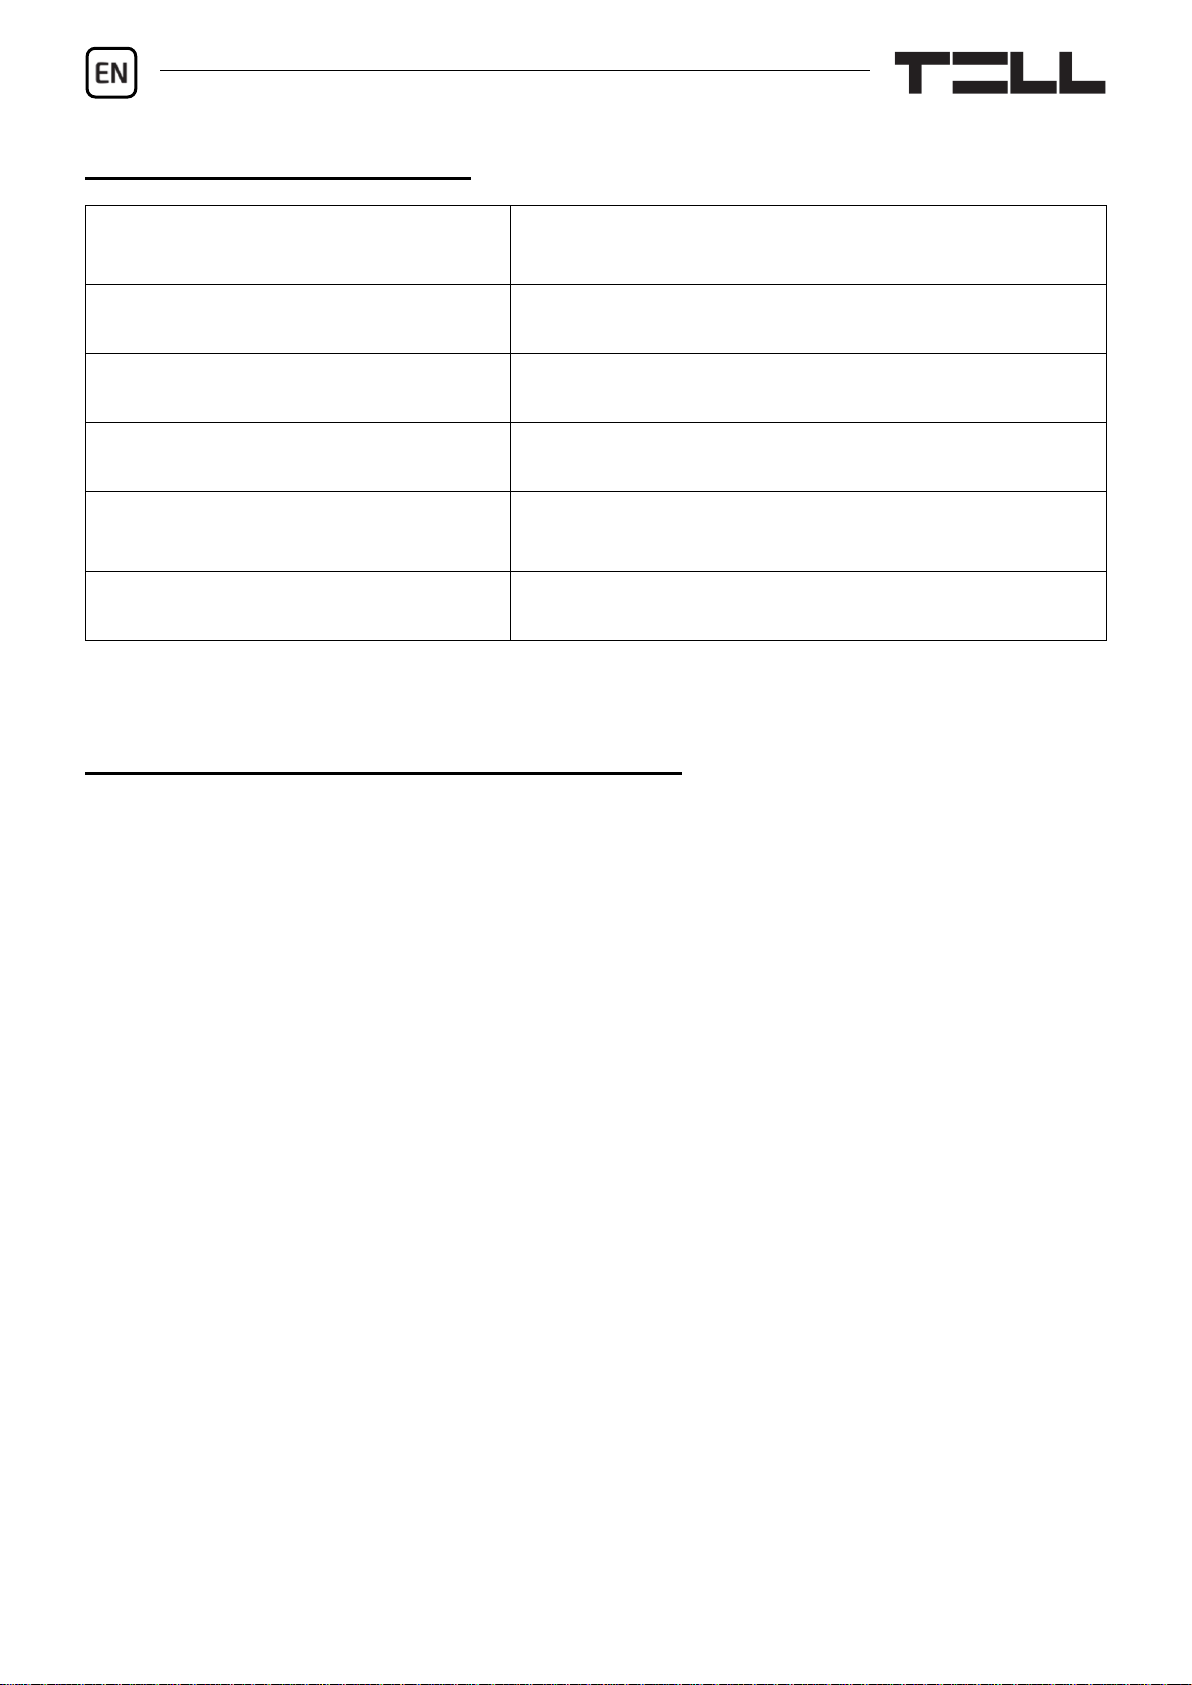
7. Do the wiring as shown in the wiring diagram. You can also connect an
optional TELL easyTEMP Compact temperature sensor to the device as
shown in the wiring diagram. The temperature sensor can be purchased
separately.
8. Connect the device to the power supply (12-30V DC, min. 200mA).

2
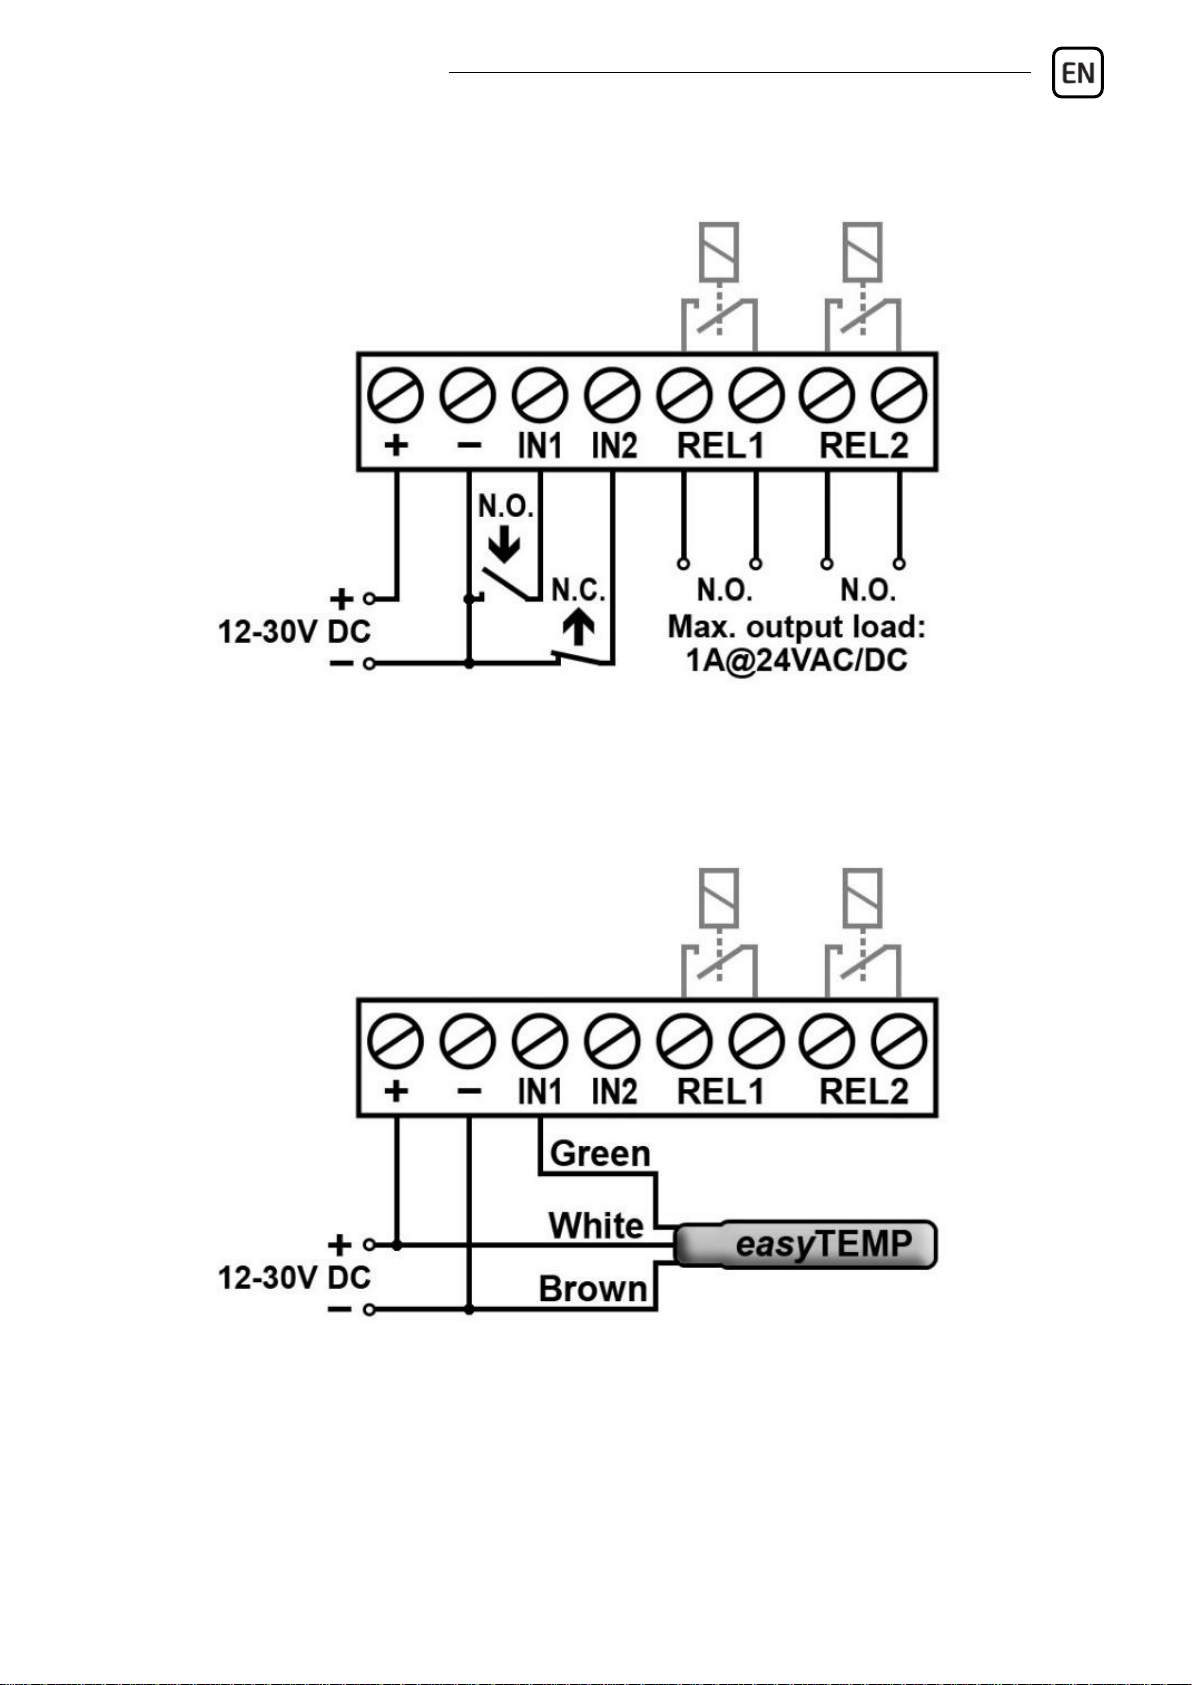
DEVICE WIRING:
The Compact GSM II has 2 contact inputs and 2 relay outputs, which you can
configure in the programming software for the task at hand.
Attention! Do NOT connect the connector of the antenna or the terminals
of the device directly or indirectly to the protective ground, because this
may damage the device!
Inputs:
The device accepts NO or NC dry (potential free) contacts on its contact inputs.
The contacts should be connected between the chosen input IN1 or IN2 and the
power input minus (”-”) terminal. The input type can be configured in the
programming software.
TELL easyTEMP Compact temperature sensor:
The optional temperature sensor should be connected to input IN1.
Outputs:
The REL1 and REL2 outputs provide a normally open (NO) dry relay contact as
the default state, and a closed contact when activated. The outputs support
a load of max. 1A@24V AC/DC.
Compact GSM II Quick guide
3
Wiring diagram:
Connecting the TELL easyTEMP Compact temperature sensor:
4
STATUS LED SIGNALS:
Flashing green
Normal operation, idle state,
connected to the mobile network.
Permanent green
Event reporting in progress.
Flashing red
Network search in progress.
Permanent red
Network or SIM card error.
A number of green blinks after
pushing the program button
Indicates the actual reception signal level.
Flashing orange
Program mode
RECEPTION SIGNAL LEVEL QUERY:
To check the reception signal level, push shortly the button found under the hole
on the left side of the device using a suitable tool. You can determine the signal
level from the number of green LED blinks right after pushing the button. In this
case the LED will be lit longer in one flash compared to when it indicates an idle
state as follows:
1 flash: weak
2 flashes: good
3 flashes: excellent
For a proper operation, at least 2 flashes (i.e. “good/excellent” reception) are
needed. In case of weak signal, move the antenna to a more suitable place.
You can also read the reception signal in the Status menu of the programming
software, where a scale from 0 to 31 is used. It is recommended to obtain here
at least value 20 when installing the antenna.

Compact GSM II Quick guide
5
PROGRAMMING SOFTWARE:
The latest version of the programming software is available on the
manufacturer’s website.
The software requires the device password upon connecting to the device.
Factory default password: 1111
Attention! It is highly recommended that you change the default password
upon the first login.
Connecting via USB :
1. Launch the Compact GSM II programming software.
2. Power up the device, and then connect it to the computer using a USB A-B
cable.
3. Enter the device password, and then click on the OK button, or if you want to
sign in and change the password at the same time, choose the Change
password option, enter the actual password, then the new password, confirm
the new password, and click on the OK button.
4. After a successful authentication, the Read and Write buttons become
available in the program under the Settings tab.
5. Read the settings stored in the device by clicking on the Read button.
6. Configure the settings as needed, and then write the changed settings into
the device by clicking on the Write button.

6
Connecting remotely via modem connection :
Connecting remotely via modem connection requires the TELL GM-900 modem
and a SIM card capable for GSM data calls. For the modem connection, it is
necessary to have GSM data call (CSD) service enabled on both SIM cards,
the one installed in the modem, and the one in the device.
1. Launch the Compact GSM II programming software.
2. Click on the Modem tab, open the Serial port drop-down menu and note the
port numbers shown in the list.
3. Connect the TELL GM-900 modem to the computer, click on a different tab
and then back on the Modem tab. (The software will read the available serial
ports automatically when switching to the Modem tab.) Select the serial port
newly created by the modem in the drop-down menu (the one that was not
available earlier in the list).
4. Enter the device’s phone number in the Phone number field, and then click
on the Connect button. You can follow the connection status in the Modem
communication details window. When the connection is established,
the CONNECT 9600 message is displayed and the login window pops up
automatically.
5. Enter the device password, and then click on the OK button.
6. After a successful authentication, the Read and Write buttons become
available in the program under the Settings tab.
7. Read the settings stored in the device by clicking on the Read button.
8. Configure the settings as needed, and then write the changed settings into
the device by clicking on the Write button.
9. When you have finished remote programming, click on the Disconnect
button to end the call.

Compact GSM II Quick guide
7
CONFIGURING THE DEVICE:
The device can be configured via USB or modem connection using the
programming software, or by sending commands via SMS to the phone number
of the SIM card installed in the device. You can find the list of commands
available for programming via SMS in the Compact GSM II Installation and
Application Manual.
After connecting to the device, read the actual settings stored in the device by
clicking on the Read button under the Settings tab, or if you want to import
settings saved earlier, click on the Open button and browse the settings file.
Configure the settings as needed, and then write them into the device using the
Write button to apply the changes. You can also save the settings to file using
the Save button.
Notifications:
The Compact GSM II can send notifications by voice call and SMS up to 4 user
phone numbers, and report to remote monitoring station in Contact ID format.
The device uses a siren tone in the calls by default, but a 6 seconds long voice
message can be recorded for each of the two contact input alarm events.
Instructions on recording voice messages you can find in the Installation and
Application Manual. Reporting to remote monitoring station is done via voice
call using the SIA DC-05 protocol.
Configuring notifications to user phone numbers:
1. Enter the user phone numbers in the User phone numbers section and
select the desired event acknowledgement option for each.
2. Configure the notifications for each event in the Notifications section as
follows:
T1…T4 checkboxes: enable voice calls to user phone numbers 1…4
S1…S4 checkboxes: enable SMS sending to user phone numbers 1…4
SMS message textbox: enter the message to be sent when the event
occurs.

8
Configuring reporting to remote monitoring station
1. Enter the receiver phone numbers and the user account ID in the Monitoring
station section.
2. Configure the notifications for each event in the Notifications section as
follows:
Contact ID code fields: the default event codes belonging to events are
configured by factory. You can change the event codes at will if needed.
Mon. stat. checkboxes: enable reporting to remote monitoring station.
Configuring the inputs
The 2 contact inputs can be configured in the Inputs section. The inputs can
work in 3 different operating modes: NO, NC, and impulse series detection.
Configuring the relay outputs
The 2 relay outputs can be configured in the Relay outputs section. The relay
outputs are equivalent, i.e. the same parameters can be configured for both
outputs in the Relay 1 and Relay 2 sections. The outputs can work in two
operating modes: bistable and timed (1…9999s), and can be controlled by
different events:
Input event
Incoming call
Temperature event (temperature thresholds for output control can be
configured independently from temperature thresholds used for generating
alarm events)
Commands sent by SMS (the detailed list of commands is available in the
Installation and Application Manual).

Compact GSM II Quick guide
9
Configuring the temperature sensor
1. Connect the temperature sensor to input IN1 as shown in the wiring diagram.
2. Enable the temperature sensor in the Inputs section.
3. Configure the desired low and high temperature thresholds in the
Temperature section. When the temperature thresholds are reached,
temperature events are generated about which the device can send
notifications as configured in the event settings.
You can also request status information in SMS, which also includes the value
of the actual temperature measured. For this, send the INFO?# message to the
phone number of the SIM card installed in the device.
When using a temperature sensor, the Normally open input mode can still be
used at the same time with input IN1 to send notifications upon triggering the
input, but taking into account that the device is unable to receive temperature
data from the sensor while the input is shorted (in an activated state). Therefore,
you can use these two functions together only with short alarm trigger signals.
When a temperature sensor is used, the Normally closed and the Car alarm
adaptation operating modes cannot be used on input IN1, otherwise
temperature sensing will not work.

10
SAFETY INSTRUCTIONS
For your safety, please read carefully and follow the instructions below!
Failure to observe safety instructions may be a threat to you and your
environment!
TELL’s product (hereinafter referred to as „device”) has a built-in mobile
communication modem. The built-in modem is capable of 2G mobile
communication.
The 2G modem can use the following frequency bands:
850/900/1800/1900 MHz @GSM/GPRS
DO NOT USE the device in an environment where radio frequency radiation
can cause a risk and may interfere with other devices that may cause
undesired operation - such as medical devices!
DO NOT USE the device if there is a risk of high humidity, hazardous
chemicals or other physical impact!
DO NOT USE the device beyond the specified operating temperature range!
DO NOT MOUNT the device in a hazardous environment!
DO NOT INSTALL/WIRE the device under voltage. For easy disconnection,
the device’s power adapter or power supply should be easily accessible!
ALWAYS DISCONNECT the power supply before starting to mount the
device!
ALWAYS DISCONNECT the device’s power supply before inserting,
removing or replacing the SIM card!
TO SWITCH OFF the device, disconnect all power sources, including the
power supply and USB!
The computer connected to the device must always be connected to the
protective ground!

Compact GSM II Quick guide
11
DO NOT USE a computer to program the device that is not connected to the
protective ground. To avoid a ground loop, the power supply of the computer
and the device must use the same grounding!
DO NOT ATTEMPT to repair the device. Only qualified personnel is allowed
to repair the device!
PROVIDE APPROPRIATE POWER SOURCE for the device. The device
operates safely and properly only with a power supply which meets even the
maximal requirements specified in the user’s manual. You can find the exact
data in the user’s manual and on the http://tell.hu website as well.
DO NOT USE the device with a power supply that does not meet the MSZ
EN 60950-1 standard!
DO NOT REVERSE THE POLARITY of the power supply! Wire the power
supply always according to the polarity indicated on the device!
DO NOT CONNECT the antenna connector to the protective ground! Do not
connect the metallic parts of the antenna connector or the device’s terminals
directly or indirectly to the protective ground, because this may damage the
device!
ATTENTION! The product is provided with built-in automatic power
disconnection (Under Voltage Lock Out) function. The device will turn off
automatically when the supply voltage drops under a critical level.

v2.71 modulverzióhoz (2020.11.18)
Compact GSM II
GYORSTELEPÍTÉSI ÚTMUTATÓ TELEPÍTŐKNEK
Tisztelt Vásárlónk!
Köszönjük, hogy megvásárolta termékünket! A teljes Telepítési
és Alkalmazási Útmutató letölthető a gyártó weboldaláról:
https://tell.hu/hu/termekek/gsm-kommunikatorok/compact-gsm-ii
ÜZEMBE HELYEZÉS:
1. A használni kívánt funkciók alapján válassza ki a SIM-kártyához
a szolgáltatásokat a mobilszolgáltatónál (hívás-, SMS-szolgáltatás)!
2. A SIM-kártyára aktiválja a szolgáltatónál a hívószámküldés és hívószám-
azonosítás szolgáltatást!
3. A SIM-kártyán tiltsa le a következő szolgáltatásokat: PIN-kód-kérés,
hangposta, nem fogadott hívás értesítés!
4. Helyezze be a SIM-kártyát az ábrán látható módon. Tolja be a kártyát a
foglalatba kattanásig.
5. Ellenőrizze a telepítési környezetet gyenge térerő és egyéb problémák
elkerülése érdekében (erős elektromágneses zavarok, magas páratartalom)!
6. Csatlakoztassa az antennát!
7. Végezze el a modul bekötését a bekötési ábrának megfelelően! A modulhoz
lehetőség van a bekötési ábrán látható módon 1db külön megvásárolható
TELL easyTEMP Compact hőmérséklet-érzékelő csatlakoztatására is.
8. Csatlakoztassa a modult tápfeszültséghez (12-30V DC, min. 200mA)!

13
A MODUL BEKÖTÉSE:
A Compact GSM II 2db kontaktusbemenettel és 2db relés kimenettel
rendelkezik, amelyek a programozószoftverrel konfigurálhatók igény szerint,
a feladatnak megfelelően.
Figyelem! Az antenna csatlakozóját és a modul termináljait se közvetlenül,
se közvetve NE csatlakoztassa védőföldhöz, mert ez a modul
meghibásodását okozhatja!
Bemenetek:
A modul bemeneteire NO vagy NC potenciálmentes kontaktus csatlakoztatható.
A kontaktust a kiválasztott bemenet (IN1…IN2) és a „-” (tápfeszültség negatív)
terminálja közé kell kötni. A bemenetek típusát a programozószoftverben
választhatja ki.
TELL easyTEMP Compact hőmérsékletérzékelő:
Az opcionális hőmérséklet-érzékelő az IN1 bemenethez csatlakoztatható.
Kimenetek:
A REL1 és REL2 kimenet alaphelyzetben nyitott (NO) potenciálmentes, azaz
szárazkontaktust, vezérléskor pedig zárókontaktust szolgáltat. A relékontaktus
maximális terhelhetősége 1A@24V AC/DC.

Compact GSM II Gyorstelepítési Útmutató
14
Bekötési ábra:
TELL easyTEMP Compact hőmérséklet-érzékelő csatlakoztatása:

15
ÁLLAPOTJELZŐ LED JELZÉSEI:
Zöld villog
Üzemszerű működés, nyugalmi állapot,
csatlakozva a mobilhálózathoz.
Folyamatos zöld
Esemény átjelzése folyamatban.
Piros villog
Hálózatkeresés folyamatban.
Folyamatos piros
Hálózat vagy SIM-kártya hiba.
Zöld meghatározott számú
villanása a programgomb rövid
megnyomása után
A térerő aktuális szintjét mutatja.
Narancs villog
Programozás-üzemmód.
TÉRERŐ LEKÉRDEZÉSE:
A térerő lekérdezéséhez nyomja meg röviden a modul bal oldalán lévő furat
mögött található nyomógombot egy arra alkalmas eszközzel. A térerő mértékét
a gomb megnyomását közvetlenül követő zöld LED villanások számából
állapíthatja meg. Ilyenkor a LED egy-egy villanás alkalmával a nyugalmi
állapothoz képest hosszabb ideig világít, az alábbiak szerint:
1 villanás: gyenge
2 villanás: jó
3 villanás: kiváló
A megfelelő működéshez legalább 2 villanás, azaz „jó/kiváló” térerő szükséges.
Gyenge térerő esetén helyezze át az antennát egy előnyösebb helyre.
A térerő leolvasható a programozószoftver Státusz menüjében is 0-tól 31-ig
terjedő skálán. Az antenna elhelyezésekor itt 20 fölötti értékre ajánlott törekedni.

Compact GSM II Gyorstelepítési Útmutató
16
PROGRAMOZÓSZOFTVER:
A programozószoftver legfrissebb változata elérhető a gyártó weboldalán.
Csatlakozáskor a program kéri a moduljelszót.
Alapértelmezett gyári jelszó: 1111
Figyelem! Az első belépéskor erősen ajánlott a gyári jelszó
megváltoztatása!
Kapcsolódás USB-n keresztül :
1. Indítsa el a Compact GSM II programozószoftvert.
2. Helyezze a modult tápfeszültségre, majd csatlakoztassa egy USB A-B
kábellel a számítógéphez.
3. Adja meg a moduljelszót, majd kattintson az OK gombra, vagy a jelszó
megváltoztatásával egybekötött bejelentkezéshez válassza a Jelszó
megváltoztatása lehetőséget, adja meg az aktuális jelszót, az új jelszót,
majd erősítse meg az új jelszót és kattintson az OK gombra.
4. Sikeres bejelentkezést követően a Beolvasás és Írás gombok elérhetővé
válnak a programban a Beállítások fül alatt.
5. Olvassa ki a modulban tárolt beállításokat a Beolvasás gombra történő
kattintással.
6. Módosítsa a beállításokat igény szerint, majd írja be a módosított
beállításokat a modulba az Írás gomb segítségével.

17
Kapcsolódás távolról modemes kapcsolaton keresztül :
A modemen keresztül történő távoli eléréshez szükség van a TELL GM-900
modemre és egy GSM-adathívásra alkalmas SIM-kártyára. A modemes
kapcsolat működéséhez szükséges hogy mind a modembe, mind a modulba
helyezett SIM-kártyán aktiválva legyen a GSM-adathívás (CSD) szolgáltatás.
1. Indítsa el a Compact GSM II programozószoftvert.
2. Kattintson a Modem fülre, nyissa le a Soros port legördülőmenüt és
jegyezze meg a listában látható portszámokat.
3. Csatlakoztassa a TELL GM-900 modemet a számítógéphez, kattintson
valamelyik másik fülre, majd vissza a Modem fülre. (A Modem fülre történő
váltáskor a program automatikusan beolvassa az elérhető soros portokat.)
Válassza ki a modem által újonnan létrehozott soros portot a
legördülőmenüből (azt amely korábban nem volt látható a listában).
4. Adja meg a modul telefonszámát a Telefonszám mezőbe, majd kattintson a
Kapcsolódás gombra. A kapcsolódás állapotát a Modemkommunikáció
ablakban követheti. Sikeres kapcsolódás esetén az ablakban CONNECT
9600 üzenet jelenik meg és automatikusan megnyílik a bejelentkezési ablak.
5. Adja meg a moduljelszót, majd kattintson az OK gombra.
6. Sikeres bejelentkezést követően a Beolvasás és Írás gombok elérhetővé
válnak a programban a Beállítások fül alatt.
7. Olvassa ki a modulban tárolt beállításokat a Beolvasás gombra történő
kattintással.
8. Módosítsa a beállításokat igény szerint, majd írja be a módosított
beállításokat a modulba az Írás gomb segítségével.
9. Ha befejezte a távprogramozást, a hívás befejezéséhez kattintson a
Kapcsolat bontása gombra.

Compact GSM II Gyorstelepítési Útmutató
18
A MODUL PROGRAMOZÁSA:
A modul programozását elvégezheti programozószoftverrel USB vagy modemes
kapcsolaton keresztül, vagy a modulba helyezett SIM-kártya telefonszámára
küldött SMS-parancsüzenetekkel. Az SMS-ben történő programozáshoz
rendelkezésre álló parancsüzenetek listáját a Compact GSM II Telepítési és
Alkalmazási Útmutatóban találja.
A modulhoz történő kapcsolódást követően olvassa ki a modulban tárolt aktuális
beállításokat a Beolvasás gomb segítségével a Beállítások fül alatt, vagy
amennyiben korábban elmentett beállításokat szeretne importálni, kattintson
a Megnyitás gombra és tallózza be a beállításfájlt. Szerkessze a beállításokat
igény szerint, majd a modulban történő érvényesítéshez írja be azokat
a modulba az Írás gomb segítségével. A beállításokat elmentheti fájlba
a Mentés gomb segítségével.
Értesítések:
A Compact GSM II képes értesítés küldésére hanghívással és SMS-ben akár
4 felhasználói telefonszámra, valamint távfelügyeletre Contact ID formátummal.
A hanghívásokban a modul alapértelmezetten szirénaszólamot használ, de a két
kontaktusbemenet riasztási eseményeihez lehetőség van egy-egy 6 másodperc
hosszúságú hangüzenet rögzítésére, amelyhez részletes útmutatást a
Telepítési és Alkalmazási Útmutatóban talál. A távfelügyeleti átjelzés
hanghíváson keresztül történik SIA DC-05 protokollal.
Felhasználói telefonszámokra küldendő értesítések konfigurálása:
1. Adja meg a felhasználói telefonszámokat a Felhasználói telefonszámok
szekcióban és válassza ki mindegyikhez az eseménynyugtázás módját.
2. Konfigurálja az értesítéseket eseményenként az Értesítések szekcióban
az alábbiak szerint:
T1…T4 jelölőnégyzetek: hanghívás az 1…4 felhasználói telefonszámokra
S1…S4 jelölőnégyzetek: SMS-küldés az 1…4 felhasználói telefonszámokra
SMS-üzenet szövegmezők: adja meg az egyes események
bekövetkezésekor küldendő üzenet szövegét.

19
Távfelügyeletre küldendő értesítések konfigurálása:
1. Adja meg a távfelügyeleti vevőegységek telefonszámait és az
ügyfélazonosítót a Távfelügyelet szekcióban.
2. Konfigurálja az értesítéseket eseményenként az Értesítések szekcióban
az alábbiak szerint:
Contact ID kód mező: az eseményekhez tartozó alapértelmezett
eseménykódok gyárilag be vannak állítva. Szükség esetén az
eseménykódokat igény szerint módosíthatja.
Távf. jelölőnégyzetek: átjelzés engedélyezése távfelügyeletre.
Bemenetek konfigurálása:
A két kontaktusbemenetet a Bemenetek szekcióban konfigurálhatja.
A bemenetek háromféle üzemmódban képesek működni: NO, NC, és
impulzussorozat-detektálás.
Relékimenetek konfigurálása:
A két relékimenetet a Relékimenetek szekcióban konfigurálhatja. A két
relékimenet egyenértékű, azaz mindkét kimenet esetében ugyanazok a
paraméterek konfigurálhatók a Relé 1 és Relé 2 szekciókban. A kimenetek
kétféle üzemmódban képesek működni: bistabil és időzített (1…9999s), és
többféle esemény által vezérelhetők:
bemeneti esemény által
bejövő hívás által
hőmérsékleti esemény által (a kimenetvezérlési hőmérsékletküszöbök
a riasztási hőmérsékletiesemény-küszöböktől függetlenül állíthatók)
SMS parancsüzenettel (a részletes parancslistát a Telepítési és
Alkalmazási Útmutatóban találja).

Compact GSM II Gyorstelepítési Útmutató
20
Hőmérséklet-érzékelő konfigurálása:
1. Csatlakoztassa a hőmérséklet-érzékelőt az IN1 bemenethez a bekötési
ábrán látható módon.
2. Engedélyezze a hőmérséklet-érzékelőt a Bemenetek szekcióban.
3. A Hőmérséklet szekcióban állítsa be a kívánt alsó és felső
hőmérsékletküszöböt. A hőmérsékletküszöbök elérésekor hőmérsékleti
események generálódnak, amelyekről a modul értesítéseket képes küldeni a
konfigurált eseménybeállításoknak megfelelően.
Lehetőség van az állapotinformációk SMS-ben történő lekérdezésére is, amely
tartalmazza az aktuálisan mért hőmérsékletértékét is. Ehhez küldje el az INFO?#
üzenetet a modulba helyezett SIM-kártya telefonszámára.
A csatlakoztatott hőmérséklet-érzékelővel egyidejűleg az IN1 bemenet
NO (rövidzárra aktív) funkciója továbbra is használható értesítésküldésre
a bemenet aktiválásának hatására, figyelembe véve, hogy amíg rövidzárban
(aktivált állapotban) van a bemenet, addig a modul nem képes a hőmérséklet-
érzékelőtől mérési adatot fogadni, ezért a két funkció csak rövid riasztási
impulzus esetén alkalmazható egyidejűleg. Hőmérséklet-érzékelő
csatlakoztatása esetén az IN1 bemenet NC (szakadásra aktív) és az
Autóriasztó-illesztés funkciója nem használható, ellenkező esetben
a hőmérséklet-érzékelés nem fog működni.
Table of contents
Languages:
Other tell Cell Phone manuals


