tell NIAGARA User manual
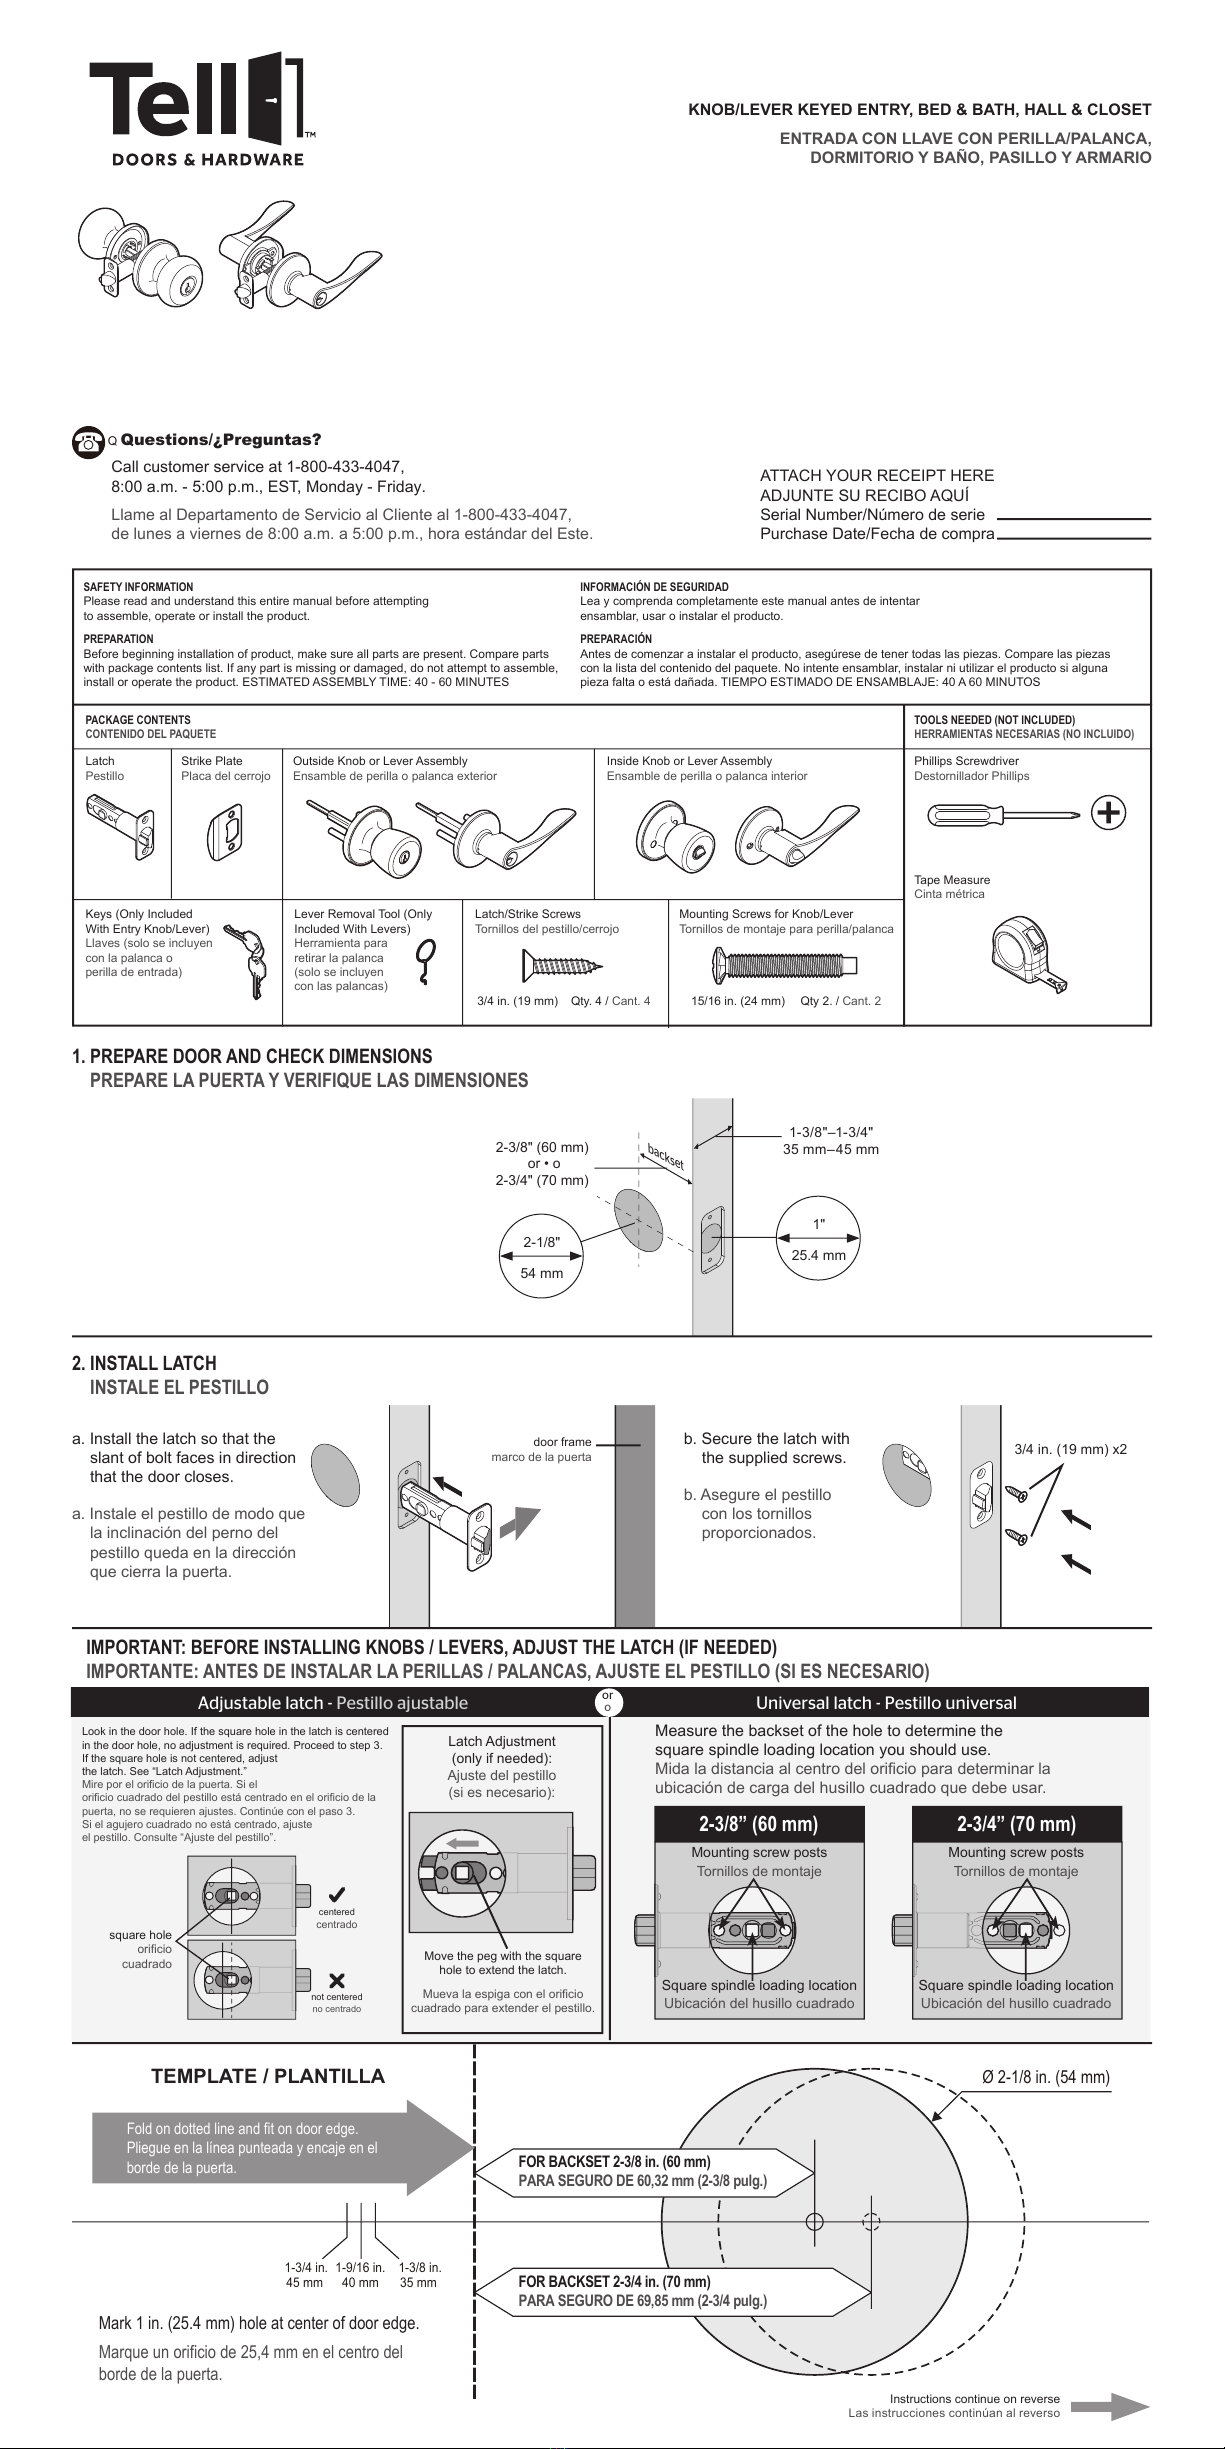
1. PREPARE DOOR AND CHECK DIMENSIONS
PREPARE LA PUERTA Y VERIFIQUE LAS DIMENSIONES
2. INSTALL LATCH
INSTALE EL PESTILLO
SAFETY INFORMATION
Please read and understand this entire manual before attempting
to assemble, operate or install the product.
PREPARATION
Before beginning installation of product, make sure all parts are present. Compare parts
with package contents list. If any part is missing or damaged, do not attempt to assemble,
install or operate the product. ESTIMATED ASSEMBLY TIME: 40 - 60 MINUTES
INFORMACIÓN DE SEGURIDAD
Lea y comprenda completamente este manual antes de intentar
ensamblar, usar o instalar el producto.
PREPARACIÓN
Antes de comenzar a instalar el producto, asegúrese de tener todas las piezas. Compare las piezas
con la lista del contenido del paquete. No intente ensamblar, instalar ni utilizar el producto si alguna
pieza falta o está dañada. TIEMPO ESTIMADO DE ENSAMBLAJE: 40 A 60 MINUTOS
68584 Rev 02-TELL
KNOB/LEVER KEYED ENTRY, BED & BATH, HALL & CLOSET
ENTRADA CON LLAVE CON PERILLA/PALANCA,
DORMITORIO Y BAÑO, PASILLO Y ARMARIO
Item/Artículo #
37249 / 37642 / 40485 / 117973 / 117976 / 117977 / 117984 / 117985 / 117987 / 117991 / 117992 / 117993 / 279797 / 279811 / 279812
597125 / 597126 / 597127 / 597128 / 597129 / 597130 / 1658854 / 1658855 / 1658856 / 1658857 / 1658858 / 1658859 / 1658860
1658862 / 1658863 / 1658864 / 1658866 / 1658867 / 1658868 / 3723394 / 3723395 / 3723396 / 3723397 / 3723398 / 3723399
3723413 / 3723414 / 3723415 / 3723416 / 3723417 / 3723418 / 3723419 / 3723420 / 3723421 / 3723422 / 3723423 / 3723424
3723425 / 3723426 / 3723427 / 3723428 / 3723429 / 3723430 / 3723433 / 3723434 / 3723435 / 3723439 / 3723440 / 3723441
3723442 / 3723443 / 3723444 / 3723445 / 3723446 / 3723447 / 3723449 / 3723451 / 3723454 / 3723455 / 3723456 / 3723457
3723458 / 3723459 / 3723460 / 3723461 / 3723462 / 3723463 / 3723464 / 3723465 / 3723466 / 3723468 / 3723470 / 3723471
Model/Modelo #
93560-012 / 93560-013 / 93560-014 / 93560-015 / 93560-016 / 93560-017 / 93560-018 / 93560-019 / 93560-020 / 93560-021
93560-022 / 93560-023 / 93560-024 / 93560-025 / 93560-026 / 93560-027 / 93560-028 / 93560-029 / 93560-030 / 93560-031
93560-032 / 93560-033 / 93560-034 / 93560-035 / 93560-036 / 93560-037 / 93560-038 / 93560-039 / 93570-012 / 93570-013
93570-014 / 93570-015 / 93570-016 / 93570-017 / 93570-018 / 93570-019 / 93570-020 / 93570-021 / 93570-022 / 93570-023
93570-024 / 93570-025 / 93570-026 / 93570-027 / 93570-028 / 93570-029 / 93570-030 / 93570-031 / 93570-032 / 93570-033
93570-034 / 93570-035 / 93570-036 / 93570-037 / 93570-038 / 93570-039 / 93580-012 / 93580-013 / 93580-014 / 93580-015
93580-016 / 93580-017 / 93580-018 / 93580-019 / 93580-020 / 93580-021 / 93680-009 / 93680-010 / 93680-011 / 93680-012
93580-022 / 93580-023 / 93580-024 / 93580-025 / 93580-026 / 93580-027 / 93580-028 / 93580-029 / 93580-030 / 93580-031
93580-032 / 93580-033 / 93580-034 / 93580-035 / 93580-036 / 93580-037 / 93580-038 / 93580-039
15/16 in. (24 mm) Qty 2. / Cant. 2Qty. 4 / Cant. 43/4 in. (19 mm)
Llame al Departamento de Servicio al Cliente al 1-800-433-4047,
de lunes a viernes de 8:00 a.m. a 5:00 p.m., hora estándar del Este.
Q Questions/¿Preguntas?
Call customer service at 1-800-433-4047,
8:00 a.m. - 5:00 p.m., EST, Monday - Friday.
uestions/¿Preguntas?
ATTACH YOUR RECEIPT HERE
ADJUNTE SU RECIBO AQUÍ
Serial Number/Número de serie
Purchase Date/Fecha de compra
PACKAGE CONTENTS
CONTENIDO DEL PAQUETE
TOOLS NEEDED (NOT INCLUDED)
HERRAMIENTAS NECESARIAS (NO INCLUIDO)
Latch
Pestillo
Strike Plate
Placa del cerrojo
Outside Knob or Lever Assembly
Ensamble de perilla o palanca exterior
Inside Knob or Lever Assembly
Ensamble de perilla o palanca interior
Phillips Screwdriver
Destornillador Phillips
Tape Measure
Cinta métrica
Keys (Only Included
With Entry Knob/Lever)
Llaves (solo se incluyen
con la palanca o
perilla de entrada)
Lever Removal Tool (Only
Included With Levers)
Herramienta para
retirar la palanca
(solo se incluyen
con las palancas)
Latch/Strike Screws
Tornillos del pestillo/cerrojo
Mounting Screws for Knob/Lever
Tornillos de montaje para perilla/palanca
For drilling instructions refer to your product’s
“Guides & Documents” tab on lowes.com
Para obtener instrucciones de taladrado,
consulte la pestaña “Guías y documentos”
de su producto en lowes.com
a. Install the latch so that the
slant of bolt faces in direction
that the door closes.
a. Instale el pestillo de modo que
la inclinación del perno del
pestillo queda en la dirección
que cierra la puerta.
door frame
marco de la puerta
b. Secure the latch with
the supplied screws.
b. Asegure el pestillo
con los tornillos
proporcionados.
2-3/8" (60 mm)
or • o
2-3/4" (70 mm)
1-3/8"–1-3/4"
35 mm–45 mm
1"
25.4 mm
2-1/8"
54 mm
3/4 in. (19 mm) x2
Fold on dotted line and fit on door edge.
Pliegue en la línea punteada y encaje en el
borde de la puerta.
1-3/4 in.
45 mm 1-9/16 in.
40 mm
Ø 2-1/8 in. (54 mm)
1-3/8 in.
35 mm
Mark 1 in. (25.4 mm) hole at center of door edge.
Marque un orificio de 25,4 mm en el centro del
borde de la puerta.
FOR BACKSET 2-3/4 in. (70 mm)
PARA SEGURO DE 69,85 mm (2-3/4 pulg.)
FOR BACKSET 2-3/8 in. (60 mm)
PARA SEGURO DE 60,32 mm (2-3/8 pulg.)
TEMPLATE / PLANTILLA
Instructions continue on reverse
Las instrucciones continúan al reverso
backset
Measure the backset of the hole to determine the
square spindle loading location you should use.
Mida la distancia al centro del oricio para determinar la
ubicación de carga del husillo cuadrado que debe usar.
2-3/8” (60 mm) 2-3/4” (70 mm)
Mounting screw posts
Tornillos de montaje
Square spindle loading location
Ubicación del husillo cuadrado
Mounting screw posts
Tornillos de montaje
Square spindle loading location
Ubicación del husillo cuadrado
IMPORTANT: BEFORE INSTALLING KNOBS / LEVERS, ADJUST THE LATCH (IF NEEDED)
IMPORTANTE: ANTES DE INSTALAR LA PERILLAS / PALANCAS, AJUSTE EL PESTILLO (SI ES NECESARIO)
or
o
Adjustable latch - Pestillo ajustable Universal latch - Pestillo universal
Latch Adjustment
(only if needed):
Ajuste del pestillo
(si es necesario):
Move the peg with the square
hole to extend the latch.
Mueva la espiga con el oricio
cuadrado para extender el pestillo.
centered
centrado
not centered
no centrado
square hole
oricio
cuadrado
Look in the door hole. If the square hole in the latch is centered
in the door hole, no adjustment is required. Proceed to step 3.
If the square hole is not centered, adjust
the latch. See “Latch Adjustment.”
Mire por el oricio de la puerta. Si el
oricio cuadrado del pestillo está centrado en el oricio de la
puerta, no se requieren ajustes. Continúe con el paso 3.
Si el agujero cuadrado no está centrado, ajuste
el pestillo. Consulte “Ajuste del pestillo”.
Styles / Estilos
NIAGARA | CORTLAND | EMPIRE
0222-TEL036801
For drilling refer to product template below.
Para taladrar, consulte la plantilla del producto a
continuación.
Limited Lifetime Warranty
The Manufacturer extends a Limited Lifetime Mechanical andFinish Warranty tothe original
“User” of this Product against defects in materials and workmanship as long as the User
occupies the residential premises upon which the Product was originally installed. Upon
return of a defective Product to the Manufacturer, the Manufacturer shall either replace,
repair or refund the purchase price in exchange for the Product. This warranty does not
cover abused or misused Products or those Products used in commercial applications. No
other warranties, express or implied are made with respect to the Product including but not
limited to any implied warranty of merchantability or tness for a particular purpose. The
Manufacturer DOES NOT authorize any person to create for it any obligation or liability
in connection with the Product. The Manufacturer maximum liability hereunder limited
to the purchase price of the Product, and in no event shall the company be liable for any
consequential, indirect, incidental orspecial damages ofanynature arising from the sale
or use of this Product, whether in contract, tort, strict liability or otherwise. (For warranty
service, please call 1-800-433-4047, 8:00 a.m. - 5:00 p.m. EST, Monday through Friday).
Note: Should the Product be considered a consumer product it may be covered by the
Magnusson Moss Federal Warranty Act, please be advised that: (1) Some states do not
allow limitations orincidental consequential damages onhow long an implied warranty
lasts so that the above limitations may not fully apply: and (2) This warranty gives specic
legal rights and a User may have other rights which may vary from state to state.
Garantía limitada de por vida
El fabricante extiende una garantía limitada de por vida, mecánica y para el acabado, al “usuario”
original de este producto, contra defectos de fabricación en el material y en la mano de obra
mientras el usuario ocupe las instalaciones residenciales en las que se instaló originalmente el
producto. Cuando se devuelve un producto defectuoso al fabricante, este deberá reemplazar,
reparar o reembolsar el precio de compra a cambio del producto. Esta garantía no cubre
productos que hayan sufrido abuso o mal uso ni aquellos productos usados en aplicaciones
comerciales. No se otorgan otras garantías, expresas o implícitas, con respecto al producto,
incluida, entre otras, cualquier garantía implícita de comerciabilidad o idoneidad para cualquier
propósito determinado. El fabricante NO autoriza a ninguna persona para crear una obligación
o responsabilidad en conexión con el producto. La máxima responsabilidad del fabricante
según la presente se limita al precio de compra del producto y en ningún caso la empresa será
responsable de ningún daño resultante, indirecto, accidental o especial de ninguna naturaleza
causado por la venta o uso de este producto, ya sea contractual, extracontractual, en estricta
responsabilidad o de otra manera. (Para obtener el servicio de garantía, llame
al 1-800-433-4047, de lunes a viernes de 8:00 a.m. a 5:00 p.m., hora estándar del Este).
Nota: Si el producto se considera de consumo, es posible que esté cubierto por la ley
federal de garantías Magnuson-Moss, por lo que debe tener presente que: (1) Algunos
estados no permiten limitaciones ni daños resultantes accidentales en cuanto a la
duración de una garantía implícita, de modo que las limitaciones anteriores pueden
no aplicarse completamente; y (2) esta garantía otorga derechos legales especícos
y el usuario podría tener también otros derechos que varían según el estado.
Replacement Parts List & Troubleshooting
Lista de piezas de repuesto y solución de problemas
For replacement parts & troubleshooting, call customer service at
1-800-433-4047, 8:00 a.m. - 5:00 p.m., EST, Monday - Friday.
Para obtener piezas de repuesto e información sobre solución de
problemas, llame al Departamento de Servicio al Cliente al 1-800-433-4047,
de lunes a viernes de 8:00 a.m. a 5:00 p.m., hora estándar del Este.
CARE AND MAINTENANCE
THE FOLLOWING CARE INSTRUCTIONS
SHOULD BE FOLLOWED TO ENSURE A
LONG LASTING FINISH:
1. Remove locks, or do not install locks,
prior to painting your door.
2. Periodically clean with mild soap and
a soft cloth only. Do not use abrasives or
harsh chemicals and avoid sharp objects.
CUIDADO Y MANTENIMIENTO
SE DEBEN SEGUIR LAS SIGUIENTES
INSTRUCCIONES DE CUIDADO PARA
ASEGURAR UN ACABADO DURADERO:
1. Retire todas las cerraduras o no las instale
antes de pintar la puerta.
2. Limpie periódicamente solo con jabón y
un paño suave. No use agentes químicos
abrasivos y evite los objetos alados.
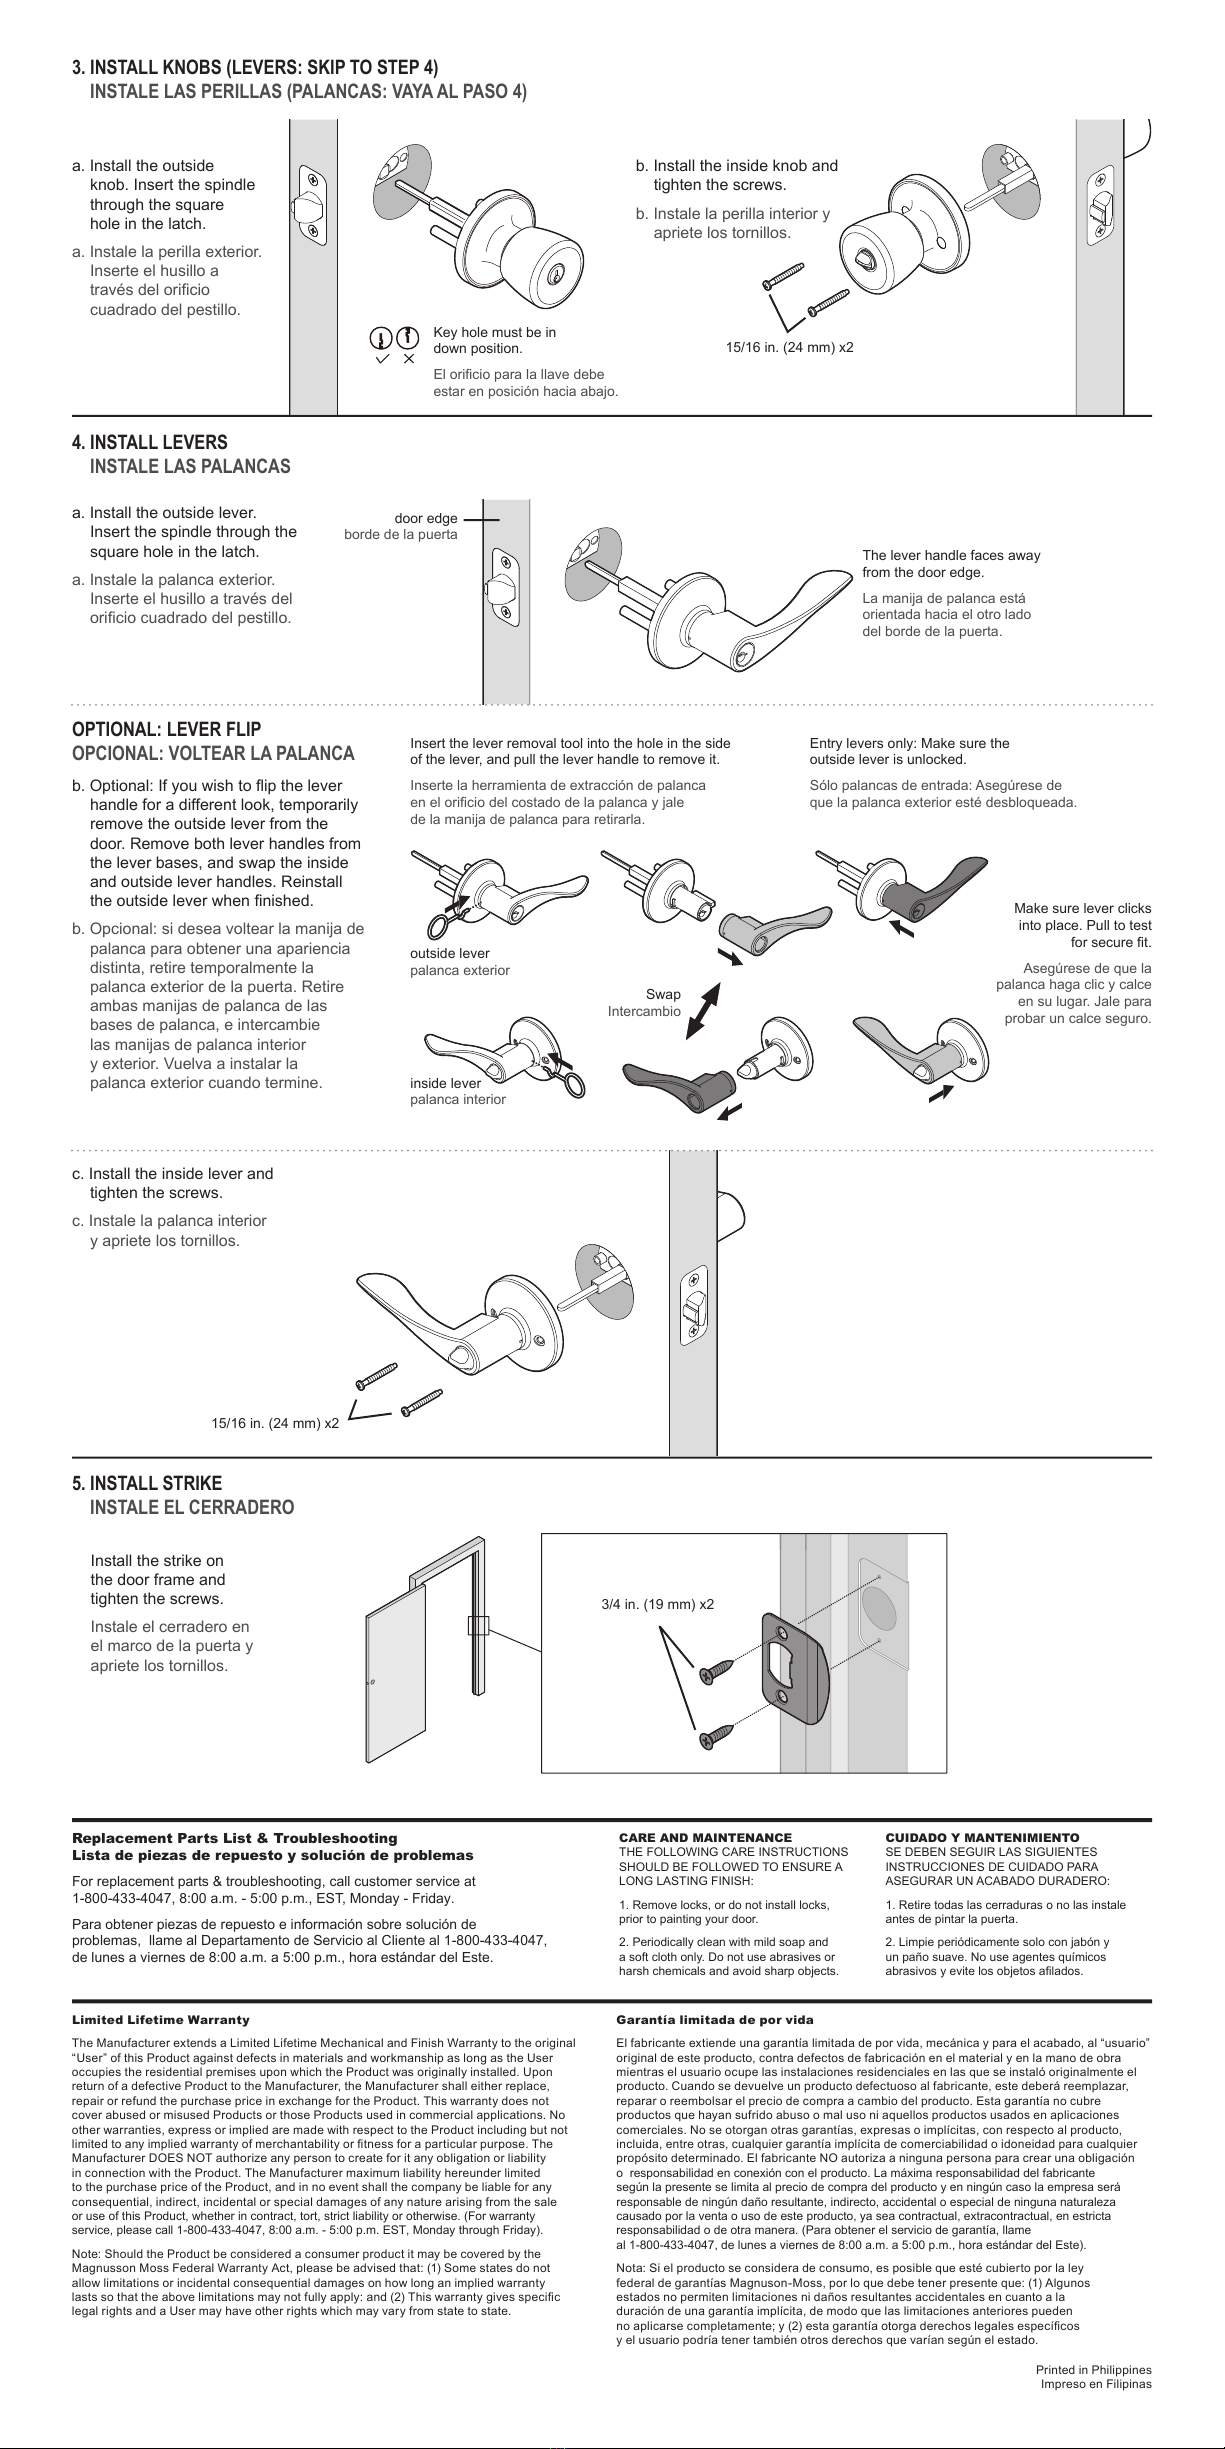
4. INSTALL LEVERS
INSTALE LAS PALANCAS
OPTIONAL: LEVER FLIP
OPCIONAL: VOLTEAR LA PALANCA
5. INSTALL STRIKE
INSTALE EL CERRADERO
a. Install the outside lever.
Insert the spindle through the
square hole in the latch.
a. Instale la palanca exterior.
Inserte el husillo a través del
oricio cuadrado del pestillo.
c. Install the inside lever and
tighten the screws.
c. Instale la palanca interior
y apriete los tornillos.
The lever handle faces away
from the door edge.
La manija de palanca está
orientada hacia el otro lado
del borde de la puerta.
Entry levers only: Make sure the
outside lever is unlocked.
Sólo palancas de entrada: Asegúrese de
que la palanca exterior esté desbloqueada.
Swap
Intercambio
Make sure lever clicks
into place. Pull to test
for secure t.
Asegúrese de que la
palanca haga clic y calce
en su lugar. Jale para
probar un calce seguro.
Insert the lever removal tool into the hole in the side
of the lever, and pull the lever handle to remove it.
Inserte la herramienta de extracción de palanca
en el oricio del costado de la palanca y jale
de la manija de palanca para retirarla.
outside lever
palanca exterior
inside lever
palanca interior
door edge
borde de la puerta
b. Optional: If you wish to ip the lever
handle for a different look, temporarily
remove the outside lever from the
door. Remove both lever handles from
the lever bases, and swap the inside
and outside lever handles. Reinstall
the outside lever when nished.
b. Opcional: si desea voltear la manija de
palanca para obtener una apariencia
distinta, retire temporalmente la
palanca exterior de la puerta. Retire
ambas manijas de palanca de las
bases de palanca, e intercambie
las manijas de palanca interior
y exterior. Vuelva a instalar la
palanca exterior cuando termine.
Install the strike on
the door frame and
tighten the screws.
Instale el cerradero en
el marco de la puerta y
apriete los tornillos.
15/16 in. (24 mm) x2
3/4 in. (19 mm) x2
3. INSTALL KNOBS (LEVERS: SKIP TO STEP 4)
INSTALE LAS PERILLAS (PALANCAS: VAYA AL PASO 4)
a. Install the outside
knob. Insert the spindle
through the square
hole in the latch.
a. Instale la perilla exterior.
Inserte el husillo a
través del oricio
cuadrado del pestillo.
Key hole must be in
down position.
El oricio para la llave debe
estar en posición hacia abajo.
b. Install the inside knob and
tighten the screws.
b. Instale la perilla interior y
apriete los tornillos.
15/16 in. (24 mm) x2
Printed in Philippines
Impreso en Filipinas
0222-TEL036801
This manual suits for next models
2
Table of contents
Other tell Lock manuals


