Telldus 14733 User manual
1. Within/inom/innen/
kuluessa/drinnen
15 sec
2. <CLICK, CLICK>
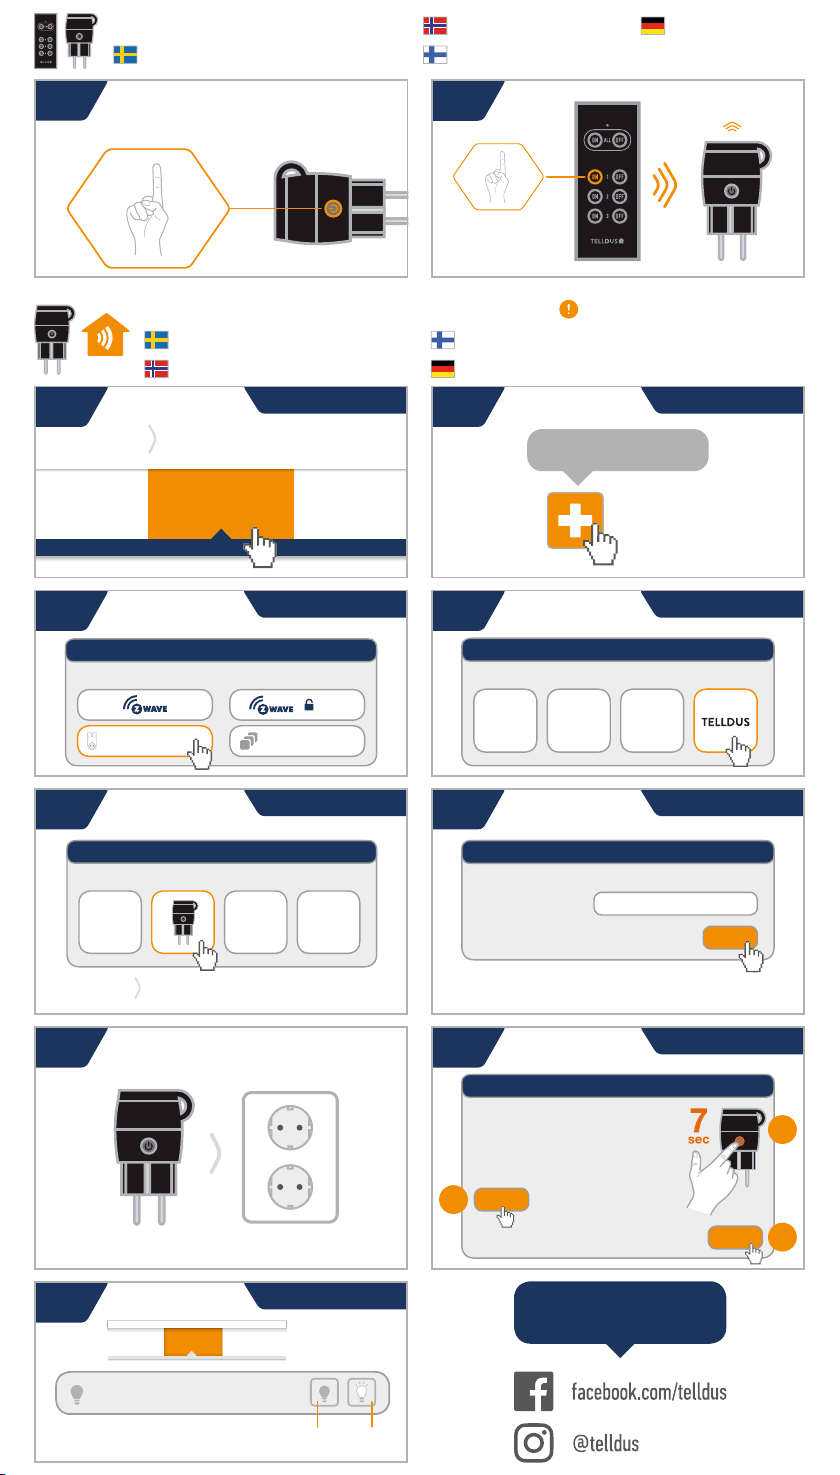
1. CONNECT TO A REMOTE CONTROL
KOPPLA IHOP MED EN FJÄRRKONTROLL
KOBLE TIL EN FJERNKONTROL EINE FERNBEDIENUNG
ANSCHLIESSEN
LIITÄ KAUKOSÄÄDIN
1.Press/tryck/trykk/
paina/drücken
7 sec 2.BLINK BLINK BLINK etc. (15s)
1.1 1.2
2. CONNECT OUTLET TO TELLDUS LIVE!
KOPPLA UTTAG TILL TELLDUS LIVE!
KOBLE MOTTAKERE TIL TELLDUS LIVE!
LIITTÄÄ VASTAANOTTIMEN TELLDUS LIVE!
EMPFÄNGER MIT TELLDUS LIVE! VERBINDEN
Control
Devices
live.telldus.com
live.telldus.com live.telldus.com
2.1 2.2
Add a new device
Requires a TellStick and a Telldus Live! account
live.telldus.com live.telldus.com
2.3 2.4
Select your device type:
Add new device wizard
Secure
Group433,92 MHz receivers
Select your device brand:
Add new device wizard
live.telldus.com live.telldus.com
2.5 2.6
Select your device model:
Add new device wizard
Self Learning On/O Outdoor
* Any name may be used/Valfritt namn/Valgfritt namn/
Nimi on vapaa valinta/Jeder Name kann verwendet werden
Enter name:
Add new device wizard
Name: Garden Lights
Next
230V~ 50Hz
2.7 live.telldus.com
2.8
Add new device wizard
1. Install the outlet as explained under “Installation” in the manual.
2. Keep the outlet programming button pressed for 7 seconds. The LED
blinks slowly.
3. Press the learn button below within 15 seconds to link the outlet.
(The programming mode is automatically disabled if no pairing signal is
received.)
4. Theconnectedlampblinksthreetimesasconrmation.
If the paring fails, repeat steps 2-4 again. The distance to the receiver may
have to be shorter when pairing than during ordinary use. Done
Learn
2
3
1
Control
Devices
Manage
Scheduler
Trigger
Events
Setup
Locations
o on
Garden Lights
live.telldus.com
2.9
Manual version 1.0
FOLLOW US ON SOCIAL MEDIA FOR
EVENTS, OFFERS AND INSPIRATION!
Size (WxH): 148x260 mm

www.telldus.com
Remote controlled outlet & remote control*
• Easy installation.
• Remote control* has 3 channels and 1 group function.
• The outlet has 5 memory settings.
• The remote control* operates at a distance up to 30 meters (free line of sight).
• Blue LED indicates ON/OFF and programming status.
• The outlet is TellStick compatible.
Installation
1. Remove the small plastic tab from the battery in the remote control*.
2. Connect the outlet to mains power.
3. Connect a lamp to the outlet. If there is a power switch on the connecting cable make sure
it is switched on.
Pair a remote control* to an outlet
1. Keep the button on the outlet pressed for 7 seconds. The LED blinks slowly indicating
learning mode.
2. Press ON button (1, 2, or 3) on the remote control* within 15 seconds to link the remote
control* to the outlet (the learning mode is automatically disabled if no button is pressed
within 15 seconds).
3. The connected lamp blinks three times as conrmation.
Unpair a single remote control* from an outlet:
1. Keep the button on the outlet pressed for 7 seconds. The LED blinks slowly.
2. Press the corresponding OFF button on the remote control* to remove the learned code (the
learning mode is automatically disabled aer 15 seconds if no button is pressed).
3. The connected lamp blinks three times as conrmation.
Unpair all remote controls from an outlet:
1. Keep the button on the outlet pressed for 7 seconds. The LED blinks slowly.
2. Within 7 seconds, press the button briey once more (the learning mode is automatically
disabled aer 15 seconds if no button is pressed).
3. The connected lamp blinks three times as conrmation.
ON/OFF operation of a paired outlet
1. Press the ON button on the remote control* to switch on the power.
2. Press the OFF button to switch o the power.
3. Press the GROUP buttons to simultaneously switch all paired outlets ON or OFF.
4. ON/OFF switching is also possible by briey pressing the button on the outlet.
Ferngesteuerte Steckdosen & Fernbedienung*
• Einfache Installation.
• Fernbedienung* hat 3 Kanäle und 1 Gruppenfunktion.
• Jede Steckdose besitzt 5 Erinnerungs-Einstellungen.
• Die Fernbedienung* kann aus bis zu 30 Meter Entfernung bedient werden (bei freier
Sichtlinie).
• Blaue LED zeigt AN/AUS und Programmierstatus.
• Die Steckdosen sind TellStick kompatibel.
Installation
1. Entfernen Sie die kleine Plastikschlaufe von der Batterie in der Fernbedienung*.
2. Verbinden Sie die Steckdose mit einer Stromversorgung.
3. Verbinden Sie eine Lampe mit der Steckdose. Wenn das dazugehörige Kabel einen Schalter
besitzt, dann schalten Sie diesen auf Ein.
Verbinden Sie eine Fernbedienung* mit einer Steckdose
1. Halten Sie den Knopf auf der Steckdose für 7 Sekunden gedrückt. Die LED blinkt langsam,
was den Lernmodus zeigt.
2. Drücken Sie den AN Knopf (1, 2 oder 3) auf der Fernbedienung* innerhalb von 15 Sekunden,
um die Fernbedienung* mit der Steckdose zu verbinden (der Lernmodus wird automatisch
abgeschaltet, wenn innerhalb von 15 Sekunden kein Knopf gedrückt wird).
3. Die verbundene Lampe blinkt zur Bestätigung drei mal auf.
Verbindung einer einzelnen Fernbedienung* von einer
Steckdose entfernen
1. Drücken Sie den Knopf auf der Steckdose für 7 Sekunden. Die LED blinkt langsam.
Fjärrstyrtuttag&ärrkontroll*
• Enkel installation.
• Fjärrkontrollen* har 3 kanaler och 1 gruppfunktion.
• Uttaget har 5 minnesplatser.
• Fjärrkontrollens* räckvidd är upp till 30 meter (fri sikt).
• Blå lysdiod indikerar på/av och inlärningsstatus.
• Uttaget är TellStick-kompatibelt.
Installation
1. Ta bort den lilla plastiken från batteriet i ärrkontrollen*.
2. Anslut uttaget till ett eluttag.
3. Anslut en lampa till uttaget. Om det nns en strömbrytare på lampans kabel, kontrollera
att den är påslagen.
Läruppettuttagmedenärrkontroll*
1. Håll knappen på uttaget intryckt i 7 sekunder. Lysdioden blinkar långsamt indikerande
inlärningsläge.
2. Tryck på ON-knappen (1, 2 eller 3) på ärrkontrollen* inom 15 sekunder för att koppla
ärrkontrollen* till uttaget. (Inlärningsläget avaktiveras automatiskt om ingen knapp trycks
in inom 15 sekunder.)
3. Den anslutna lampan blinkar tre gånger som bekräelse.
Taborteninlärdärrkontroll*frånettuttag:
1. Håll knappen på uttaget intryckt i 7 sekunder. Lysdioden blinkar långsamt.
2. Tryck på kopplad OFF-knapp på ärrkontrollen* för att ta bort den lärda koden. (Inlärnings-
läget avaktiveras automatiskt eer 15 sekunder om ingen knapp trycks in.)
3. Den anslutna lampan blinkar tre gånger som bekräelse.
Tabortallainlärdaärrkontrollerfrånettuttag:
1. Håll knappen på uttaget intryckt i 7 sekunder. Lysdioden blinkar långsamt.
2. Inom 7 sekunder, tryck kort på knappen en gång till. (Inlärningsläget avaktiveras automatiskt
eer 15 sekunder om ingen knapp trycks in.)
3. Den anslutna lampan blinkar tre gånger som bekräelse.
På/av-styrningavettupplärtuttag
1. Tryck på ON-knappen på ärrkontrollen* för att slå på strömmen.
2. Tryck på OFF-knappen för att stänga av strömmen.
3. Tryck på GROUP-knapparna för att samtidigt styra alla parade uttag på eller av.
4. På/av-styrning är också möjlig genom att kort trycka på knappen på uttaget.
Specications/Specikationer/Beschreibung
Remote control / ärrkontroll / Fernbedienung*:
Item number / Artikelnummer / Produktnummer: ........................................................................ 14733
Battery / Batteri / Batterie: ..............................................3V CR2032 (included / inkluderat / beinhaltet)
Outlets / Uttag / Steckdosen:
Item number/Artikelnummer / Produktnummer: .......................................................................... 14732
Max Load / Max belastning / Lade: ................max 3680 W (resistive load / resistiv last / ohmsche Last)
Range / Räckvidd / Aktionsradius: ...........Up to / Upp till / Bis zu 30 m (free line of sight / fri sikt / freie
Sichtlinie)
Protection rating / Kapsling / Schutzart: ........................................................................................... IP44
Protection class / Skyddsklass / Schutzklasse: ...................................................................................... I
Frequency / Frekvens / Frequenz:..........................................................................................433,92 MHz
Power supply / Strömförsörjning / Stromversorgung: .........................................................230 V~, 50 Hz
Standby power / Standby-förbrukning / Ruheleistung: .................................................................... <1 W
Ambient temperature / Användningstemperatur / Umgebungstemperatur: ...............................0°C–35°C
* Remote Control only included in selected packages / Fjärrkontroll ingår endast i utvalda paket /
Fernbedienung nur in bestimmten Paketen enthalten
WARNING!
DO NOT OVERLOAD THE OUTLETS! Please note that you should always allow for a safety
margin, especially if the load is not resistive. Powerless only when disconnected from wall
socket. Do not stack. Splash protected. Outlet category: Class 3
VARNING!
ÖVERBELASTA INTE UTTAGEN! Tänk på att alltid ha en säkerhets marginal, speciellt om last-
en inte är resistiv. Spänningslöst endast när uttaget är bortkopplat från vägguttag. Koppla
ej in era uttag eer varandra. Stänkskyddad. Uttagskategori: Klass 3
WARNUNG!
ÜBERLADEN SIE DIE STECKDOSEN NICHT! Bitte beachten Sie, das es immer einen Sicher-
heitsspielraum geben sollte, vor allem, wenn die Ladung nicht ohmsch ist. Spannungsfrei
nur mit abgezogenem Stecker. Nicht hintereinander stecken. Spritzwassergeschützt.
Empfangerkategorie: Klasse 3
USER MANUAL FOR REMOTE CONTROLLED
OUTDOOR OUTLET AND REMOTE CONTROL*
BEDIENUNGSANLEITUNG FÜR FERNGESTEUERTE AUßNSTECKDOSE UND FERNBEDIENUNG*
ANVÄNDARMANUAL FÖR FJÄRRSTYRT
UTOMHUSUTTAG OCH FJÄRRKONTROLL*
Telldus Technologies AB, Kabelvägen 7, 311 50 Falkenberg, Sweden
www.telldus.com • support.telldus.com
Within the European Union, this symbol indicates that the products must not be disposed in the household waste.
Devices contain valuable recyclable materials that should be recycled for reuse and uncontrolled waste disposal may
cause harm to the environment and human health. Please dispose the old products via suitable collection systems or
send the unit to the oce where you bought it. This will make the product recycling.
Correct disposal of the products
2. Drücken Sie den dazugehörigen AUS Knopf auf der Fernbedienung*, um den gelernten Kode
zu entfernen (der Lernmodus wird nach 15 Sekunden automatisch deaktiviert, wenn kein
Knopf gedrückt wird).
3. Die verbundene Lampe blinkt als Bestätigung drei mal.
Verbindungen aller Fernbedienungen von Steckdose
trennen
1. Halten Sie den Knopf auf der Steckdose für 7 Sekunden gedrückt. Die LED blinkt langsam.
2. Drücken Sie den Knopf innerhalb von 7 Sekunden noch einmal kurz (der Lernmodus wird
automatisch nach 15 Sekunden abgeschaltet, wenn kein Knopf gedrückt wird.
3. Die verbunden Lampe blinkt als Bestätigung drei mal.
AN/AUSBetriebeinerverbundenenSteckdose
1. Drücken Sie den AN Knopf an der Fernbedienung*, um sie einzuschalten.
2. Drücken Sie den AUS Knopf, um sie auszuschalten.
3. Drücken Sie den GRUPPE Knopf, um alle Steckdosen gleichzeitig AN oder AUS zu schalten.
4. AN/AUS schalten ist auch durch das kurze drücken des Knopfes an der Steckdose selbst
möglich.
Innerhalb der EU weist dieses Symbol darauf hin, dass dieses Produkt nicht über den Hausmüll entsorgt
werden darf. Altgeräte enthalten wertvolle recyclingfähige Materialen, die einer Wiederverwertung zuge-
führt werden sollten und um der Umwelt bzw. der menschlichen Gesundheit nicht durch unkontrollierte
Müllbeseitigung zu schaden. Bitte entsorgen Sie Altgeräte deshalb über geeignete Sammelsysteme oder
senden Sie das Gerät zur Entsorgung an die Stelle, bei der Sie es gekau haben. Diese wird dann das
Gerät der stoichen Verwertung zuführen.
Korrekte Entsorgung dieses Produkts
Other Telldus Accessories manuals


