TELNET Yealink T46S User manual

TelNet Worldwide, Inc. • telnetww.com
Yealink T46S
IP Phone Reference Guide
Yealink_T46S_190524_RG Page 1TelNet Worldwide, Inc. • telnetww.com • 1-833-4TELNET
Table of Contents
Dialing...............................................................................................2
Dial phone number or extension...........................................2
Phone Guide...................................................................................2
Yealink T46S Phone..................................................................2
Your Phone Calling Features......................................................2
Basics............................................................................................2
Change Views ........................................................................2
End Calls ..................................................................................2
Hold Calls.................................................................................2
Transfer Calls ..........................................................................2
Transfer Call Direct to Voicemail........................................2
Conference Calls ................................................................... 3
Forward Calls.......................................................................... 3
Intercom ................................................................................... 3
Do Not Disturb........................................................................ 3
Menu ......................................................................................... 3
Redial ........................................................................................ 3
Park and Unpark Calls (If Enabled).................................... 3
Broadcast Paging and Intercom Features........................... 4
Broadcast Paging................................................................... 4
Intercom ................................................................................... 4
Viewing Recent Calls................................................................ 4
View Recent Calls List .......................................................... 4
Directory ...................................................................................... 4
View Organization Directory............................................... 4
Busy Lamp Field (BLF) .............................................................. 4
View Phone Status ................................................................ 4
Speed Dial ............................................................................... 4
Intercept Call Ringing to BLF.............................................. 4
Transfer Call to BLF ............................................................... 4
Speed Dial Keys ..................................................................... 4
ACD Call Queues (If Enabled) ...............................................5
Log In to a Call Queue..........................................................5
Log Out of a Call Queue ......................................................5
Change Your Agent State to Unavailable
While Logged In ....................................................................5
After Ending a Call.................................................................5
Additional Phone Features .....................................................5
Muting the Microphone........................................................5
Change Volume .....................................................................5
Change Ringtone...................................................................5
Access Voice Messages ......................................................5
Line Appearances..................................................................5
Quick Dial Calling Features ........................................................6
Call Forwarding .....................................................................6
Activate Call Forwarding......................................................6
Deactivate Call Forwarding.................................................6
Call Waiting .................................................................................6
Activate Call Waiting for All Calls.......................................6
Deactivate Call Waiting for All Calls.................................. 6
Cancel Call Waiting for a Single Call ................................6
Speed Dial 8 (1-digit codes) ....................................................6
Set Up/Update Speed Dial 8 (1-Digit Codes)..................6
Place Call Using Speed Dial 8............................................6
Speed Dial 100 (If Enabled).....................................................6
Set Up/Update Speed Dial 100 (2-Digit Codes).............6
Place Call Using Speed Dial 100 .......................................6
Accessing Voicemail and Your Voice Portal ......................... 7
Initial Voicemail Set Up ............................................................ 7
Access Voicemail and Voice Portal....................................... 7
From Your Own Phone ......................................................... 7
From Another Phone Within Your Group......................... 7
From a Phone Outside of Your Group..............................8
Voice Messaging Main Menu .................................................8
Voice Portal Main Menu...........................................................8
Reference Guide
Yealink_T46S_190524_RG Page 2TelNet Worldwide, Inc. • telnetww.com • 1-833-4TELNET
TelNet Worldwide, Inc. • telnetww.com
Yealink T46S
IP Phone
Dialing
Dial phone number or extension
Lift your handset and dial the phone number, (OR, with
handset on-hook, dial number and press Send, or press
Speakerphone button ). For:
• Local call – dial the 7-digit local number
• Long distance – dial the 10-digit phone number (area
code + local number)
• International – dial 011 + country code + city code +
number
• Internal extension – dial the extension
Phone Guide
Yealink T46S Phone
NOTE: Be sure to use a surge protector with your phone.
Your Phone Calling Features
Basics
Change Views
• To answer a ringing call, pick up the handset or press
the Answer softkey to put call on speakerphone.
• To answer a second call while on an active call,
simply press the blinking line key. The rst call
will automatically be placed on hold. Toggle back
and forth between multiple calls by pressing the
corresponding line key.
End Calls
• Press to end an active call, replace the handset, or
press . Or, press More > End Call.
• For multiple calls, press More > End Call to hang up
active call and then press corresponding line key to
resume held call.
Hold Calls
• While on an active call, press the Hold key and the call
will be held. Press the Hold key again to resume the
call.
• Or press More > Hold to place caller on hold while on
an active call. Press Resume to resume the held call.
NOTE: You can also press the blinking line key to resume
the call.
Transfer Calls
Attended Transfer
1. Press Transfer or , then dial the other party and
press Send. Active call is held.
2. When you hear the ring back sound, or after
you talk with the other party, press Transfer or
again.
Blind Transfer
1. Press Transfer or , dial the other party and then
press B Transfer.
Transfer Call Direct to Voicemail
1. During an active call, press VM Transfer line key.
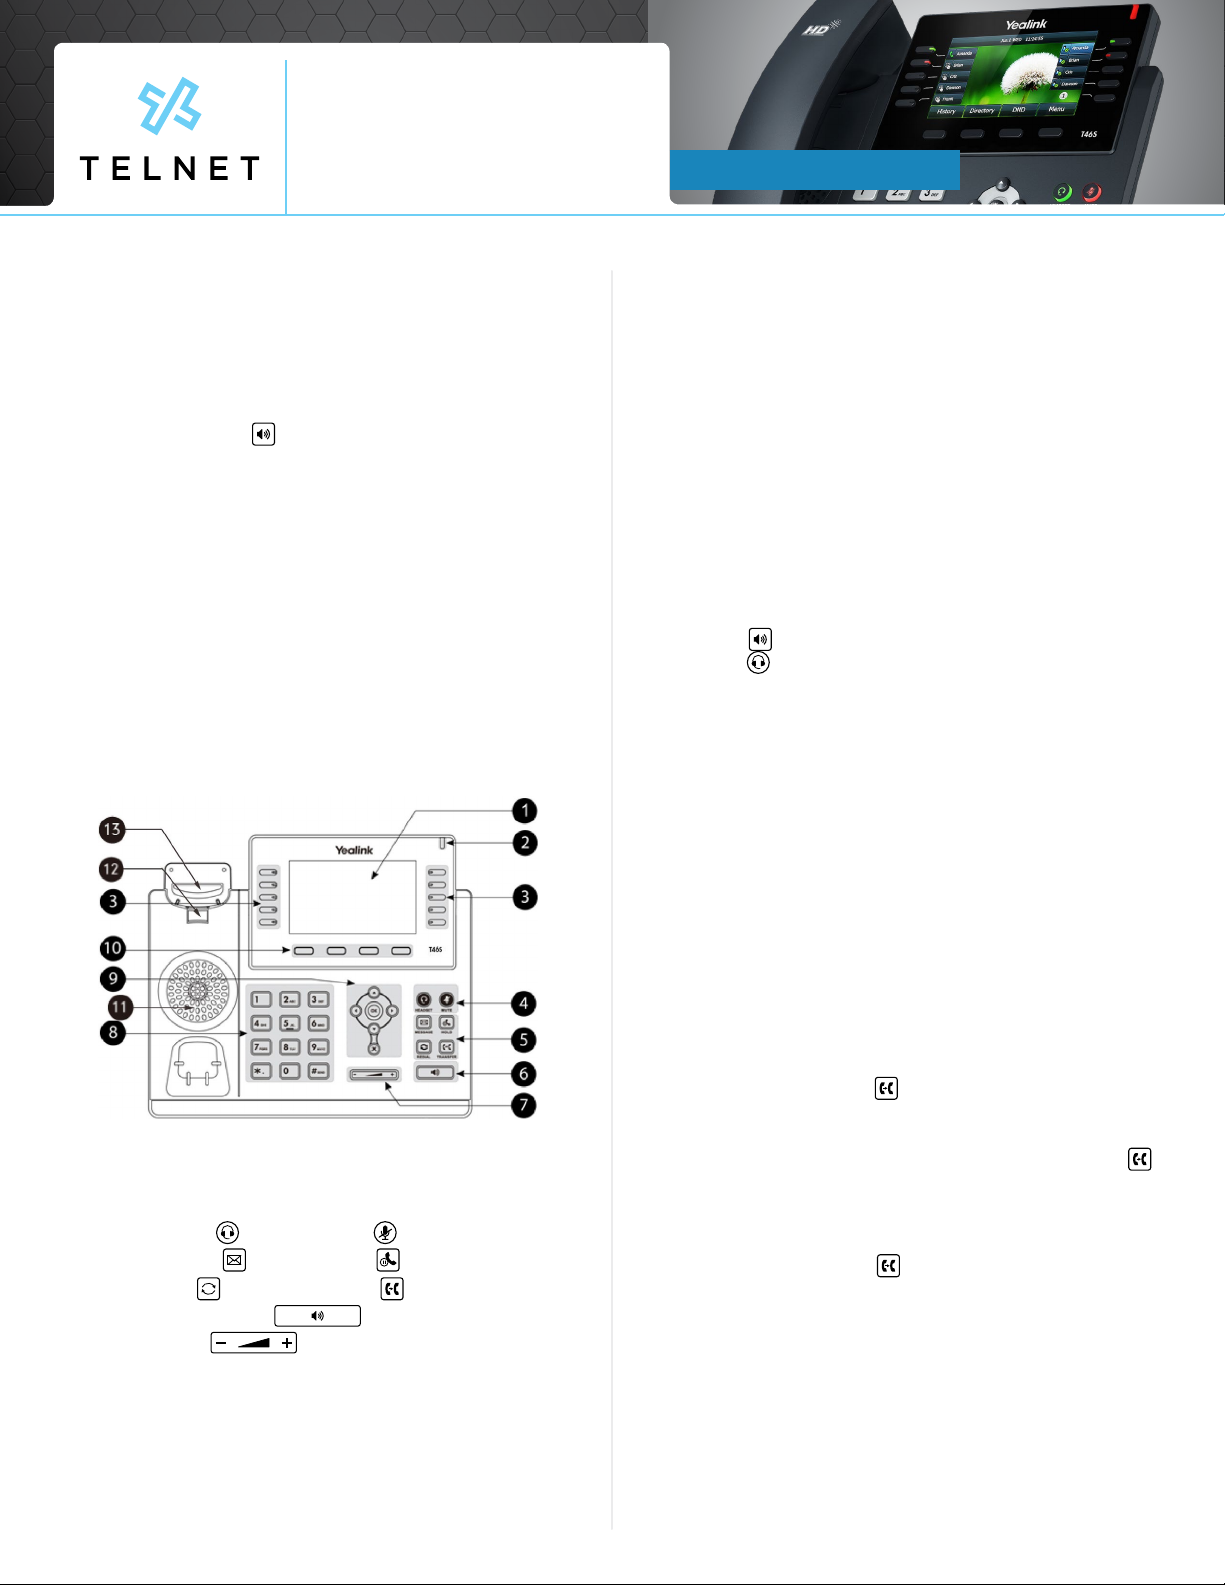
1. Phone screen
2. Power LED Indicator
3. Line Keys
4. Headset Key and Mute Key
5. Message Key and Hold Key
5. Redial Key and Transfer Key
6. Speakerphone Key
7. Volume Key
8. Keypad Keys
9. Navigation, OK and Cancel Keys
10. Soft Keys
11. Speaker
12. Reversible Tab
13. Hookswitch

Reference Guide
Yealink_T46S_190524_RG Page 3TelNet Worldwide, Inc. • telnetww.com • 1-833-4TELNET
TelNet Worldwide, Inc. • telnetww.com
Yealink T46S
IP Phone
2. Enter the extension number and press OK.
Conference Calls
Conduct Conference Calls
1. Make call to or receive call from other party.
2. Press Conference softkey.
3. Dial the third party and press Send (or #).
4. Wait for third party to answer then press
Conference.
5. Press Split to remove a party from the conference.
Forward Calls
NOTE: Please see Quick Dial section of this guide for
additional Call Forwarding options and methods.
To enable call forwarding always (rst time setup)
1. Press Forward, then press Switch to enable
forwarding.
2. Press the down navigation arrow to select the
Forward to option.
3. Enter forwarding number or extension.
4. Press Save.
Note: the next time you press forward it will
automatically forward to the last number specied.
To modify an existing forwarding number, press Menu,
navigate to Features, OK > Call Control > Call Forward
> Always Forward. Press down arrow to select the
forwarded number. Modify number as required and
then press Save. Lift handset to clear screen.
Disable Call Forwarding Always
1. Press Forward.
Call Forwarding No Answer
1. Press Menu, navigate to Features, OK > Call
Control > Call Forward > select No Answer
Forward.
2. Select options to enable, enter number and specify
number of rings.
Call Forwarding Busy
1. Press Menu, navigate to Features, OK > Call
Control > Call Forward > select Busy Forward.
2. Select options for enabled, navigate down and
enter the forward to number.
Intercom
• To connect directly to the speakerphone of a
co-worker, press Intercom, dial the extension followed
by # (or press Send).
NOTE: If you are receiving an intercom call, the phone
beeps, then the caller automatically connects to your
speakerphone.
Do Not Disturb
• To disable ringing, press DND. The LCD display will
show a DND icon and any incoming calls will be
directed to voicemail.
• Press DND again to re-enable ringing.
Menu
• The Menu softkey provides access to multiple options.
Use the navigation keys to highlight desired option
and the press Enter softkey or OK.
Redial
• To redial the last call placed, press Redial > Send.
Note that you can also use the down navigation key to
select a number from a list to redial.
Park and Unpark Calls (If Enabled)
Parking is a way to place a call on public hold so that
others can unpark and answer the call from any phone.
Park an Active Call
1. Press GPark
2. Listen to the message which identies the
extension the call is parked to.
3. Notify the intended recipient(s) that a call is parked
at specied extension. This can be done via
intercom or broadcast paging.
Note: If congured, simply press an available park line
key (near upper right of phone) to park an active call.
Unpark a Call
1. Recipient presses corresponding blinking Unpark
line key and parked call is retrieved.

Reference Guide
Yealink_T46S_190524_RG Page 4TelNet Worldwide, Inc. • telnetww.com • 1-833-4TELNET
TelNet Worldwide, Inc. • telnetww.com
Yealink T46S
IP Phone
Broadcast Paging and Intercom Features
Broadcast Paging
• To page all phones on your local network (LAN), press
the Paging line key and begin talking. All phones
that are not on active calls will be alerted of the page
with an audible beep and then receive the page via
speakerphone.
Intercom
• To connect directly to the speakerphone of one
co-worker, press Intercom, dial the extension followed
by # (or press Send).
NOTE: If you are receiving an intercom call, the phone
beeps, then the caller automatically connects to your
speakerphone.
Viewing Recent Calls
View Recent Calls List
1. Press the down navigation arrow.
2. Scroll down/up to view all calls.
3. Then press right arrow for multiple options to view
respective missed, placed and received call lists.
4. Press Send to dial the highlighted call.
Directory
View Organization Directory
1. Press the up navigation arrow (All Contacts option
will be highlighted).
2. Press OK navigation button or Enter to view contacts.
3. Scroll down/up to view contact list and highlight
desired contact.
4. Press Send > Send to dial the contact.
Busy Lamp Field (BLF)
Monitored Lines (BLF Keys) are part of an optional add-on,
and are managed by your phone system administrator. Up to
18 BLFs can be congured on phone display (pages 2 & 3).
View Phone Status
1. Press the 10th line key near lower right of graphical
display.
2. This will show up to two pages of other users/
phones.
3. Green indicates other person’s phone is idle. Red
indicates other person is on a call.
Speed Dial
1. Simply press the BLF to place a call to that phone.
Intercept Call Ringing to BLF
1. While BLF is blinking on an incoming call, simply
press BLF key to intercept or pickup that call.
Transfer Call to BLF
1. While on an active call, press Transfer.
2. Press 10th line key to search for BLF.
3. Press desired BLF and call will be transferred.
Speed Dial Keys
Any unused line keys can be setup as speed dials.
Create Speed Dial (or Remove)
1. Press the 10th line key near lower right of graphical
display and then locate an unused line key.
2. Press and hold the unused line key.
3. Change the Type to Speed Dial by pressing the
right navigation arrow.
4. Select the Value eld, enter desired phone number
and then press Save.
5. The newly created speed dial will display the
number. Add a Label to display a name instead of
number.
6. Change Type to N/A to remove the speed dial.
Use Speed Dial Key
1. Locate desired speed dial key and press it. This
will place an outbound call to the specied number.
Reference Guide
Yealink_T46S_190524_RG Page 5TelNet Worldwide, Inc. • telnetww.com • 1-833-4TELNET
TelNet Worldwide, Inc. • telnetww.com
Yealink T46S
IP Phone
Line Appearances
• Line Appearance Keys (3 standard) can independently
handle live calls. With this optional add-on, additional
appearance keys can be congured or shared lines
from other phones added. These are managed by
your phone system administrator.
ACD Call Queues (If Enabled)
Log In to a Call Queue
1. Press the Login softkey. When you are signed into
a call queue and state is set to available, a green
checkmark will be displayed next to your line.
Incoming calls to ACD will ring agent’s phone.
Log Out of a Call Queue
1. Press the Logout softkey. After logging out, a blue
arrow will be displayed next to your line.
Change Your Agent State to Unavailable While Logged In
1. Press the Unavail softkey and enter the unavailable
code.
2. Press the OK button.
3. A red X will appear next to your lines and an
Unavailable status will display on phone screen.
4. ACD calls will not ring to your phone when state is
set to unavailable or wrap-up.
After Ending a Call
1. Your availability state will automatically change to
wrap-up (congurable by supervisor).
2. Press DispCode softkey to enter a disposition code
followed by OK (see supervisor for details).
Note: Unavailable codes and Disposition codes require
a one-time setup.
Additional Phone Features
Muting the Microphone
• During a call, press to mute your audio.
• To disable Mute, press again.
Change Volume
• To change call volume, press during a call.
• To change the ringer volume, press when
the phone is idle or ringing.
Change Ringtone
Change the Incoming Call Ringtone
1. Press Menu softkey.
2. Navigate to Basic.
3. Navigate to Sound.
4. Select Ring Tones.
5. Select Common and press OK.
6. Highlighted ringtone will automatically play.
7. Navigate up/down to select the desired ringtone.
8. Press OK.
Access Voice Messages
1. Press the voicemail button followed by Connect.
2. Follow prompts to play messages, record greetings,
etc. (See Voice Messaging section for more options).
VoIP 911 Alert
Important Note About 911:
Emergency 911 service on this device may be limited or
unavailable and DOES NOT function during a power
or broadband outage.
Because VOIP (Voice over Internet Protocol)
service works differently than traditional phone service,
VOIP E911 service may also work differently. To
understand limitations and to be prepared should you
need to make a 911 call from your IP phone, please
read the TelNet E911 Emergency Service Advisory
Notication at:
Click to visit www.telnetww.com/911info/
www.telnetww.com/TelNet911Advisory.pdf
Table of contents
Other TELNET IP Phone manuals


