Tense MDK-03 User manual

General:
Usage and Operating Principle of the Device:
It has been designed for controlling submersible pump motors and protecting them against adverse situations that can be arising from dry operation, high
or low voltage and high or low current.
www.tense.com.tr [email protected]
Contacts:
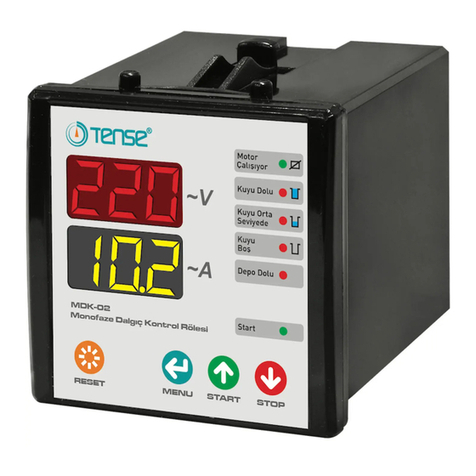
Stop/Down Button: Sets the device to the start position. It is used as the
down scroll button.
Start/Up Button: Sets the device to the start position. It is used as the up scroll button in the menu.
Menu Button: It provides to enter to the menu, to browse the menu, to save the value changes and to exit from the menu.
Reset Button: It provides to reset the submersible pump manually after high or low current error and to exit from the menu.
Warnings:
When two electrodes are in use, the upper and lower electrodes are shorted
out and used together with the base electrode.
Connect the motor casing to the ground line. Otherwise, the device may
break down
Never energize the floater (Tank) terminals.
Make sure that the temperature is above 0°C in the place where the
device is mounted.
Make sure that the liquid is not flammable or explosive.
The device is connected in accordance with the connection diagram.
Be sure to read the warning section before connecting the device. Connect the device according to the connection diagram. After you have connected the
device, power it up. Set the switch to "1" to switch on the appliance. Compare whether the factory values on the device's menu match the operating values of
your motor. If not, respectively;
If you want to automatically reset after high voltage (P1), high current (thermal) (P2), low voltage (P3), low current (P4), current error waiting time (P5),
current error automatic reset time (P6) demurrage multiplier (P7), demurrage time (P8), the current auto reset number (P9),
and the top electrode standby time (P10)
After the device is energized, it will wait 4 seconds for the first power-on time. The system then examines whether there is water in the well, whether the tank
to be filled with water is empty or not, according to the voltage values set from the menu. If the water level is above or in the middle of the water level, if the
voltage value is within the normal values, the tank is empty and the device is in the start position, the motor starts to run and the engine is running. The engine
starts up and the inrush current appears for the first few seconds. The motor then falls to its normal operating current. Voltage in the red display group and
current values in the yellow display group appear on the display.
Start position: When the unit is in the start position, start led is on. Press the start key to get to the start position.
Stop position: When the unit is in the stop position, stop led is on. Press the stop key to stop. The device does not operate under any conditions while in
stop mode.
As the Well is being Drained: When the water in the well comes into contact with the upper electrode, the well is full (Upper Elc.) And the engine starts.
When the water drops below the top electrode, the well is burned in the middle level (Lower Elc.). The engine starts. When the water drops below the bottom
electrode, the well is empty (Bottom Elc.) And the engine is stopped.
As the Well is being Filled: If the water in the well is below the lower-eletrode, the well is empty (Bottom Elc) and the engine does not start. When the water
comes into contact with the bottom electrode, the well is on the middle level (Lower El.) And the engine does not start. When the water comes into contact with
the upper electrode, the device waits for the upper electrode waiting time while the well is full (Upper Elc) flashes. After the time has elapsed, the well (Upper Elc)
is constantly lit and the engine is started.
Tank: Make the connection of the short-circuited when the tank is empty. Never apply energy to the appliance floater inlet. If you are not going to use the
device's tank feature, short-circuit the floater inlet
Tank is Empty: When the floater inlet is short-circuit, the tank is detected as empty and tank full led is off.
Tank is Full: When the floater inlet is open-circuit, the tank is detected as full and tank full led is on. Under no circumstances will the engine start when the
tank is full.
If the motor is not running: If the "MOTOR ON" led is not lit, Check that the device is in the start position. Check that the tank is empty. Check the tank
LED is not lit. See that the "full" LED is on continuously. Iif flashing the "full" led the device is counting the top electrode waiting time. Also, the voltage values
may be outside the set values, or high or low current may have entered the fault.
Cut the energy of the device and disconnect its connections. Clean
the device casing with a slightly damp cloth. Do not use conducting or
other substances as cleaning agents that can harm to the device.
After the cleaning of the device is completed, make the connections of
it and be sure that it operates by energizing it.
Maintenance of the Device:
MONO-PHASE RELAY FOR CONTROLLING PUMP MOTOR MDK-03 ENG
<50KΩ
1A - 30A
150V-270V AC
50 Hz.
<6VA
-20°C.....+55°C
2 x 3 digit display, 7x LEDs
30A / 250V AC (Resistive Load)
0,250Kg.
<2000meter
IP20
10mm², 2,5mm²(Supply and float input)
Operating Voltage(Un) :.:
Operating Frequency ....:
Measurement Range ....:
Operating Power ...........:
Operating Temperature .:
Connection Type ..........:
Display.........................:
Contact........................:
Sensitivity.....................:
Weight ...........................:
Mounting.......................:
Operating Altitude .........:
Protection Class............:
Cable Diameter ............:
Tecnical Specifications:
Mounted vertically in the panel or on the terminal rail
Terminal Connection
MADE IN TURKEY
Dimension
10,16mm
59,85mm
114,5mm
119,9mm
70mm
70,65mm
93,5mm
6,35mm
Connection Diagram
~V
~A
(ON/OFF)
0-1
SWITCH
FLOAT
2A
MDK-03
TANK
N
L
Phase
IN NPhase
OUT
Upper Lower Bottom
~V
~A
MOTOR
M
~
Well
Upper Electrode
Lower Electrode
MDK-03
Bottom Electrode
Document Number: DK-069-1

Parameter 1 : By pressing Up and Down buttons, you can enter the High Voltage Value. This adjusts the high
operating voltage of the motor. Slide the menu forward by pressing menu button.
Value Range..: 230V - 270V Default Value: 245V
The red display group shows the voltage value. If low or high voltage error occurs, this display group blinks.
Press menu button in order to enter menu. Firstly, (P1) will be displayed on the screen. On the menu, the red display group shows the parameter
value and the yellow display group shows the adjusted value. On the menu, you can change the value by pressing on the up and down keys. Then,
by pressing the menu button you can slide the menu forward and save the previous value if you have changed it. By pressing the reset button when
you are on any parameter, you can exit from the menu. When you press the reset button, the parameter on the screen is not saved but the
adjustments on the previous parameters are saved. As (P12) parameter is being displayed on the screen, you can also press the menu button in order
to exit from the menu. If you do not press any button when you are on the menu for about 50 seconds, the device automatically exits from the menu
and the adjustment made on the parameter displayed on the screen is not.
Menu Usage:
The yellow display group shows the current value. If low or high current error occurs, this display group blinks.
Parameter 2 : By pressing Up and Down buttons, you can enter the High Current Value. This adjusts the high
operating current (Thermic) of the motor. Slide the menu forward by pressing menu button.
Value Range..: 1A- 30A Default Value: 5A
Parameter 4 : By pressing Up and Down buttons, you can enter the Low Current Value. This adjusts the low
operating current of the motor. Slide the menu forward by pressing menu button.
Value Range..: 0V - 30A Default Value: 0A
Parameter 3 : By pressing Up and Down buttons, you can enter the Low Voltage Value. This adjusts the low
operating voltage of the motor. Slide the menu forward by pressing menu button.
Value Range..: 150V - 210V Default Value: 160V
Parameter 5 : By pressing Up and Down buttons, you can set the Current Error Waiting Time It is used to set the
time period (in seconds) at the end of which the motor will be stopped after a low or high current error occurs.
Slide the menu forward by pressing menu button. Value Range..: 0 sec. - 850 sec. Default Value: 2 sec.
Parameter 6 : By pressing Up and Down buttons, you can set the Current Auto Reset Time It is used to set the time
for automatic reactivation (reset) of the motor after it stops due to a high or low current error. When the value is on
"OFF" position, the motor should be reset manually. When a time period is set, the motor stands by for the adjusted
time period after it stops and it is reset automatically. Slide the menu forward by pressing menu button.
Value Range..: OFF - 850 sec. Default Value: OFF
Parameter 7 : By pressing Up and Down buttons, you can set the Demurrage Multiplier. During start up (demurrage),
the engine draws current at a level higher than that of the normal operating current. It indicates how many times this
drawn high-current (demurrage current) is above than the high-current set value. Slide the menu forward by pressing
menu button. Value Range..: 1 - 10 Default Value: 3
Parameter 8 : By pressing Up and Down buttons, you can set the Demurrage Time. It adjusts the start-up time of the
motor. While the motor is on the start-up process, the device allows demurrage (starting) current to flow during this
duration. Demurrage Current = High Current Set (P2) x Demurrage Multiplier (P7). Example: Assume that High
Current Set Value is 5A and Demurrage Multiplier is 3. Demurrage Current = 5 x 3 = 15A. Slide the menu forward
by pressing menu button. Value Range..:0 sec. - 850 sec. Default Value: 10 sec.
Parameter 9 : By pressing Up and Down buttons, you can set the Current Auto Reset Number. it is used to limit the
number of resets, if the motor is automatically reset constantly after a high or low voltage error occurs. If the value is
on "OFF" position, there is no limitation for the number of resets. When a value is set, the device resets the motor
automatically as much as the number set for the parameter and then the device switches to manual reset mode.
Slide the menu forward by pressing menu button. Value Range..: OFF - 200 Default Value: OFF
Parameter 11 : Indicates whether the electrodes contact the water. If the reading is less than 230, the electrode is in
contact with the water. If the value is big, it does not touch. The red display indicates the top electrode and the yellow
display indicates the bottom electrode. Use the Menu key to scroll through the menu.
Parameter 10 : By pressing Up and Down buttons, you can set the Upper Electrode Waiting Time When the water
level within the well reaches to the upper electrode, this parameter provides the motor to operate after it stands by
during the time set beforehand. Slide the menu forward by pressing menu button.
Value Range..: 0 min. - 850 min. Default Value: 0 min.
Parameter 12 : By pressing the Up or Down button, you can select Start / Stop Memory. It is used to set whether the
device will launch in the last operating position (start or stop) or not. If you want the device to always launch in start
position, the value must be set to "1" and the device must be on start position. Otherwise, the device always
launches on stop position. By pressing the menu button, you can exit from the menu.
Value Range..: 0 - 1 Default Value: 1
Menu
Menu
Menu
Menu
Menu
Menu
Menu
Menu
Menu
Menu
Menu
Menu
Menu
Reset
Reset
Reset
Reset
Reset
Reset
Reset
Reset
Reset
Reset
Reset
Reset
Table of contents
Other Tense Relay manuals
