TeraBee People Counting L User manual

Terabee People Counting L
Installation Guide
v1.0
Technical support: [email protected]
Sales and commercial support: [email protected]

Many thanks and congratulations on buying our People Counting L product.
Using our product will allow you to be fully GDPR compliant and maintain the privacy of
your customers while acquiring an accurate count for all your people counting use
cases.
We hope you will enjoy using our People Counting L as much as we have enjoyed
designing it!
If you have any questions or remarks regarding the product please contact your
commercial representative or our technical support at [email protected]
Copyright © Terabee 2020
Terabee, 90 Rue Henri Fabre 01630,
St Genis-Pouilly, France (next to CERN)
2 / 19

Table of contents
1.Package contents 4
2. Prerequisites 5
3.Installation 6
3.1.Device Installation 6
3.1.1. Necessary tools and accessories 6
3.1.2. Mounting instructions 7
3.2. Device configuration 9
3.2.1. Necessary tools and accessories 9
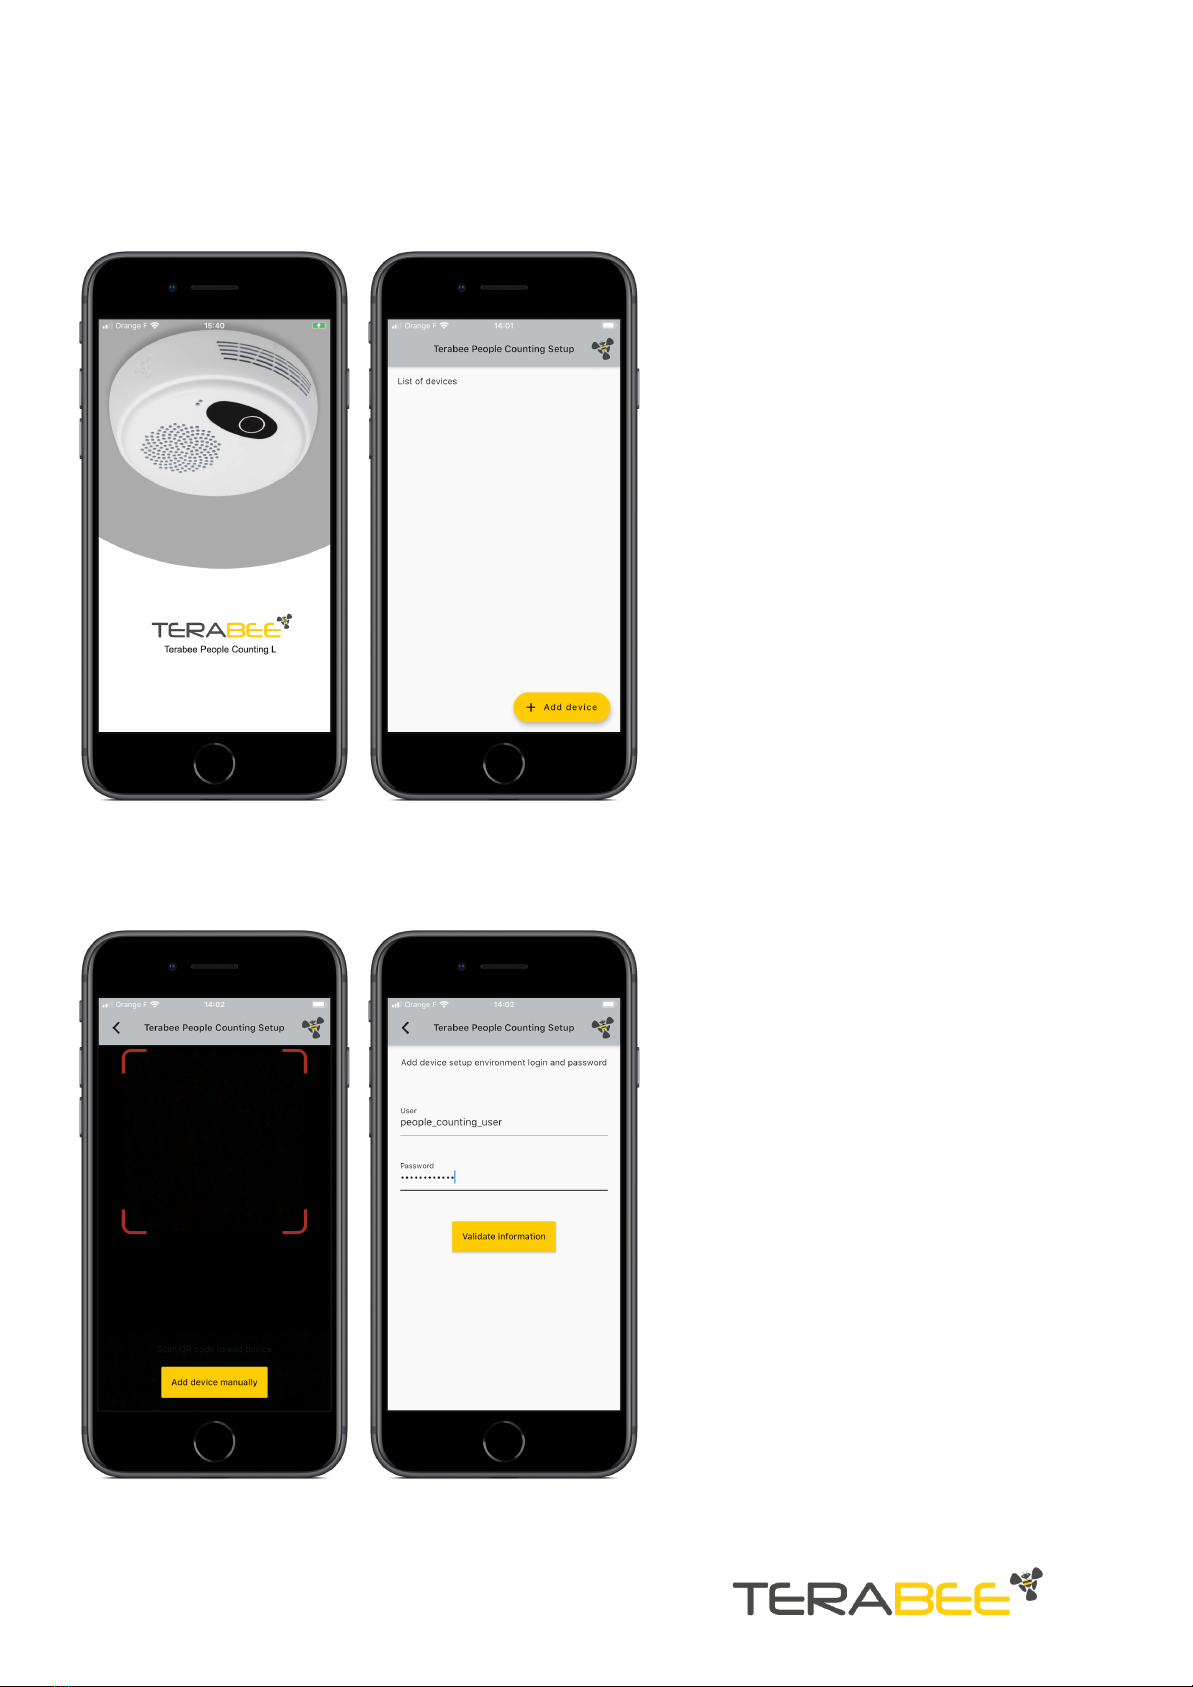
3.2.2. Set up using a Smartphone 9
3.2.3. Set up using a Computer 13
3.2.4. Next step after setting up your device 15
4.Additional Information 16
4.1. Installation Height and Wall Clearance 16
4.2.Manually entering points in the “In Area” field. 16
4.3. Connectivity requirements 17
4.3.1. Protocols used 17
4.3.2. Ports 17
4.3.3. Data traffic 17
5. Troubleshooting 18
5.1. Device LED status 18
5.2. In case of device failure 19
Copyright © Terabee 2020
Terabee, 90 Rue Henri Fabre 01630,
St Genis-Pouilly, France (next to CERN)
3 / 19

1.Package contents
●People Counter device x1
●People Counter ID card x1
●Mounting plate x1
●Concrete screws and wall plug x3
●Plaster screws and wall plug x3
Copyright © Terabee 2020
Terabee, 90 Rue Henri Fabre 01630,
St Genis-Pouilly, France (next to CERN)
4 / 19

2. Prerequisites
Make sure to respect our prerequisites and recommendations before installing your
People Counting L.
Here is a quick checklist:
❏The point of installation is clearly identified
❏There is no direct sunlight exposure on the ground
❏Installation height and minimum clearance from vertical wall can be respected
❏Doors and entryway dimensions are in accordance with the monitoring area
coverage
❏Power over Ethernet (PoE) is available at the point of installation
For more information, please check our Necessary Prerequisites and Guidelines for
Successful Installation documents.
If one or several points above cannot be fulfilled, or in case you are unsure about one of
the above, please contact our commercial representative or our Support Team at
[email protected]. We will help you resolve any problems.
Copyright © Terabee 2020
Terabee, 90 Rue Henri Fabre 01630,
St Genis-Pouilly, France (next to CERN)
5 / 19

3.Installation
3.1.Device Installation
3.1.1. Necessary tools and accessories
Included accessories
- People Counting L x1
- People Counter ID card x1
- Mounting plate x1
- For concrete ceiling: concrete screws and wall plug x3
- For false ceiling: plaster screws and wall plug x3
Not included
- Drilling machine
- Drill bit size 6 mm for concrete ceiling
- Drill bit size 8 mm for false ceiling (Plaster)
- Mallet or Hammer
- Cross-headed screwdriver
- Measuring tape
- RJ45 cable (cat 6 or above)
- PoE injector (sold separately)
Copyright © Terabee 2020
Terabee, 90 Rue Henri Fabre 01630,
St Genis-Pouilly, France (next to CERN)
6 / 19

3.1.2. Mounting instructions
We recommend having a look at our Guidelines for Successful Installation document in
order to understand all the installation aspects of the People Counting L.
The Terabee People Counting L is installed directly on the ceiling and works in the same
way on both sides of the door. However, installation is easier if the device is installed on
the opposite side from the direction of the door swing.
Follow these guidelines to install your People Counting L
1. Measure the ceiling height in
order to estimate the required
clearance from the wall
(For more information please refer
to section 4. Additional
Information)
2. Locate the centre of the door and
mark it on the ceiling
3. Measure the required clearance
for placing the product from the
vertical wall.
Copyright © Terabee 2020
Terabee, 90 Rue Henri Fabre 01630,
St Genis-Pouilly, France (next to CERN)
7 / 19

4. Place the mounting plate and
make sure the lock axis is
perpendicular to the door
5. Mark the drill holes
6. Drill and install the plugs, then
screw the mounting plate in place
7. Place the product under the
mounting plate making sure that
the fins of the mounting plate are
aligned with the openings on the
back of the device
8. Turn the product to the right until
you hear a click
9. Connect a RJ45 cat6 (or above)
with PoE IEEE 802.3af and proceed
to the configuration
Note: If your IT network doesn’t support PoE connectivity, you may consider PoE injectors for each Terabee People
Counting L device. Terabee can provide PoE injectors as an extra accessory, sold separately.
Copyright © Terabee 2020
Terabee, 90 Rue Henri Fabre 01630,
St Genis-Pouilly, France (next to CERN)
8 / 19

3.2. Device configuration
3.2.1. Necessary tools and accessories
Included accessories
- People Counting L
- People Counter ID card x1
- Terabee People Counting Setup App
Not included
- Smartphone or Computer
3.2.2. Set up using a Smartphone
With your smartphone, connect to the device via the Terabee People Counting Setup
App. Make sure both the device and your smartphone are connected to the same
network.
Our App is available for iOS and Android smartphone
Copyright © Terabee 2020
Terabee, 90 Rue Henri Fabre 01630,
St Genis-Pouilly, France (next to CERN)
9 / 19

The following steps will help you setup the device using the App
Wait approx. 2 minutes for the device to
start up and launch the App
You can start the device configuration by
clicking on the “Add device” button
Flash the QR code located on the People
Counter ID card or enter the URL manually.
The URL should be in the following format:
http://terabee-<device_id>.local
Enter the following credentials:
User: people_counting_user
Password: Device ID written on the QR
Code
Copyright © Terabee 2020
Terabee, 90 Rue Henri Fabre 01630,
St Genis-Pouilly, France (next to CERN)
10 / 19

Setup page 1
Draw the counting area according to the
configuration of your environment - For
more explanation a video tutorial is
available under the info button
To switch between an “entering” and
“exiting” area, tick the reverse direction box
Setup page 2
You have to set :
- The camera height and exclusion height
in meters
- The reset hour at which the device will
reset the daily count, advised to be when
the area is normally empty
Once you have entered all the parameters,
click on Submit
You will be directed to a summary page
where you can modify all parameters, add
a device name or remove the device from
your list
Copyright © Terabee 2020
Terabee, 90 Rue Henri Fabre 01630,
St Genis-Pouilly, France (next to CERN)
11 / 19

At the end of the configuration, you will
access a list where all the devices are
recorded.
A green tick indicates that the
configuration process has been correctly
achieved
Copyright © Terabee 2020
Terabee, 90 Rue Henri Fabre 01630,
St Genis-Pouilly, France (next to CERN)
12 / 19

3.2.3. Set up using a Computer
Wait approximately 2 minutes for the device to start up and make sure that your
computer is connected to the same network, via Wi-Fi or Ethernet.
1. Flash the QR code located on the
People Counter ID card - or enter
the web address manually - you
will access the Web GUI
configuration tool.
The URL should be in the following
format:
http://terabee-<device_id>.local
2. Once on the login page, connect
using the following credentials:
User: people_counting_user
Password: Device ID written on
the QR Code
Copyright © Terabee 2020
Terabee, 90 Rue Henri Fabre 01630,
St Genis-Pouilly, France (next to CERN)
13 / 19

3. Draw the counting area according
to the configuration of your
environment (for more
explanation, please refer to the
Guidelines for Successful
Installation documentation)
4. Reverse direction: This allows
switching between an “entering”
and “exiting” area. When testing,
you can go back and reverse if
needed.
5. Camera height: Installation
height in millimeters at which the
device is installed (from 2400 to
3200 mm)
6. Exclusion height: Height in
millimeters below which there will
be no detections (starting from the
ground)
7. Reset hour: The time at which the
device will reset the daily count,
advised to be when the area is
normally empty (in the format
HH:MM, default value is midnight
00:00)
8. Once you have entered all the
parameters, click on Submit
Query
Copyright © Terabee 2020
Terabee, 90 Rue Henri Fabre 01630,
St Genis-Pouilly, France (next to CERN)
14 / 19

3.2.4. Next step after setting up your device
Once you have completed the configuration of your device, it will restart and start to
push the counting data to our IoT Platform. To access the Platform please read our IoT
Platform Guide.
If you do not receive the IoT Platform Guide please contact your commercial
representative or our support team at [email protected]
We highly recommend writing the information related to your device such as the
location or other technical information (building, floor, door name) on the People
Counting ID Card for future reference.
Copyright © Terabee 2020
Terabee, 90 Rue Henri Fabre 01630,
St Genis-Pouilly, France (next to CERN)
15 / 19

4.Additional Information
4.1. Installation Height and Wall Clearance
The Terabee People Counting L is designed to be installed on the ceiling. The size of the
monitored area varies depending on the installation height. The higher the device is
installed, the wider the monitored area is.
In order to maximise the monitoring area use, the device must be installed with some
clearance from the wall that includes the monitored passage.
The below table gives both monitoring width variation and wall clearance depending on
installation height and the minimum and maximum installation height.
Installation Height (m)
Door or corridor width (m)
Min Clearance from wall
(m)
2.40 (Minimum installation
Height)
1.50
0.3
2.50
1.55
0.3
2.60
1.60
0.4
2.70
1.70
0.4
2.80
1.80
0.5
2.90
1.90
0.5
3.00
2.10
0.5
3.10
2.20
0.6
3.20 (Maximum installation
Height)
2.30
0.6
4.2.Manually entering points in the “In Area” field.
The image is a 80x60 pixels image. X coordinates goes from 0 to 79 and Y coordinates
goes from 0 to 59.
To define a point you need both X and Y coordinates, define this way: [x,y]
Define in the “In area” field your list of points that will delimit your “Entry” zone: [[x1,y1],
[x2,y2] [x3,y3], [x4,y4], ...]
Copyright © Terabee 2020
Terabee, 90 Rue Henri Fabre 01630,
St Genis-Pouilly, France (next to CERN)
16 / 19

4.3. Connectivity requirements
4.3.1. Protocols used
●HTTP/HTTPS
●MQTT/MQTTS
4.3.2. Ports
●Outbound:
○53 (DNS)
○80/443 (HTTP)
○1883/8883 (MQTT)
●Inbound: None
●Domains to whitelist: *.terabee.com
4.3.3. Data traffic
Current estimate is roughly: 20 MiB daily (15 MiB down and 5 MiB up)
Copyright © Terabee 2020
Terabee, 90 Rue Henri Fabre 01630,
St Genis-Pouilly, France (next to CERN)
17 / 19

5. Troubleshooting
5.1. Device LED status
In order to troubleshoot the device, the Terabee People Counting L is equipped with
two LEDs visible from the outside:
●Power LED
●Status LED
Those LEDs can have the following status:
LED
Color
Status
Power
Off
Device is not powered
Green
Device is powered
Status
Off
Device is starting or is off
Red
Counting software could not start or stopped
unexpectedly
Yellow
Counting software starting
Green
Counting software started and running
Blue (brief blink)
Last data pushed successfully
Blue (constant)
Failing to push data
Copyright © Terabee 2020
Terabee, 90 Rue Henri Fabre 01630,
St Genis-Pouilly, France (next to CERN)
18 / 19

5.2. In case of device failure
In case of device failure, try first to force a reboot by unplugging and replugging the
ethernet cable and wait for the device to restart.
If you still face an issue, try the following sequence:
1. Connect to the device using the mobile application or a computer
2. Check that the parameters are ok
3. Click on submit button to restart the device
If this sequence does not work, contact our support team at [email protected] and
indicate the following information:
●What is the Device ID?
●What is the LED sequence you see on the device?
●When did the issue started?
Copyright © Terabee 2020
Terabee, 90 Rue Henri Fabre 01630,
St Genis-Pouilly, France (next to CERN)
19 / 19
Table of contents
Other TeraBee Cash Counter manuals