Terragene BIONOVA MiniBio User manual

Bionova® MiniBio
Auto-reader
for Rapid, Super Rapid and Ultra Rapid
Biological Indicators
WARNING: this product contains dry natural rubber
Rev. 10 | February 2022


Bionova® MiniBio
Index
4 Composition
4 Product description
5 Indications for use
5 Features
5 Safety information
5 Symbols
6 Operating conditions
6 Power supply specications
6 Environment operating conditions
6 Device safety compliance
7 Product compatibility and incubation programs
7 Bionova®MiniBio incubation programs
7 Bionova®MiniPro Auto-reader compatible indicators
7 Instructions for use
7 Start-up
9 Remaining incubation time
9 Interpretation of results
9 Positive control
9 Disposal
10 Audible alarm
10 Temperature monitoring
10 Reprinting of results
10 Thermalpaperspecications
10 Replacement of the paper roll
10 Set-up Mode
11 Time setting mode
11 Additional features
11 Firmware update
11 Bionova® Cloud Environment
12 Cleaning and maintenance
13 Troubleshooting
14 Warranty
14 Term
14 Limitation of liability
14 Technical assistance

4 Bionova®MiniBio
Composition
Product description
Bionova®MiniBio Auto-reader has been designed for the
incubation and automatic readout of Terragene®Rapid, Super
Rapid and Ultra Rapid Self-contained biological indicator
(SCBIs) appropriate for sterilization and environmental
disinfection process control applications.
Bionova®MiniBio allows two different incubation temperatures,
37 °C or 60 °C. Microorganisms contained within the SCBIs
vary depending on the sterilization process for which they
have been designed, therefore, incubation temperatures and
incubation times differ depending on the SCBI being used.
Bionova® MiniBio allows independent time settings selection
for each one of the three incubation positions.
SCBIs for Ethylene Oxide (EO), should be incubated at
37°C,whilethoseusedforthemonitoringoftherestofthe
sterilization processes should be incubated at 60 °C.
!
Simultaneous incubation of SCBIs for monitoring EO processes
along with SCBIs for monitoring other sterilization processes is
not possible.
1
2
34
5
6
7
8
9
10
11
12 13
14
15
16
17
18
Please check the Product Compatibility and Incubation
programs section for more information about Incubation
Programs and new available Indicators for your Bionova®
MiniBio.
Bionova®MiniBio Auto-reader allows easy and rapid detection
of positive and negative SCBIs using advanced fluorescence
techniques. A positive result can also be evidenced by culture
medium color change when performing extended incubations.
Due to the high sensitivity of the fluorescence results, the
option to perform or not an extended incubation depends on
the internal protocols of each laboratory or hospital. Read the
instructions for use of the SCBI for more information.
Bionova®MiniBio Auto-reader also provides a printed ticket
each time an incubation is completed for recording the results.
This allows for easy result management, for documentation
compliance and safe-keeping.

Bionova® MiniBio 5
10 ºC
30 ºC
LOT
Indications for use
Terragene®Bionova®Reader Incubators MiniBio incubate at
60 °C and 37 °C and read the Terragene®Bionova®SCBI for
fluorescent results at the times prescribed in the User Manuals.
Features
1 Protective Cover
2 Incubation Area
3Control Panel
4Ampoule Crusher
5Cavity for Paper
6Thermal Printer
7Incubation Temperature Selection Button
8Incubation Time Selection Buttons / Time Left
9Blue Attention Light
10 Red Light / Positive Indicator
11 Green Light / Negative Indicator
12 Incubation Position
13 Alarm Cancellation Button
14 Reprint of Results
15 Configuration / Paper Traction Button
16 Hole for External Temperature Control
17 Input for Power Supply Plug (12 Volts DC)
18 USB Port
Safety information
Symbols
Operating relative humidity
Operating temperature
Caution, Warning, Attention - Refer to the
instructions for use
Caution: Hot surface
Important
Direct current
For indoor use only
Keep away from sunlight
Batch code
Manufacturer
Separate collection for waste of electrical and
electronic equipment
!
To avoid risks and/or damaging the device:
For indoor use only.
Do not place the incubator in a room exposed to direct
sunlight or to high luminous intensity lamps.
Do not place the incubator near devices that emit strong
electromagnetic fields.
Do not use the incubator on leaned surfaces or on surfaces
that are subject to shocks, vibrations, temperature or high
relative humidity.
Disconnect the power cord before cleaning.
Do not use abrasive, corrosive cleaners or disinfectants.
Do not immerse into any liquid . Do not pour any liquid inside.
Make sure the incubator is connected to an appropriate
electrical mains outlet socket.
Use only the included power supply (AC power adapter),
power supply’s AC plug, power supply cords, and USB cable.
Verify that all the included elements are in good condition on
daily basis. If any of them is damaged, discontinue their use.
The use of cables, adapters, cords, and/or power supplies
different from the ones included may cause fires, electrical
shocks, or even physical injuries.
80 %
30 %

6 Bionova®MiniBio
Safety information
Do not plug any devices into the Incubator’s USB port other
than a personal computer (PC). The PC has to be compliant with
IEC60950-1, IEC 62368-1 or comparable, with safety extra-low
voltages on its USB ports. Ask a qualified technician to verify
device compatibility. Attaching any other device to the USB port
may damage the incubator and may not be safe for the user.
Do not attempt to repair the incubator by yourself, that could
lead to major and irreversible damages to the device. In case
of device malfunction, contact your local distributor for further
assistance.
!
To reduce the risk of using incompletely sterilized
loads:
Please read, understand, and follow the Instructions for Use
of each SCBI before its incubation.
Do not remove the SCBI before the incubator reports the
final readout result. Check a result ticket is printed.
Check that culture medium completely wets the spore carrier.
!
To avoid the risk of injury, related to glass fragments
produced when crushing the glass ampoule inside the
SCBI tube:
Cool the SCBI during the indicated time before crushing the
ampoule.
Do not handle the SCBI excessively since this might cause the
glass ampoule to burst.
Wear safety gloves and glasses when removing the SCBI from the
sterilizer, pressing the SCBI’s cap, and crushing the SCBI’s ampoule.
Do not use your finger for crushing SCBI. Use the Ampoule
Crusher instead.
!
To avoid a potentially hazardous situation:
Avoid contact with the hot metal block inside each incubation
position.
Do not insert your fingers, or any other element, inside the
incubation positions.
Place only compatible indicators inside the incubation positions.
!
To avoid SCBIs from absorbing fluorescent particles:
Avoid direct contact between the SCBIs and Chemical Indicators
or Tapes before the SCBI incubation.
!
IMPORTANT
Do not use this product in a manner not specified by
Terragene®S.A., otherwise the protection provided by the
product might be affected.
Only Terragene®S.A. authorized personnel can access or service
the internal components of the Incubator. Parts or components
inside the Incubator should not be manipulated by the user.
Operating conditions
Power supply specifications
Input parameters Operating conditions Units
Voltage range (100-240) AC Volts
Frequency 50/60 Hertz
*Current 0,5 Amperes
Output parameters Values Units
Voltage 12 DC Volts
**Current 2 Amperes
* 1 Ampere in USA and Canada.
** 3 Amperes in USA and Canada.
Terragene®S.A. recommends the use of UPS instead of
voltage stabilizers, since they fulfill two functions: to stabilize
and maintain the energy during a power outage.
Environment operating conditions
Environmental Operating Units
conditions conditions
Altitude 3500 (max.) Meters
Operation temperature 10-30 Celsius
Relative Humidity 30-80 %
Installation/Over-voltage Category II
Degree of contamination 2
Storage temperature 10-30 %
Voltage 12 DC Volts
Device safety compliance
Bionova®MiniBio Auto-reader Incubator complies with the
following standards and directives:
Electrical Safety IEC 61010-1
IEC 61010-2-010
Low Voltage Directive
2014/35/EU

Bionova® MiniBio 7
Electromagnetic EN 61326-1
Compatibility (EMC) EMC Directive 2014/30/EU
European Commission RoHS Directive 2011/65/EU
WEEE Directive 2012/19/EU
Bionova®MiniBio Auto-reader Incubator do not represent
photobiological risk and do not generate dangerous optical
radiation in any of its normal operation conditions as per the
requirements of IEC 62471 Standard.
Designed under Quality Management System standards ISO
13485:2016/NS-EN ISO 13485:2016.
Safety information Instructions for use
Start-up
1|Place the Bionova®MiniBio Auto-reader Incubator on a
firm surface, free from vibrations, away from direct sunlight,
currents of hot or cold air, chemical and corrosive or
flammable substances. Do not place the Incubator in a way
that disconnection of the power supply’s AC plug from mains
could be difficult. Leave a space of at least 10 cm from the
Incubator to the closest wall. Do not move the Incubator
periodically or during its use. Connect the Incubator to a
secure and stable electrical mains outlet socket.
!
Do not wet or heat the device. If liquid is spilled on the
Incubator, disconnect it and follow the instructions on the
Cleaning and maintenance section.
2|Power on your Bionova®MiniBio by connecting the power
supply´s AC plug to mains and then connect the plug at the
other end of power supply to the rear of the incubator.
!
Before power on, verify that all incubation positions are empty.
!
If the Blue Attention light starts blinking after powering on the
Incubator, check that the printer’s door is tightly closed and
that the printer has paper, if not follow the instructions on the
Replacement of the paper roll section.
3|Set the incubator internal clock to correspond to your local
time. See configuration methods in the Time setting Mode
section.
!
All devices are manufactured with the following settings:
Time zone: UTC +0:00
Printing language: English
If you want to change the time zone, or the printing language
refer to Modification of time zone, or Modification of printing
language on the Set-up Mode section.
4|Select the appropriate incubation temperature for the SCBI
Product compatibility and
incubation programs
Bionova® MiniBio incubation
programs
The following incubation programs are available for your
Bionova®MiniBio. Verify which incubation programs are available
for your country checking the Indications for Use section.
Temperature Time Incubation
selection selection program
60 ºC 20 min (Ultra) 20 min at 60 °C
30 min 30 min at 60 °C
1 hs 1 hour at 60 °C
2 hs 2 hours at 60 °C
3 hs 3 hours at 60 °C
37 ºC 4 hs 4 hours at 37 °C
To select the appropriate incubation program for the Indicator you
are planning to use, follow each Indicator’s Instructions for use.
Select the appropriate incubation program before the
incubation of any Indicator.
Bionova® MiniPro Auto-reader
compatible indicators
We develop new Indicators for extending the features of our
Auto-readers regularly. Please check out your Auto-reader’s
compatibility matrix on www.terragene.com/minibio tond
out all compatible indicators for your device.

8 Bionova®MiniBio
you are planing to use, according the SCBI’s Instructions for
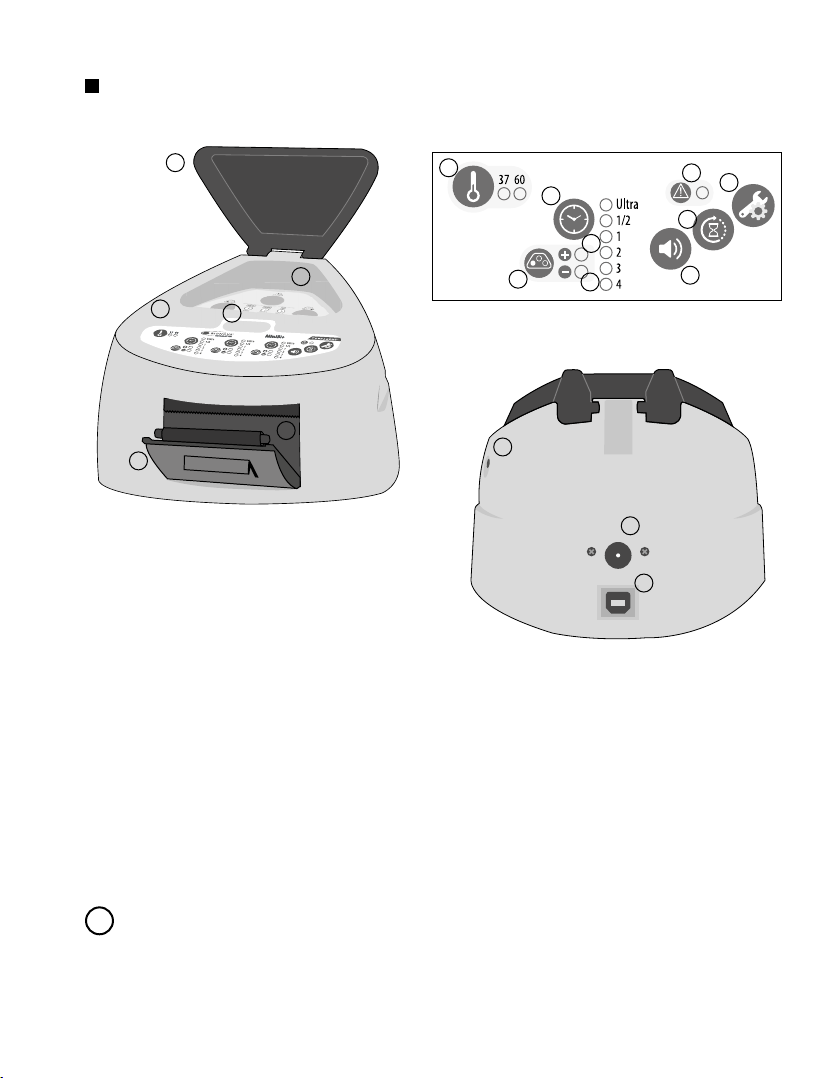
use. Press and hold the temperature selection button for 3
seconds to enter the temperature selection mode. Press
again to select the desired temperature. After 4 seconds the
temperaturemodicationwillbeacceptedautomatically.
5|Select the appropriate incubation time for the SCBI you are
planning to use by pressing the incubation time selection button
of each of the incubation position.
Please refer to the Product Compatibility and Incubation
programs section to know more about the temperature and time
combinations (incubation programs) available for your device.
6|Wait until the temperature stability indicator stops blinking
for the incubator to reach a steady working temperature.
!
Do not place an indicator in an incubation position before the
incubation temperature is stable.
7|Once the temperature stability indicator remains stable,
a one-time automated test to check each position internal
status will be carried out (auto-test).
Once the test is complete, the green negative indicator light
will turn on to indicate that the position can be used to
perform readings. Otherwise, the red positive indicator light
will turn on to indicate that an error has occurred.
When the incubator detects an error in a position, the position
will be disabled to guarantee the reliability of the results and it
cannot be used to perform any further readings.
To indicate that a position has been disabled, the red positive
indicator light will blink indefinitely.
!
For the correct performance of the auto-test keep the
protective cover closed when the auto-test is running.
8|After the auto-test, readings can be initiated on any
incubation position if the position is not disabled. Place an
indicator in an SCBI reading position. The reading process
will start automatically after placing the SCBI. The incubator
will emit an audible notification, indicating that a reading has
successfully begun, at the same time the position status lights
will start blinking. Close the protective cover and wait until a
readout result is obtained.
Instructions for use !
Read and follow the SCBI’s instructions for use. Before placing
an SCBI in the incubator, press the top to seal the tube. Crush
the internal ampoule (either using the incubator’s ampoule
crusher or using the ampoule crusher included in the SCBI’s
box). Make sure that culture medium completely wets the
spore carrier at the base of the SCBI’s tube and agitate.
!
Do not remove or change the SCBI’s placement once a reading
process has begun or the reading will be cancelled. See the
Cancel reading section for further details. If the incubator
does not start a reading immediately after placing an SCBI in a
reading position, refer to the Troubleshooting section for more
information.
9|When a positive result is detected in a reading position, the
red positive indicator light will turn on and an audible alarm
will activate.
!
Press the button to cancel the audible alarm.
When a negative result is detected in a reading position, the
green negative indicator light will turn on. Once the SCBI is
removed, the green light will turn off automatically after 30
seconds. The position will be available to start a new reading
once the green negative indicator light has turned off. Please
refer to the Interpretation of results for more information.
Note: The incubation time setting defines the upper time
limit in which an incubator can inform a fluorescence readout.
Nevertheless, the incubator can detect and inform a positive
result before the selected time limit as part of its normal
operation. Please refer to the product compatibility and
incubation settings for more information.
10|Every time the incubator informs a uorescence result
(positive, negative, or canceled), a ticket will be printed to
register the result. Pull upward for the paper to be cut with the
serrated edge of the printer.
Note: If there is no paper for ticket printing, the blue
attention light will start blinking. To replace the paper, follow
the instructions in the Paper roll replacement section. The
incubator will save the last three results for re-printing (follow
the Reprinting of results section instructions).

Bionova® MiniBio 9
Instructions for use
POSITIVE NEGATIVE CANCELED
Remaining incubation time
The Bionova®MiniBio allows you to verify the remaining
incubation time in every reading position by ticket printing.
Whenever a reading process is in course, press and hold the
button for 3 seconds. A ticket will print, informing reading
position, incubation program and remaining incubation time.
To verify remaining incubation time of 2 or more readings in
course, press 2 buttons simultaneously; the device
renders a ticket, informing remaining incubation time of all
positions.
Cancellation of a reading
When an SCBI is removed from a position during the
incubation process, an audible alarm will be enabled.
At the same time, the red positive indicator light will start to
blink to indicate that the SCBI should be returned into its
original reading position.
If the SCBI is not placed back after 10 seconds of being
removed, the reading will be canceled automatically and a
ticket will be printed.
Interpretation of results
If a positive result is obtained (red light ) when
incubating an exposed SCBI, this indicates that the sterilization
process to which the SCBI was exposed has failed. This result
is valid if a positive result is obtained for the positive control
SCBI.
Take action immediately if a positive result is obtained when
incubating an exposed SCBI. Please refer to the sterilizer
instructions for use for more information.
If a negative result is obtained when incubating an exposed
SCBI (green light ), this indicates that the sterilization
process to which the SCBI was exposed has been successful.
This result is valid if a positive result is obtained for the positive
control SCBI.
!
A positive result should always be obtained by the incubator
when incubating a positive control SCBI. Refer to the Positive
control section for more information.
Positive control
A positive control is a non-sterilized SCBI used as a reference
during the incubation process. The use of a positive control is
a recommended practice as it helps to ensure:
The correct incubation temperature is reached.
Viability of spores has not been altered due to improper
storage temperature, humidity, or proximity to chemicals.
The aptitude of the media to promote rapid growth and
fluorescence generation.
Proper functioning of the incubator.
For the incubation of a positive control SCBI, first press the
cap to seal the SCBI and crush the ampoule, making sure
the media completely wets the spore carrier. Identify the
control SCBI on its label. Place the positive control in an empty
incubation position and incubate as described in the SCBI
instructions for use.
!
The positive control and the exposed SCBI should belong to
the same batch.
!
Incubate the positive control SCBI as specified on the SCBI
instructions for use.
Disposal
Discard the SCBIs according to your country’s sanitary
regulations. Positive SCBIs can be sterilized before discarding
following the SCBIs instructions for use. It is not possible to
use or incubate an SCBI more than once.

10 Bionova®MiniBio
Audible alarm
An audible alarm will sound every time a positive result is
detected by the incubator. The alarm allows the user to
immediately detect a positive result without the need to
visually check the device. The alarm can be canceled by
pressing the button.
Temperature monitoring
The Bionova®MiniBio Auto-reader features an automated
internal temperature control. If the incubation temperature
falls outside of the specified range of 37±2 °C or 60±2 °C, the
temperature stability indicator light will start to blink.
The incubation temperature can be externally monitored
by placing an external thermometer in the hole for external
temperature control located at the back of the device.
Reprinting of results
The incubator allows reprinting of the last 3 results by
fluorescence readout. For printing the results, press the
button for 3 seconds.
Thermal paper specifications
Recommended paper: JUJO AF50KSE3 or similar (order code
ICTP).
Paper width : 57 mm
Maximum paper thickness: 60 g/m2
Maximum diameter size: 23 mm
Replacement of the paper roll
1|To replace the paper roll, pull the handle on the printer
door. Open the cover and remove the empty roll.
2|Place the new paper roll with the outer side up.
3|Close the printer cover by pressing on the sides of the lid.
Note: You can check the correct paper replacement by
pressing to advance the paper a few centimeters.
Set-up Mode
Bionova®MiniBiofeaturesacongurationmodethatenables
you to set the printing language and the date format and time
zone in the device. To enter Set-up Mode, turn on the Auto-
reader while holding down the button . The red and green
LEDs in the three positions will remain on, indicating that the
device is in this mode. The printer will render a ticket indicating
that it is in Set-up Mode.
To change the date format, time zone and printing language,
please follow the instructions listed below. When nished,
restart the computer to exit Set-up Mode.
Modification of date format and time zone
The date format and time zone modication function allows
changing the date format and time zone of the device to suit
better the local characteristics of your country.
To make these changes, start your device in Set-up Mode (See
Set-up Mode section) and press the button.
The green light indicator corresponding to incubation position
1 will start blinking. In addition, the current date format will be
printed in order to set a reference value.
Three types of date format are available: DD/MM/YY, MM/DD/
YY and YY/MM/DD.
Note: The default date format is DD/MM/YY.
Press the or button to move back and forth between
each of the 3 available options. After 2 seconds, a ticket with
the selected format will be printed to set a reference.

Bionova® MiniBio 11
Instructions for use
To save the selected date format, press and hold the
button for 3 seconds. To exit without saving the changes,
disconnect the device.
Once the date format has been modied and saved,
the incubator will enter Time Zone modication Mode
automatically. The current date (with the previously selected
format) and the current time will be printed to set a reference.
To subtract hours, press the button as many times as
necessary. To add hours, press the button as many times
as necessary. After 2 seconds, a ticket will be printed, informing
the selected time zone.
To conrm the change, hold down the button for 3
seconds. To discard the changes, unplug the incubator from
the power source.
Note: The green light indicator corresponding to incubation
position 1 will stop blinking once both, the date format, and time
zonemodicationsaresaved.
Modification of printing language
This functionality allows changing the language that appears
on the tickets. To make this change, the device must be started
in Set-up Mode (see Set-up Mode), then press the button.
The current language and list of available languages will be
printed to establish a reference. Press the button to scroll
up and the button to scroll down. After 2 seconds, a ticket
will be printed informing the selected language.
Toconrmthechange,pressandholdthe button for 3
seconds. To discard the change, unplug the Auto-reader from
the power source.
Time setting mode
Modification of the time using the Bioupdate® software
Connect the auto-reader via the USB port to a PC and Run
Bionova®Bioupdate Firmware Upate Utility. Select the Auto-
reader and press the Clock Sync button, the auto-reader
internal time and date will be synchronized with the PC’s
current time and date. Synchronization can only be done as
long as there is not an ongoing reading.
Modification of the time using Bionova® Cloud Agent
Connect the auto-reader via the USB port to a PC and run
Bionova®Cloud Agent. Select the Auto-reader and press the
Clock Sync button, the auto-reader internal time and date
will be synchronized with the PC’s current time and date.
Synchronization can only be done as long as there is not an
ongoing reading.
Additional features
Firmware update
Bionova®MiniBio Auto-reader allows the update of its
rmware (program inside the Auto-reader that controls and
denes its dierent features) by using Bionova®Bioupdate
rmwareupdate utility.Bionova®Bioupdate connects to the
Internet to verify, download, and install, the latest rmware
version available for your Auto-reader. The update process
only lasts a few seconds and is carried out without the loss
of any Auto-reader’s data. Please visit www.terragene.com/
software to download Bionova®Bioupdate.
Update process
Before updating the device, make sure that the Bionova®
Cloud Agent is closed. Power Off the Incubator for five
seconds, afterwards Power On the Incubator and follow the
next steps:
1|Using the included USB cable, connect your Bionova®MiniBio
to a PC where Bionova®Bioupdate has been previously
installed. Make sure the PC has a working Internet connection.
2|Run Bionova®Bioupdate.
3|Select the Auto-reader from the list and press the Start
button to update.
4|Wait until the software indicates that update process
has been completed. The Auto-reader will print an update
conrmationticket.Ifitwasalreadyuptodate,theticketwill
not be printed.
Note: This process must be repeated every time that a new
rmware version is available, this will be informed in the
Terragene S.A. Website.
Bionova® Cloud Environment
The new Bionova®Cloud environment is a Cloud based solution
that integrates the information generated by Terragene®
electronic devices with an easy-to-use Web App for the
traceability of sterilization and disinfection control applications.
The Bionova®Cloud environment is composed by two main

12 Bionova®MiniBio
components: the Bionova®Cloud Traceability Software which
is a Web Based application, and the Bionova®Cloud Agent
which is a Microsoft™ Windows App that acts as an interface
between the Terragene®compatible devices and the web
based application.
Bionova®Cloud Traceability Software allows to manage
and store the readout results of Self-contained biological
indicators and Hygiene Monitoring System Indicators in a
secure and user-friendly way.
Bionova®Cloud Traceability Software allows matching the
information of an Indicator result with the sterilizer or washing
machine used, the operator, cycle characteristics, and all
relevant information for allowing each institution achieve
reliable documentation compliance and safe-keeping.
The Bionova®Cloud Agent handles all communications with
Terragene®compatible electronic devices and the Host PC
where the Agent App runs.
Bionova®Cloud Agent then acts as an interface between
the Terragene®compatible devices and the Bionova®Cloud
Traceability software and sends the information generated
from the devices to the Microsoft™ Azure powered Cloud
server where the Traceability Software Web App runs and
stores the information.
The user can then access to the Cloud saved information
through any device with a compatible web browser.
To access to the Bionova®Cloud Environment please visit
www.terragene.com/bionova-cloud.
Bionova® Cloud Environment Cleaning and maintenance
Cleaning and decontamination of external surfaces
Disconnect the power supply cable and the USB cable from
the Auto-reader. If the device is hot, wait until it has cooled
down before handling it.
Cleantheexternal surfacesof thedeviceusing amicrober
cloth moistened with a solution of mild dish washing
detergent and water. Wring the cloth so it is damp but not
dripping before cleaning, and wipe the outer surfaces of the
Auto-reader. Afterwards, moisten a clean microber cloth
with water only, and repeat the procedure until all traces
of detergent are removed from the external surfaces of the
device. After cleaning, allow the Auto-reader to air dry for at
least 1 hour before connecting the power supply cable or the
USB cable again.
This cleaning procedure can be followed whenever considered
appropriate.
This cleaning procedure must be followed every time a spill
occurs on any of the external surfaces of the Auto-reader.
If further cleaning is required, or if you have doubts about
the cleaning agents you may use, please contact your local
distributor.
Do not clean the internal parts of the device.
Do not pour or immerse the device into any liquid. Do not
allow any liquid to run inside the device during its cleaning.
Maintenance
Bionova®MiniBio does not require routine maintenance.

Bionova® MiniBio 13
Troubleshooting
Fault
The Auto-reader does not start.
The Auto-reader informs an error
in an incubation position during
“Autotest”.
The Auto-reader informs an error
in an incubation position during
“Autotest”.
An incubation can not be run
in a SCBI incubation position
(position’s red light is on).
The Auto-reader does not run an
incubation in any position.
Is not possible to change
temperature and/or time setting.
The printer does not print (Blue
attention light blinks quickly).
The printer releases unprinted
paper.
The Auto-reader can not be
updated.
The Auto-reader is not detected by
Bionova® Cloud Agent.
Possible cause
Power supply is not connected.
A indicator is placed in the incubation
position during the Autotest.
Dust particles might be obstructing the
readout mechanism.
Position disabled. Error in that position
during “Autotest”.
Incubation temperature is not stable.
The printer cover is not tightly closed.
Printer without paper.
Paper roll is not placed correctly.
Bionova®Cloud Agent is running on the
PC.
The Auto-reader is turned off / The Auto-
reader is not connected to the PC.
Action
Check that the power supply is connected
to a proper mains. Check that the DC
plug of the power supply is connected to
the rear of the Auto-reader.
Check that every incubation position is
empty during the Autotest.
Avoid using the Auto-reader in dusty
environments. Use air to dust-off inside
a position. Do not insert solid objects.
Once cleared, restart the Auto-reader.
Make sure that the position is empty
when starting the Auto-reader. Once
cleared, restart the Auto-reader.
Wait until temperature is stable before
any incubations.
Wait for any incubation to complete, and
try again.
Check that the cover is tightly closed.
Place a new paper roll in the right direction.
Place the paper according to the
directions on the Replacement of the
paper roll section.
Close Bionova®Cloud Agent and restart
the Auto-reader.
Follow the directions on the Start-up
section to set-up the device properly.

14 Bionova®MiniBio
Warranty
Terragene S.A. guarantees both the quality of the product
material components and the quality of its manufacturing
process. Should any material or manufacturing faults be
detected within the warranty period, the only obligation of
Terragene S.A. will be product repairing or substitution.
Term
The warranty period for electronic products marketed by
Terragene®will be 1 (one) year from the date of first use of the
product, and may never be extended beyond the product’s
useful life -5 (five) years from its manufacture-.
Limitation of liability
Terragene S.A. shall not be held liable for any loss or damage
that result from the unsuitable use of the equipment,
negligence or user’s full responsibility.
Technical assistance
Terragene S.A.
Ruta Nacional Nº 9, KM 280 - CP 2130.
Parque Industrial Micropi - Alvear - Santa Fe - Argentina.

Other manuals for BIONOVA MiniBio
3
Table of contents
Other Terragene Laboratory Equipment manuals

Terragene
Terragene Trazanto User manual

Terragene
Terragene Trazanto User manual

Terragene
Terragene IC10/20FRT Instruction manual

Terragene
Terragene Bionova IC10FR User manual

Terragene
Terragene BIONOVA MiniBio User manual

Terragene
Terragene Bionova MiniPro User manual

Terragene
Terragene Bionova IC10/20FRLCD User manual

Terragene
Terragene Bionova IC10FR User manual

Terragene
Terragene UVFlow User manual

Terragene
Terragene Bionova MiniPro User manual