Terragene Bionova IC10FR User manual

IC10/20FR
Innovation in technologies for Infection Control
Warning: this product contains dry natural rubber
Rev.30 | December 2020
and Hygiene Monitoring systems
Auto-reader
for Rapid, Super Rapid,
Ultra Rapid Biological Indicators


Index
Composition....................................................................................................................................................................... 4
Product description................................................................................................................................................................................................4
Indications for Use.................................................................................................................................................................................................5
References...............................................................................................................................................................................................................5
Safety information.............................................................................................................................................................. 5
Symbols....................................................................................................................................................................................................................5
Operating conditions .............................................................................................................................................................................................6
Power supply specications ......................................................................................................................................................................6
Environment operating conditions............................................................................................................................................................6
Device Safety Compliance....................................................................................................................................................................................6
Product Compatibility and Incubation programs ............................................................................................................................................7
Bionova®IC10/20FR Incubation Programs............................................................................................................................................7
Bionova®IC10/20FR Auto-reader compatible indicators ....................................................................................................................7
Serial/Batch Number .......................................................................................................................................................... 7
Instructions for use ............................................................................................................................................................ 7
Start-up.....................................................................................................................................................................................................................7
Positive control.......................................................................................................................................................................................................8
Interpretation of results ........................................................................................................................................................................................9
Disposal....................................................................................................................................................................................................................9
Audible alarm ..........................................................................................................................................................................................................9
Canceling a reading ...............................................................................................................................................................................................9
Temperature monitoring.......................................................................................................................................................................................9
Reprinting of results ..............................................................................................................................................................................................9
Remaining incubation time ..................................................................................................................................................................................9
Thermal paper specications .............................................................................................................................................................................10
Replacement of the paper roll ............................................................................................................................................................................10
Time zone change mode .....................................................................................................................................................................................10
Time setting mode................................................................................................................................................................................................11
Printing language change mode........................................................................................................................................................................12
Cleaning and maintenance..................................................................................................................................................................................13
Additional Features ........................................................................................................................................................... 13
Hygiene monitoring systems..............................................................................................................................................................................13
Firmware update ...................................................................................................................................................................................................15
Bionova®Traceability Software..........................................................................................................................................................................15
Troubleshooting ................................................................................................................................................................ 17
Warranty............................................................................................................................................................................ 18
Limitation of liability..............................................................................................................................................................................................18
Technical assistance............................................................................................................................................................................................18

IC10/20FR Page 4
Simultaneous incubation of SCBIs for monitoring
EO processes along with SCBIs for monitoring
other sterilization processes is not possible.
Bionova®IC10/20FR Auto-reader has been designed for the
incubation and automatic readout of Terragene®Rapid, Super
Rapid and Ultra Rapid Self-contained biological indicators
(SCBIs) appropriate for a wide range of sterilization control
applications, and for the incubation and automatic readout of
Hygiene Monitoring System Indicators (Protein Pen) appropriate
for surface cleaning and contamination control applications.
Bionova®IC10/20FR allows two different incubation
temperatures, 37 °C or 60 °C. Microorganisms contained
within the SCBIs vary depending on the sterilization process
for which they have been designed, therefore, incubation
temperatures and incubation times differ depending on the
SCBI being used. Bionova®IC10/20FR allows two independent
time settings selections. One of them for conguring the
incubation time for positions 1 to 6, and the other for postions
7 to 12.
SCBIs for Ethylene Oxide (EO), should be incubated at 37 ºC,
while those used for the monitoring of the rest of the sterilization
processes should be incubated at 60 ºC.
Product description
Composition
15
16
Please check the Product Compatibility and Incubation programs
section for more information about Incubation Programs and
new available Indicators for your Bionova®IC10/20FR.
Bionova®IC10/20FR Auto-reader allows easy and rapid
detection of positive and negative SCBIs using advanced
fluorescence techniques. A positive result can also be
evidenced by culture medium color change when performing
extended incubations. Read the instructions for use of each
SCBI for more information. The option to perform or not an
extended incubation depends on the internal protocols of each
laboratory or hospital.
Bionova®IC10/20FR Auto-reader also provides a printed ticket
each time an incubation is completed for recording the results.
This allows for easy result management, for documentation
compliance and safe-keeping.
1
1
2
3
10
11
9
12
14
13
8
6
712

IC10/20FR Page 5
To avoid risks and/or damaging the device:
•For indoor use only.
•Do not place the incubator in a room exposed to
direct sunlight or to high luminous intensity lamps.
•Do not place the incubator near devices that emit
strong electromagnetic elds.
•Do not use the incubator on leaned surfaces or
on surfaces that are subject to shocks, vibrations,
temperature or high relative humidity.
•Disconnect the power cord before cleaning.
•Do not use abrasive, corrosive cleaners or
disinfectants.
•Do not immerse into any liquid. Do not pour any
liquid inside.
•Make sure the incubator is connected to an
appropriate electrical mains outlet socket.
•Use only the included power supply (AC power
adapter), power supply's AC plug, power supply
cords, and USB cable. Verify that all the included
elements are in good condition on daily basis. If any
of them is damaged, discontinue their use. The use
of cables, adapters, cords, and/or power supplies
different from the ones included may cause res,
electrical shocks, or even physical injuries.
•Do not plug any devices into the Incubator's USB
port other than a personal computer (PC). The PC
has to be compliant with IEC60950-1, IEC 62368-1
or comparable, with safety extra-low voltages on its
USB ports. Ask a qualied technician to verify device
Symbols
Safety information
Operating relative humidity.
Operating temperature.
Caution, Warning, Attention - Refer to the
instructions for use.
Caution: Hot surface.
Important.
Direct current.
For indoor use only.
Keep away from sunlight.
Batch code.
Manufacturer.
Separate collection for waste of electrical and
electronic equipment.
80 %
30 %
10 ºC
30 ºC
References
Protective cover.
1
Incubation Area for 12 SCBIs and 1 Protein Pen.
SCBI Ampoule Crusher.
2
Control Panel.
3
Red Light / Positive Indicator.
4
Green Light / Negative Indicator.
5
Incubation Position Number.
6
Incubation Time Selection Buttons.
7
Incubation Temperature Selection Button
/ Time Left.
8
Alarm Cancellation Button.
9
Thermal Printer.
10
Printer's Paper Indicator Light.
11
Paper’s traction button.
12
Cavity for Paper.
13
USB Port.
14
Input for Power Supply Plug (12Volts DC).
15
16 Hole for External Temperature Control.
Indications for Use
United States of America
Terragene®Bionova®(IC10/20FR) Reader Incubator incubates
at 60°C and reads the Terragene®Bionova®SCBI (BT220,
BT221, BT222, and BT223) for fluorecent results at 30 minutes
(BT223), 1 hour (BT221, BT222), and 3 hours (BT220).
Outside the United States
Terragene®Bionova®Reader Incubator (IC10/20FR) incubate
at 60°C and 37°C, and read the Terragene®Bionova®SCBIs
and the Terragene®Chemdye®Hygiene Monitoring System
Indicators at the times prescribed in the User Manuals.
LOT
Safety information

IC10/20FR Page 6
Power supply specications
Operating conditions
Environment operating conditions
* 1 Ampere in USA and Canada.
** 3 Amperes in USA and Canada.
Terragene®S.A. recommends the use of UPS instead of voltage
stabilizers, since they fulll two functions: to stabilize and
maintain the energy during a power outage.
Device Safety Compliance
Important
Do not use this product in a manner not specied by
Terragene®S.A., otherwise the protection provided
by the product might be affected.
Only Terragene®S.A. authorized personnel can
access or service the internal components of the
Incubator. Parts or components inside the Incubator
should not be manipulated by the user.
compatibility. Attaching any other device to the USB
port may damage the incubator and may not be safe
for the user.
•Do not attempt to repair the incubator by yourself,
that could lead to major and irreversible damages to
the device. In case of device malfunction, contact
your local distributor for further assistance.
To reduce the risk of using incompletely sterilized
loads:
•Please read, understand, and follow the Instructions
for Use of each SCBI before its incubation.
•Do not remove the SCBI before the incubator
reports the nal readout result. Check a result ticket
is printed.
•Check that culture medium completely wets the
spore carrier.
To avoid the risk of injury, related to glass
fragments produced when crushing the glass
ampoule inside the SCBI tube:
•Cool the SCBI during the indicated time before
crushing the ampoule.
•Do not handle the SCBI excessively since this might
cause the glass ampoule to burst.
•Wear safety gloves and glasses when removing the
SCBI from the sterilizer, pressing the SCBI's
cap, and crushing the SCBI's ampoule.
•Do not use your nger for crushing SCBI. Use the
Ampoule Crusher instead.
To avoid a potentially hazardous situation:
•Avoid contact with the hot metal block inside each
incubation position.
•Do not insert your ngers, or any other element,
inside the incubation positions.
•Place only compatible indicators inside the
incubation positions.
To avoid SCBIs from absorbing uorescent
particles:
•Avoid direct contact between the SCBIs and
Chemical Indicators or Tapes before the SCBI
incubation.
Input
parameters.
Voltage range
Frequency
*Current
Output parameters
Voltage
**Current
Operating
Conditions.
(100-240)
50/60
0,2
Values
12
4
Units
Volts
Hertz
Ampers
Units
DC Volts
Amperes
Environmental
Conditions.
Altitude
Operation temperature
Relative humidity
Installation/overvoltage
Degree of contamination
Storage temperature
Voltage
Operating
Conditions.
3500 (máx.)
10-30
30-80
category II
2
10-30
12
Units.
Meters
Celsius
%
Celcius
DC volts
Bionova®IC10/20FR Auto-reader Incubator complies with the
following standards and directives:
Electrical Safety.
Electromagnetic
Compatibility (EMC).
European Commission.
IEC 61010-1
IEC 61010-2-010
Low Voltage Directive
2014/35/EU.
EN 61326-1
EMC Directive 2014/30/EU.
RoHS Directive 2011/65/EU.
WEEE Directive 2012/19/EU.
Bionova®IC10/20FR Auto-reader Incubator do not represent
photobiological risk and do not generate dangerous optical
radiation in any of its normal operation conditions as per the
requirements of IEC 62471 Standard.
Designed under Quality Management System standards ISO
13485:2016/NS-EN ISO 13485:2016.
Safety information

IC10/20FR Page 7
All devices are manufactured with the
following settings:
- Time zone: UTC +0:00
- Printing language: English
Select the appropriate incubation program before
the incubation of any Indicator.
Instructions for use
Start-up
Instructions for use
1.Place the Bionova®IC10/20FR Auto-reader Incubator
on a rm surface, free from vibrations, away from direct
sunlight, currents of hot or cold air, chemical and corrosive or
flammable substances. Do not place the Incubator in a way that
disconnection of the power supply's AC plug from mains could
be difcult. Leave a space of at least 10 cm from the Incubator
to the closest wall. Do not move the Incubator periodically or
during its use. Connect the Incubator to a secure and stable
electrical mains outlet socket.
To select the appropriate incubation program for the Indicator you
are planning to use, follow each Indicator's Instructions for use.
We develop new Indicators for extending the features of
our incubators regularly. Please visit www.terragene.com/
compatible or scan the QR code below to check the latest
compatible Indicators developed for your incubator.
Bionova®IC10/20FR Auto-reader compatible indicators
Serial/Batch Number
For easy identication, each Bionova®IC10/20FR Auto-reader
Incubator has a distinctive serial and batch numbers. The number
can be found printed on two labels, one placed at the bottom of
the Incubator, and one on its packaging. Please, register your
serial and batch numbers in this manual for future reference:
Serial Number:
Batch Number:
2.Power on your Bionova®IC10/20FR by connecting the power
supply's AC plug to mains and then connect the plug at the
other end of power supply to the rear of the Incubator. The last
incubation program used (time and temperature combination)
will be selected by default.
3.Set the incubator internal clock to correspond to your local time.
See conguration methods in the Time setting mode section.
If you want to change the time zone, or the printing language
refer to Modication of time zone, or Modication of printing
language on the Set-up mode section.
4.Check that the incubation temperature is correct. To change
it, press the button for 3 seconds. Lights corresponding to
37 °C and 60 °C will start blinking, indicating that a temperature
program must be selected. For temperature selection, press the
button to select 37 ºC or 60 ºC. After 4 seconds the
temperature modication will be accepted.
For 37 ºC, the IC10/20FR auto-reader will automatically select the 4 hrs.
nal reading program in both sides of the incubation area (1-6 and 7-12).
For 60 ºC, Instant/Ultra (20 min.), 30 min., 1, 2 or 3 hrs. program
can be selected. It’s possible to select different programs for
each half or the same for both, depending on the indicator´s nal
reading characteristics.
Check that the time setting is appropriate for the SCBIs to be
incubated in each zone.
To change the time program, press the button of the
correspondent zone as many times as needed to choose
Product Compatibility and
Incubation programs
The following incubation programs are available for your
Bionova®IC10/20FR. Verify which incubation programs are
available for your country checking the Indications for Use
section.
Bionova®IC10/20FR Incubation Programs
Temperature
selection
60 ºC
37 ºC 4 hs 4 hours at 37 °C
Time selection
20 min (Ultra)
30 min
1 hs
2 hs
3 hs
PRO (15 min)
Incubation Program
20 min. at 60 °C
30 min. at 60 °C
1 hour at 60 °C
2 hours at 60 °C
3 hours at 60 °C
PRO at 60 °C
Before power on, verify that all incubation
positions are empty.
If the Printer's paper indicator light starts blinking
after powering on the Incubator, check that the
printer's door is tightly closed and that the printer
has paper, if not follow the instructions on the
Replacement of the paper roll section.
Do not wet or heat the device. If liquid is spilled on the
Incubator, disconnect it and follow the instructions on
the Cleaning and maintenance section.

IC10/20FR Page 8
8.If the incubator detects a positive result, the red light and the
audible alarm will turn on. This will indicate that the sterilization
The auto-reader will keep the selected incubation program during
the reading process. The system does not allow to modify the
incubation program once the reading process has begun, unless
the reading is nished.
6.Start readings once the blue temperature selection’s light
remains stable, this indicates that incubation temperature was
reached. Once the selected temperature has been reached and
remains stable, after turning on the equipment, a one-time
automatic check of the Biological Indicators and Protein Pen
incubation positions will be carried out. Indicating lights of each well
will turn on bringing the result, a green light will show a
satisfactory result while a red light will indicate error.
When the equipment detects an error in any position, a ticket
indicating the day, time and position involved will be printed. To
guarantee the reliability of the results, these positions will be
deactivated, thus preventing their use. To evidence this, the red light
of that position will remain blinking indenitely, in order to
indicate that the position has been disabled.
The positive control should belong to the same
batch of the processed SCBI.
Incubate the processed biological indicator and
the indicator used as positive control as specied
in the SCBI instructions.
Read the instructions for use of each SCBI for
more information.
the right setting.
5.Wait for temperature of the machine to be stable. Once
is stable, the indicator of the desired temperature will
remain steady.
7.Place the rapid SCBI in a reading position and wait for the
result. Reading will start automatically. Immediately after
placing the SCBI in a position, an alarm will sound indicating
that reading has successfully began and the position LED will
blink until the result is informed.
Do not put any biological indicator in the reading
positions until the auto-reader does not conrm
temperature stability.
Do not remove or change placement of SCBI
once the reading process has begun. If this
occurs, results may be invalidated.
For a correct automatic check, the protective
cover of the auto-reader should be in its place.
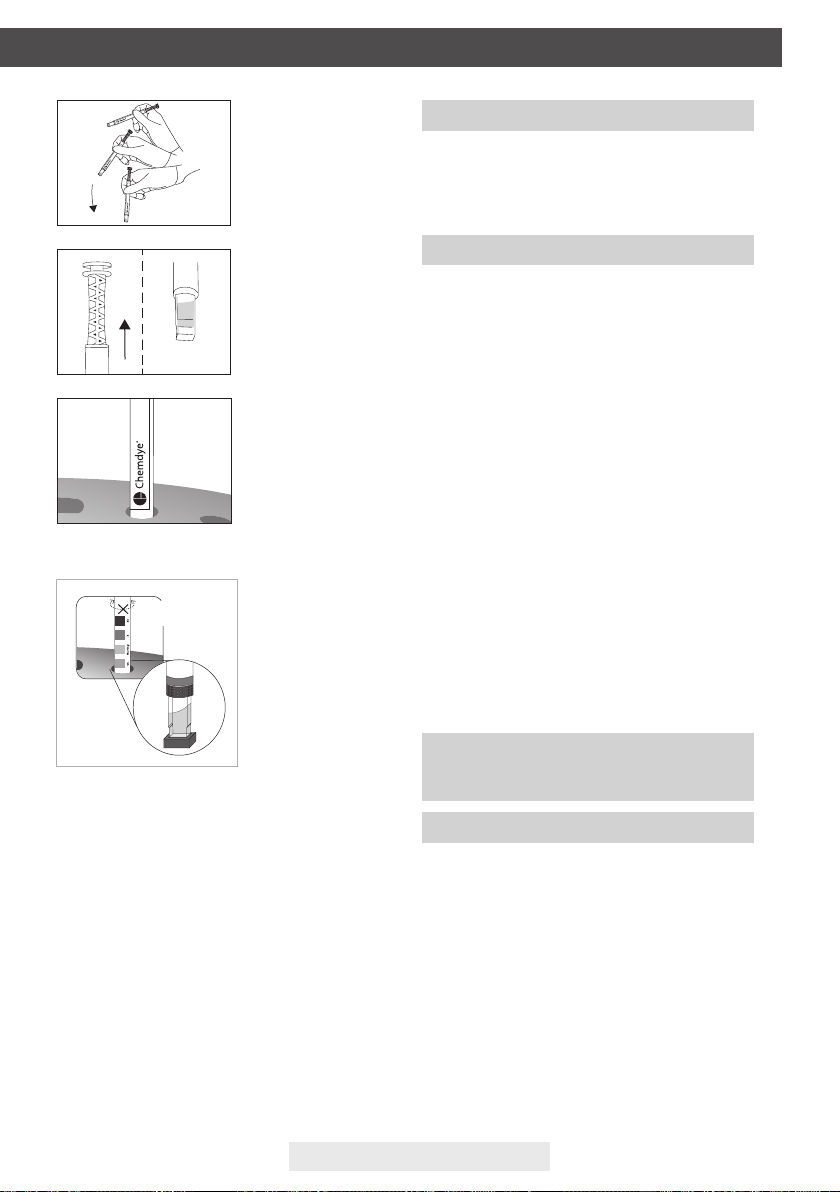
Read SCBIs instructions for use. Before placing
the vials in the auto-reader, press the top to seal
the tube. Crush the ampoule (using the ampoule
crusher within the box of SCBIs or the one located
within the incubation area of the auto-reader)
and make sure that the liquid has completely
wet the spore carrier placed at the bottom of the
biological indicator plastic tube.
POSITIVE CANCELEDNEGATIVE
Positive control
NOTE: If the auto-reader does not run automatically, it
might indicate that the auto-reader temperature is not
steady yet (check the temperature indicating light to
remain steady) or that the incubation position is disabled
due to an error in the initial autotest.
NOTE: If the paper runs out, printer’s blue light will start
blinking (see Replacement of the paper roll in the printer).
The incubator will save the last 13 results, for re-printing,
follow the Reprinting of the last results instructions.
Press the cap to seal the tube and crush the ampoule, make
sure the media completely wets the carrier. Write a C(for
control) and the date on the label. The positive control can be
placed in any well of the Bionova®IC10/20FR Auto-reader.
It is a good practice to use a positive control, this helps ensuring:
•Correct temperature is reached.
•Viability of spores has not been altered due to improper storage
temperature, humidity, or proximity to chemicals.
Instructions for use
process to which the SCBI was subject, has failed. 30 seconds
after removing the SCBI from the incubation position, the alarm
and the red light will turn off automatically and the position will be
available to start a new reading.
The negative SCBIs will be informed with a green light in the
corresponding position. This will indicate that the sterilization
process to which it was subject has been successful. The green
light will remain on for up to 30 seconds after the BI is withdrawn
from the reading position.
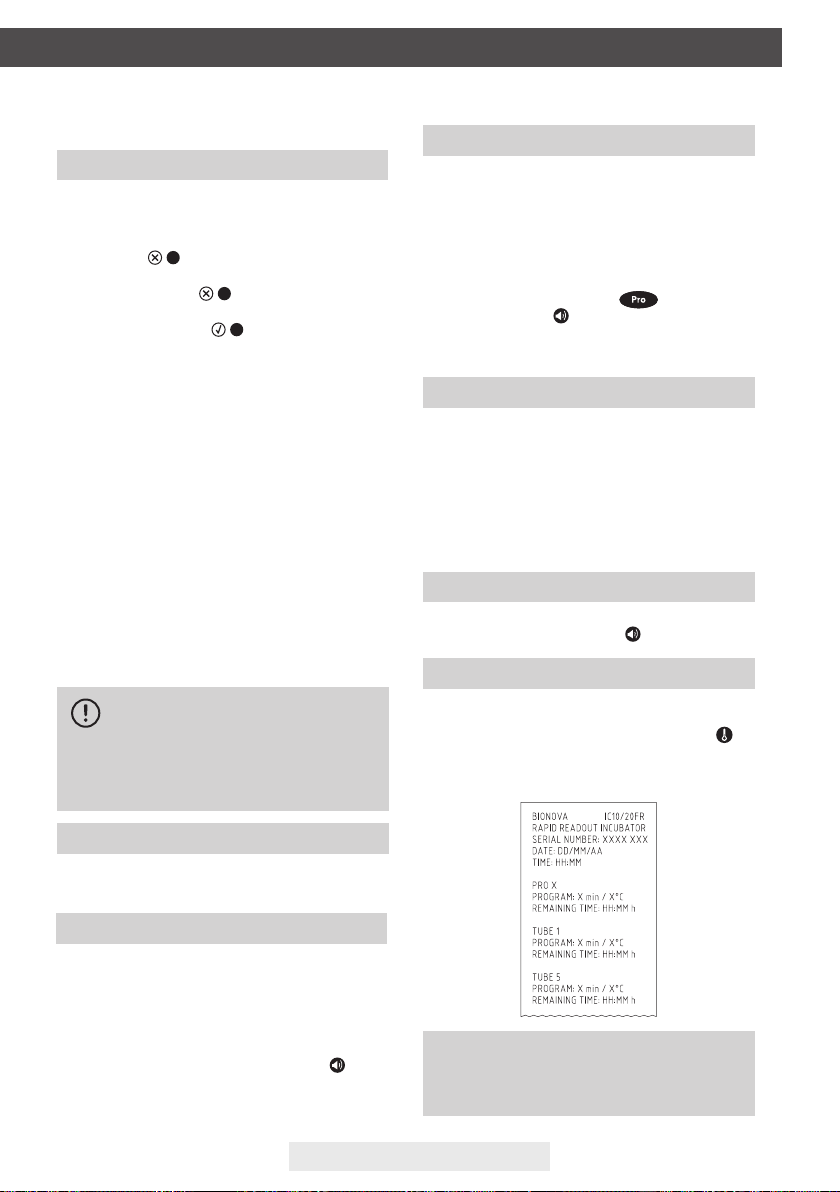
The incubator will inform results within 20 min (60 °C), 30 min.
(60 ºC),1 h. (60 ºC), 2 hs. (60 °C), 3 hs. (60 ºC) or 4 hs. (37 ºC),
according to the program selected. These periods of incubation
are the time-limits used by the equipment to inform the
fluorescence nal readout.
9.Every time a positive result is detected, it will be informed
through the printing of the corresponding ticket and with an
audible alarm. The alarm can be cancelled by pressing the
button .
10.To register the tickets, press paper’s traction button, take the
paper and press up for the paper to be cut with the serrated edge
of the printer.

IC10/20FR Page 9
Instructions for use
Rapid Readout
The indicator used as positive control should show a positive
result (red light ). The processed SCBI results are not
valid until the biological indicator used as positive control
shows a positive result . A processed SCBI with a
positive result, indicates a failure in the sterilization process. A
negative result, (green light ) after 20 min. (60 °C), 30
min. (60 ºC), 1 h. (60 ºC), 2 hs. (60 °C), 3 hs. (60 ºC) 4 hs. (37 ºC)
according to the used program, indicates that the sterilization
process was effective.
Take action on any positive result inmediately. A positive result
indicates a sterilization process failure may have ocurred.
Determine the cause of the positive SCBI following current
facility policies and procedures. Always retest the sterilizer and
do not use the sterilizer for processing loads until 3 consecutive
SCBI results are negative.
Visual Readout
The Rapid readout system allows the conrmation of results
by color change after 48 hours or 7 days incubation analysis
(if 7-day readout is made, an humidied auto-reader will be
required to avoid media dry out). If the sterilization process was
not successful, the growth media contained in the indicator will
turn to yellow. If the sterilization process was successful, the
media will remain unchanged.
•Capability of the media to promote rapid growth.
•Proper functioning of Bionova®IC10/20FR Auto-reader.
Interpretation of results
Disposal
Dispose SCBls after use, according to your healthcare and
safety regulations (see SCBIs instructions for use).
The auto-reader is equipped with several alarm functions that
indicate different states after the incubation.
In the case of the biological indicators, an alarm will go off
whenever the Bionova®IC10/20FR Auto-reader emits a positive
result. This will allow the user to immediately detect a positive
result without visually verifying the result on the equipment.
The alarm can be cancelled by pressing the button .
The hygiene monitoring system, is equipped with an alarm
that the auto-reader will set off 30 seconds before the
program cycle ends and will last until.
Canceling a reading
When a SCBI is removed from it’s position during incubation
process, an audible alarm will sound to indicate the tube should
be returned to its corresponding position.
If the indicator is not returned to the reading position within 10
seconds from its removal, the reading will be canceled and the
auto-reader will print out a ticket conrming the cancellation.
In the hygiene monitoring system, the user can cancel the
reading by pressing the button of the chosen
position and the button for three seconds. The device will
cancel the reading and the auto-reader will print out a ticket
conrming the cancellation.
Reprinting of results
The auto-reader allows reprinting of the last 13 results. For
printing the results, press the button for 5 seconds.
Remaining incubation time
The Bionova®IC10/20FR Auto-Reader also allows verifying the
remaining incubation time in every reading position. Whenever a
reading process is in course, press and hold the button for
ve seconds, a ticket will then be printed containing the
following information: reading position, incubation program and
remaining incubation time.
Temperature monitoring
The Bionova®IC10/20FR Auto-reader contains an internal
temperature control. If the temperature falls outside of the
specied range (37±2 or 60±2 ºC), the blue temperature led light
will start to twinkle.
Temperature can be externally monitored by using a Bionova®
TB-IC1020 thermometer or other similar. The Auto-Reader
IC10/20FR has a special hole for placing the thermometer
which is located at the back of the device.
NOTE:This feature is available starting from the
IC10/20FR Rev. 2.5 Firmware version.
For the detailed procedure for updating the rmware, please
refer to the Firmware Update section of this user guide.
Audible alarm
The color of the growth media in the SCBI used
as positive control must turn to yellow during
the process of incubation for the results to be
valid. Record the positive ones and discard them
immediately as shown in the biological indicators
instructions for use.

IC10/20FR Page 10
Instructions for use
Replacement of the paper roll
The printer uses thermal paper rolls.
Thermal paper specications
1.To replace the paper
roll, pull the handle of the
printer’s door.
2.Open the printer’s cover
and remove the spent roll.
3.Place the new paper roll
with the outer side up.
4.Close the printer cover by
pressing on the sides of the
lid.
Recommended paper: JUJO AF50KSE3 or similar (order
code ICTP).
Paper width : 58 mm
Maximum paper thickness: 60 g/m2
Maximum diameter size: 50 mm
This function allows you to advance or delay the internal auto-
reader clock in order to adopt a different time zone.
Time zone change mode
Enter Time zone change mode
De-energize the auto-reader.
Press and hold both buttons simultaneously and energize
the equipment. A beep will be emitted to indicate access to Time
zone change.
NOTE:when entering Time zone change mode a green
light will turn on in one of the incubation/reading
position. This number corresponds to the current auto-
reader time.
Time zone change
To advance time, press button as many times as hours
you need to advance. To delay time press button as many
times as hours you need to delay.
NOTE: Remember that it is possible to synchronize
the time with the Bioupdate®software and Bionova®
traceability software.
Advance Delay

IC10/20FR Page 11
To change hours and minutes digits, use
and buttons. To increase digit value press
; to decrease press (see next figure).
Cancel time zone change
To cancel time zone change process without saving the
changes, disconnect power source.
Enter Time setting mode
De-energize the auto-reader.
Time setting functionality allows you establish a specic time
regardless of auto-reader current time.
Modication of the time using the Bioupdate®Software
Connect the auto-reader via the USB port to a PC and start-
up the program. Select the Bionova®IC10/20FR Auto-reader
and press the Clock Sync button, the auto-reader will be
synchronized with the PC's clock. Synchronization can only be
done as long as there is not an ongoing reading.
Change the time using the Bionova®Traceability Software
Connect the auto-reader via the USB port to a PC and start-
up the program. The Bionova®IC10/20FR Auto-reader will be
synchronized with the PC's clock. Synchronization can only be
done as long as there is not an ongoing reading.
Press and hold both buttons and button simultaneously
and energize the equipment. A beep will be emitted to indicate
access to Time setting mode.
NOTE:37 °C light indicates a.m. 60 °C light indicates p.m.
Complete time zone change
To save changes press and hold button for three seconds
(see next gure). A beep will sound indicating that process has been
completed successfully. A ticket with the new set time will be
printed.
Time setting mode
Hours setting
Lights corresponding to 1 to 10 incubation/reading positions
indicate the digit value which is set. Lights from 1 to 9 indicate
digit value from 1 to 9. Light 10 indicates 0 value.
In time setting mode, light 1 from PRO sector will turn on to
indicate ten hour modication and incubation light corresponding
to the 10th position will turn on to indicate setting started.
Change the time using the panel
Increase Decrease
NOTE:24-hour format.
Instructions for use

IC10/20FR Page 12
- Hours setting: Ten hours (Hh:mm)
The blue light number 1 corresponding to PRO sector should be
on. If any other light from PRO sector is on, press
button as many times as necessary to turn on the blue light
number 1. This indicates ten hour setting.
To increase ten hours value, press button . To reduce ten
hours value, press button.
- Hours setting: Unit hours (hH:mm)
Press button to turn on the blue light number 2. This
indicates unit hours setting. If any other light from PRO sector is
on, press button as many times as necessary to turn
on the blue light number 2.
To increase unit hours value, press button. To decrease unit
hours value, press button.
To increase ten minutes value, press button. To decrease
ten minutes value, press button.
Minutes setting
- Minutes setting: Ten minutes (hh:Mm)
Press button to turn on the blue light number 3. This
indicates ten minutes setting. If any other light from PRO sector
is on, press button as many times as necessary to turn
on the blue light number 3.
- Minutes setting: Unit minutes (hh:mM)
Press button to turn on the blue light number 4. This
indicates unit minutes setting. If any other light from Pro sector
is on, press button as many times as necessary to
turn on the blue light number 4.
To increase unit minutes value, press button. To decrease
unit minutes value, press button.
Finish hours setting
To save changes press and hol-dzbutton (see Figure
4) for three seconds. A beep will sound, PRO green light will turn
on and a ticket with the new set time will be printed to indicate
the procedure has been completed successfully.
NOTE: If the modication has not been done correctly,
the auto-reader will emit 3 beeps and the red light from
PRO sector will turn on. Repeat the procedure.
Cancel hours setting
To cancel hours setting procedure without saving the changes,
disconnect power source.
NOTE:the possible values for ten hour are 0, 1 and 2.
NOTE: possible values for ten minutes are 0, 1, 2, 3, 4 and 5.
This function allows you to change the auto-reader printing
language.
Printing language change mode
Enter to Printing language change mode
De-energize the auto-reader.
NOTE: each language has a code number assigned:
1: English | 2: Spanish | 3: Portuguese | 4: Turkish
Press and hold button and energize the equipment. A
sound will be emitted to indicate Access to Printing
language change mode.
Instructions for use

IC10/20FR Page 13
Readings will be able to initiate once the incubation
temperature has been selected and is stable. The
lights corresponding to the selected temperature
(37 ºC or 60 ºC) will blink until the temperature
is reached, and then stay stable. PRO1MICRO
readings must be performed at 60 ºC.
Additional Features
Finish printing language change
To save changes press and hold button for three
seconds. A sound will be emitted indicating that process has
been completed successfully. A ticket with the new language
will be printed.
Use and buttons to select the position number
corresponding to language code.
Cleaning and maintenance
Maintenance
Cleaning and decontamination of external surfaces
Disconnect the power supply cable and the USB cable from
the incubator. If the device is hot, wait until it has cooled down
before handling it.
Clean the external surfaces of the device using a microber
cloth moistened with a solution of mild dish washing detergent
and water. Wring the cloth so it is damp but not dripping
before cleaning, and wipe the outer surfaces of the incubator.
Afterwards, moisten a clean microber cloth with water
only, and repeat the procedure until all traces of detergent
are removed from the external surfaces of the device. After
cleaning, allow the Incubator to air dry for at least 1 hour before
connecting the power supply cable or the USB cable again.
This cleaning procedure can be followed whenever
considered appropriate.
This cleaning procedure must be followed every time a spill
occurs on any of the external surfaces of the incubator.
If further cleaning is required, or if you have doubts about
Bionova®IC10/20FR does not require routine maintenance.
Do not clean the internal parts of the device.
Do not pour or immerse the device into any liquid. Do
not allow any liquid to run inside the device during
its cleaning.
Hygiene monitoring systems
Chemdye®PRO1MICRO reading system
Chemdye®PRO1MICRO reading system consists of an
incubation position that allows the quantitative analysis
of the products destinated to evaluate cleaning and
contamination control.
IC10/20FR can run a quantitative analysis of PRO1MICRO
Hygiene monitoring system, adjusted by a BSA (Bovine
Seric Albumin) calibration curve. This analysis ensures the
traceability of the control of surface cleaning.
The method has a detection limit of 1 µg and a sensitivity of
0.3 μg. The result is indicated with a resolution of 0.1 μg, and
its accuracy is ± 0.5 μg (IC95%), in the range of 0 to 5 μg, and
±0.7 μg (IC95%), in the range of 5 to 10 μg with a range of 10 μg.
Reading Process:
1.Press and hold the button for 1 second to enter the
reading program. A beep will sound. Then wait three seconds to
conrm the selection. The auto-reader will emit two beeps
indicating that a program has been selected.
2.Use the PRO1MICRO pen to take the sample from the surface
to be analyzed. For this, follow directions described in Figure 1
(Also explained on PRO1MICRO’s directions for use).
3.Once the solutions contained within the device have been
correctly mixed, proceed with incubation (remember that the
reading cone must not contain the swab). For this, insert the
pen on the incubation/reading position (Figure 2). Make sure to
place PRO1MICRO as it is indicated on the auto-reader label.
When it is inserted in the correct position, it cannot be rotated
(Figure 2).
4.Press and hold the button for 2 seconds to iniciate
the incubation and reading process (15 minutes 60 °C). The
lights and will start blinking.
the cleaning agents you may use, please contact your local
distributor.
Additional features

IC10/20FR Page 14
Do not move or remove the pen from its position
during the reading process, this can cause erroneous
readings or even cancellation of the same.
If the auto-reader detects that the protein pen has
not been placed properly in the reading position, a
ticket will be printed indicating: "Pen not detected.
Check result visually".
It is not possible to reuse an already incubated
protein pen.
Additional Features
Approximate amounts of
BSA expressed in µg
1 µg2 µg3 µg
4 µg
5 µg
12345
Figure 1
Remove swab and add
the moisturizer
Swab the desired
surface by applying a
strong pressure
Cuantitative Results: For IC10/20FR-2.10 (March 2017)
rmware version or higher (others versions could report
different values).
5.Once the incubation process is complete, an audible alarm
indicates the end of the program. The sample is read and the
protein value is calculated based on a BSA (Bovine Seric
Albumin) calibration/standard curve. Then, the auto-reader will
print a ticket conrming the calculated protein concentration. If
the value is below the selected threshold, a green light
will appear, indicating a negative result, if it is by above the
selected threshold, a red light will appear, indicating a
positive result. In both cases, one of the lights of the PRO panel
will indicate the approximated rank of concentration calculated
between 1 to 5 µg; if the value exceeds the 5 µg all the lights on
the panel they will light up. The threshold to determine a positive
or negative result can be congured using the Bionova®
traceability software. The conguration process is outlined in
the Bionova®traceability software manual. The factory-set
threshold is 1 µg.
NOTE: 30 seconds before the end of the program, the
auto-reader will emit an alarm that will last until the
reading is complete, notifying the operator that the
incubation time will be fullled. The color of the solution
can be used for a qualitative reading only if the pen
is removed once the program nalizes. If the pen is
not removed at that time, the color of the solution will
continue to evolve.
Read the directions for use of each product and be
aware of the sensibility limits.
Place the swab back into
the device
Activate
Slide swab upwards
without
completely removing
Shake downwards
vigorously until the
solution turns to green
and reaches the
readout cone reference
volume
Shake for 15 seconds
with the swab
inside the readout cone
G
F
E
*Reference
volume
D
C
B
A

IC10/20FR Page 15
Again, shake downwards
vigorously and reach the
readout cone reference
volume
Readout cone without
swab
Incubate immediately
and read
Figure 2
Insert the pen on the
incubation/reading
position.
Impossible
to rotate
After reading, discard the hygiene indicators according to the
sanitary regulations of your country. The hygiene indicators used
cannot be reused (read the Instructions for use of Chemdye®PRO1
MICRO Hygiene Monitoring System).
Bionova®IC10/20FR Auto-reader Incubator allows the update of its
rmware (program inside the Incubator that controls and denes
its different features) by using the rmware update utility Bionova®
Bioupdate. Bionova®Bioupdate connects to the internet to verify,
download, and install, the latest rmware version available for your
incubator. The update process only lasts a few seconds and is
carried out without the loss of any Incubator's data. Please visit
www.terragene.com/software to download Bionova®Bioupdate.
Update process
Before updating the device, make sure that the Bionova®
Traceability Software is closed. Power Off the Incubator for ve
seconds, afterwards Power On the Incubator and follow the
next steps:
1.Using the included USB cable, connect your Bionova®
IC10/20FR to a PC where Bionova®Bioupdate has been
previously installed. Make sure the PC has a working internet
connection.
2.Run Bionova®Bioupdate.
3.Select the Incubator from the list and press the Start button
to update.
4.Wait until the software indicates that update process has
been completed. The Incubator will print an update conrmation
ticket. If it was already up to date, the ticket will not be printed.
Disposal
Firmware update
Bionova®Traceability Software is a proprietary software
designed by Terragene®to manage and store the results of Self-
contained biological indicators and Hygiene Monitoring System
Indicatorsin a secure and user-friendly way.
Bionova®Traceability Software allows matching the information
of an Indicator result with the sterilizer or washing machine used,
the operator, cycle characteristics, and all relevant information
for allowing each institution achieve reliable documentation
compliance and safe-keeping. All saved information is stored
in a password protected encrypted database to assure its
integrity. Furthermore, all previously saved information can be
Bionova®Traceability Software
Managing results with Bionova®Traceability Software
NOTE:This process must be repeated every time that a
new rmware version is available, this will be informed in
the Terragene®S.A. website.
Additional Features
J
I
*Reference
volume
H

IC10/20FR Page 16
To use Bionova®Traceability Software along with your incubator,
please download the software from our webpage and install it
in a compatible Personal Computer (PC). The PC minimum
requirments are listed in the Traceability Software User Manual.
After the installation is complete, connect your Bionova®
IC10/20FR via the USB port to the PC and run Bionova®
Traceability Software.
Using Bionova®Traceability Software
reprinted at any time to generate a hard copy of the results.
Visit www.terragene.com/software to download the latest
version of Bionova®Traceability Software, its User Manual, and
to check its newest features and capabilities.
Additional Features

IC10/20FR Page 17
Troubleshooting
The incubator does not start.
The Incubator informs an error in an
incubation position during “Autotest”.
The Incubator informs an error in an
incubation position during “Autotest”.
An incubation can not be run in
a SCBI or Protein Pen incubation
position (position's red light is on).
The Incubator does not run an
incubation in any position.
Is not possible to change temperature
and/or time setting.
The printer does not print (printer
blue light blinks quickly).
The printer releases unprinted paper.
The Incubator can not be updated.
The Incubator is not detected by
Bionova®Traceability Software.
Power supply is not connected.
A indicator is placed in the incubation
position during the Autotest.
Dust particles might be obstructing
the readout mechanism.
Position disabled. Error in that position
during “Autotest”.
Incubation temperature not stable.
Ongoing reading.
The printer cover is not tightly closed.
Printer without paper.
Paper roll is not placed correctly.
Bionova®Traceability Software is
being run.
The Incubator is turned off / incubator
is not connected to the PC.
Check that the power supply is connected to
a proper mains. Check that the DC plug of
the power supply is connected to the rear of
the Incubator.
Check that every incubation position is
empty during the Autotest.
Avoid using the Incubator in dusty
environments. Use air to dust-off inside a
position. Do not insert solid objects. Once
cleared, restart the Incubator.
Make sure that the position is empty when
starting the Incubator. Once cleared, restart
the Incubator.
Wait until temperature is stable before any
incubations.
Wait for any incubation to complete, and try
again.
Check that the cover is tightly closed.
Place a new paper roll in the right direction.
Place the paper according to the directions
on the Replacement of the paper roll section.
Close Bionova®Traceability Software and
restart the Incubator.
Follow the directions on the Start-up section
to set-up the device properly.
Fault Possible cause Action

IC10/20FR Page 18
Warranty
Terragene®S.A. guarantees both the quality of the product
material components and the quality of its manufacturing
process. Should any material or manufacturing faults be
detected within the warranty period, the only obligation of
Terragene®S.A. will be product repairing or substitution.
Term
Limitation of liability
Technical assistance
The warranty period for electronic products marketed by
Terragene® will be 1 (one) year from the date of rst use of
the product, and may never be extended beyond the product's
useful life -5 (ve) years from its manufacture-.
Terragene®S.A. shall not be held liable for any loss or damage
that result from the unsuitable use of the equipment, negligence
or user’s full responsibility.
Terragene®S.A.
Ruta Nacional Nº 9, Km 280 - CP 2130.
Parque Industrial Micropi-Alvear-Santa Fe-Argentina.

IC10/20FR
Rev.30 | Diciembre 2020
Innovación en tecnologías para el Control de Infecciones
Advertencia: este producto contiene caucho natural seco.
y sistemas de Monitoreo de Higiene
para Indicadores Biológicos
Rápidos, Súper Rápidos, Ultra Rápidos
Auto-Lectora

Other manuals for Bionova IC10FR
1
This manual suits for next models
1
Table of contents
Languages:
Other Terragene Laboratory Equipment manuals

Terragene
Terragene Bionova IC10/20FRLCD User manual

Terragene
Terragene IC10/20FRT Instruction manual

Terragene
Terragene Bionova MiniPro User manual

Terragene
Terragene Bionova IC10FR User manual

Terragene
Terragene BIONOVA MiniBio User manual

Terragene
Terragene UVFlow User manual

Terragene
Terragene Bionova MiniPro User manual

Terragene
Terragene BIONOVA MiniBio User manual

Terragene
Terragene Trazanto User manual

Terragene
Terragene Trazanto User manual