Tescom Nobby NTE21 User manual
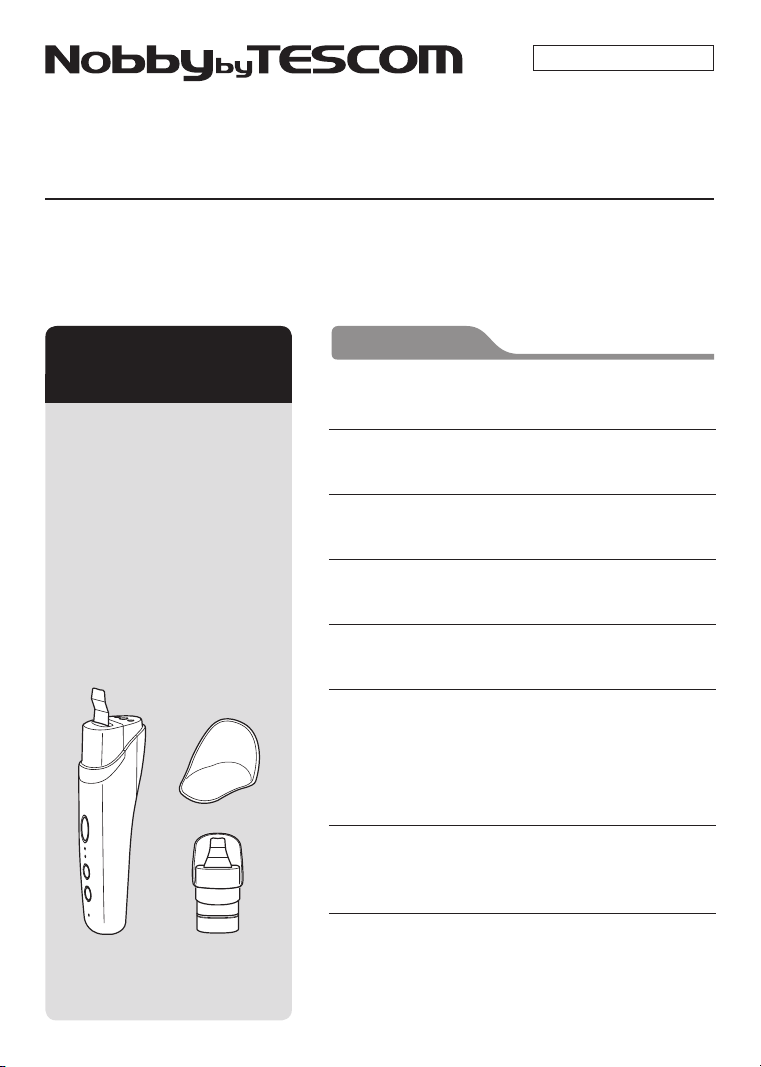
Household Use Only
Table of Contents
Manual
Thank you for your purchase.
Before using this product, be
sure to read the manual and use
the product correctly.
After reading, keep the manual
in a location where users of the
product can find it easily.
NTE21
Safety Warnings ……………………………………1-3
Names and Functions of the Components ………… 4, 5
Specifications ……………………………………… 5
Charging the Battery ………………………………… 6
Precautions for Use ………………………………… 7
How to Use ……………………………………… 8-13
Safety device/
Timing of charge/
Cleaning ……………………………………………… 13
How to Remove the Nickel-Metal Hydride Battery
(when disposing) …………………………………… 14
Troubleshooting……………………………………… 15
Ultrasonic Peeling

Safety Warnings
1
Consult with a doctor before use if any of
the following apply.
●Heart problems
●Acute (painful) illness
●Fever
●Abnormal blood pressure
●Infectious disease
●Tuberculosis
●Malignant tumor
●Facial neuralgia
●Pregnancy
●While on period
●Atopic eczema
●Allergies
●Particularly sensitive skin
●Hemophilia
●Receiving dental treatment
●Capillary dilatation due to long-term
steroidal hormone treatments or liver
dysfunction
●While under the influence of drugs or
alcohol, or extremely tired
●Make sure to read these safety warnings before using, and use the product correctly.
●The warnings listed here are to ensure the product is used properly and safely, and avoid any
injury to the user or others or damage to property in advance. Make sure to follow the warnings.
Danger
Never use along with the following medical
electronic devices.
●Pacemakers or other medical electronics
implanted in the body
●Electrocardiograph or other attachable
medical electronics
There is a risk of the medical electronics
malfunctioning.
Alert
Do not use on the following areas.
●Areas where plastic surgery was
performed
●Eyeballs and upper eyelids
●Injuries
●Facial melanosis
●Inside the mouth or other mucous areas
●Areas inflamed with pimples or other
breakouts
●Areas with impairment of pain sensation
or of perception
●Areas with metal, plastic, silicone or other
objects under the skin
●Areas that are itchy, have a rash or other
stains with physical stimuli
●Areas inflamed due make-up or other
reasons
●Around the eyes and ears
Do not use the product on wounds or
inflammation of skin.
There is a risk of the power cord
disconnecting when used improperly or for
long periods, so do not use the product in
the following situations:
●Repeatedly starts and stops during
operation.
●Plug is not fully inserted into receptacle.
●If the power cord is twisted and does not
return properly.
●If the base of the power cord or adapter
has warped or is damaged.
Do not damage the power cord. (Do not
twist, bend, or pull it unnecessarily, do not
place heavy objects on it, do not place it
near heat, do not bundle it, do not squeeze
it, do not modify it)

Safety Warnings
2
Hold the power adapter when removing the
plug from the outlet.
Do not wrap the power cord around the
power adapter.
This appliance is not intended for use by
persons (including children) with reduced
physical, sensory or mental capabilities,
or lack of experience and knowledge,
unless they have been given supervision or
instruction concerning use of the appliance
by a person responsible for their safety.
Children should be supervised to ensure
that they do not play with the appliance.
Do not use on toddlers, children or pets.
Use with 100 to 240 VAC.
If you experience pain or discomfort while
using the product or issues with your skin
after using the product, stop using the
product and consult a medical specialist.
If the product makes abnormal noises or
some other irregularity occurs, stop use
immediately.
Follow directions in manual for frequency
and duration of use.
When first using the product, track
condition of skin.
Remove the power adapter from the outlet
when not in use.
Do not plug in or remove the power adapter
with wet hands.
Do not wash with water. Do not place the
product in water or splash it with water.
Do not drop in water. Do not leave in water.
Do not get wet.
Do not use or store the power adapter in
bathrooms or areas with high humidity.
Do not modify the product. Do not dismantle
or repair the product if you are not a repair
technician.
The rechargeable batteries of this product
cannot be replaced.
Do not use this appliance near bathtubs,
showers, basins other vessels containing
water.
When the appliance is used in a bathroom,
unplug it after use since the proximity of
water presents a hazard even when the
appliance is switched off.
For additional protection, the installation
of a residual current device (RCD) having
a rated residual operating current not
exceeding 30 mA is advisable in the
electrical circuit supplying the bathroom.
Ask your installer for advice.

3
Safety Warnings
Do not use at the same time as other beauty
goods.
Do not drop or hit the product. Do not apply
strong impacts to the product.
Do not wipe the product with benzine, paint
thinner or alcohol, nor spray disinfectant on
the product.
Only use with the dedicated power adapter
(TAD28 or TAD29) and head. Do not use the
dedicated power adapter and head with
other products.
Do not use for commercial purposes. Do
not put it in a place unknown numbers of
people may use it.
Do not use if deformed or damaged.
Do not share with family or strangers.
Do not use on dry skin.
Do not use on areas from which hair has
been just removed.
Do not allow the spatula to come in contact
with anything other than skin.
Do not store with water remaining in the
water tank.
Do not store in bathrooms or areas with
high humidity.
Remove contact lenses and accessories
such as earrings and necklaces before
using.
When skin is very rough or the surface is
uneven, or when used on areas with hair
or whiskers, the product may seem too
forceful. In that case, avoid using it on that
area.
When using the spatula, move it around and
do not leave it in the same location.
Store with the body cap on.
Firmly grip the body when holding the
product.
Warning
4
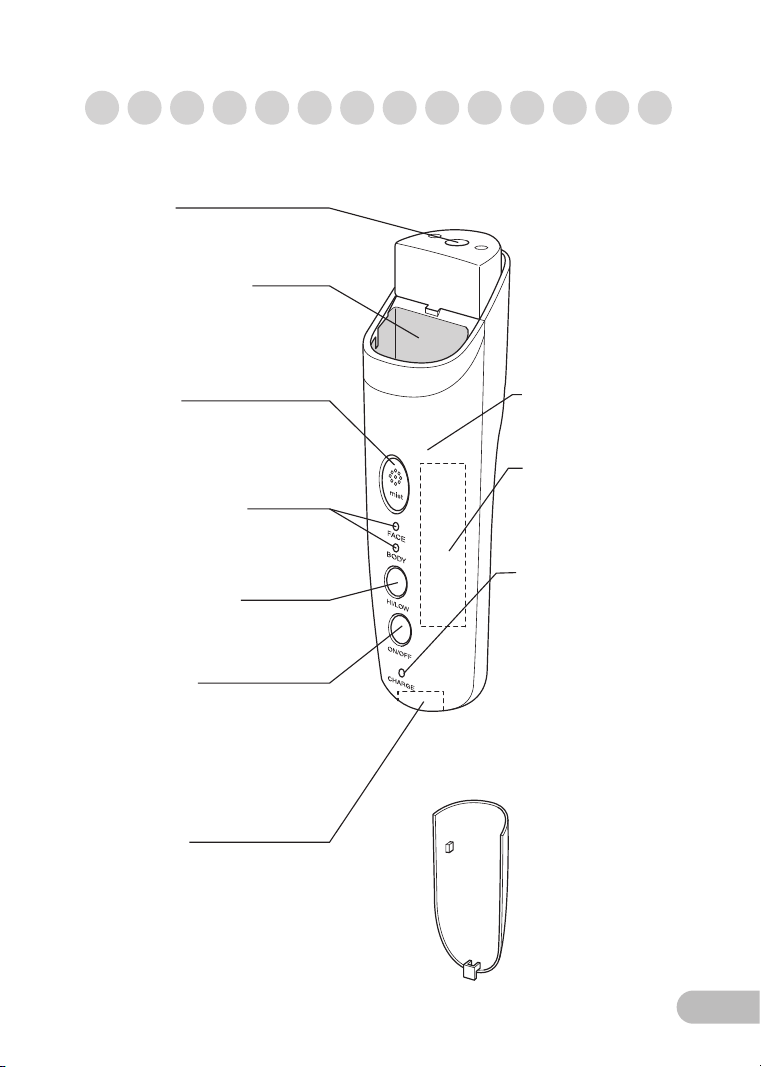
Names and Functions of the Components
Mist outlet
Mist button
Mist is emitted while holding down the
Mist button during operation. While mist is
being emitted, the spatula vibration stops. Nickel-Metal
Hydride Battery
(built-in)
Head inserting block
Body
Body socket
Power switch
Pressing and holding down this switch for 1 sec
turns on the power.
Power switch: Red lamp lights up.
Changeover switch: Green lamp lights up.
Head indicator lamp: Green lamp lights up.
* Lights up according to the inserting head status.
Pressing the switch again turns off the power.
Changeover switch
Changes the peeling strength (HI/LOW).
HI: Blue LOW: Green
Head indicator lamp
Indicates the currently inserted head
during operation.
Battery lamp
[In regular use]
Extinguishes
[Charging in progress]
On: Now charging is in
progress.
Off: Charging is complete.
[Low battery]
Flashes for 10 sec and
then is extinguished. (With
warning beep)
Water tank cover
5
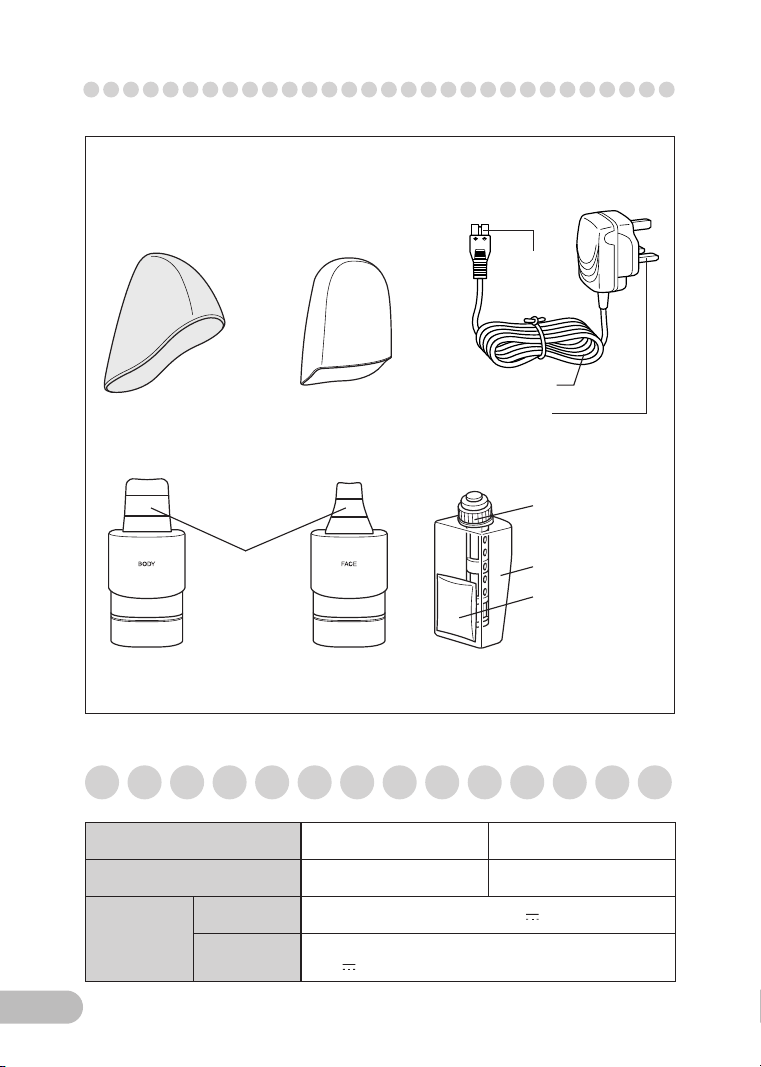
■Accessories
BODY head
Body cap
Attached to keep the
body.
Sub cap
Attached to keep the FACE
or BODY head separate.
Spatula
FACE head
Water tank cap
Water tank
Ion-exchanger
resin
Power adapter
Power cord
Power plug
Plug type G (TAD28)
Plug type C (TAD29)
Names and Functions of the Components/Specications
* Periodically replace the water tank
with a new one.
Plug-to-
appliance
Specications
Part name Ultrasonic Peeling 10 min (automatic turn-off)
Part number NTE21 Approx. 5 h
Power supply
Power adapter 100-240 V ~50-60 Hz 5.5 V 600 mA
Body Nickel-Metal Hydride Battery
(3.6 V 800 mA) 1 set

6
Charging the Battery
1Make sure that the Power switch is off. Then, connect the power
adapter to the body and receptacle.
●The battery lamp lights up.
●Do not push the power adapter’s plug-to-appliance into the body’s socket with
excessive force, or tilt it in a forced manner. If you do so, the socket may break.
●Make sure that the power supply voltage is 100 to 240 V.
2After the battery lamp is extinguished, unplug the power adapter from
the receptacle and body.
●The standard time for charging is approx. 5 hours.
●The body and power adapter may become slightly hot; this does not indicate a
failure.
●A battery fully charged once enables the appliance to operate approx. six times
(approx. 10 min for each session). (The number of times may decrease, depending
on the conditions for use of the appliance, for example, how you clean the
appliance.)
How to Have a Long-lasting Nickel Metal Hydride Battery
●When storing the product, fully charge it before storage.
●When not using for a long time, still charge periodically every six months.
When the operating time after charging becomes extremely short, the following procedure can
refresh the battery and improve operating time.
(1) Press the power switch and mist button simultaneously for 10 seconds or more.
(2) Stop pressing when a beeping sound is heard and check that the battery lamp is flashing.
(3) Charge until the battery lamp goes out.
After that, please use as normal.
If it cannot be used even after performing the procedure above, the nickel-metal hydride battery
may have reached the end of its life. Please contact the store from which purchased.
* Do not use while charging.

7
WARNING
Avoid using this appliance together with the medical electrical equipment below.
Failure to follow these instructions may cause the appliance to malfunction.
●Implanted medical electrical equipment (e.g. cardiac pacemaker)
●Wearable medical electrical equipment (e.g. electrocardiograph)
CAUTION
Precautions for Use
This appliance must not be used on any
of the following regions.
Failure to follow these instructions may result in
accident or injury.
●A region that has been subjected to cosmetic
surgery
●Eye balls and upper eyelids
●Wounds
●Melanoderma of face
●Mucosal regions (e.g. inside of mouth)
●Inflamed regions due to comedo or pimples
●Regions that have impairment of pain
sensation or disturbance of perception
●Skin regions under which there is a metallic,
plastic, silicone, or other implant
●Regions that have inflamed pigmented spots
due to itch, flush, physical stimulus, or other
●Inflamed regions due to cosmetics or similar
products
If you experience any problems with your skin or body, stop use of the appliance
immediately and consult with a medical specialist.
Failure to follow these instructions may result in accident or adverse effects.
* Skin care with this appliance should be undertaken for no more than once a day, and the
time of use should be within 10 min for one session. The number of times of use should be
once or twice a week.
Do not use the appliance continuously for longer than 10 min to protect your skin from damage.
●Cleanse your face to wash off any makeup.
●Wash the makeup off your face using a cleansing agent.
Use this appliance on the skin of your face from which makeup has been removed.
Use the appliance on skin that has been moistened with water or mist.
If you apply to one of the following
categories, be sure to consult with a doctor.
Failure to follow these instructions may result in
accident or injury.
●A person with cardiac damage
●A person with an acute (painful) illness
●A person with a febrile disease
●A person with abnormal blood pressure
●A person with a communicable disease
●A person with a tuberculous disease
●A person with a malignancy
●A person with facial pain
●A person who is pregnant
●During menstruation
●A person with atopic dermatitis
●A person with allergies
●A person with particularly sensitive skin
●A hemophiliac
●Undergoing dental treatment
●A person with a telangiectatic disease that is
due to long-term use of a steroid hormonal
agent or due to liver function disorder
●A person who has consumed alcohol, taken
a drug or is very tired
8
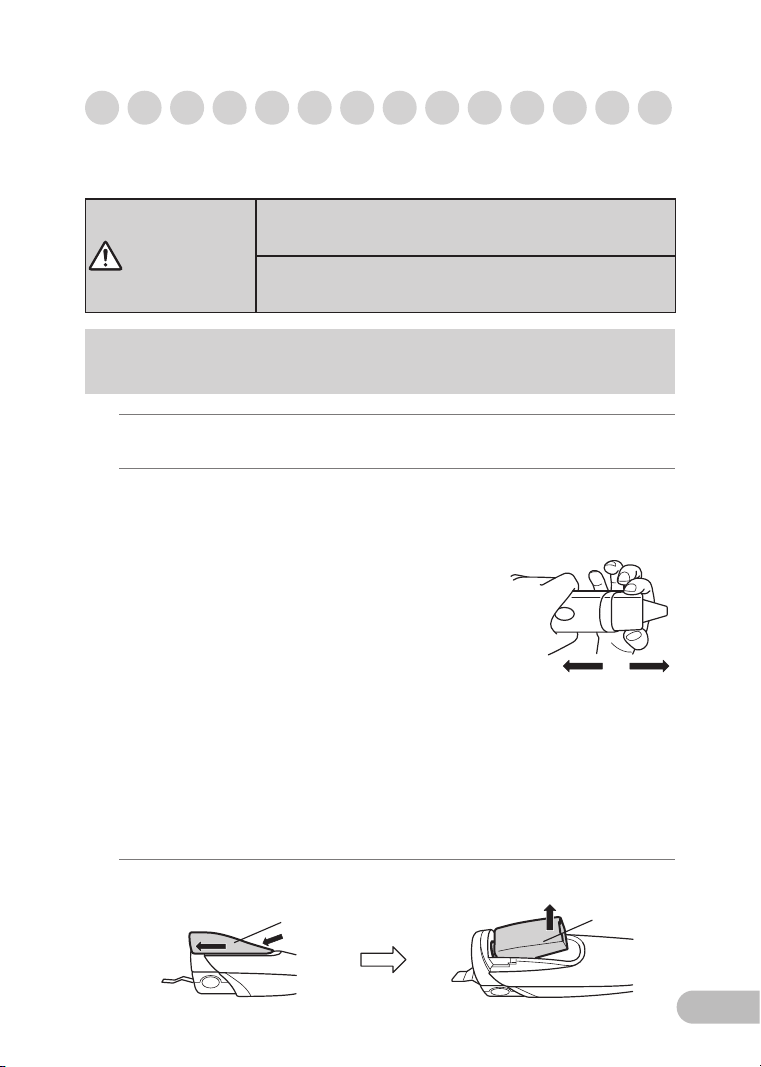
How to Use
Do not use this appliance for care around the eyes or ears.
(Failure to follow these instructions may result in accident or adverse
effects.)
If your skin has an injury or wound, the appliance should not be
used under any circumstances.
(Failure to follow these instructions may result in skin problems or injury.)
WARNING
1Remove the body cap.
2Install either the BODY or FACE head of the accessories on the body.
Insert the head fully to the rear.
* When you receive the product, the body has the BODY head already
installed on it.
●Do not remove the head with the power on.
●If the head is not installed fully or is uninstalled, the
power cannot be turned on.
●While using the appliance, the power is turned off owing
to action of the safety device if water enters the head
inserting block during replacement of the head or when
installation of the head is not fully completed. This does not indicate a failure.
●To remove the head, place the appliance sideways as shown in the figure and pull out the
head slowly while holding both sides with your fingers.
Pulling out the head with wet hands or with the head faced toward your face may result in
injury due to the spatula tip.
●When removing the head, do not hold the spatula.
Failure to follow these instructions may result in failure of the appliance.
3Remove the water tank cover from the back and take out the water tank.
Install Remove
Water tank cover Water tank
Skin care with this appliance should be undertaken for no more than once a day, and the time of use
should be within 10 min for one session. The number of times of use should be once or twice a week.
When 10 min have passed after pressing the Power switch, the power is turned off automatically.
9
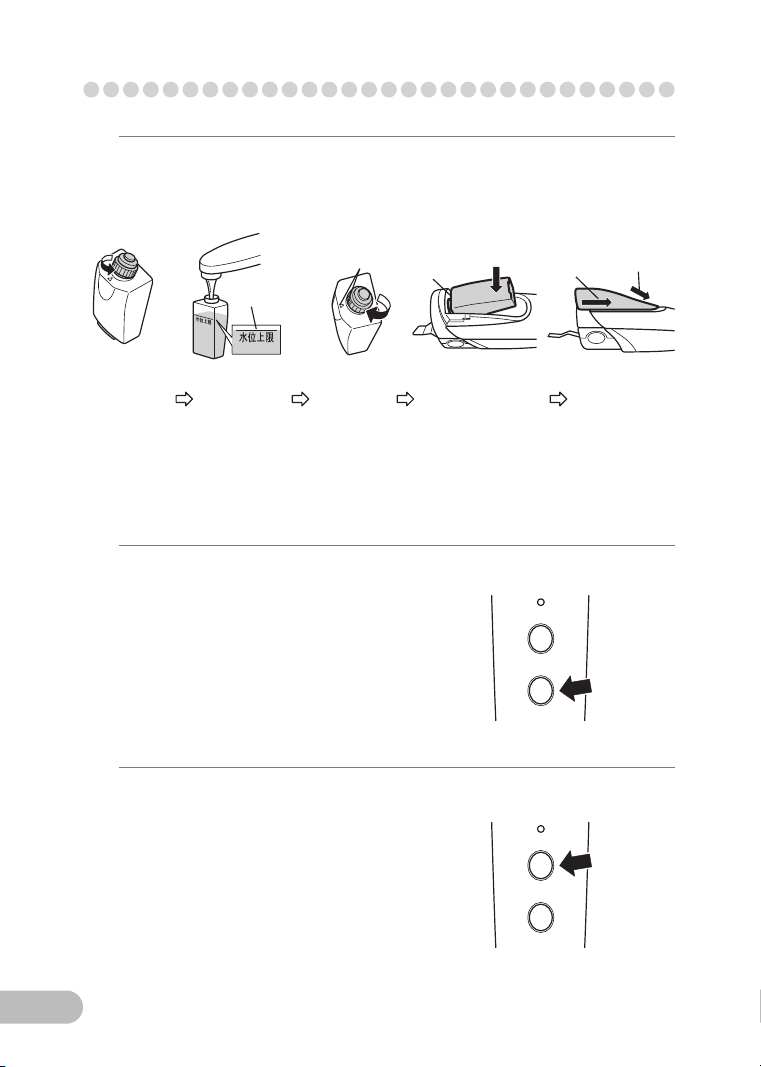
4Remove the water tank cap. Then, fill the tank with purified or potable
water up to the upper limit of the water level. Tighten the water tank cap
firmly. Then, wipe droplets off the tank before loading it into the body.
HI/LOW
ON/OFF
BODY
HI/LOW
ON/OFF
BODY
●If your skin is wet or you do not use the mist function, you can use the appliance without
putting water into the water tank.
Note that without water in the tank, pressing the Mist button during peeling does not
enable misting.
●No water other than purified or potable water must be used.
Turn the water
tank cap
counterclockwise
to remove it.
Put water into the
water tank.
Turn the water
tank cap
clockwise to
reinstall it.
Load the water tank into
the body in the order of
(1) and then (2).
Reinstall the water
tank cap on the
body.
Up to here
With the marks aligned,
insert the water tank
cap into the water tank. Press this down
Press the
Power switch.
Press the
Changeover
switch.
How to Use
(2)
(1)
5Press and hold down the Power switch to turn on the power.
●
The appliance emits a short beep and recognizes the
installed head, causing the head indicator lamp to light up.
●The power is turned off automatically about 10 min after
pressing the Power switch.
●If you have installed the head on the body with the head
inserting block filled with water, pressing and holding
down the Power switch may be unable to turn on the
power owing to action of the safety device.
6Select the peeling strength by pressing the Changeover switch.
The HI/LOW mode is toggled each time the
switch is pressed.
Preset to “LOW” as the mode that immediately
follows the startup.
HI: Blue LOW: Green
●At the beginning of use, “LOW” should be set to use the
appliance for a short time.
●
Stop using the appliance if you experience any discomfort.
Slide
10
●This appliance should be used on bare skin without makeup.
●If you experience any disorder in the portion of care during or after using the appliance
(e.g. rubification, rash, itch), stop use immediately and consult with a medical specialist.
●Do not use the appliance many times on the same region.
●Be sure to moisten your skin before peeling.
●When using the appliance, do not press the spatula against your skin using excessive
force.
●Whenever you find dirt or grime on the metallic section of the spatula, wipe it off using a
towel or tissue.
●If the water tank contains no water, no mist will be sprayed.
●If large droplets are placed on the spatula tip, those attached to the skin will hardly be
shed while being transformed into mist. In this case, wipe away the droplets once before
use.
●While holding down the Mist button, the spatula vibration stops. This does not indicate a
failure.
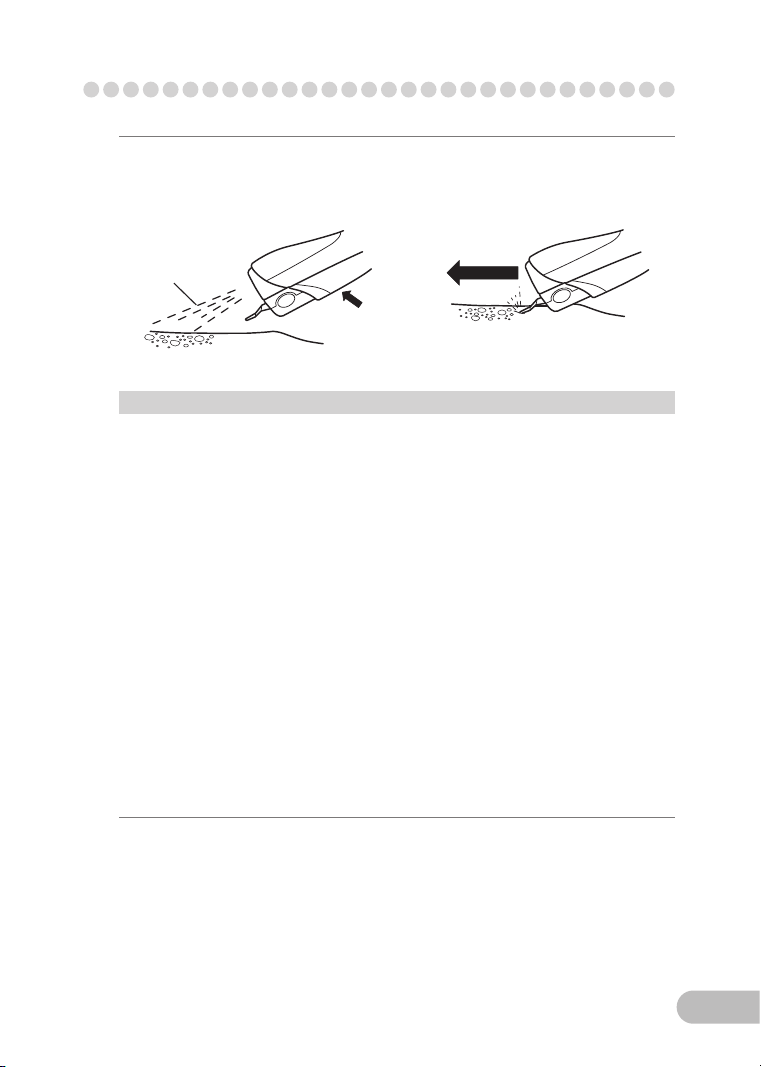
●As a guide for sliding, move the spatula at about a speed of 10 cm for 3 sec without
stopping it in the same position.
How to Use
8After use, turn off the Power switch. Discard the tank water, and clean the
head and body. (Go to page 13)
After the inside of the water tank has dried fully, reinstall the body cap and
sub cap and store the appliance in a low-humidity location.
* Remove all water from the tank after each use and allow it to dry fully.
Direction of movement
Press the Mist
button.
Mist
Mist will be emitted when the button is pressed.
7Mist will be sprayed when the mist button is pressed, wetting the skin. (This
is not necessary when the skin is already wet from washing, etc.)
Gently place the spatula on the wet skin and move it around.
Adjust the tilt of the spatula so that mist on the skin can be shed.
11
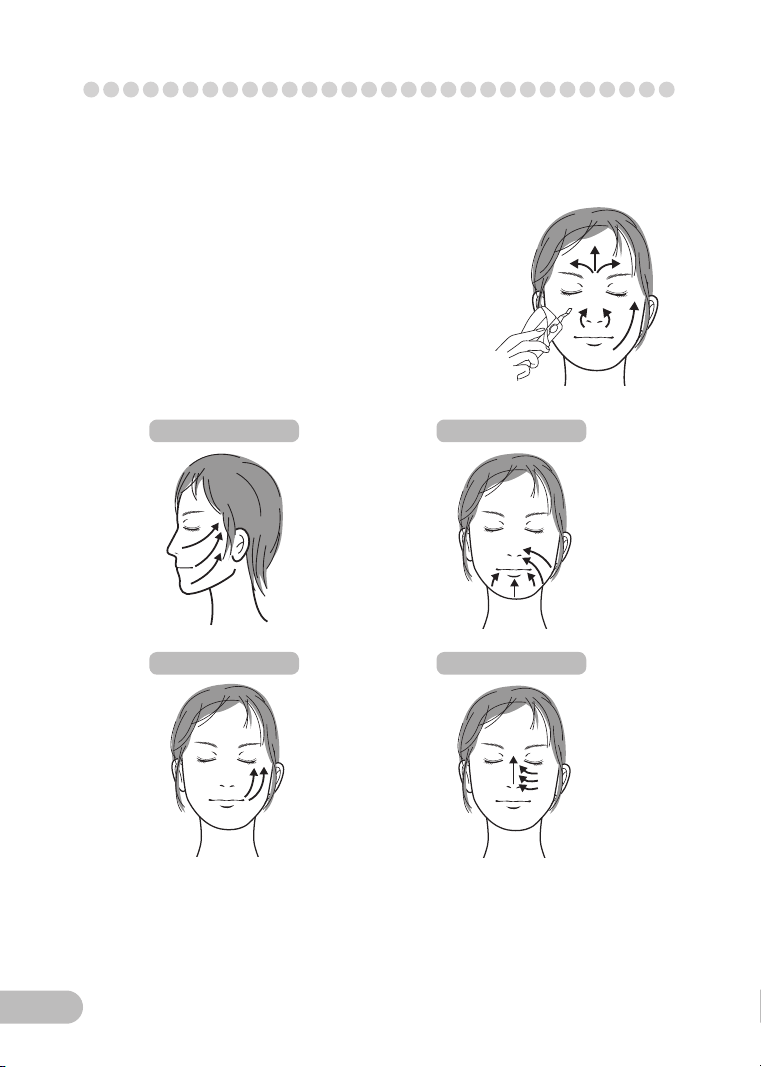
[Using the FACE Head]
(1) Install the FACE head on the body. Make sure that when you turn on the Power
switch, the head indicator lamp FACE is on.
(2) By pressing the Mist button, spray mist will moisten
your skin.
● Take care to prevent the spatula tip from touching the
skin.
●Face lines
●Cheeks
●
Jaw and around mouth
●Around nostril
(4) After use, resume your regular daily skin care regime.
● Condition your skin with beauty lotion, and supplement oil with emulsion or equivalent.
(5) After use, wipe dirt and grime off the head using a soft cloth or tissue, for example.
(3) With the spatula gently placed on the skin, slowly
slide it from bottom to top.
● While using the appliance, you will hear a continuous
metallic sound this does not indicate a failure.
How to Use
12
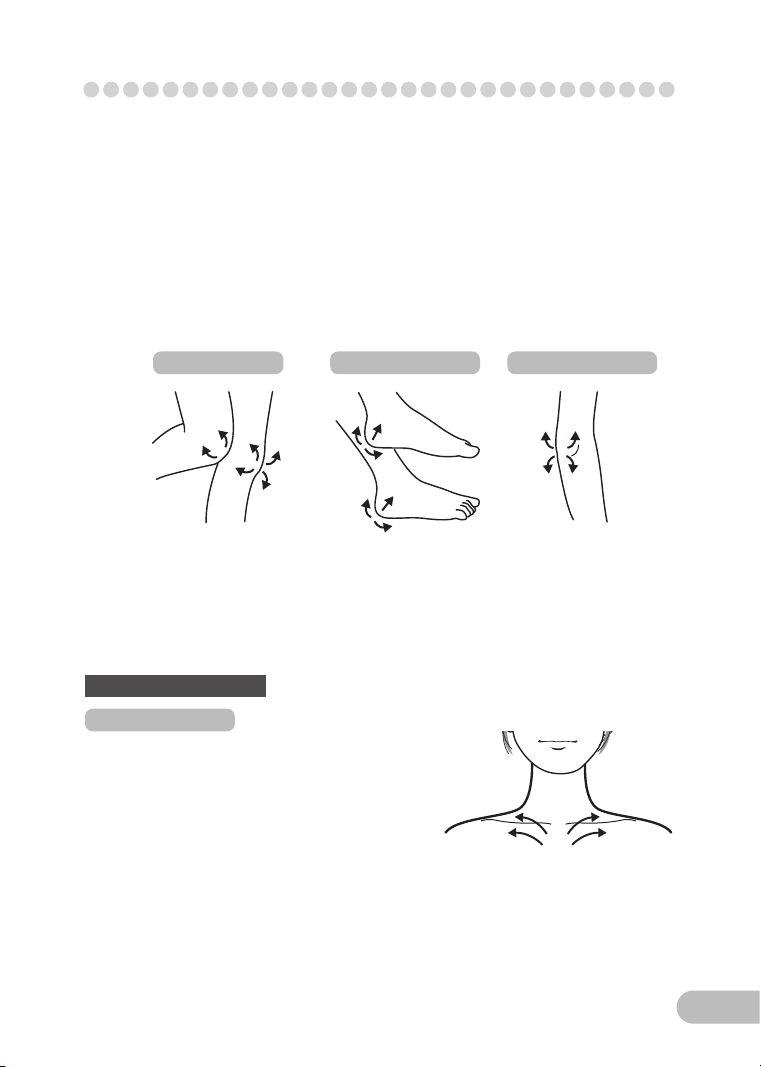
●Decollete
● Use the FACE head.
(1) By pressing the Mist button, spray mist will
moisten your skin.
● Take care to prevent the spatula tip from touching
the skin.
(3) After use, supplement oil with cream or other material for moisture retention.
Advanced Use
(2) With the spatula gently placed on the skin, slowly slide it upward.
[Using the BODY Head]
(1) Install the BODY head on the body.
When you turn on the Power switch, make sure that the head indicator lamp BODY is on.
(2) By pressing the Mist button, spray mist will moisten your skin.
● Take care to prevent the spatula tip from touching the skin.
(4) After use, supplement oil with cream or other material for moisture retention.
●Knees ●Heels ●Elbows
(5) After use, wipe dirt and grime off the head using a soft cloth or tissue, for example.
(3) With the spatula gently placed on the skin, slowly slide it outward.
● While using the appliance, you will hear a continuous metallic sound this is not a failure.
How to Use

13
●Body
●Spatula block
●Head
To wipe the head
inserting block, use a
soft dry cloth.
* A wet cloth must
not be used to wipe
the inserting block.
●Water tank and water tank cap
[Safety device]
[Timing of charge]
[Cleaning]
●If water enters the head inserting block, the power can no longer be turned on or off
owing to action of the safety device.
-> To take action for this case, with the head removed from the body, drain off the
water from the head and head inserting block, clean them, reinstall the head in
the initial position, and press the Power switch to restore to normal operation.
●The low battery status is indicated by the battery lamp that flashes (when the power
is on) while consecutive short beeps are generated for 10 sec, and the power is
turned off automatically.
-> Immediately charge the battery.
●This product can be used with AC 100 to 240 V power supply.
●Make sure that the power is off and the power adapter has been removed. Then start
the cleaning.
●Body, head, and spatula block
Wipe away dirt and grime using a soft dry cloth.
●If it is difficult to remove dirt or grime from the body, soak a soft cloth in a soap-and-
water solution or a water-diluted neutral detergent, and wring well. Then, use this
cloth to wipe dirt and grime off the body.
Discard the tank water. Then, after drying naturally, reinstall the tank on the body.
How to Use

14
1 4
2
3
5
How to Remove the Nickel-Metal Hydride Battery
(when disposing)
Insert a flat-headed screwdriver into the
gap between the front and rear sections
of the body case to remove the rear side.
Press the power switch and mist button
simultaneously for 10 seconds or more.
Stop pressing when a beeping sound is
heard and check that the battery lamp
is flashing.
Charge until the battery lamp goes out.
Screw
Flat-headed screwdriver
Nickel-metal hydride battery
Water
tank
Rubber cap
Body
cap
Water tank
cover
Remove the screws (6).
Remove the body cap, water tank cover,
and water tank. Remove the rubber caps
(6) from the rear of the body.
Remove the connector for the lead wire
that connects the nickel-metal hydride
battery to the circuit board and pull out
the battery.
Lead wire
This is an explanation of how to dispose of the product. It is not an explanation to be used by
users to repair the product. This product cannot be replaced by users.
Lead wire
connector
●Rechargeable Battery (Nickel-Metal Hydride Battery)
Please recycle the removed battery as required in your local area as it
contains precious resources.
Product name: Nickel-Metal Hydride Battery (Ni-MH)
Nominal voltage: 3.6 V
Quantity: 1 set ÎéÍÈ

15
Troubleshooting
Issues Possible Reasons Solutions
Tescom Denki Co.,Ltd.
4217-1 Wada Matsumoto-City, Nagano, Japan
http://www.tescom-japan.co.jp/
Power will not turn on even
though the power switch is
pressed. This means that the safety
device is working.
Refer to “Safety Device” on
page 13.
Power turns off during
operation.
Mist is not emitted. Water tank is not attached
properly.
Please attempt to reattach the
water tank.
Spatula does not vibrate. Head is not inserted properly. Reinstall the head.
The charging lamp lights up
and goes out when the power
cord is bent.
The power cord is coming close
to be being broken.
Immediately stop use and
contact the store from which
the product was purchased.
There is another problem or failure.
Charging is not possible.
(Battery lamp lights up)
The end of the nickel-metal
hydride battery’s life is near.
Charging is not possible.
(Battery light does not light
up)
The power adapter is faulty.
Stops operating soon after
being charged.
The device was charging even
though a large amount of power
remained. (Extended charging)
Charge again after allowing
the rechargeable battery to sit
for a while. (Go to page 6)
8031-1
Table of contents
Other Tescom Personal Care Product manuals


