Tescoma President 702744 User manual
Instructions for use / Návod k použití / Gebrauchsanleitung / Mode d‘emploi
Istruzioni per l‘uso / Instrucciones de uso / Instruções de utilização
Instrukcja użytkowania / Návod na použitie / Инструкция по использованию
© 2012 Tescoma
Pressure cooker /Tlakový hrnec
Schnellkochtopf / Cocotte minute
Pentola a pressione / Olla a presión
Panela de pressão / Szybkowar
Tlakový hrniec / Скороварка
1
11
10
6
7
5
4
9
Art.: 702744
Art.: 702746
Art.
2
1b
1
1a
5
3
4
6
8
1c
1d
M
TU
max. 1/2
ABCD
E
GF
K
HJ
LNP
O
RQ S
www.tescoma.com/video/702744

Instructions for use 2
Návod k použití 10
Gebrauchsanleitung 18
Mode d‘emploi 26
Istruzioni per l‘uso 34
Instrucciones de uso 42
Instruções de utilização 50
Instrukcja użytkowania 58
Návod na použitie 66
Инструкция по использованию 74

2
We congratulate you on the purchase of this Tescoma product. Thank you for buying Tescoma.
If needed, please contact your retailer or Tescoma at www.tescoma.com.
CHARACTERISTICS
The luxurious pressure cooker PRESIDENT with easy adjustment of ideal pressure, IDEALCOOK, for quick
and economic cooking of all common meals, is excellent for preparing all kinds of meat including sh,
vegetables, side dishes and soups. Cooking with pressure cooker PRESIDENT is signicantly faster than
standard cooking.
Pressure cooker PRESIDENT comes with a steamer basket which can be used for cooking in steam in the
pressure cooker; this is excellent particularly for preparing sh and tender vegetables. The steamer basket
is made of high-grade stainless steel.
The comfortable folding handle and special safety closure of the lid enable the pressure cooker to be easily
opened and closed with just one hand.
The pressure cooker has 3 pressure-reducing safety components and a lock against accidental opening; it
is entirely safe to use.
Pressure cooker PRESIDENT is made of high-grade stainless steel; the grips of high-quality resistant plastic
materials do not burn if used properly.
The solid three-layer sandwich bottom has excellent heat retaining properties for additional energy
economy. Cooking takes place at a low heat output; the heat may be switched o in advance before the
end of cooking.
PressurecookerPRESIDENTissuitableforalltypesofcookers:gas,electric,vitro-ceramicandinductioncookers.
OPERATING PRESSURES IN PRESSURE COOKER PRESIDENT
0.15 bar
0.40 bar
0.65 bar
0.85 bar
The maximum operating pressure in the vessel is 1.05 bar.
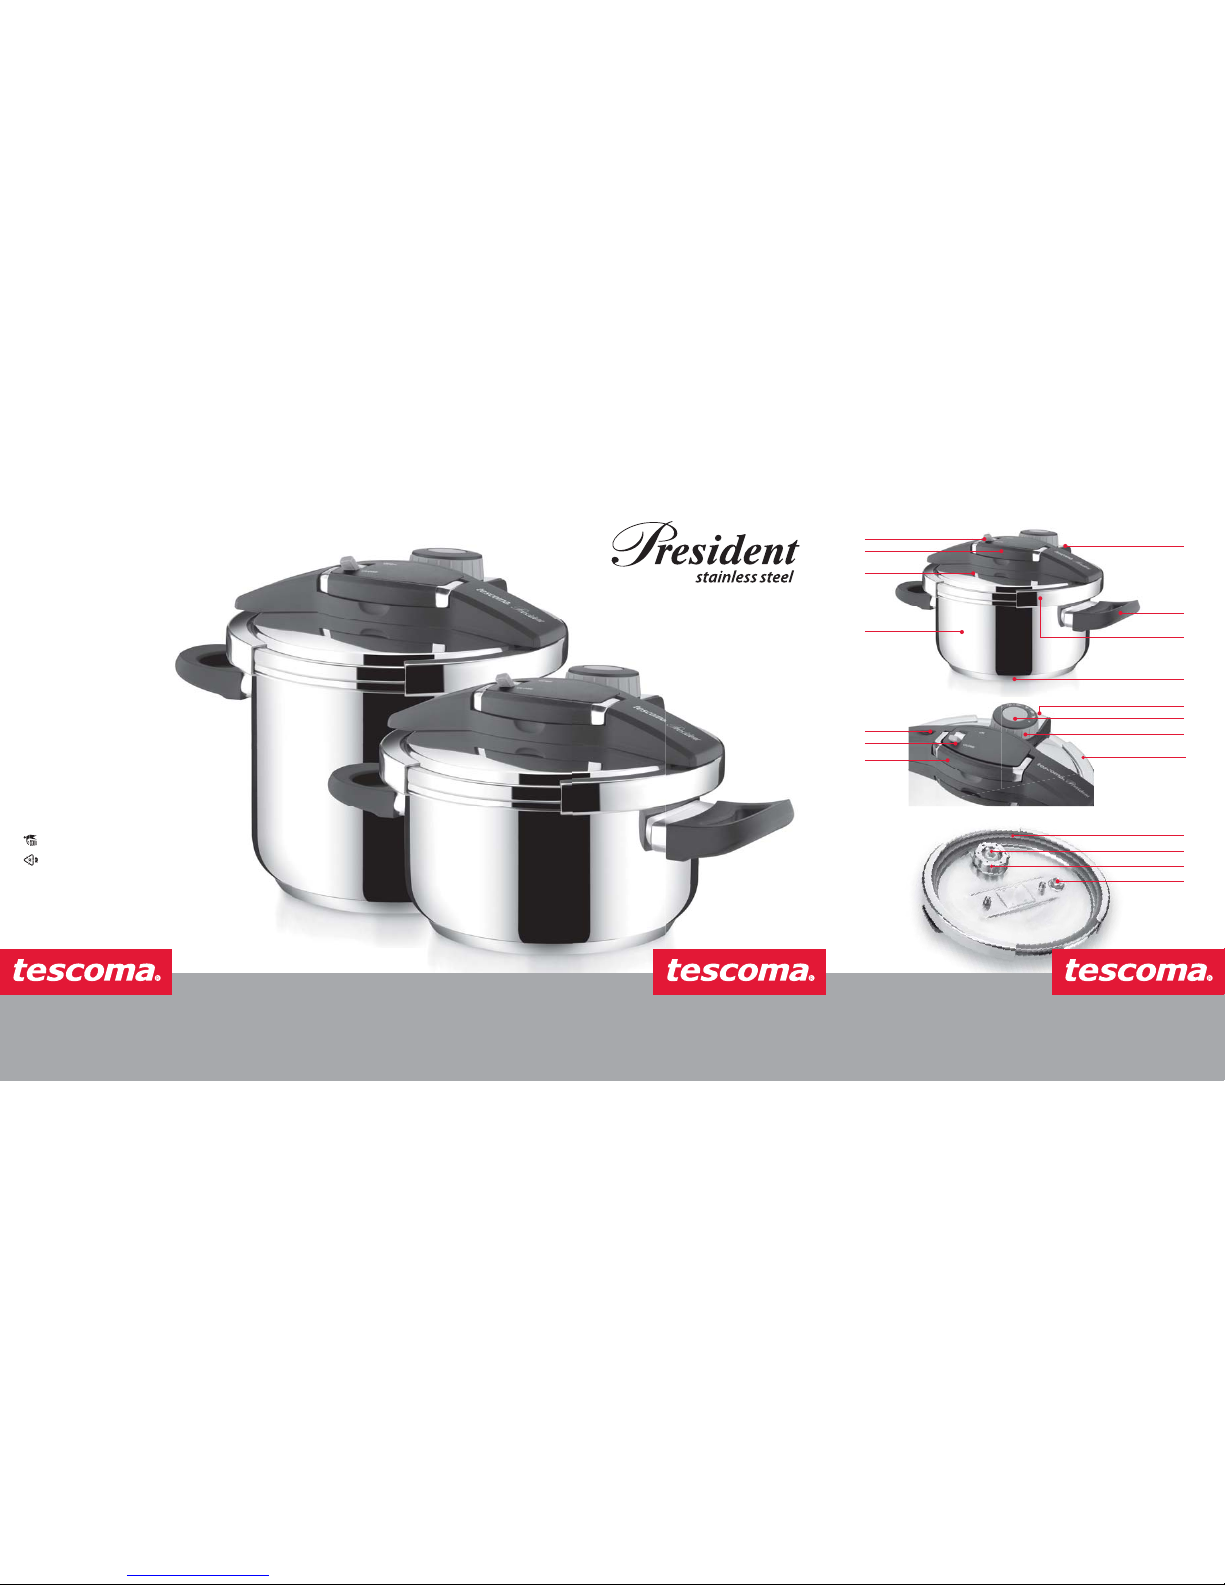
PRESSURE COOKER DESCRIPTION
1) Operating valve
1a) Pressure regulator and steam release IDEALCOOK
1b) Pressure indicator of the vessel
1c) Nut of the operating valve
1d) Pressure-reducing safety component
2) Safety valve
3) Lock against accidental opening
4) Safety closure
5) Folding handle
6) Clamp-type closure
7) Lid of the pressure cooker
8) Silicone seal
9) Pressure cooker vessel
10) Solid grips
11) Sandwich bottom
Pressure cooker PRESIDENT

3
BEFORE FIRST USE
Thoroughly study these instructions for use before rst use.Wash the pressure cooker and all its parts with
warm water and detergent and wipe them dry.
BEFORE EACH USE
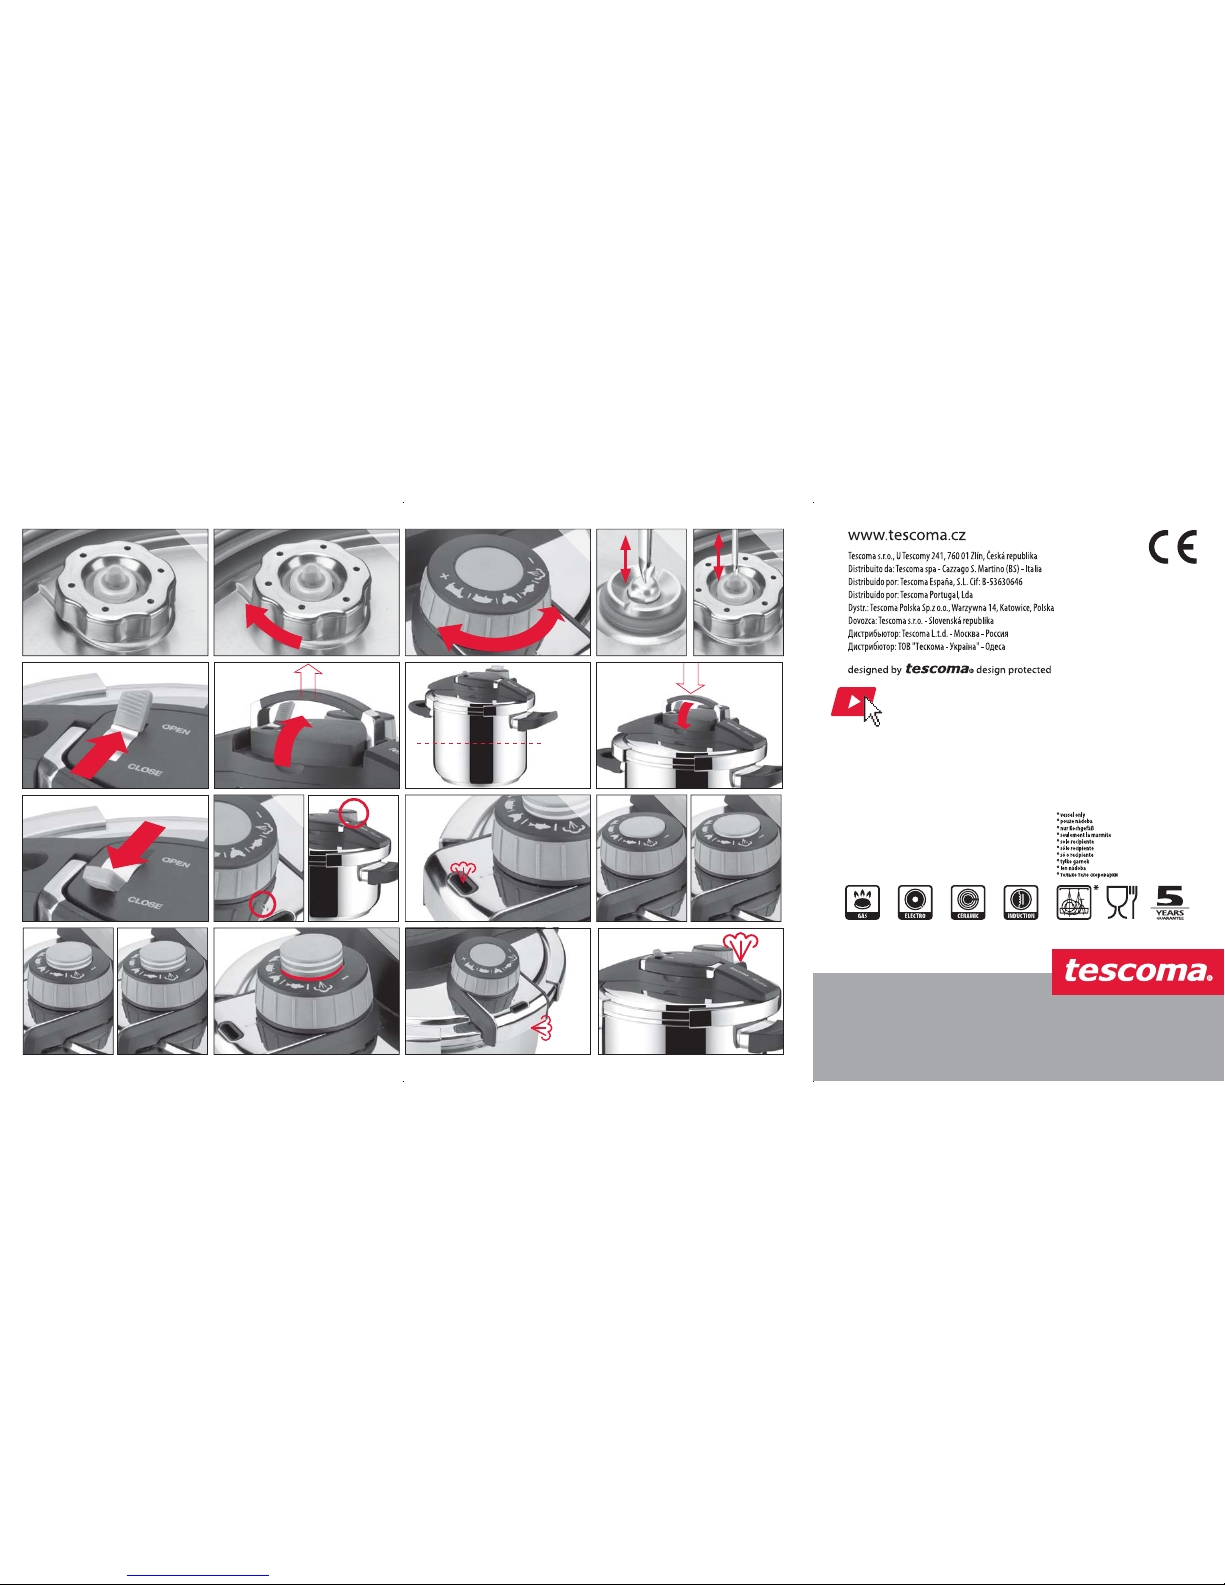
Inspecting the valves
Operating valve
Checktheholes in thenutofthe operatingvalveon the bottomofthe lidofthepressurecooker– theymust
be clean, not clogged. If clogged, ush them under running water or clean using a suitable object (Fig. A).
Check if the nut of the operating valve in the bottom of the lid is tight enough; if not, tighten the nut with
your hand (Fig. B).
After inspection, make sure that the pressure regulator IDEALCOOK can be smoothly adjusted to any
operating position as well as the position for releasing steam xxxxx (Fig. C).
Safety valve
Push on the centre of the safety valve in the bottom of the lid – it must spring. Make sure that the entire
safety valve moves freely in the lid and the seal of the safety valve is not damaged (Fig. D).
Pressure indicator
Push on the pressure indicator seal in the centre of the nut of the operating valve in the bottom of the
lid – it must spring (Fig. E).
USING THE PRESSURE COOKER
Opening the pressure cooker
Move the safety closure control to the“OPEN”position; this will release the clamp-types closure (Fig. F).
Lift the handle and remove the lid from the pressure cooker vessel (Fig. G).
ALWAYS OPEN THE PRESSURE COOKER ONLY AFTER ENTIRELY RELEASING STEAM FROM IT. NEVER APPLY
INAPPROPRIATE FORCEWHEN OPENINGTHE PRESSURE COOKER.
Filling the pressure cooker
FOR SAFETY REASONS,THE PRESSURE COOKER MUST BE FILLEDTO A MAXIMUM OF 2/3VESSEL CAPACITY.
With foods that tend to froth or swell when heated, such as soups or lentils, rice, etc., ll the pressure
cooker to a maximum of ½ vessel capacity to avoid unwanted clogging of valves and boiling over (Fig. H).
DO NOT COOKWITHOUTWATER INTHE PRESSURE COOKER.THE MINIMUM AMOUNT OFWATER IS 250 ML.
Closing the pressure cooker
Grab the handle of the lid of the pressure cooker, attach it to the vessel by lowering it to the horizontal
position and fold the lid down; this will close the pressure cooker (Fig. J).
Move the safety closure control to the“CLOSE”position; this will close the pressure cooker (Fig. K).
Make sure that the pressure regulator IDEALCOOK can be smoothly adjusted to any operating position as
well as the position for releasing steam xxxxx (Fig. C).
DO NOT APPLY INAPPROPRIATE FORCE WHEN CLOSING THE PRESSURE COOKER.

4
COOKING IN THE PRESSURE COOKER
Adjusting the ideal pressure
ADJUST THE IDEAL PRESSURE BEFORE YOU BEGIN TO COOK BY SLIGHTLY TURNING THE PRESSURE REGULATOR,
IDEALCOOK, INTOTHE POSITION CORRESPONDINGTOTHE CHOSEN FOOD (FIG. L).
If you cook sh, fruits, vegetables including potatoes, or cereals in pressure cooker PRESIDENT, adjust the
pressure regulator to the xxxxx position. We recommend using the steamer basket when preparing sh
and tender vegetables.
If you cook poultry, rabbit, young venison, etc. in pressure cooker PRESIDENT, adjust the pressure regulator
to the xxxx position.
If you cook pork, venison, soups or lentils in pressure cooker PRESIDENT, adjust the pressure regulator to
the xxxxx position.
If you cook beef, mutton or lamb in pressure cooker PRESIDENT, adjust the pressure regulator to the xxxxx
position.
YOU CAN ALSO USE INTERMEDIATE SETTINGS FOR SOME FOOD TO ACHIEVE THE IDEAL ADJUSTMENT OF
PRESSURE, E.G.THE POSITION BETWEEN xxxx AND xxxxx FORVEAL – SEETHETABLE OF INDICATIVETIMES OF
PREPARATION OF FOOD IN PRESSURE COOKER PRESIDENT.
Cooking
Place the correctly lled and closed pressure cooker with the selected ideal pressure onto heat set to the
highest output. Put the pressure cooker on heat so that the IDEALCOOK pressure regulator is on the remote
end of the pressure cooker (Fig. M).
The red lock against accidental opening will slip upwards after a short while.This means that pressure has
been generated in the vessel and the pressure cooker can no longer be opened - steam will begin to escape
from the aperture in the operating valve after a while (Fig. N).
When steam begins to escape from the aperture in the operating valve, reduce the heat
output so that only a small amount of steam escapes from the aperture.
Pressure control during the cooking process
Once operating pressure is generated in the vessel of the pressure cooker, the pressure indicator slips
upwards and indicates accurately the current pressure in the vessel (Fig. O, P, Q, R).
Control the output of the cooker during the entire cooking process so that a small amount of
steam continuously escapes from the aperture of the operating valve.
WARNING! If the pressure indicator shows a red ring in addition to the two white rings and
the three grey rings (Fig. S), the pressure in the vessel is higher than the maximum permitted
operating pressure (1.05 bar). In this case, immediately reduce the heat output to minimum
and make sure that the pressure indicator immediately slips to a lower position. If, even after
reducing heat output to minimum, the pressure indicator fails to slip downwards and continues
toshow theredring,immediatelyturnothe heat sourceandremovethepressurecookerfrom
theheat.Leaveit tocooldownuntil the pressure inthevesseldropsentirelyandonly then open
the pressure cooker again, clean it and, following the instructions for use, check all valves and
safety components for functioning.
The pressure adjustment inside the vessel can be changed also during the cooking process; to do so, make
sure when handling the pressure regulator that the steam escaping from the pressure cooker is directed
away from you and use an oven mitten when handling the regulator.
WARNING! A MINUTE AMOUNT OF STEAM MAY ALSO ESCAPE FROM THE AREA BETWEEN THE LID AND THE
BOTTOM OFTHE OPERATINGVALVE DURINGTHE COOKING PROCESS (Fig. R).

5
ENDING THE COOKING PROCESS
Releasing steam and opening the pressure cooker
ALWAYS RELEASE STEAM ONLY AFTER REMOVINGTHE PRESSURE COOKER FROMTHE HEAT.
After the time required for cooking your meal elapses, remove the pressure cooker from the heat source
even if the latter has already been switched o.
Set the pressure cooker aside for a while to allow the temperature and pressure in the pressure cooker to
drop suciently.
Make sure before releasing steam that the pressure cooker is placed on the heat source in such a way that
the IDEALCOOK pressure regulator is on the remote end of the pressure cooker. Then adjust the pressure
regulator to the steam release position and release all steam from the pressure cooker (Fig. U).
The pressure intensity regulator automatically slips into the operating valve while the steam is released.
The lock against accidental opening will slip downwards after the steam has been entirely released and the
pressure has entirely dropped.The pressure cooker can now be opened.
If the pressure indicator and the lock against accidental opening remain slipped to the upper position after
steam is released, this means that there is still pressure in the vessel. In this case, put the pressure cooker
into the sink and cool the lid with a small amount of slowly running cold water until the pressure indicator
and the lock slip into position.
NEVER COOL THE PRESSURE COOKER ABRUPTLY UNDER RUNNING WATER, DO NOT LET WATER RUN DOWN
THE PLASTIC PARTS AND DO NOT IMMERSETHE ENTIRE PRESSURE COOKER INWATER.
NEVER OPEN THE PRESSURE COOKER BEFOREYOU HAVE RELEASED ALL STEAM AND THE RED LOCK AGAINST
ACCIDENTAL OPENING SLIPS AUTOMATICALLY INTO POSITION.
FUNCTIONING OF THE SAFETY COMPONENTS
Operating valve
The operating valve controls the operating pressure in the vessel, continuously releases excess steam
and releases all steam from the pressure cooker at the end of cooking. The operating valve includes the
pressure-reducing safety component – if the operating valve and the safety valve become clogged
at once and the pressure cooker is not removed from the heat in time, the pressure in the pressure cooker
releases the pressure-reducing safety component inside the operating valve, whereby the pressure drops
immediately and steam escapes from the pressure cooker. The operating valve and especially the aperture
for releasing steam must remain free and not covered e.g. by an oven mitten or any other object while the
pressure cooker is in use.
Safety valve
The safety valve operates as a safety component activated when the operating valve becomes clogged. If
steam begins to escape intensely from the safety valve during the cooking process, immediately remove
the pressure cooker from the heat. When the pressure cooker cools down, open it, unscrew the nut of the
operating valve on the bottom of the lid, remove the operating valve from the lid and thoroughly clean it
underrunningwater. Pressyourngersonthepressure-reducingsafety component,the pressureregulator
and the pressure intensity indicator to make sure that all of the 3 components spring. Clean the apertures
in the nut of the operating valve and install the operating valve back into the lid of the pressure cooker.
Lock against accidental opening
Prevents accidental opening of the pressure cooker before all steam has escaped from the vessel and
pressure has dropped entirely.

6
Pressure indicator
The pressure intensity indicator uses white and grey rings to show the current pressure in the vessel. If the
indicator is inserted inside the operating valve, there is no operating pressure in the vessel. If the pressure
intensity indicator shows a red ring, the operating pressure in the vessel is higher than permitted; in this
case, immediately reduce the heat output to minimum and if the red ring remains in the upper position
even after reducing the heat output, immediately turn o the heat source and remove the pressure cooker
from the heat.
PRACTICAL HINTS
ALWAYS USE AN APPROPRIATE SIZE OF COOKING RANGE OR FLAME FOR COOKING.
The diameter of the cooking range must be identical or smaller than the diameter of the bottom of the
pressure cooker! Flames must never expand beyond the bottom of the pressure cooker. Use the dispenser
net or cooking range when cooking on gas.
Make use of the heat retaining properties of the three-layer sandwich bottom. Switch the heat o in
advance before the end of cooking. Thanks to the three-layer sandwich bottom, the accumulated heat
energy is transferred into the pressure cooker even after the heat has been switched o.
The vessel of the pressure cooker may also be used without the lid as a traditional pot for cooking meals
on the cooking range.
NOTICE
Ifalargeamountofsteam escapesfromthepressurecookerat thebeginningofthecookingprocess,the
pressure cooker has not been correctly closed. Incorrect closing is usually due to the following:
a) The lid is attached incorrectly - close the pressure cooker again.
b) Thepressureregulatorissetinthesteamreleaseposition – adjust ittooneof the positions forcooking.
c) The silicone seal is incorrectly positioned in the lid - check its position.
d) The silicone seal is faulty - replace it with a new originalTescoma seal.
STORAGE, MAINTENANCE AND CLEANING
Lid
DO NOTWASH THE LID OFTHE PRESSURE COOKER IN DISHWASHER.
Cleantheoperatingvalveaperturesbyushingthemwithrunningwaterorcleanthemusingasuitableobject.
Clean the safety valve by repeatedly pushing on the centre and lightly pulling the entire valve upwards
under running water.
Do not dismount the safety valve, the folding handle, the clamp-type closure, the grips or other parts of the lid.
ALWAYS STORETHE PRESSURE COOKERWITH THE LID UNATTACHED.
Vessel
THEVESSEL OFTHE PRESSURE COOKER IS DISHWASHER SAFE.
Should white stains due to scale formation appear inside the pressure cooker, use vinegar, drops of
lemon or the special stainless steel cleaning agent CLINOX to clean them. The white stains do not aect
functioning of the cookware and are not hazardous to health. As such they do not represent a fault and
cannot be claimed. When the pressure cooker is overheated, purple to brown stains might appear on the

7
surface.These stains do not aect correct functioning of the cookware and are not hazardous to health. As
such they do not represent a fault and cannot be claimed.
Never expose the pressure cooker vessel to detergents including water-soluble detergents for prolonged
periods of time. Do not store leftover food inside the vessel.
Silicone seal
The pressure cooker seal is made of excellent silicone. Remove the seal from the lid after each use of the
pressure cooker, wash it and dry, lightly grease with cooking oil or fat and insert back in.
If the seal shows any signs of leakage or loss of exibility, it must be immediately replaced with a new
Tescoma brand seal.
If you are not constantly using the pressure cooker, replace the seal regularly at two-year intervals.
ALWAYS USETESCOMA SPARE PARTS.
SAFETY INSTRUCTIONS pursuant to EN 12778
1. Read the INSTRUCTIONS FOR USE thoroughly before rst use.
2. Do not leave the pressure cooker unattended during the cooking process and do not use it for any
other purposes than cooking foodstus.
3. Check the operating valve and the safety valve for proper functioning prior to each use.
4. Handle the pressure cooker with utmost care when cooking; never touch the hot parts.
5. Prevent children coming near the pressure cooker while cooking.
6. Fill the pressure cooker to a maximum of vessel capacity; when cooking foods that tend to swell, such as
rice,lentils,pasta, etc.,ll thepressurecooker toamaximum of½ vesselcapacity. Shakethe closedpressure
cooker before opening it when cooking pasta in pressurised environment. Never cook without water.
7. Do not put meals wrapped in fabric, paper or plastic materials into the pressure cooker. Never pierce
foods that tend to expand in volume (such as meat with skin, beef tongue, etc.) while the skin is
enlarged to avoid scalding.
8. Do not open the pressure cooker without entirely reducing pressure inside the vessel. Never apply
force when opening the pressure cooker.
9. Do not put the pressure cooker inside a heated oven and do not use it for frying.
10. Do not intervene in any system within the pressure cooker beyond the Instructions for use - always
contact a professional service for repairs and use nothing other than original spare parts.
WARNING! INTENDEDFORHEATTREATMENTOFFOODSINAPRESSURISEDENVIRONMENT. IMPROPER USEOR
MAINTENANCE CAN CAUSE INJURY!

8
MEAT
Beef pressure regulator time in min
Roll 20-30
Roast beef 30-40
Sirloin 30-40
Soup meat 35-40
Tongue 45
Pork
Smoked side 20
Roll 20-30
Boiled pork knuckle 25-30
Roast 30-35
Veal
Roast between 12-15
Head between 15
Leg between 15-20
Tongue between 15-20
Lamb and mutton
Leg 30
Poultry
Squab 8-10
Chicken 15
Hen 15-20
Giblets 15
Venison
Rabbit 15
Roasted hare 15
Venison back between 10
Hare on pepper 10-15
Venison leg 20-30
FISH, FRUITS AND VEGETABLES
Fish time in min
Depending on amount 6-8
Potatoes
Sliced salted potatoes 7-9
Potatoes in their jackets 10-15
Fruit
Sliced apples 2-5
Sliced pears 2-5
Vegetables
Spinach 2-3
Pepper 3-4
Sliced celery 3-5
Sliced garlic 4
Broccoli 5-6
Sterilised beans 5-6
Kohlrabi 5-6
Carrot 6-8
Asparagus 6-10
Sprouts 8-10
Cut cauliflower 8-9
Cabbage between 7-12
Red cabbage between 8-10
Sauerkraut between 10-12
Wholecauliflower between 15-18
SOUPS, LENTILS AND CEREALS
Soups
Mushroom soup 2-5
Chicken broth 30
Oxtail 25-30
Lentils
Soaked peas 10-12
Soaked beans 25-30
Oat and maize
Oat and maize
Oat flour 5
Oat flakes 6
Gristles 6
Maize 10
Rice
Rice milk 7-8
Risotto 5-7
INDICATIVE TIMES OF COOKING IN PRESSURE COOKER PRESIDENT
The times of cooking specified below apply when the ideal pressure is set for the chosen kind of food from
the time when steam begins to escape from the operating valve. When this happens, set to low heat. All
these times are indicative and depend on the ingredients, their quantity, quality, initial temperature, type
of heat source, etc. Deviations from the indicated times might occur; you will determine accurate times
based on your own experience.
//
/
/
/
/
/
/
/

9
WARRANTY CERTIFICATE
A 5-year warranty period applies to this product from the date of purchase. Present this warranty
certificate with a valid purchase receipt. Provision of the warranty does not prejudice the purchaser’s rights
applicable to the purchase under the special legal regulations. The warranty period commences on the
date of purchase.
Product:
Retailer (trade name and address):
Date of purchase:
Retailer’s stamp and signature:
The warranty does not cover:
- improper use of the product incompatible with the Instructions for use
- unauthorised repairs of and alterations to the product
- anything other than the original spare parts used in the product
- defects resulting from an impact or fall
- everyday wear and tear of the product, with the exception of obvious material defects.
If you feel your complaints are justified, please contact your retailer or aTescoma servicing centre directly.
For a current list of the servicing centres, please refer to www.tescoma.com.
THE MANUFACTURER IS NOT LIABLE FOR ANY DAMAGE DUE TO HANDLING AND USING THE PRESSURE
COOKER ATVARIANCEWITHTHESE INSTRUCTIONS FOR USE.

10
Blahopřejeme kzakoupení výrobku Tescoma a děkujeme za důvěru projevenou naší značce.
Vpřípadě potřebyseprosím obraťtena svéhoprodejcenebo narmuTescoma prostřednictvím
www.tescoma.com.
CHARAKTERISTIKA
Luxusnítlakový hrnec PRESIDENT se snadným nastavenímideálního tlaku IDEALCOOKprorychlou a šetrnou
přípravu všech obvyklých pokrmů je vynikající pro přípravu všech druhů masa včetně ryb, zeleniny,
příloh i polévek.Vaření stlakovým hrncem PRESIDENT probíhá výrazně rychleji než standardní vaření.
Tlakový hrnec PRESIDENT je dodáván snapařovacím sítem, které umožňuje i vaření vtlakovém hrnci vpáře, které
jevynikající zejména propřípravuryb akřehkézeleniny. Napařovacísíto jevyrobenozprvotřídnínerezavějícíoceli.
Komfortní sklápěcí rukojeť a speciální bezpečnostní uzávěr víka umožňují snadné otevírání a uzavírání
tlakového hrnce jen jednou rukou.
Tlakový hrnec je vybaven 3 bezpečnostními tlakovými pojistkami a pojistkou proti nechtěnému otevření,
jeho použití je zcela bezpečné.
Tlakový hrnec PRESIDENT je vyroben z prvotřídní nerezavějící oceli, rukojeti zkvalitních odolných plastů při
správném použití nepálí.
Masivní třívrstvé sendvičové dno má vynikající termoakumulační vlastnosti přispívající k další úspoře
energie. Vaření probíhá při nižším výkonu sporáku, který je možné vypínat s předstihem ještě před
ukončením vaření.
Tlakový hrnec PRESIDENT je vhodný pro všechny typy sporáků: plynové, elektrické, sklokeramické
a indukční.
PRACOVNÍ TLAKY VTLAKOVÉM HRNCI PRESIDENT
0,15 bar
0,40 bar
0,65 bar
0,85 bar
Maximální pracovní tlak vnádobě 1,05 bar.
POPIS TLAKOVÉHO HRNCE
1) Pracovní ventil
1a) Regulátor tlaku a vypouštění páry IDEALCOOK
1b) Indikátor tlaku v nádobě
1c) Matice pracovního ventilu
1d)Tlaková pojistka
2) Bezpečnostní ventil
3) Pojistka proti nechtěnému otevření
4) Bezpečnostní uzávěr
5) Sklápěcí rukojeť
6) Čelisťový uzávěr
7)Víko tlakového hrnce
8) Silikonové těsnění
9) Nádoba tlakového hrnce
10) Masivní úchyty
11) Sendvičové dno
Tlakový hrnec PRESIDENT

11
PŘED PRVNÍM POUŽITÍM
Před prvním použitím si důkladně prostudujte tento návod. Tlakový hrnec a všechny jeho části omyjte
teplou vodou spřídavkem saponátu a vytřete do sucha.
PŘED KAŽDÝM POUŽITÍM
Kontrola ventilů
Pracovní ventil
Zkontrolujte otvory vmatici pracovního ventilu na spodní straně víka tlakového hrnce - musí být čisté,
nezanesené.Vpřípadě zanesení je propláchněte pod proudem vody nebo pročistěte vhodným předmětem
(obr. A).
Zkontrolujte, zda je matice pracovního ventilu ve spodní části víka pevně utažena, pokud tomu tak není,
matici rukou dotáhněte (obr. B).
Po kontrole se ujistěte, že lze regulátor tlaku IDEALCOOK plynule nastavit do kterékoliv pracovní polohy i do
polohy pro vypouštění páry (obr. C).
Bezpečnostní ventil
Zatlačte na střed bezpečnostního ventilu ve spodní části víka - musí pružit. Ověřte, že celý bezpečnostní
ventil se volně pohybuje ve víku, a že těsnění bezpečnostního ventilu je nepoškozené (obr. D).
Indikátor tlaku
Zatlačtena těsněníindikátorutlakuvestředumaticepracovníhoventilunaspodní straněvíka–musípružit
(obr. E).
POUŽITÍ
Otevírání tlakového hrnce
Ovladač bezpečnostního uzávěru posuňte do polohy„OPEN“, tím uvolníte čelisťový uzávěr (obr. F).
Rukojeť zvedněte a víko sejměte znádoby tlakového hrnce (obr. G).
TLAKOVÝ HRNEC OTEVÍREJTE VŽDY AŽ PO ÚPLNÉM VYPUŠTĚNÍ PÁRY ZTLAKOVÉHO HRNCE. PŘI OTEVÍRÁNÍ
TLAKOVÉHO HRNCE NIKDY NEPOUŽÍVEJTE NEPŘIMĚŘENOU SÍLU.
Plnění tlakového hrnce
TLAKOVÝ HRNEC LZE ZBEZPEČNOSTNÍCH DŮVODŮ PLNIT MAXIMÁLNĚ DO 2/3 OBJEMU NÁDOBY.
U jídel, která během tepelného zpracování pění nebo bobtnají, např. polévky nebo luštěniny, rýže apod.,
plňte hrnec maximálně do ½ objemu nádoby, abyste zabránili nežádoucímu zanesení ventilů a překypění
(obr. H).
VTLAKOVÉM HRNCI NEVAŘTE BEZ POUŽITÍVODY. MINIMÁLNÍ MNOŽSTVÍ VODY JE 250 ML.
Uzavírání tlakového hrnce
Víko tlakového hrnce uchopte za rukojeť, nasaďte jej kolmo na nádobu tlakového hrnce a rukojeť víka
sklopte (obr. J).
Ovladač bezpečnostního uzávěru posuňte do polohy„CLOSE“, čímž tlakový hrnec uzavřete (obr. K).
Zkontrolujte, že lze regulátor tlaku IDEALCOOK plynule nastavit do kterékoliv pracovní polohy i do polohy
pro vypouštění páry (obr. C).
PŘI UZAVÍRÁNÍ HRNCE NEPOUŽÍVEJTE NEPŘIMĚŘENOU SÍLU.

12
VAŘENÍ VTLAKOVÉM HRNCI
Nastavení ideálního tlaku
IDEÁLNÍ TLAK NASTAVTE PŘED ZAHÁJENÍM VAŘENÍ POOTOČENÍM REGULÁTORU TLAKU IDEALCOOK DO
POLOHY ODPOVÍDAJÍCÍ ZVOLENÉMU POKRMU (OBR. L).
Pokud budete vtlakovém hrnci PRESIDENT vařit rybu, ovoce, zeleninu včetně brambor nebo obilovin,
nastavte regulátor tlaku do polohy xxxx. Při přípravě ryb a křehké zeleniny doporučujeme používat
napařovací síto.
Pokud budete vtlakovém hrnci PRESIDENT vařit drůbež, králíka, mladou zvěřinu apod., nastavte regulátor
tlaku do polohy xxx.
Pokud budete vtlakovém hrnci PRESIDENT vařit vepřové maso, zvěřinu, polévky či luštěniny, nastavte
regulátor tlaku do polohy xxxx.
Pokud budete vtlakovém hrnci PRESIDENT vařit hovězí, skopové či jehněčí maso, nastavte regulátor tlaku
do polohy xxxx.
U NĚKTERÝCH POTRAVIN MŮŽETE PRO IDEÁLNÍ NASTAVENÍ TLAKU POUŽÍVAT I MEZIPOLOHY, NAPŘÍKLAD
U TELECÍHO MASA POLOHU MEZI SYMBOLY xxxxA xxxx - VIZ TABULKA ORIENTAČNÍCH ČASŮ PŘÍPRAVY
POKRMŮVTLAKOVÉM HRNCI PRESIDENT.
Vaření
Správně naplněný uzavřený hrnec s nastaveným ideálním tlakem postavte na sporák nastavený na nejvyšší
stupeň.Hrnecumístětena sporák tak, aby bylregulátortlakuIDEALCOOKodvásnavzdálenějšístraněhrnce
(obr. M).
Po krátké chvíli se červená pojistka proti nechtěnému otevření hrnce vysune nahoru. To znamená, že se
vnádobě vytvořil tlak a tlakový hrnec již nelze otevřít – pára začne po chvíli unikat zotvoru pracovního
ventilu (obr. N).
Jakmile začne pára unikat zotvoru pracovního ventilu, snižte výkon sporáku tak, aby zotvoru
ucházelo jen malé množství páry.
Kontrola tlaku během vaření
Jakmile se vnádobě tlakového hrnce vytvoří pracovní tlak, vysune se indikátor tlaku, který zobrazí aktuální
tlak vnádobě (obr. O, P, Q, R).
Po celou dobu vaření regulujte výkon sporáku tak, aby zotvoru pracovního ventilu ucházelo průběžně malé
množství páry.
POZOR! Pokud indikátor tlaku zobrazí kromě dvou bílých a třech šedých kroužků také kroužek
červený (obr. S), je vnádobě vyšší než maximálně povolený pracovní tlak (1,05 bar) Vtakovém
případě ihned snižte výkon sporáku na minimum a ujistěte se, že se indikátor tlaku ihned
zasunul do nižší polohy. Pokud se i po snížení výkonu sporáku na minimum indikátor tlaku
nezasune a zobrazuje i nadále červený kroužek, sporák ihned vypněte a tlakový hrnec
odstavte.Ponechtejej vychladnoutaždoúplnéhosnížení tlaku vnádoběateprvepoté tlakový
hrnec otevřete, vyčistěte a zkontrolujte funkci všech ventilů a bezpečnostních pojistek podle
návodu.
Nastavení tlaku uvnitř nádoby lze měnit i během vaření, vtakovém případě se ujistěte, že při manipulaci
s regulátorem tlaku směruje pára vycházející z hrnce směrem od vás a při manipulaci sregulátorem
používejte kuchyňskou rukavici.
POZOR! V PRŮBĚHU VAŘENÍ MŮŽE NEPATRNÉ MNOŽSTVÍ PÁRY UNIKAT TAKÉ Z PROSTORU MEZI VÍKEM
A SPODNÍ STRANOU PRACOVNÍHOVENTILU (OBR.T).

13
UKONČENÍ VAŘENÍ
Vypouštění páry a otevírání tlakového hrnce
PÁRU ZTLAKOVÉHO HRNCEVYPOUŠTĚJTEVŽDY AŽ PO JEHO ODSTAVENÍ ZE SPORÁKU.
Po uplynutí doby potřebné kuvaření pokrmů sejměte tlakový hrnec ze sporáku, a to i vpřípadě, že je sporák
již vypnutý.
Tlakový hrnec ponechte chvíli odstavený, aby teplota a tlak vhrnci dostatečně poklesly.
Před vypouštěním páry se ujistěte, že je tlakový hrnec umístěn na sporáku tak, aby byl regulátor tlaku
IDEALCOOK od vás na vzdálenější straně hrnce. Poté nastavte regulátor tlaku do polohy pro vypouštění páry
a ztlakového hrnce vypusťte veškerou páru (obr.U).
Běhemvypouštěnípáryseindikátorintenzitytlakusámzasunedopracovníhoventilu.Poúplnémvypuštění
páry a úplném snížení tlaku se pojistka proti nechtěnému otevření zasune dolů a tlakový hrnec lze otevřít.
Pokud indikátor tlaku a pojistka proti nechtěnému otevření zůstávají po vypuštění páry vysunuty vhorní
poloze, znamená to, že je vnádobě stále tlak.Vtakovém případě vložte tlakový hrnec do dřezu a ochlaďte
poklici malým množstvím pomalu stékající studené vody, dokud se indikátor tlaku a pojistka nezasunou.
TLAKOVÝ HRNEC POD TEKOUCÍ VODOU NIKDY NEOCHLAZUJTE ZPRUDKA, VODU NENECHTE STÉKAT PO
PLASTOVÝCH ČÁSTECH A HRNEC NENOŘTE DOVODY CELÝ.
TLAKOVÝ HRNEC NIKDY NEOTEVÍREJTE, DOKUD NEVYPUSTÍTE Z HRNCE VEŠKEROU PÁRU A ČERVENÁ
POJISTKA PROTI NECHTĚNÉMU OTEVŘENÍ SE SAMA NEZASUNE.
FUNKCE BEZPEČNOSTNÍCH POJISTEK
Pracovní ventil
Pracovní ventil reguluje pracovní tlak v nádobě, průběžně vypouští přebytečnou páru a po ukončení
vaření vypouští zhrnce veškerou páru. Součástí pracovního ventilu je tlaková bezpečnostní pojistka
– pokud dojde k zanesení pracovního i bezpečnostního ventilu současně a tlakový hrnec není včas
odstaven ze sporáku, tlak vhrnci uvolní bezpečnostní tlakovou pojistku uvnitřpracovního ventilu, čímž
dojde kokamžitému snížení tlaku a úniku páry. Během použití tlakového hrnce musí pracovní ventil a
zejména otvor pro vypouštění páry zůstat volný, nezakrytý např. kuchyňskou rukavicí ani jakýmkoliv jiným
předmětem.
Bezpečnostní ventil
Bezpečnostní ventil funguje jako pojistka při zanesení pracovního ventilu. Vpřípadě, že během vaření
začnepáraintenzivněunikat zbezpečnostního ventilu,hrnec ihnedodstavte.Povychladnutí tlakový hrnec
otevřete, odšroubujte matici pracovního ventilu na spodní straně víka, vyjměte zvíka pracovní ventil a pod
tekoucí vodou jej důkladně vyčistěte. Zatlačením prstů na bezpečnostní tlakovou pojistku, regulátor tlaku
i indikátor intenzity tlaku se ujistěte, že všechny 3 komponenty pruží. Pročistěte otvory vmatici pracovního
ventilu a pracovní ventil namontujte zpět do víka tlakového hrnce.
Pojistka proti nechtěnému otevření
Brání nechtěnému otevření tlakového hrnce, dokud z nádoby neunikne všechna pára a nedojde kúplnému
snížení tlaku.
Indikátor tlaku
Indikátor intenzity tlaku zobrazuje bílými a šedými kroužky aktuální tlak vnádobě. Pokud je indikátor
zasunutý uvnitř pracovního ventilu, není vnádobě pracovní tlak. Pokud indikátor intenzity tlaku zobrazí
červený kroužek, je vnádobě vyšší než povolený pracovní tlak, vtakovém případě ihned snižte výkon
sporáku na minimum, a pokud červený kroužek zůstává i po snížení výkonu sporáku stále vysunutý,
vypněte sporák a tlakový hrnec odstavte.

14
PRAKTICKÁ DOPORUČENÍ
KVAŘENÍ VOLTEVŽDY ODPOVÍDAJÍCÍVELIKOST PLOTÝNKY NEBO PLAMENE.
Průměr plotýnky musí být stejný nebo menší než je průměr dna hrnce! Plamen nesmí nikdy přesahovat
okraje dna hrnce. Při vaření na plynu používejte rozptylovací síťku nebo varnou plotýnku.
Využívejte termoakumulačních vlastností třívrstvého sendvičového dna. Sporák vypínejte spředstihem
ještě před ukončením vaření. Díky třívrstvému sendvičovému dnu je akumulovaná tepelná energie
předávána do hrnce i po vypnutí sporáku.
Nádobu tlakového hrnce bez víka je možné využít i jako klasický hrnec pro přípravu pokrmů na plotně
sporáku.
UPOZORNĚNÍ
Pokud na počátku vaření z tlakového hrnce uniká velké množství páry, není tlakový hrnec správně
uzavřen. Nesprávné uzavření je obvykle způsobeno:
a) Víko není správně nasazeno - zopakujte uzavření hrnce.
b) Regulátor tlaku je nastavený v poloze pro vypouštění páry - nastavte jej do polohy pro vaření při
nízkém nebo vysokém tlaku.
c) Silikonové těsnění není správně osazeno ve víku - zkontrolujte jeho umístění.
d) Silikonové těsnění je poškozeno - vyměňte jej za nové originální těsnění značkyTescoma.
SKLADOVÁNÍ, ÚDRŽBA a ČIŠTĚNÍ
Víko
VÍKOTLAKOVÉHO HRNCE NEMYJTEVMYČCE NÁDOBÍ.
Otvory maticepracovníhoventilučistětepropláchnutímpod proudemvody, případně je vyčistětevhodným
nástrojem.
Bezpečnostní ventil vyčistěte opakovaným zatlačením na střed a povytažením celého ventilu pod tekoucí
vodou.
Bezpečnostní ventil, sklápěcí rukojeť, čelisťový uzávěr, úchyty ani jiné části víka nedemontujte.
TLAKOVÝ HRNEC SKLADUJTEVŽDYS NENASAZENÝMVÍKEM.
Nádoba
NÁDOBUTLAKOVÉHO HRNCE LZE MÝT VMYČCE NÁDOBÍ.
Objeví-liseuvnitřhrncebílé usazeninyvodníhokamene,vyčistětejeoctem,několikakapkami citronunebo
speciálním prostředkem na čištění nerezového nádobí CLINOX. Bílé skvrny nijak neomezují funkčnost či
zdravotní nezávadnost nádobí, nejsou vadou výrobku a nemohou být předmětem reklamace. Při přehřátí
hrnce se na povrchu může objevit alové až hnědé zabarvení. Toto zabarvení neomezuje funkčnost či
zdravotní nezávadnost hrnce, není vadou výrobku a nemůže být předmětem reklamace.
Na nádobu tlakového hrnce nenechávejte nikdy dlouhodobě působit saponáty, a to ani vodou ředěné.
Uvnitř nádoby neskladujte zbytky pokrmů.

15
Silikonové těsnění
Těsnění tlakového hrnce je vyrobeno zprvotřídního silikonu. Po každém použití tlakového hrnce vyjměte
těsnění z víka, umyjte jej, osušte, potřete lehce potravinářským olejem nebo tukem a vložte zpět.
Pokud těsnění vykazuje jakékoliv známky netěsnosti nebo ztrátu pružnosti, je třeba jej okamžitě vyměnit
za nové těsnění značkyTescoma.
Pokud tlakový hrnec nepoužíváte intenzivně, měňte těsnění pravidelně vdvouletých cyklech.
POUŽÍVEJTE ZÁSADNĚ NÁHRADNÍ DÍLY ZNAČKYTESCOMA.
BEZPEČNOSTNÍ POKYNY dle EN 12778
1. Před prvním použitím si důkladně prostudujte NÁVOD KOBSLUZE.
2. Tlakový hrnec nenechávejte během vaření bez dozoru a nepoužívejte jej pro jiné účely, než kvaření
potravin.
3. Před každým použitím zkontrolujte funkčnost pracovního a bezpečnostního ventilu.
4. Během vaření manipulujte stlakovým hrncem smaximální opatrností, nikdy se nedotýkejte jeho
horkých částí.
5. Zamezte dětem v přístupu doblízkosti tlakového hrnce během vaření.
6. Tlakový hrnec plňte maximálně do objemu nádoby, při přípravě pokrmů, které vařením bobtnají,
jako jsou rýže, luštěniny, těstoviny apod., plňte tlakový hrnec max. do ½ objemu nádoby. Při vaření
těstovin pod tlakem uzavřeným hrncem po úplném snížení tlaku před otevřením zatřeste. Nikdy
nevařte bez použití vody.
7. Do tlakového hrnce nevkládejte jídla zabalená do tkaniny, papíru nebo plastikových obalů. Pokrmy,
u kterých dochází ke zvětšení objemu (např. maso skůží, hovězí jazyk apod.), nikdy nepropichujte,
dokud je kůže nabobtnalá - nebezpečí opaření.
8. Tlakový hrnec neotvírejte, aniž byste zcela snížili tlak uvnitř nádoby. Nikdy při otvírání hrnce
nepoužívejte sílu.
9. Tlakový hrnec nedávejte do vyhřáté pečící trouby a nepoužívejte ke smažení.
10. Nezasahujte do žádného systému hrnce nad rámec návodu k použití - opravu svěřte vždy odbornému
servisu, nikdy nepoužívejte jiné, než originální náhradní díly.
POZOR! SLOUŽÍ KTEPELNÉ ÚPRAVĚ POKRMŮ POD TLAKEM. NESPRÁVNÉ POUŽITÍ NEBO ÚDRŽBA MOHOU
ZPŮSOBIT PORANĚNÍ.

16
ORIENTAČNÍ ČASY PRO VAŘENÍ V TLAKOVÉM HRNCI PRESIDENT
Uvedené časy vaření jsou stanoveny při nastavení ideálního tlaku pro zvolený druh potraviny od okamžiku,
kdy zpracovního ventilu začne unikat pára. Vtom okamžiku přepněte sporák na nízký výkon. Všechny
uvedené časy jsou orientační, závislé na druhu připravovaných surovin, jejich množství, kvalitě, výchozí
teplotě, typu sporáku atd. Odchylky od uvedených časů nejsou vyloučeny, přesné časy stanovíte na základě
vlastních zkušeností.
MASO
Hovězí maso regulátor tlaku čas v min.
Roláda 20-30
Pečeně 30-40
Svíčková 30-40
Hovězí vývar 35-40
Jazyk 45
Vepřové maso
Uzený bůček 20
Roláda 20-30
Ovarové kolínko 25-30
Pečeně 30-35
Telecí maso
Pečeně mezi 12-15
Hlava mezi 15
Nožička mezi 15-20
Jazyk mezi 15-20
Jehněčí a skopové maso
Kýta 30
Drůbeží maso
Holoubě 8-10
Kuře 15
Slepice 15-20
Husí drůbky 15
Zvěřina
Králík 15
Zaječí pečeně 15
Srnčí hřbet mezi 10
Zaječí na pepři 10-15
Srnčí kýta 20-30
RYBY, OVOCE A ZELENINA
Ryby čas v min.
Dle velikosti porce 6-10
Brambory
Brambory krájené solené 7-9
Brambory ve slupce 10-15
Ovoce
Jablka krájená 2-5
Hrušky krájené 2-5
Zelenina
Špenát 2-3
Paprika 3-4
Celer krájený 3-5
Česnek krájený 4
Brokolice 5-6
Zavařené fazole 5-6
Kedlubny 5-6
Mrkev 6-8
Chřest 6-10
Růžičková kapusta 8-10
Květák dělený 8-9
Hlávkové zelí mezi 7-12
Červené zelí mezi 8-10
Kysané zelí mezi 10-12
Květák celý mezi 15-18
POLÉVKY A LUŠTĚNINY A OBILOVINY
Polévky
Houbová 2-5
Slepičí vývar 30
Volská oháňka 25-30
Luštěniny
Namočený hrách 10-12
Namočené fazole 25-30
Oves a kukuřice
Ovesná mouka 5
Ovesné vločky 6
Ovesná krupice 6
Kukuřice 10
Rýže
Rýžová kaše 7-8
Rizoto 5-7
//
/
/
/
/
/
/
/

17
ZÁRUČNÍ LIST
Na tento výrobek je poskytována záruční doba 5 roků ode dne prodeje. Tento záruční list předkládejte
s platným potvrzením o zakoupení výrobku. Poskytnutím záruky nejsou dotčena práva kupujícího, která se
ke koupi věci váží podle zvláštních právních předpisů. Záruční doba začíná dnem prodeje.
Výrobek:
Prodejce (obchodní název a adresa):
Datum prodeje:
Razítko a podpis prodejce:
Záruka se zásadně nevztahuje na tyto případy:
- výrobek byl používán v rozporu s Návodem k obsluze
- na výrobku byly provedeny neautorizované opravy a změny
- na výrobku byly použity jiné než originální náhradní díly
- závady byly způsobeny úderem či pádem
- výrobek byl opotřebován běžným užíváním, kromě zjevných materiálových vad.
Oprávněnou reklamaci uplatňujte u prodejce, u kterého jste výrobek zakoupili nebo přímo v servisních
střediscíchTescoma. Aktuální seznam servisních středisek na www.tescoma.com.
VÝROBCE NEODPOVÍDÁ ZA JAKÉKOLIV ŠKODY ZPŮSOBENÉ MANIPULACÍ A POUŽITÍM TLAKOVÉHO HRNCE
V ROZPORU STÍMTO NÁVODEM K POUŽITÍ.

18
Wir gratulieren Ihnen zum Kauf des Produktes Tescoma und danken für Ihr in unsere Marke
gezeigtes Vertrauen. Im Bedarfsfall wenden Sie sich bitte an Ihren Händler, bzw. na die Firma
Tescoma über www.tescoma.com.
EIGENSCHAFTEN
Luxuriöser Schnellkochtopf PRESIDENT mit leichter Einstellung der idealen Druckstufe IDEALCOOK für
schnelle und schonende Zubereitung ist für Zubereitung sämtlicher Fleischsorten, Fisch, Gemüse, Beilagen
sowie Suppen hervorragend. Das Kochen im Schnellkochtopf PRESIDENT erfolgt erheblich schneller als
beim üblichen Kochvorgang.
Der Schnellkochtopf PRESIDENT ist mit dem Siebeinsatz geliefert, mit dem auch im Schnellkochtopf das
Dampfgaren möglich ist, was vor allem bei der Zubereitung von Fisch und leckerem Gemüse hervorragend
ist. Der Siebeinsatz ist aus erstklassigem rostfreien Edelstahl hergestellt.
MitdemkomfortablenKlappgrisowie mitdemspeziellenSicherheitsverschlusskannder Schnellkochtopf
leicht nur mit einer Hand geönet und geschlossen werden.
Der Schnellkochtopf ist mit 3 sicherheitsrelevanten Drucksicherungen und einer Sicherung gegen
unbeabsichtigtes Önen ausgestattet, der Kochvorgang ist voll betriebssicher.
Der Schnellkochtopf PRESIDENT ist aus erstklassigem rostfreien Edelstahl hergestellt, die Grien aus
hochwertigen festen Kunststoen werden beim richtigen Gebrauch nicht heiß.
Der massive dreischichtige Sandwich-Boden hat ausgezeichnete Wärmeleit-Eigenschaften, die noch
weitere Energieersparnis bringen. Das Kochen erfolgt bei der niedrigeren Leistungsstufe des Kochherdes,
der ausgeschaltet werden kann, bevor das Gargut fertig gekocht ist.
Der Schnellkochtopf ist für sämtliche Herdarten geeignet: Gas-, Elektro-, glaskeramische sowie Induktionsherde.
ARBEITSDRUCKE IM SCHNELLKOCHTOPF PRESIDENT
0,15 bar
0,40 bar
0,65 bar
0,85 bar
Maximaler Arbeitsdruck im Kochgefäß 1,05 bar.
BESCHREIBUNG DES SCHNELLKOCHTOPFES
1) Arbeitsventil
1a) Druckregler und Dampfaustrittloch IDEALCOOK
1b) Druckanzeige im Kochgefäß
1c) Mutter des Arbeitsventils
1d) Drucksicherung
2) Sicherheitsventil
3) Sicherung gegen unbeabsichtigtes Önen
4) Sicherheitsverschluss
5) Klappgri
6) Backenverschluss
7) Deckel des Schnellkochtopfes
8) Silikon-Dichtung
9) Kochgefäß
10) Massive Grie
11) Sandwich-Boden
Schnellkochtopf PRESIDENT
This manual suits for next models
1
Table of contents
Languages:
Other Tescoma Electric Pressure Cooker manuals

Tescoma
Tescoma Prominent User manual

Tescoma
Tescoma Ultima Series User manual

Tescoma
Tescoma MAGNUM User manual

Tescoma
Tescoma IMPRESSION User manual

Tescoma
Tescoma Bio exclusive User manual

Tescoma
Tescoma 702404 User manual

Tescoma
Tescoma SmartClick 702104 User manual

Tescoma
Tescoma presto User manual

Tescoma
Tescoma Bio exclusice+ User manual

Tescoma
Tescoma President User manual


