ThePondguy clearspring mini 110572 User manual

ClearSpring™ Mini
Waterfall Filter
8
IMPORTANT SAFETY
INSTRUCTIONS
• ClearSpring™ Mini
(Item #110572)
5-YEAR WARRANTY
115_12
NOTES:
__________________________________________________________
__________________________________________________________
__________________________________________________________
__________________________________________________________
__________________________________________________________
__________________________________________________________
__________________________________________________________
__________________________________________________________
__________________________________________________________
__________________________________________________________
__________________________________________________________
__________________________________________________________
__________________________________________________________
__________________________________________________________
__________________________________________________________
__________________________________________________________
__________________________________________________________
__________________________________________________________
__________________________________________________________
__________________________________________________________
www.thepondguy.com
866-POND-HELP (766.3435)
www.thepondguy.com
866-POND-HELP (766.3435)
72
READ AND FOLLOW ALL SAFETY INSTRUCTIONS
• Inspect before use for any damage to the unit. Any damage or missing parts should be
reported immediately before attempting use.
• Always unplug power from pumps or other electrical devices BEFORE putting hands in
water, or if service and maintenance is
being performed.
• Always use properly grounded electrical
equipment and a drip loop on any power
cords to prevent water from travelling
along the cord and into the outlet.
• Do not lift or move the ClearSpring™
Mini using the plumbing.
• The ClearSpring™ Mini is intended for
use with fresh water only. Do not use
ammable materials.
Failure to follow these instructions and
warnings may lead to product damage
or personal injury of which The Pond Guy® or any associated party will not be held liable.
SAVE THESE INSTRUCTIONS
POND HEALTH TIP BEFORE INSTALLATION
• For best results, functional ponds (ponds with plants & sh) should not be exposed
to full sun and should have sufcient plant cover to promote a balanced environment.
• Overfeeding sh is the number one contributor to pond balance problems and
should be avoided.
• If the pond is in an area close to falling leaves or debris, a cover net should be used.
ClearSpring™ Mini
Waterfall Filter
Installation & Maintenance Instructions
Partially Buried
ClearSpring™ Mini
Plug
Buried
Tubing
Pond
Elevated mound
of soil, sand
and rock
Bio Balls
Blue Coarse
Filters
Black Fine Filters
NOTES:
__________________________________________________________
__________________________________________________________
__________________________________________________________
__________________________________________________________
__________________________________________________________
__________________________________________________________
__________________________________________________________
__________________________________________________________
__________________________________________________________
__________________________________________________________
__________________________________________________________
__________________________________________________________
__________________________________________________________
__________________________________________________________
__________________________________________________________
__________________________________________________________
__________________________________________________________
__________________________________________________________
__________________________________________________________
__________________________________________________________
__________________________________________________________
__________________________________________________________
36
BEFORE YOU BEGIN
• When constructing a new pond, try to nd an area in your
yard that offers enough level space in a high ground area.
• Avoid low lying areas to protect
against potential water runoff that
causes ooding and/or unwanted
residues, pesticides, fertilizers,
herbicides or other hazardous
elements that can adversely affect
your pond’s ecosystem.
• Place your pond in a location that
is easily viewable for the most
common areas of your yard, deck,
patio, or from within your home.
ASSEMBLY INSTRUCTIONS
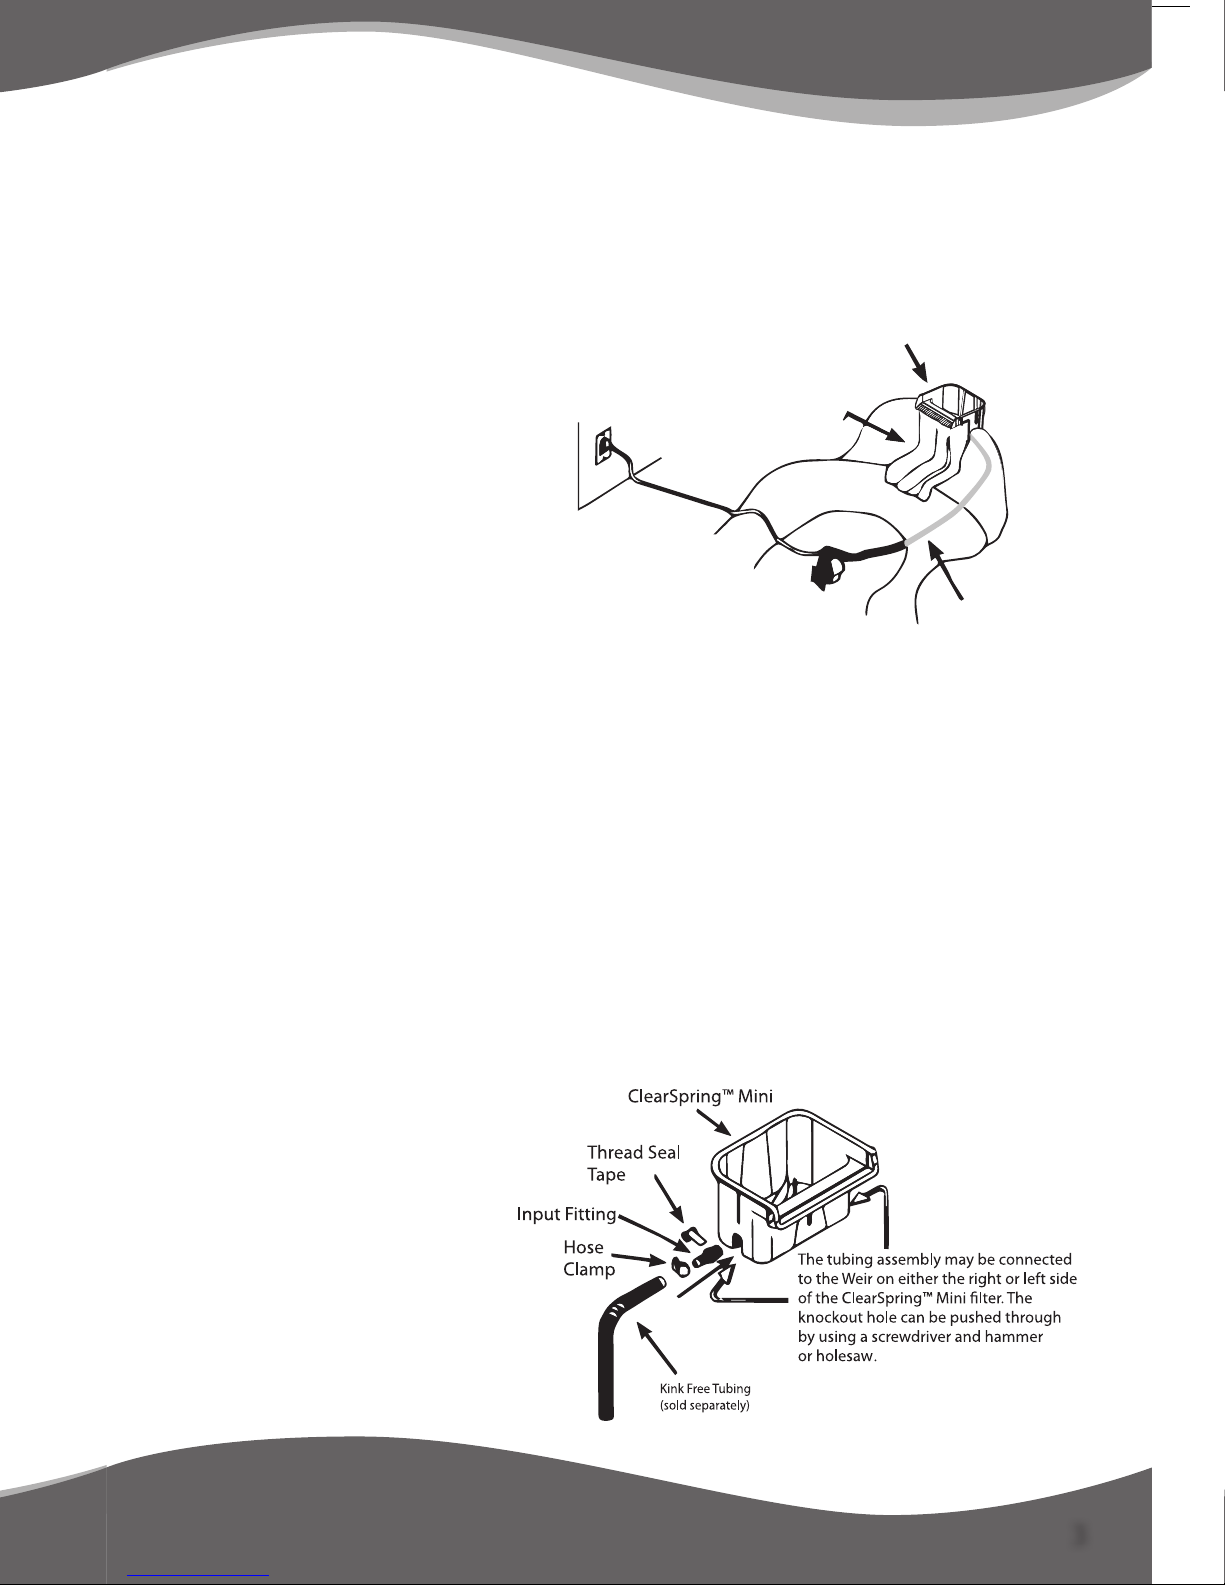
Determine which side of the ClearSpring™ Mini will be used for water input. The
ClearSpring™ Mini has factory sealed inlets on both sides. Remove the knockout on the
desired side to activate the inlet. (see below)
PREPARING THE CONNECTION
• Apply thread seal tape to the threads on the barbed hose tting. If using 1 ½” tubing,
gently saw off the 1” barbs to allow maximum ow.
• Knockout the desired inlet seal using a hammer and large at screwdriver or hole saw.
Clean out any remaining debris to ensure a smooth and complete opening. Be sure not
to damage threads.
• Securely thread the barbed
hose tting into the newly
opened inlet.
• Slide the stainless hose clamp
over one end of your kink-free
tubing. Push tubing onto the
barbed hose tting and tighten
hose clamp to form a tight seal.
Partially Buried
ClearSpring™ Mini
Plug
Buried
Tubing
Pond
Elevated mound
of soil, sand
and rock
Bio Balls
Blue Coarse
Filters
Black Fine Filters
FILTER CLEANING AND MAINTENANCE
• As your lter media begins to ll with debris, water ow and ltration performance
will begin to decline. Cleaning intervals will depend on the pond environment.
• Remove and rinse clogged lter media outside of your pond. To preserve water
ltering bacteria, try using water from your pond to remove loose debris.
• Filter pads that are too saturated with debris, or show noticeable signs of damage
should be replaced.
• Bio ball media will not wear out and can be rinsed and reused indenitely. A brush
can be used to remove stubborn debris.
• Do NOT use chemicals or household cleaning agents to clean lter media.
REPLACMENT PARTS
REPLACEMENT FILTER PAD SET - #110573
WARRANTY
The Pond Guy® will repair or replace the ClearSpring™ Mini Waterfall lter
that is found to be defective within 5 years of the original purchase date. This
limited warranty is extended exclusively to the original purchaser beginning
from the date of original receipt. Filter Media Pads are considered to be wear
items and are not covered by this warranty. Abuse or misuse of this product
voids all warranty. In case of warranty claims, please call our Customer Care
Department at 866-766-3435 to request a Return Merchandise Authorization
Number (RMA #).
Fig. 1
Fig. 2
54
Partially Buried
ClearSpring™ Mini
Plug
Buried
Tubing
Pond
Elevated mound
of soil, sand
and rock
Bio Balls
Blue Coarse
Filters
Black Fine Filters
INSTALLATION INSTRUCTIONS
The ClearSpring™ Mini Waterfall Filter is designed to handle pumps up to 1,800
GPH & can lter ponds up to 1,000 gallons.
• Using soil, build an elevated area to partially bury the ClearSpring™ Mini.
• Place the ClearSpring™ Mini on top of the elevated area. Attach liner and weir to
ClearSpring™ Mini. See ATTACHING THE WEIR section for reference.
• Backll the ClearSpring™ Mini with soil until rmly held in place. The ClearSpring™
Mini should slightly tilt forward and be level from side to side to promote proper ow
towards the weir.
• Secure the elevated area with soil, rocks, bricks or other reinforcements.
• Attach your pump to the open end of your plumbing. One end should already be
connected to the ClearSpring™ Mini (See the PREPARING THE CONNECTION
section for reference).
• Position and bury the tubing.
• Fill pond with water
• Plug in your pump and inspect water ow. Check for leaks and adjust if necessary.
• Finish your surrounding landscape with rocks, plants, mulch or other desired
landscaping material. For a natural look, use a Pond Logic®TrueRock™
(#510329) at cover to disguise the open top. Call or visit thepondguy.com
for information on TrueRock™.
• Unplug your pump and install lter media (See ADDING FILTRATION COMPONENTS
below for reference).
• Restore power to your pump and enjoy your pond and waterfall.
ADDING FILTRATION COMPONENTS
The ClearSpring™ Mini utilizes bio balls and 2 lter pads to lter debris from your water.
Always install the lter media as shown in Figure 4.
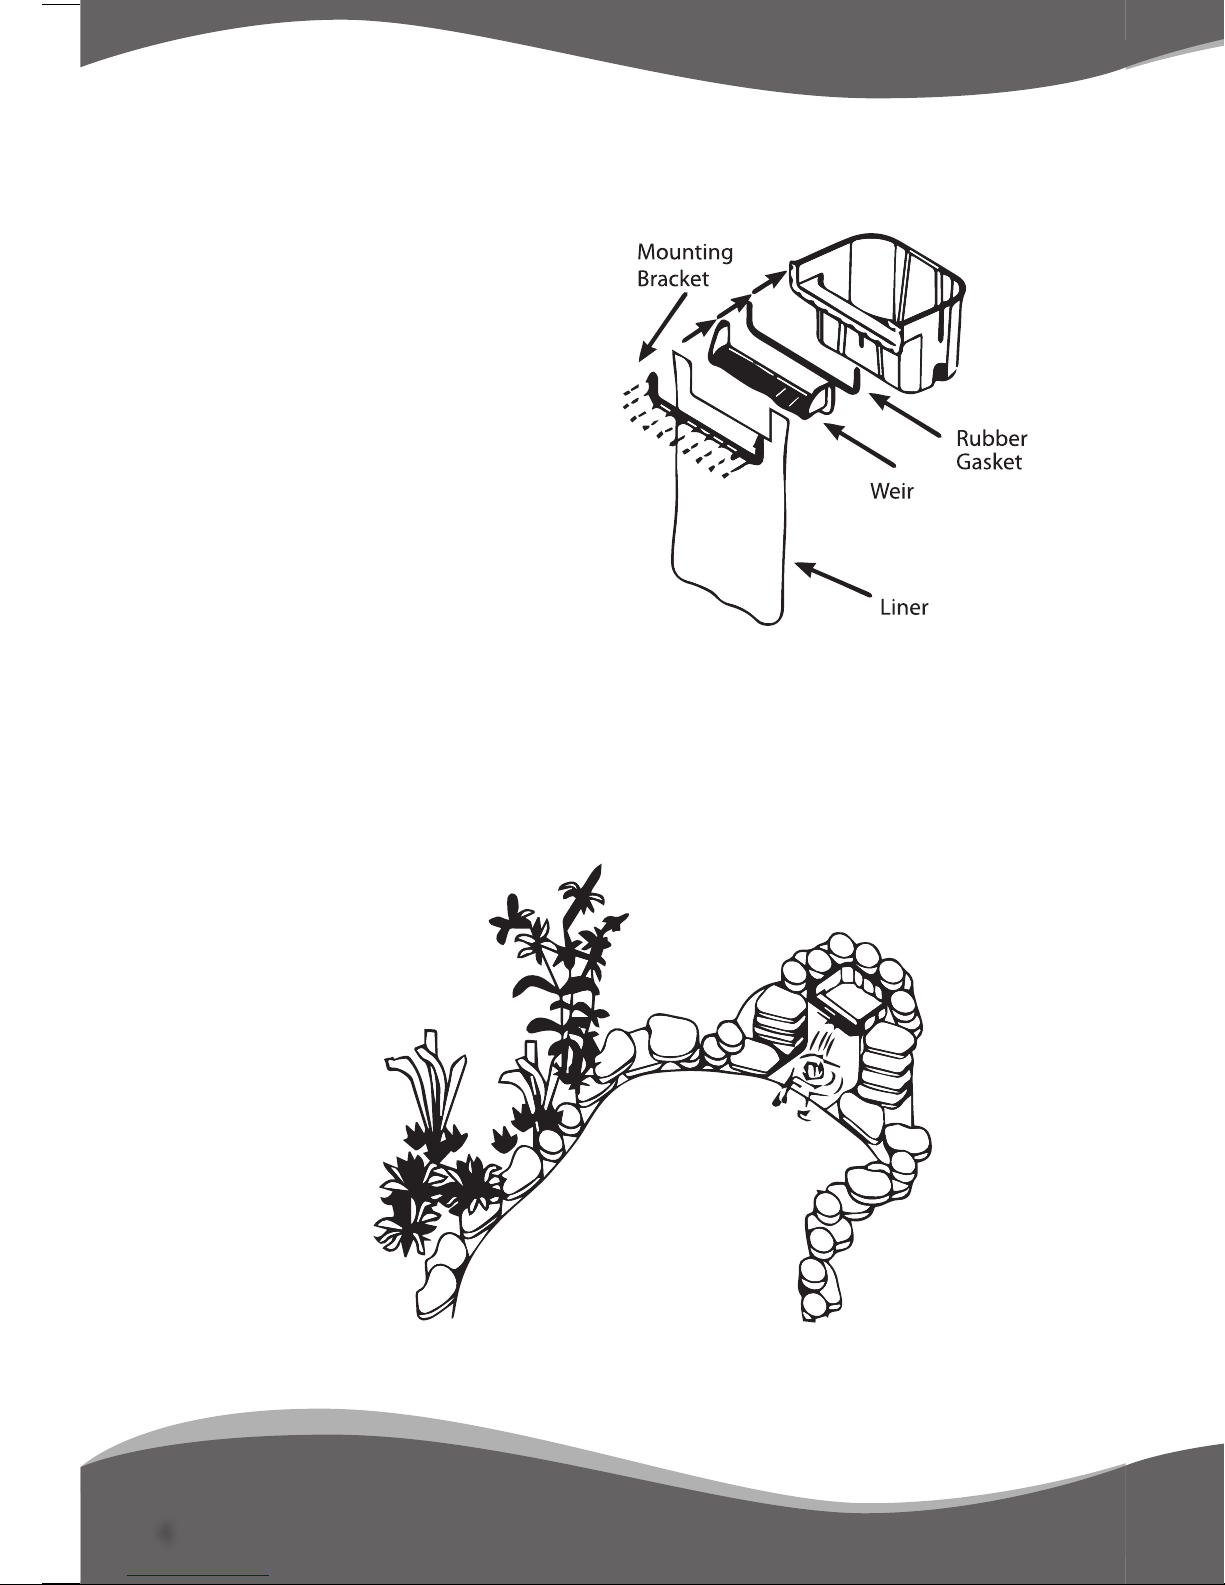
ATTACHING THE WEIR
Your ClearSpring™ Mini comes with
two Weir options. Your choice of Weir
type is completely cosmetic and will
not effect the units performance.
• Choose your desired weir. Ensure
the gasket is rmly installed and
that the screw holes line up.
• Install gasket, weir, liner & bracket
in order shown in Figure 3.
TIP: Using sh safe 100% silicone
is always a good way of providing
a waterproof seal between joints.
Partially Buried
ClearSpring™ Mini
Plug
Buried
Tubing
Pond
Elevated mound
of soil, sand
and rock
Bio Balls
Blue Coarse
Filters
Black Fine Filters
Fig. 3
Fig. 4

54
Partially Buried
ClearSpring™ Mini
Plug
Buried
Tubing
Pond
Elevated mound
of soil, sand
and rock
Bio Balls
Blue Coarse
Filters
Black Fine Filters
INSTALLATION INSTRUCTIONS
The ClearSpring™ Mini Waterfall Filter is designed to handle pumps up to 1,800
GPH & can lter ponds up to 1,000 gallons.
• Using soil, build an elevated area to partially bury the ClearSpring™ Mini.
• Place the ClearSpring™ Mini on top of the elevated area. Attach liner and weir to
ClearSpring™ Mini. See ATTACHING THE WEIR section for reference.
• Backll the ClearSpring™ Mini with soil until rmly held in place. The ClearSpring™
Mini should slightly tilt forward and be level from side to side to promote proper ow
towards the weir.
• Secure the elevated area with soil, rocks, bricks or other reinforcements.
• Attach your pump to the open end of your plumbing. One end should already be
connected to the ClearSpring™ Mini (See the PREPARING THE CONNECTION
section for reference).
• Position and bury the tubing.
• Fill pond with water
• Plug in your pump and inspect water ow. Check for leaks and adjust if necessary.
• Finish your surrounding landscape with rocks, plants, mulch or other desired
landscaping material. For a natural look, use a Pond Logic®TrueRock™
(#510329) at cover to disguise the open top. Call or visit thepondguy.com
for information on TrueRock™.
• Unplug your pump and install lter media (See ADDING FILTRATION COMPONENTS
below for reference).
• Restore power to your pump and enjoy your pond and waterfall.
ADDING FILTRATION COMPONENTS
The ClearSpring™ Mini utilizes bio balls and 2 lter pads to lter debris from your water.
Always install the lter media as shown in Figure 4.
ATTACHING THE WEIR
Your ClearSpring™ Mini comes with
two Weir options. Your choice of Weir
type is completely cosmetic and will
not effect the units performance.
• Choose your desired weir. Ensure
the gasket is rmly installed and
that the screw holes line up.
• Install gasket, weir, liner & bracket
in order shown in Figure 3.
TIP: Using sh safe 100% silicone
is always a good way of providing
a waterproof seal between joints.
Partially Buried
ClearSpring™ Mini
Plug
Buried
Tubing
Pond
Elevated mound
of soil, sand
and rock
Bio Balls
Blue Coarse
Filters
Black Fine Filters
Fig. 3
Fig. 4

36
BEFORE YOU BEGIN
• When constructing a new pond, try to nd an area in your
yard that offers enough level space in a high ground area.
• Avoid low lying areas to protect
against potential water runoff that
causes ooding and/or unwanted
residues, pesticides, fertilizers,
herbicides or other hazardous
elements that can adversely affect
your pond’s ecosystem.
• Place your pond in a location that
is easily viewable for the most
common areas of your yard, deck,
patio, or from within your home.
ASSEMBLY INSTRUCTIONS
Determine which side of the ClearSpring™ Mini will be used for water input. The
ClearSpring™ Mini has factory sealed inlets on both sides. Remove the knockout on the
desired side to activate the inlet. (see below)
PREPARING THE CONNECTION
• Apply thread seal tape to the threads on the barbed hose tting. If using 1 ½” tubing,
gently saw off the 1” barbs to allow maximum ow.
• Knockout the desired inlet seal using a hammer and large at screwdriver or hole saw.
Clean out any remaining debris to ensure a smooth and complete opening. Be sure not
to damage threads.
• Securely thread the barbed
hose tting into the newly
opened inlet.
• Slide the stainless hose clamp
over one end of your kink-free
tubing. Push tubing onto the
barbed hose tting and tighten
hose clamp to form a tight seal.
Partially Buried
ClearSpring™ Mini
Plug
Buried
Tubing
Pond
Elevated mound
of soil, sand
and rock
Bio Balls
Blue Coarse
Filters
Black Fine Filters
FILTER CLEANING AND MAINTENANCE
• As your lter media begins to ll with debris, water ow and ltration performance
will begin to decline. Cleaning intervals will depend on the pond environment.
• Remove and rinse clogged lter media outside of your pond. To preserve water
ltering bacteria, try using water from your pond to remove loose debris.
• Filter pads that are too saturated with debris, or show noticeable signs of damage
should be replaced.
• Bio ball media will not wear out and can be rinsed and reused indenitely. A brush
can be used to remove stubborn debris.
• Do NOT use chemicals or household cleaning agents to clean lter media.
REPLACMENT PARTS
REPLACEMENT FILTER PAD SET - #110573
WARRANTY
The Pond Guy® will repair or replace the ClearSpring™ Mini Waterfall lter
that is found to be defective within 5 years of the original purchase date. This
limited warranty is extended exclusively to the original purchaser beginning
from the date of original receipt. Filter Media Pads are considered to be wear
items and are not covered by this warranty. Abuse or misuse of this product
voids all warranty. In case of warranty claims, please call our Customer Care
Department at 866-766-3435 to request a Return Merchandise Authorization
Number (RMA #).
Fig. 1
Fig. 2

72
READ AND FOLLOW ALL SAFETY INSTRUCTIONS
• Inspect before use for any damage to the unit. Any damage or missing parts should be
reported immediately before attempting use.
• Always unplug power from pumps or other electrical devices BEFORE putting hands in
water, or if service and maintenance is
being performed.
• Always use properly grounded electrical
equipment and a drip loop on any power
cords to prevent water from travelling
along the cord and into the outlet.
• Do not lift or move the ClearSpring™
Mini using the plumbing.
• The ClearSpring™ Mini is intended for
use with fresh water only. Do not use
ammable materials.
Failure to follow these instructions and
warnings may lead to product damage
or personal injury of which The Pond Guy® or any associated party will not be held liable.
SAVE THESE INSTRUCTIONS
POND HEALTH TIP BEFORE INSTALLATION
• For best results, functional ponds (ponds with plants & sh) should not be exposed
to full sun and should have sufcient plant cover to promote a balanced environment.
• Overfeeding sh is the number one contributor to pond balance problems and
should be avoided.
• If the pond is in an area close to falling leaves or debris, a cover net should be used.
ClearSpring™ Mini
Waterfall Filter
Installation & Maintenance Instructions
Partially Buried
ClearSpring™ Mini
Plug
Buried
Tubing
Pond
Elevated mound
of soil, sand
and rock
Bio Balls
Blue Coarse
Filters
Black Fine Filters
NOTES:
__________________________________________________________
__________________________________________________________
__________________________________________________________
__________________________________________________________
__________________________________________________________
__________________________________________________________
__________________________________________________________
__________________________________________________________
__________________________________________________________
__________________________________________________________
__________________________________________________________
__________________________________________________________
__________________________________________________________
__________________________________________________________
__________________________________________________________
__________________________________________________________
__________________________________________________________
__________________________________________________________
__________________________________________________________
__________________________________________________________
__________________________________________________________
__________________________________________________________

ClearSpring™ Mini
Waterfall Filter
8
IMPORTANT SAFETY
INSTRUCTIONS
• ClearSpring™ Mini
(Item #110572)
5-YEAR WARRANTY
115_12
NOTES:
__________________________________________________________
__________________________________________________________
__________________________________________________________
__________________________________________________________
__________________________________________________________
__________________________________________________________
__________________________________________________________
__________________________________________________________
__________________________________________________________
__________________________________________________________
__________________________________________________________
__________________________________________________________
__________________________________________________________
__________________________________________________________
__________________________________________________________
__________________________________________________________
__________________________________________________________
__________________________________________________________
__________________________________________________________
__________________________________________________________
www.thepondguy.com
866-POND-HELP (766.3435)
www.thepondguy.com
866-POND-HELP (766.3435)
Table of contents
Other ThePondguy Water Filtration System manuals

ThePondguy
ThePondguy AllClear Series User manual

ThePondguy
ThePondguy ClearSolution 120800 Maintenance and service guide

ThePondguy
ThePondguy ClearSolution G2 User manual

ThePondguy
ThePondguy PowerUV 9 User manual

ThePondguy
ThePondguy SimplyClear Filter 1250 User manual

ThePondguy
ThePondguy AllClear G2 2000 User manual
Popular Water Filtration System manuals by other brands


Davey
Davey STERIFLO SF1000S mkII Installation and operating instructions

TOOLSTATION
TOOLSTATION 84582 quick start guide

Wellness
Wellness Wellness Shower Usage & Care Guide

Bermuda
Bermuda BER4001 instruction manual

Puro
Puro PURO-35T Installation, operation & service manual

Evoqua
Evoqua WALLACE & TIERNAN JETPAK instruction manual