THERM PRO TP-17H User manual

Cook Like A Pro Every Time!
Digital Food Thermometer with 4 Temperature Probes
English................. 2 Français............... 12
20200511 EN FR
Model No.: TP-17H

-2- -3-
EN EN
1. Features and Specifications
1 Temperature displays for all 4 probes on the LCD screen. .
2 4 different color coated probes eliminate confusion when
monitoring multiple different types of meat.
.
3 Programmable alert with preset temperatures recommended
by USDA for specific foods.
.
4 Heat-resistant stainless-steel probes with steel mesh cable..
5 BBQ Hi/Low Temperature monitor and alert to ensure your BBQ
/OVEN/Grill temperature is always within your set range.
.
6 Quickly set the target temperature. .
7 Temperature range of probes: 14˚F to 572˚F (-10˚C to 300˚C)..
8 Temperature tolerance of internal food reading:+/-1.8˚F
(+/-1.0˚C).
.
9 Temperature readings in ˚F or ˚C..
10 Multiple Placement Options: Flip-out countertop stand,
magnetic back and hanging wall hole.
.
11. Touch Backlight button. Backlight stays active for 10 seconds.
12 Uses one AAA battery (included)..
2. Product Diagram
1. Backlight Button
2 PROBE Selection/Alarm Button.
3 Button. ▲
4 Button. ▼
5 MEAT Selection/HI&LO Convert Button.
6 Probe 1/2/3/4 Sockets.
7. Hanging Wall Hole
8. ˚C/˚F Selector
9. Magnets
10. Flip-out Countertop Stand
11. ON/OFF Selector
12. Battery Compartment
1
2345
68
9
11
7
12
10
3. Key Definitions
1. Button: Touch once to turn ON/OFF the backlight of the
display. If there is no button presses for 10 seconds, the
backlight will automatically turn off. When the temperature
alarm is triggered, the backlight will turn on and flash.
2. PROPE/ : Press to rotate through the temperature probes.
When a probe is selected, the current temperature will be
flashing. To disable/enable the alarm function, press and hold
for 3 seconds.
3. ▲Button: Press ▲ button to increase your desired cooking
temperature while in User-Defined /BBQ HI&LO temperature
setting.
4. ▼Button: Press ▼button to decrease your desired cooking
temperature while in User-Defined /BBQ HI&LO temperature
setting.
5. Press and hold the PROBE/ and MEAT/HI/LO keys at
the same time for 3 seconds to quickly set all probes’ target
temperature to the current probe set target temperature.
6. MEAT/HI/LO Button: Press to rotate through temperature
selection settings: Poultry ( ), Pork/Veal ( ), Ham ( ),
Beef Rare/Fish ( ), Beef Medium( ), Beef Well Done
( ),BBQ and User-Defined ( ). The pre-programmed
doneness temperature setting for each meat type is
recommended by USDA (U.S. Department of Agriculture).
Press PROPE/ to confirm selection. When in BBQ HI/LO
temperature setting, press MEAT/HI/LO Button to switch
between the HI or LO temperature setting.

-4- -5-
ENEN
7. ˚C/˚F Selector (on the back of the thermometer): Move the
position of the selector to select the temperature display unit,
choose between °C or °F.
8. ON/OFF Button: Turn on/off the digital cooking thermometer.
Note:
* If probe is not inserted into food and put directly inside the
oven/grill/smoker, the temperature reading of oven heat above
200˚F (93˚C) will only be accurate to within 2˚F to 5˚F (1.1˚C to
2.7˚C).
4. Important Notes/Warning
This product is not for use in microwave ovens.
Keep out of reach of children.
Do not expose probe directly to flame. Doing so will cause
wire to deteriorate.
When not in use, turn the digital thermometer off to conserve
battery.
Be sure to use a good quality alkaline battery and replace it
often. A weak battery will cause the unit to lose accuracy.
Always dispose of depleted batteries safely.
A food thermometer can assist in the proper preparation of
food. However, use of this electronic device does not guard
against unsafe food handling practices. Always follow proper
food preparation techniques to limit the risk of food borne
illness.
The stainless-steel wire probe should not be exposed to oven
temperatures exceeding 716˚F (380˚C).
Do not let probe or cable come into direct contact with the
oven elements, as this will result in faulty readings and/or
damage.
If the temperature exceeds or falls below the measurable
ranges, the LCD screen will display the following letters: HHH
If the unit displays LLL or HHH instead of the probe
temperature, wait for probe to reach room temperature. If LLL
or HHH is still displayed it is likely the internal probe wire has
shorted out either through moisture or heat damage.
If the temperature displayed seems to read too high or the
temperature seems to increase too quickly, check to make
sure the probe tip is not poking through the food to outside.
for temperatures above range and LLL for temperatures below
range.
5. Battery Installation/Set Up
Slide open the battery compartment door at the back of the
unit.
Insert one (1) AAA battery according to the polarity markings.
Replace the battery compartment door.
Remove the printed vinyl sticker from the LCD screen.
6. Operating Instructions
Using the Cooking Thermometer
Plug the temperature probes into the corresponding probe
sockets on the right side of the device.
Make sure the probe cable is free of knots. Make sure the
sensor plug at the end of the probe cable is fully inserted into
the probe sockets. (Note: if the probe is not plugged in
properly or is crimped, the display will show LLL.)
Slide the switch on the back of the device to choose between
displaying the temperature in ˚F or ˚C.
Set your desired cooking temperatures for the probes by
choosing Quick Temperature Setting or User-defined
Temperature Setting. (see Section Quick Temperature Setting
and User-defined Temperature Setting below)

-6- -7-
ENEN
Place food into the smoker/oven. Before closing the smoker
lid or oven door, make sure there is enough slack in the steel
mesh probe cable to prevent the probe from being pulled out
of the food when the smoker lid or oven door is closed. The
thermometer must be positioned outside of the smoker/oven
on a stable surface and must be firmly connected to the
temperature probes.
Insert the tip of the probe at least 2”/5cm into the thickest
part of the meat, but not near bone or gristle.
To prevent damage to the thermometer, it should not be
placed on a hot surface.
When the internal temperature of your food reaches the
temperature you have set, an audible alarm will sound. Press
any button to stop the alarm.
Before removing the food from the oven, disconnect the steel
mesh probe cables from the device. Do not touch hot probe or
wire with bare hands during or just after cooking. Always wear
a heat-resistant glove.
Clean the stainless temperature probe with hot water and
soap and rinse clean. Do not submerge the probe and cable in
water. The probe /cable connection is not waterproof.
7. Quick Temperature Setting
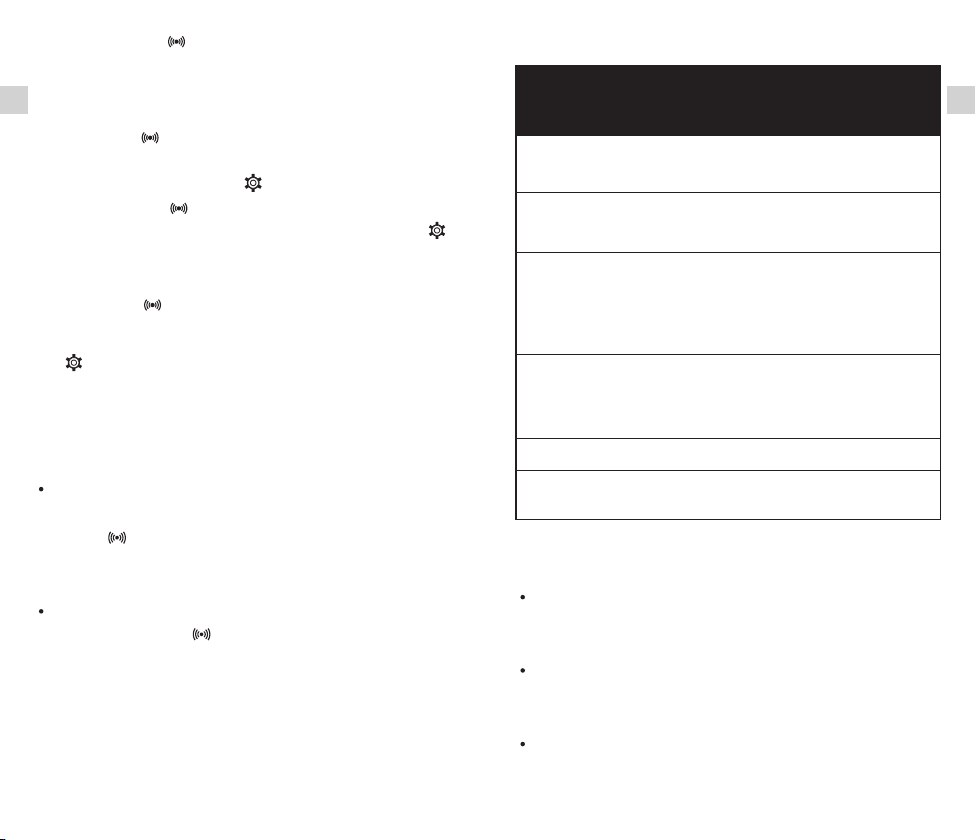
Your digital cooking thermometer is pre-programmed with preset
meat temperatures for various types of meat and doneness
levels based on USDA recommendations: Poultry (165˚F), Pork/
Veal(170˚F),Beef Well (170˚F) , Beef Medium (160˚F), Ham
(160˚F) and Beef Rare/Fish (145˚F). See the below table.
1. Press the PROBE/ to select between Probe 1 to 4.
2 Press the MEAT/HI/LO button when the current temperature is
flashing to rotate through preset meat temperatures.
.
3. Press the PROBE/ button to confirm your preset meat
temperature selection (The thermometer will automatically
confirm the selection if you don’t press any buttons for 5
seconds).
4. Repeat the above process to set any other probe’s temperature.
8. BBQ Temperature Range Setting
You can select any Probe to monitor BBQ/Smoker /Oven
temperature to make sure it won't exceed or go below the set
High/Low temperatures.
1. Press the PROBE/ to select between Probe 1 to 4.
2 Press the MEAT/HI/LO button until BBQ mode is selected. .
3 Press the ▲ or ▼ button to activate the HI/LO temperature
setting.
.
4 Press the ▲ or ▼ buttons to set your target HI temperature. .
5 Press the MEAT/HI/LO button to switch to the LO temperature
setting.
.
6 Press the ▲ or ▼ buttons to set your target LO temperature. .
7 Press PROBE/ to confirm target temperature selections. .
Note: If needing to check the HI/LI temperature setting is correct,
press and hold the MEAT/HI/LO button for 3 seconds to display
the HI/LO set temperature.
Tips: The digital meat thermometer will save the last BBQ HI/LO
temperature setting. Once you have selected the BBQ mode,
simply press ▲ or ▼ button to activate the HI/LO temperature
setting.
9. User-Defined Temperature Setting
If you prefer setting your own desired cooking temperatures and
not using the preset meat temperatures, set your own desired
cooking temperatures as follow:

12. Preset Temperature Cooking Chart
PRESET
TYPE
HEADING
FOOD
TYPE
RECOMMENDED
INTERNAL
TEMPERATURE
FISH
BEEF MED RARE
Fish
Beef (roasts, steaks & chops)
- Medium Rare
63˚C/145˚F
HAM
Egg dishes
Ham (Raw) – Note: Precooked
Ham (140˚F)
71˚C/160˚F
BEEF
MEDIUM
Beef (roasts, steaks & chops) –
Medium
Pork (roasts, steaks, chops,
sausages) –Medium (Pink)
Ground Meats (beef, veal, pork)
71˚C/160˚F
VEAL
PORK
Veal (steaks, roasts, tenderized or
non-tenderized cuts) – Well Done
Pork (roasts, steaks, chops,
sausages) –Well Done
77˚C/170˚F
BEEF WELL Beef (roasts, steaks & chops) – Well 77˚C/170˚F
POULTRY Poultry (chicken, turkey) – Whole
Duck & Goose 74˚C/165˚F
-8- -9-
ENEN
1. Press the button to select between Probe 1 to 4. PROBE/
2. When not in BBQ MODE, press the ▲ or ▼ button to increase/
decrease to set the target temperature to your desired
temperature.
3. Press to confirm. PROBE/
10. Change BBQ mode to User-Defined:
1. Press the PROBE/ to select between Probe 1 to 4.
2. Press the MEAT/HI/LO button to rotate through to select
User-Defined. Press ▲ or ▼ button to set the target
temperature to your desired temperature.
3. Press to confirm. PROBE/
NOTE:
a) If icon is displayed, the temperature setting is user-defined.
b) When setting temperature, press and hold ▲or▼ to rapidly
scroll through digits.
11. Fast Target Temperature Setting
To quickly set the target temperature of the other three probe
with current selected probe’s settings, press and hold the
PROBE/ and MEAT/HI/LO keys at the same time for
3 seconds to quickly set all probes’ target temperature to the
current probe set target temperature.
For example, when probe 1 selects BEEF MEDIUM 160F, press
and hold the PROBE/ and MEAT/HI/LO keys at the same
time, the target temperature of PROBE 2, 3, 4 will be set to
BEEF MEDIUM 160F.
13. Cleaning and Care
The device is not waterproof. Do not expose plug of probe or
plug-in hole to any liquid, which will result in a bad connection
and faulty readings.
The probe and cable are not dishwasher safe. They must be
hand washed using hot water and soap. Make sure to rinse
and dry the probe thoroughly before storing.
Do not submerge the device in water or expose to any
corrosive cleaning materials. Wipe with damp cloth.

This will contribute to the recycling
forms of reutilisation of electrical and electronic
equipment.
and other
Information concerning where the
can be disposed of can be obtained from your
local authority.
equipment
CAUTION: Batteries/rechargeable
disposed of with household waste!
batteries must not be
The batteries must be removed from the appliance.
Take spent batteries to the appropriate
a dealer.
collection point or to
Your town or local authority can provide
public collection points.
information about
This symbol can be found on batteries/
which contain hazardous:
rechargeable batteries
Pb = contains lead
Cd = contains cadmium
Hg = contains mercury
Li = contains lithium
human health.
15. Disposal
Meaning of the “Dustbin” Symbol
Protect our environment: do not
electrical equipment in the domestic waste.
dispose of
This helps avoid the potential
incorrect disposal on the environment and
effects of
Please return any electrical
will no longer use to the collection points
provided for their disposal.
equipment that you
14. Declaration of Conformity
Hereby, the manufacturer declares that this product complies
with the basic requirements and applicable regulations of the
EMC Directive 2014/30/EU. The complete declaration of
conformity can be found at:
https://itronicsmall.com/eu-declaration-of-conformity/
16. Limited One-Year Warranty
ThermoPro warrants this product to be free of defects in parts,
materials and workmanship for a period of one year, from date of
purchase.
Should any repairs or servicing under this warranty be required,
contact Customer Service by phone or email for instructions on
how to pack and ship the product to ThermoPro.
This warranty gives you specific legal rights and you may also
have other rights which vary from state to state.
17. Customer service
Telephone: 1-877-515-7797 (USA & Canada only)
44-203-769-1321(UK)
Email: service@buythermopro.com
Hours: Weekdays 8:00 AM- 8:00 PM EST(USA & Canada only)
1:00 PM - 12:00 PM CET(UK)
-10- -11-
ENEN
Table of contents
Other THERM PRO Thermometer manuals

THERM PRO
THERM PRO TP-03A User manual

THERM PRO
THERM PRO TP-09 User manual

THERM PRO
THERM PRO TP-04 User manual

THERM PRO
THERM PRO TP-02 User manual

THERM PRO
THERM PRO TP-17 User manual

THERM PRO
THERM PRO TP-07S User manual

THERM PRO
THERM PRO TP-16 User manual

THERM PRO
THERM PRO TP-22 User manual

THERM PRO
THERM PRO TP393 User manual

THERM PRO
THERM PRO TP-30 User manual