THERM PRO TP-17 User manual

Kochen wie ein Profi - Jedes Mal!
Digitales Lebensmittel-Thermometer mit Dual-Sonden
Modell-Nr.: TP-17
V20170731 EN DE FR IT ES
DE Bedienungsanleitung.............. 6
EN Instruction Manual................ 18
FR Mode d’emploi...................... 30
IT Istruzioni per I’uso................. 42
ES Manual de instrucciones....... 55
Esta garantía le otorga derechos legales específicos y puede que usted
tenga otros derechos que varíen según el estado.
Servicio al Cliente
Teléfono: 1-877-515-7797(solo Estados Unidos & Canadá)
Correo electrónico: service@buythermopro.com
Horarios: Días laborables: 8:00 AM - 6:00 PM EST
-67-
PROBE SET TEMP THERMO TEMP
1
PROBE SET TEMP THERMO TEMP
2
PROBE 1
MEDIUM
CLEAR
ES

Deutsch
Produktbild....................................................................................... 6
Funktionen und techinische Daten...................................................... 8
Batterien Einsetzen/set up................................................................. 8
Wichtige Hinweise/Warnung............................................................... 9
Gebrauchsanweisung...................................................................... 10
Verwendung des Kochthermometers........................................... 10
Schnelle Temperatureinstellung.................................................. 11
Benutzerdefinierte Temperatureinstellung.................................... 12
Voreingestellte Temperatur Koch-Diagramm...................................... 13
Timer.............................................................................................. 14
Countdown-Timer ..................................................................... 14
Stoppuhr .................................................................................. 15
Reinigung und Pflege....................................................................... 16
Ein Jahr beschränkte Garantie......................................................... 16
Kundenservice................................................................................ 17
Wesentliche Definition....................................................................... 6
English
Product image................................................................................. 19
Important notes/warning.................................................................. 22
Features and specifications.............................................................. 21
Battery installation/set Up................................................................ 21
Operating instructions..................................................................... 23
Using the cooking thermometer................................................... 23
Quick temperature setting.......................................................... 24
User-Defined temperature setting............................................... 25
Preset temperature cooking............................................................. 26
Timer.............................................................................................. 26
Countdown timer ....................................................................... 27
Count up timer........................................................................... 27
Cleaning and care........................................................................... 29
Limited one-year warranty................................................................ 29
Customer service............................................................................ 29
Definition........................................................................................ 19
-1- -2-
Contents
Inhalt
Hilfreiche Hinweise.......................................................................... 15 Helpful Hints................................................................................... 28

Français
Image du produit.............................................................................. 31
Remarques importantes/avertissements........................................... 34
Caractéristiques et spécifications ..................................................... 33
Installation de la pile........................................................................ 33
Instructions d utilisation'................................................................... 35
Utiliser le thermomètre de cuisson............................................... 35
Paramétrage rapide de la température.......................................... 36
Paramétrage de la température par l'utilisateur............................. 37
Tableau de cuisson des temp ratures pr programm esé é é ...................... 38
Minuteur......................................................................................... 38
Minuteur .................................................................................. 39
Chronomètre............................................................................ 49
Nettoyage et entretien..................................................................... 41
Garantie un an limit edé.................................................................... 41'
Service client.................................................................................. 41
Explication des touches.................................................................... 31
Italiano
Immagine del prodotto..................................................................... 43
Note importanti/avvertenza.............................................................. 46
Caratteristiche e specifiche.............................................................. 45
Installazione/impostazione della Batteria.......................................... 45
Istruzioni per l uso'........................................................................... 47
Utilizzo del termometro da cucina................................................ 47
Impostazione rapida della temperatura........................................ 48
Impostazione della temperatura definita dall'utente....................... 49
Tabella per la temperatura di cottura preimpostata............................. 50
Timer.............................................................................................. 51
Timer con conto alla rovescia .................................................... 51
Timer di conto alla rovescia........................................................ 52
Pulizia cura.................................................................................... 53
Garanzia limitata di un anno............................................................. 53
Servizio clienti................................................................................ 54
Definizione dei tasti......................................................................... 43
-3- -4-
Indice
Sommaire
Astuces pratiques............................................................................ 40 Consigli utili.................................................................................... 52

Produktbild
PROBE SET TEMP THERMO TEMP
1
PROBE SET TEMP THERMO TEMP
2
PROBE 1
MEDIUM
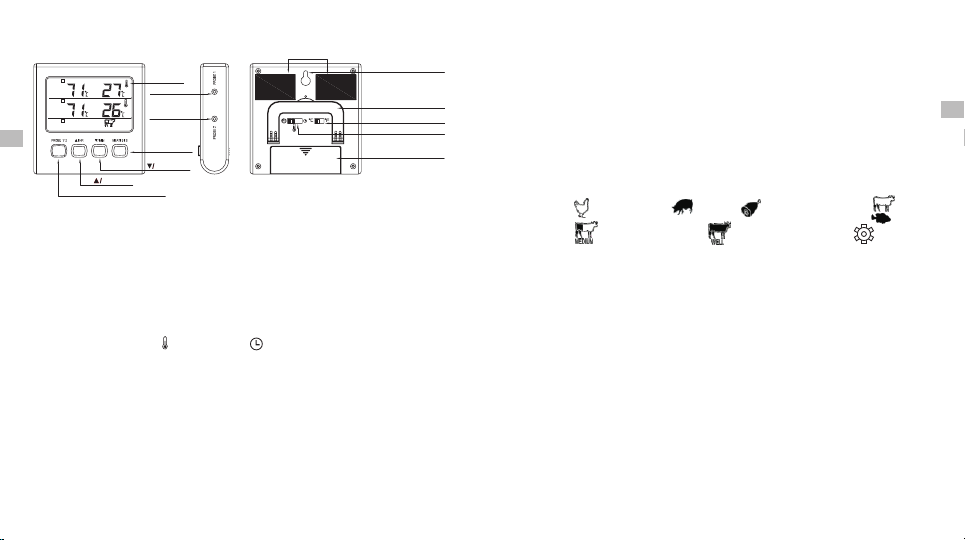
LCD-Bildschirm
Sonde 1 Buchse
Sonde 2 Buchse
MEAT/START/
STOP Taste
▼ /MIN-Taste
▲ /HR-Taste
Probe1/2-Taste
Magnet
Hintergrundbeleuchtung
˚ ˚ SchalterC/ F
Modus-Schalter
Batteriefach
1. Sonde 1/2 Buchse: Sonde 1 und/oder 2 in die entsprechende Buchse
stecken, um Fleischtemperaturen zu messen.
2. LCD-Bildschirm: Zeigt Temperaturen, Countdown oder Timer und andere
Informationen.
3. Modus-Schalter(auf der Rückseite des Gerätes): Verschieben Sie die
Position des Schalters auf Koch-Modus , Timer-Modus , oder schalten
Sie das Gerät aus.
4. / F Schalter (auf der Rückseite des Gerätes): Verschieben Sie die Position
des Schalters, um die Temperaturanzeigeeinheit in °C oder °F auszuwählen.
°C °
5. Probe1/2-Taste: Drücken Sie im Kochmodus die Taste PROBE , 1/2 um den
Einstellmodus für Sonde 1 oder Sonde 2 auszuwählen. Die letzte Zeile des
Wesentliche Definition
Español
Imagen del producto........................................................................ 56
Notas importantes/advertencias....................................................... 59
Especificaciones y carcterísticas...................................................... 58
Instalación la pila/preparación.......................................................... 59
Instrucciones de Uso....................................................................... 60
Utilizando el termómetro de cocción............................................. 60
Configuración rápida de temperatura........................................... 61
Configuración de temperatura definida por el usuario.................... 62
Tabla de temperaturas de cocci n preestablecidasó............................ 63
Temporizador................................................................................. 64
Contador regresivo ................................................................... 64
Cron metroó.............................................................................. 65
Limpieza y cuidado......................................................................... 66
Garant a un añoí.............................................................................. 66
Servicio al cliente........................................................................... 67
Definición de las teclas..................................................................... 56
-5- -6-
Contenidos
DE
Ausklapp-Ständer
Sie im Timer-Modus die Taste PROBE1/2, um die Anzeige der Temperaturen
von Sonde 1 oder 2 in der ersten Zeile des Bildschirms umzuschalten.
Bildschirms zeigt den Fleischtyp für die entsprechende Sonde an. Drücken
Consejos útiles................................................................................ 65

6. /HR-Taste: Im Kochmodus drücken Sie ▲, um die gewünschte ▲
temperatur zu erhöhen, wenn Sie nicht die vorprogrammierte Koch
temperatur verwenden möchten. Im Timer-Modus drücken Sie Fleisch
diese Taste, um die Countdown-Stunden einzustellen. Um die Countdown
-Zeit zu löschen, drücken Sie die Tasten HR und MIN gleichzeitig. Drücken
und halten Sie die Taste für die schnelle Einstellung.
7. /MIN-Taste: Im Kochmodus drücken Sie ▼, um die gewünschte ▼
Kochtemperatur zu verringern, wenn Sie nicht die vorprogrammierte
Fleischtemperatur verwenden möchten. Im Timer-Modus drücken Sie
diese Taste, um die Countdown-Minuten einzustellen. Um die Countdown
-Zeit zu löschen, drücken Sie die Tasten HR und MIN gleichzeitig. Drücken
und halten Sie die Taste für die schnelle Einstellung.
8. MEAT/S/S-Taste: Im Kochmodus drücken Sie diese Taste, um die Fleischart
auszuwählen: Geflügel ( ), Schweinefleisch ( ), Schinken( ),
Rindfleisch Rare/Fisch ( ), Rindfleisch Medium ( ), Rindfleisch
Well Done( ), und benutzerdefiniert ( ). Die vorprogrammierte
Temperatureinstellung der Garheitsgrade für jede Fleischart wird vom
USDA (US Department of Agriculture) empfohlen. Drücken Sie im Timer-
Modus die S/S-Taste, um den Countdown- oder Timer zu starten. Drücken
Sie die S/S-Taste, um den Timer anzuhalten oder neu zu starten.
9. Ausklapp-Ständer: Ermöglicht dem Benutzer zur einfachen Anzeige die
Platzierung auf einem Ständer.
10. Magnet: Ermöglicht dem Benutzer das Gerät auf eine Metalloberfläche
zu befestigen. Zum Beispiel ein Kühlschrank.
11. Batteriefach: Für eine AAA-Batterie.
12. Hintergrundbeleuchtung: Drücken Sie eine beliebige Taste, um die
Hintergrundbeleuchtung des Bildschirms zu aktivieren. Wenn für 10
Sekunden keine Taste gedrückt wird, schaltet sich die Hintergrund-
automatisch ab. Bei Alarmtönen wird die Hintergrund- beleuchtung
und blinkt.beleuchtung eingeschaltet
Hinweis: Dieses Gerät ist für die Überwachung des Kochfortschritts aus der
Ferne konzipiert. Entfernen Sie die Sonden nicht während des Kochens. Die
Innentemperatur wird auf dem Gerät außerhalb des Ofens dargestellt.
Funktionen und Techinische Daten
1. Programmierbarer Alarm mit von der USDA empfohlenen, voreingestellten
Temperaturen für bestimmte Lebensmittel.
2. Duale Edelstahl-Sonden mit stahlverstärktem Kabel zur Messung und
Überwachung der Temperaturen von zwei Stücken Fleisch, oder zwei
Teilen des gleichen großen Stücks Fleisch.
3. Temperaturbereich der Sonde: -10°C bis 300°C (14°F bis 572°F).
4. Temperaturtoleranz der internen Lebensmittelmessung: +/-1,0°C (+/-1,8°F).
5. 99-Stunden, 59-Minuten Countdown-Timer und Stoppuhr.
6. Temperaturmessungen in °F oder °C.
-7- -8-
DE
DE
Batterien Einsetzen/set up
Öffnen Sie die Batteriefachabdeckung an der Rückseite des Geräts.
Setzen Sie eine (1) AAA-Batterie gemäß der Polaritätsmarkierungen ein.
* Wenn sich die Sonde nicht in Lebensmitteln befindet und direkt in den Ofen
gelegt wird, ist die Temperaturablesung der Ofenwärme über 93˚C (200˚F)
auf 1,1˚C bis 2,7˚C (2˚F bis 5˚F) genau.
8.Verwendet eine AAA-Batterie (enthalten).
7. Ausklapp-Ständer und Magnet .

Setzen Sie die Abdeckung des Batteriefachs wieder auf.
Nehmen Sie das bedruckte Vinyl-Label vom LCD-Bildschirm.
Wichtige Hinweise/Warnung
Dieses Produkt ist nicht für die Verwendung in der Mikrowelle geeignet.
Für Kinder unzugänglich aufbewahren.
Berühren Sie die heiße Sonde oder den Draht nicht mit bloßen Händen
oder direkt nach dem Kochen. Tragen Sie immer einen hitzebeständigen
Handschuh.
Setzen Sie die Sonde nicht direktem Feuer aus. Andernfalls wird sich
der Draht verschlechtern.
Wenn nicht in Gebrauch, schieben Sie den Betriebsartenschalter in die
AUS-Position , um die Batterie zu schonen.
Achten Sie darauf, eine Alkaline-Batterie guter Qualität zu verwenden
und ersetzen Sie diese oft. Eine schwache Batterie wird dazu führen,
dass das Gerät an Genauigkeit verliert. Entsorgen Sie leere Batterien
sicher.
Ein Lebensmittel-Thermometer kann in der richtigen Zubereitung von
Lebensmitteln unterstützen. Allerdings schützt die Verwendung dieses
elektronischen Geräts nicht vor unsicherer Handhabung von Nahrungs-
mitteln. Befolgen Sie immer die richtigen Techniken zur Zubereitung von
Speisen, um das Risiko durch Lebensmittel übertragener Krankheiten
zu begrenzen.
Gebrauchsanweisung
Verwendung des Kochthermometers
Reinigen Sie die Edelstahl-Temperaturfühler mit heißem Wasser und
Seife und waschen sie sauber ab. Tauchen Sie die Sonde und das Kabel
nicht in Wasser. Die Sonden/Kabel-Verbindung ist nicht wasserdicht.
-9- -10-
DE
DE
Der Edelstahlsondendraht sollte keinen Temperaturen im Ofen von über
380°C (716˚F) ausgesetzt werden.
Lassen Sie die Sonde oder das Kabel nicht in direkten Kontakt mit den
Ofenelementen kommen, da dies zu fehlerhaften Messwerten und/oder
Sachschäden führen kann.
Wenn die Temperatur den messbaren Bereich über- oder unterschreitet,
wird der LCD-Bildschirm die folgenden Buchstaben anzeigen: HHH für
Temperaturen über dem Bereich und LLL für Temperaturen unter dem
Bereich.
Stellen Sie die gewünschten Kochtemperaturen für Sonde 1 und 2 ein,
indem Sie die Schnelltemperatur, oder eine benutzerdefinierte Temperatur
einstellen. (siehe Abschnitt Schnelle Temperatureinstellung und
Sie sehen zwei Temperaturen auf jeder der oberen zwei Zeilen (die erste
Zeile steht für Sonde 1 und die zweite Zeile für Sonde 2) des Bildschirms.
Auf der rechten Seite ist die aktuelle Messtemperatur, die durch den
Temperaturfühler gemessen wird und auf der linken Seite ist die
eingestellte Temperatur.
Schieben Sie den Modusschalter auf Koch-Position " ."
Verstellen Sie den Schalter auf der Rückseite des Gerätes, um die
Temperatur in °F oder °C anzuzeigen.
wird die Anzeige LLL anzeigen.)
(Hinweis: Wenn die Sonde nicht richtig eingesteckt oder gequetscht ist,
Sensorstecker am Ende des Kabels vollständig in der Buchse befinden.
Son denkabel frei von Kno ten ist. Stellen Sie sicher, dass sich die
Buchse auf der rechten Seite des Gerätes. Stellen Sie sicher, dass das
Stecken Sie den Temperaturfühler 1 und/oder 2 in die entsprechende

Stecken Sie die Spitze des Fühlers mindestens 5cm/2" in den dicksten
Teil des Fleisches, aber nicht in der Nähe von Knochen oder Knorpel.
Sie können zwei Sonden zur Messung und Überwachung der Temperaturen
von zwei Stücken Fleisch, oder zwei Teilen des gleichen großen Stücks
Fleisch verwenden.
Legen Sie die Lebensmittel in den Ofen. Stellen Sie vor dem Schließen
der Ofentür sicher, dass es genügend Spielraum am Stahlnetz-Kabel
gibt, um die Sonde vor dem Herausziehen aus der Nahrung wird beim
Schließen der Ofentür zu hindern. Das Gerät muss außerhalb des
Ofens auf eine stabile Oberfläche positioniert werden und fest mit den
Temperaturfühlern verbunden sein.
Um Schäden am Gerät zu verhindern, sollte es nicht auf eine heiße
Oberfläche platziert werden.
Wenn die Innentemperatur der Speisen die Temperatur erreicht, die Sie
festgelegt haben, wird ein akustisches Signal ertönen. Drücken Sie eine
beliebige Taste, um den Alarm abzustellen.
Vor dem Entfernen der Speisen aus dem Backofen, trennen Sie das
stahlverstärkte Kabel vom Gerät. Während oder kurz nach dem Kochen
berühren Sie die heiße Sonde oder Draht nicht mit bloßen Händen.
Tragen Sie immer einen hitzebeständigen Handschuh.
Schnelle Temperatureinstellung
Ihr digitales Koch-Thermometer ist mit Temperaturen für verschiedene
Kochstufen, gemäß der USDA-Empfehlung, vorprogrammiert; Geflügel
(74°C), Rindfleisch Well (77°C), Kalb/Schwein (77°C), Rindfleisch
Medium (71°C), Schinken (71°C) und Rindfleisch Rare/Fisch (63°C).
Siehe untenstehende Tabelle.
Drücken Sie Probe 1/2, um Sonde 1 oder 2 für die Einstellung auszuwählen.
Die Anzeige für die ausgewählte Sonde blinkt für einige Sekunden.
Drücken Sie die Taste MEAT/S/S, um die Fleischart zu wählen. Sobald
Sie Ihre Auswahl getroffen haben, drücken Sie die▲/HR oder▼/MIN-
benutzerdefinierte Temperatureinstellung weiter unten)
-11- -12-
DE DE
Benutzerdefinierte Temperatureinstellung
Wenn Sie gerne Ihre eigenen gewünschten Kochtemperaturen einstellen
und die voreingestellten Temperaturen nicht nutzen möchten, können Sie
die Einstellungen jederzeit ändern, indem Sie einfach die Taste ▲ oder ▼
drücken, um die Temperatureinstellung nach Ihrem Wunsch einzustellen.
Oder drücken Sie die Taste MEAT/S/S, um den Modus für benutzerdefinierte
Einstellungen aufzurufen und drücken Sie dann ▲ oder ▼, um die
Temperatur auf die gewünschte Einstellung zu bringen.
HINWEIS:
a) Wenn in der unteren rechten Ecke des Bildschirms das Symbol
angezeigt wird, ist die Temperatureinstellung benutzerdefiniert.
b) Wenn Sie die Temperatur einstellen, halten Sie die Taste ▲ oder ▼
gedrückt, um schneller auszuwählen.
Taste zur Bestätigung der Auswahl. (Das Gerät wird annehmen, dass
Sie die Auswahl bestätigt haben, wenn Sie für 4 Sekunden keine Taste
drücken).
Wiederholen Sie den obigen Vorgang, um die andere Sondentemperatur
einzustellen.
Voreingestellte Temperatur Koch-Diagramm
VOREINSTELLUNG
ÜBERSCHRIFT
LEBENSMITTEL
ART
EMPFOHLENE
INNERE
TEMPERATUR
FISCH
RIND RARE
Fisch
Rindfleisch (Braten, Steaks &
Koteletts) - Rare
63˚C/145˚F
SCHINKEN
Eiergerichte
Schinken (Roh) - Hinweis: Vorgekocht
Schinken (60°C/140°F)
71˚C/160˚F
RIND
MEDIUM
Rindfleisch (Braten, Steaks & Koteletts) - Medium
Schwein (Braten, Steaks, Koteletts, Würstchen)
Medium (Pink)
Hackfleisch (Rind, Kalb, Schwein)
71˚C/160˚F
KALB
SCHWEIN
Kalb (Steaks, Braten, zart oder nicht
zart gemachte Abschnitte) - Well Done
Schwein (Braten, Steaks, Koteletts, Würstchen)
-Well Done
77˚C/170˚F
RIND WELL Rindfleisch (Braten, Steaks & Koteletts) - Well 77˚C/170˚F
GEFLÜGEL Geflügel (Huhn, Truthahn) - Ganz
Ente & Gans 74˚C/165˚F
-13- -14-
DE
DE
Timer
Der Timer kann verwendet werden, ob das Thermometer in Betrieb ist oder
nicht.
Countdown-Timer
Schieben Sie den Moduswahlschalter auf der Rückseite des Gerätes in
die Timer-Position .
Die zweite Zeile des Bildschirms zeigt die Timer-Information an und die
erste Zeile des Bildschirms schaltet zwischen der Anzeige der
Temperaturen von Sonde 1 oder 2 um.
Drücken Sie ▲/HR, um die Stunden einzustellen und ▼/MIN, um die
Minuten einzustellen.
Drücken Sie die S/S (Start/Stopp) Taste, um den Countdown zu starten.
Der Doppelpunkt zwischen Stunden und Minuten wird blinken.
Wenn die Einstellung selbst, oder der verbleibende Countdown-Timer
weniger als 1 Stunde beträgt, schaltet das Display automatisch auf
Minuten und Sekunden um.
Wenn der Timer auf 0=:00 kommt, ertönt der Alarm. Drücken Sie eine
beliebige Taste, um den Alarm auszuschalten. Dieses Gerät verfügt
über einen Zeitspeicher und wird die ursprüngliche Timereinstellung
automatisch anzeigen, wenn S/S gedrückt wurde, um den Alarm
abzustellen.
Um die Countdown-Zeit zu löschen, drücken Sie die Tasten ▲/HR and
▼/MIN gleichzeitig. Sie können den Timer während der Ausführung durch
Drücken der S/S Taste unterbrechen. Drücken Sie die S/S Taste erneut,
um den Timer neu zu starten.
Wenn Sie Timer und Thermometer zur gleichen Zeit verwenden, können

Sie den Schalter während des Messvorgangs wieder auf Koch-Position
schieben, um die Kochtemperaturen einzustellen oder anzuzeigen. Der
Timer wird den Countdown fortsetzen. Der Alarm ertönt, wenn dieser
00:00 erreicht und Sie können den Alarm ausschalten, indem Sie eine
beliebige Taste drücken.
Stoppuhr
Schieben Sie den Moduswahlschalter auf der Rückseite des Gerätes
in die Timer-Position .
Drücken Sie gleichzeitig die Tasten ▲/HR und ▼/MIN, um die Timer-
Einstellung auf 00:00 zurückzusetzen.
Drücken Sie die S/S Taste, um die Stoppuhr zu starten. Drücken Sie
diese Taste erneut, um den Timer zu stoppen/neu zu starten.
Der Timer stoppt, wenn er 99 Stunden und 59 Minuten erreicht.
Wenn Sie Timer und Thermometer zur gleichen Zeit verwenden, können
Sie den Schalter während des Messvorgangs wieder auf Koch-Position
schieben, um die Kochtemperaturen einzustellen oder anzuzeigen. Der
Timer wird weiterlaufen.
Hinweis: Wenn Sie den Timer einstellen, halten Sie die Taste ▲ oder ▼
gedrückt, um schneller auszuwählen.
-15- -16-
DE DE
Reinigung und Pflege
Das Gerät ist nicht wasserdicht. Den Stecker der Sonde oder das Einsteck
-Loch keinen Flüssigkeiten aussetzen, da das zu einer schlechten
Verbindung und fehlerhaften Messwerten führen wird.
Die Sonde und das Kabel sind nicht spülmaschinenfest. Sie müssen
von Hand mit warmem Wasser und Seife gewaschen werden. Achten Sie
darauf, die Sonde vor dem Lagern gründlich zu spülen und zu trocknen.
Tauchen Sie das Gerät nicht in Wasser oder setzen es ätzenden
Reinigungsmitteln aus. Mit feuchtem Tuch abwischen.
Wenn das Gerät LLL oder HHH anstelle der Sondentemperatur auf dem
Display zeigt, warten Sie, bis die Sonde Raumtemperatur erreicht. Wenn
LLL oder HHH weiterhin angezeigt wird, ist wahrscheinlich der interne
Sondendraht entweder durch Beschädigungen von Feuchtigkeit oder
Hitze worden.
moisture or heat damage.
Hilfreiche Hinweise
Tauchen Sie den Messfühler beim Reinigen nicht unter Wasser.
Setzen Sie den Messfühler oder die Messleitung nicht dem direkten
Kontakt mit den Flammen aus.
Wenn die angezeigte Temperatur Ihnen zu hoch erscheint oder die
Temperatur zu schnell ansteigt, dann überprüfen Sie bitte ob der
Messfühler aus dem Fleisch herausragt. Ändern Sie die Position des
Messfühlers in die Mitte des dicksten Teils des Grillgutes. Vermeiden
Sie den Kontakt mit Knochen oder mit Bereichen mit hohen Fettanteil.
Ein Jahr beschränkte Garantie
ThermoPro garantiert für einen Zeitraum von einem Jahr ab dem Kaufdatum,
dass dieses Produkt frei von Mängeln in Teilen, Material und Verarbeitung ist.
Sollten Reparaturen oder Wartungen im Rahmen dieser Garantie erforderlich
sein, kontaktieren Sie für Anleitungen zum Verpacken und Versenden des
Produkts an ThermoPro den Kundenservice per Telefon oder E-Mail.

Kundenservice
Telefon: 49-211-546-9003
E-Mail: service@buythermopro.com
Zeiten: Wochentags 09:00 - 18:00 Uhr EST
Cook Like A Pro Every Time!
Digital Food Thermometer with Dual Probes
Model No.: TP-17
-17- -18-
PROBE SET TEMP THERMO TEMP
1
PROBE SET TEMP THERMO TEMP
2
PROBE 1
MEDIUM
CLEAR
DE
Diese Garantie gibt Ihnen bestimmte Rechte und eventuell haben Sie zudem
andere Rechte, die von Staat zu Staat variieren.
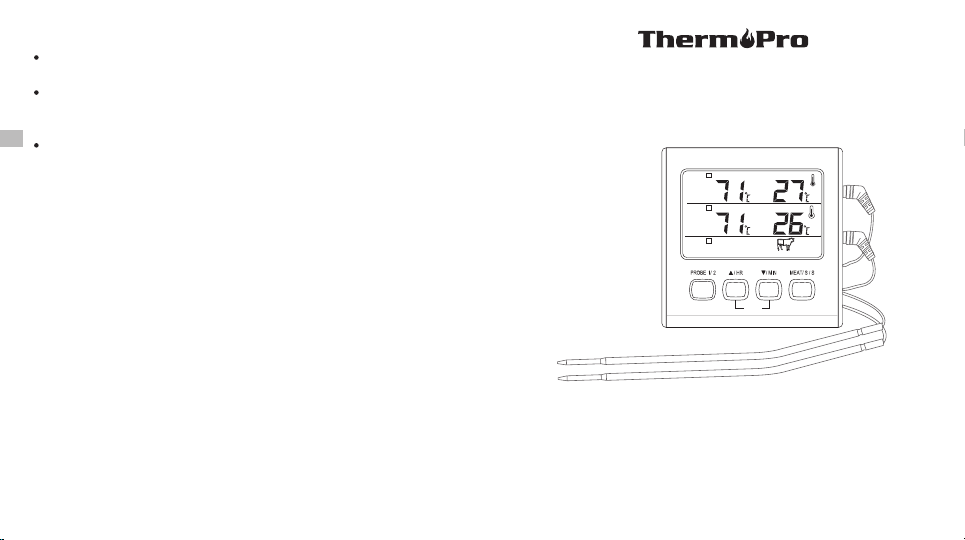
Product Image
PROBE SET TEMP THERMO TEMP
1
PROBE SET TEMP THERMO TEMP
2
PROBE 1
MEDIUM
LCD Screen
Probe 1 Socket
Probe 2 Socket
MEAT/START/
STOP Button
MIN Button
HR Button
PROBE 1&2 Selection Button
Magnet
Hanging wall hole
Flip-out Counter Top Stand
° °C/ F Selector
Mode Seletor
Battery Compartment
Keys Definition
1. Probe 1/2 Socket: Insert Probe 1 and/or 2 into the corresponding socket
to measure meat temperatures.
2. LCD Screen: Displays temperatures, count up or count down timer and
other information.
3. Mode Selector (on the back of the unit): Move the position of the selector
to select Cook mode , Timer mode or power off the device.
4. C/ F Selector (on the back of the unit): Move the position of the selector
to select the temperature display unit in °C or °F.
° °
5. Probe1/2 Button: In Cook mode, press the PROBE 1/2 button to select
and enter Probe 1 or Probe 2 setting mode. The last row of the screen will
display the meat type for the corresponding probe. In timer mode, press
the PROBE1/2 button to toggle the display of the Probe 1 or 2 temperatures
in the first row of the screen.
6. /HR Button: In Cook mode, press ▲ to increase your desired cooking ▲
temperature setting if you do not want to use the pre-programmed meat
temperature setting. In Timer mode, press this button to set count down
hours. To clear count down timer setting, press the HR and MIN buttons
at the same time. Press and hold the button for fast setting.
7. /MIN Button: In Cook mode, press ▼ to decrease your desired cooking ▼
temperature setting if you do not want to use the pre-programmed meat
temperature setting. In Timer mode, press this button to set count down
minutes. To clear count down timer setting, press the HR and MIN buttons
at the same time. Press and hold the button for fast setting.
8. MEAT/S/S Button: In Cook mode, press this button to select the meat type:
Poultry ( ), Pork/Veal ( ), Ham ( ), Beef Rare/Fish ( ), Beef
( ), Beef Well Done ( ), and User-Defined ( ). The pre-Medium
doneness temperature setting for each meat type is programmed
USDA (U.S. Department of Agriculture). In Timer mode, recommended by
button to begin the count-down or count-up timer. Press the press the S/S
pause or restart the timer.S/S button to
9. Flip-out Counter Top Stand: Allows user to place device on counter for
easy viewing.
-19- -20-
10. Magnet: Allows user to stick device to a metal surface. For example, a
refrigerator.
EN
EN
12. Backlight: Press any key to activate the back light of the screen. If there
is no key operation for 10 seconds, the backlight will be automatically
turned off. When there is alarm sound, the backlight will be turned on and
flashing.
11. Battery Compartment: Hold one AAA battery.

Note: This unit is designed to remotely monitor cooking progress. Do not
remove the probes during cooking. The internal temperature will be displayed
on the unit outside of the oven.
Features And Specifications
1. Programmable alert with preset temperatures recommended by USDA for
specific foods.
2. Dual stainless-steel probes with steel mesh cable to measure and monitor
temperatures of two pieces of meat or two sections of the same large piece
of meat simultaneously.
3. Temperature range of probe: 14˚F to 572˚F (-10˚C to 300˚C).
4. Temperature tolerance of internal food reading:+/-1.8˚F (+/-1.0˚C).
5. 99-hour and 59-minute countdown timer and count up timer.
6. Temperature readings in ˚F or ˚C.
7. Flip-out counter top stand and magnet.
8. Uses one AAA battery (included).
* If probe is not inserted into food and put directly inside the oven, the
temperature reading of oven heat above 200˚F (93˚C) will be accurate to
within 2˚F to 5˚F (1.1˚C to 2.7˚C).
Battery Installation/Set Up
Slide open the battery compartment door at the back of the unit.
Insert one (1) AAA battery according to the polarity markings.
Replace the battery compartment door.
Remove the printed vinyl label from the LCD screen.
Important Notes/Warning
This product is not for use in microwave ovens.
Keep out of reach of children.
Do not touch hot probe or wire with bare hands or just after cooking.
Always wear a heat-resistant glove.
Do not expose probe directly to flame. Doing so will cause wire to
deteriorate.
When not in use, slide the mode selector switch to the OFF position
to conserve the battery.
Be sure to use a good quality alkaline battery and replace it often. A weak
battery will cause the unit to lose accuracy. Always dispose of exhausted
batteries safely.
A food thermometer can assist in the proper preparation of food. However,
use of this electronic device does not guard against unsafe food handling
practices. Always follow proper food preparation techniques to limit the
risk of food borne illness.
-21- -22-
EN EN
The stainless-steel wire probe should not be exposed to oven temperatures
exceeding 716˚F (380˚C).
Do not let probe or cable come into direct contact with the oven elements,
as this will result in faulty readings and/or damage.
If the temperature exceeds or falls below the measurable ranges, the
LCD screen will display the following letters: HHH for temperatures
above range and LLL for temperatures below range.

Operating Instructions
Using the Cooking Thermometer
Clean the stainless temperature probe with hot water and soap and rinse
clean. Do not submerge the probe and cable in water. The probe /cable
connection is not waterproof.
Plug the temperature probe 1 and/or 2 into the corresponding sockets
on the right side of the device.
Make sure the probe cable is free of knots. Make sure the sensor plug
on the end of the cord is plugged into the sockets completely. (Note: if
the probe is not plugged in properly or is crimped, the display will show
LLL.)
Slide the switch on the back of the device to display the temperature in
˚F or ˚C.
Slide the mode selector switch to the cook position “ ”.
You will see two temperatures on each top two rows (the first row
represents Probe 1 and the second row represents Probe 2) of the
screen. On the right is the actual temperature reading as measured by
the temperature probe and on the left is the set temperature.
Set your desired cooking temperatures for Probe 1 and 2 respectively
by choosing Quick Temperature Setting or User-defined Temperature
Setting. (see Section Quick Temperature Setting and User-defined
Temperature Setting below)
Insert the tip of the probe at least 2”/5cm into the thickest part of the meat,
but not near bone or gristle. You can use two probes to measure and
Place food into the oven. Before closing the oven door, make sure there
is enough slack in the steel mesh cable to prevent the probe from being
pulled out of the food when the oven door is closed. The device must be
positioned outside of the oven on a stable surface and must be firmly
connected to the temperature probes.
To prevent damage to the device, it should not be placed on a hot surface.
When the internal temperature of your food reaches the temperature
you have set, an audible alert will sound. Press any button to stop the
alert.
Before removing the food from the oven, disconnect the steel mesh cables
from the device. Do not touch hot probe or wire with bare hands during
or just after cooking. Always wear a heat-resistant glove.
monitor temperatures of two pieces of meat or two sections of the same
large piece of meat simultaneously.
-23- -24-
EN
EN
your selection, press▲/HR or▼/MIN button to confirm the selection.
(The device will regard you've confirmed the selection if you don't press
any button for 4 seconds).
Repeat the above process to set the other probe temperature.
Quick Temperature Setting
Your digital cooking thermometer is pre-programmed with temperatures
for various cooking levels: poultry (165˚F), beef well (170˚F), veal/pork
(170˚F), beef medium (160˚F), ham (160˚F) and beef rare/fish (145˚F)
based on the USDA recommendation. See the below table.
Press Probe 1/2 to select Probe 1 or 2 for setting. The display for the
selected probe will be flashing for a few seconds.
Press the MEAT/S/S button to choose meat type. Once you've made

User-Defined Temperature Setting
If you prefer setting your own desired cooking temperatures and not using
the preset temperatures, you can always change the setting by simply press
▲or▼ button to adjust the temperature setting to your desired one. Or you
can press MEAT/S/S button to enter User-defined setting mode and
then press ▲ or ▼to set the temperature to your desired one.
NOTE:
a) In the lower right corner of the screen, if icon shows, it means the
temperature setting is user-defined.
b) When setting temperature, press and hold ▲or▼ for fast setting.
Preset Temperature Cooking
PRESET
TYPE
HEADING
FOOD
TYPE
RECOMMENDED
INTERNAL
TEMPERATURE
FISH
BEEF RARE
Fish
Beef (roasts, steaks & chops) - Rare 63˚C/145˚F
HAM
Egg dishes
Ham (Raw) – Note: Precooked
Ham (140˚F)
71˚C/160˚F
BEEF
MEDIUM
Beef (roasts, steaks & chops) – Medium
Pork (roasts, steaks, chops, sausages) –
Medium (Pink)
Ground Meats (beef, veal, pork)
71˚C/160˚F
VEAL
PORK
Veal (steaks, roasts, tenderized or non-
tenderized cuts) – Well Done
Pork (roasts, steaks, chops, sausages) –
Well Done
77˚C/170˚F
BEEF WELL Beef (roasts, steaks & chops) – Well 77˚C/170˚F
POULTRY Poultry (chicken, turkey) – Whole
Duck & Goose 74˚C/165˚F
-25- -26-
EN
EN
Timer
Your timer can be used whether the thermometer is in operation or not.

Countdown Timer:
Slide the mode selector switch on the back of the device to the timer
position .
The second row of the screen will display the timer information and the
first row of the screen will toggle the display of the temperatures of Probe
1 or 2.
Press ▲/HR to set the hours and ▼/MIN to set the minutes.
Press S/S (start/stop) button to start the countdown timer. The colon
between hours and minutes will flash.
If the setting or the remaining countdown timer is less than 1 hour, the
display will automatically switch to display the minutes and seconds.
Count up Timer:
Slide the mode selector switch on the back of the device to the timer
position .
Press the ▲/HR and ▼/MIN buttons at the same time to clear the timer
setting to 00:00.
Press S/S button to start count up timer. Press it again to stop/re-start
the timer.
The timer will stop when it reaches 99 Hour:59 Minute.
If you are using the timer and thermometer at the same time, you may
slide the selector switch back to the cook position during the timing
session to set or view the cooking temperatures. The timer will continue
counting up .
Note: When setting the timer, you can press and hold ▲or▼ for fast setting.
-27- -28-
When the timer gets to 00:00, the alarm will sound. Press any button to
silence the alarm. The device has a timing memory and will automatically
display the original timer setting when S/S is pressed to silence the
alarm.
To clear the timer setting, press the ▲/HR and ▼/MIN buttons at the
same time. You can pause the timer while it is running by pressing S/S
button. Press S/S button again to restart the timer.
If you are using the timer and thermometer at the same time, you may
slide the selector switch back to the cook position during the timing
session to set or view the cooking temperatures. The timer will continue
the countdown . The alarm will sound when it reaches 00:00 and you can
silence the alarm by pressing any button.
EN
EN
If the unit display LLL or HHH instead of the probe temperature, wait for
probe to reach room temperature. If LLL or HHH is still displayed it is likely
the internal probe wire has shorted out either through moisture or heat
damage.
Helpful Hints
Do not allow the probe or probe wire to come into contact with flames.
Do not immerse the probe in water while cleaning.
Within the warranty period, return defective probe to address below
along with return address and we will send you a replacement probe at
no charge.
If the temperature displayed seems to read too high or the temperature
seems to increase too quickly, check to make sure the probe tip is not
poking through the food to outside. Reposition the probe tip in the center
of the thickest part of food. Avoid touching bone or heavy fat areas.
Customer Service
Telephone: 44-203-769-1321
Email: service@buythermopro.com
Hours: Weekdays 8:00 AM- 6:00 PM EST
Cuisinez comme un pro à tous les coups !
Thermomètre alimentaire digital avec double sonde
Modèle N°.: TP-17
-29- -30-
Limited One-Year Warranty
ThermoPro warrants this product to be free of defects in parts, materials
and workmanship for a period of one year, from dateof purchase.
Should any repairs or servicing under this warranty be required, contact
Customer Service by phone or email for instructions onhow to pack and ship
the product to ThermoPro.
This warranty gives you specific legal rights and you may also have other
rights which vary from state to state.
PROBE SET TEMP THERMO TEMP
1
PROBE SET TEMP THERMO TEMP
2
PROBE 1
MEDIUM
CLEAR
EN
Cleaning and Care
The device is not waterproof. Do not expose plug of probe or plug-in hole
to any liquid, which will result in a bad connection and faulty readings.
The probe and cable are not dishwasher safe. They must be hand washed
using hot water and soap. Make sure to rinse and dry the probe thoroughly
before storing.
Do not submerge the device in water or expose to any corrosive cleaning
materials. Wipe with damp cloth.
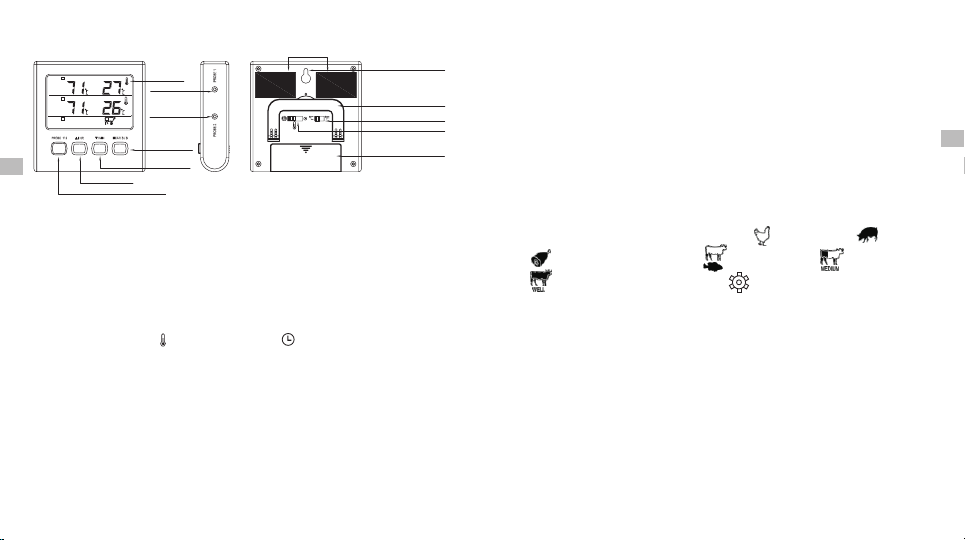
Image du produit
PROBE SET TEMP THERMO TEMP
1
PROBE SET TEMP THERMO TEMP
2
PROBE 1
MEDIUM
Écran LCD
Prise de la sonde 1
Prise de la sonde 2
Bouton Viande/
Démarrer/Arrêter
Bouton ▼/MIN
Bouton ▲/HR
Bouton de sélection Sonde 1 ou 2
Aimant
Trou pour fixation murale
Support de table
Sélectionneur ° °C/ F
Sélectionneur de mode
Explication des touches
1. Prise de la sonde 1/2 : Insérez la sonde 1 et/ou 2 dans la prise
correspondante pour mesurer les températures de la viande.
2. Écran LCD : Affiche les températures, un minuteur ou un chronomètre et
les autres informations.
3. Sélectionneur de mode (à l'arrière de l'appareil) : Déplacez l'interrupteur
sur le mode Cuisson , le mode Minuteur ou pour éteindre l'appareil.
4. Sélectionneur / F (à l'arrière de l'appareil) : Déplacez le sélectionneur
pour définir l'unité de température en °C ou °F.
°C °
5. Bouton Probe 1 ou 2 : En mode Cuisson, appuyez sur le bouton Probe 1
ou 2 pour sélectionner la sonde 1 ou 2 et entrer dans les paramètres. La
dernière ligne de l'écran affichera le type de viande pour la sonde
correspondante. En mode Minuteur, appuyez sur le Bouton Probe 1 ou 2
pour passer entre l'affichage des températures des sondes 1 et 2 sur la
première ligne de l'écran.
6. Bouton ▲/HR : En mode Cuisson, appuyez sur ▲ pour augmenter les
paramètres de température désirée si vous ne souhaitez pas utiliser les
paramètres préprogrammés. En mode Minuteur, appuyez sur ce bouton
pour définir le nombre d'heures du minuteur. Pour effacer la configuration
du minuteur, . Laissez appuyez sur les boutons HR et MIN en même temps
sur le bouton pour accélérer la configuration.appuyer
7. Bouton ▼/MIN : En mode Cuisson, appuyez sur ▼ pour diminuer les
paramètres de température désirée si vous ne souhaitez pas utiliser les
paramètres préprogrammés. En mode Minuteur, appuyez sur ce bouton
pour définir le nombre de minutes du minuteur. Pour effacer la configuration
du minuteur, appuyez sur les boutons HR et MIN en même temps. Laissez
appuyer sur le bouton pour accélérer la configuration.
8. Bouton MEAT/S/S : En mode Cuisson, appuyez sur ce bouton pour
sélectionner le type de viande : volaille ( ), porc, veau ( ), jambon
( ), bœuf saignant/poisson ( ), bœuf à point ( ), bœuf bien cuit
( ),et configuration de l'utilisateur ( ). Les paramètres préprogrammés
de température de cuisson pour chaque viande sont recommandés par
l'USDA (Département de l'agriculture américain). En mode Minuteur,
appuyez sur le bouton S/S pour démarrer le minuteur ou le chronomètre.
Appuyez sur le bouton S/S pour mettre le minuteur sur pause ou le
redémarrer.
-31- -32-
9. Support de table : Permet à l'utilisateur de placer l'appareil sur une surface
Compartiment de Pile
FR
FR
10. Aimant : Permet à l'utilisateur de placer l'appareil sur une surface
métallique, comme par exemple un réfrigérateur.
11. Compartiment de pile : Contient une pile AAA.
12. Rétroéclairage : Appuyez sur n'importe quelle touche pour activer le
rétroéclairage de l'écran. Si aucune touche n'est pressée pendant 10
plane pour le voir facilement.

secondes, le rétroéclairage s'éteindra automatiquement. Lorsque l'alarme
sonne, le rétroéclairage sera activé et clignotera.
Remarque : Cet appareil est conçu pour contrôler la progression de la cuisson
à distance. Ne retirez pas les sondes pendant la cuisson. La température
interne sera affichée sur l'unité à l'extérieur du four.
Caract ristiqueset sp cificationsé é
1. Alerte programmable avec les températures préprogrammées
recommandées par l'USDA pour des aliments spécifiques.
2. Double sonde en acier inoxydable avec câbles en fer pour mesurer et
surveiller les températures de deux morceaux de viande ou deux sections
d'un même morceau de viande simultanément.
3. Plage de température des sondes : -10 C à 300 C (14 F à 572 F).° ° ° °
4. Tolérance de la température de la lecture des aliments : +/-1,0 C (+/-1,8 F).° °
5. Minuteur et chronomètre : 99 heures et 59 minutes.
6. Lecture des températures en C ou °F.°
Installation de la pile
Faites glisser le couvercle du compartiment à l'arrière de l'appareil.
Insérez une (1) pile AAA en respectant la polarité.
Remettez le couvercle du compartiment.
Retire l'étiquette imprimée en vinyle de l'écran LCD.
Remarques importantes/avertissements
Ce produit ne doit pas être utilisé dans le micro-onde.
Garder hors de portée des enfants.
Ne touchez pas les sondes et les câbles chauds ou juste après la cuisson
avec vos mains nues. Utilisez toujours des gants résistants à la chaleur.
N'exposez pas directement les sondes aux flammes, cela endommagerait
les câbles.
Lorsque vous n'utilisez pas l'appareil, mettez l'interrupteur sur la position
OFF pour conserver la batterie.
Assurez-vous d'utiliser une pile alcaline de bonne qualité et remplacez-
la souvent. Une faible batterie fera perdre de la précision à l'appareil.
Jetez toujours les piles en respectant les consignes locales.
-33- -34-
7. Support de table et les aimants.
* Si la sonde n'est pas insérée dans la nourriture et placée directement
dans le four, la lecture de température du four supérieure à 93°C (200°F)
sera précise entre 1,1°C et 2,7°C (2°F à 5°F).
8. Nécessite une pile AAA (inclue).
Un thermomètre alimentaire peut aider à la préparation de la nourriture.
Cependant, l'utilisation de cet appareil ne protège pas des manipulations
FR FR
Ne laissez pas la sonde ou les câbles entrer en contact direct avec les
éléments du four car cela entrainerait de mauvaises lectures et/ou des
dommages.
Si la température est un inférieure ou supérieure à la plage mesurable,
l'écran LCD affichera les lettres suivantes : HHH pour les températures
supérieures à la plage et LLL pour les températures inférieures à la plage.
Les sondes en acier inoxydable ne doivent pas être exposées à des
températures supérieures à 380˚C (716˚F).
dangereuses des aliments. Suivez toujours les techniques de préparation
appropriées pour limiter les risques des maladies causées par la nourriture.

Instructions D'utilisation
Utiliser le thermomètre de cuisson
Nettoyez la sonde de température inoxydable avec de l'eau chaude et
du savon et rincez-la. Ne plongez la sonde et le câble dans l'eau. La
sonde et les câbles ne sont pas étanches.
Branchez la sonde 1 et/ou 2 dans les prises correspondantes sur la
droite de l'appareil.
Mettez l'interrupteur à l'arrière de l'appareil pour afficher la température
en ˚F ou ˚C.
Mettez l'interrupteur de sélection de mode sur la position Cuisson “ ”.
Vous verrez deux températures sur les deux lignes du haut de l'écran (la
première pour la sonde 1 et la deuxième pour la sonde 2). Sur la droite se
la température prise par la sonde et sur la gauche la température trouve définie.
Configurez vos températures de cuisson désirées pour la sonde 1 et 2
en choisissant entre les paramètres préprogrammés ou les paramètres
définis par l'utilisateur (voir les sections Paramétrage rapide de la
température et Paramétrage de la température par l'utilisateur)
Insérez l'extrémité de la sonde au moins 5 cm dans la partie la plus épaisse
de la viande, mais pas à proximité de l'os ou du cartilage. Vous pouvez utiliser
deux sondes pour mesurer et surveiller les températures de deux morceaux
de viande ou deux sections d'un même morceau de viande simultanément.
Placez la nourriture dans le four. avant de fermer la porte du four, assurez-
vous que le câble en fer soit assez lâche pour éviter que la sonde sorte
de la nourriture lorsque la porte est fermée. L'appareil doit être positionné
à l'extérieur du four sur une surface plane et doit être fermement connecté
aux sondes de température.
Ne placez pas l'appareil sur une surface chaude pour éviter de
l'endommager.
Une sonore se fera entendre lorsque la température interne de votre
nourriture atteint la température que vous avez définie. Appuyez sur
n'importe quel bouton pour arrêter l'alarme.
Avant de retirer la nourriture du four, déconnectez les câbles en fer de
l'appareil. Ne touchez pas les sondes et les câbles chauds ou juste après
la cuisson avec vos mains nues. Utilisez toujours des gants résistants
à la chaleur.
-35- -36-
Votre thermomètre de cuisson digital est préprogrammé avec des
Paramétrage rapide de la température
FR
FR
températures pour différents niveaux de cuisson : volaille (74°C), bœuf
bien cuit (77°C), veau/porc (77°C), bœuf à point (71°C) et bœuf saignant/
poisson (63°C) conformément aux recommandations de l'USDA. Voir
le tableau ci-dessous.
Appuyez sur Probe 1/2 pour sélectionner la sonde 1 ou 2 à configurer.
L'écran de la sonde sélectionnée clignotera pendant quelques secondes.
Appuyez sur le bouton MEAT/S/S pour choisir le type de viande. Une fois
la sélection faite, appuyez sur le bouton ▲/HR ou ▼/MIN pour confirmer
la sélection (l'appareil considèrera que vous avez confirmé la sélection
si vous n'appuyez sur aucun bouton pendant 4 secondes).
Répétez le processus ci-dessus pour l'autre sonde.

Paramétrage de la température par l'utilisateur
Si vous préférez configurer vos propres paramètres de température
de cuisson et ne pas utiliser les températures préprogrammées, vous
pouvez simplement changer le paramétrage en appuyant sur les boutons
▲ ou ▼ pour ajuster la température selon vos souhaits. Vous pouvez
également appuyer sur le bouton MEAT/S/S pour entrer dans le mode
de paramétrage par l'utilisateur , puis appuyez sur ▲ ou ▼ pour
configurer la température comme vous le souhaitez.
REMARQUE :
a) Dans le coin inférieur de l'écran, si l'icône est affiché, cela signifie
que les paramètres de température sont définis par l'utilisateur.
b) Lorsque vous configurez la température, laissez appuyer sur ▲ou▼ pour
aller plus vite.
Tableau De Cuisson Des Temp ratures Pr programm esé é é
PROGRAMME TYPE D'ALIMENT TEMPÉRATURE
INTERNE
RECOMMANDÉE
POISSON
BŒUF SAIGNANT
Poisson
Bœuf (rôtis, steaks et côtelettes)
- Saignant 63˚C/145˚F
JAMBON
Plats avec de l'œuf
Jambon (cru) – Note : précuit
Jambon (60°C)
71˚C/160˚F
BŒUF
À POINT
Bœuf (rôtis, steaks et côtelettes) – À point
Porc (rôtis, steaks, côtelettes et saucisses)
- À point (rose)
Viandes hachées (bœuf, veau, porc)
71˚C/160˚F
VEAU
PORC
Veau (steaks, rôtis, morceaux attendris ou non)
– Bien cuit
Porc (rôtis, steaks, côtelettes et saucisses)
– Bien cuit
77˚C/170˚F
BŒUF
BIEN CUIT Bœuf (rôtis, steaks et côtelettes) – Bien cuit 77˚C/170˚F
VOLAILLE Volaille (poulet, dinde) – Canard et oie entiers 74˚C/165˚F
-37- -38-
FR
FR
Minuteur
Vous pouvez utiliser le minuteur que vous utilisiez le thermomètre ou non.
Table of contents
Languages:
Other THERM PRO Thermometer manuals

THERM PRO
THERM PRO TP-16 User manual

THERM PRO
THERM PRO TP359 User manual

THERM PRO
THERM PRO TP-09 User manual

THERM PRO
THERM PRO TP-07S User manual

THERM PRO
THERM PRO TP393 User manual

THERM PRO
THERM PRO TP-15H User manual

THERM PRO
THERM PRO TP-17H User manual

THERM PRO
THERM PRO TP-22 User manual

THERM PRO
THERM PRO TP-02 User manual

THERM PRO
THERM PRO TP-30 User manual


