Thermopatch DP-JUNIOR User manual

2
BACK TO INDEX For more informaon about our products and how to contact us, please visit thermopatch.com
Copyrights
© 2023, Thermopatch bv, Almere, The Netherlands.
No part of this publicaon may be reproduced by any means without the prior wrien permission of
Thermopatch bv, The Netherlands.
Thermopatch and the Thermopatch logo are registered trademarks of Thermopatch.
Introducon
Dear User,
Welcome to the growing group of Thermopatch users. Your
purchase has been manufactured with the utmost care to ensure that you benet as long as possible from
your Thermopatch product.
The products by Thermopatch are designed with special aenon to your convenience. Should you
discover any fault or damage upon receipt of this product, please contact your local Thermopatch vendor.
The manual has been prepared in accordance with NEN 5509 and in conformity with the Machinery
Direcve 2006/42/EC.
This user manual is intended not only for all users of the machine, but also for those who install and
maintain the DP-junior. The goal is to familiarize you with the operaon, to provide for safe working
instrucons and guidelines for maintenance.
ATTENTION!
In order to make safe and optimal use of the DP-junior, it is important to take note of and
understand the contents of this manual.

3
BACK TO INDEX For more informaon about our products and how to contact us, please visit thermopatch.com
Contents
Copyrights ..........................................................................................................................................2
Introducon........................................................................................................................................2
1. General descripon ..............................................................................................................5
1.1 Delivery ........................................................................................................................................ 5
1.2 Condions of warranty ............................................................................................................... 5
2. Intended use .........................................................................................................................6
3. Technical specicaons.........................................................................................................7
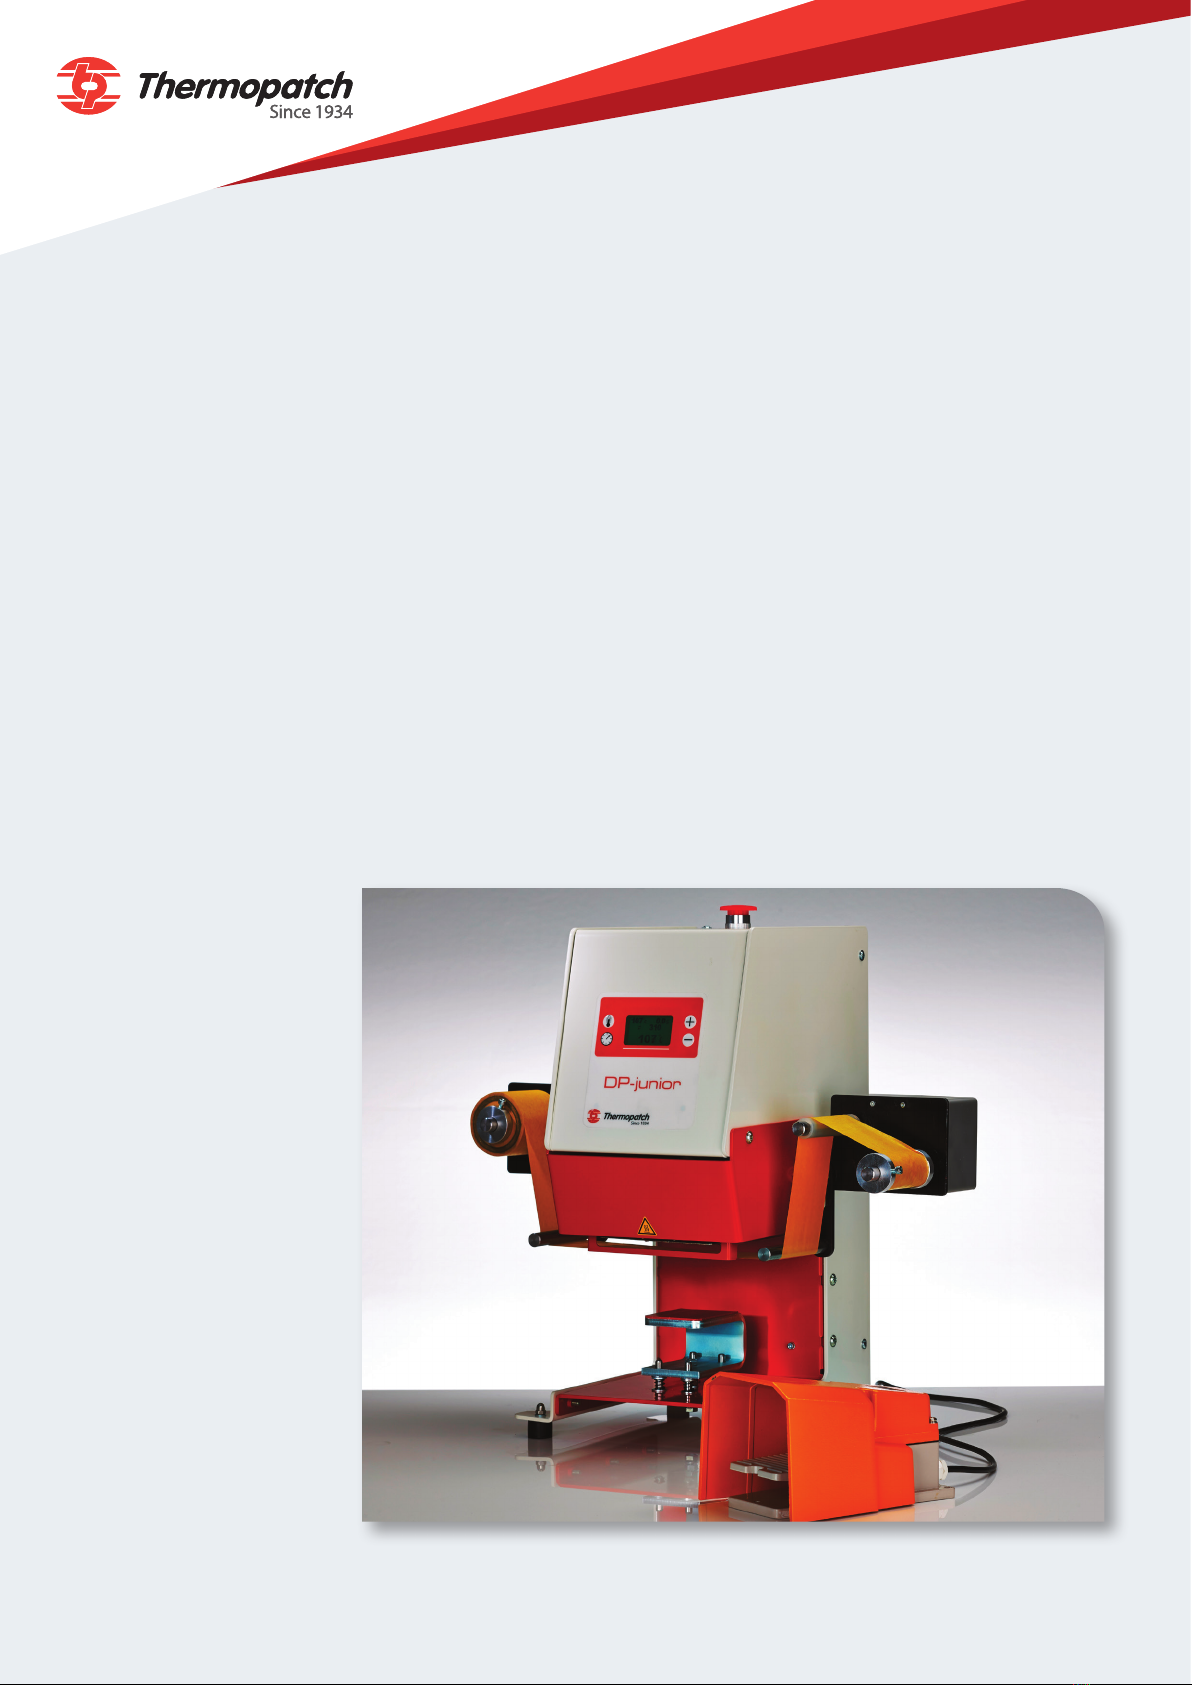
3.1 Specicaons of the DP-junior..................................................................................................... 7
4. Overview of safety measures and warnings..........................................................................8
4.1 Safety............................................................................................................................................ 8
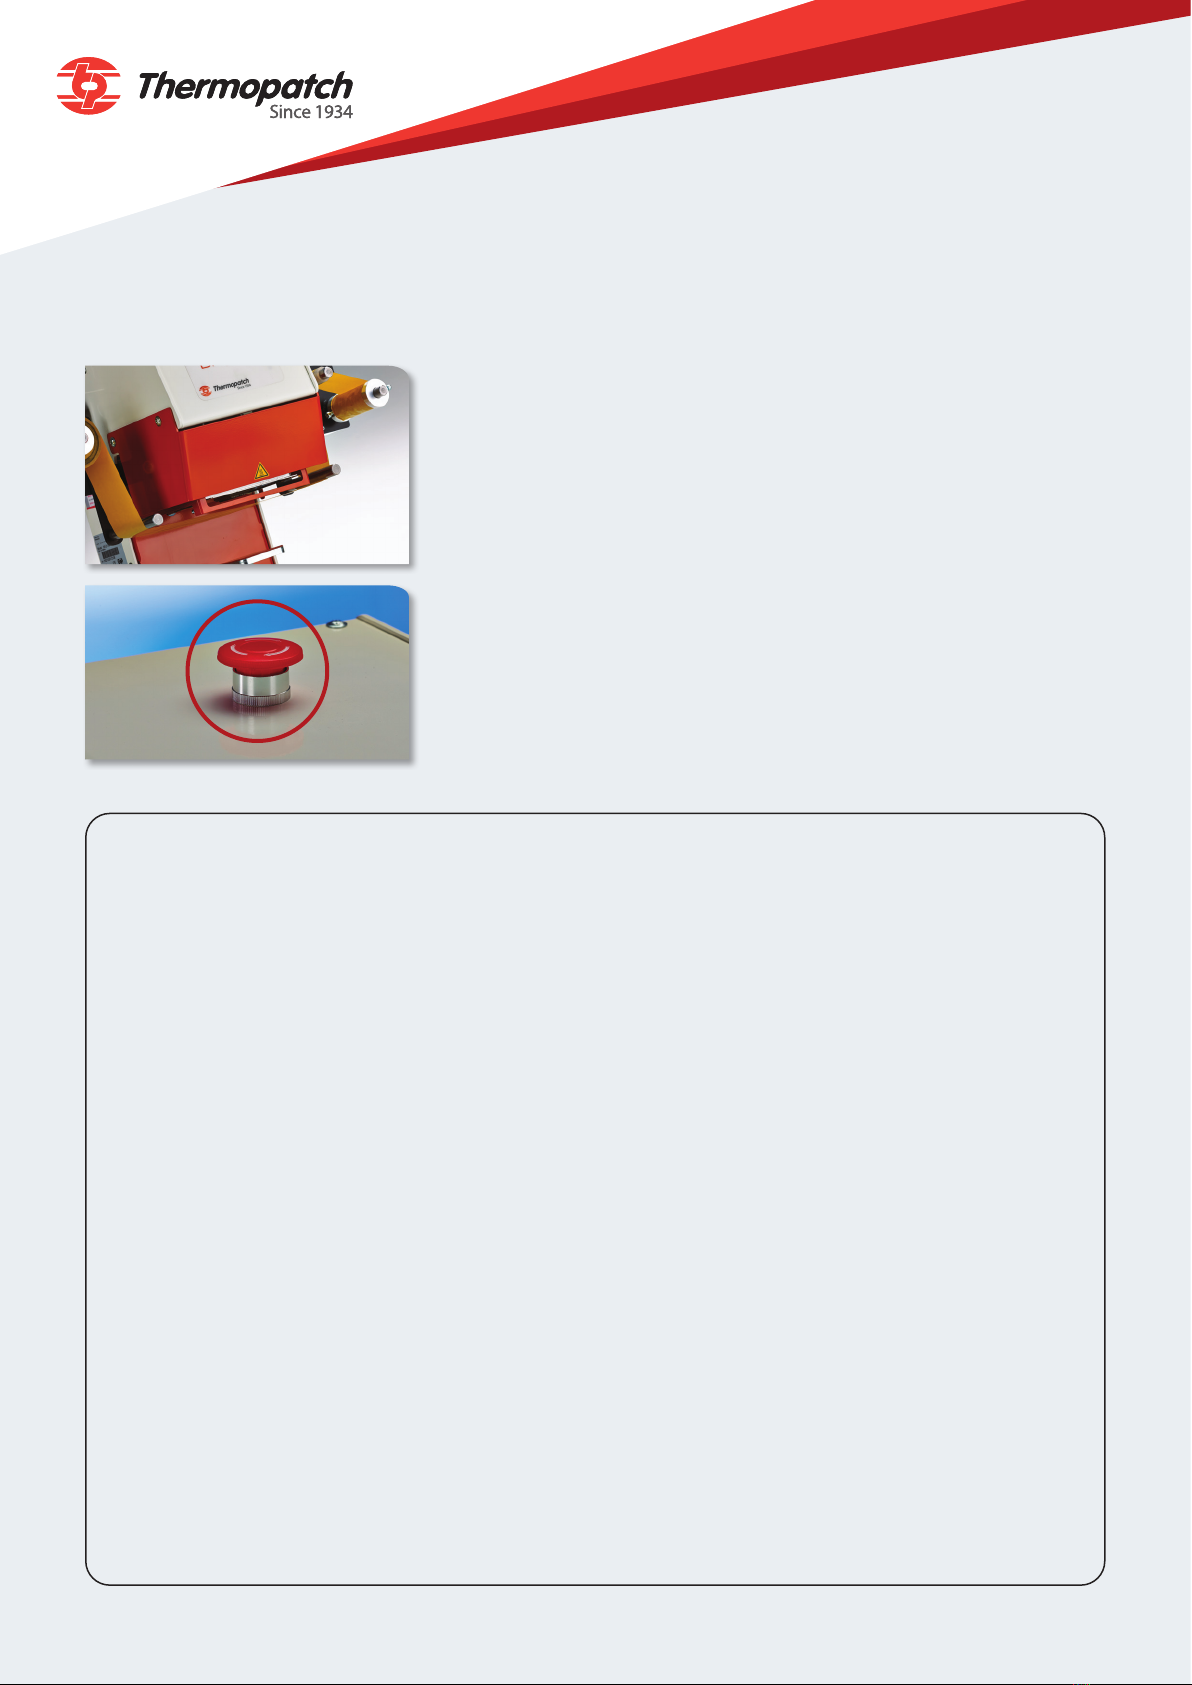
The safety frame .......................................................................................................................... 8
The emergency stop buon......................................................................................................... 8
5. Transport and storage .........................................................................................................10
5.1 Transport .................................................................................................................................... 10
5.2 Storage ....................................................................................................................................... 10
6. Operang instrucon..........................................................................................................11
6.1 Operang the DP-junior............................................................................................................. 11
6.2 Safety frame ............................................................................................................................... 11
6.3 The control panel ....................................................................................................................... 11
6.4 Sengs....................................................................................................................................... 12
6.4.1 Temperature sengs ................................................................................................................. 12
Change temperature sengs .................................................................................................... 12
6.4.2 Time sengs .............................................................................................................................. 13
Change sealing me................................................................................................................... 13
Change the C-tape transport me............................................................................................ 14
6.4.3 Interrupng the operaon ot the DP-junior ............................................................................. 14
6.4.4 Counter....................................................................................................................................... 15
6.4.5 Error codes ................................................................................................................................ 16
6.5 Inserng C-tape.......................................................................................................................... 17
6.6 Inserng the cliché..................................................................................................................... 18
7. Assembly and installaon ...................................................................................................19
7.1 Assembly .................................................................................................................................... 19
7.2 Installaon.................................................................................................................................. 19

4
BACK TO INDEX For more informaon about our products and how to contact us, please visit thermopatch.com
8. Maintenance.......................................................................................................................20
8.1 Maintenance .............................................................................................................................. 20
9. Technical annexes ...............................................................................................................21
9.1 Drawing of the frame ................................................................................................................. 22
9.1 Parts list...................................................................................................................................... 23
9.2 Drawing electrical....................................................................................................................... 24
Components and electronics ..................................................................................................... 25
9.2 Parts list...................................................................................................................................... 26
9.3 Drawing of the tape drive ........................................................................................................ 27
9.3 Parts list...................................................................................................................................... 28
9.4 Drawing heater assembly .......................................................................................................... 29
9.4 Parts list...................................................................................................................................... 30
9.5 Drawing of the safety guard and................................................................................................ 31
Heater assembly......................................................................................................................... 32
9.6 Electric Wiring Diagram 230 Volts ............................................................................................. 33
10. Recycling ............................................................................................................................34
11. Declaraon of conformity ...................................................................................................34
12. Disclaimer ...........................................................................................................................35

5
BACK TO INDEX For more informaon about our products and how to contact us, please visit thermopatch.com
1. General descripon
The DP-junior is a praccal and universal heat transfer press for
direct marking purposes.
Once set up, it produces a permanent image directly onto your
texle item.
1.1 Delivery
The DP-junior is mounted onto a wooden pallet and xed with
bolts and straps and covered with a cardboard box.
The screw-on feet are supplied separately in a small plasc bag
The DP-junior shipment contains following items:
• DP-junior direct marking machine
• Power cord
• 6 mm air tube
• Screw-on feet (4x)
• Quick installaon guide
• Quality checklist
• Manual on CD-ROM
• CE Declaraon of Conformity
• Cliché handle
• Foot switch
• Sample roll of C-tape
If one of these arcles should be missing or faulty, please contact
your Thermopatch supplier.
1.2 Condions of warranty
Thermopatch points to its warranty and product liability
condions as laid down in our condions of sales. These can be
obtained at your Thermopatch supplier.

6
BACK TO INDEX For more informaon about our products and how to contact us, please visit thermopatch.com
2. Intended use
The DP junior is designed for direct prinng of property marking, branding, coding, logos and care
instrucons.
All types of atwork and other suitable texles can be printed directly with an engraved plate (prinng
plate) and C-tape, which provides a sharp and clean print, in a fracon of a
second.
WARNING!
Any use other than described above can be dangerous and cause damage and thus qualies as ‘misuse’
which excludes Thermopatch bv from any liability.

7
BACK TO INDEX For more informaon about our products and how to contact us, please visit thermopatch.com
3. Technical specicaons
3.1 Specicaons of the DP-junior
Power 600 Was
Power supply 230 Volt
Operang temperature 260 °C
Temperature range 25-270 °C
Press Time range 0.1-60 sec.
Discharge pressure range 2-5 bar
Compressed air use, per cycle 0.5 l
Machine height 550 mm
Machine width 550 mm
Machine depth 350 mm
Gross weight, including packaging 37.5 kg
Net weight 27.7 kg
Maximum size cliché 96 x 125mm
Fuses 2x 4 Amp.
A-weighted noise level <70 dB (A)

8
BACK TO INDEX For more informaon about our products and how to contact us, please visit thermopatch.com
4. Overview of safety measures and warnings
ATTENTION!
Make sure you are informed about the contents of this manual before starting to work with the DP-junior. This
ensures an optimal and safe use of the machine.
ATTENTION!
Always turn the power off (unplug it) when you need to carry out maintenance work or when cleaning the
machine.
ATTENTION!
In case of emergency, press the emergency stop button!
ATTENTION!
Take care that there is enough space around the machine. Cables and connections must not get pinched.
Although the heat radiation of the press is low, there should be enough
space for cooling down.
ATTENTION!
Avoid contact with the press and the heating element.
ATTENTION!
Pull the fabrics tight around the lower platenn and ensure that your hands are away from
the machine before operating the machine.
4.1 Safety
The DP-junior is ed with all required safety measures to ensure
safe working as required by European safety guidelines.
The safety frame
The press plate of the DP-junior is provided with a safety frame.
When this frame is touched and moved, it will automacally interrupt
the sealing cycle.
In order to resume work, switch the machine o and start it up again.
The emergency stop buon
In accordance to the safety measures required by the conformity
with the Machinery Direcve, an emergency stop buon has
been installed, to be able to intervene with producon in case of
unforeseen events.

10
BACK TO INDEX For more informaon about our products and how to contact us, please visit thermopatch.com
5. Transport and storage
5.1 Transport
When the machine needs to be moved, Thermopatch advises to use the original packaging.
5.2 Storage
When the machine needs to be stored, Thermopatch advises to use the original packaging. The machine
should be stored on a pallet, o the oor, in dry condions.

11
BACK TO INDEX For more informaon about our products and how to contact us, please visit thermopatch.com
6. Operang instrucon
6.1 Operang the DP-junior
You can work with the DP-junior when the machine is connected to the mains.
• Set the airpressure, depending on imprint surface, to 2 - 5 bar.
• Place the plug in the socket and turn on the DP-junior with the ON - OFF switch mounted on the back of
the machine.
• Wait unl the factory set temperature is reached. This will take approximately 3 minutes. The standard
operang temperature has been set to 260 °C.
The press is ready for operaon.
6.2 Safety frame
The upper platen of the press head of the DP-junior is guarded by a safety frame. This frame will react if it
is touched and moved, and will then interrupt the sealing cycle immediately. Switch the machine o and on
again to resume work.
6.3 The control panel
The pressure, temperature and me are shown on the display. The minimum, maximum and default values
for temperature and pressure have been set by the manufacturer.
The following symbols are present on the control panel:
The buons me seng, temperature
seng, set increase (+) and set
decrease (-) are used to change the
sealing condions of the imprint.
ATTENTION!
When the safety frame is touched or moved, the machine will stop the production cycle immediately.
Switch the machine off and restart again to resume production.
260 0.4
xxx
259
set temperature actual sealing temperature set sealing time
counter
set increasetemperature setting
time setting set decrease

12
BACK TO INDEX For more informaon about our products and how to contact us, please visit thermopatch.com
6.4 Sengs
6.4.1 Temperature sengs
The default operang temperature of 260 °C has been set by the manufacturer.
In case you want to adjust the operang temperature above or below the default temperature range,
please contact the service department of your supplier.
The default temperature range is set to a minimum of 50 °C up to a maximum of 270 °C.
Change temperature sengs
You can change the temperature in steps of 1 degree
By pushing the buon for Temperature seng you will enter the Temperature seng mode.
Push the + buon or the – buon, to change the set temperature.
The set temperature is stored aer 3 seconds.
ATTENTION!
The DP-junior has maximum a tolerance of 15 °C above or below the set temperature.
If the limit of + or - of 15 °C is exceeded, the machine cannot be operated.

13
BACK TO INDEX For more informaon about our products and how to contact us, please visit thermopatch.com
6.4.2 Time sengs
There are 2 seperate me sengs that can be programmed in th DP-junior:
• the heat sealing me and
• the C-tape transportaon me.
Change sealing me
The default sealing me for the DP-junior is set to 0.5 seconds, this includes the me for the cylinder to go
down. To change this me push the “me-set” once, then press the + buon or the - buon, to change the
seng.
The set sealing me is stored aer 3 seconds.

14
BACK TO INDEX For more informaon about our products and how to contact us, please visit thermopatch.com
Change the C-tape transport me
The C-tape default transport me is set to 1 second, which corresponds with approx 35 mm of C-tape
transport.
The me can be adjusted by steps of 0.1 second.
For that, press the “me-set” twice, and set the required changes by pressing the + buon or – buon.
The set C-tape transport me is stored aer 3 seconds.
6.4.3 Interrupng the operaon ot the DP-junior
There are various means to interrupt the operaon of the machine:
• Turning the machine o with the ON/OFF switch on the back of the DP-junior.
• Sr the safety bar. You have to press the “set temp” buon to reacvate the machine or switch o the
machine and aer 5 seconds switch it on again.
• Push the emergency stop buon and aer 5 seconds switch the machine on again.

15
BACK TO INDEX For more informaon about our products and how to contact us, please visit thermopatch.com
6.4.4 Counter
The DP-junior has two types of counters.
The piece counter can be re-set aer pushing the - buon for three seconds.
When the - buon is pushed shortly, the machine counter can be seen.
This counter cannot be reset.

16
BACK TO INDEX For more informaon about our products and how to contact us, please visit thermopatch.com
6.4.5 Error codes
There are 4 error codes that can be displayed in the display:
• 01: Temperature is too high, indicang that the sensor is defecve or a
broken sensor cable, or a loose sensor cable connector
• 02: Temperature is too low, indicang that the sensor or cable is cut short.
• 03: The heang element does not heat up, indicang that the element is
defecve, or a broken cable, or a bad connector.
• 04: indicates that there is a memory storage issue on the print.
• Safety Warning: Indicates that the touchbar has been acvated; any
producon cycle is stopped immediately.
• Safety Warning: Aer reset (switch o and on again) the machine is safe
for use again.

17
BACK TO INDEX For more informaon about our products and how to contact us, please visit thermopatch.com
6.5 Inserng C-tape
C-Tape can be obtained in 1”, 2”, 3” and 4” width and in 11 standard colours.
The tape should run centered through the DP-junior which means that the center of the C-tape roll should
be ± 70 mm from the black back plate of the tape roll holder.
Make sure that both the tape-collars are not too ght, allowing the tape
and the cardboard core to slip on the de-roll and on the enroll side of
the machine. The tape de-rolls from the le hand side to the right hand
side and has to be lead under the tape supports and under the heater,
over the transport roll and the rewind roll, see pictures.
The ink side of the roll (dark side) poinng downwards.
ATTENTION!
Do NOT attempt to rotate the wind up shaft by hand. This can cause damage to the wind up mechanism!
C-tape colours

18
BACK TO INDEX For more informaon about our products and how to contact us, please visit thermopatch.com
6.6 Inserng the cliché
To insert the cliché, use the provided handle SPA46007 to pick up the cliché and place it through the slot in
the safetyguard into the guide rail to place it underneath the heater.
Wait for 5 minutes to allow the cliché to heat up to the set working temperature, aer which the DP-junior
is ready for producon.
SPA46007
Cliché

19
BACK TO INDEX For more informaon about our products and how to contact us, please visit thermopatch.com
7. Assembly and installaon
7.1 Assembly
It is very important that the DP-junior is provided with clean, dry air. The water condenser is an addional
safety measure.
Provide air pressure of 2 - 6 bar from the compressor or its own air supply.
Connect the air tubing with a diameter of 6 mm to the compressor or to your own local air supply, and to
the pressure regulator of the DP-junior.
7.2 Installaon
Upon delivery, the DP-junior is fastened with straps and bolts to a pallet.
Put the machine on a work table near an earthed wall socket.
Take care that there is enough free space around the machine.
Also take care that there are no items near the machine that are sensive to heat radiaon.
If you have to move the machine at a later me, it is
recommended to pack it in a similar way.
Make sure the machine is cooled down before you pack it.
7.3 Electrical requirements
The DP-junior should be connected to the mains
(230 V alternang current) with the supplied power cable. The DP-junior is an earthed machine and has
been provided with two fuses of 4 amps.

20
BACK TO INDEX For more informaon about our products and how to contact us, please visit thermopatch.com
8. Maintenance
8.1 Maintenance
Every day
Clean the machine with a dry non pilling cloth.
Periodically
Replace the self adhesive teon cover when worn
ATTENTION!
Switch off the machine and disconnect from the electrical power
Make sure the DP-junior has cooled down enough before starting maintenance or repairs.
Teon cover small SPADP48027A
Teon cover medium SPADP48030A
Teon cover large SPADP48026A
Table of contents
Other Thermopatch Industrial Equipment manuals