THIEMAN TVLR 125 User manual

TVLR SeRieSSeRieS
Railgates By THIEMAN
TVLR 125, 16, 125A, 16A
OWNERS MANUAL/PARTS LIST
IMPORTANT! KEEP IN VEHICLE!
!
PLEASE READ AND UNDERSTAND THE CONTENTS OF THIS
MANUAL BEFORE OPERATING THE EQUIPMENT.
HIEMAN
TAILGATES, INC.
600 East Wayne Street
Celina, Ohio 45822
Phone: 419-586-7727 Fax: 419-586-9724
www.thiemantailgates.com
NTEA
THE ASSOCIATION FOR THE WORK TRUCK INDUSTRY
TM
MEMBER

TABLE OF CONTENTS
PAGE
PARTS ORDERING PROCEDURE ............................................................................ 2
SAFETY INFORMATION & WARNINGS.................................................................3-7
OPERATING INSTRUCTIONS ................................................................................... 8
MAINTENANCE GUIDE & MONTHLY INSPECTION AND MAINTENANCE........9-12
SEMI-ANNUAL INSPECTION & MAINTENANCE.................................................... 12
DECAL MAINTENANCE - INSPECTION AND LOCATION OF DECALS ................ 13
MAIN FRAME ASSEMBLY..................................................................................14, 15
LIFTING CHAIN ASSEMBLY .................................................................................... 16
SLIDER ASSEMBLY ................................................................................................. 17
STEEL PLATFORM ASSEMBLY............................................................................... 18
ALUMINUM PLATFORM ASSEMBLY. ...................................................................... 19
PLATFORM CHAIN, SPRING & DAMPER ASSEMBLES ........................................ 20
HOUSING COVERS ............................................................................................21-22
CAM CLOSE/ELECTRICAL PICTORIAL.................................................................. 23
2 PC PLATFORM 3 FINGERED HINGE .................................................................. 24
TROUBLESHOOTING GUIDE.............................................................................25-28
FOR YOUR RECORDS
Model No. ______________________________ Date Purchased_________________
Serial No. ______________________________________________________________
NOTE: When Ordering Parts Be Sure To Include This Information!
Your Thieman Tailgate is constructed of top quality material and is warranted to be free
from defects in material and workmanship under normal use. With routine maintenance and
proper operation this liftgate will provide long lasting service and dependability.
PARTS ORDERING PROCEDURE
When ordering parts, please include all the information asked below. If this information is not
available, a photo of the required part MAY help Thieman identify and deliver the needed part
to you.
THE FOLLOWING INFORMATION MUST BE INCLUDED:
1. Serial Number - Thieman TVLR liftgate serial numbers can be found on the tag
located on the inner or outer side of the curb side frame rail.
2. Model number and capacity
3. Platform size and material - steel or aluminum
4. Part number
5. Description
6. Quantity required
2.

3.
SAFETY INFORMATION
This is the safety alert symbol. This manual uses this symbol combined with the
Signal Words below, which together, alert you of potential personal injury hazards. Obey all
safety messages throughout this manual, including those that follow the Signal Words
below, to avoid personal injury or death. Each Signal Word is explained below.
SIGNAL WORDS used in this manual
DANGER – Indicates a hazardous situation which, if not avoided, will result in death or
serious injury.
Related information will follow
WARNING – Indicates a hazardous situation which, if not avoided, could result in death or
serious injury.
Related information will follow
CAUTION – Indicates a hazardous situation which, if not avoided, could result in minor or
moderate injury.
Related information will follow
!
!
!
!
DANGER
WARNING
CAUTION

4.
WARNINGS!
1. DO NOT operate this Thieman liftgate without the Owner’s Manual for this model present on
the vehicle and without all decals present and legible, as guides for proper liftgate operation
and maintenance (see the “Decal Maintenance - Inspection and Location of Decals” section
of this manual). For replacement Owner’s Manuals, decals, etc. call Thieman at 419-586-
7727. For the latest manuals and warnings for each liftgate, visit our website at www.
thiemantailgates.com. Note: manuals and warnings update regularly.
2. The vehicle must be securely and properly braked on level ground before using the liftgate.
3. All protective covers and guards must be in place before operating the liftgate.
4. Before using liftgate, check for signs of improper maintenance or damage (unusual noises,
vibrations, fails to operate freely, missing hardware, cracked welds…etc. See the sections
in this manual with “Maintenance” in the title – refer to “Table of Contents” on Page 2).
DONOTusetheliftiftheseareevident.OnlyanauthorizedThiemandistributorisqualied
to do repairs on the liftgate. DO NOT attempt to do your own repairs or modify this liftgate.
Altering this product will void all warranties and may damage the liftgate or even cause
serious injury. If any repairs, adjustments, or maintenance not covered in this manual are
required, contact your nearest Thieman distributor or call Thieman at 419-586-7727.
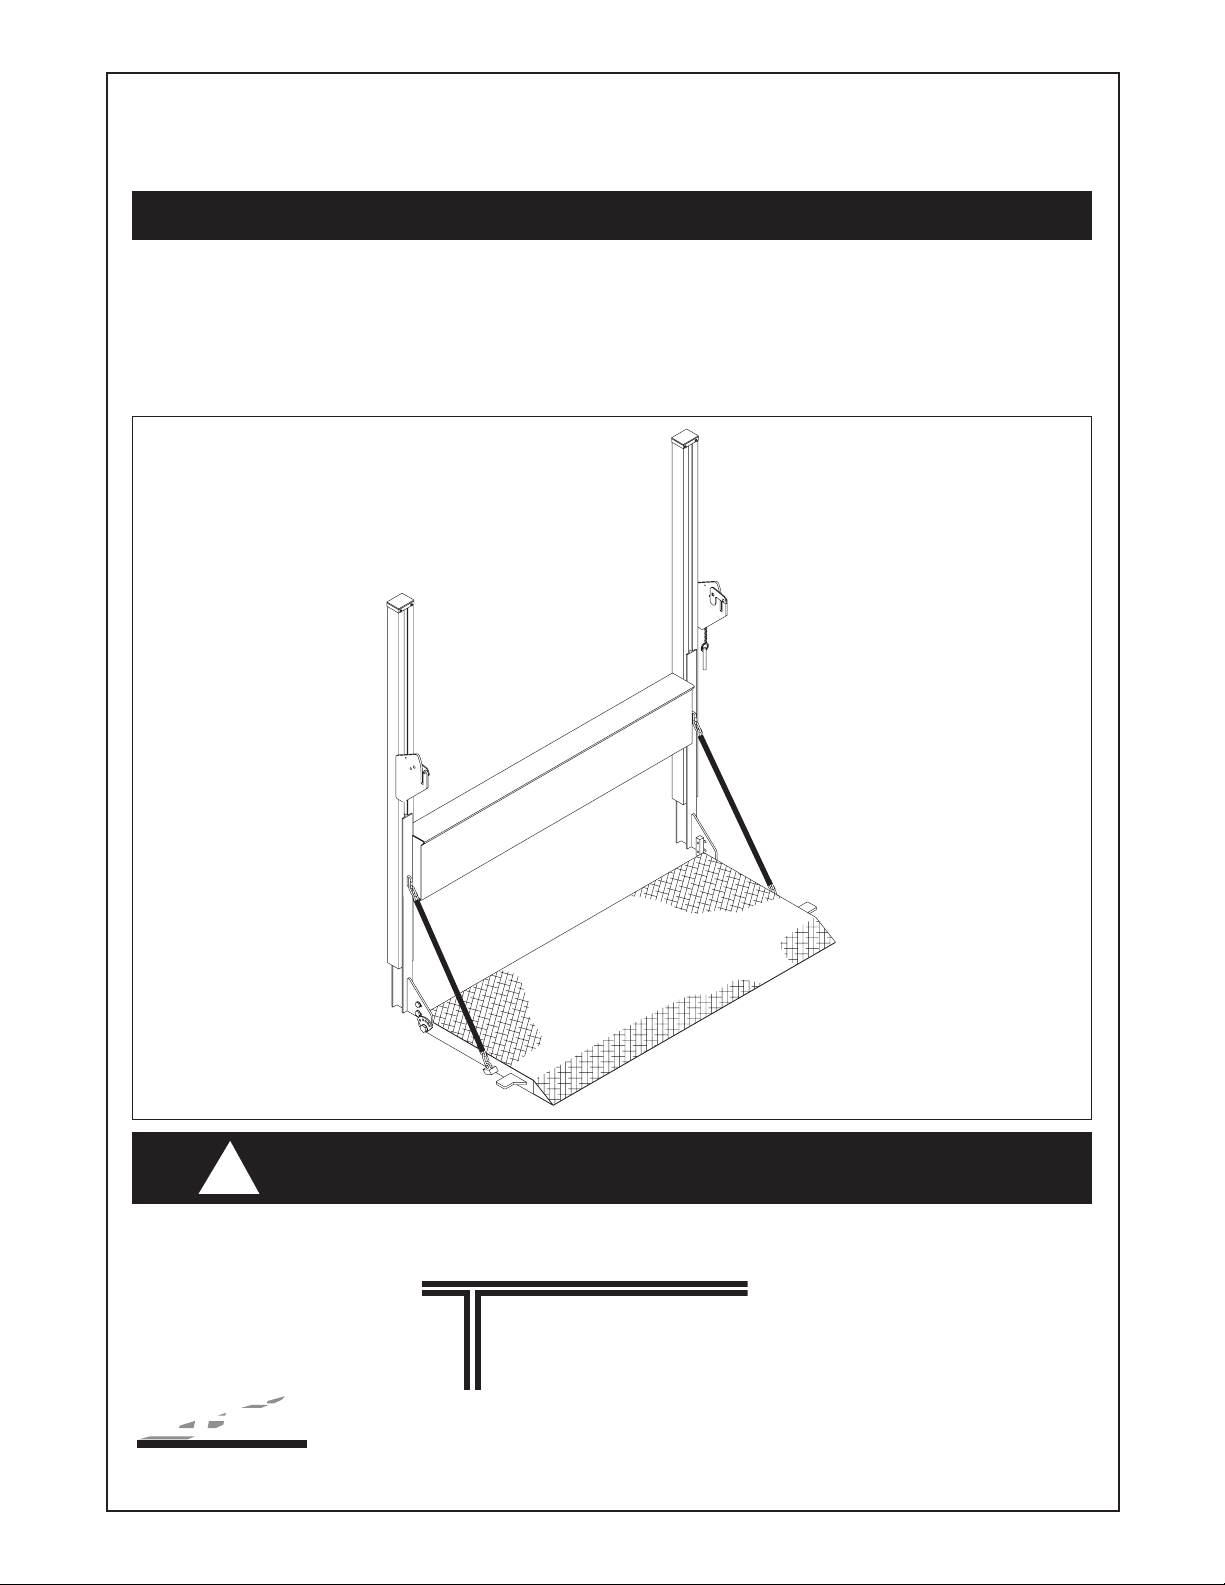
5. THIS IS NOT A PERSONNEL LIFT. Because of the pinch point between the platform and
the truck, fall hazards, unstable loads, etc., riding the lift may cause severe personal injury
or death. ALWAYS stay clear of the liftgate when in operation. Do NOT ride the liftgate.
6. Make certain the areas, in which the platform will open or close, are clear before opening
or closing the platform.
7. Use this liftgate ONLY for its intended purpose of loading/unloading cargo between truck
bedandground.ItisNOTtobeusedforanythingotherthanthis.Thegroundisdenedas
the surface the truck is parked on.
(Warnings continued on following pages)
IMPROPER OPERATION OF THIS LIFTGATE MAY RESULT IN SERIOUS PERSONAL INJURY
AND/OR DEATH. DO NOT operate this liftgate unless you have been properly instructed and
have read and understood the Owner’s Manual and all of its warnings, operating instructions
and all decals.
The following list of warnings is to be read and understood before operating the TVLR
series liftgate. The numbered list begins below and continues on the following pages.
!WARNING

5.
8. DONOTOVERLOADTHELIFTGATE.Eachliftgatehasaspecicmaximumcapacityfor
lifting and lowering. The standard maximum rated capacity of the TVLR series liftgates
dierswitheachmodelasfollows:
TVLR125-1250 lbs. Maximum Load
TVLR16-1600 lbs. Maximum Load
WARNING note: Special options can lower the maximum rated capacities below
those shown above. Be certain you know what the maximum rated capacity is for your
particular liftgate.
9. NEVERo-centertheloadontheplatform,fromsidetosideorawayfromtruckasthis
may overload the liftgate. The center of weight of the load should NEVER be placed
beyond the center of the platform load surface, away from truck. Loads should be placed
closetoplatformedgenearesttruck.Seegure1.
10. NEVERallowanypartoftheloadtoextendbeyondtheedgesoftheplatform’satload
surface. Overhanging objects increase the risks of tipping loads due to unstable loading
or snagging these objects on surroundings and THESE OBJECTS COULD ALSO STRIKE
OR CRUSH OPERATORS OR BYSTANDERS.
11. NEVER step on or place loads on, the ramp portion of any liftgate platform (includes
all ramp styles), unless the platform is lowered completely to the ground and the entire
platform and ramp are supported by the ground.
12. NEVER lift or lower unstable loads.
13. NEVER operate liftgate if platform load surface is slippery.
14. Make certain the areas above and below the liftgate platform and other moving liftgate
parts, are clear before, and at all times during, operation of the liftgate. Do NOT allow
anyone to stand around the platform where a falling load could land on them.
15. Load and unload the platform from the rear and not from the side of the platform.
Never remove the platform support chains to load or unload the platform.
16. Never operate lift trucks on or over any part of the platform.
17. Follow all sections in this manual with “Maintenance” in the title – refer to “Table of
Contents” on Page 2.
18. NEVERmovevehicleunlessplatformisproperlystowedandpoweriso.Anopenliftgate
onamovingvehicleposesaserioustrachazard.
(Warnings continued on following pages)

6.
19. ALWAYS stow liftgate in transit position when not in use. Liftgates left in their open
positions, may create hazards for people and vehicles passing nearby.
20. Take care to retain cargo during transit. Liftgates are not designed to retain objects on
thetruck. Improperlyretainedobjectsmay fallfromthe vehicleand poseserioustrac
hazards and larger objects could shift and damage the liftgate or truck
21. Any time the vehicle is washed, this liftgate MUST be inspected to MAKE SURE all parts
are properly lubricated and have the appropriate protectants. Failure to replace lubricants
and protectants after washing the vehicle, may lead to improper operation of the liftgate,
accelerated corrosion, and possible component failure.

7.
Ξ∆Ρ
ΜΝ
ΧΝ ΜΝΣ
ΝΕΕ Β∆ΜΣ∆Θ ΚΝ≅Χ
∋ρηχδ σν ρηχδ(
ς≅ΘΜΗΜΦ
Ξ∆Ρ
ΜΝ
ΧΝ ΜΝΣ
ΝΕΕ Β∆ΜΣ∆Θ ΚΝ≅Χ
∋ϖξ εθνλ σθτβϕ(
ΧΝ ΜΝΣ
οκβδ κνχ νµ
οκσενθλ θλο ϖησγ οκσενθλ
νεε φθντµχ
Ξ∆Ρ
ΜΝ
ΦΘΝΤΜΧ
Θ≅ΛΟ
ΦΘΝΤΜΧ
ΟΚ≅ΣΕΝΘΛ
Θ≅ΛΟ
ΟΚ≅Σ,
ΕΝΘΛ
3571Β
ΓΗ∆Λ≅Μ
An improperly positioned load can overload the liftgate and result in sudden liftgate failure and/
or increased risks to personnel of being hit or crushed by loads. IMPROPERLY POSITIONED
LOADS MAY RESULT IN SERIOUS PERSONAL INJURY AND/OR DEATH. Always position
loads properly on the liftgate platform. Follow information below on how to position loads
properly.
POSITION LOADS PROPERLY ON PLATFORM
NEVERo-center theloadon theplatform, from sideto sideoraway from truckas this
may overload the liftgate. The center of weight of the load should NEVER be placed beyond
the center of the platform load surface, away from truck. Loads should be placed close to the
platform edge nearest truck. If a load is not uniformly distributed, then the heaviest portion
should be closest to the edge of the platform nearest the truck. NEVER allow any part of the
loadtoextendbeyondtheedgesoftheplatform’satloadsurface.NEVERallowanypartof
the load to extend over or on, the tapered ramp portion of the platform unless the platform is
lowered completely to the ground and the ramp is supported by the ground.
!WARNING
DO NOT OVERHEAT THE HYDRAULIC PUMP
Exceeding the duty cycle of the hydraulic pump, can overheat many components,
including the gear pump, the hydraulic motor, the motor start solenoid, valve coils, etc., and
signicantlyshortentheexpectedlifeofthesecomponents.Inextremecases,immediate
damage to the pump or related components may occur. Refer to the Thermal data below.
THERMAL DATA: To avoid overheating the motor do not operate this unit for more than 5
cycles/ 10 minutes with the maximum load. The motor then must be allowed to completely
cool down to ambient temperature before cycling the lift again. This unit also has a 10% duty
cycle, which means the liftgate can be cycled no more than 2 cycles/10 minutes constantly
with the maximum load.
Fig. 1

8.
OPERATING INSTRUCTIONS
Be sure to operate liftgate at a safe distance and never improperly load platform as this
may cause personal injury or damage to the liftgate.
1. UNLOCK
A. Remove curb side AND street side
latch pins from resting plates.
B. Raise liftgate until locking cams rotate
back down
2. UNFOLD
C. Lower liftgate, so guide plates ride over
cams, and are below resting plates
D. Lower liftgate to a comfortable height
to unfold the platform.
E. Manually unfold platform slowly to
horizontalposition.Don’tletitfall.
F. Unfold secondary platform sections if
soequipped.Don’tletthemfall.
3. RAISE OR LOWER
G. Use toggle switch or other supplied
control to raise or lower liftgate.
4. STORE FOR TRANSIT
H. Reverse Step 2 above. Fold platform to
vertical position and raise folded liftgate
until locking cams on resting plates are
rotated up and stowage slot in resting
plates are exposed.
I. Lower liftgate until locking cams rotate
back down.
J. Reinsert curb side AND street side latch
pins into holes of resting plates and
locking cams.
IMPROPER OPERATION OF THIS LIFTGATE MAY RESULT IN SERIOUS PERSONAL
INJURY AND/OR DEATH. DO NOT operate this liftgate unless you have been properly
instructed and have read and understood the Owner’s Manual and all of its warnings,
operating instructions and all decals.
!WARNING

9.
MAINTENANCE GUIDE
The following inspection and maintenance operations should be performed at the recommended
intervals or anytime the liftgate shows signs of abuse and improper or abnormal operation.
MONTHLY INSPECTION AND MAINTENANCE
Operate the liftgate throughout its entire operational cycle and check the following:
1. Check that there are no unusual noises or vibrations.
2. Check that the platform is level front to back and side to side when raised to bed height. If
front to back adjustments are necessary, this can be done by adjusting nuts (A) on U-bolt
(B)onplatformblock(C).Seegure2.Ifsidetosideadjustmentsarenecessary,thiscanbe
done by adjusting nuts (D), nylon insert locknuts (E), and lockwashers (F) on tension rods
(G)onanchorbracket(H).Seegure2.
IMPROPER MAINTENANCE OF THIS LIFTGATE MAY RESULT IN SERIOUS PERSONAL
INJURY AND/OR DEATH. Never use a liftgate, that has not been properly maintained.
Follow all maintenance outlined in this manual, beginning with “Maintenance Guide” thru and
including “Decal Maintenance - Inspection and Location of Decals”.
!WARNING

10.
11. Check that all wiring and battery cable connections are tight and free of corrosion.
Temperature
Range
-75º F to 165º F
-20º F to 130º F
-50º F to 80º F
Acceptable
Fluids
Exxon Univis J-26
Dexron III
ExxonSuperoATF
Shell Spirax S3 ATF MD3
Shell Aero Fluid 4
Mobil Aero HFA
Exxon Univis J-13
MIL H-5606
HYDRAULIC FLUID CHART
3. Check for apparent damage to the liftgate such as bent or distorted members, any cracked
welds, which may have resulted from overloading or abuse.
4. Check for any excessive wear in the following pivot areas (Note: For bushed pivots, if the
gap between pin and bushing exceeds 1/32 of an inch, the bushing should be replaced. For
pivots without bushings, replace worn components if gap between pin and pivot exceeds
1/32 of an inch. Refer to parts breakdowns in this manual):
A. Cylinder pin.
B. Adjustment bracket, pin retainer and bushings joining sliders to platform.
C. Slider roller assemblies (roller and bearing) and pins.
D. Nylon wear pads on slider.
E. Pusher wear pad
F. Sprocket Asm. bushings and pins.
G. Platform support chains and chain anchor points.
H. Liftchains-replaceifstretchedornon-exible.
I. Platform hinge pins, and bushings (two-piece platform only).
5. Check that all platform pivot pins are in place and retained by their proper retainers. The
street side platform pivot pin (Adjusting Bracket) is bolted to the slider pivot with a 3/8 bolt.
There is a formed retainer welded to the street side of the platform, which wraps around the
slotted plate of the Adjusting Bracket in the stored position and holds the street side platform
pivot pin in the platform pivot. The curb side platform pivot pin (Pin Retainer) is bolted to the
slider pivot with a 3/8 bolt. There is a Stop, which is bolted to the curb side of the platform
with two 1/4 inch screws which holds curb side platform pivot pin in the platform pivot.
6. Check that all protective covers and guards are properly in place and secured.
7. Checkpaintednish,ifinpoorcondition,repaint.Maskanyrailopeningtoavoidoverspray.
Any rusted parts should be replaced.
8. Check condition of non-painted parts, replace if corrosion exists.
9. Check for oil leaks in these areas:
A. Lift cylinder
B. Hydraulic hose - replace if it shows signs of wear or cracking.
C.Hydraulicttings-tightenorreplaceasmayberequiredtostopleakage.
10.Check the oil level in the hydraulic reservoir located in the cylinder housing. With the plat-
form open and at ground level, the oil should be within ½ inch from the top of the reservoir.
See chart below.

11.
12. Lubrication of the TVLR series gate should be as follows for all user conditions.
Area of Tailgate Type of Lubrication *Frequency
Vertical Rails SAE 10 to SAE 20 oil 50 cycles
Lift Chain SAE 10 to SAE 20 oil 100 cycles
Chain Anchor Links SAE 10 to SAE 20 oil 100 cycles
Locking Cams SAE 10 to SAE 20 oil 100 cycles
*NOTE: TVLR gates which see less than 50 cycles per week must be lubricated in the areas
listed above no less than once a week. Once lubricated, run the gate up and down
through one complete cycle to spread lubricant more evenly.
14.Torsionbaradjustment(Seegure3).
A. Place platform in stowed (vertical)
position.
B. Remove 5/8” diameter bolt (A) from
center of tension adjusting bracket.
C. Place ½” square breaker bar in the
square hole of the adjusting bracket
pin.
D. Turn breaker bar counterclockwise to
relieve tension on 3/8” diameter bolt (B)
and remove it from the bracket.
E. To increase tension, rotate bracket
counterclockwise until desired tension
is reached. Line up hole in bracket
to hole in slider platform support and
replace bolt (B).
13. Check the pump relief pressure and also the motor amperage at this pressure. These
values should be as follows:
Model Max Amp Draw Relief Pressure (psi)
TVLR 125 135 1950
TVLR 16 150 2500

12.
15. Set adjustment angles on either side of liftgate to hold platform vertical such that the stow
bars on platform are aligned with the resting plate slots. Inspect alignment with stow bars
raisedcompletelyoutofrestingplateslots(Seegure4A).Iftheyareoutofalignment,put
the platform in the stored position. Raise platform slightly, so that stow bars are not sitting
onthebottomoftherestingplateslot,sothereistensioninchains(Seegure4B).Then,
unloosen screws on the adjustment angles and move angles so they are tight against the
vertical platform. Once angles are adjusted, tighten screws. Be sure to do this for both
sides. Repeat inspection of stow bar alignment and readjust if necessary. Failure to keep
stow bars aligned with resting plate slots can result in excessive wear of stow bars and
resting plates.
SEMI-ANNUAL INSPECTION
1. Perform the procedures outlined in the “Monthly Inspection and Maintenance.”
2. Inspect pump motor by:
A. Disconnecting battery cable
B. Remove motor end cover
C. Examine the armature brushes for wear. (Brushes should be replaced if they are less
than 1/8” long).
D. Clean all residue out from inside of the motor housing.
E. Apply several drops of light weight machine oil to the armature shaft bearing in the
motor end cover and reassemble the motor end cover.
3. If the hydraulic oil in the reservoir is dirty:
A. Unfold platform and lower platform to the ground so the cylinder is fully retracted.
B. Draintheoilfromthehydraulicsystemandushtheentiresystem.
C. Removethereservoirfromthepumpandcleanthesuctionlinelter.Alsocleanout
any contaminants from the reservoir. Remount the reservoir when completed.
D. Replace the oil as outlined in Section 10 under Monthly Maintenance and Inspection.

13.
IMPROPER OPERATION OF THIS LIFTGATE MAY RESULT IN SERIOUS PERSONAL
INJURY AND/OR DEATH. Liftgate decals provide important information, which is vital for
proper and safe operation of the liftgate. Replace any decals which are missing or which are
not fully legible.
DO NOT operate liftgate unless all decals are legible and are properly located.
!WARNING
DECAL MAINTENANCE - INSPECTION AND LOCATION OF DECALS
Item Part Name Part Number
1 Warning Decal-center load 4682
2 Fast Idle Decal 4650150
3 Danger Decal-no riding 4609
4* *Operating Decal - standard 4650780
5 Capacity Decal 1250# 4650060
5 Capacity Decal 1600# 4650750
6 Warning Decal-pinch point 4650790
7 Caution Decal-cover 4650760
8 Warning Decal-working area 4650770
9 Reector(3) 5705
10 Thieman Nameplate 4650801
11 Toggle Switch Decal(1) 4650820
12 Wiring Decal 4617
13 Warning Decal-high pressure 4620
14 Lubrication Decal 4662
15 Lube Location Decal(4) 4663
16 Warning Decal-general warning 4681
*Operating Decal (Cam Close/Open) 4674
*Operating Decal (Cam Close) 4655
LIST OF DECALS AND LOCATIONS
Inspect all of the decals listed below to be certain that they are in the proper location and they
are legible. All decals must be in place and legible or all warranties are void!

14.
MAIN FRAME ASSEMBLY

15.
Qty
Item Part Number Description 125, 16 125A, 16A
1 31770-001 Main frame 80(56”BH) 1
1 31770-002 Main frame 90(56”BH) 1
1 31770-003 Main frame 95(56”BH) 1
1 31770-004 Main frame 100(56”BH) 1
1 31770-005 Main frame 80(46”BH) 1
1 31770-006 Main frame 90(46”BH) 1
1 31770-007 Main frame 95(46”BH) 1
1 31770-008 Main frame 100(46”BH) 1
2 4473 Power unit 1 1
3 42004 Cylinder assembly 1 1
3 42018 Cylinder assembly (80W) 1 1
4 4420409 Breather cap 1 1
5 4930-001 MJ-MAORB 90° 1 1
6 4951-002 .25 Hose assembly 1 1
7 4931-001 Restrictor MJ-MAORB 90° 1 1
8 4350 Cable Lug #2 1 1
9 8101-001 Clevis pin 1 1
10 5700022 Hairpin cotter 1 1
11 8120388 .38 Flatwasher 2 2
12 8120382 .38 Lockwasher 2 2
13 8180126 .38 x 1.50 Screw 2 2
14 4318-002 Battery cable 1 1
15 4477 Solenoid 1 1
16 31558 Cylinder Retainer Weld 1 1
17 8180022 .25 x 1 Screw 4 4
18 8120380 .25 Lockwasher 4 4
19 8120375 .25 Nut 4 4
20 5701960 Grommet 3 3
21 8456922 .50 x 1.50 carriage bolt 2 2
22 2103160 Locking cam 2 2
23 8120396 .50 Flatwasher 2 2
24 8103-021 .50 Lock nut 2 2
25 31765 sprocket housing weld 2 2
26 5793010 .25 x .75 Screw 8 8
27 3109140 Latch cable assembly 2 2
28 4300030 Batterycable25’ 1 1
29 4318-003 BatteryCable#2x5’ 1 1
30 31447 Toggle switch Asm 1 1
31 4301290 Wiring harness 1 1
32 5791 Resting Plate Pad 2 2
33 8111-005 Screw #10 x .75 2 2
34 4319-002 Heat Shrink 1 1
35 4318-001 BatteryCable#2x2’ 1 1
36 4301770 Circuit Breaker 1 1
37 8120386 Flat Washer 4 4
38 4309 Pendant control 1 1
39 4301342 Receptacle 1 1

16.
LIFTING CHAIN ASSEMBLY
Qty
Item Part Number Description 125, 16 125A, 16A
1 31528 Pusher Weld 1 1
2 5700022 Hairpin Cotter 7 7
3 31214-002 15T Sprocket Asm (inc item 17) 1 1
4 31214-003 21T Sprocket Asm (inc item 17) 1 1
5 5084-002 Tension Rod 2 2
6 2504030 Chain Pin Bushing 4 4
7 8219758 .75 Jam Nut 6 6
8 5067 Pin 7 7
9 31214-001 13T Sprocket Asm (inc item 17) 5 5
10 4108-004 Chain SS 90 (56” BH) 1
10 4108-005 Chain SS 95 (56” BH) 1
10 4108-006 Chain SS 100 (56” BH) 1
10 4108-010 Chain SS 90 (46” BH) 1
10 4108-011 Chain SS 95 (46” BH) 1
10 4108-012 Chain SS 100 (46” BH) 1
10 4108-001 Chain SS 80 (56” BH) 1
10 4108-008 Chain SS 80 (46” BH) 1
11 4108-002 Chain CS 80 (56” BH) 1
11 4108-007 Chain CS 80 (46” BH) 1
11 4108-003 Chain CS 90,95,100 (56” BH) 1
11 4108-009 Chain CS 90,95,100 (46” BH) 1
12 8106-005 .75 Lockwasher 4 4
13 4100320 Connecting link 4 4
14 8449646 Self Tapping Screw 2 2
15 5703 Wear Pad 1 1
16 8103-029 Hex Jam, Nylon Locknut.75 2 2
17 5504-008 Bushing 7 7

17.
Item Part Number Description Qty.
1 31807-002 Slider Asm RH 1
1 31807-004+ Slider Asm RH-Spring 1
2 31807-001 Slider Asm LH 1
2 31807-003+ Slider Asm LH-Spring 1
3 5781 Front Wear Pad 4
4 8103-019 .25 Locknut 16
5 8109-012 Screw .25 x .75 16
6 2013 Adjustment Angle 2
7 8120388 .38 Flatwasher 8
8 8180126 .38-16 x 1.50 Screw 4
9 8120382 Lockwasher .38 4
10 8120377 .38-16 Nut 4
11 8106-016 .38 Int/Ext Tooth Lockwasher 8
12 3106470 Roller Asm 4
13 5781016 Retaining ring 4
SLIDER ASSEMBLY
+Used with aluminum platforms requiring a spring assembly.

18.
Item Part Number Description Qty.
1 3408-001 7530 Platform 1
1 3408-002 7536 Platform 1
1 3408-003 7542 Platform 1
1 3408-004 8530 Platform 1
1 3408-005 8536 Platform 1
1 3408-006 8542 Platform (see note 1) 1
1 3408-007 9030 Platform 1
1 3408-008 9036 Platform 1
1 3408-009 9042 Platform (see note 1) 1
1 3408-010 9530 Platform 1
1 3408-011 9536 Platform 1
1 3408-012 9542 Platform (see note 1) 1
Notes:
1. Requires one spring assembly and appropriate RH slider.
Item Part Number Description Qty.
2 2329 Stop 1
3 8120380 .25 Lockwasher 2
4 8180022 .25 x 1.00 Screw 2
5 3199 Pin retainer 1
6 8180120 .38 x .75 Screw 2
7 8271713 .62 x 1.00 Screw 1
8 8121574 .62 Lockwasher 1
9 8130999 .62 Flatwasher 1
10 3108980 Adjusting bracket 1
11 5101-001 Torsion bar 85” platform 1
11 5101-002 Torsion bar 90” platform 1
11 5101-003 Torsion bar 95” platform 1
11 5101-004 Torsion bar 75” platform 1
12 8120382 .38 Lockwasher 2
13 5504-005 Bushing 2
14 5504-001 Bushing 2
STEEL PLATFORM ASSEMBLY

19.
Notes:
1. Requires one spring assembly and appropriate RH slider.
2. Requires two spring assemblies and appropriate LH and RH sliders.
Item Part Number Description Qty. Item Part Number Description Qty.
ALUMINUM PLATFORM ASSEMBLY
1 3407-001 7530 Platform 1 1 3407-023 9536 Platform 1
1 3407-002 7536 Platform 1 1 3407-024 9542 Platform 1
1 3407-003 7542 Platform 1 1 3407-025 9548 Platform 1
1 3407-004 7548 Platform 1 1 3407-026 9554 Platform (see note 1) 1
1 3407-005 7554 Platform 1 1 3407-027 9560 Platform (see note 1) 1
1 3407-006 7560 Platform 1 1 3407-028 9566 Platform (see note 1) 1
1 3407-007 7566 Platform (see note 1) 1 1 3407-029 8572 Platform (see note 2) 1
1 3407-008 8530 Platform 1 1 3407-030 9072 Platform (see note 2) 1
1 3407-009 8536 Platform 1 1 3407-031 7572 Platform (see note 1) 1
1 3407-010 8542 Platform 1 1 3407-032 9572 Platform (see note 2) 1
1 3407-011 8548 Platform 1 2 2329 Stop 1
1 3407-012 8554 Platform 1 3 8271713 .62 x .75 Screw 1
1 3407-013 8560 Platform (see note 1) 1 4 8121574 .62 Lockwasher 1
1 3407-014 8566 Platform (see note 1) 1 5 8130999 .62 Flatwasher 1
1 3407-015 9030 Platform 1 6 8109-001 .25 x 1.00 Screw SS 2
1 3407-016 9036 Platform 1 7 8120382 .38 Lockwasher 2
1 3407-017 9042 Platform 1 8 3108980 Adjusting bracket 1
1 3407-018 9048 Platform 1 9 3199 Pin retainer 1
1 3407-019 9054 Platform 1 10 5101-001 Torsion bar 85” Platform 1
1 3407-020 9060 Platform (see note 1) 1 10 5101-002 Torsion bar 90” Platform 1
1 3407-021 9066 Platform (see note 1) 1 10 5101-003 Torsion bar 95” Platform 1
1 3407-022 9530 Platform 1 10 5101-004 Torsion bar 75” Platform 1
11 5504-001 Bushing 2
12 5504-005 Bushing 2
13 8180120 .38 x .75 Screw 2
14 8106-002 .25 Lockwasher SS 2

20.
PLATFORM CHAIN ASSEMBLY
SPRING ASSEMBLY
DAMPER ASSEMBLY
Item Part Number Description Qty.
1 5793150 U-Bolt 2
2 9414073 .44 Locknut 6
3 4101-009 Chain 48,54” deep alum. 2
3 4101-011 Chain 60,66,72” deep alum. 2
3 4101-012 Chain 30,36,42” deep steel or alum. 2
4 5702300 Protective sleeve 2
5 5701910 .44 x 1.50 Bolt 2
Item Part Number Description Qty.
1 5793150 U-BOLT 1
2 9414073 Locknut 2
3 5101120 Spring 1
Item Part Number Description Qty.
1 5770 Hyd. Damper 1
2 8104-004 Screw .31-18 x 1.75 1
3 8104-012 Screw .31-18 x 1 1
4 8103-013 Locknut .31-18 2
5 8107-004 Flatwasher .31 2
Other manuals for TVLR 125
1
This manual suits for next models
3
Table of contents
Other THIEMAN Lifting System manuals