Thomas Dudley Wave S1 User manual

Touch Free Flushplate Instructions
R326372 13315 iss A
Thomas Dudley Ltd
P.O. Box 28, Birmingham New Road,
Dudley, West Midlands, DY1 4SN.
Telephone: 0121 530 7000
Fax: 0121 557 5345
Wave S1 & S2
Web: www.thomasdudley.co.uk
© 2016 Thomas Dudley Ltd
E-mail: sales@thomasdudley.co.uk
6
OR
Wave S1 Pushplate Assembly Wave S2 Pushplate Assembly
Screws x 4
Cover Mount
Tunnel
1
1PACK CONTENTS
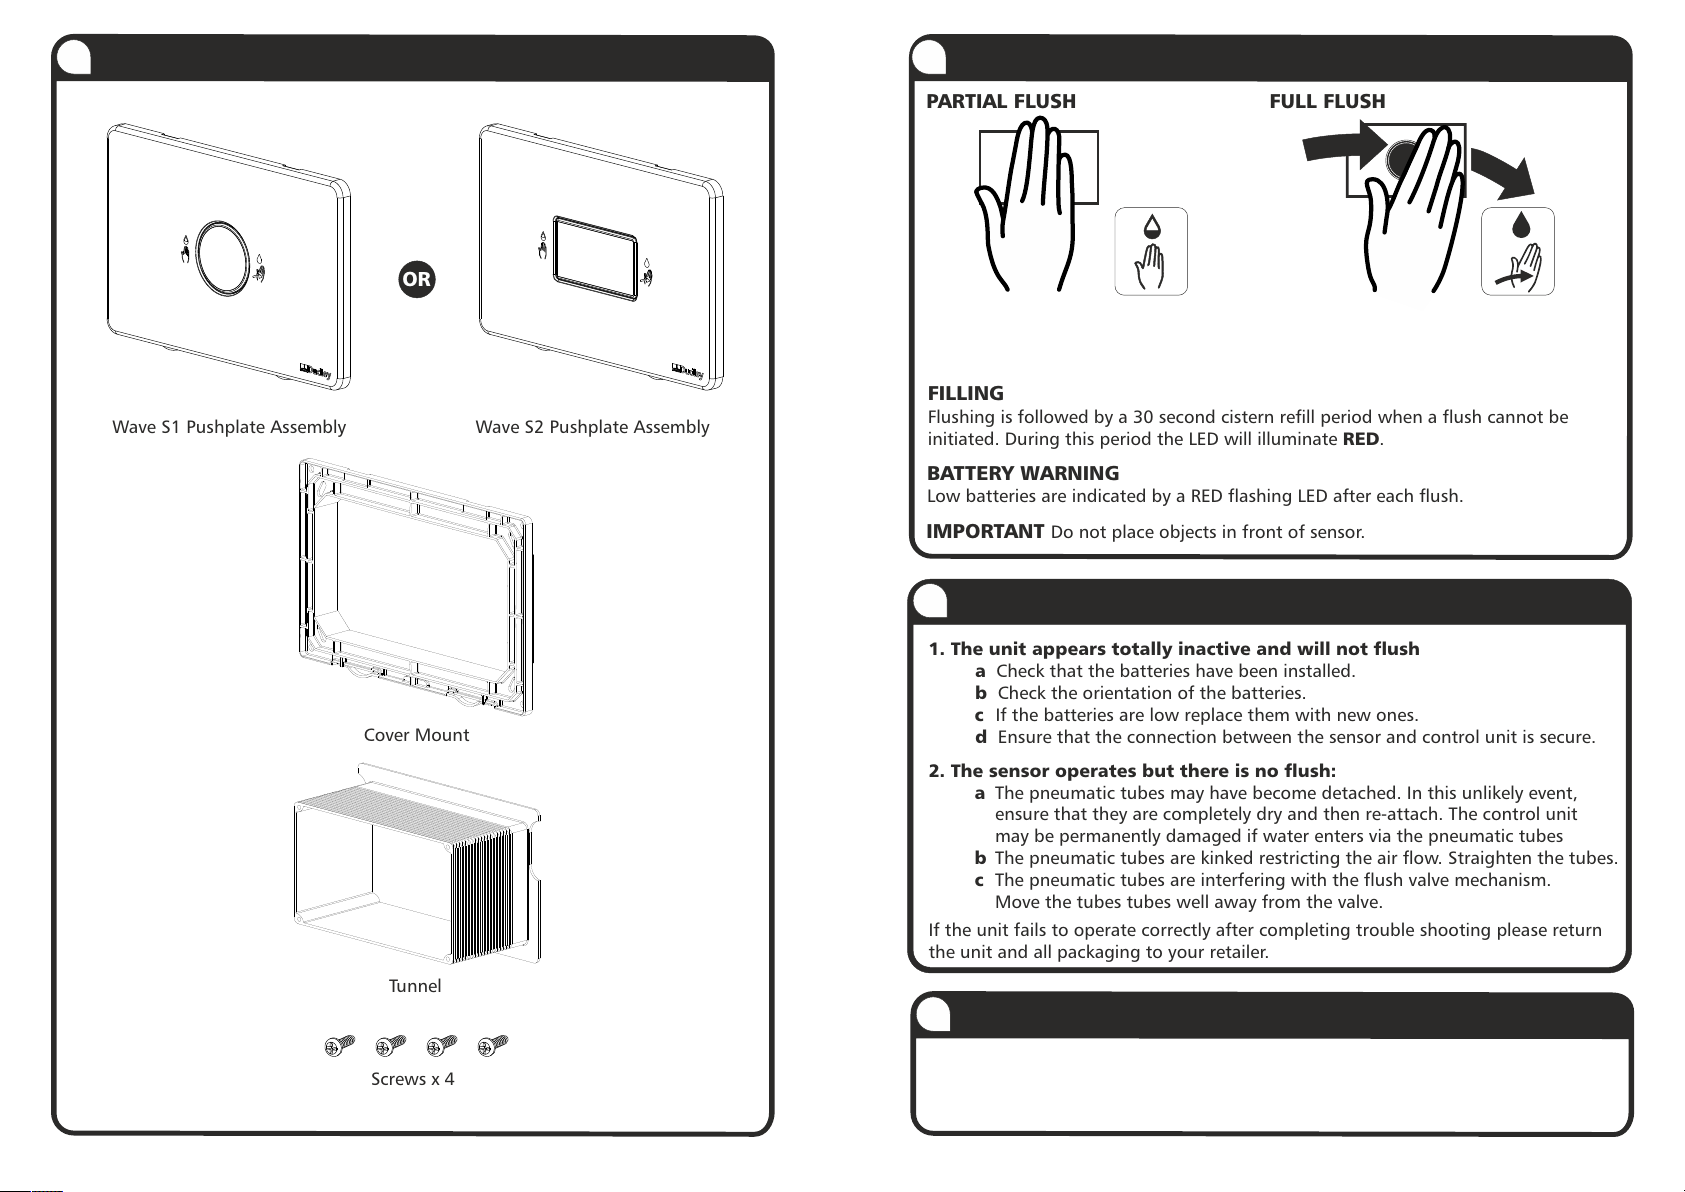
FULL FLUSHPARTIAL FLUSH
FILLING
Flushing is followed by a 30 second cistern refill period when a flush cannot be
initiated. During this period the LED will illuminate RED.
BATTERY WARNING
Low batteries are indicated by a RED flashing LED after each flush.
IMPORTANT Do not place objects in front of sensor.
9OPERATION
1. The unit appears totally inactive and will not flush
cIf the batteries are low replace them with new ones.
d Ensure that the connection between the sensor and control unit is secure.
2. The sensor operates but there is no flush:
aThe pneumatic tubes may have become detached. In this unlikely event,
ensure that they are completely dry and then re-attach. The control unit
may be permanently damaged if water enters via the pneumatic tubes
bThe pneumatic tubes are kinked restricting the air flow. Straighten the tubes.
cThe pneumatic tubes are interfering with the flush valve mechanism.
Move the tubes tubes well away from the valve.
If the unit fails to operate correctly after completing trouble shooting please return
the unit and all packaging to your retailer.
a Check that the batteries have been installed.
b Check the orientation of the batteries.
HOLD
WAVE
ONCE
10 TROUBLE SHOOTING
11 CLEANING AND MAINTENANCE INSTRUCTIONS
To clean this product use only warm water with a non abrasive cloth. Do not use
any cleaning agents or abrasive cleaner.
Wave hand once across the front of the
sensor at a distance less than 50mm. On
activation the LED will illuminate BLUE.
Hold hand in front of the sensor at a
distance less than 50mm. On activation
the LED will illuminate GREEN.

175mm min
(Vantage only)
2
124 max
116 min
213 max
205 min
5
The tunnel is used to bridge gap between partition and Vantage cistern service
aperture. Longer fixing screws may be required. (Not supplied)
2CISTERN INSTALLATION OPTIONS (Vantage cistern only)
3INSTALLATION DIMENSIONS
Option 1
Behind partition with Vantage
cistern fixed to back wall
Option 2
Behind partition with Dudley
Illusion Frame
When used with alternative Dudley WC cisterns the service aperture
may not be present. In this case the tunnel may not be required.
8INSTALLATION OF FASCIA PLATE
8.2 Position the pushplate on the
lower edge of the mounting frame
engaging with the spring clip features
8.3 Lift and rotate the pushplate until the top edge of the
pushplate clips over the top edge of the mounting frame
8.1 Connect the two leads ensuring
the arrows align. Press firmly
Cut hole in wall or panel to align flush plate with cistern installation

4
3
5FITTING THE COVER PLATE
4.1 Cut tunnel to required depth.
5.1
Front
Front
4CUTTING THE TUNNEL (if required) 6FITTING THE BATTERIES
6.1 (Vantage cistern only)
The Electroflo control unit can be seen
through the tunnel as shown below.
6.2 Carefully remove the control unit
through the wall, furniture or IPS panel.
6.3 Remove cover 6.5 Replace cover
6.4 Insert 4 x AA (1.5V) batteries.
Alkaline LR6 recommended.
(Not supplied)
7MAINS OPTION
7.1 Snap off the socket cover and connect the mains adaptor
Replace the control unit.
Installation of the mains adaptor must be carried out and checked by a
qualified electrician. IMPORTANT during installation do not expose the
electronics to fluids, dust, dirt or damp
Wall or panel
If a tunnel is not used,
fix the cover plate
using the outer holes
If a tunnel is used,
fix the cover plate
using the inner holes
Option A Option B
Option A Position cover mount and fix with the four screws provided
Option B Position tunnel in void and attach cover mount. Longer
screws will be required (Not supplied)
This manual suits for next models
1
Popular Bathroom Fixture manuals by other brands


KUDOS
KUDOS ORIGINAL Series installation instructions

Allen + Roth
Allen + Roth 1315VA-48-201 manual

PDP
PDP CRISTAL Series quick start guide

Swiss Madison
Swiss Madison Voltaire SM-VT324 installation instructions

Kohler
Kohler Mira Decor Installation and user guide

Victorian Plumbing
Victorian Plumbing Aurora Pearlstone installation instructions

Fleurco
Fleurco K301C installation manual

Uberhaus
Uberhaus SHOWER COLUMN 14925000 installation instructions

Williams-Sonoma
Williams-Sonoma ALLENGLADE Knob Assembly instructions

BELLOSTA
BELLOSTA Noel 1511/5A Installation instruction

Boekel
Boekel 14792 operating instructions

Prostock
Prostock PSBTWE1000 installation guide